


 We’re going to deviate from our Fishing Knots this week to bring you one of our favorite knots, the Eye Splice.
Splicing a rope is a tremendous skill to learn, and will benefit you time and time again.
This technique creates a permanant modification to a rope. The difference between a splice and a knot is that no matter how strong your knot is, it can still come untied.
There are many different kinds of splices, but the concept is the same in each. You’re simply separating the strands of the rope and weaving them back into the standing part of the rope.
With an Eye Splice, you’re creating a fixed loop that can be any size that you determine. It can be used for anything from mooring lines to climbing ropes.
Splicing is stronger in natural fiber ropes like the three-strand Manilla Rope we’ve used for our demonstration.
Synthetic ropes are good to use too, but just ensure that there’s no slipping of the individual strands.
Eye Splice » Splices
(Strength: 5/Secure: 5/Stability: 5/Difficulty: 4)
Please refer to our Knot of the Week introduction post for a description of what these ratings mean.
Uses:
- Creating a fixed loop (or eye) in a rope for use in mooring lines or climbing ropes
- The possibilities are endless!
Preparation
A few extra steps are necessary to properly prepare your three-strand rope for splicing.
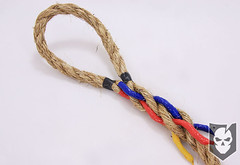
For starters, and at the very least, you’ll need to tape off the point where you’ll stop unravelling the end of your rope to ensure it doesn’t unravel past your chosen point.
It’s also a good idea to tape the area right above where you’ll splice into for the same reasons above.
What we’ve done is to also take different colored electrical tape and not only wrap each individual strand, but tape them in a way that creates a tip that will make weaving easier.
The colors are a great way to learn how to splice because you can actually see exactly how the different strands weave into each other.
Our YouTube video below goes into this in a lot more detail, and we’d highly recommend watching it for this Knot of the Week.
We’re going to try something new this week, instead of writing out step by step instructions we’re going to ask that you refer to the video and photo gallery below.
No matter how in-depth we attempt to try and describe splicing it’s no match for watching it done. Let us know how it works out for you!
[flickrset id=”72157622784902831″ thumbnail=”square” overlay=”true” size=”medium”]


Discussion