
The last two weeks we’ve been discussing Decorative Knots, and while the Monkey’s Fist is often used to finish off decorative knot work, it also has another more common practical application.
Primarily the Monkey’s Fist is tied ton the end of a rope to be used as a heaving line, or a line to be thrown over distance. This heaving line could then be attached to a larger or heavier line and pulled into position.
A Monkey’s Fist was historically used to run a line for ship-to-ship operations due to the fact that it could be tied with a weighted core inserted and endure many tosses back and forth.
Currently Shot Line is used in U.S. Navy ship-to-ship transfers during UNREP (Underway Replenishment).
Shot line is connected to a projectile housed in an adapter at the end of an M14, fired by a blank round and received by the opposing ship’s crew.
The Monkey’s Fist can also be used as a stopper knot, to stop a knot from passing through a hole.
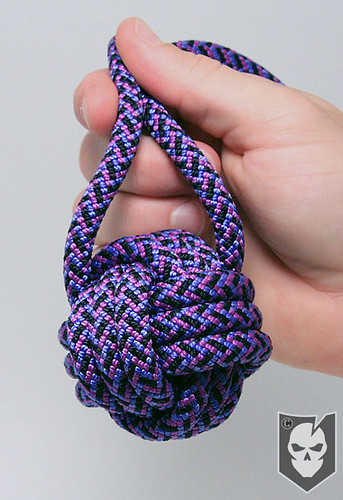
We’ll be tying the Monkey’s Fist today with a large marble as the weighted core, but anything could be used from a golf ball to a metal nut.
Monkey’s Fist » Decorative / Stopper
(Strength: 5/Secure: 5/Stability: 4/Difficulty: 4)
Please refer to our Knot of the Week introduction post for a description of what these ratings mean.
Uses:
- Decorative knot work
- Heaving line (with or without weighted core)
- Stopper Knot
Tying Instructions:
In this demonstration the Monkey’s Fist was tied in 8mm Climbing Rope to aid in the visual instructions. A large marble was used for the weighted core.
- Make three vertical coils
- Enclose the vertical coils with three more horizontal coils
- *Ensure that everything is tight in your hand when working with this knot as it will come unravelled easily in these early stages*
- On the third horizontal coil pass the working end through and start wrapping three more horizontal coils at a right-angle to those you just made
- At this point or before the final right-angle coil is made a weighted core can be inserted (see photos and video)
- *These final right-angle turns will lock the knot together*
- The basic structure of the knot will now be formed and all that’s left to do is tighten it up
- Starting an one end of the knot, pull the unwanted slack through the knot to the other side
- Continue pulling the slack through the knot until it reaches the desired tightness
- *If a weighted core is not used the knot might take on a somewhat flat appearance*
- The working end of the line can now be knotted to the standing part of the line
- Congratulations! That wasn’t so hard was it?
View the gallery or YouTube video below and follow along with the steps above!
[flickrset id=”72157622001832230″ thumbnail=”square” overlay=”true” size=”medium”]