


How to Make an Inexpensive DIY Lock Pick Practice Set
How to Make an Inexpensive DIY Lock Pick Practice Set
Whether you consider yourself a novice or pro when it comes to lock picking, there’s no denying that everyone needs to keep up their skill-set without damaging their house locks.
Today we’re going to show you how to build an inexpensive lock pick practice set for less than $40 that will rival the stands, kits and sets that cost three times that.
With just a quick trip to Home Depot, you’ll be on your way to creating your own set to work with and ensure that the next time you’re locked out of your house, you’ll be able to get back in!
Comprehensive
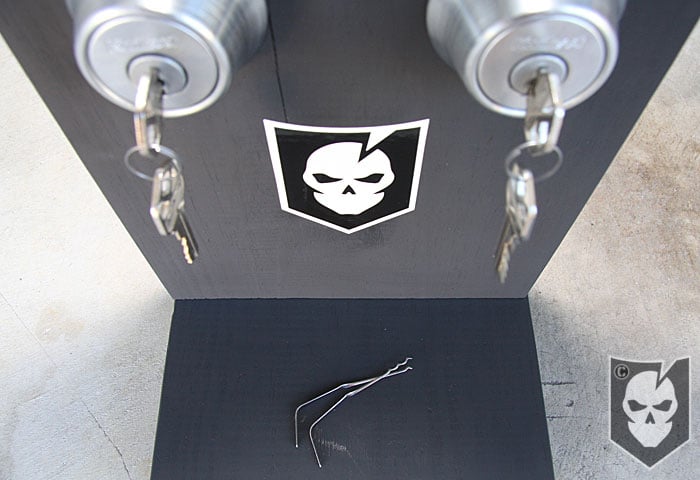
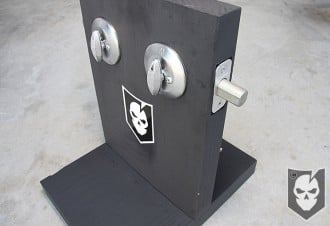
The way we’ve designed this practice set, is to enable you to practice providing tension from both directions, i.e. clockwise and counter clockwise. As you might know from practicing yourself, it’s nearly impossible to tell which direction the plug in a cylinder is going to turn simply by looking at the lock.
Other visual queues must be used in order to read the direction the plug is going to turn and from which direction you’ll provide tension with your tension wrench. While we could take up an entire article just on technique, we’ll save that for an upcoming article.
Suffice to say that this set will allow you to practice for what you may potentially encounter when LEGALLY picking locks and makes an excellent practice station for you pick set. What it won’t help you practice for are the dummies that install their locks upside down, which will eventually cause pin spring problems. Make sure you don’t make that mistake when building this setup.
Versatile
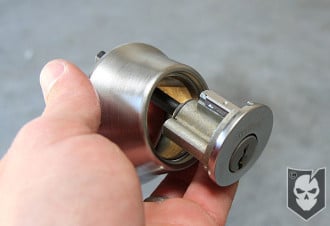
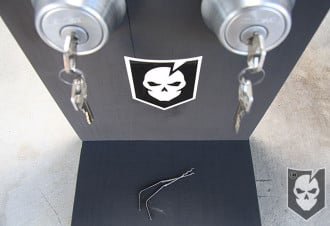
Not only will this practice set allow you to turn plugs in either direction, but the cylinders you’ll have with your purchased deadbolt sets will allow you to re-key or remove pins.

Removing pins is a great building-block method for learning how to pick locks. While again the scope of this article is the creation of this set, not necessarily teaching how to remove the pins. However, this is something that will be addressed in an upcoming article.
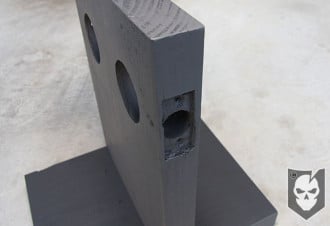
The cylinders you’ll see in the image to the right are removable from the deadbolt housing and with a simply sliding/prying motion, you can remove the cover and access the pins.
Beware of cheaper deadbolt sets you’ll see in your hardware store adventures, some lack the ability to access the pins and remove or re-key the lock.
Materials
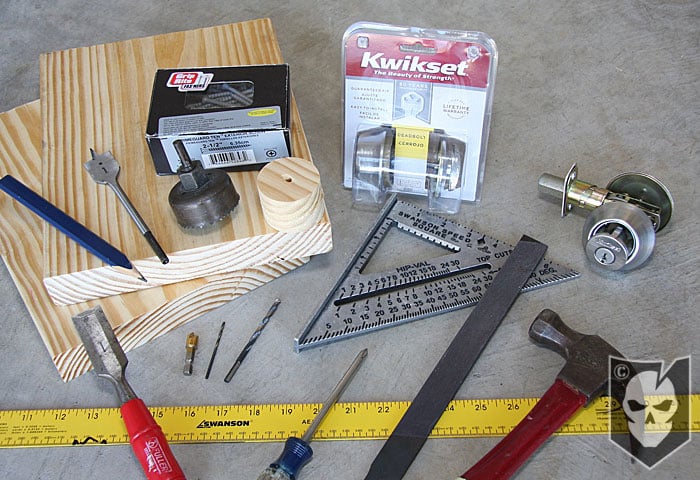
The only real expenses for the set, provided you own tools, are the two deadbolt sets and wood. However, there are some specialized drill bits you’ll need that you may have hiding out in your tool box.
Don’t be afraid to open the deadbolt package up in the store to make sure it’s the kind we’re describing.
Here’s what you’ll need:
- (2) Deadbolt Sets (with removable cylinders)
- (2) 12″ long x 9″ wide x 1 1/2″ deep (actual dimension) blocks of wood
- (3) 2 1/2″ wood or exterior screws
- Small diameter drill bit long enough to reach all the way through the 1 1/2″ deep block of wood (smaller in diameter than your screws)
- 2 1/8″ Hole Saw
- 1″ Wood Boring Bit
- Countersink (size of your screw heads)
- 1″ Wood Chisel
- Bastard File (to sharpen your chisel if needed)
- Hammer
- Phillips Head Screwdriver
- Ruler or Speed Square
- Pencil
- Optional: non-slip drawer liner material (to line the bottom of the stand)
Assembly
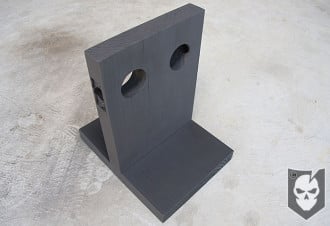
Essentially what you’ll be creating is two door jambs, but first you have to build the stand. We were able to find a 48″ x 9″ wide x 1 1/2″ deep piece of wood to make two stands for about $2. What’s great about buying this at Home Depot was that they’ll cut it for you. So for $2 we had four 12″ pieces of wood to work with, even though the project only requires two.
Make the Stand
Assembly is very straightforward after your wood is cut. Simply draw an outline of the upright 12″ piece of wood on the base piece and mark the location for your pilot holes in the bottom side of the upright piece and the top side of the base piece. Our three holes were marked at 2″, 4 1/2″ and 7″.

Now drill pilot holes (to keep the wood from splitting when you screw the two pieces together) with your small diameter drill bit all the way through the base piece, as well as up through the bottom side of the upright piece of wood. Flip your base piece over and using the pilot holes you drilled all the way through, countersink these to allow for clearance of the screw heads so they’ll fit flush.
Keeping the base board flipped over, line up the upright piece underneath it and screw your three screws in. You might want someone to hold and provide pressure to the base piece to ensure it stays still and that you don’t wind up with a gap where the two pieces meet.
Drilling Deadbolt Holes
As you’ll read in the instructions for the deadbolts you’ll buy, the 2 1/8″ circle that needs to be cut is either 2 3/8″ or 2 1/2″ in from the outside edge depending on what. Our measurement was at 2 3/8″. Remember that you’ll be repeating the instructions for both sides. Our instructions even had a template you could use to mark the location of your holes.
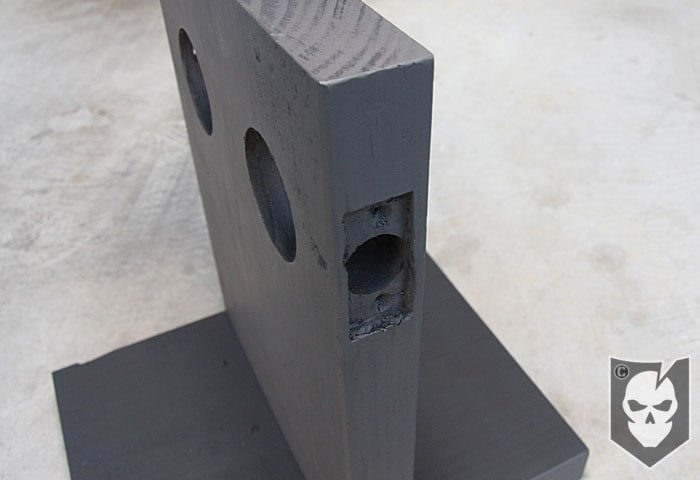
On our 12″ piece of wood, we measured 3″ down from the top of the upright piece and drew a nice straight line all the way around the upright. This will help you out when you drill the 1″ holes required for the actual deadbolt backset.
We’re not going to get into how to drill these holes, as it’s pretty simple. You need to (2) 2 1/8″ holes and (2) 1″ holes drilled deep enough in the sides to meet the larger 2 1/8″ hole on each side.
After your holes are drilled, insert the deadbolt backset and trace around the face plate of the latch. This is now the area you’re going to chisel out. This takes some patience and work, as you need to continuously check the fit to ensure the chiseled out area is deep enough. Be careful not to chisel out too much. You’re not going for style points here, just make sure it fits flush.
You can also mark where the screw holes are in the faceplate and drill pilot holes for those, although it’s not really necessary.
Hardware Assembly
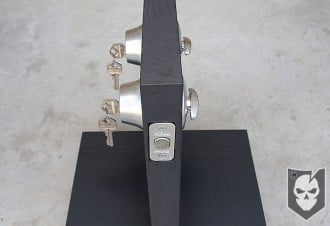
At this point you can spray paint your stand if you’d like to, we just used flat black spray paint. This is just cosmetic though, but you’re welcome to throw some support our way and slap some ITS Stickers on there too!

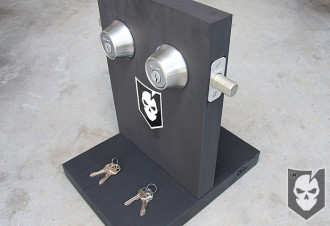
Following the assembly directions on your deadbolts is the best course of action here. All you’re essentially doing though is inserting the backset, screwing down the faceplate, placing the deadbolt cylinder set in the hole (make sure your cylinder is facing the right direction!), placing the turn piece on the back and screwing it all together with the long screws that are included.
What you have now is an awesome place to practice your lock picking that allows you quick access to change out pins or even replace the deadbolts completely if you wear them out. Keeping graphite in the locks is a good way to ensure proper operation.
An option modification to this stand is to purchase a piece of non-slip drawer liner material and spray glue it to the bottom like we mention at the end of the video below. This will ensure your stand doesn’t slide around while you’re practicing.
Notes
We hope you enjoyed this tutorial on creating your own Lock Pick Station, please follow the lock sport code of ethics below and have fun! Stay tuned for our next article where we’ll show you in detail how to remove pins and some good techniques for picking.
Lock sport is an honest, ethical, and legitimate hobby. Unfortunately, the whole world hasn’t figured that out yet (though we’re working on it!). Because the lay person has a tendency to perceive what we do as somehow nefarious, it is extra important that we commit to following a strict code of ethics. For this reason, the above credo is non-negotiable in the lock sport community. Lockpicking should never, ever be used for illegal or even questionable purposes. Please do not misuse this information. We assume no responsibility for your actions, and in no way condone immoral activity. Help keep locksport fun for all by following strictly the one rule.
“You may only pick locks you own or those you have been given explicit permission to pick.”

Discussion