
Continuing on our Knot of the Week climbing mini-series, we introduce the Threaded Figure-Eight. Rather than just simply teach the standard Figure-Eight, we’d like to demonstrate the more advanced way of tying the knot to teach its versatility.
The Threaded Figure-Eight is an essential climbing knot which has many applications in all types of climbing, and can be easily tied. It has a unique shape that is easy to recognize when checking a buddy before a climb.
The reason to use a Threaded Figure-Eight, instead of a normal Figure-Eight, is to allow the knot to be tied directly onto anchors. With a traditional Figure-Eight tied on a bight, the climber would have to use a carabiner to attach the rope to an anchor.
When the Threaded Figure-Eight is used to attach the rope directly to a Lead Climber’s harness, it becomes very advantageous in the event of a fall. The knot will self-tighten under load, and actually absorb some of the shock placed on an anchor system, which is a good thing.
Warning!
A note to mention here is that in a Lead Climbing situation the threaded figure eight should ALWAYS be used when being attached to a harness. Using a standard Figure-Eight and then connecting it to a harness (using a carabiner) can introduce a weak link.
The carabiner can become cross-loaded in a fall, where the it becomes twisted and the shock is caught by the gate of the carabiner (which carries a reduced strength). The kN (Kilo Newton) rating of a carabiner only holds true if the carabiner is loaded appropriately.
*** The photos below show the exact thing we’ve just told you NOT to do! We did this simply for the sake of the demonstration! ***
Threaded Figure-Eight » Loop
(Strength: 5/Security: 5/Stability: 4/Difficulty: 3)
Please refer to our Knot of the Week introduction post for a description of what these ratings mean.
Make sure to leave at least 12 inches of length in the tail of the knot in order to back it up. We’ve shown the backup below with two overhand knots to stick with what we’ve already taught here on the site, but most stopper knots will work just fine.
Uses:
- Tying a rope into an anchor
- Attaching a rope to a Lead Climber’s Harness in belaying
Instructions:
- Make a loop at the end of the rope
- Wrap the working end around the standing part (front to back)
- Feed the working end through the loop
- Pull the working end and standing end away from each other to slightly tighten
- *This is the stopping point for a standard Figure-Eight Knot*
- At this point ensure you have the appropriate tail length
- Feed the working end through your attachment point
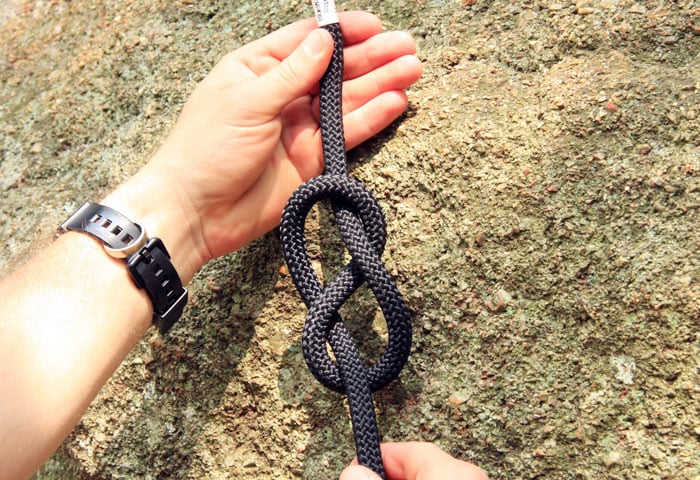
- Now you’re going to trace the knot, contouring it’s shape
- Ensure the lines are even and parallel when tracing!
- After threading the working end through, tie two overhand knots to back it up
- The backup will act as a stopper in the unlikely event the knot slips
View the gallery below and follow along with the steps above!
[flickrset id=”72157618417005522″ thumbnail=”square” overlay=”true” size=”medium”]
Check back next week as we continue our Knot of the Week mini-series with the Climbing Rope Coil