Check out the ITS Online Store for awesome new products!

email
share

Versatile Option for Securing a Load with the Diamond Hitch

by The ITS Crew on June 7, 2011

email
share
Post image for Versatile Option for Securing a Load with the Diamond Hitch

In our latest installment of the Knot of the Week, we’ll teach you how to tie the Diamond Hitch and explain what benefits it offers over traditional methods of securing a load.

What’s truly versatile about the Diamond Hitch is that once tied, it creates a diamond pattern in the center which not only is where its namesake comes from, but is what gives it the ability to compensate for the load shifting.

Whether being used to secure a load to a roof rack, truck bed or even a pack animal, the Diamond Hitch is definitely one to put into your knot tying toolbox.

Diamond Hitch » Hitches

(Strength: 3/Secure: 4/Stability: 4/Difficulty: 3)

Please refer to our Knot of the Week introduction post for a description of what these ratings mean.

Uses:

  • Securing a load
  • Tie down for a roof rack, truck bed or pack animal

Tying Instructions:

  1. Diamond Hitch 06 
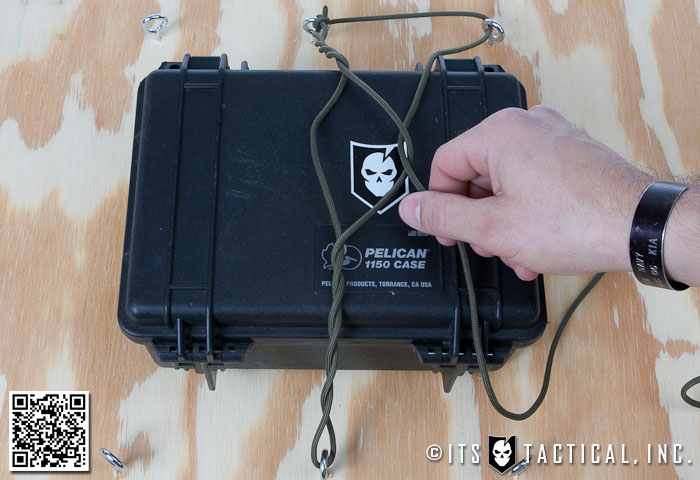
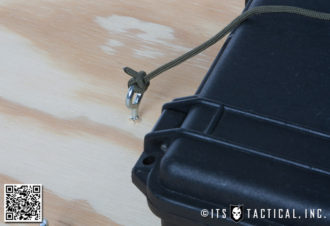
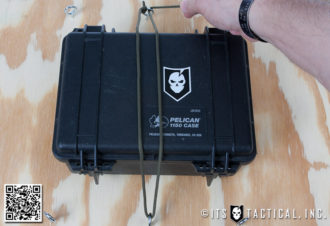
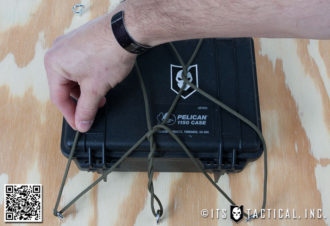
Attach the standing end of your line to a fixed midpoint in an array of 6 tie-down points.
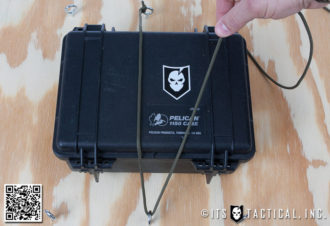
  2. Use the working end to span across the load and to the opposite midpoint.
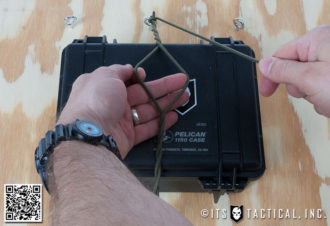
  3. Route the working end through the second midpoint and back to the original midpoint.
  4. Wrap or pass the working end through this original midpoint.
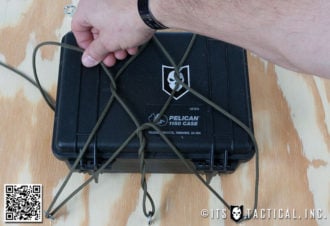
  5. Grasp the double line created over your load and twist the two lines six times or so, creating a diamond pattern in the center.
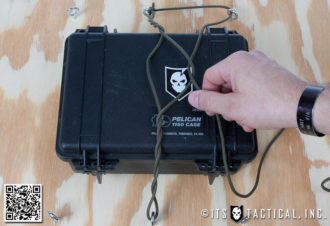
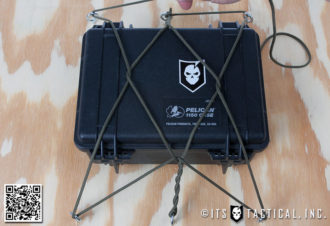
  6. Ensuring to keep the diamond pattern, run your working end to the closest corner of your tie-down points.
  7. Wrap or pass the working end through this corner point and through the backside of the center diamond before passing it down to the opposite corner.
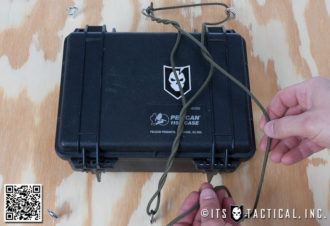
  8. Wrap or pass the working end through the opposite corner and down through the top of the center diamond and out to the bottom-most corner.
  9. Wrap or pass the working end through this corner point and back through the backside of the center diamond before passing it to the last corner.
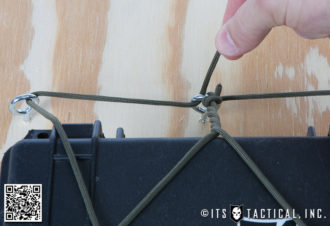
  10. At this point take a few seconds to adjust the lines and tighten them up.
  11. Pull tension at the last corner and secure the working end to the midpoint you started at, which completes the Diamond Hitch.

Video and Photos

Diamond Hitch 01Diamond Hitch 02Diamond Hitch 03Diamond Hitch 04Diamond Hitch 05Diamond Hitch 06Diamond Hitch 07Diamond Hitch 08Diamond Hitch 09Diamond Hitch 10Diamond Hitch 11Diamond Hitch 12Diamond Hitch 13
email
share

Are you getting more than 14¢ of value per day from ITS Tactical?

Become a Crew Leader!

Please consider joining our Crew Leader Membership and our growing community of supporters.

At ITS Tactical we’re working hard every day to provide different methods, ideas and knowledge that could one day save your life. Instead of simply asking for your support with donations, we’ve developed a membership to allow our readers to support what we do and allow us to give you back something in return.

For less than 14¢ a day you can help contribute directly to our content, and join our growing community of supporters who have directly influenced what we’ve been able to accomplish and where we’re headed.

Click here to learn about all the benefits and Join!

{ 11 comments… read them below or add oneDiscuss in our Forum }

Blade Stalker June 7, 2011 at 3:57 pm
Thumb up Thumb down 0

Thanks for this, I always need help with my knots!

Reply

glenn chan June 7, 2011 at 9:14 pm
Thumb up Thumb down 0

I looks like a very sturdy set-up if you’re carrying a large load of material. How would you do it on a pick-up truck with only 4 lashing points? Would suggest going from opposite corner points?

Reply

siegrisj June 8, 2011 at 12:05 am
Thumb up Thumb down 0

Ditto on posting 4 point lashing technique if you have one available. I could use that for the cargo rack on my bike.

Reply

We’ll see what we can put together, thanks for the comment!

Reply

Greg Kinyon June 8, 2011 at 12:21 pm
Thumb up Thumb down 0

You guys are awesome. Keep up the good work. Scratch that…keep up the GREAT work!

Reply

Thanks for your support and kind words Greg!

Reply

David Liles June 8, 2011 at 10:15 pm
Thumb up Thumb down +1

An option for a 4 point anchor constraint might be to tie a rope between each of the two anchor points so the two ropes are parallel to each other. The trick is to tie an eye-loop in each of the ropes so it can be used as the needed additional anchor points giving you six.

Crude example (‘x’ is corner anchor in truck and the ’0′ is the eye-loop tied in the rope between the ends):
x——0——x

x——0——x

Reply

You’ve pretty much hinted at what we’re going to do for this David LOL. Our KOTW next week will cover the loop and the week after that we’ll get into the 4-Point Anchor.

Reply

David Liles June 9, 2011 at 12:14 pm
Thumb up Thumb down 0

Didn’t intend to post a “spoiler alert”… :)

Reply

ok this my be a stupid question but how does one determine the amount of rope , or 550 to use in doing tis knot ?

Reply

It’s really up to what you’ll be using it on James. Whether a truck bed or a roof rack, it’s all going to change, but suffice to say if you keep 100 ft. of paracord in your vehicle you’ll be good to go for quite a few situations you might find yourself in.

Reply

« Previous post

Next post »