


Survival Techniques: Tips and Tricks to Constantly Improve Your Situation
Survival Techniques: Tips and Tricks to Constantly Improve Your Situation
- Survival Techniques: Learning to Observe, Adapt and Overcome
- Survival Techniques: Building a Shelter to Live Through the Night
- Survival Techniques: Tips and Tricks to Constantly Improve Your Situation
When you spend time in the wilderness with people who’ve become accustomed to the environment, it’s easy to stay humble. Some people don’t see survival situations as survival, they see it as a minimalistic lifestyle. Knowing the environment is essential to becoming a master of it. Here’s a few tips and tricks that I’ve picked up by working with people smarter than me.
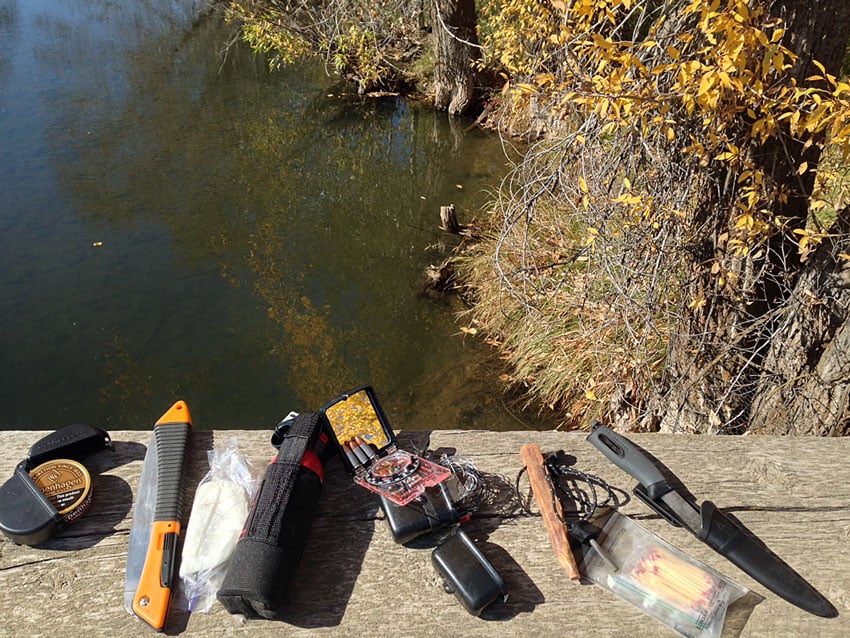
Survival Kit Essentials
You’re really only as strong as your kit will allow you to be. The ability to start a fire once is fine, but does your kit allow for multiples fires while traveling through a variety of terrain? Does it have enough wire to place multiple snares? I ask this because, on average, only 25% of the snares that you place will work.
Will your kit help you navigate? Even a small survival kit compass will provide you with cardinal directions (North, South, East and West). Dead reckoning will be a challenge, but not impossible. Just having your cardinal directions will greatly improve your chance of survival. Is there something to cut with? It’s hard to imagine any ITS readers not carrying a knife, but I would suggest having an extra blade along with your survival kit. It’s an important enough tool to apply the age old saying, “two is one and one is none.” Can you dig?
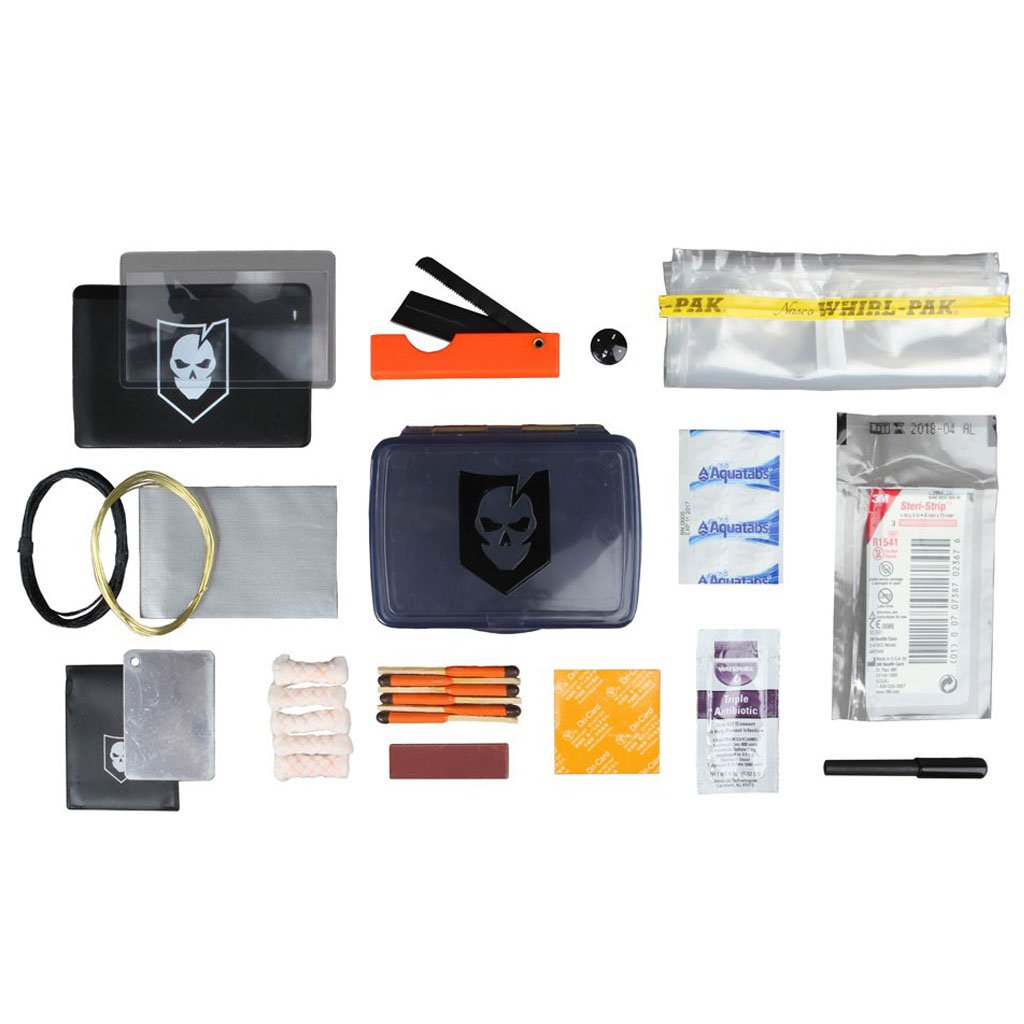
I know this sounds a little out there, but I say this because of the effectiveness of the coal bed method of staying warm through the night. It’s one of the better ways to keep warm while on the move because it takes much less set up time, if you have a way to dig. The ITS Mini Survival Kit case does just this. It provides a digging tool that’s also capable of carrying your survival kit essentials.
Snaring Small Game
Site Selection
Snaring small game is ideal for hunting dinner. This is because you can set up a snare, leave the area to build your shelter or fish the stream and then return for your reward. The hard part is knowing where and how to set your traps. Be sure to look for areas that already contain small game. You’ll notice them running around, hear them, or see their sign. Also, your chances will be higher if you’re located near water for obvious reasons. If your lay-up point was selected out of necessity for movement and you find it less than ideal, I still recommend setting up your snares. Keep trying, no matter what. Here are a few tips for setting your snares.
 Create the Snare
Fold the wire back onto itself and tie a simple overhand knot. The knots don’t need to be tight because the force of the animal will tighten the wire onto itself.
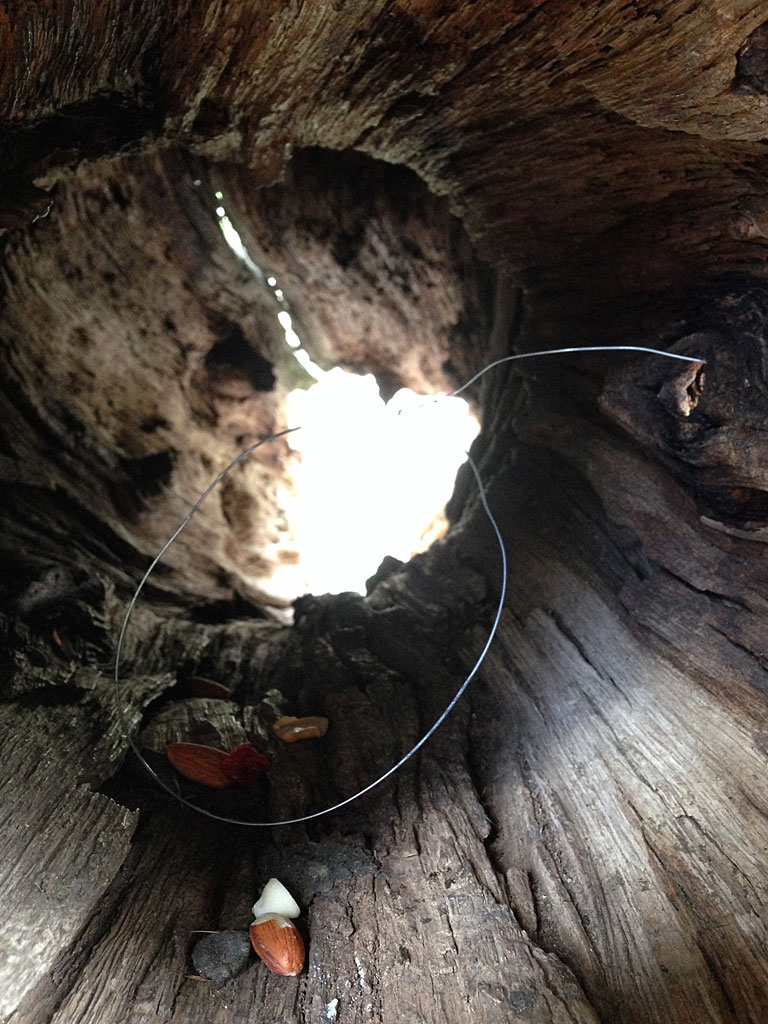
Set the Snare and Bait
On the bitter end, tie the wire to the tree. You need to set an anchor so that the animal can’t get free while you’re gone. If you’re setting the snare higher on a tree, test the length to ensure the animal will hang himself when he falls. I know it sounds rough but it will make your life easier.
Sometimes you’ll need to set the snare on a hole into the ground. In this situation, make sure that the anchor is up high and that there isn’t enough slack in the line for the animal to dig in.
I set this snare on a hole and successfully snared a rock chuck. I had to pull him out while he was still alive and he came out fighting. If you find yourself in this situation, have something ready to club his head. Don’t waste valuable rounds on a sitting duck.
X Factor
There are a couple of tricks you can use to make sure you catch what you need. The first is to set the loop in the snare at the right size for what you’re hunting. If you can identify the game, make the snare large enough for the head to pass through, but still small enough for his shoulders to catch the wire. As he pulls past the tension, the wire will tighten around his neck. This is actually what will set it on his neck. Another tip is that you can actually force the animal onto your path by using natural vegetation to block other avenues of approach. If you block to the left and right, the animal will take the path of least resistance, as all things do. Finally, place some food in front of the loop and some just after. The idea is to keep him moving through the trap, not to simply place the bait on the wire.
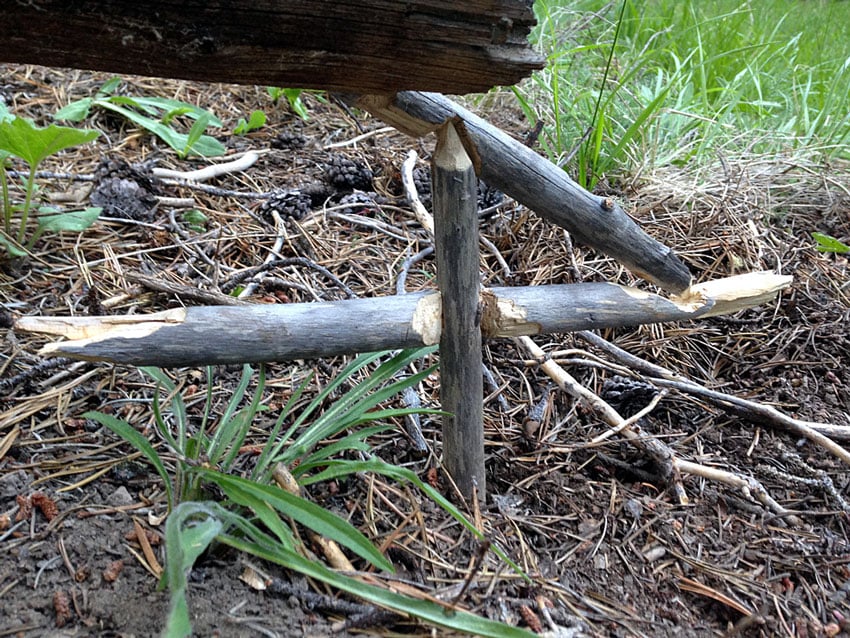
Figure 4 Deadfall
I included this into the arsenal of tips and tricks, because while it’s fun, building a Figure 4 can be challenging. The measurements must be accurate or you risk losing hours. The other challenge is making the deadfall out of material that’s capable of holding up a blunt object large enough to kill your desired target. The one that a friend and I made was correct in design, but too small to be effective. Once you have your build, setting the trap is one of the more challenging survival techniques out there. The balance has to be perfect and it’ll take multiple tries to get it just right. For this reason, I recommend baiting the stick with berries or raisins before setting the trap. Raisins have a natural adhesive quality that make them perfect for multiple attempts to set the trap. The trap works for the same reasons it’s hard to set. All an animal has to do is take a nibble of the bait and it’s enough to crumble the sticks and bring down the rock or large branch.
All said and done, you’ll get one very valuable advantage from creating a Figure 4 dead fall; it’ll occupy your time and provide a distracting challenge for your mind to find peace. Remember, the golden rule of survival is to constantly improve your situation. This works for several reasons, but arguably the most important is the mental edge of proactivity and accomplishment.
Bread on a Stick
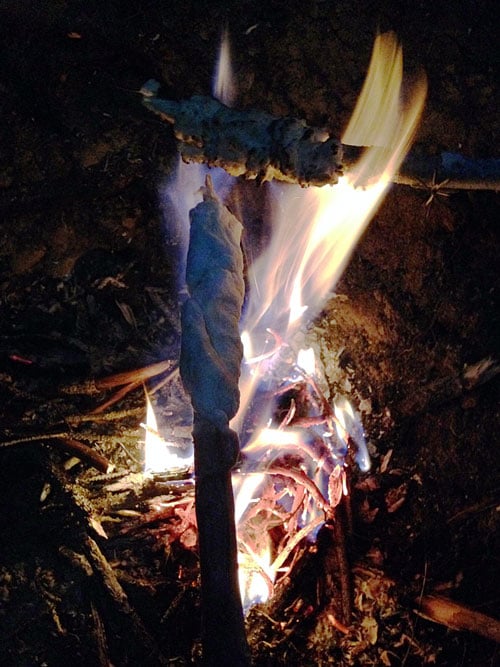 This is a great meal for any backpacker, but can also be lifesaver and morale booster should your day trip become a survival crisis. Keep in mind that a little will go a long way and since this mix is set up to be carried before adding water, it makes for a cheap, easy and lightweight meal option.
The ingredients are simple, all you need is 500g of self-rising flour and 3 tablespoons of sugar. Put both of those items together into a Ziploc style bag and seal it tight.
When it’s time to eat, add between 300 and 500 ml of water which should provide the right consistency. It can’t be runny and must be malleable enough to wrap around a stick. The above ingredients will make about 12 sticks of bread.
Tip: Add garlic or other seasonings to your mix for a tastier treat.
Wild Edibles
Buffaloberries – The Indians in Montana used to harvest these by spreading hides on the ground and shaking the plants with sticks. Whatever method you use, you’ll be eating well.
Willow Bark – As you saw in my article entitled Survival Techniques: Building a Shelter to Live Through the Night, the willow tree can be used to add comfort and insulation for a shelter. It can actually be used for far more than that too. The bark can be boiled into a medicinal tea that will help relieve pain by acting like a mild anti-inflammatory.
Camassia (Wild Hyacinths) – This little bulb can certainly sweeten things up a little. They can be roasted, dried, or boiled to make a drink or to use as a sweetener.
Note: Do your own research when considering edible plants as the results can be deadly if you’re wrong.
Making Rope
Really Nick? Rope, you’ve got to be kidding me. You can trust me, it doesn’t take as much time as you think. As you know, there are two stages of any survival scenario. The first is when you should bed down and wait for rescue. The second is when your situation is dire and you’re choosing between moving or dying. It’s in the first stage that boredom can lead to extremely poor morale.
Once your shelter is built, the fire is no longer a problem and you have your snares in place, you can begin to take on special projects. The Figure 4 dead fall is one of these, but making rope is another way to have fun while doing something proactive and beneficial. Rope made in the wild is actually very strong and will easily hold up the frame of your shelter. It can also be used to hard point essential equipment to your body in the event of a water crossing.
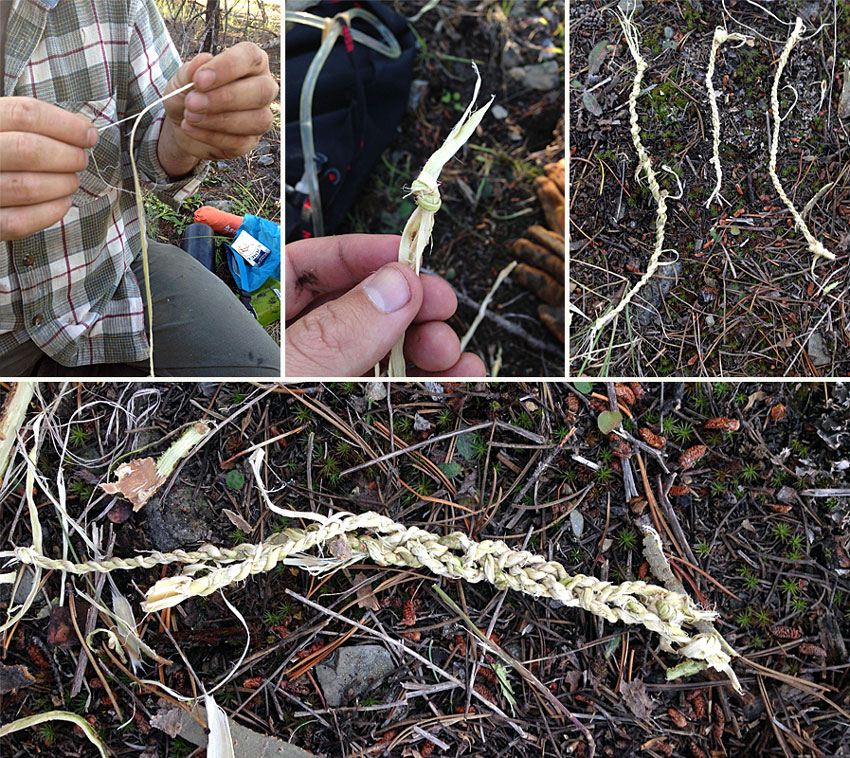
Step One: Strip some Willow tree branches and skin them with your knife. It’s the soft layer past the bark that can be used. Using your knife, skin long ribbons from top to bottom; the longer the better. Then split these lengths gently with your hands to create three separate ribbons that are narrow in width.
Step Two: Take all three lengths and tie together at one of the bitter ends. Next, twist an individual length away your body until very tight. Without losing tension, wrap one strand over one of the others. Next, take the new strand directly in front of you and twist, wrap and repeat. It doesn’t have to be perfect, but it has to be tight. If three ribbons becomes too complicated, you can use only two, as it will still have a high tensile strength after all is said and done. When the ribbon runs out, just splice in a new piece and begin twisting tight. No knots are necessary to splice; it’ll become part of the whole without it.
Step Three: Repeat the entire process with two more complete strands. When you have all three separate cords ready, begin braiding all three together in the same way that a girl braids her hair. Three cords bound together will surprise you when you test the strength. I made these in about 30 minutes.
White Bark Pine for Splints
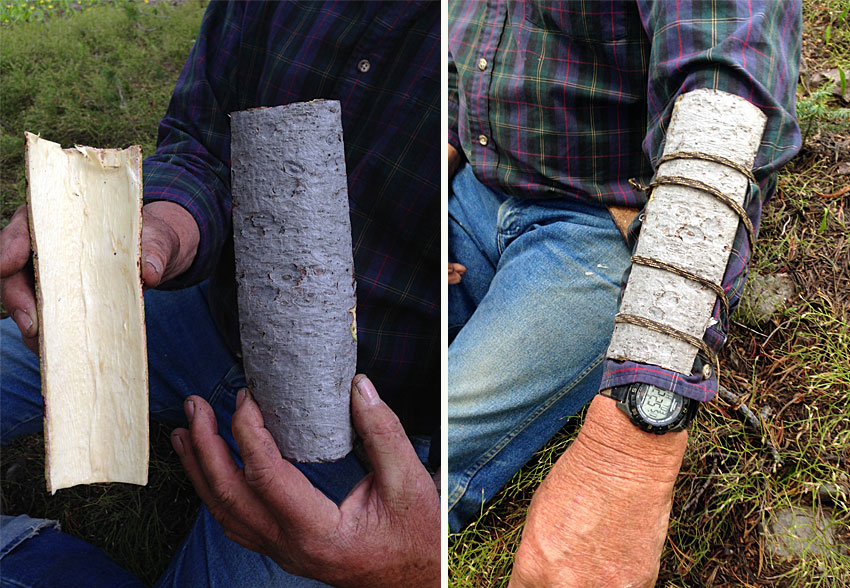
Learn to see what’s around you. Sometimes this requires peeling back the layers of what’s actually in your sightline. The White Bark Pine is a good example of how something seemingly insignificant can make your life easier if you know how to exploit it for your benefit. Injury in the wild can be a deal breaker. Using a splint will increase your overall effectiveness and lessen the amount of pain felt from a broken bone shifting and moving free.
If you cut into the bark with your knife or the Folding Razor Saw in your ITS Mini Survival Kit, you can split the outer layer of bark from the inner. Cut out two rectangular pieces and take off your shoelace. Place the bark pieces opposite each other around the area that needs a splint and tighten with your shoelace.
Remember, knowledge is more than power; it’s often the difference between who lives and who dies WSHTF.
Editor-in-Chief’s Note: Nick recently left the Navy after serving for 10 years as a Navy SEAL with multiple deployments, having been awarded the Bronze Star for operations in austere environments. Nick’s been with us since the beginning here at ITS on our Advisory Board.

Discussion