


DIY G-Shock Watch Negative Display Conversion
DIY G-Shock Watch Negative Display Conversion
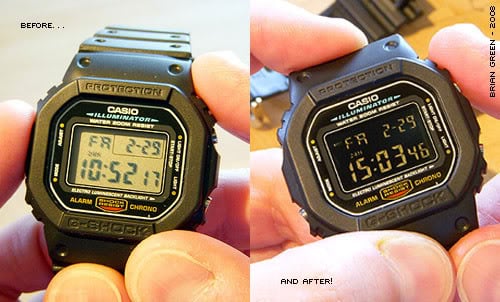
This project was quite adventurous for me and quite a bit more complicated than some of the other projects I’ve done with my G-Shock watches.
It involves doing some pretty nasty things to the screen of a “naked” G-Shock, so if you’re faint-hearted this is probably not the ideal DIY project for you.
If you’re still reading this and desperately wanting to try reversing the display of one of your digital watches for yourself — read on!
Creating a Negative Display
I’m going to be taking my plain Casio G-Shock DW-5600 and converting the regular display into a negative one with the use of some self-adhesive polarizing film. It took me a while to find a good source for the right type of polarizing film. I bought mine from Polarization.com in Texas.
The quality was very good, service excellent, and the shipping was pretty fast (3 days). I ordered the thinnest self-adhesive film they had in a relatively small size, part name was: “Linear Polarizer w/adhesive PFA”.
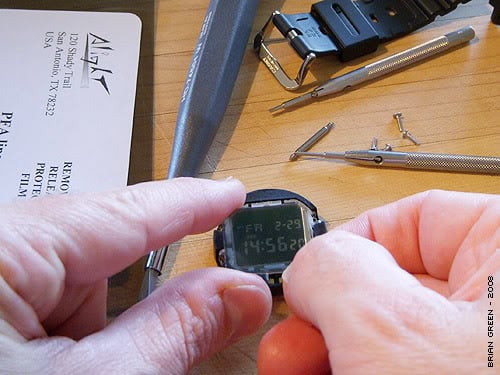
Ok, on to the project. First let me show you some of the tools you might like to have ready for this.
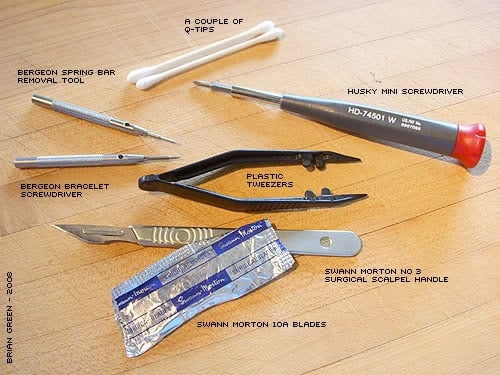
- Plastic tweezers
- Spring bar removal tool
- Small flat head screwdriver
- Some Q-Tips
- A surgical scalpel or sharp modeling knife and fresh blades
- The all important Husky Mini Screwdriver (a must have item)
With all the necessary tools at hand it’s time to start thinking about how to tackle this. I will be using the DW-5600 that I recently stealthed the bezel on (separate post coming). By reversing the display it should be a pretty fine looking little watch. The next few steps will be obvious to most of you, but I figured I’d snap some pictures anyway.
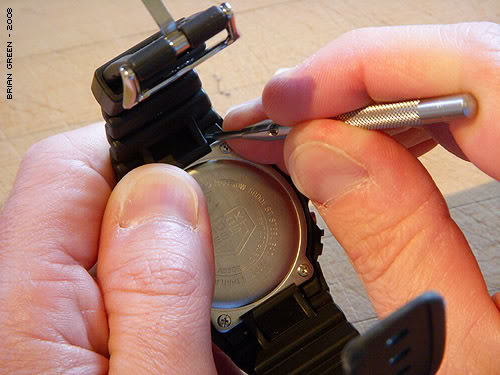
Take off the straps so that you can remove the back cover and so that they won’t get in the way while you are working on the body of the watch. I like to use my nifty little Bergeon Spring Bar Tool that is designed specifically for this.

Next, carefully remove the four small screws that hold on the case back. Always make sure to put these somewhere safe and keep them together. This is where the Husky Mini Screwdriver comes in very handy.
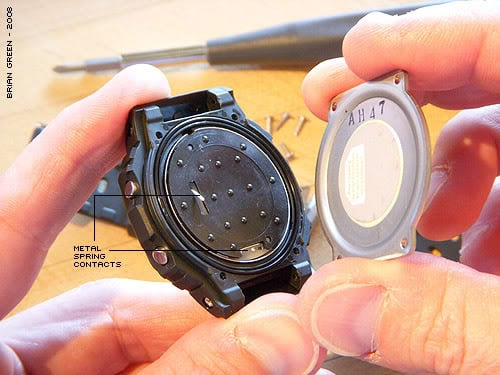
Remove the metal case back carefully, trying not to disturb the rubber gasket that creates the watertight seal around the module.
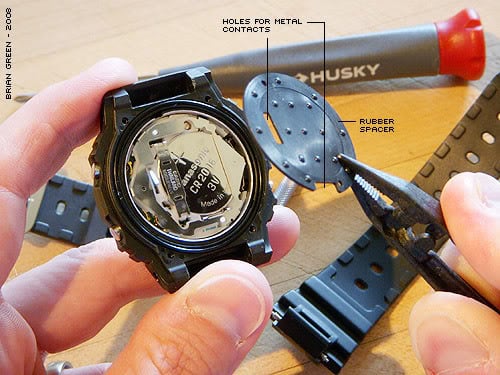
You should see the rubber spacer that covers and adds protection to the inner module. Remove the rubber spacer using the tweezers for extra grip. It can sometimes feel like it is deliberately stuck to the module but it isn’t, it just gets pressed tightly and sticks a bit — it should come off very easily.
You should now be able to lift out the entire module by one of its edges using your tweezers. Mine actually fell right out when I flipped it over. Be patient, there’s really nothing holding it in other than the pressure of the buttons against the spring contacts.
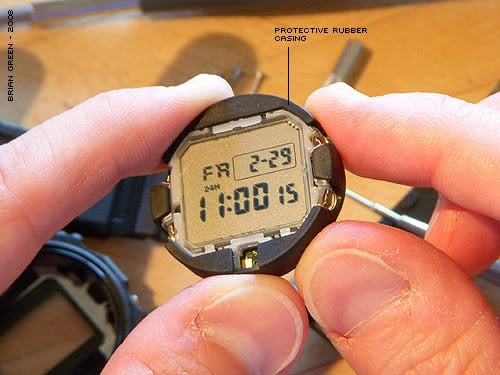
I took off on a bit of a tangent here and decided to remove the black outer rubber protector and the metal inner ring casing. I also removed the glass screen from the module and spent the next three hours shouting and cursing at how hard it was to put the darn glass screen back in. I was also extremely annoyed at my stupidity as I discovered that it was not necessary to remove the glass at all (I learn as I go along..).
I have deliberately omitted the next six or so images that I took of me removing the glass and putting it back in because it is not necessary and very nearly screwed up my display and module!
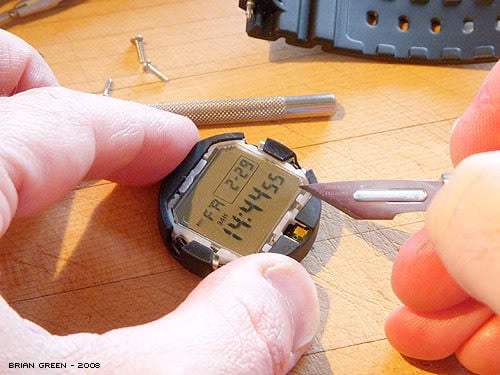
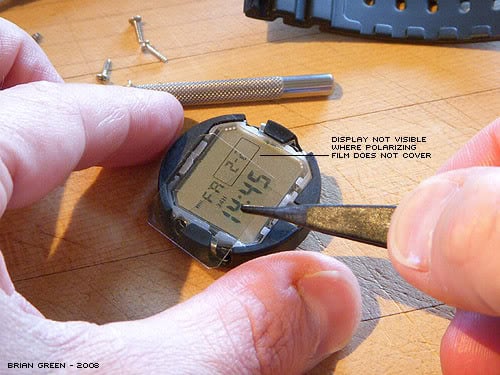
The next thing to do is to remove the polarizing film that is glued to the surface of the glass. The film is slightly smaller than the glass and can be seen easily if you look close up. I am using my scalpel to gently lift up the polarizing film a bit at a time. The trick is to slide the blade between the polarizing film and the glass.

Take your time and work from one edge of the polarizing film across to the other, slowly pushing the blade of your knife under more and more while still moving it from side to side. Eventually you will have the blade under far enough to lift off the polarizing film.
The film is stuck to the glass by a thin layer of tacky glue. It’s pretty nasty stuff so be patient and it will come up eventually. Lift off the polarizing film using your plastic tweezers. You can see that the film looks almost transparent while over the display and the digits are only visible on the parts of the display that are covered by the film — it’s quite amazing.
Here’s where it gets very cool. Simply turn the polarizing film around 90 degrees and as if by magic the digital display becomes reversed! The polarizing film does not need to be in contact with the glass to work.
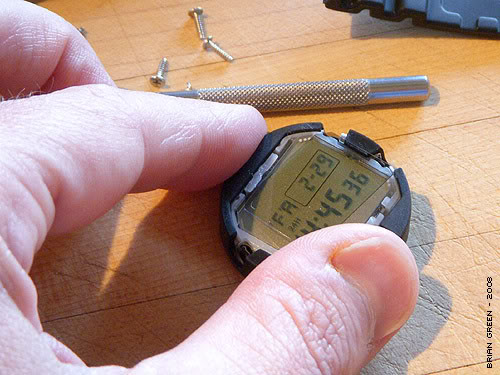
At this point I used my Q-Tips and some Goof Off to clean the tacky glue residue from the glass and the old piece of polarizing film. Make sure you get the glass as ‘squeaky’ clean as you can. It took me several Q-Tips and about 15 minutes to get it perfectly clean. I promise you that the time spent getting the glue off as much as possible will be worth it. If there is any glue residue left on the glass it will show up when you stick on the new piece of polarizing film and you don’t want that.
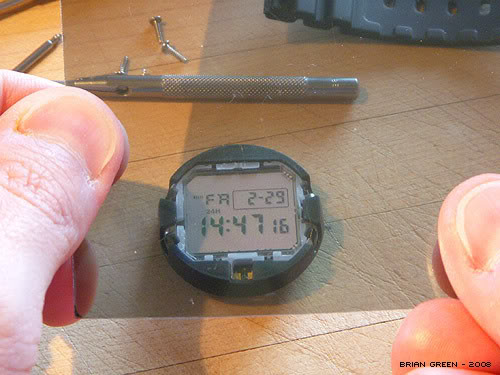
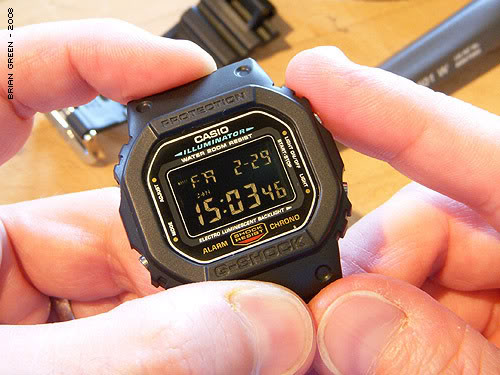
Now let’s take a look at the digital module display using the new sheet of polarizing film. Here is the display with the film held in the regular position. The display is shown as normal and we can see the module is still ticking away quite happily.
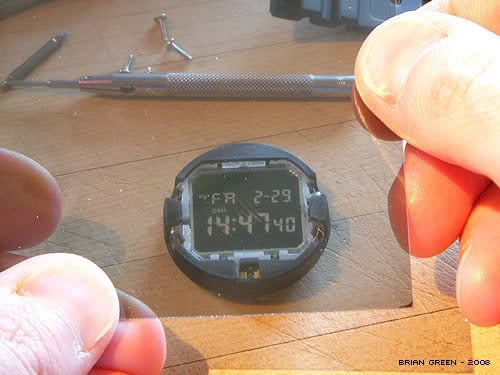
Rotate the polarizing film 90 degrees just like you did with the piece that was removed from the glass and the display is reversed. Excellent, this ensures that the film is going to work — until this point it was a bit of a gamble on whether or not this particular type of polarizing film would work — looks good.
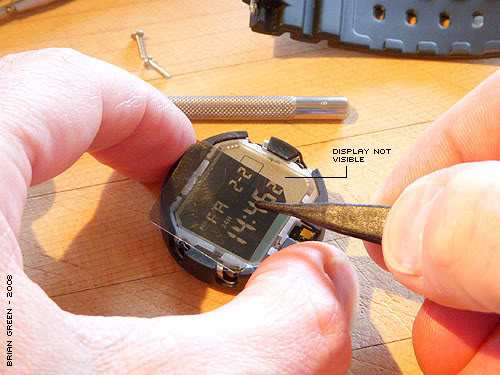
Next you’ll need to cut out a piece of the new polarizing film to the exact shape of the original piece. Make sure that you are cutting out the film with it turned in the right direction. Make doubly sure you have the film oriented so that it will make the display look reversed before you place the old piece on top as a cutting guide.
Hint: you can tell when the two pieces are the right way because the original piece that you are using as a cutting template should look completely black. Notice in the picture below how the display is invisible without the polarizing film. Also notice the small box on the display in the upper right corner; this will be disappearing when we reverse the display using this ‘hack’. The factory reversed modules manage to reverse the box too — interesting distinction.
Hold the original piece of film tightly up to the corner of the new sheet and gently cut around it using your sharp knife. Make several slices using medium pressure rather than trying to cut all the way through on the first pass. By making several slices you will avoid slipping and hopefully avoid the loss of any finger tips! Just take your time.

Once you have cut out the new piece of polarizing film, hold it over the display to make sure that it fits and that it will create the desired negative effect. The film used here (details at top) was self-adhesive on one side and had a protective cover on the other. Remove the cover from the self adhesive side and without touching it carefully place the new piece of polarizing film onto the glass screen.
Use your tweezers for better precision. Gently rub the polarizing film with a soft cloth or clean Q-Tip to make sure it is adequately stuck down. Then use your tweezers again to lift of the protective cover from the front of the film. You should be left with a smudge and fingerprint free surface.
The final step is to reassemble the whole thing. Carefully put the whole module back into the watch casing making sure it it seated down. I find that I nearly always have to use my tiny screwdriver to hold in the metal connectors where the buttons are in order to get a module back in.
Replace the rubber spacer making sure that the protruding metal contacts show through. Then replace the metal case back and four screws. I’m not showing pictures of these steps because most of you know how to do this and if you don’t simply read through the steps above that describe how to take the module out.
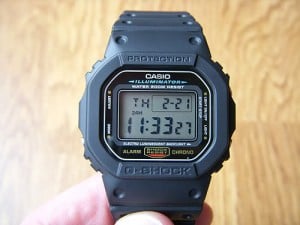
When the case back is firmly screwed down, flip the whole thing over and admire your handy work, a beautiful, negative display module. Notice how the small box in the upper right corner of the display is no longer visible. This is one difference between the DIY reverse display and the factory fitted version, but I kind of like the minimal look anyway so no great loss for me.
Well that’s it. The hardest part of this whole project was biting the bullet on the polarizing film and waiting the couple of days it took for it to arrive. The rest was relatively easy.
I hope you found this useful and I also hope this encourages a few of you to pop open that old G-Shock and hack a negative display. It took me a little over four hours to do this, but nearly three of those were spent trying to replace the glass display that I shouldn’t have removed in the first place. There were also some other distractions along the way.
I’ve done my best to provide as much detail as possible, but if you have any additional questions feel free to post a comment here and I’ll do my best to answer it. Happy hacking!
About the author: Brian is an avid lightweight backpacker and author of the popular Brian’s Backpacking Blog. In his spare time he designs watches and is the original designer of the Prometheus Ocean Diver line of dive watches. In addition to a rather large analogue watch collection, Brian is a self confessed G-Shock addict.


Discussion