


Rigging to Rappel: A Basic Guide
Rigging to Rappel: A Basic Guide
Rigging to rappel is an often undervalued skill. It is certainly a necessary part of rappelling, but most people I know rig quickly and almost thoughtlessly so they can get to the fun stuff.
While I too would like to get rappelling as quickly as possible, there are some fast rigging setups that add huge value to your system and to your skill set as a technician in the vertical environment.
In my estimation, there are three types of rigging. Different scenarios present different options and obstacles and these three types cover all the bases.
These three types of rigging are:
- Hasty
- Retrievable
- Contingency
I will discuss the first two types of rigging briefly and focus a bit more on contingency rigging.
Hasty Rigging
I call this first type of rigging hasty, for lack of a better term. This is quick and dirty rigging that gets you rappelling as quickly as possible. I usually see one of two options in the hasting rigging category.
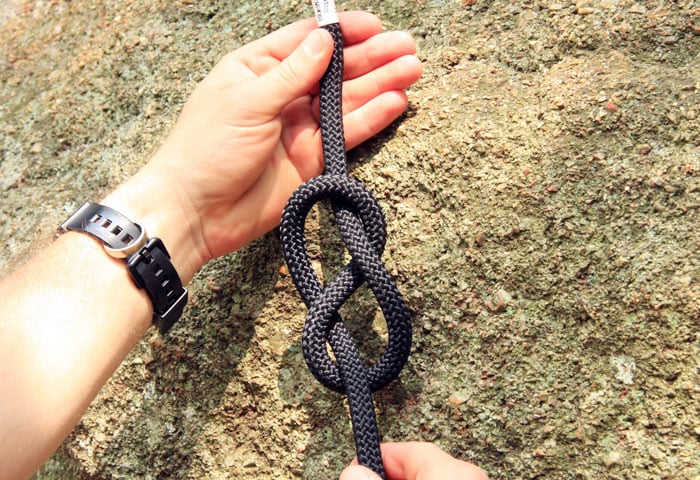
The first option is simply to build a webbing anchor and attach the end of the rope to the anchor using a single-loop figure-8 and a locking carabiner.
On my Search and Rescue (SAR) team, we use this option for the first rescuer to arrive on scene because it allows them to get over the wall as quickly as possible, get to the subject and begin the rescue.

(Left: Figure 8; Right: Toss-and-Go)
Another option that is used almost universally by climbers is called the “toss-and-go.”
This method consists of reeving the rope through bolts or rap ring at the top of a climb/rappel, feeding rope until you reach the middle of the rope and rappelling with both sides of the rope through the descending device.
Both of these options (and probably many others) get the job done quickly and efficiently and require minimal gear and effort. One major drawback to the first option however, is that you cannot retrieve the line once you get to the bottom of the rappel.
So if you need to perform multiple, different rappels with the same rope, you need to look to the “toss-and-go” or other options in the second category of rigging.
Retrievable Rigging
Retrievable rigging is just what it says: retrievable from the bottom of the rappel. The “toss-and-go” option also falls into this category which is why most climbers use it – it is quick and you get your gear back. Once you get to the bottom of the rappel you simply pull one side of the rope through the bolts or rap ring at the top. Retrievable rigging is also essential for canyoneering where you perform multiple rappels down wet or dry waterfalls to get through a slot canyon.
 Canyoneers have put a lot of thought and time into this type of rigging and have developed additional options for retrievable rigging including the knot block.
With this method you reeve the rope through the bolt or rap ring, measure rope to the ground (no sense in stepping on rope at the bottom) and tie a knot like a single-loop figure 8 that will not pass through the rap ring.
There is some additional risk involved in this setup because you MUST rappel on the correct side of the rope. One side is meant for rappelling but the other side is meant to pull the rope at the bottom and will NOT work for rappelling.
There have been injuries and fatalities because people have rigged to the wrong side of the rope so it is essential that an experienced person rig and check these systems.
Another Way
The last point brings up something that most people don’t often consider: what can you rig to help the inexperienced rappellers as they are learning to rappel. What happens if a new rappeller gets stuck? How are you going to rescue them? Hopefully you know how to rescue yourself if something gets sucked into your descending device, but does your friend that is rappelling for the first time know how to fix it? Or what if they are using a prusik and it gets stuck because they forgot to tend it on the way down? Or what if they freak out and/or go unconscious and cannot unstick their prusik? How are you going to perform a rescue?
Their are a couple of options for the cool-guy carrying extra gear. You could setup an additional rope and perform a pick off. Once they are transferred to your line you can continue your rappel to the bottom. Or you could build a mechanical advantage (MA) system and haul their entire system back up to the top of the rappel. Both of these options are good, but they are time, personnel and equipment intensive. Great for SAR when you have tons of gear and trained people but not so ideal when it’s you and your other friends who have no clue what’s going on. Let me suggest another way: contingency rigging.
Contingency Rigging
Contingency rigging provides you the ability to lower the entire system in the event of a problem or emergency. Instead of needing another rope for a pick off or MA system, you lower their system. And instead of waiting 5 or 10 minutes to build the pick off or MA system, you can lower within seconds. In my rappelling class we have performed rescues on students literally within seconds of an incident. Consider this: if you get your hair or glove stuck in your descending device, would you rather wait minutes or seconds to get rescued?
There are many different contingency rigs out there, but today I am going to discuss the two most minimalistic, quick and versatile of the systems that I know. There are two additional systems that require more gear that I can cover another time. One important thing to note from the start: like the retrievable rigging systems, it is essential that the rope being used to rappel is twice as long as the drop for the rappel. It is possible that a person could get stuck right at the top of the rappel and you would need to lower them the entire distance of the rappel.
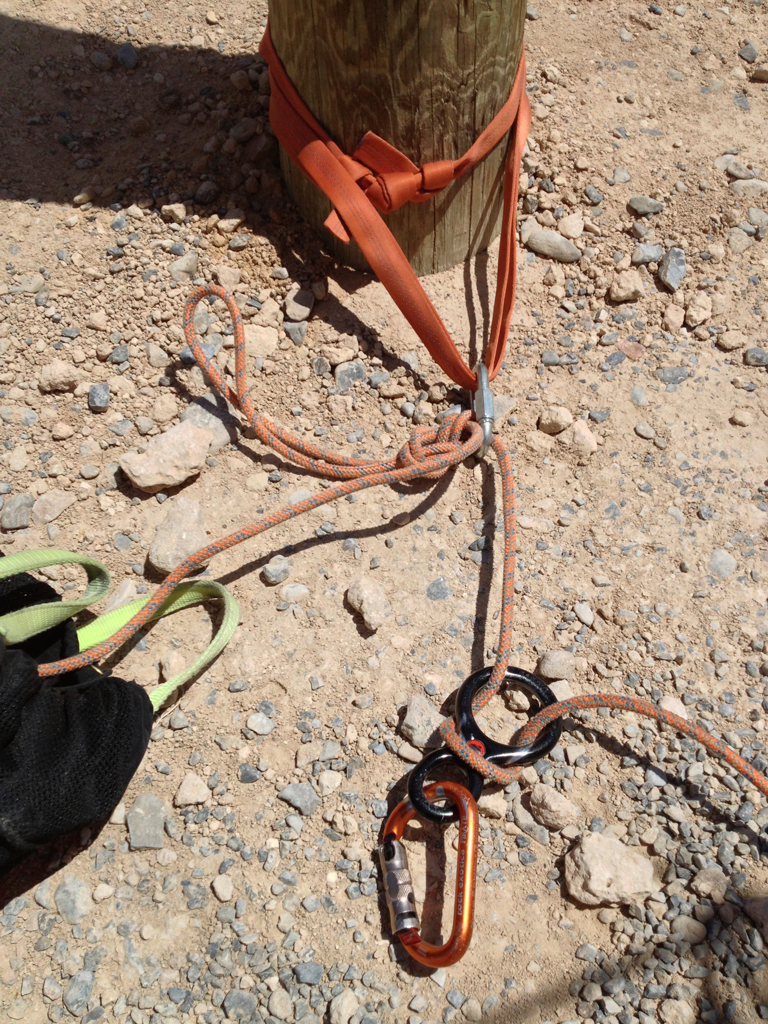
Tensionless
This first option is fast, requires nothing more than a rope and is just plain cool. This rig is also used on my SAR team for the first rescuer on scene whenever there is a good tree that can be used for an anchor. In fact, that is the only drawback to this system I can think of – it is only well suited for a tree or a pole, not for rocks or any artificial protection. However, a major bonus to this system is that there are no loaded knots in the system. Because knots inherently weaken the rope, with the tensionless you get the full strength of the rope in the system.
The tensionless is basically what you see in old cowboy westerns where the cowboy gets to the hitching post and simply wraps his reins around the post a couple of times. Believe it or not, that’s not just cowboys being lazy – it actually holds. To build the tensionless, you simply measure the rope to the ground and wrap the rope around a tree or pole a handful of times. You don’t need any webbing or carabiners or other anchor building materials. The number of wraps is dependent on the slickness of your rope and your tree or pole. On a normal, big tree I will usually do 4 wraps. If I were to use this on a 3″ diameter polished steel pole I might end up using more than 10.
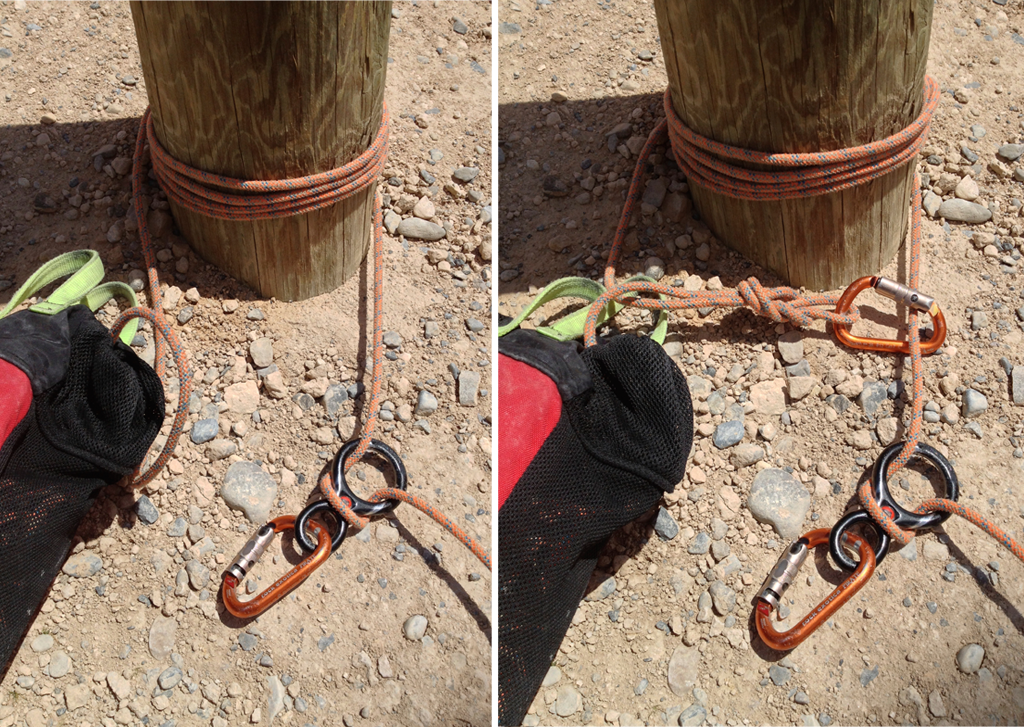
At this point the rigging is still considered an open system. Though I submit that a tensionless with an appropriate number of wraps for the pole will PROBABLY never slip, you can close the system by tying a knot on the standing end of the rope and clipping to the loaded side of the rigging. However, if the system is properly rigged, that knot should never be loaded. In order to perform a rescue lower, untie the knot and feed rope through the system. You will have to create slack in the first couple of wraps in order to get the system to lower.
One last note on the tensionless: if you are performing a lower on a tree, you will undoubtedly damage the bark of the tree and may risk killing the tree. Plus, moving over rough bark isn’t exactly great for the sheath of your rope. The tensionless shouldn’t be a replacement lower system – just use it in case of emergency and conserve the trees at your favorite rappelling area whenever possible. If you expect to do multiple rescues, you might consider placing a tarp under your wraps.
There is another very minimalistic contingency rigging system that you can use when you don’t have a nice healthy tree available for rigging that I’ll cover next.
Munter Mule
 The munter mule rigging is taught (so I’ve been told) by the Boy Scouts of America rappelling and climbing instructors for use at BSA events.
Though not as uber-minimalist as the tensionless, all you need is anchor building materials and an additional carabiner. You may already know the munter hitch as a good backup for when you drop your descending device down the cliff – it provides enough friction to be rappelled with or perform a lower.
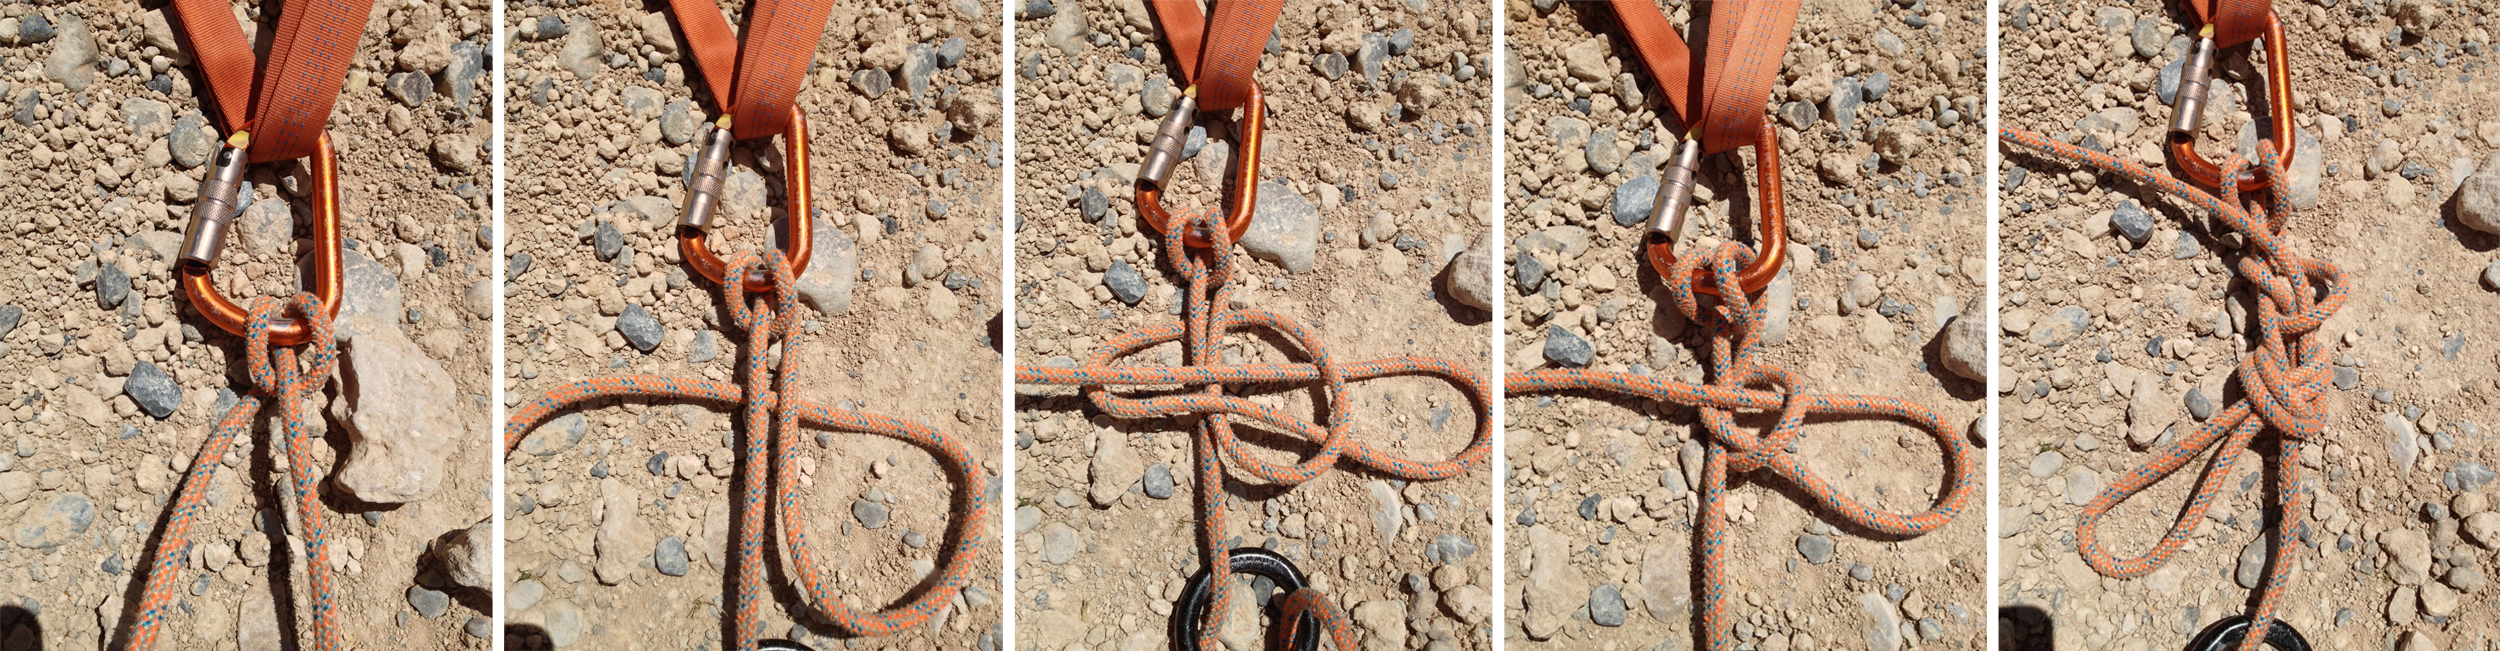
The mule knot ties off the munter hitch so that it will not slip and can be used for static rigging. The munter mule is perfect for contingency rigging because the mule knot can be easily untied under load so that you can lower the entire system using the munter hitch.
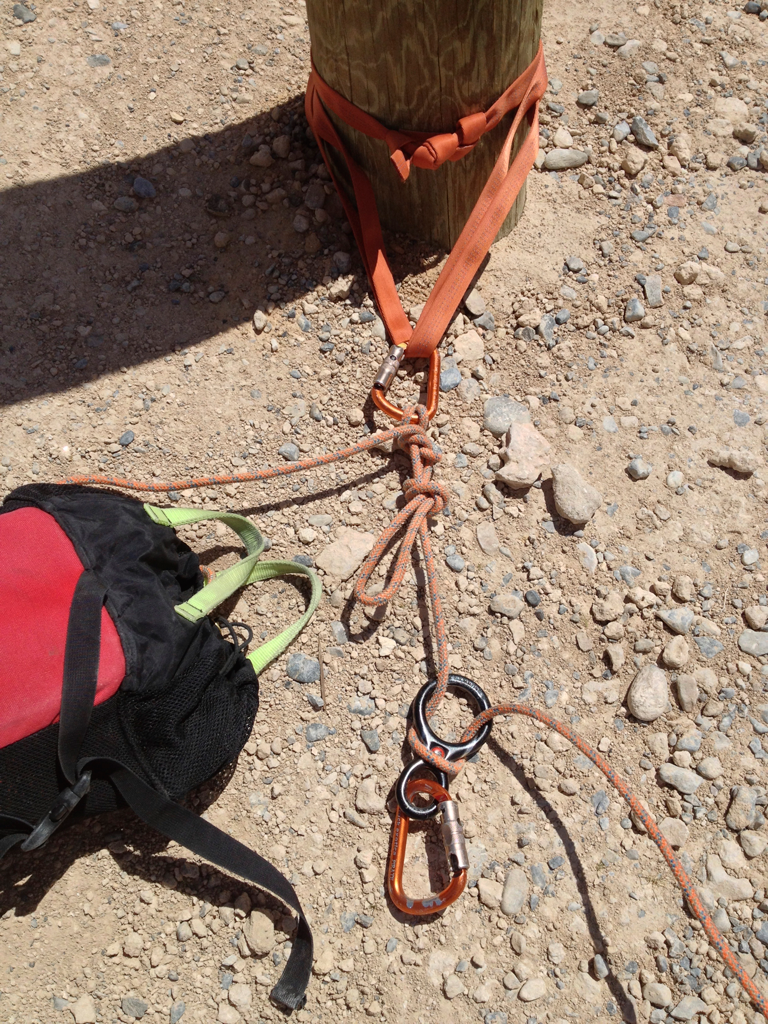
To use the munter mule rigging, you must first build or place an anchor. This can be webbing slung around a rock, bolts or rap ring, or a piece of artificial rock (or ice) protection.
Once you have measured your rope, clip a locking carabiner onto the anchor and tie the munter mule on the locking carabiner.
If you don’t consider an overhand or half-hitch backup a part of the munter mule knot itself (as some do), I recommend you tie a backup knot. Last, you can close the system by clipping a carabiner (even a non-locking carabiner) from the bight leftover from the backup knot to the line to be used for rappelling.
To lower with this system, unclip the carabiner, untie the backup knot and pull the standing end to untie the mule portion of the knot. At this point you can lower the entire system and subject to the ground.
This system is about as minimalistic as you can get if you have to build your own anchor. In fact, this requires the exact same amount of equipment as the figure-8 hasty rigging option. And once you’ve learned to tie it, it’s pretty quick to setup. There are other contingency rigs out there that require more equipment and provide additional benefits, but these are by far the most simple, minimalistic and efficient systems.
Use of Contingency Rigging
I want to finish by talking about the use of these systems and things to consider when rigging any rappel. First of all, you must remember that if you are rigging for contingency you have to have enough rope to perform a lower of the entire rappel distance. This means your rope must be a little bit more than twice as long as the rappel is tall. However, if you are performing a long rappel and have two ropes that are long enough for the rappel, you can make it work. You can do this by attaching the two ropes and placing the knot between the rigging and the rappeller. This way, if the system must be lowered, you don’t have to bother with passing the knot through your rigging.
Second, remember to protect the rope from any edge while performing your rappel. It will do you no good to break your rope because your lowered the rope over an abrasive edge without any form of protection. Even if the loweree survives, your operation is over. You should always be protecting your rope from the edge but it becomes even more essential if you are performing a lower. If you are not able to protect your edge you can also use contingency rigging to change the abrasion point between rappels.
Last, it’s not necessary that everyone in your group rappel with contingency rigging. I know canyoneers that use this rigging in canyons for everyone but the last person in the group. The last man at risk or LMAR (pronounced Lamar) should be a good enough rappeller that they can rappel on a retrievable system so you can get your rope and continue to the next rappel. It does take some effort to change a contingency rig over to a retrievable rig but if you are rappelling with inexperienced people, it’s probably worth it.
Conclusion
Though contingency rigging is probably not necessary in every circumstance, it’s a great tool for your toolkit. You should know how to rescue someone using mechanical advantage or a pickoff if you consider yourself proficient in the vertical environment. But if you’re anything like me, you will prefer this ounce of prevention whenever you can get it to the pounds of cure when it can be avoided.
Rappelling is inherently dangerous. The author, nor ITS Tactical, assumes any responsibility or liability for injury incurred by the reader. The information presented here is for educational purposes only. Always seek the instruction of a certified climbing or mountaineering guide.
Editor-in-Chief’s Note: Please welcome Nick Sealy as a contributor to ITS Tactical. Nick is a member of the Park County Search and Rescue Team as a Wilderness EMT and member of the Technical Rescue Team. His background includes alpine mountaineering in Colorado and Alaska, canyoneering, backpacking and mountain guiding. Nick currently instructs in technical rope work, firearms and wilderness medicine.
Discussion