


DIY Primer on How to Get Started Working with KYDEX
DIY Primer on How to Get Started Working with KYDEX
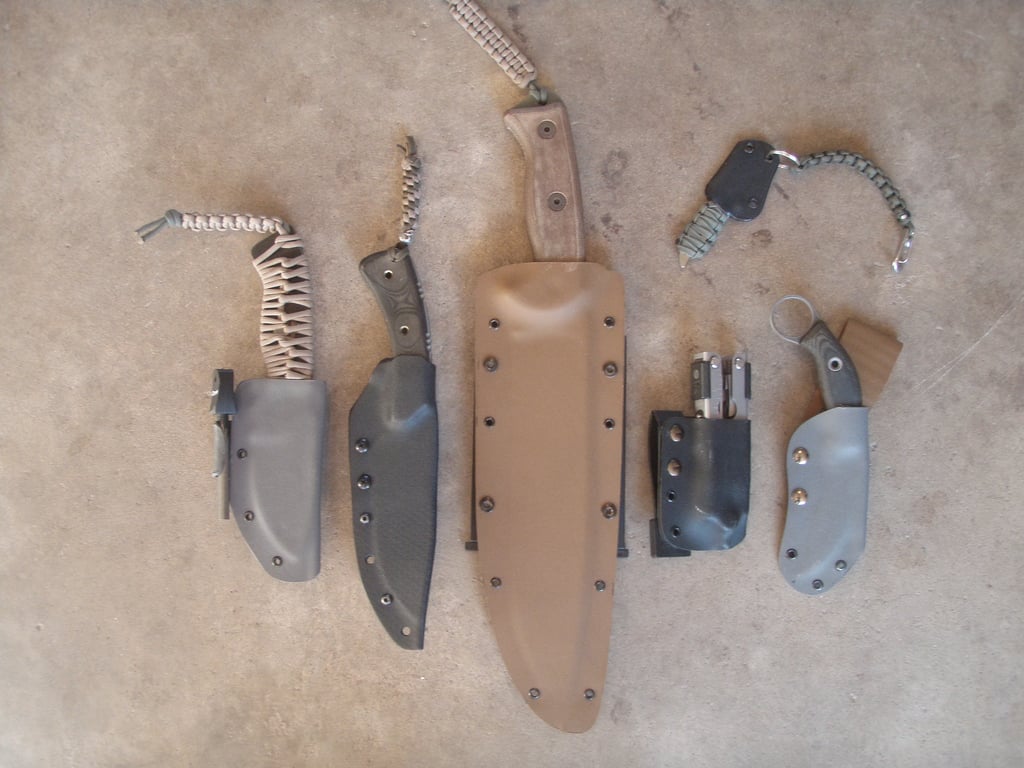
This is a short how to article for anyone interested in working with KYDEX. I’m sure most of the people here know of KYDEX and many of you probably own a KYDEX sheath or holster that was either sold with a blade or purchased for a hand gun.
My personal experience working with KYDEX is somewhat limited and there may be others here with more experience and knowledge on the subject, so feel free to add your thoughts.
DIY KYDEX
I had a few knives that I really liked but loathed the sheaths they were supplied with, so I decided to make my own from KYDEX. I went with it because it seemed to be a material I could work with easily. (no stitching required, I suck at that.) After some web searching I came across www.knifekits.com. They offer KYDEX in various colors and thicknesses. They also supply tools, instructional books and all the hardware needed to complete just about any KYDEX related DIY project.
For those interested in just making a sheath or two, there’s no need to purchase an expensive arbor press and other specialty tools, a lot of the work can be done with some tools that you probably already own.
Tools
 Here ‘s a list of tools that I used:
- Hammer
- Heat Gun
- Drill
- Hack Saw or Coping Saw, a band saw would be ideal
- Belt Sander
- Vice or other type of clamps that you can tighten down
- Two pieces of plywood, 12″ x 12″ square should be sufficient for most knife sheath projects
- Heat resistant gloves
- Rivet Eyelet Flaring Die
- Sheath making foam
The flaring dies and sheath making foam can be found at knifekits.com, but all other tools (and hardware below) can be found at a hardware store. Here are the materials you’ll need:
- KYDEX sheeting, different sizes and thicknesses are available
- Rivets – get the proper size for the KYDEX you intend to use
- Chicago screws
- Belt or web gear mounting hardware
How to Get Started
 First you will need to make the molding blocks that you will use to form the KYDEX around your knife. Simply glue the two pieces of sheath making foam to the two pieces of plywood, allow to dry and there you have it.
Now you need to decide if you want to make your sheath from two pieces of KYDEX (a front and back) or from one piece wrapped around the blade. Using one piece wrapped around the blade is the easiest way to go and it creates a more narrow, lower profile sheath. However, it leaves less material available for mounting hardware.
If it’s a large knife I would recommend using two pieces of KYDEX riveted together on each side of the blade to allow for more stable mounting options, but for medium and small knives one piece of KYDEX wrapped around the blade is sufficient.
Wrap-Around Style
 For the wrap around style of sheath first lay your knife flat on the KYDEX about one inch from the edge and roll the knife over once then add another inch, this will give you the proper width of KYDEX to fully wrap around the blade and should leave you with some extra “screw up” material. With a utility knife and straight edge (two tools that I forgot to mention above), score the KYDEX and snap it off.
Take your piece of KYDEX and lay it flat on a work bench. You should also have your Vice/C-Clamps and Foam Press within arms reach. Use your heat gun to heat the KYDEX until it becomes pliable. Hold the heat gun about four to six inches away from the KYDEX and fan it over the surface. If you pick up the KYDEX and it’s floppy, then it’s ready to mold.
When the KYDEX is sufficiently pliable, lay your knife on the surface with the spine of the blade in the center then fold the KYDEX over the blade.
Molding
 With the KYDEX still hot, sandwich the knife between the two foam molds and clamp the entire unit down tight. After about ten minutes you can remove the sheath from the mold. Check that the blade is secure but not overly difficult to remove from the sheath, remember that the sheath will tighten up when you add the rivets.
The next step is to drill the holes for the rivets and mounting hardware. Drill the holes far enough away from the edge of the blade so that when you add the rivets they will not pinch the cutting edge of your knife. You can now use a saw to remove the excess KYDEX and shape the sheath to your liking. I used a hack saw for this but a band saw would be ideal.
Now that the sheath is roughed out you can sand down the burs. For this I used a belt sander, it removes the burs and can be used for final shaping of the KYDEX. You may want to move to a higher grit paper to smooth off the edge, you can also buff the edge just by rubbing it on your jeans.
Rivets
 Adding the rivets and using the flaring die is pretty self explanatory just remember when setting the rivets one good tap with the hammer on the flaring die is better than a lot of little taps. There are several options for MOLLE or belt mounting hardware including making your own out of another piece of KYDEX, this is where the Chicago screws can come in handy.
For making a sheath by using two pieces of KYDEX the process is pretty much the same as above, you just need to be careful during the molding process because the two pieces will want to shift while you are clamping them together.
KYDEX is a forgiving material, should you have any screw ups during the molding process you can always reheat and try again. I hope this article is of some help to those who might be interested in making their own KYDEX sheaths.
Editor-in-Chief’s Note: Please join us in welcoming Justin Spindler as a contributing author on ITS Tactical! An avid outdoorsman, shooter, fly fisherman and fellow connoisseur of BOSS Coffee! Be sure to check out his great photos on Flickr!
[flickrset id=”72157625796975779″ thumbnail=”square” overlay=”true” size=”large”]
Discussion