


Cache is King: How to Store Weapons and Non-Electronic Equipment for the Long Term
Cache is King: How to Store Weapons and Non-Electronic Equipment for the Long Term
- Cache is King: Learn How to Plan and Create Your Own Survival Cache
- Cache is King: How to Store Weapons and Non-Electronic Equipment for the Long Term
- Cache is King: Why Caching Radio Equipment is a Top Priority
In the first part of this series on caches, I provided an overview of various kinds of caches and their purposes. The goal of this second part is to provide more detailed information about how to prepare a weapons cache for decades in long-term storage. I’ll also be providing suggestions for specific types of weapons and related technology. Electronics have unique storage requirements that merit a separate discussion and those will be addressed in a subsequent article on caches.
Caching lethal weapons and ammunition together is serious business. If possible, it’s always best to remove a part of the weapon necessary for it to fire and place that part in the spares container co-located with, but separate from the weapon. For an M4 carbine, the firing pin is a logical disabling item and the lack of it will render the weapon safe. It can be fired again only by disassembly, insertion of the missing firing pin in the bolt carrier, proper reassembly and loading of the weapon. These actions are beyond the capacity of most children and adults who aren’t experienced with weapons.
Considerations for Caching Weapons
Caching weapons and ammunition provides a secure place to store any surplus and if done correctly, is not only better for the weapon and ammunition, but more secure than any gun safe. Cached weapons and ammunition are hedges against future shortages, even in the face of state-sponsored confiscation. In particular, items cached for the latter purpose should be free of latent fingerprints and biological material that may lead to identification of the cache owner. It probably goes without saying, but caches with weapons shouldn’t contain anything that is database linked to the owner.
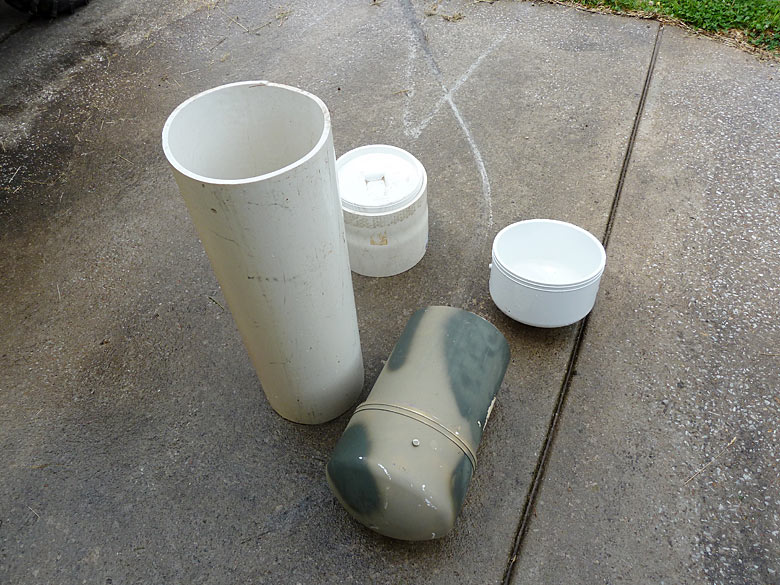
The highest ethical and moral obligation I can impart to anyone clandestinely caching weapons and ammunition is to ensure that the cache is secure from inadvertent discovery by children or adults. Various different cache containers were discussed in Part I and included PVC tubing, Monovault commercial cache tubes, which are offered in a variety of sizes and plastic buckets of the five to seven gallon variety with Gamma seal or regular snap lids.

Obviously there are many other containers suitable or even specific to unique items. Food properly canned in Ball or Mason jars, especially with reusable Tattler plastic lids and gaskets under partial vacuum seal are useful to store and preserve food.
Atmospheric pressure differential tightly seals the gasketed lid or ‘flat’ to the jar making the ring redundant after the seal is ‘set’. The combination of glass jar and plastic lid makes for a rust free, albeit fragile container, which is suitable for preserving a variety of materials (including small caliber ammunition) for long term storage.
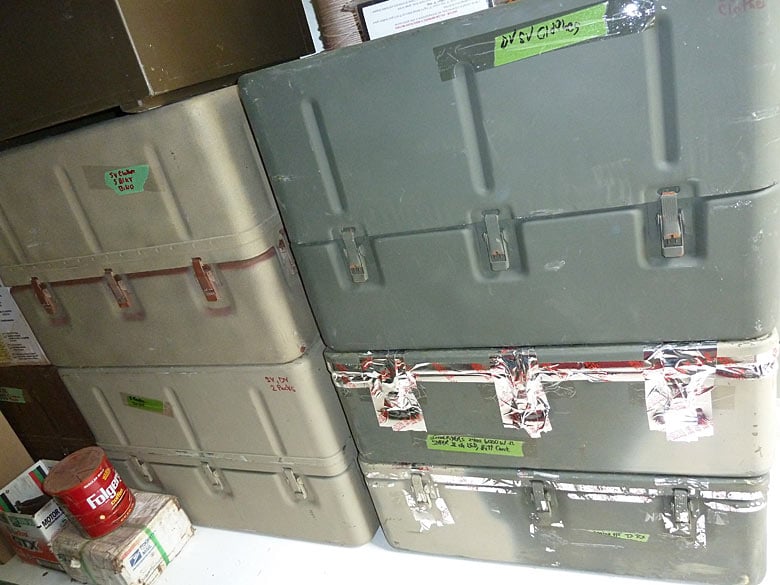
Larger containers such as aluminum US Military medical containers are useful for caching more bulky items. These medical containers are made of rust free aluminum with ammunition can like rubber seals and are watertight. They do, however, suffer the liability of having steel clasps that are guaranteed to rust. These larger metal containers also load easily in a trailer for quick evacuation.
Although the focus of this article will be on PVC and Monovault commercial cache containers, there are a plethora of special use containers suitable and perhaps even specific for special purpose caches.
Understanding Materials and Rust
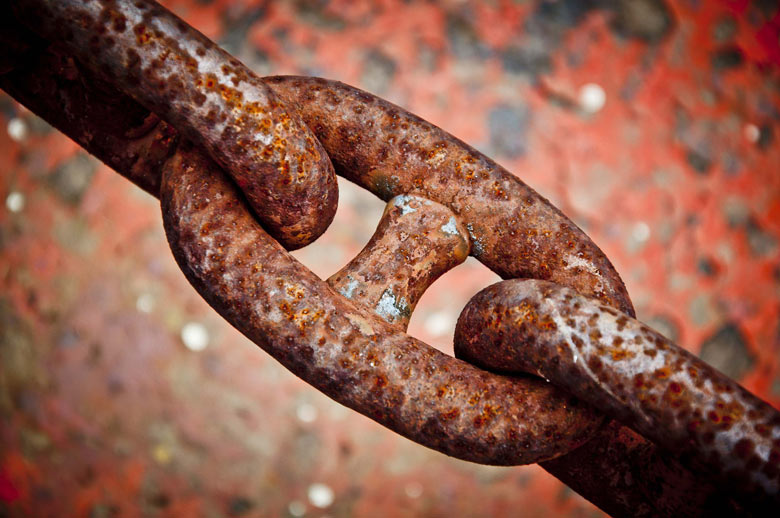
Most modern firearms, including those advertised as being made of stainless steel, usually contain small parts (like springs) that aren’t composed of stainless and given the presence of oxygen and moisture, will corrode or rust over time. In fact, even stainless steel will rust given the proper environment.
Machinists have long recognized that some people leave a body moisture that’s particularly corrosive and these people are usually referred to as “rusters.” In most locales, the atmosphere has sufficient water content that will eventually rust many unprotected metals. For these reasons, most people carefully clean and wipe the surface of their weapons with an oily rag to remove fingerprints and leave a film of oil that serves as a moisture barrier.
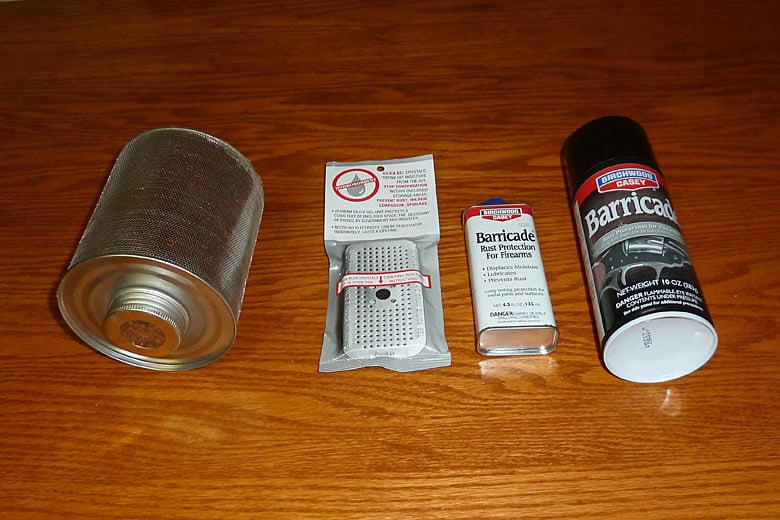
Those familiar with weapons understand that WD-40 isn’t a gun oil and it’s recommended that weapons being cached be treated with a high quality preservative lubricant such as Birchwood Casey’s Barricade. Some advocate filling the bore with grease, however it’s my opinion that in a properly prepared cache, this practice is redundant at best. If grease is used in the barrel bore, the weapon should be appropriately tagged against the possibility of a future firing without first removing all traces of grease.
Well designed weapon caches will include, at minimum, a kit of small user replaceable parts, cleaning supplies, ammunition, additional magazines, holster or sling, weapon maintenance multi-tool with telescopic sight mount wrenches, a chest rig and/or ruck with water bladder as appropriate, fixed blade knife and a folding bag in which to carry everything away from the cache.
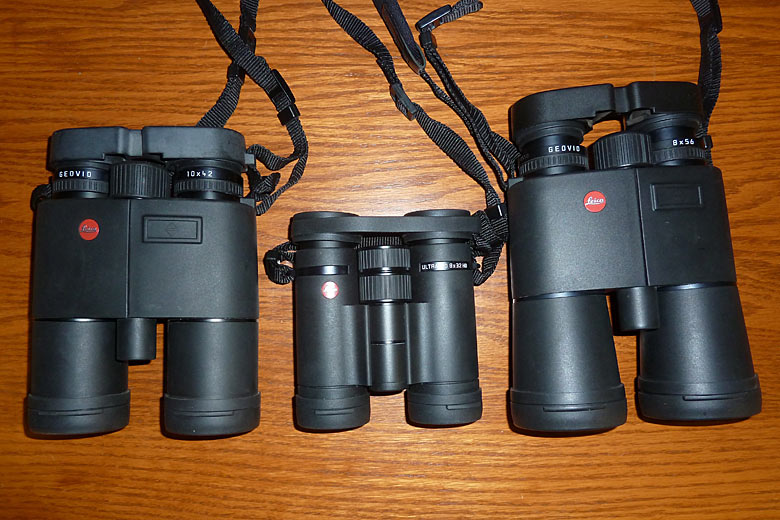
Other related items might include high quality binoculars such as any by Leica, which are available with range finding options, a first rate water filter such as the Katadyn Pocket Filter, maps or charts of the area of operation, a best quality compass such as the Brunton Pocket Transit and several methods of starting a fire.
Location, Location, Location

Particular attention must be paid to where the weapon cache is hidden. In part one, I mentioned a shallow weapons cache buried on the author’s land, with the express purpose of providing ready access to the tools necessary to retake the residence by force if necessary. Further away from the residence in public or national forest property for instance, other weapon and ammunition caches could be buried more deeply so as to help defeat metal detectors.
There are several other countermeasures you can take against inadvertent discovery, including salting the area with bits of metal such as old welding rod stubs, junk bolts and nuts or by transplanting thorny bushes to the cache area. In particular, look for non-food bearing thorny plants and go to great lengths to secrete the cache where it will be protected from the casual passerby due to the presence of these plants. A game camera is useful for observing any traffic in a proposed cache location.
In addition, the cache should not be located in an utility right-of-way. Future digging in a right-of-way for repair or increased service capacity should be expected and such excavation poses a direct threat to a cache. The same holds true for road right-of-ways and even unimproved public dirt roads will have right-of-ways located some distance from either side of the road itself.
Properly Preparing Weapons
So what should be done to preserve weapons and other equipment from rust and damage when placed in long term storage? The weapon should be zeroed at a known range and sighting data should be recorded. The weapon is then disassembled and all parts are carefully cleaned. The bolt face and/or revolver cylinder face should be scrubbed until all traces of carbon are removed. A 1/4″ diameter brass rod with one end flattened into a screwdriver shape is useful to scrape away carbon. Brass is a soft metal and won’t scratch harder weapon metals.
Then, the barrel bore is cleaned until it’s bright and shiny, lightly oiled and then set aside for a day. The following day, the bore is re-cleaned until no trace of carbon and/or fouling is detected; then the weapon can be coated with preservative. The remaining parts are carefully inspected, cleaned and coated with a preservative and the weapon is reassembled, leaving out a part or parts necessary to fire ammunition.
I generally wear linen gloves of the type favored by document examiners, rare and forensic, when cleaning and handling a weapon or its parts. This practice ensures no latent fingerprints will be left on the weapon that might cause rust and future owner/handler/shooter identification, should a third party discover the cache.
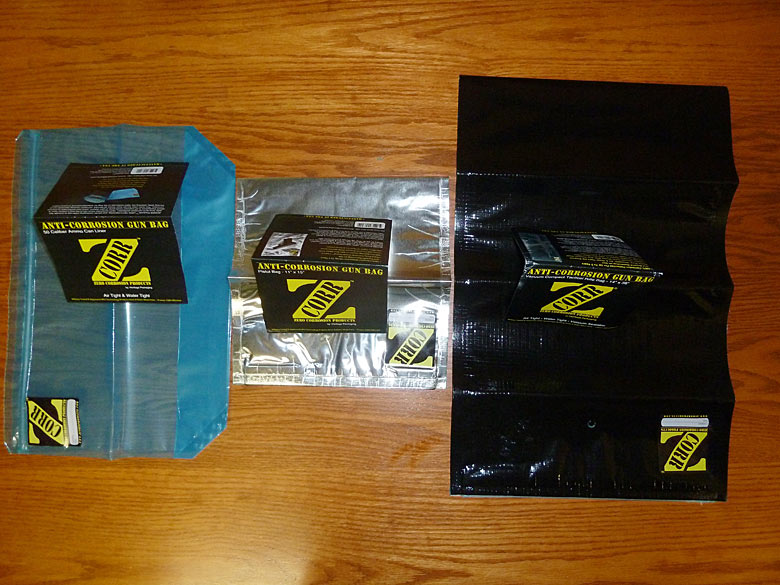
After the weapon is verified unloaded and with muzzle pointed in a safe direction, the trigger is pulled, releasing tension on the springs. For Mauser type bolt-action rifles, pull the trigger while closing the bolt. The weapon zero information is then recorded on a tag tied to the trigger guard and the weapon is placed in a Z Corr bag and set aside. Each magazine should be completely disassembled, cleaned, oiled with Barricade and placed in the bag.
An aluminum tin containing dried desiccant should be added to the protective bag and sealed. If a Z Corr vacuum bag is used, remove the air in the bag with a vacuum cleaner following manufacturer instructions. The zip lock seal on the vacuum bag is robust and may require a set of pliers for mechanical advantage when sealing.
The weapon and magazines (and telescopic sight if used) are now stored in their own protective environment with minimal moisture. This style bag should also serve to protect its contents from inadvertent water intrusion into the cache due to mechanical breach or seal failure.
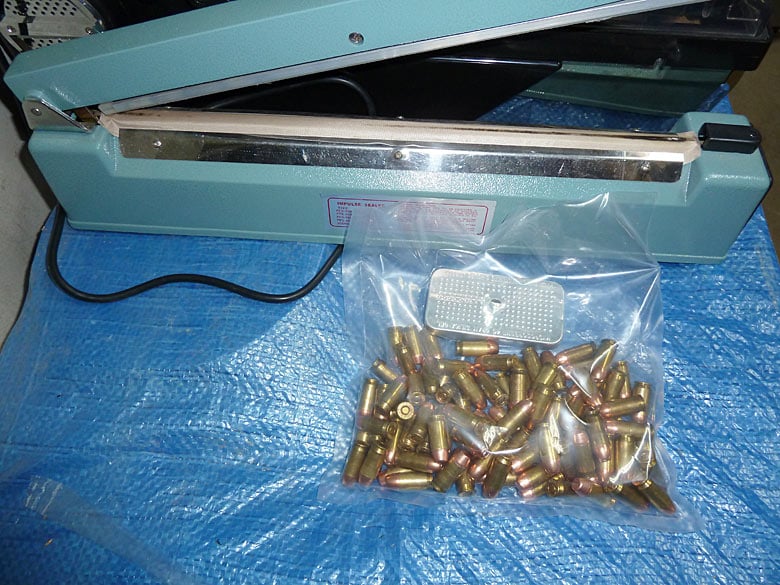
Wearing document examiner gloves, carefully examine and wipe every round of ammunition and place inside an appropriately sized heavy gauge plastic bag. A tin of desiccant should be added to the bag before it’s impulse sealed. Repeat this process with subsequent lots of ammunition until all of the ammunition intended for the cache is bagged and sealed.
While you may be tempted to use a cheaper container (paper or cloth) of desiccant, remember that the purpose of the desiccant is to absorb moisture and by so doing, it will eventually wet the packaging material. If that material is in contact with metal or your ammunition, it may cause corrosion.
The higher quality aluminum desiccant containers won’t rust and the moist desiccant is contained within the can safely away from the preserved items. The last two items added to the cache should be a large container of desiccant and a bag or ruck with which to transport the cache contents.
Sealing Your Container
To seal a Monovault cache, spread a coating of grease or silicon lube on the o-ring and place it in the groove around the lid. Screw the lid into the container using moderate force. Grease the inner circumference of the protective cap and place it over the lid. Wipe away any grease that may have squeezed out from under the cap.
Where the joint of the protective cap meets the vault body, wrap with several turns of high quality plastic electrician’s tape then overlay this tape with Gorilla tape. Wear appropriate gloves when handling the cache tube and particularly when taping as biological materials and latent fingerprints are easily transferred to adhesive tape.
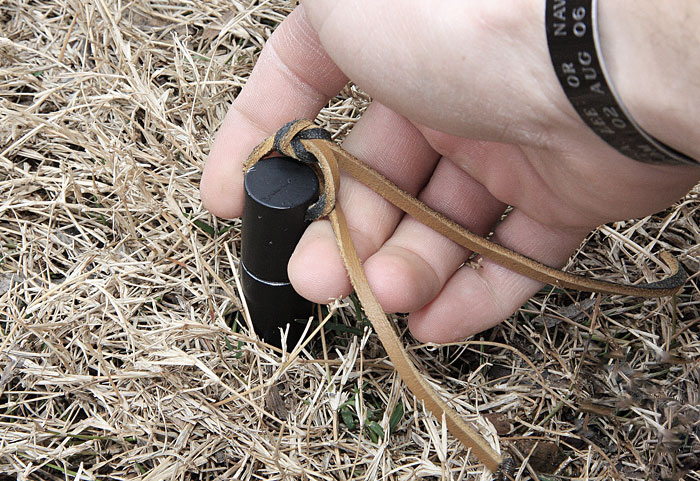
Tie a six-foot length of polypropylene rope (highly resistant to water) to the circumferential notch just below the protective cap and wrap the remainder into the notch; tucking in the last wrap under the previous preventing it from unwinding. The purpose of this rope is to aid in recovery of the cache tube by tying a loop in the free end and placing it over a Hi-Lift jack tongue. The cache tube is now ready for clandestine burial.
Jogging Your Memory

The biggest threat to successful recovery of the long term cache isn’t inadvertent discovery by a third party, but simply forgetting where the cache was emplaced. Read that part again for emphasis.
Take a photo of the completed cache that’s ready to be covered. Take another photo from further away. Note at least three bearings from the cache to geologically and temporally invariant objects. If trees or large immovable rocks are in the area, measure the distance from the cache to at least three of these objects. If necessary, these distances and bearings can be easily encoded by doubling or transposition, but whatever mechanism is used, it should be unforgettable.
Reference trees can be notched on the side away from the cache and witness rocks can be marked with cold chisel. Be sure to photograph all reference objects from the cache. Plan a logical approach to the cache and shoot a bearing line along this approach. Photograph this approach both from the cache and from a logical point along the approach. Describe the cache location in writing along with each reference point and witness mark.
Draw a map of the relationship of the cache to references and witness marks. Your goal is to provide such a clear description of the cache location that an heir you’ve never met could locate it decades later. Transcribe the written description of the cache and its contents to an electronic document and drop in all photos, identifying each. Carefully recreate the hand drawn map of the cache on this reference sheet.
Revisit the cache seasonally and take photographs as appropriate. Incorporate these subsequent photographs into the cache description. An example of this can be seen in this PDF file. Laminating these cache location descriptors will keep them waterproof and aid their long life in the cache recovery tube.
If several caches are all located in a general area, you might wish to prepare a cache of recovery tools and equipment. These might include a short sharpshooter shovel, hand trowel, nylon tape measure, compass, gloves, a small tarp and copies of the relevant cache descriptive documents. This cache should be especially well hidden with the location indelibly marked in the mind as it holds the key to recovery of all other caches.
Accessing Things Within a Cache

Deeply buried cache tubes designed for access through the upper end present unique challenges during recovery, especially if the cache is to be accessed and then resealed and left in place. Imagine a situation where the top end of the cache is two feet below the surface. If the cache tube is four feet long, the bottom of the cache will be six feet deep, rendering any loose small items in the bottom of the cache almost unrecoverable.
In many instances, these small items store best in a temperature equilibrium at the bottom of the cache tube (ammunition for example). A bag containing these small items with parachute cord tied to the hand grip of the bag and the other end to an item near the top of the tube is a most helpful aid to retrieve any small items and pre-packaged impulse sealed plastic bags of ammunition, which can be heavy.
Providing a yard or so of extra cordage per bag, loosely tie the free ends to the Z Corr long weapon bag in the area of the weapon pistol or hand grip and weapon body, just tight enough that it won’t slip down. Leaving extra cordage between the bag and weapon allows you to use the long weapon as an aid to pull up the small bags from the bottom of the tube. Alternatively, the free ends of the cord can be tied to a cleaning rod at the top of the cache.
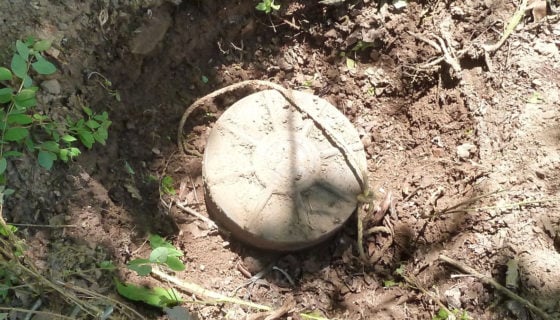
During recovery of a Monovault cache, dig a 1.5 foot diameter hole, exposing the top end of the tube to a depth of about one foot below the top. If the cache tube is co-located near a thorny bush as recommended, a canvas tarp can provide protection from thorns. Dirt and debris entering an opened vertical cache tube is almost impossible to remove without removing the tube itself from the ground.
Digging a larger diameter access hole deeper than necessary is quite useful, as any debris knocked free during recovery will slide to the bottom of this deep hole and not into the bottom of the cache tube. A hole larger than the cache tube is also helpful when resealing the tube’s protective top with tape..
The Problems with Plastics

Plastic pipe presents unique challenges for caching. Over the decades, I’ve tried several methods including threaded end plugs, one end plug sealed only with grease, one end plug seated without sealer and RTV placed around the cap/PVC tube to seal against water and cementing both end caps to the tube.
When using two end caps and large diameter PVC tubing, sealing the second cap can be difficult. This is because as the cap seats on the PVC pipe, the volume inside the tube decreases which creates a high pressure that tends to force the cap off of the pipe. When sealing a cache with two caps, always use the slowest hardening agent possible in order to provide adequate time to seat the second cap.
The most waterproof and strongest PVC tube cache will have two cemented end caps. Unfortunately, recovery of items from inside the cache will likely involve a saw and at best, the PVC tube will require a new cap or union and hence will be either shorter or longer than it was initially.
However, PVC tubing caches are almost optimal for storing ammunition either loose or in US Military ammunition cans. The larger diameters will accept these ammunition cans that alone provide a great measure of protection and permit easy segregation by caliber. Whenever using a hermetically sealed cache, the contents should always be protected by desiccant.
The cut tube in the photo at the beginning of the article will easily hold 2,000 loose rounds of .223 Remington (similar to 5.56×45 Nato) and the larger uncapped tube will hold more than 5,000 loose rounds with both including a large can of desiccant. When two end caps are cemented onto a tube, a PVC tubing hand saw or similar will be necessary to access the contents.
Using Nitrogen
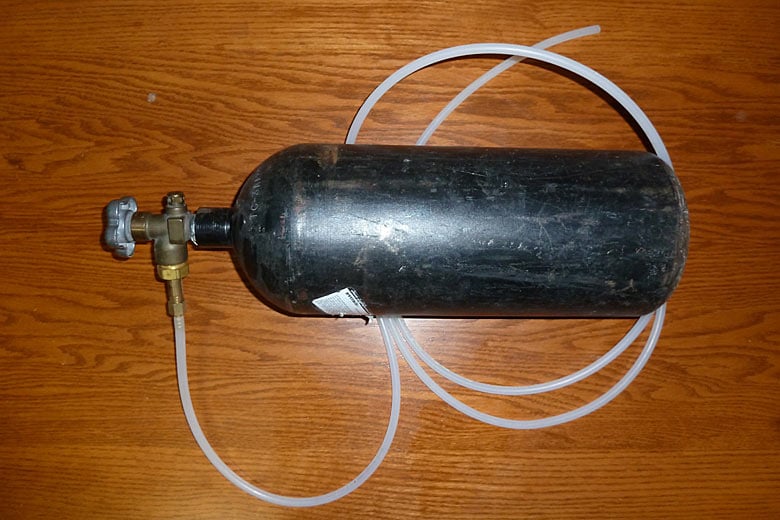
Cache tubes can be backfilled with nitrogen for the very best in long term preservation. Nitrogen in pressurized bottles is available from welding supply dealers, along with threaded valve adapters and hose barbs. Nitrogen is an inert gas and will neither support combustion nor corrosion. However, it should never be used in enclosed or confined spaces, as it can cause asphyxiation by displacement of oxygen.
To backfill the cache tube with nitrogen, place the content-filled tube upright with the hose from the nitrogen bottle near the bottom of the tube. Open the valve on the bottle slightly until the hiss from releasing nitrogen is heard. Place a cover loosely on the open tube end so there’s only a little space around the hose. After a moment, hold a lit flame near the opening around the tube. When the fire extinguishes, the nitrogen has displaced almost all of the oxygen in the tube. Turn off the nitrogen bottle valve, remove the hose and promptly seal the cache tube. Desiccant should always be used in hermetically sealed caches, even when backfilled with nitrogen.
PVC Considerations
Threaded PVC end caps avoid the pressure seating issue when sealing, however those caps are uniformly thinner and weaker than the PVC tubing. This thinness greatly reduces the mechanical integrity of the cache. If a threaded cap is used on one end of the tube, it should be well greased before screwing into its adapter sleeve that’s cemented onto the PVC tube and the square wrench device should be turned inward for protection.
The outside adapter/cap interface should be coated by RTV or something similar as an additional barrier to water intrusion. Large diameter PVC tubing can be quite heavy, even when empty, so care should be taken not to rest the tube vertically on a cap not completely threaded into the adapter. When buried vertically, the threaded cap should be upright. Layer sand or sifted dirt on top of the cap for a depth of several inches.
This protects the thin cap from rocks. Additionally, a flat rock just larger than the diameter of the cache tube can be placed on top of the sand layer as a protection against hooves, etc.
Eight to twelve inch diameter PVC tubing is quite strong and unlike the Monovault, can be buried horizontally. Horizontal burial will help protect any threaded caps. Cut a piece of hardwood into a 2″ square section. This will fit into the square recess in the threaded end cap as an aid for tightening and removing. A one foot diameter PVC cache that’s four feet long will likely require several strong men to maneuver, as the cache and contents may weigh more than 300 pounds. For this reason alone, you should seriously consider the much lighter Monovault cache.
Equipment Suggestions
Like many of you, I’ve developed preferences for some brands and types of equipment. Having traveled this world depending upon only what I could carry with little or no hope of resupply, I eventually accumulated the very best quality and most dependable types of portable technology. Caching, which is the very act of preparing against future uncertainty and lack of availability, should include securing and preserving equipment that offers great dependability, long life and maximum utility.
Some of the items I specifically recommended for their characteristics described above, especially when it comes to caching, include:
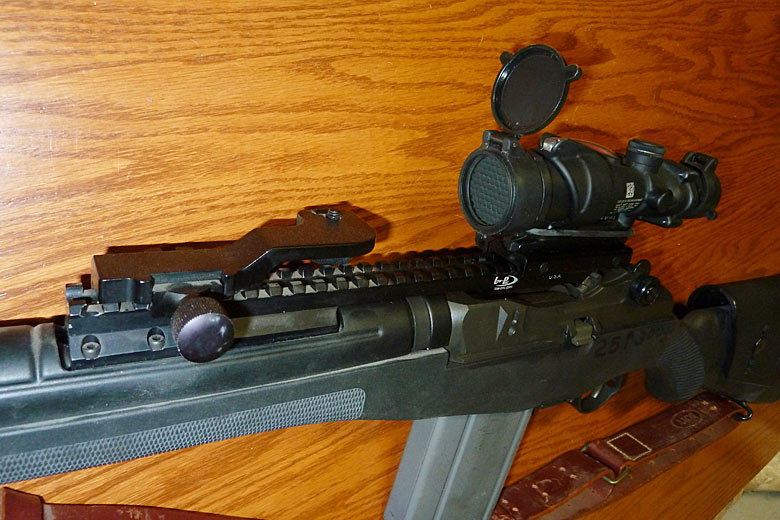
M14/M1A Main Battle Rifle, Equipped with Leupold Telescopic Sight and Kill Flash Device.
Leupold tactical telescopic sights are among the best, especially when combined with their well designed accessories. These accessories include silent magnetic aluminum lens covers and in the recent past, a Plano (no magnification) lens, both clear and tinted for the very best in eye and objective lens protection. These have been discontinued but are still available in some places.
Both Leupold and Tenebraex make a great quality screw-on reticular objective lens obscurator, often called a kill flash device. A kill flash largely eliminates perceived muzzle flash (from the shooter’s perspective) while at the same time hiding specular reflection from the objective lens (sun reflection) from third party observers. Anyone shooting at night understands the effect of muzzle flash on night vision, so equipping all tactical telescopic sights with a kill flash device is essential. There are plenty of stories of would be snipers given away by the reflection of the sun from their telescopic sight, binoculars or spotting scope.
M4 Carbine or M1A SOCOM, Equipped with Dual Illuminated Trijicon ACOG.
Either rifle is well equipped with a dual illuminated Trijicon ACOG. Decay of radioactive tritium illuminates the Trijicon dual illuminated ACOG, as well as their handgun sights, so no batteries are required. The front post sight on the Springfield M1A (M14 action) SOCOM is illuminated by the same radioactive tritium.
Springfield Operator, Kimber, SIG P220 or P226 or Any of the Glocks.
Pistols should be equipped with Trijicon sights. Appropriate holsters should also be included in the cache.
Hearing Protection.
If the cached weapon(s) aren’t suppressed, then high quality hearing protection should also be included in the cache. This hearing protection should be both headset and earplug type, the latter being the most easily transportable. If eyeglasses are worn, then certainly a set of prescription eyeglasses (along with the prescription) should be included in the weapon cache.
Extra Magazines for Rifle and Pistol in a Chest Rig.
All ammunition for these magazine should be stored with desiccant sealed in plastic bags.
Cleaning Equipment, Spare Parts and Any Needed Maintenance Tools, like the Leatherman MUT.
Binoculars and Eye Protection.
If prescription eye protection is needed, Liberty Sports work great and if not, Revision Goggles are great.
Fire Starting Tools.
These include a magnifying lens, ferrocerium or magnesium rod fire starter and waterproof container of life boat matches.
Navigation Tools.
A good quality compass along with maps and/or charts of the area of operation.
Conclusion
Remember that caching weapons and ammunition is serious business. Extreme care should be taken to preclude such a cache from falling into the hands of a third party. Adults and children untrained in handling weapons may reasonably be expected to come to great accidental grief when discovering cached weapons. That burden will attach to the cache owner. Always deactivate cached weapons by removing a critical part. This action alone will reduce the potential for great grief and agony.
Editor-in-Chief’s Note: Steve V. retired from a tri-letter US Government organization and has been elected to the bench. He’s flown ski planes onto glaciers high in the Swiss Alps and landed in the grassy meadows on cliffs near La Dame Blanch; hunted lion and other dangerous game in the hot plains of equatorial East Africa, stag in Scotland and bear in the Aleutians. He’s peered into a cradle of mankind at Olduvai Gorge in the Great Rift Valley, danced with Maasai and walked with curiosity throughout much of the world.


Discussion