


Backcountry Emergencies: Why Wound Cleaning is One of the Most Important Skills to Know
Backcountry Emergencies: Why Wound Cleaning is One of the Most Important Skills to Know
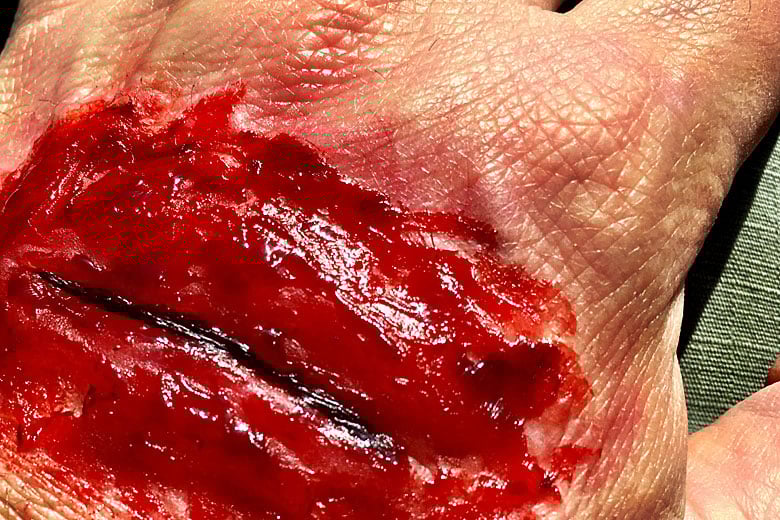
Imagine you’re three days into a six-day hiking trip on the Yukon River. You’re taking some time out from hiking to explore the river and maybe try your hand at some fishing. As you approach the bank, you slip in some soft mud and fall to the ground. You throw your hand out and catch yourself on a large piece of flint, cutting your palm open to the fascia, before sliding into the organically rich mud.
Your buddy is a few dozen yards away and gets to you quickly. He immediately wipes away some of the gooey mud and you’re able to see some of the damage, including some of the white/silvery connective tissue. While you’re sitting there watching the blood well up, you begin to anticipate the inevitable pain. In addition, you’re immediately concerned about the contamination of the wound, given that you just noticed a pile of moose droppings right next to the rock that cut you.
However, you have an ITS First Aid Kit™, which you were smart enough to buy specifically for this trip. You pull it out of your pack and crack it open for the first time.
What Kind of Wound is it?
All external wounds share one common trait, they all damage your skin. Your skin is a very important organ, as it helps manage thermoregulation (as in helps manage your body temperature) and it provides a protective barrier to keep bad stuff out and good stuff in. When you injure it, you impede its function.
With respect to physical wounds, we can categorize them three main ways: low risk, high risk and functional or cosmetic risk.
“Low risk” refers to a simple wound and one that we’ve all had at some point. Ever gotten scratched by a thorn? Scuffed your knee? Cut yourself shaving? If you didn’t penetrate deep enough to see fascia or connective tissue then it was low risk.
A “high risk” wound is one that penetrates to the fascia (or beyond). Simple as that. In addition, I’m willing to bet everyone reading this article has also experienced a high-risk wound. Have you ever received a vaccination or had blood drawn for any reason? Guess what? That needle penetrated the fascia and you lived to tell about it.
Functional and/or cosmetic wounds are a little more subjective. These are injuries that will impair the function of the location (beyond the function that the skin performs), or will result in unacceptable scar formation.
Our wound, from the example in the first paragraph, can be safely considered to be high risk, with a potential for functional risk. It would only be cosmetic if you were a hand model or something.
Impalements
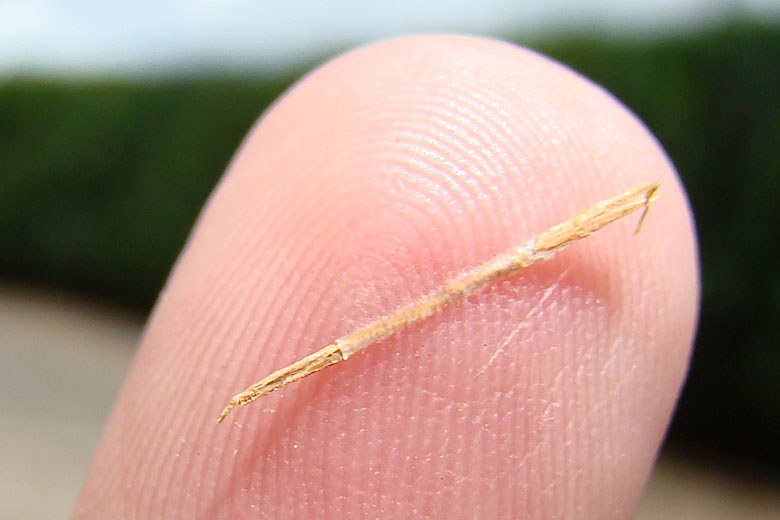
Okay, let’s kill a sacred cow. Raise your hand if you’ve ever heard that you should not remove an impalement. M’kay. Now raise your hand if you’ve ever had a splinter, fish hook or cactus spine in your skin. Did you remove that on your own and go about your business? Most likely; those are impalements. The apocalypse didn’t happen because you removed them on your own.
There are very few instances in which you really want bright lights and cold steel (also known as a hospital) for help with impalements. Examples would be if the globe of the eye is impaled or if the impalement is in (or very near) a large blood vessel of some type. (Has anyone seen John Wick 2, yet?) Other examples would be if you encounter significant resistance when trying to remove it (e.g a knobby branch is hooking on ligaments), or when the patient is complaining of pain way out of proportion to the injury. For anything else, go ahead and remove it.
Wound Healing
Since we’ve already established that everyone reading this article has been wounded at some point, we can conclude that you survived the event, despite whatever severity that wound had.
So what happened to that wound? I’m assuming it healed. Healing is a pretty straightforward process. Starting from the time of injury, your body immediately engages a whole series of actions to repair the breach. Anyone that’s reading this has experienced this process.
First the bleeding vessels clot. Then, within a couple of hours, the body sends construction materials to form a framework for new tissues, as well as materials to build those tissues. Defensive cells are sent to combat foreign invaders. After a period of time (a few days), the wound is sealed and a scar forms. Depending on your individual body and scarring process, that scar may eventually disappear. This is the process in a normal healthy human. There are a number of factors that can delay healing (e.g. smoking, hypothermia, diabetes, etc).
If we’re going to clean a wound, we really want to do it as rapidly as possible after the bleeding has been controlled, as we don’t want to interfere with the body starting the repair process. We also want to do it before infection can take hold, which can happen in the first couple of hours.
Infection
So, Tom, what is the big deal? I’ve survived all manner of wounds, including a high-risk needle stab as a defenseless baby. The big deal is infection. That needle was sterile. The area around the injection site was cleaned and after it was completed, the injury site was bandaged and dressed to prevent further contamination. Furthermore, your parent was instructed to monitor the site for redness, swelling and drainage. Remember this, you’ll see those components again.
The concern is when the wound is created in circumstances that are less than ideal and the contamination is greater than your body can combat. The purpose of cleaning is to mechanically assist the body with removing as much foreign material as possible, so it has to do less work fighting off foreign organisms.
Everyone gets a small “infection” with every wound. The local area gets a little red, maybe a little warm with some swelling and may be a little sore. You may even see a little bit of pus. That’s entirely fine, normal and natural. It’s not fine, however, when the patient develops a “systemic” infection. Meaning that the patient’s system is affected, not just the local area.
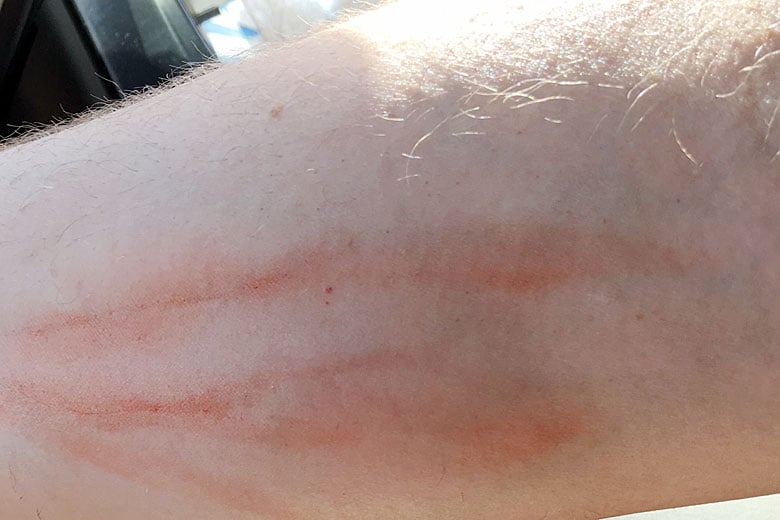
A systemic infection can present as a fever, feeling sick or with the presence of red streaking emanating from the wound (otherwise known as lymphangitis; “blood poisoning”). This is a life-threatening condition and it can kill your patient. We really want to avoid this.
The size of the wound isn’t a guarantee on whether or not a patient will develop this kind of infection. Larger wounds have larger potential though, simply due to greater possible contamination.
Cleaning
Cleaning is actually pretty simple. Most of you have probably done a pretty decent job with your own wounds, but I want to give you some steps to increase your success, especially in austere conditions.
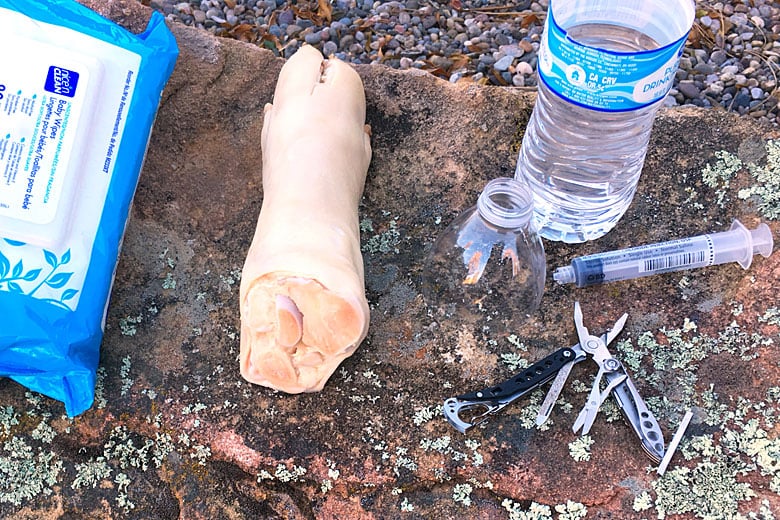
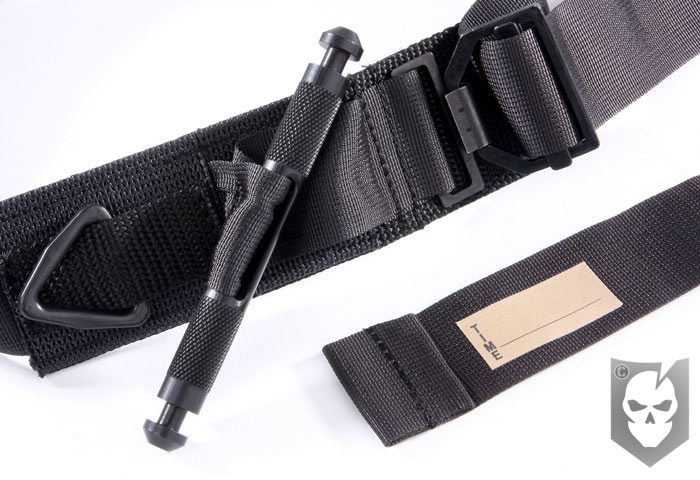
First, the items you need:
- Leatherman Style PS. Which is TSA Friendly.
- Gloves. If it’s wet and not yours, you shouldn’t touch it.
- Container for water. You do carry water, right? I carry bottled water in cheap lightweight bottles.
- Steri-Strips.
- Gauze. A few 4x4s and a few 2x2s.
- Tape. Duct or sports or medical.
- Optional: Baby wipes.
- Optional: Soft Bristled Toothbrush.
- Optional: Tweezers. Good ones. I like the kind with an angled tip.
- Optional: Tissue Forceps.
- Optional: Hemostats. Curved or straight.
- Optional: Magnifying Glass (or a fresnel lens like the one found in the ITS Mini Survival Kit)
- Optional: Iodine.
- Optional: Plastic wrap.
All of the above (non-optional) can fit in a pretty small kit and I wonder if there are any companies that could put together such a kit…
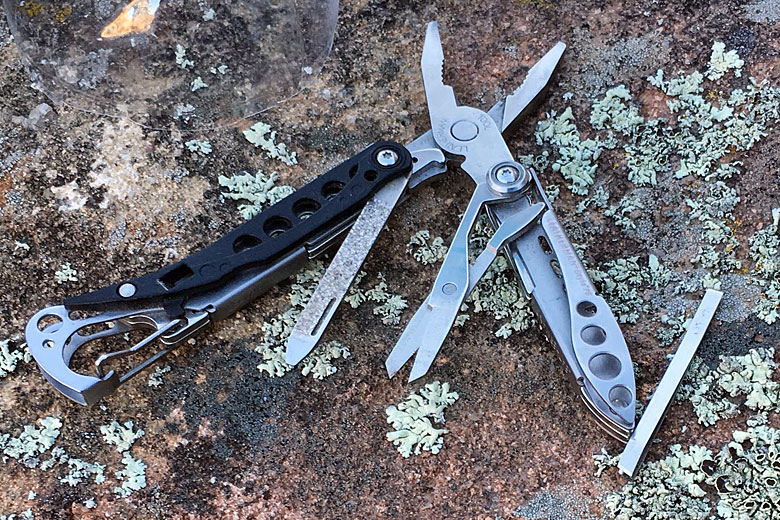
I like the Leatherman Style PS because I can travel with it anywhere because it has no knife (and I can generally buy a workable blade anywhere I go). It has tweezers, small pliers, a flat screwdriver and scissors; everything you need (though you can certainly supplement with optional items). Gloves should be obvious.
You also need copious amounts of “clean drinking water”. No, you don’t need sterile saline water or any other nonsense. If you don’t have access to a lot of water, you can use a weak iodine solution. Lots of people will throw out percent solutions. Just go with a “weak tea” coloration. I promise it will be fine.
The reason I like lightweight bottles is because they’re easy to cut the top off of (and you don’t feel bad about it). This gives you a container for holding the water used to irrigate and allows you to use the top as a splash shield.
Get your work area set up. Try and keep the area as clean as possible, but remember, you’re not making a sterile field. Have easy access to your water source. Here are the steps:
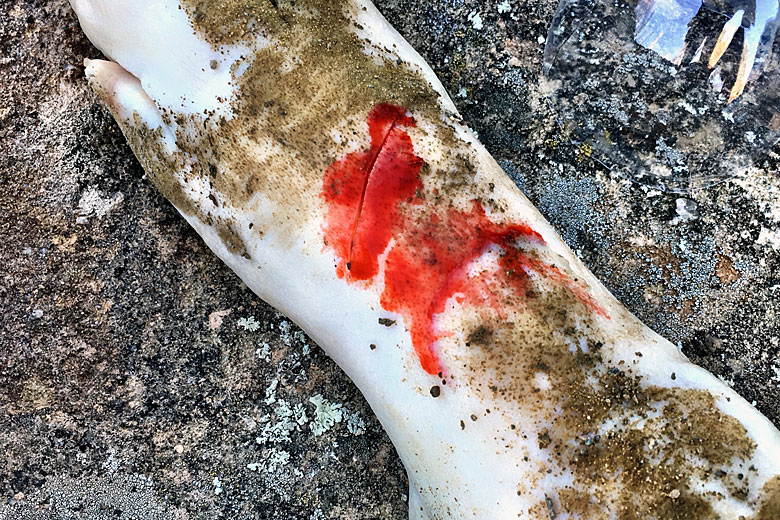
Step 1: Clean the whole area around the wound; as big an area as you can get away with. Baby wipes are great here. I always keep some in my pack for other hygiene purposes. For the above hand, I would clean the whole hand at least up to the wrist. What you are looking to do is to clean away any potential sources of contamination. There’s not much worse than spending time cleaning the wound (and subjecting your patient to significant discomfort) only to find you got grunge from their body right back in the wound.
Step 2: Expose the wound and pick out any large pieces of debris, including any impalements that meet the above criteria.
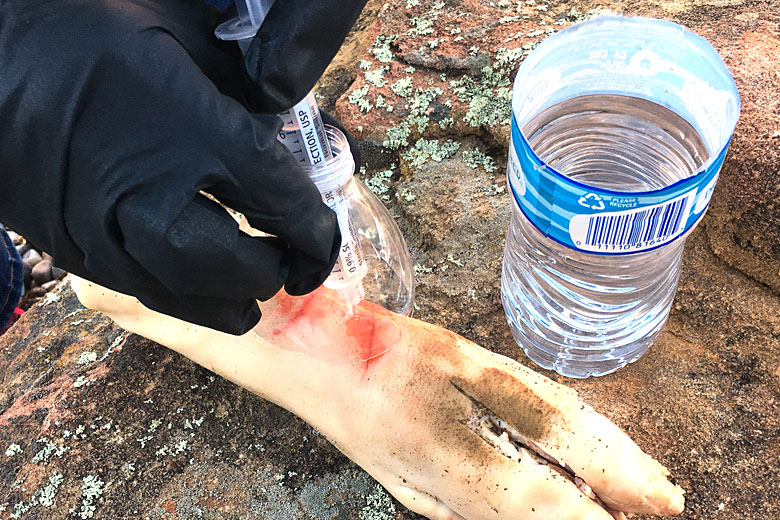
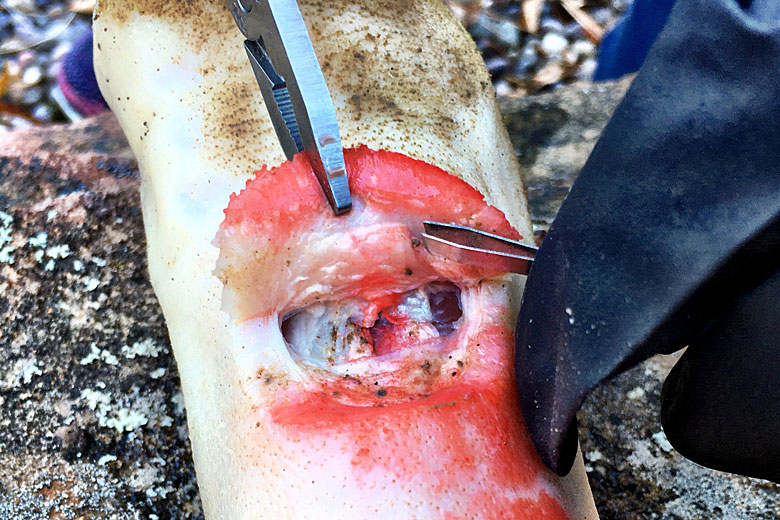
Step 3: Rinse the wound with pressure, using the syringe. Fill it with water and use it to pressure spray the wound out. Aim the stream away from you (and the patient if possible). Use the top of a water bottle as a spray shield if you want. You will likely need the pliers/forceps/etc to hold the wound open while you do this. If you have a toothbrush, you may need to gently scrub the insides to loosen up bits embedded in the fascia. You’re going to use a lot of water.
Step 4: Pick out any new debris you’ve loosened or freed up.
Repeat 3 and 4 until you cannot see any more contamination. This is where the magnifying lens is helpful. Your goal is to remove anything that would be a potential “hotel” for bacteria. These could be as small as a grain of salt.
Cleaning a wound outside of a nice clean hospital can take 20-30 minutes to do correctly. This process will also be very uncomfortable for both you and your patient. If the wound is big enough (or contaminated enough) hopefully they’ll pass out. Hopefully, you won’t pass out.
Protection
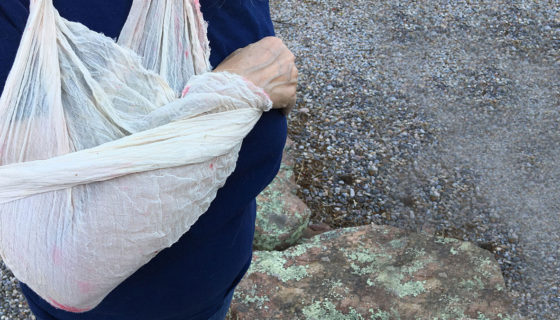
Obviously, after cleaning the wound, you need to take steps to prevent further contamination otherwise you’d need to just start the whole process over again. There are two main concepts you need to understand with respect to wound protection, bandaging and dressing.
- A “dressing” is a protective cover that seals the wound.
- A “bandage” is a support for the dressing (and may also protect the dressing).
I’d like to go ahead a preempt the whole suture conversation (this includes staples). The answer is “NO.” A suture is nothing more than a semi-permanent, durable dressing. It’s not some mystical Tier One skill, but it does have a specific time and place.
It’s generally a bad idea (as in potentially lethal, or disfiguring) unless you can both guarantee you’ve done a perfect job of cleaning the wound and have the training to suture effectively. Plus you’re actually creating new wounds with each needle poke or staple point. Suturing is well outside the scope of this article.
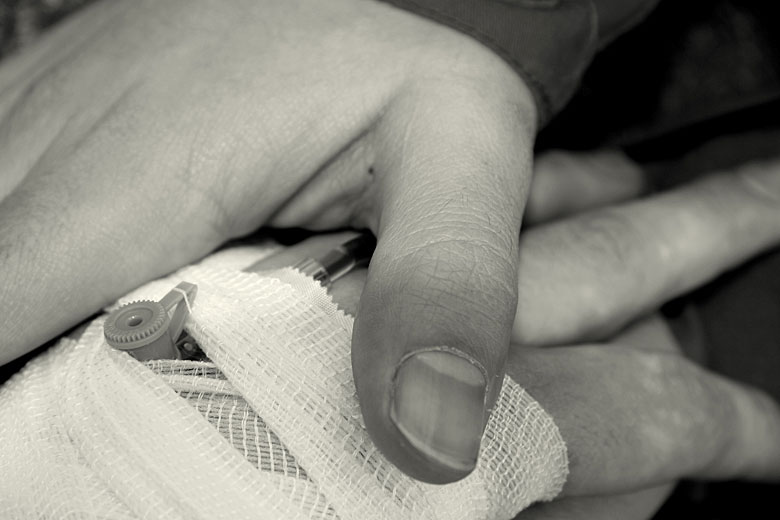
There’s no hard and fast rule for dressing a wound and everyone develops their own technique. Following is an example of dressing the wound from the example in the introduction; other wounds are going to have slightly different requirements. Follow these steps to close the wound with Steri-Strips:
- Dry the area around the cleaned wound.
- Approximate the edges of the wound (which is fancy medical speak for “try and realign the edges”).
- Tape it with the Steri-Strips.
It can be helpful to anchor the tape on one side and then gently pull the tissue, with the tape, toward the matching edge. That way, you’re not pinching and pulling too much tension (which can create issues with swelling and wound healing later). With wounds, like the one on the hand, you need to be cognizant of the way in which the tissues naturally pull and stretch with movement and make sure you don’t create a situation where the person is going to accidentally defeat your dressing with simple movements. Avulsions and abrasions won’t fit the above technique because of the way the wound presents.
After the wound is “closed” then you should “bandage” it and add an absorptive layer to soak up any fluids that will leak from the wound. For the hand, in the example, I would fold over some 4×4 gauze pads and overlap the wound by at least one-half to three-quarters of an inch on the sides. To secure the pad, I would wrap the whole hand with plastic wrap (much like doing a boxer’s wrap).
The reason I like plastic wrap is it allows me to see if the gauze is getting saturated. It’s also thin, reusable and it’s really hard to put too much pressure with it (like with an ACE wrap). Also, if you need some non-chemical pain control you can apply ice/snow/cold water/etc. to the area with good conduction.
Conclusion
Wound cleaning isn’t a skill you want to do in the backcountry for the first time. I’d recommend going to your local butcher and getting a couple of pig’s feet and practicing. If you don’t have access to pig’s feet, you can try skin-on, bone-in chicken. Take your “patient” and roll them in the dirt. Start easy and then work into really messy problems.
Remember our goal, we’re ultimately trying to prevent a massive infection from taking hold of our patient and we attempt that by aggressive wound cleaning. You still need to monitor your patient and consider immediate evacuation if they show signs of a systemic infection.
If the wound results in a cosmetic or functional risk, I would try and get the patient out as soon as possible and to a hospital that has a plastic surgeon.
There are obviously a ton of “what if’s” and different wounds we can discuss, so let’s do that in comments (I could have easily tripled the size of this post).
Editor-in-Chief’s Note: Tom Rader is a former Navy Corpsman that spent some time bumbling around the deserts of Iraq with a Marine Recon unit, kicking in tent flaps and harassing sheep. Prior to that he was a paramedic somewhere in DFW, also doing some Executive Protection work between shifts. Now that those exciting days are behind him, he has embraced his inner “Warrior Hippie” and assaults 14er in his sandals and beard, or engages in rucking adventure challenges while consuming craft beer. To fund these adventures, he writes medical software and builds websites and mobile apps. He hopes that his posts will help you find solid gear that will survive whatever you can throw at it–he is known (in certain circles) for his curse…ahem, ability…to find the breaking point of anything.

Discussion