


Diving: Minimize Your Failure Points
Diving: Minimize Your Failure Points
Whether you are recreation diving, combat diving, technical diving, or just goofing around in the pool, there are some things to keep in mind.
In all of my years of diving, I didn’t hear the words “tighten up your rig” until I started tech diving. I spent a lot of time diving off of cattle boats, but looking back, I wish someone had mentioned what I am about to cover just a little bit sooner.
I want to give you some pointers and lay out the benefits of the pony/bailout bottle as well as a review of some “safe second” devices. This article is going to be very informative for those that have not been around a diving community much. We have some ground to cover, so I’ll jump right in.
Controversy
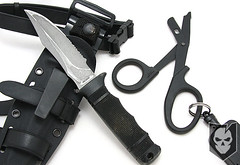 There is often the controversy of “shears vs. knives” in the diving world. People tend to get very heated bout the subject, as with nearly anything in diving. For some reason or another, people believe there is only one right way to dive, and similar to dog trainers, there way is best.
I’m not going to instruct you on how your dives should be completed, but instead I will present you with the facts and my personal opinions, allowing you to draw your own conclusions. So, instead of fighting over knives and scissors, which is a remedy for potential bad situation, why not take some preventative measures instead?
Pressure
Your standard SCUBA diving 1st stage regulator consists of (generally) 1-2 high pressure ports, and 2-4 low pressure ports. High pressure ports support the much higher pressure of the cylinder to display your remaining air supply on your pressure gauge.
Low pressure ports supply your 2nd stage equipment with a much lower, intermediate working pressure (around 130 psi/9 bar). Your second stage equipment consists (again, generally) of 2 working regulators (one primary, one secondary) and your inflator for your BC (Buoyancy Compensator).
Some diving in the colder waters will generally have an extra hose for the inflator on their drysuits, but if you don’t know about this, you probably don’t need to yet.
Snags
So now we have all of these hoses running every which way, and they are very good at getting snagged on things. Trust me, your 2nd stage regulators pop off of their hoses with little more than a gentle tug underwater. I feel certain most of divers reading this article have seen the guy with his octopus and his pressure gauge hanging freely from his gear. Most of the time, these hoses drag the ground and do a great job of destroying the coral reefs. This is more than just obnoxious, this is flat out dangerous. How can a rubber hose be dangerous?
Let’s put this same “hose dragger” on a wreck dive for a minute. He and his buddy decide to go inside. Being the irresponsible divers that they are, one of them whacks the yoke of his regulator really hard on the overhead ceiling. The regulator pops off, damaged, and the diver loses his air. So he grabs his buddy to let him know he is in trouble. But he can’t find his octopus. I don’t have to go into detail, and I am sure you have formulated your own “well I would…” by now. Hopefully you wouldn’t dive with this person in the first place.
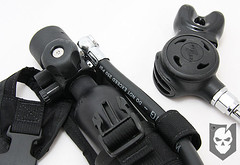
Tighten up your rig
 With that behind us, let’s move on to tightening up your rig. In tech diving the instructors like to go over your gear very thoroughly with you before you even consider getting in the pool. The first thing I was taught about assembling my rig was to turn my first stage regulators on their side, and allow the hoses to head straight down the length of the tanks.
Most always you will see rental gear, and regular open water divers that have hoses spanning out to either side of their bodies. In my humble opinion, this makes you look like you are from another planet, and is absolutely ridiculous.
Following the steps below will get your hoses out of the space around you, and into your gear so that you will be streamlined and much safer in the water. Keep in mind that this is not to “DIR” standards and is not to be used as a reference to tech diving. This is a reference for recreational SCUBA ONLY.
- Begin by removing all hoses and plugs (those things with the hex key openings) from your first stage regulator.
- Turn the regulator so that it will allow the hoses to travel downward, as if they are to be run right alongside your tank.
- Now plug the holes on the top of the regulator. The idea here is to (again) get your hoses running down your rig, and not up or out.
- Begin attaching the hoses one by one, loosely, so that they sort of cradle your body instead of fanning out.
- Attach clips, snaps, or bungees to your octo and gauge console. Be careful not to clip anything across your body as this could prevent a quick escape from your gear if necessary.
- Ensure you don’t try to shorten the length of your hoses by tucking them under the 1st stage regulator, you want as much length as possible for a diver in an out-of-air scenario.
- Avoid any extreme bends or creases in your hoses as you begin to set everything in place. When the rig becomes pressurized, creases can rupture, or (most likely) the fit will change compared to what you had planned as the air straightens the hoses.
If you are diving a pony or a bailout bottle, it may be ok to remove one regulator from your dive setup as your entire system has become redundant. An extra inflator hose is a good idea for the overly cautious, but you can always inflate your BC manually underwater with little effort.
Pony/Bailout Bottle
 A growing trend in SCUBA is the bailout bottle. This is a bottle ranging in size from 3-40 cubic feet. I don’t know what this translates to in the metric system, but maybe half a liter to something like 5 liters. Anyway, these bottles are carried in a number of ways.
The smallest bottles are usually put into a custom bag with a hook and loop closure on top and then strapped to the leg. The medium sized bottles can be tucked underneath the dive wing or bladder. The larger ones are either mounted on the side of the primary tank, or hung off of the front of the diver like a stage bottle.
Editor’s note: A HEED Bottle (Helicopter Emergency Egress Device) is shown on the right and is commonly used for helicopter water emergencies, but has found its way into service as a bailout bottle in SCUBA/Combat Diving applications.
The use of a pony bottle or a bailout bottle provides a very large safety cushion for the diver, but also poses a new set of obstacles. In most cases, the bottles have to be offset with counter weight. The diver must take several things into account like the negative weight of the bottle in the water, the weight of the regulator, how far is the bottle from your center of gravity, and so forth. Most ponies are of aluminum construction and tend to get positively buoyant as they are drained, so counter weight must be readily moveable to prevent instability.
On the flip side of hassling with weight, there is the added safety as mentioned before. When diving with “doubles,” you are required to dive with a completely independent regulator on each tank. Each regulator consists of a 2nd stage regulator, an inflator hose, and a pressure gauge.
The primary tanks can be isolated from one another in the event of a catastrophic failure by closing the manifold. There is no need for a backup 2nd stage regulator on either side since you have two complete breathing systems. This is the same concept with the pony bottle. It’s there for emergencies like a system failure or an accidental deco hit.
Safe Second
If you’re not one to add another bottle to your array of gear, you can always add an integrated regulator/inflator to your BC. I don’t recommend these for technical diving, but again, you are welcome to do as you wish. The point of this device is to basically streamline your gear by removing a hose that would be used for your back up regulator.
It’s also a great piece of equipment for that diver who can’t get his stray hoses under control since you won’t have to flail about while you look for your other octo so your buddy doesn’t drown. You simply pull your primary reg. out of your mouth and pass it off to your buddy, and grab your inflator system to begin breathing.
I don’t personally use one of these devices on my technical rig because they often require special hoses, and carrying extra bottles in an emergency situation makes operating your inflator cumbersome. I do, however, use one on my other BC that I use for diving warm water reefs and shallower wrecks. This sort of thing simply boils down to preference.
Notes
There is nothing dangerous about this equipment, so don’t let divers scare you out of what’s comfortable for you, regardless of experience level. Remember, you’re the one that has to dive your rig, so don’t let someone else decide what’s best for you. Take your time, get it right, and have fun.
There is a little running joke amongst our dive circle that says “Divers and dog trainers are just alike. The only thing they can agree on is that everyone else is wrong.” It doesn’t take long to see that everyone has their own flavor of diving and gear. You must have your own style as well. Remember to check out Intro to Diving if you are a little confused about getting into diving.

Discussion