Field Testing the Gerber Cable Dawg
Field Testing the Gerber Cable Dawg
I recently had the opportunity to take the Gerber Cable Dawg on a multi-week exercise and put it to the test in the field. The Dawg is one of the most well thought out tools I’ve come across, specifically targeting the communication specialists out there.
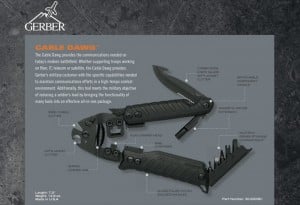
In one tool they’ve combined a cable cutter, knife, CAT5 jacket cutter, wire stripper, RJ45 crimper, and an interchangeable magnetic driver for your flat, Phillips, and even punch-downs.
My team’s multi-week experience with the tool included creating custom-length Ethernet cables, punching down wires, snipping the ends off of zip ties, opening up boxes full of network gear, etc. Essentially, we used the tool for all the real-world things one would expect from someone setting up comms gear in the field. Our goal was to install a series of IP-based cameras and other sensors, along with the supporting comms gear, bringing everything back into a small Network Operating Center (NOC) at a Forward Operating Base (FOB).
Gerber Cable Dawg
[flickr id=”6090745120″ thumbnail=”small” overlay=”false” size=”medium” group=”” align=”right”] The feature that I came to love the most on the Gerber Cable Dawg was the removable handle on the side with the magnetic driver extension. It truly felt like a screwdriver handle compared to the awkward feel of most thick multi-tools. Likewise, by allowing the handle to slide off, the knife felt like a pocketknife when you used it. Punching down wires was also easy to manage when the handle was detached.
The dimensions of the tool are correct for the tasks it was designed to accomplish. It has a length of 7.5 inches, and a weight of 14 oz. In contrast, the SOG multi-tool that I typically carry has a weight of 9.3 oz., an open length of 7.125 inches, and a closed length of 4.675 inches. Since the multi-tool closes down to a compact size, it fits nicely on your belt, where it was intended to be stored.
The Dawg comes with a suitable MOLLE compatible sheath, but it definitely was not intended to be stored in your belt. In reality, this isn’t a detractor from the tool because one isn’t likely to go out on patrol with the Dawg; it was designed for use at the FOB inside the fence line. It fits nicely into one of the leg cargo pockets if you really want it with you at all times.
Thoughts from the Field
 Gerber’s claim that the tool “reduces the soldier’s load by bringing the functionality of many tools into an effective all-in-one package” is spot-on. The engineering forethought that went into this tool is absolutely brilliant. However, it is only a first generation implementation, and in my opinion there is much room for improvement with the tool.
Let’s discuss wire stripping first. Getting the jacket off of CAT5 cable is the first step, regardless if your goal is to crimp a plastic connector on the end or punch down the colored pairs. Stripping with the Dawg was challenging, and we ended up nicking a lot of wires before we would get clean strips.
[flickr id=”6090201389″ thumbnail=”small” overlay=”false” size=”medium” group=”” align=”right”] In fairness, we were transitioning from the no-brainer Irwin Vise-Grip self-adjusting wire stripper ($24.99), a tool that makes wire stripping so simple that a one-armed grandmother could do it. As time went on, we did find ourselves becoming more proficient with the Dawg’s stripper. The key point here is that you should expect to nick some wires before you learn the right touch with the Dawg. If you’re short on supplies, best to stick with what you are most comfortable with.
After stripping the wire, we either were crimping on connectors, or punching down the wires into a wall jack. Let’s discuss the crimping first. We consistently had trouble with the RJ45 crimper not fully engaging the copper conductors into each strand of wire. Using our trusty Klein Tools Scout Pro Tester Kit ($77.99, and a must have), we routinely had wires that weren’t fully engaged, e.g. 3 and 4 would be flashing open. We would reach back to our trusty Klein Tools Ratcheting Modular Crimper ($29.95) to finish the job–one squeeze, re-test, and all the wires were then fully engaged.
The best we could tell, the wire stripper grooves were preventing the crimper head from engaging to the level required to fully set the wires in the connector. We even tried crimping with the driver extension and the driver storage compartment opened, as we speculated that maybe they were hitting on the inside of the handles, preventing the full crimp action. The tolerances were off by maybe a millimeter or two–something that Gerber should be able to easily correct.
[flickr id=”6090745062″ thumbnail=”small” overlay=”false” size=”medium” group=”” align=”right”] We were able to overcome the nicks from wire stripping through practice and repetition, but we had no such luck with the 110 punch down extension point.
Try as we might, we could punch the wire down, but we couldn’t get the excess wire to cut off, usually accomplished by rocking the punch down tip side to side.
[flickr id=”6090201341″ thumbnail=”small” overlay=”false” size=”medium” group=”” align=”right”] The best way to understand why we could only dent, and not cut, the excess wire is to compare two different 110 tips. Here is a picture comparing the 110 tip from the Gardner Bender Punch Down Tool ($22.98, left) and the tip from the Dawg (right).
Notice the sharp difference (pun intended) between the GB tip on the left and the dull and short Dawg tip on the right. In this zoomed-in image, you can see how the Dawg would only dent the wire, not actually cut the wire through. Once again the Dawg kind of worked.
While most retail web sites are selling the tool for around $300, I would expect demand the tool perform as good as the $20 to $30 tools I could buy individually at Amazon.com.
Consider this:
| Klein Tools Ratcheting Modular Crimper |
$29.95 |
| Irwin Vise-Grip Self-Adjusting Wire Stripper |
$24.99 |
| Gardner Bender Punch Down Tool |
$22.98 |
|
Grand Total: |
$77.92 |
Notes
If you concur with the notion that the Gerber Cable Dawg is best suited for use at the FOB and typically not taken out on patrol, walking around with three tools that just work makes more sense having one tool that kind of works. Perhaps the bigger point is that three tools that just work cost nearly $225 less than the single tool that kind of works.
I remain extremely optimistic that Gerber’s next iteration of the Cable Dawg will improve, but as for the first generation, my recommendation is to save your money and stick with three tools that just work.


Discussion