
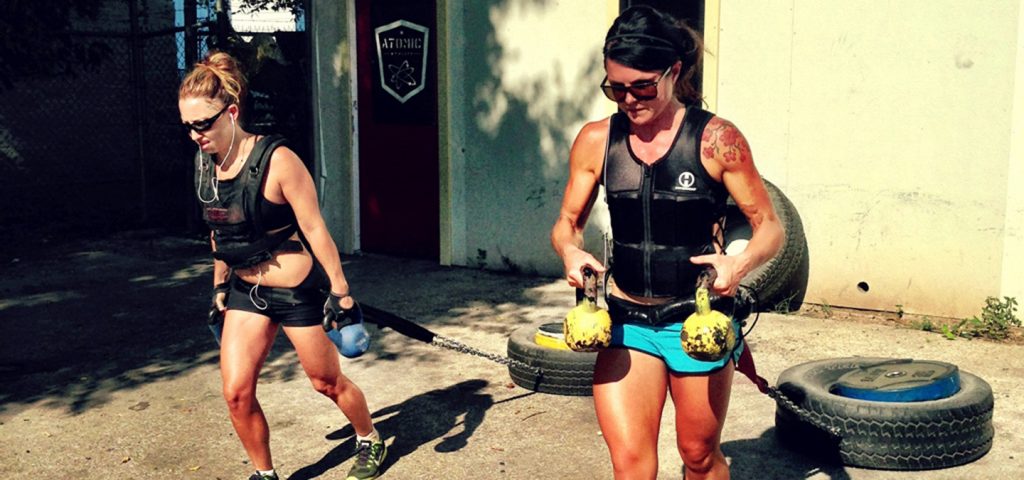
The tire and drag harness is probably the cheapest and most effective training tool in our arsenal. Its simple design and execution allows athletes of all levels to train 3 distinct types of fitness and is a great substitution exercise for injured athletes.
Unlike barbells which are expensive and require more technical instruction and practice, an old tire and a $25 dollar trip to Home Depot can have even the least experienced athlete sweating hard with about 20 minutes of work with no technical instruction.
Besides being able to train strength, anaerobic capacity and aerobic capacity, the tire is a great tool for athletes that struggle with running. Athletes that carry an excessive amount of mass can really do a number on their lower body joints when doing long slow runs. The great thing about the tire is there is little to no impact, but it keeps the heart rate high. My heart rate ranges from 140-150bpm during a moderately paced drag. So if you’re a heavy hitter that avoids running because it hurts, now you have no excuse.
For athletes going to the mountains, this is a great way to train the legs concentrically for extended periods of time to mimic a long ascent. Add in some jumping lunges and jump squats after and you’re getting the eccentric portion of a descent. I’m currently working through a 5-week program that revolves around this training tool in preparation for a month long elk hunt and it’s no joke. The first long drag was such a humbling experience that we actually now use a 2000 meter drag as punishment in our gym. Needless to say it usually only takes once to get the message across.


What You’ll Need to Build a Rig
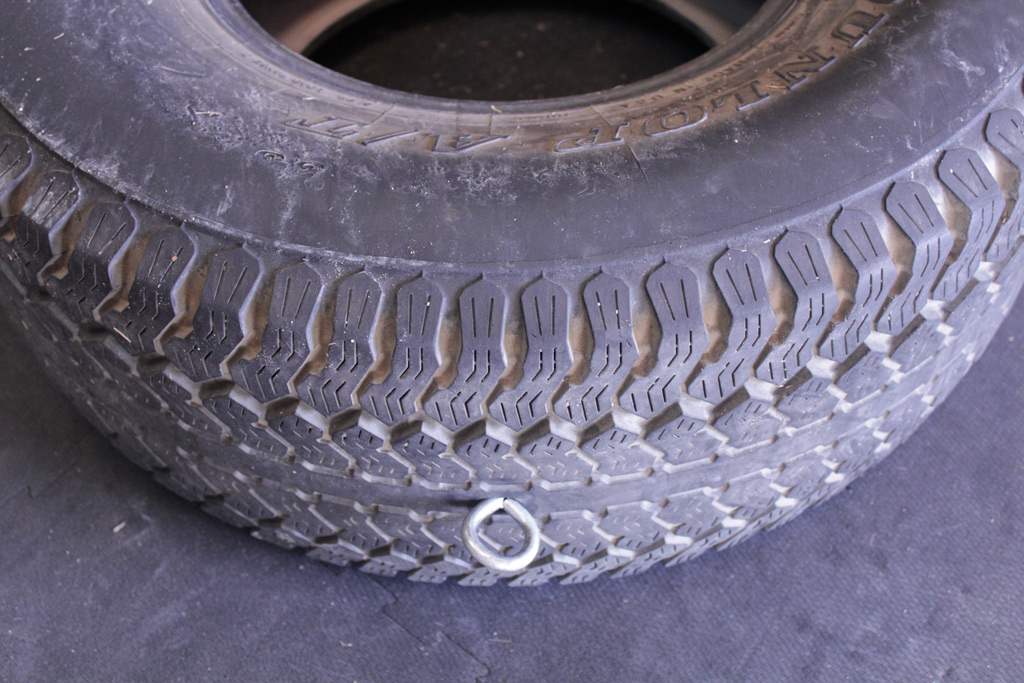
- 1 Old Tire Made for a 16” Wheel
- 3” Eye Bolt with Large Washer and Nut
- Carabiner or Snap Link
- 6 Feet of Light Chain
- 12 Feet of Seat Belt Webbing, Tow Strap, or Fire Hose
- Something Heavy
Putting it Together
- Drill a hole in between the tread of the tires.
- Insert the eye bolt, place the washer and nut on the inside of tire and snug down.
- Take the tow strap and connect the ends using a water knot or make two overhand knot loops on the ends.
- Connect one end of chain to eye bolt with carabiner then run the other end through the loops of the strap.
- Connect the other end of the chain to eye bolt and carabiner.
- Add weight.

Training Sessions Using the Tire and Harness
Below are 3 different training sessions with just the tire and bodyweight. Each one trains a different fitness attribute – Stamina, Strength and Work Capacity. For unfamiliar exercises check out our Exercise Library on Atomic Athlete.
Stamina Session
- Warmup: 3 Rounds
- 300 Meter Run
- 10x Squats
- 10x Pushups
- 5x Hydrants Each Side
1) 1000m Tire Drag
- Load Tire to 45lbs
- 25lbs Vest / Pack is Optional
2) 2 Rounds
- Jane Fonda Complex – 20 Seconds Per Movement, Per Side
- 50x Shoulder Handjob Each Side – 2.5lbs
Comments: The pace of this is meant to be a slow walk, very similar to walking uphill under load. The dragging surface is very influential in how fast you are able to drag – look for a smooth, gravel free surface. The Tire drag alone should take 20 minutes per 1000 meters, more fit athletes can take this up to 2000 meters if they choose. The second part of the session is durability designed to increase shoulder and hip stabilizer strength. If you are a soldier or a hunter we suggest carrying a sledge hammer to mimic carrying a rifle.


Strength Session
Warmup:
- 1 Mile Run
- Movement Prep Complex
1) 6 Rounds
- 50 Meter Tire Drag – Increase Weight Until Difficult But Doable
- 3x Jumping lunges Each Side
- 3x Mantis
2) 6 Rounds
- 5x Pull Ups – Any Grip
- 10x Dips
- 15x Pushups
- 15 Second Instep + Quad Stretch Each Side
3) 6 Rounds
- 8-10x Tire Thrusters
- 3x Burpees
- 20 Seconds 3rd World Stretch
Comments: The drag during part one should be slow and heavy. Find what ever you can to increase the load. Small children work fine if you are a family man. Part 2 is bodyweight upper body strength. If you don’t have a dip bar folding chairs work fine. Part 3 will make you breath heavy by design. You should feel fairly rested each round so take an additional 30-45 seconds rest if needed. Tire thrusters are just like barbell thrusters except the head will go in the tire in the bottom of the squat.
Work Capacity Session
- Warmup: 4 rounds
- 10x Pushups
- 10x Squat Jumps
- 200 Meter Run
- 3x Dynamic Instep Each Side
1) 8 Rounds
- 50 Meter Max Effort Tire Sprint – 45lbs
- 30 Second Rest
Rest 3-5 Minutes
2) 5 Rounds for time
- 10x Burpees
- 25 Meter Run
- 10x Squat Jumps
- 25 Meter Run
- 10x Pushups
- 25 Meter Run
- 10x Jumping Lunge – 5 Each Side
Rest 3-5 Minutes
3) 3 Rounds
- 30 Seconds Situps
- 30 Seconds Flutter kicks
- 30 Seconds Hello Dolly
- 30 Seconds Front Bridge
- 30 Seconds Rest
4) 3 Rounds
- 30 Seconds Glute Leg Lift
- 30 Seconds Y+L
Comments: Two hard efforts back to back followed by some core and durability. Part 1 utilizes the tire in an interval format and Part 2 is a rounds for time format with all bodyweight exercises. On the tire sprints rounds 1 and 2 can be done at moderate pace to warmup but each subsequent round needs to be max effort. These intervals should leave you gasping for air. If you see a large decrease in output go ahead and adjust the rest to 45 seconds, if you are still suffering then take it to a full minute. For part 2 I recommend starting out a little slower as well to get a feel for the pace then cranking up the intensity as you work through. The standard for this is sub 10 minutes. The core circuit is meant to be done with all the exercises back to back – it’ll take 2 minutes exactly. Take a short rest then hit it again. Finish off with some durability.
Editor-in-Chief’s Note: Jake Saenz is a former Special Operations soldier that lives and coaches in Austin, Texas. His gym, Atomic Athlete, is a performance based strength and conditioning company that focuses on making athletes stronger, faster and harder to kill. Their training focuses on outside performance and uses well thought out programming and periodization to get athletes of all types to elite levels of fitness. As a partner gym of Military Athlete, Jake has the opportunity to travel across the nation assisting Rob Shaul in preparing soldiers for combat deployments and missions.