
- DIY AR-15 Build: Upper Receiver Assembly Introduction
- DIY AR-15 Build: Ejection Port Cover and Forward Assist Installation
- DIY AR-15 Build: Barrel and Free-Float Rail System Installation
- DIY AR-15 Build: Front Sight Base Installation
- DIY AR-15 Build: Muzzle Device Installation
- DIY AR-15 Build – Bolt Carrier Group Installation
- DIY AR-15 Build – Welding and Checking the Headspace
- DIY AR-15 Build: Lubrication, Assembly and Firing
Today in our continuing DIY AR-15 Build, we’ll be assembling the Bolt Carrier Group, putting it into the Upper Receiver and talking about some different parts and myths to ensure your build finishes up without a hitch!
The Bolt Carrier Group is particularly important to not only diagnose, but to build properly with good parts right from the beginning. Many malfunctions are directly related to the Bolt Carrier Group, particularly the Extractor within the Bolt.
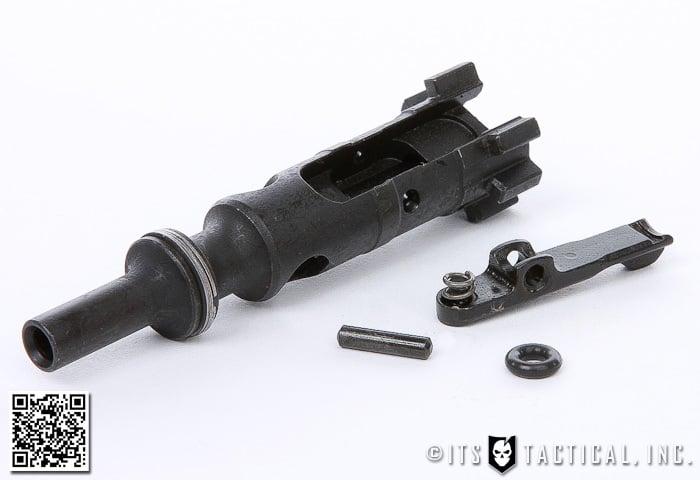
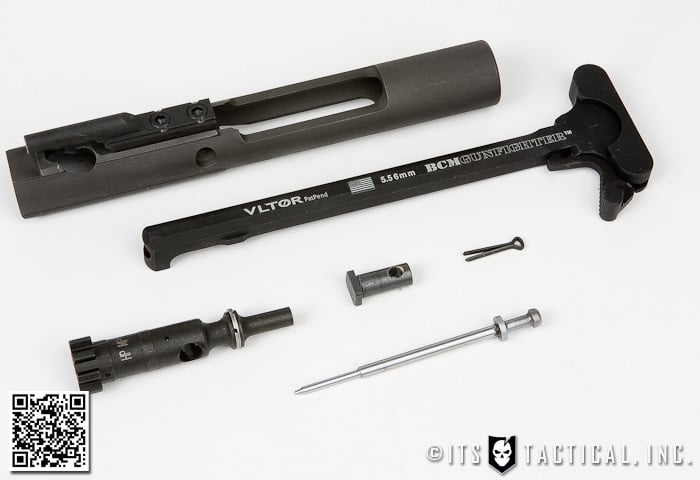
A BCG is made up of the Bolt Carrier, Bolt (complete), Firing Pin, Cam Pin, Firing Pin Retaining Pin and we like to lump the Charging Handle in with this, though many don’t.
Let’s get into the specifics and talk about the assembly and our recommendations.
Bolt Carrier Group
While the assembly of the BCG may seem fairly straightforward, it’s the most important group of parts on the AR-15 and likewise important that we take the time to talk about a few key areas to pay attention to. What we’re not going to get into here is the differences in the parts you may have at home on your AR-15, but what we recommend you start with from the beginning.
Maintenance and Replacement of parts is something we’ll be getting into with our next installment of our series on How to Keep your AR Running. For starters, if you follow our parts list below, you’ll see we’re using ALL Bravo Company USA parts. We feel Bravo Company offers some of the very best parts on the market, especially when it comes to the importance of the BCG.
Extractor Spring and Insert

Of particular importance on the BCG are a properly staked Carrier Key and correct Extractor Spring with insert.
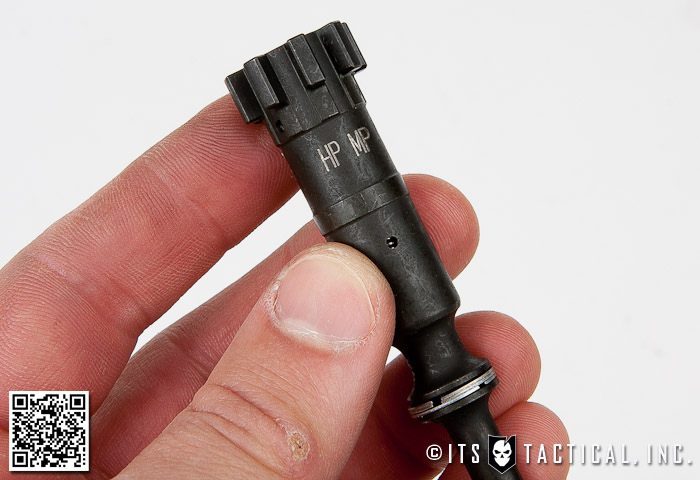
Starting with the Extractor Spring, you want a well made spring and black insert, which is exactly what Bravo Company includes with their Bolts. Their Extractor Springs are made from chrome silicon, heat treated & stress relieved and shot peened.
Failure to extract and stove pipe malfunctions can, more often than not, be traced back to a faulty extractor spring/insert combo. If your Extractor Spring is weak the Extractor won’t grab the spent round and properly extract it, resulting in a either a stuck case or one that doesn’t completely eject before the bolt comes back (stove pipe).
We’ve also mentioned the importance of High Pressure Testing and Magnetic Particle Inspection in a previous article and it definitely applies here as well. You want to ensure your bolt is HP/MP!
Carrier Key Staking
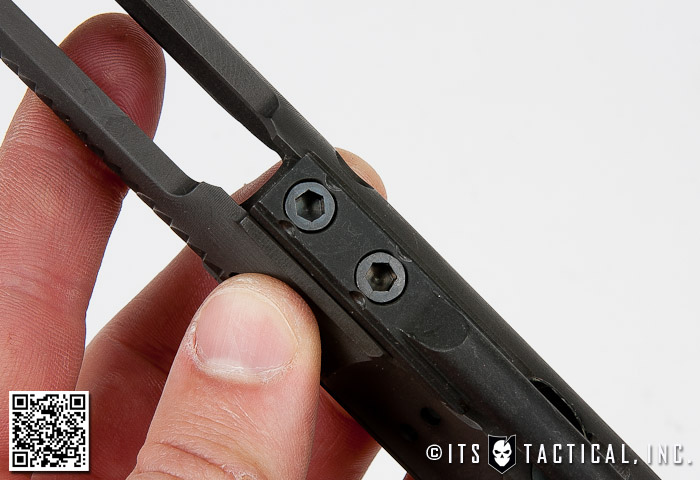
A properly staked Carrier Key is of the upmost importance on a Direct Impingement AR. As spent gas travels back to the Gas Key on the Bolt Carrier it’s dependent on proper alignment to complete the cycle of operations. A loose carrier key can cause short stroking, or when the bolt carrier doesn’t get far enough back to be able to travel forward and strip off the next round.
Bravo Company properly stakes their keys as seen in the photo to the right. If your’s doesn’t look like this we’ll get into detail on how to do this properly in our next How to Keep your AR Running article.
Gas Rings
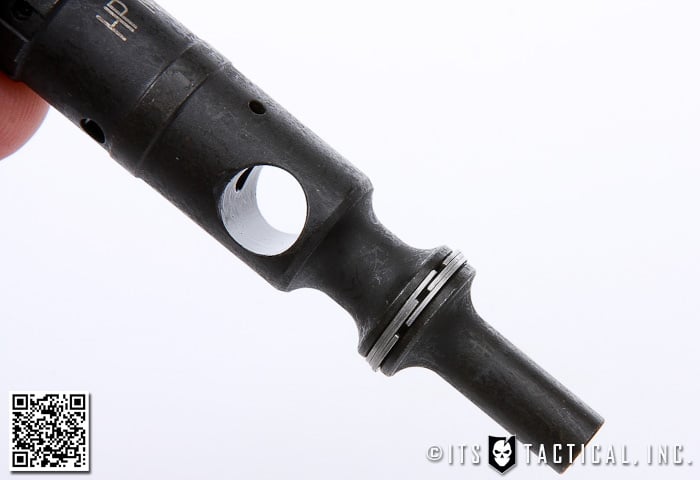
First of all, let’s dispel the myth you might have learned in bootcamp. The gaps in the gas rings do not have to be staggered! It’s not going to hurt, but not mandatory. You should ensure there are three of them, but we’ve seen guns run with one gas ring before.
The goal of the gas rings are to trap enough gas to push the bolt carrier to the rear. A test on how to know if you need to replace the gas rings is demonstrated by Bryan in the video below.
Set the assembled BCG down on the table with the bolt face facing down. If it stands up under it’s own weight, the gas rings are good. If the Bolt Carrier drops under it’s own weight, it’s time to replace the gas rings.
Accessories and Furniture
At this point you can also slap on any accessories and furniture you might want to put on the Upper Receiver of your new AR-15. We used various Magpul goodies coated in Desert Digital by our friends at CRC Hydrographics. Everything we had coated by them, with the exception of the Back Up Iron Sight, features their new Grip-Tec coating,
We’re looking forward to evaluating the durability of the clear grippy texture further after we assemble this AR completely and get to start putting rounds through it!
Parts Needed
- BCM Bolt Carrier Group (MPI) (Can be purchased complete here)
- BCMGunfighter Charging Handle Mod 4
- Magpul XT Rail Panels
- Magpul AFG
- Magpul MBUS — Rear
- Midwest Industries MCTAR-TS
Tools Needed
- Screwdriver
Assembly Instructions
- Insert the Bolt into the Bolt Carrier with the flared side facing out
- Turn the Bolt, aligning the larger opening with the Bolt Carrier opening just below the Carrier Key
- Insert the Cam Pin through the Bolt Carrier opening and into the Bolt so that the flat bar on top of the Cam Pin is inline with the Bolt Carrier
- Pull the Bolt back to extend it and turn the Cam Pin 90 degrees.
- Drop in the Firing Pin (pointed side down) from the opposite end of the Bolt Carrier and press it down to properly seat it.
- Insert the Firing Pin Retaining Pin in through the larger opening on the same side of the Bolt Carrier you inserted your Cam Pin from.
- This completes the assembly of the Bolt Carrier Group.
- Insert the Charging Handle into the proper cut out notch in the Upper Receiver
- Ensure the Bolt is still extended within the carrier and place it into the Charging Handle with the Carrier Key providing the alignment.
- Press everything home and listen for the audible click of the Charging Handle seating.

Join us back here soon for the next installment in the DIY AR-15 Build (Upper Receiver) where we’ll be checking the headspace and welding the BattleComp 1.5 to complete the Upper Receiver!