


LandNav 101: Maneuvering with Map and Compass
LandNav 101: Maneuvering with Map and Compass
- LandNav 101: Introduction to Map Terminology
- LandNav 101: Introduction to Map Margins
- LandNav 101: Reading and Associating Terrain
- LandNav 101: Compass Selection and Recommendations
- LandNav 101: Understanding the Universal Transverse Mercator System (UTM)
- LandNav 101: Maneuvering with Map and Compass
The LandNav series has reached its zenith; we’re now at the point where we are ready to learn how to use the map and compass together to maneuver.
In one sense, maneuvering with the map and compass is rather elementary since the compass is effectively employed as a protractor and ruler.
The straight sides of the compass’ base plate are used as a ruler to connect points and measure distances. This, in fact, is the first step in maneuvering from point A to point B with the map and compass.
Putting it Together
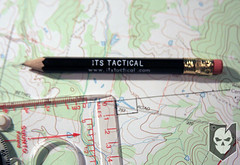
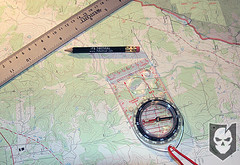 Step 1: Use the compass edge (or ruler) to draw a line from your starting point to your destination.
The 360 ° represented by the compass bezel serves as a protractor. We use this protractor, in conjunction with the arrows on the base plate to obtain a heading that needs to be traveled to reach the destination.
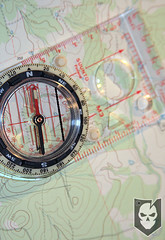
Step 2: With the direction-of-travel arrow pointing to the destination, turn the compass bezel until the orienting arrows are pointing north and aligned parallel with the nearest north-south meridian.In the photo below, an exaggerated north-south line has been added- look closely and you can see the light pencil lines used in practice.
 Often the map will not include the north-south lines in the map body. Using a straight edge aligned with the map border, you only need to draw one north-south line that is within the bezel of your compass so that you can effectively obtain the heading.
The key prerequisites for step #2 include orienting your map and accounting for declination–both of which were covered in previous articles in the series. Once the compass’ orienting arrows are both pointing north and aligned parallel with the nearest north-south meridian, read the heading from the bezel at the little white triangle between the two red orienting arrows. This is the heading, or azimuth, that you’d need to travel from the origin to reach the destination.
Warning: Ensure that your compass is pointing from the start to the destination. If you place your compass at your destination and point backwards, your readings will be opposite what they should, and you’ll actually travel away from your destination!
Azimuth
Formally, an azimuth is defined as a horizontal angle measured clockwise from a north base line. A back azimuth is always 180 ° away from the azimuth, and it is how you “find your way home” back to your starting point. If you azimuth is 180 ° or less, then you always add 180 ° for your back azimuth; otherwise subtract 180 °. For example, if your azimuth was 74 °, then your back azimuth would be (74 + 180), 254 °. In contrast, if you azimuth was 337 °, then your back azimuth would be (337 — 180), 157 °.
If you need to estimate the distance between the two points, one inch on a 1:24,000 scale map is 2,000 feet. Measure the inches between the two points, then multiply by 2,000 to get the distance. Alternatively, the scale at the bottom margin of the topo map can be used to obtain the distance using other units of measure, e.g. meters.
Often the distance is greater than the length of the compass base plate. A common way to measure distance, especially if there are obstacles in the way that must be navigated, is to use the lanyard on the compass. The string is extremely malleable, and easy to create 90 ° turns.
Practical
 Let’s put this into a practical exercise. Say that we are interested in visiting cemeteries to read the old headstones. We are presently at Bethel Church Cemetery (4955/9420), and we want to shoot an azimuth to our next cemetery, Allen Cemetery (5250/9510).
After drawing our line, we get our heading of 74 °. At the cemetery, we hold the compass flat, extended slightly out from our chest and turn our body until the compass needle is “boxed” inside of the orienting arrow. Wearing a huge metal belt buckle, or if your pack has a lot of metal on it, you may wish to remove that gear so that you obtain an accurate heading. Look up on the horizon and try to find a distant landmark to aim towards. This can be more difficult in flat terrain. Proceed to walk in that direction toward your destination.
Before we set off, we look over the path and realize that our heading has us going straight through a small body of water–unacceptable! What we will have to do is maneuver around the obstacle. We can do this by choosing a 90 ° heading off of our original azimuth for a fixed distance, get around the width obstacle, then continue parallel to our original azimuth until we are past the length of the obstacle. Once past the obstacle, we turn back 90 ° until we join our original track line–turning 90 ° once more, then continuing on our original track. For illustrative purposes, I choose the southerly route (a greater distance, but equally effective) around the pond (see photo above).
Pace Count
In the field, the most effective way to measure around small obstacles like this pond is to measure your distance by counting your stride, known as a pace count or tally count. Even if you have no idea just how much ground you cover between paces, so long as you accurately count your paces out, then match that pace count back after making your turns–you’ll end up on the same track line from where you started out.
Formally, one step is the distance one covers when measured from one foot to the other foot. A stride, in contrast, is the distance between two steps. Stated differently, a stride is the distance between where the left foot strikes the ground and the next time that the left foot strikes the ground. The measure of your stride is known as a pace or tally.
One thing to consider is that your pace will vary based on many factors- going up hill versus down hill, morning treks versus late afternoon treks where you’re tired from spending the day on the trail, etc. No easy solutions exist to these problems; spending time on the trail and practicing will help you refine your ability to estimate distance covered.
Keeping a tally count doesn’t involve high-tech solutions. Common trail approaches include grabbing a string and tying a knot every 100 strides, or grabbing a handful of pebbles and moving a pebble from the left pocket to the right pocket every 100 strides.
More information about how to calculate your pace count can be found in this ITS article from the archives.
Waypoints
On longer treks, the journey will often include waypoints. A waypoint is an intermediate destination. For example, if the pond was actually a respectably sized lake, and our journey was planned for 3 days, we would break up the journey into waypoints. The first waypoint might represent where we are stopping for lunch, with the next waypoint representing where we’ll have dinner and setup camp for the evening.
Rarely is an overall trek in the backcountry as simple as navigating from point A to point B, yet in practice every piece of the journey is just that simple. Today, the marvel of handheld GPS devices makes backcountry navigation simpler, but not foolproof. Batteries die, devices are lost, dropped in the river, etc. Having the skill to resort to a compass and map is critical on a backcountry adventure. Unfortunately, this skill is highly perishable–so get out in the backcountry, leave your GPS in your pack, and practice navigating the old fashioned way with a map and compass!


Discussion