


RSKTKR 1-Day Pistol Class: After Action Report
RSKTKR 1-Day Pistol Class: After Action Report
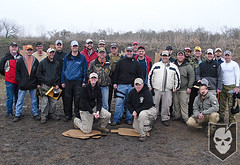
The rain apparently didn’t get the “Don’t mess with Texas” memo, as we definitely saw it on Sunday during the RSKTKR 1-Day Combative Pistol Class we hosted in Greenville, TX.
Despite the rain and eventual mud on the range, the class was a huge success! Jacob’s Plain Gun Range, where the class was held, proved to be less than ideal for a class our size though.
RSKTKR had originally capped the class at 20 people but let 2 more register since there’s always a few that don’t show up for various reasons, I know I’ve seen that at all the classes I’ve been to.
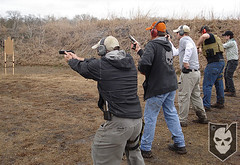
Well, everyone decided to show up, including two walk-ons. It proved to be a non-issue though, as the individual bays at the range only held about eight shooters across comfortably and we would have wound up having three relays anyway.
The range bays while a decent size for a pistol class, would not have given us the room we needed had this been a rifle class.
Instructors
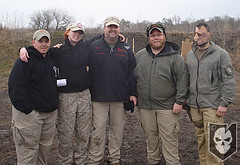 Our instructors for the class were Mike “Doc” Hewett and his wife Andrea, along with assistant instructors Casey Bohn from The Caskell Group and Justin Springer of XS Sight Systems.
The crew did a phenomenal job relating the course material to all the different skill levels in attendance. We had quite a wide range of shooters, from those who had never been to any kind of formal training, up to those with Military, Law Enforcement and multiple classes under their belts.
Everyone seemed to take just what they needed from Doc’s instruction, which is the definition of a great instructor in my book. Doc had a unique way of explaining each of the class fundamentals with real life examples… despite having to give the fundamentals lecture under a tin roof in a heavy downpour (I could have sworn I heard hail too).
Gear Selection
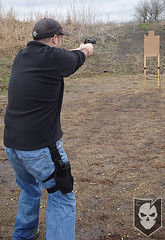
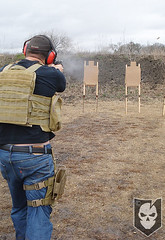
The class was largely Concealed Carry based, which didn’t go to well with the Safariland Drop Leg Holster I was running, but I made it work. I was running a Sig Sauer P226 with a Surefire X200 WeaponLight, which ran like a champ. Despite dropping my mags in the mud with every mag change and emergency reload I had no failures to feed or any malfunctions.
The MSA Ranger Single Comm Hearing Protection I ran also took the rain just fine without any issue. I wore Oakley M-Frames with Amber lenses which truly helped with the overcast day. I’m not a big fan of the 1st Gen. M-Frames digging into my head beneath comms, but I’ve heard the 2nd Gen. frames are much more comfortable.
On my belt I wore two Emdom CQB Mag Pouches affixed to a Down Range Gear Belt Stabilizer. DRG was also a sponsor for the class (more later). The 215 Gear URB did a great job of holding my mag pouches and Safariland Holster throughout the day without sagging.
And I can’t forget to mention my Crye Precision Field Pants AC. While this will obviously vary for everyone reading this, these pants fit me perfectly. You know, that great feeling you get from a good fitting pair of blue jeans. Definitely the most comfortable tactical pants I’ve ever purchased.
Cold Quals
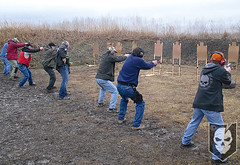
 We started the day with a brief introduction and moved into Cold Quals, which is the equivalent of how it happens in real life if you’re involved in a shootout. Unless you’re a tier one shooter, odds are that you won’t have just been on the range when the bullets start flying.
The Cold Qual encompasses the two major points in Concealed Carry situations: Draw & Fire, and Emergency Reload. During the CQ the instructors were also looking at the shooter for the first time, noticing things like stance and grip.
Doc mentioned that there were a lot of stance and grip issue with this class due to the number of new shooters.
Due to the sudden downpour, which forced us all under the tin roof covered picnic area, only about half the class wound up getting through the Cold Qual. Doc expressed his disappointment with this, as it’s proven to be a valuable training tool to gauge results after the qual is run again at the end of the day.
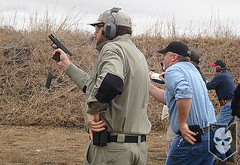
Draw & Fire
 Next we moved into draw and fire exercises where we worked on stance, grip, draw stroke, sight picture and trigger squeeze. Emphasis was placed on drawing your thumb straight up the rib cage, meeting and greeting your support hand and punching straight out to the threat.
A few people were corrected for fishing (throwing the gun down in an arc) and scooping (bringing the gun up in an arc) on the draw. The more efficient the draw the less chance there is for the bad guy to exploit an opportunity to take your weapon in a CQC situation.
Emergency Reload
 The emphasis during the emergency reload practice was increased efficiency and economy of motion. Cutting out unnecessary movement reduces the time it takes you to perform the reload.
This is also one of the most time consuming pieces in a concealed carry situation. As Doc says, “You have the rest of your life to fix it.” Those seconds may not seem like they would matter, but those are seconds that could mean the difference between life and death.
The goal is to keep the Emergency Reload to sub 6 sec. while keeping your eye on the threat, cutting out extraneous movement and relying on instincts to perform it.
Doc also stressed that this is the time to develop your rituals, and carry them over into your daily routine. If you carry concealed, don’t just get into the habit of taking your gun out a the end of the day and placing it on your dresser.
Every time your hand goes to your weapon, use it as an opportunity to practice your draw stroke, scan & assess and back to high ready. Get into a ritual!
Doc doesn’t emphasize the “Tactical Reload” for concealed carry, which is retaining a partial magazine and topping off a weapon during a lull in the gunfight. The Tactical Reload definitely has its place, but I tend to agree that in a Civilian Concealed Carry situation I’ll be shooting until empty before reloading.
Malfunctions
 After the Emergency Reload we moved into Malfunction Drills, which consisted of just one drill. Tap (tap the bottom of the magazine to ensure it’s seated), Rack (rack the slide to clear the malfunction), Ready (back to the ready position).
It used to be Tap, Rack, Bang, but Doc mentioned that somebody decided that Tap, Rack, Bang gives off the impression that as soon as the Tap and Rack is executed one should fire automatically.
I know that if I have to clear a malfunction I’m more than likely trying to shoot already, so I still prefer the Tap, Rack, Bang… personally. TRB will also clear about 90% of the malfunctions that are encountered with a pistol.
The next step after TRB, if it doesn’t clear the malfunction, is Lock (lock the slide to the rear), Rip (rip the magazine out), Work (work the slide back and forth at least three times), Tap, Rack, Ready.
Transitions
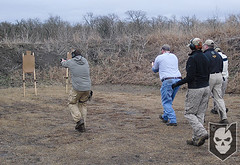
 Next up were Transition Drills, where we’d draw down on a threat (the target directly in front of us) and then based on the command would fire 2 rounds to the body and 1 to the head of the threat in whichever direction was called (left or right).
The emphasis on these drills was using your eyes to move to the threat before your gun does. This avoids turreting, which as you can imagine is how a tank turret moves.
Turning Drills
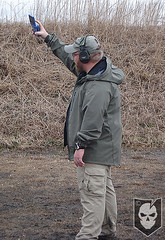
For Turning Drills we faced up range, turning 180 degrees as the command “threat rear” was given followed by the direction we’d turn. We were educated on why you turn towards the front and not behind, to avoid obstacles that could be behind you.
You can’t pick up objects in your peripheral vision like you can turning towards the front, and while it may not save time compared to other turning movements, it will eliminate the possibility of tripping on an object. The other teaching point of this was to pivot on the foot of the direction you’re turning in.
The first step is to look over the shoulder of the direction you’ll be turning in, while making contact with your weapon. Next is the turn to the rear, and then and only then do you draw your weapon down on the threat.
This is to ensure that you have a stable shooting platform before starting your draw & fire. You may be able to unleash a few rounds from an unstable platform, but when you’re having to make transitions and movement you’ll need that stability.
Shooting & Moving
 This was the other area we had to trim due to the rain and mud, as there was a safety concern from slipping while running. We did go over how to step while moving and shooting, just not running.
Emphasis here was placed on heel/toe contact to be able to respond to changes in the terrain, having a lower body position and taking shorter steps. If stepping normally while encountering an obstacle, you can correct for it faster using the heel/toe method.
While walking backwards run the opposite, toe/heel contact.
Single-Handed Shooting
 Our last exercise of the day was Single-Handed Shooting, where we were taught two different techniques to stabilize our shooting platform when shooting one handed.
The first was “Muscular Tension” where the arm is significantly bent and the elbow is pointed down towards the ground. This creates additional muscular tension around the shoulder and adjoining muscles to help stabilize your shooting platform. I found this technique to work better for my strong side hand.
The other was canting the weapon at 45 degrees inboard to aid in lining the sights up. To me this was particularly important on my weak / non-dominant side as I did feel that it helped me line the sights up better.
Top Shooter
 We held a shoot-off for top shooter at the end of class, as there wasn’t a Cold Qual score for everyone to compete with.
Our shoot-off consisted of a modified version of the new Navy Qual, which is much more difficult than it sounds.
I know that when I qualified as Expert in the Navy, it consisted of nothing more than a few rounds from standing, kneeling and prone. This was considerably more advanced.
Schwag
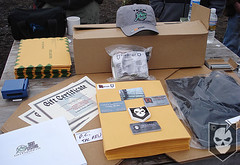 Our top shooter, William W., got first pick from the schwag pile consisting of an ITS Tactical ETA Kit, 2 Gift Certificates for free sights from XS Sight Systems, 2 Gift Certificates for free holsters from Peter’s Custom Holsters, a Down Range Gear Modular Panel Insert with Modular Holster Insert and a Tactical Revolution Plate Carrier.
The next six shooters down continued to pick until the schwag was gone! Congratulations guys!
Wrap Up
 We’d like to thank RSKTKR for a stellar class and their level of knowledge, attention and passion that went into a great day of shooting, rain or not.
Thank you to all those that attended, it was great to put names with faces! I think we’ve got a great group that’s interested in training in the D/FW area, and we’re all looking forward to hosting more classes!
If you’ll excuse me, I still have some muddy magazines to clean out.
~ Bryan
Here’s a photo gallery of all the photos from the class! Click here to view the images on Flickr to download.
[flickrset id=”72157623379889227″ thumbnail=”square” overlay=”true” size=”medium”]

Discussion