


How to Keep Your AR Running, Part 2: Nomenclature and Cycle of Operation
How to Keep Your AR Running, Part 2: Nomenclature and Cycle of Operation
- How To Keep Your AR Running, Part 1: AR History
- How to Keep Your AR Running, Part 2: Nomenclature and Cycle of Operation
- How to Keep Your AR Running, Part 3: Limited Technical Inspection
Today we’re going to continue our series on Keeping Your AR Running by looking into the AR nomenclature and Cycle of Operation for a Direct-Impingement Gas System.
We’d like to urge everyone to read our first part of this series on the History of the AR. These articles will all be building blocks, as it’s important to get a solid foundation.
Knowing the different parts of an AR and how they operate is essential to being able to diagnose a problem and ensure you’ve taken the necessary steps to prevent problems from occurring.
AR Nomenclature
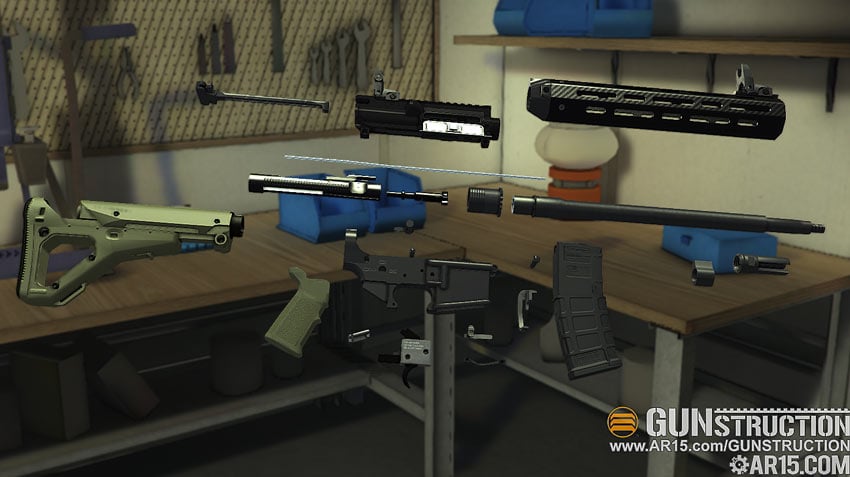
To describe the different parts of the AR platform we’re going to break it down by what we refer to as the Upper Receiver Group and Lower Receiver Group.
Check out the embedded YouTube video below for a visual walkthrough we’ve put together of these parts and a simple field strip of the AR you can follow along with.
 You can also click on the image to the right to see an expanded view of all the components of an AR.
Upper Receiver Group
- Upper Receiver
- Forward Assist
- Brass Deflector
- Ejection Port Cover
- Barrel Nut and the other components that hold the barrel to the upper receiver
- Barrel Extension (Feed Ramps)
- Barrel
- Flash Suppresor
- Gas Tube or Piston (depending on your AR)
- Sights whether they be fixed or BUIS (back up iron sights)
- Optics (optional)
Inside the upper receiver we have the Charging Handle with latch and the Bolt Carrier Group.
Bolt Carrier Group
- Bolt
- Bolt Carrier Key
- Firing Pin
- Cam Pin
- Bolt
- Gas Rings
- Extractor
- Ejector
Lower Receiver Group
- Magazine
- Buttstock
- Buffer Retainer
- Action Spring
- Buffer
- Buffer Tube
- Pistol Grip
- Trigger Guard
- Take Down Pins
- Hammer, Trigger and Disconnector
- Bolt Catch
- Magazine Catch / Magazine Release Button
Cycle of Operation
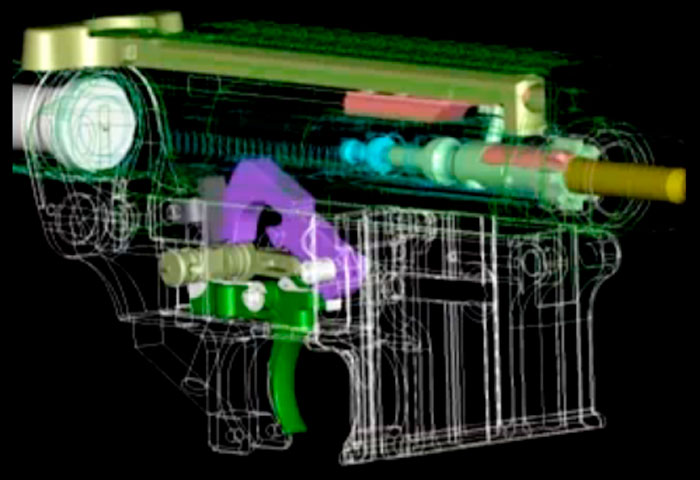
Now that we’ve gone over the individual parts of the AR, lets examine the Cycle of Operation and how the AR functions.
Cocking
The first step in the cycle of operation for an AR is to charge the weapon, or “make ready.” This is done by ensuring a loaded magazine is present in the weapon, grabbing the charging handle, pulling it to the rear and releasing.
As the bolt carrier group is pulled to the rear by the charging handle, the action spring is compressed in the buffer tube, causing the buffer to reach its rearmost position inside the buffer tube.
While simultaneously moving rearward, the bolt carrier group rides over the hammer and forces it down into the receiver, compressing the hammer spring and cocking the weapon.
Feeding
As the bolt carrier group is thrust forward from releasing the charging handle (and the expanding action spring), the face of the bolt picks up a new round that is pushed into its path by the upward thrust of the magazine’s follower and spring.
Chambering
The bolt’s extractor now grips the new round, which also compresses the ejector and ejector spring as the round is seated in the chamber.
Locking
As the bolt carrier enters the last 1/2 inch of its forward movement, the cam pin emerges from the guide channel, moves along the cam track, turns the bolt counter clockwise (22.5 degrees) and locks the bolt into the barrel extension.
Firing
The weapon is now locked and ready to be fired. Depressing the trigger thrusts the hammer forward, striking the firing pin. The firing pin makes contact with the primer of the round and ignites the propellant in the cartridge, firing the round.
Firing then forces gas through the barrel carrying the round out and forcing a bit of the gas through the gas port. The gas is directed through the gas tube and into the upper receiver into the awaiting bolt carrier key.
Unlocking
As the gas traveling through the gas tube is directed into the bolt carrier key, it’s channeled into the expansion chamber in the bolt carrier. The gas is now trapped between the rear portion of the expansion chamber and the gas rings on the bolt.
The entire bolt carrier group now moves rearward as the gas expands and is contained by the gas rings. This causes the cam pin to rotate 22.5 degrees, “unlocking” the bolt from the barrel extension.
Extracting
While the bolt carrier group is moving rearward, the spent cartridge is pulled out of the chamber.
Ejecting
When the spent cartridge continues to move rearward with the bolt carrier group, it’s thrown out of the upper receiver chamber as it clears the ejection port. This is due to the ejector spring pushing on the ejector and the spent cartridge. This pressure from the ejector also causes the extractor to release and kick out the round.
Cocking
As the bolt carrier group moves rearward it rides over the hammer and forces it down into the receiver, compressing the hammer spring. Because the trigger is still depressed at this point, the hammer is engaged with the disconnector. When the trigger is released or “reset,” the hammer slips from the disconnector and is caught by the nose of the trigger.
The weapon is now ready to fire again.
Here’s a couple of YouTube videos that explain the cycle of operation
Closing Notes
Hopefully you’re now familiar with the different parts of the AR system, understand how they work and even how to complete a basic field strip.
in our next article we’ll look at the pros and cons of Direct-Impingement vs. Gas Piston, and get into an LTI or Limited Technical Inspection so you’ll know how to properly assess your AR parts for damage.
Let us know if you have any questions regarding what we’ve covered today, and we look forward to continuing this series!

Discussion