


How to Sharpen a Knife while Minimizing Mistakes and Maximizing Cutting Edge Performance
How to Sharpen a Knife while Minimizing Mistakes and Maximizing Cutting Edge Performance

DISCLAIMER: I ask that you read the entire article and keep in mind that this is one of those discussions that rank up there with talking about religion and politics. And please, let the results speak for themselves.
I don’t claim to know everything there is to know about sharpening. It’s a lifelong journey and one that I feel isn’t perfected overnight. However, I will say that “shaving sharp” is only the beginning of the sharpness that can be obtained, a lot like how obtaining a black belt is only the beginning of learning in martial arts. I hope to get those that don’t already know, to that “beginning” point, where after I feel that they’ll continue to learn and grow.
First, before you go tearing off and grab your favorite knife to start, I’d like to mention four reasons why people fail at sharpening.
- They start off with a knife that is EXTREMELY dull to learn on.
- They don’t see progress and change their technique.
- They progress too soon from a coarser to a finer medium, or start out on too fine a medium.
- They have too steep of a sharpening angle.
Common Mistakes while Sharpening a Knife
Failure 1: Starting off with a knife that is EXTREMELY dull to learn on.
I suggest starting on a knife that you may actually think is sharp, even a new knife or one that is barely used. If you can’t do that, try having someone sharpen it who knows how to sharpen and then use your sharpening skills to maintain that edge just as soon as it looses it cutting ability. Even most new knives don’t have a truly sharp edge. By training and learning your skills on a fairly sharp knife, you make it easier on yourself because you’ll be able to see progress much quicker. You’ll also be able to tell what’s working and what’s not. Every time that edge starts to get a little dull, take it straight to your stone and put in a few minutes getting back that edge. It’ll be much less frustrating than spending an hour or more whaling away at a very dull knife, unable to see any progress.
Failure 2: Not seeing progress and changing technique.
This happens when you’re trying to learn how to sharpen and you start with a knife that should’ve been sharpened years ago. You start sharpening and you don’t see any change in the dullness or sharpness of the knife, so you try something else, which also fails to bring an edge within five or ten minutes, so you try something else – all without making any real progress in the long run. I consider myself proficient at sharpening, but even I don’t try restoring an edge by hand that’s extremely bad unless I have no other choice. Even then, sometimes it’s best to take a break if you haven’t established an edge and are getting tired. Then come back and keep working, using the same angle you had before until you get the edge you were working for. If you’re working with a hard steel and extremely worn edge, sometimes it can take well over thirty minutes of sharpening by hand just to establish an edge.
Failure 3: Progressing too soon to a finer medium or start out on too fine a medium.
Sharpening is no different than sanding wood. If you need to move a lot of material, it’s best to start out with a coarse grit and not move to a finer grit until you’ve removed all the steel you need to with the coarser grit. Learning the different grits like Japanese, CAM or Microns is an entire article in itself. I use a 1000 Japanese water stone for my coarse stone, which is equivalent to a 700 Grit or 14 Microns. This will produce a shaving sharp edge with practice, yet is still coarse enough to remove plenty of steel. However, if I were using sandpaper instead, I would start with 80 or 120 grit, which makes it very easy to move a lot of steel.
Failure 4: Using too steep of an angle.
There are several different factors that determine the proper angle to sharpen:
- The purpose you’re using the knife for. Heavy cutting or light slicing?
- The quality of the steel you are working with. Can it hold a steep edge?
- Personal preference.
I prefer to hold a shallower angle on my knives than most, which sacrifices some of the edge retention or longevity of the edge for cutting performance. That being said, in defense of my position, I try to use my knifes for cutting, not plowing my way through things. I’ll discuss what angle you should sharpen your knives at next.
Where to Start
Now that I’ve warned you about the dangers that can discourage you while learning to sharpen, let’s talk about sharpening itself. The first thing we’ll talk about is the angle of the knife to the sharpening surface. Angles for knives can vary from ten degrees to thirty degrees or greater. I prefer fifteen to twenty degrees on each side, giving you a total of a thirty to sixty degree angle cutting edge, if you can visualize that in your head. There are a couple of ways to determine the angle you’re at while sharpening. With time and experience, you’ll be able to tell your angle just from holding the knife in your hands, but here are a few tricks that will help you get started.
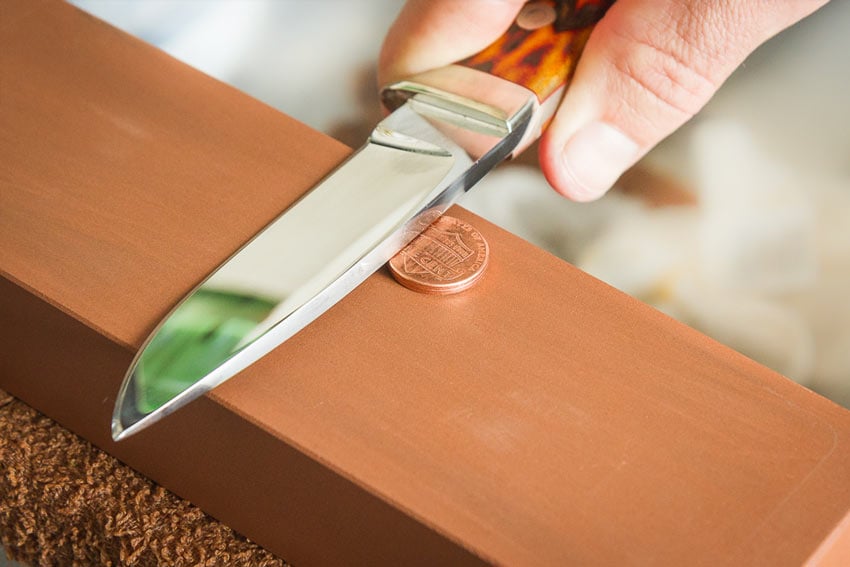
First is the old two-penny trick. Simply place two pennies under the spine of the blade to get roughly a fifteen to twenty degree angle on most pocket knives. Don’t try to sharpen the knife with those pennies still underneath it, just prop the knife up on the coins so you can feel about what your angle should be while you are sharpening, then take the pennies off the stone and sharpen for a while. If you need a reminder, just pull out your pennies again and check how well you’re doing at maintaining that fifteen to twenty degree angle while you are sharpening.
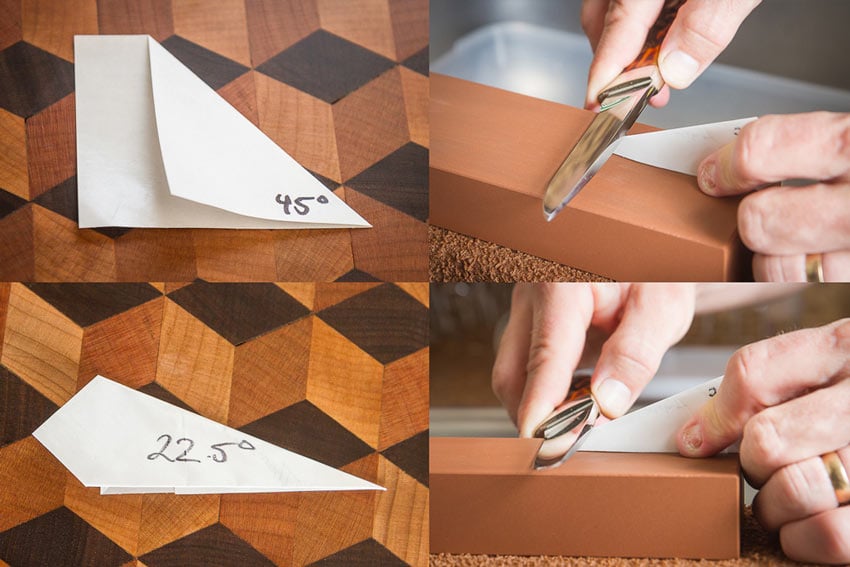
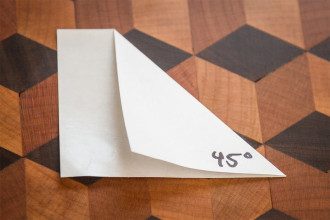
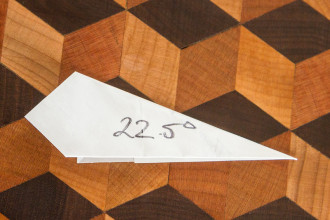
Another way is to take a post-it note or a small, square piece of paper and fold it in half diagonally. By folding it diagonally, you have a forty-five degree angle. Fold it in half diagonally one more time and you have a twenty-two and a half degree angle. Simply place this paper under your edge and adjust accordingly. Again, the paper is just a reminder to yourself. You’re trying to train your hands and your brain to remember the angle you’re trying to sharpen so you can always find that angle again with any knife that you choose to work on.
One last way is to use a matchbook if you can still find one around. This will give you a shallower, twelve to fifteen degree angle to use for a finer edge, like a filleting knife or something similar.
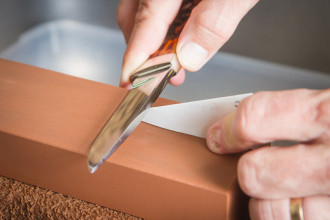
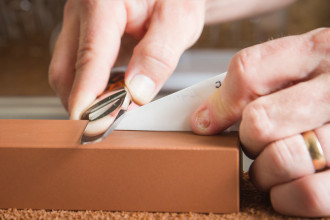
Once you’ve decided on the angle you want, it’s time to start removing steel. There are several techniques for doing this. Some like to act as if they were trying to cut a stamp off of the surface of the stone. Others like to go in circles. I prefer to go back and forth using the entire length of the stone. I find this the fastest and most efficient way of removing steel.
You will continue doing this back and forth motion, checking your angle frequently as you sharpen, until you’ve established an edge.
Go slow at first, concentrating on keeping the same angle. This brings me to the problem of compensating for the human element. Naturally, as you’re sharpening, you’re going to rock up and down on your angle to some degree. You should try to control the wrist or the forearm rocking as much as possible to keep the angle of the blade the same as you push and pull the knife from one end of the stone to the other. One thing to remember is that as your wrists or forearms rock back and forth, the angle of the edge you are creating will end up being the highest angle you’ve rocked up to during the process of sharpening. Simply put, you need to hold your angle a little lower than you want your final angle to be to compensate for your rocking motion. Do five to ten strokes and then check your progress, looking at the edge to determine where you’re removing steel from and how to correct it if needed. Then swap sides and do five or ten strokes on the opposite side of the knife to keep your edge symmetrical. Make an even amount of strokes for either side until an edge is established.

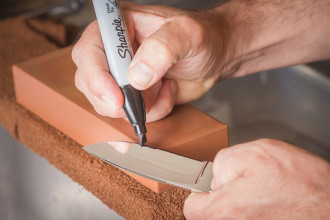
Tip: Sometimes it helps to cover the edge with permanent marker so you can see where you’re removing steel.
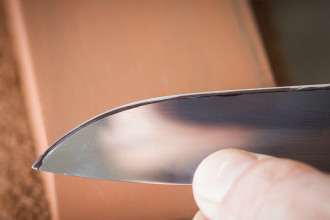
Here you can see that you’re holding too high of an angle to match the angle already on the knife. Notice the permeant marker is removed from the edge but not the top of the secondary edge. Lower your angle slightly and check again.
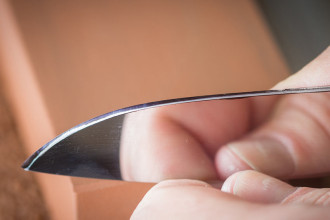
Here we have the opposite problem too shallow of an angle raise up your angle slightly until you are removing steel at the proper angle.
How can you tell when you’ve established an edge?
Trying to decide whether or not you’ve established an edge can be difficult, because sometimes when you’re sharpening you can create a small burr on the knife edge. The burr is made up of small particles of steel hanging on the very edge of the blade, like you would see if you cut a board with a chop saw and small pieces of wood hung off of the edge of the board. On the knife edge, these small pieces of steel can fool you into thinking your knife is much sharper than it really is. As soon as these small pieces of steel are knocked off during the use of the knife, you’re left with a dull edge. Here are two methods you can use to tell if you’ve gotten a really fine edge you can be proud of.
Using your Sight
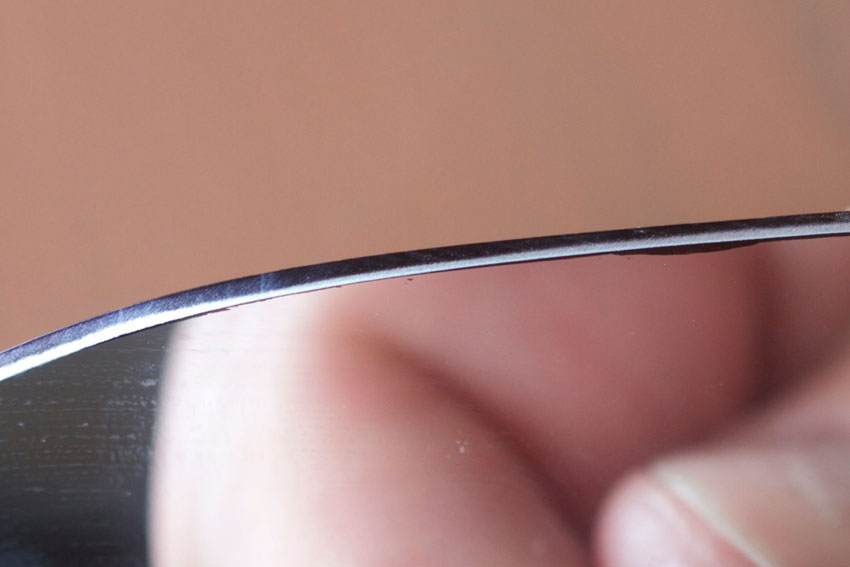
I suggest getting a jewelers loupe to inspect the edge. Here you can see the slight burr produced and that I held my both my edges higher. You can feel the burr on the opposite side of the knife that you were sharpening on. This lets you know that you’ve established the edge. You want an even burr along the entire blade.

One thing is for sure, if you have a true edge you won’t see any light reflect off of the edge when looking straight at the edge. This takes a good source of light and a little practice. Simply hold the knife with the edge straight up under a bright light (preferably sunlight) and rock the blade side to side and up and down looking for any reflection.
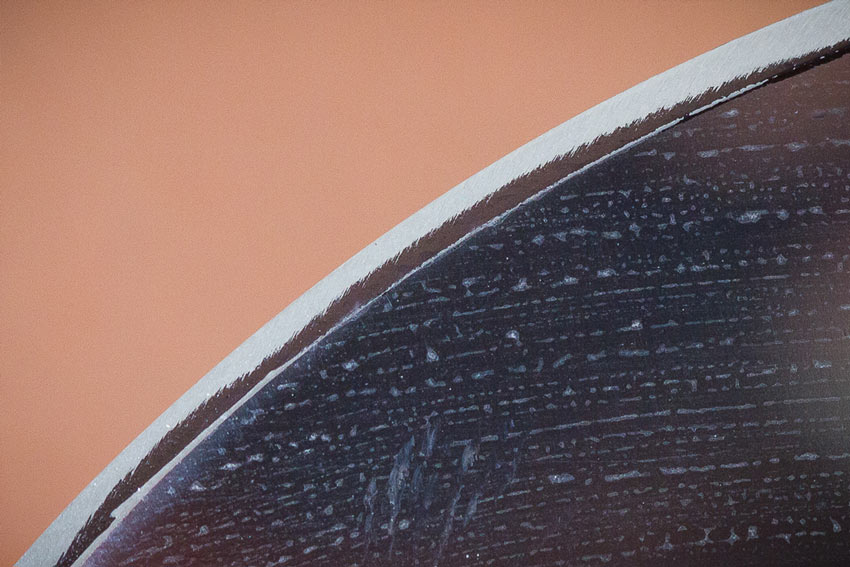
The light will only reflect off of flat spots or rounded spots on the blade. If the two sides of your blade meet in a true point, there will be no flat or rounded spots for the light to reflect from. If you see any light reflecting off of the blade, you still haven’t established a good edge. The two most commonly missed spots on a knife are the heel of the blade and the tip. Here is a photo showing an edge established everywhere except the tip.

Feeling the Edge
This can be one of the most deceiving ways to determine whether or not you’ve established an edge. I can’t tell you how many times I have seen someone take their thumb and run it over the edge and say a knife is sharp, when in fact it isn’t. This is an example of just how deceiving that burr can be. The person felt the tiny metal particles along the edge and it certainly seemed sharp, but as soon as the knife experiences some resistance in the cut, these metal particles are gone. One way to get rid of that burr is to run the blade lightly over a piece of wood once or twice. This will remove the burrs without damaging the edge underneath and then you will be able to feel exactly how sharp the edge really is.
Knife Care and Maintenance
I cringe every time I sharpen a knife for someone and then they turn around and destroy all my work in seconds by abusing the knife. Much like someone putting a deep scratch in finished woodwork, you know it’ll take a lot of work to fix it and many times there was no reason for all that hard work to be ruined.
Maintaining a knife is easy. Just remember this:
A knife is for cutting things that are softer than the steel itself. It only takes the slightest pressure on something harder than the steel to remove the edge.
This includes glass, ceramics, other knives, steel, rocks, bones, dirt, etc. One little bump of the blade against any of these will remove the edge instantly. So don’t throw your knives in the sink, drawer, dishwasher or anywhere else the edge of the knife will come into contact with something harder than itself. Keep your knife in a sheath to protect the edge while not in use. Never cut on top of anything harder than the blade, such as a glass cutting board or a granite countertop or similar. And the minute your knife’s performance drops even the slightest, give it a couple of strops on a fine stone and bring the edge back. If you follow this advice, you’ll be amazed at how long you can keep an edge on most knives.
I could talk for hours about sharpening and maintenance of your cutting tools. If you’d like to learn how to get started on your own knives for under $10, tips on starting your own sharpening service, or even just more about sharpening in general, I’m putting together a DVD covering all of those topics. I am currently trying to raise enough support through Kickstarter to make this possible. I’d appreciate you taking the time to watch my short video to see what you can do with a sharp knife!
In closing, let me share a few words of wisdom with you.
Sharpening is 90% skill and 10% tools.
This is one of the reasons I feel so strongly about learning to sharpen free hand. Once you’ve mastered the skills of sharpening free hand with a set of stones, you can use just about anything to sharpen a knife. If it will dull the knife, it will sharpen it in the reverse manner. If you’re relying on a machine to sharpen your knives, you’re limited by what the machine can do and by your access to the machine. However, if you have the required knowledge and sharpening skills, then you can sharpen anything, under any circumstances!
Editor-in-Chief’s Note: Please join us in welcoming Patrick Roehrman as a contributor on ITS. Patrick runs MT Knives and has been making custom knives from his shop in the Ozarks of Missouri for the last several years.
Photo Credit: Elon Gane


Discussion