


Learn How to Ascend: Part 3, Ascent
Learn How to Ascend: Part 3, Ascent
 Today we wrap up the last installment of our “Learn How to Ascend” series, with the ascent.
If you’ve just joined us, please take the time to read our other two articles on ascending equipment and setting up an ascent before continuing.
We left off with just having attached our Metolius Easy Aiders to our feet, and preparing to start the ascent.
Adjustments
Before starting the ascent, it’s important to properly adjust your Metolius Easy Daisies and Easy Aiders.
While it’s tempting to get allow as much slack as possible from the Easy Daisies to the ascenders, avoid it. Always tie in short.
You won’t be able to get as long of an extension on each movement with the ascenders, but if something happens and you’re forced to rely on the safety of the Easy Daisies, you’ll be glad you tied in short.
As you’ll see in the video, the length we’ve used for our Easy Aiders is approximately the same distance as the height between the starting position of our strong hand ascender and the ground.
Meaning that you should be able to stand upright with the strong hand ascender at head level.
Backup
As a last precautionary step, provided there’s sufficient slack rope, the rope can be tied into your harness as a backup.
Every 20-30 feet it can be retied, so if the ascenders slip you’d only fall as far as your last knot. This is especially important when ascending wet ropes, icy ropes and long pitches.
Confirmation
Make one last check of all your equipment, and even have a buddy verify everything.
Check everything including straps, connections, carabiners (locked) and that you’ve screwed down so you don’t screw up!
Technique
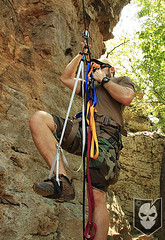
Once everything is properly verified you can start your ascent.
- Grab both ascenders and move them into position (starting position is strong side ascender at head level)
- Transfer your weight to your weak side ascender and foot
- In one fluid motion, push up with your strong hand ascender and reach high enough so your strong side foot must leave the ground with the ascender
- This motion will open the cam halfway and allow the rope to move freely through the ascender
- Transfer your weight to the strong side ascender and foot
- While transferring to your strong side, repeat the same upwards fluid motion with your weak side ascender and foot
- Transfer your weight back to the weak side and repeat the pattern
 On the first few pushes with the weak hand ascender, you may have difficulty getting the rope to flow through the cam properly. If this happens, simply pull the trigger to partially release the cam as you push the weak hand ascender up.
The ascender should be locked in through the top most hole using a locking carabiner (as described in the last article), and will not release from the rope during this maneuver.
Also, be careful not to let the ascenders slam into each other (while bringing the weak hand ascender up), as it may make it difficult to make the next push. Try to leave a few inches between the ascenders after the weak hand push.
Completion
Once at the top of your ascent, simply pull yourself up over the rock face and unclip your ascending equipment. If you’re setting this up just to practice ascending you can either descend with your ascenders the same way you came up, or hook into a descender such as a figure 8 to get back down.
Descending with ascenders is not the most ideal thing to do and will cause a nice forearm burn (not a real burn) if attempted. We show this on the video, but be extremely careful here to allow proper clearance between the ascenders.
Keep in mind that to release the ascenders to get back down you have to push up first before the cam can be opened. If the ascenders are right on top of each other there will be no clearance to push up on the ascender to back it down.
Check out our video below for a walkthrough of the ascent
For further information on the Black Diamond nForce Ascenders visit Black Diamond’s Web site at www.blackdiamondequipment.com
For further information on Metolius Easy Daisies and Easy Aiders visit Metolius’ Web site at www.metoliusclimbing.com
This information is provided solely as reference to supplement proper ascending training from an experienced guide, not replace it. Ascending is one of the most dangerous things you can do in climbing because you have to rely on your equipment and anchors 100%.
Discussion