


Performance Under Pressure: Accurate Ordnance 6.5 Creedmoor Precision Rifle Build
Performance Under Pressure: Accurate Ordnance 6.5 Creedmoor Precision Rifle Build
In terms of my overall firearm ownership timeline, I’m a relative newbie to Precision Rifle. In the two years since I’ve jumped in with both feet, I’ve attended a phenomenal course of instruction at Rifles Only, competed at the annual Mammoth Sniper Challenge twice and have been fortunate to work with many of the top companies in the industry to build my own 6.5 Creedmoor rifle.
In this article, I’ll be walking through my Accurate Ordnance 6.5 Creedmoor build process in hopes that this article provides a good starting point to those wishing to build their own Precision Rifle. A caveat to this process is that while I worked closely with these top industry companies and more specifically, Accurate Ordnance, to select the parts that would be used in this build, I didn’t build it myself like I did with the DIY AR-15 Build, or the DIY AK Build.
When it comes to building a Precision Rifle, I’m of the opinion that with a completely custom build, things like bedding, inletting, cutting a barrel, chambering and threading to precise tolerances should be left to the professionals. This isn’t said to disparage those who have access to precision machinery and have the know how to do this themselves.
Rather, this is to say that I know my limitations and lack the years of experience that Accurate Ordnance has building Precision Rifles, therefore I’ve deferred to them. I also learned a ton of great information from Mark and his crew at AO, both during the build process and when I toured their Widner, Georgia facility late last year.
What’s a Precision Rifle?
The term Precision Rifle might seem ambiguous and some also refer to it as Long Range Shooting, but I feel Precision Rifle is a more fitting term. By my definition, a Precision Rifle is a firearm capable of maintaining repeatable accuracy when engaging targets out to 1,000 yards from any position, to include non-standard shooting positions. This “precision” also requires a competent shooter with a well developed fundamental skill-set.
To quote Jacob at Rifles Only, “It’s not the gun behind the nut, it’s the nut behind the gun.” Meaning the gun is only as good as the shooter behind it.
Accurate Ordnance
I first heard of Accurate Ordnance around the same time I was introduced to the world of Precision Rifle by my friend Jason Crist. As purchasing a gun capable of PR performance was a distant goal of mine, Jason thankfully had a .308 built by Accurate Ordnance he was willing to let me learn on.
This was not only the platform I learned on, but used during the Rifles Only Precision Rifle I & II courses and competed with during my first Mammoth Sniper Challenge. I quickly grew to love the gun and the performance I was capable of with it. However, I never once outshot the gun; meaning that I never got to the point where I was capable of performing better than the gun could shoot. This is still the case.
Jason had always raved about the build quality of his AO .308 that had been built on a Remington 40x action, but with an unbiased opinion going into my usage experience with it, I formulated my own thoughts. Like a good Doctor does, I concur with Jason’s assessment. Naturally, having had experience with Accurate Ordnance, I knew I wanted to talk to Mark when it came time to grow up and build a Precision Rifle of my own.
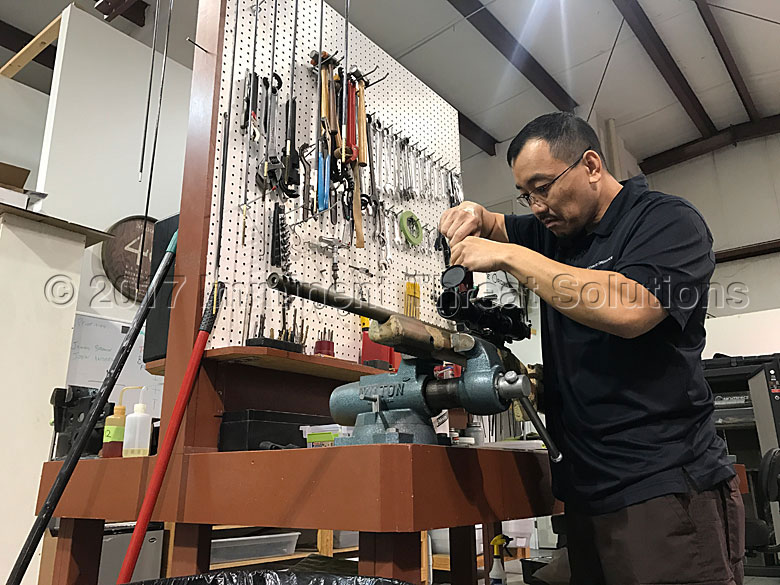
Mark Kuczka is the business manager at Accurate Ordnance and one of the most friendly and knowledgeable people I’ve ever met in the industry. His insight during the build process was extremely helpful and I very much valued his feedback in not only making recommendations, but explaining the why behind it too.
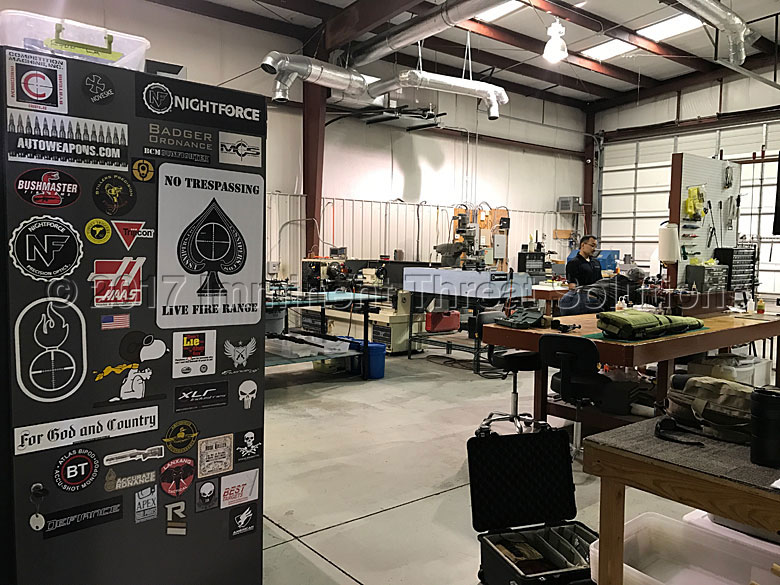
Accurate Ordnance is located in Winder, Georgia, just east of Atlanta. Within their facility, they operate their custom manufacturing shop, gunsmithing services and NFA dealership. Their facility also houses a pro shop where they sell their in-stock Signature Series Custom Rifles and other high-end firearm accessories.
While it’s in their name, Accurate Ordnance is known for their quality and exacting standards building high precision bolt-action rifles. Their rifles are built to customer specifications using only the highest quality parts and craftsmanship. They pride themselves on honesty, integrity and complete customer satisfaction.
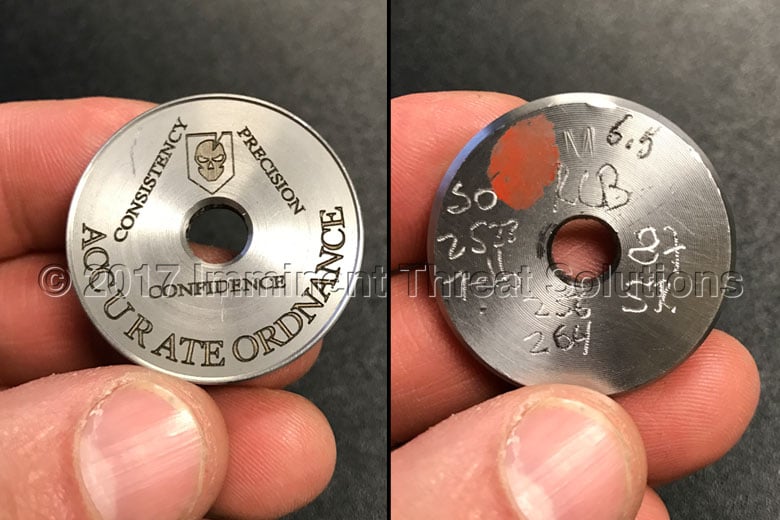
I very much enjoyed the opportunity to tour Accurate Ordnance and meet Mark, Woody and the AO crew in person. I was humbled by the gift that Mark presented me, which was a Challenge Coin that Woody had created using the barrel stub from the Rock Creek Barrel blank on my rifle. It’s probably the most unique Challenge Coin I’ve ever been presented.
The 6.5 Creedmoor Advantage
While I’d read quite a lot about the ballistic advantage that the 6.5 Creedmoor cartridge has over .308 Winchester, I’d always thought my first build would be a .308 Win. The reason was due to it being the standard precision round for Military and Law Enforcement for decades.
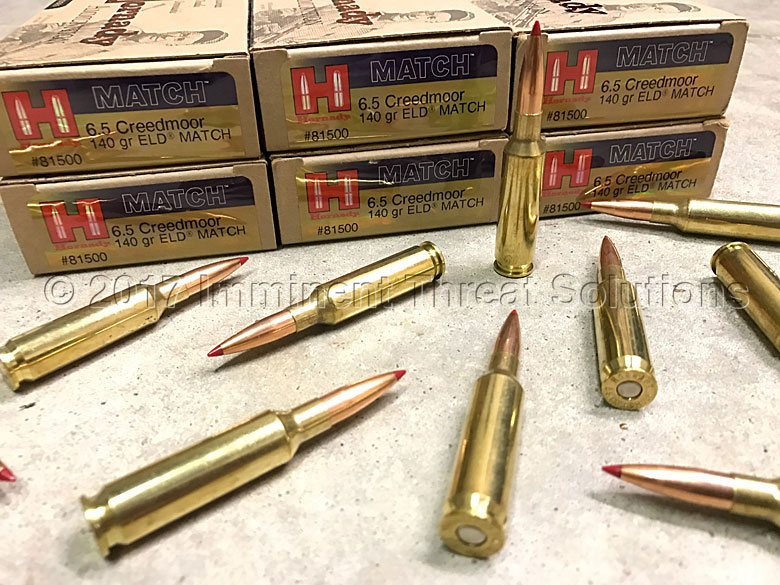
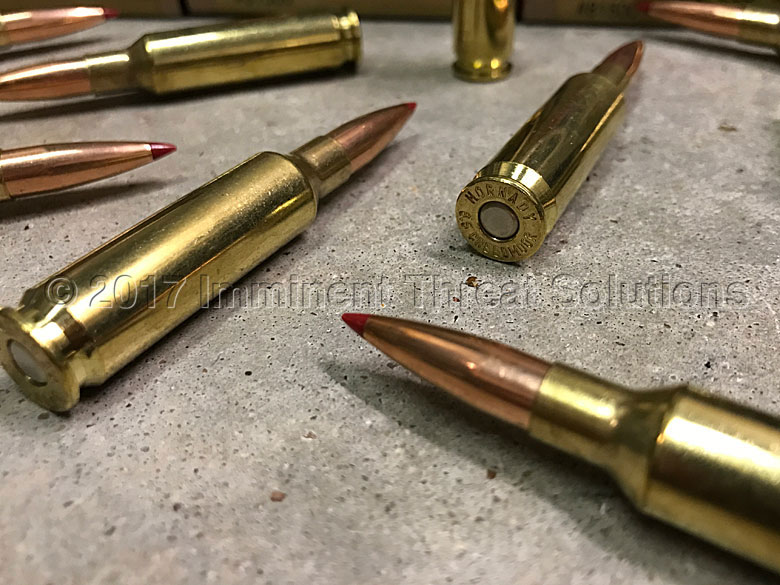
The first year I competed at Mammoth, .308 Win was also the largest allowed caliber there. Just to provide a bit more detail here, the G1 BC of the .308 Federal Gold Medal Match 175g Sierra Match King I’d been shooting, is .505. The Hornady 6.5 Creedmoor 140g ELD I’m shooting now, has a G1 BC of .646.
Two things changed, one is that I started learning more about ballistic coefficient and the effect of environmentals on a bullet once it leaves the muzzle and two, the 2017 Mammoth Sniper Challenge changed the caliber restriction and included all rounds up to .300 Win Mag (Winchester Magnum). There’s also less felt recoil shooting 6.5 CM vs. .308 Win., but that really wasn’t a factor for me.
6.5 Creedmoor has been gaining in popularity over the years, as the commercial and competitive Precision Rifle market isn’t restricted to the same requirements that have kept the Military and Law Enforcement using .308 Win. If you want to delve further into caliber comparisons, there’s an excellent discussion in this article on Guns & Ammo.
For me, it really just came down to realistically being ready to build a gun, my knowledge of 6.5 Creedmoor’s superior ballistic coefficient and Mammoth opening up their caliber restrictions. That and discussing its advantages as a platform with Mark from Accurate Ordnance.
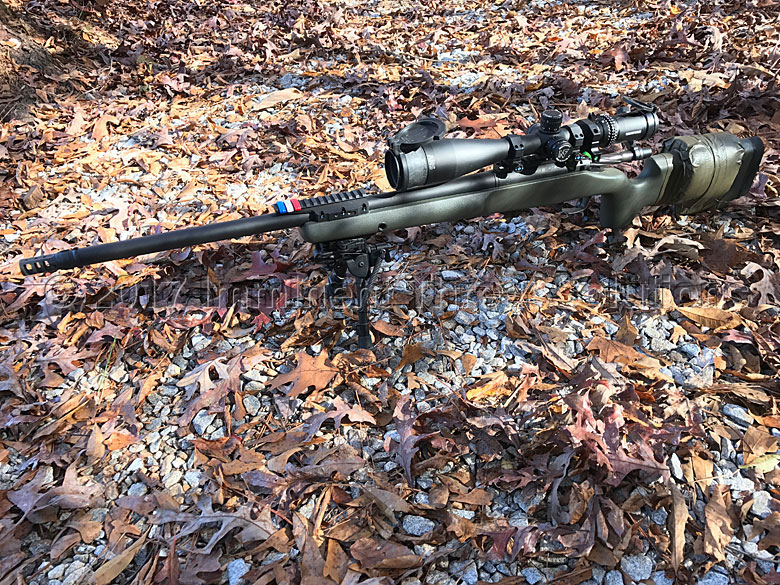
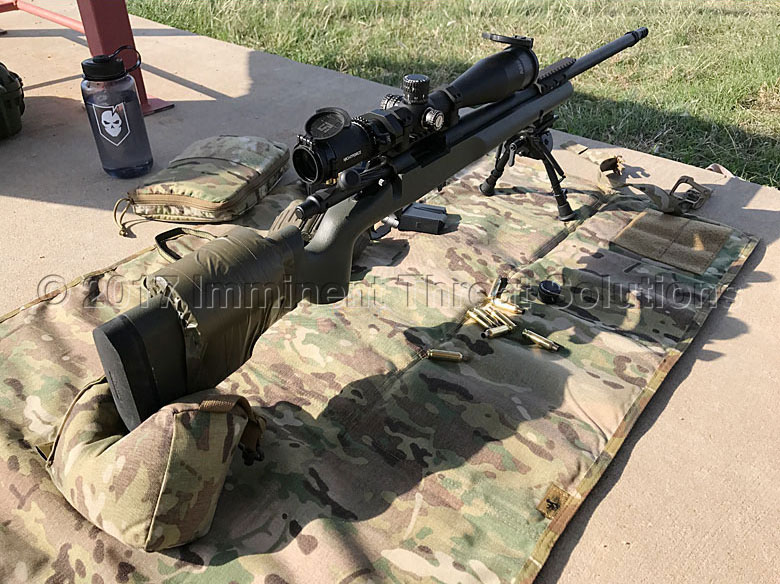
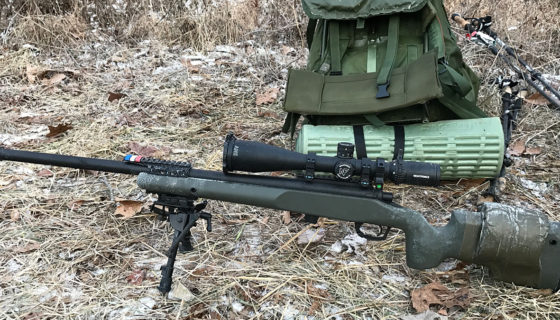
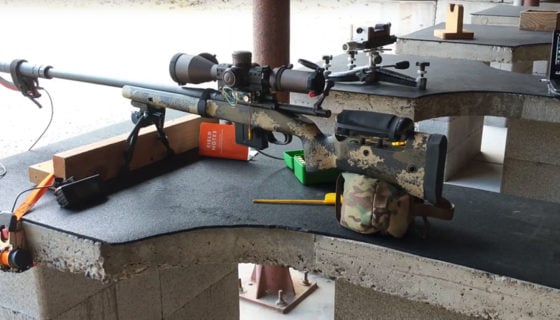
Accurate Ordnance Custom Rifle Build Specs
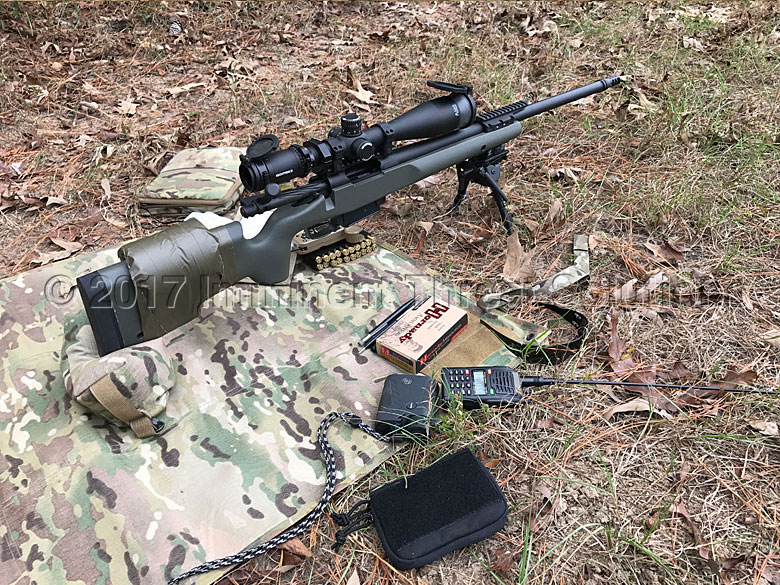
The 6.5 Creedmoor I built with Accurate Ordnance represents a culmination of a few different companies that I reached out in my search for what I felt were the best parts to utilize. Up front, I’ll mention that ITS did incur costs to build this rifle, but those were reduced by the companies I chose to go with offering industry discounts and their help in putting me in touch with the right people to make things happen. For this I’m very grateful, as I’ve learned a lot from these folks and much that I’ve been able to share with our readership.
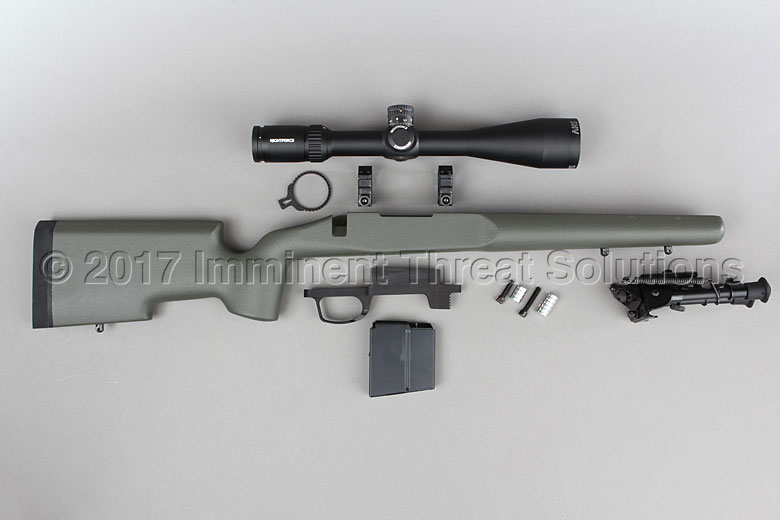
I worked with Nightforce when selecting my scope, Badger Ordnance when selecting scope rings, bottom metal and accessories, as well as Grayboe when landing on a stock for the build. I’ll be going through each section of the build, highlighting the specifics for each section.
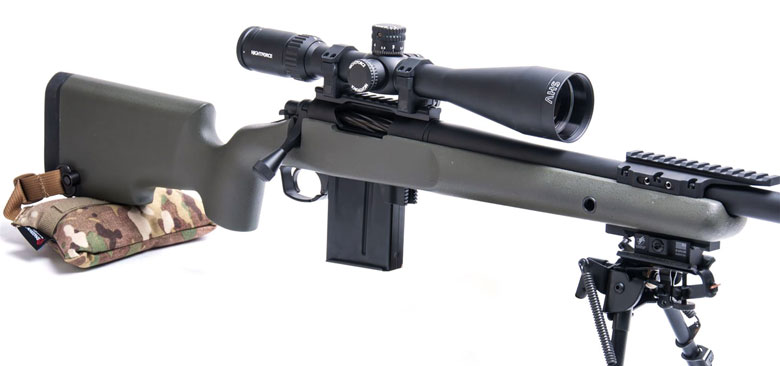
Receiver
When it came to the receiver, I originally considered using a Remington 700 Short Action, but settled on the Stiller Precision action that Accurate Ordnance has made to their specs. It features a one piece bolt assembly with an M-16 style extractor and a pinned recoil lug. For inquiring minds, the recoil lug transfers the recoil to the stock, rather than the action screws. AO also laps the recoil lugs on the receiver before installing the barrel.
My Precision Rifle trigger experience was with the Jewell trigger that Jason had installed on his .308 rifle. While I really liked it, I didn’t like the looming chance that it would need to be flushed with lighter fluid to keep it running in dirty, dusty environments.
That being said, I never had that issue when running that particular Jewell trigger through the Rifles Only courses and the Mammoth Sniper Challenge. I went with a Timney Trigger in the end, as I didn’t need the lighter adjustment the Jewell is capable of and I’ve enjoyed the crisp trigger pull of the Timney and the increased security of knowing I won’t run into issues in different environments.
Manufacturer: Stiller Precision Firearms
Model: Accurate Ordnance
Blue Print: Lap Lugs
Lug: Stiller Pinned; .1875”
Trigger: Timney Triggers #510THIN Tuned to 2 lb. 8.8 oz.
Other: Stiller 20 MOA Pinned Scope Base
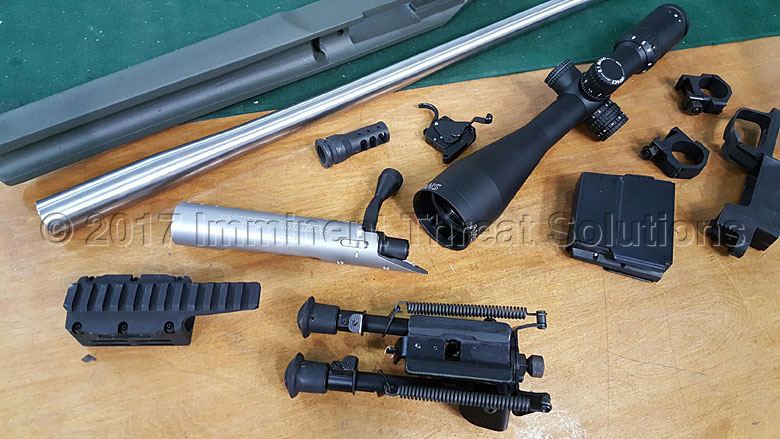
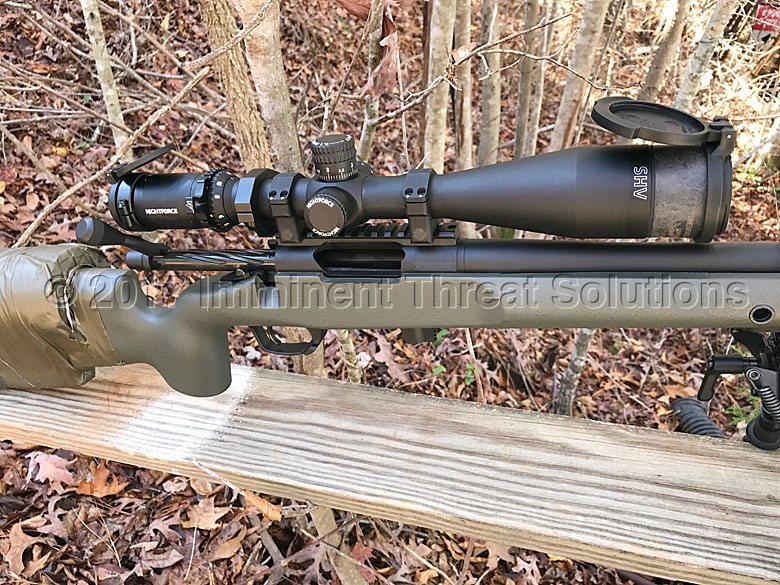
Barrel
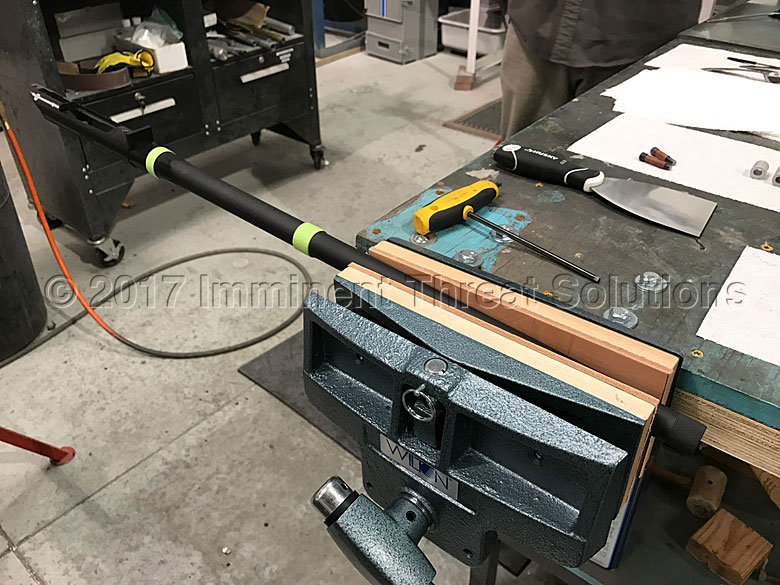
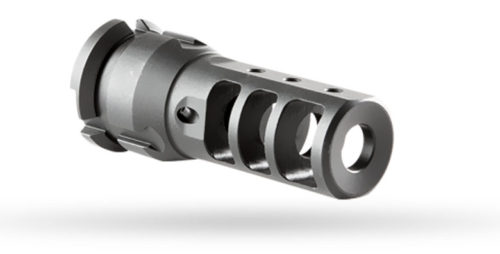
The rifle I’d been shooting utilized a Remington Varmint Contour and Mark explained that the benefit of a Sendero Contour. It’s just slightly heavier than the Varmint Contour, but not too heavy to carry or maneuver. The Sendero is also a medium contour that allows you to shoot longer strings of fire, even with the weight of a suppressor on the muzzle. I’ve had a Form 4 out on a Dead Air Sandman-S Suppressor that’s going on 9 months now. So one of these days I’ll be shooting this rifle suppressed, which is why I had the barrel threaded for a 5/8 x 24 Dead Air Keymount Muzzle Brake.
The barrel from Rock Creek is a Single Point Cut Rifled Barrel, the flagship of their barrel line. They’re manufactured on a twin spindle hydraulic Pratt & Whitney rifling machine from 416R Stainless Steel and mine featured a 5R rifling profile with a 1:8 Twist Rate. All RC barrels are hand lapped for superb interior finishes.
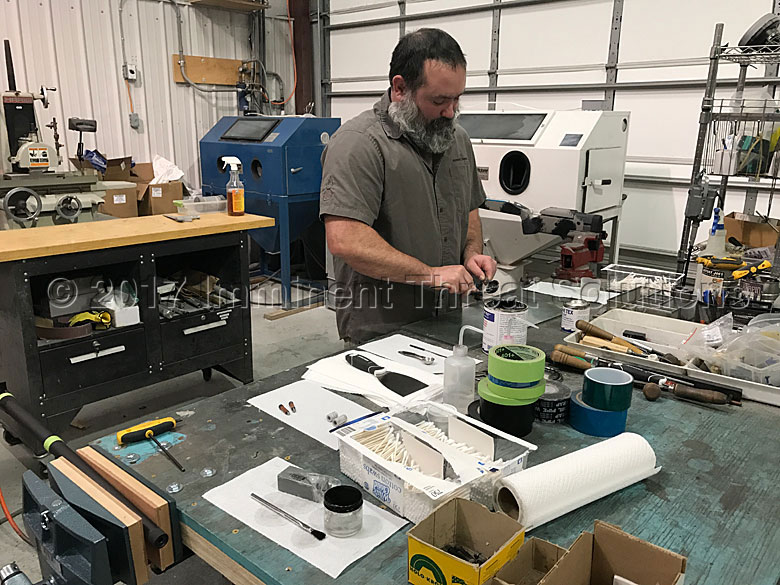
AO performed their work to the barrel on a HAAS TL-1 CNC Lathe and utilized a coolant system during the process that floods the barrel with cooling/cutting fluid to keep barrel and tools cool. This also flushes chips out of the way as it’s cut to produce the smoothest finish surface possible. The chamber is polished while still on the lathe and a JGS Carbide Chamber Reamer is used to finish it to AO specifications.
The last thing to mention in this section is that Accurate Ordnance used Graphite Black Cerakote to match all metal surfaces to the black used in parts like the scope and scope rings, so that everything looked consistent.
Manufacturer: Rock Creek Barrels
Caliber: 6.5 Creedmoor
Details: Sendero Contour; 1:8 Twist; 24” Finish Length
Headspace: .0015” Gap
Reamer: 6.5 CM Min Thr Fin 5/13 JGS
Muzzle Device: Threaded for Dead Air Armament Keymount Muzzle Brake (5/8 x 24)
Coating: All Metal Cerakoted Graphite Black
Stock
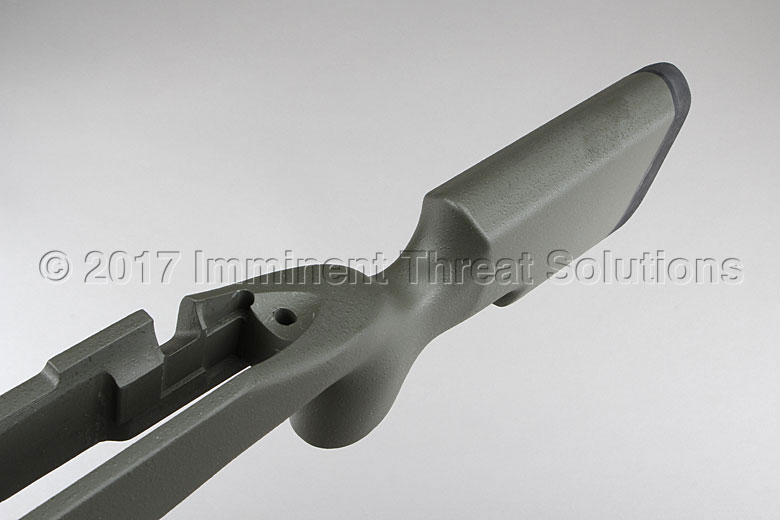
I’ve always loved the look of the McMillan A5 Stock and wanted to use one on the build. However, around the time I was choosing a stock, a new company called Grayboe came onto the scene. Grayboe was co-founded by Ryan McMillan, the grandson of Gale McMillan of McMillan Stocks. Ryan is a former Navy SEAL and had originally founded McMillan Firearms Manufacturing in 2007, which was sold in 2013. He’s recently co-founded Grayboe, who is the only authorized user of the McMillan Fiberglass Stock Company A5 design. You may notice the similarity between it and the Grayboe Renegade stock I utilized for this build.
Considering the A5 is around twice the price and can often have a long wait to acquire, I was excited to give the Grayboe Renegade a shot. The Grayboe stock material differs from traditional fiberglass stocks by using a composite mixture that can perform in any environment and is still able to be cut and modified to install hardware, prep for bedding or additional modification.
It’s as workable as wood and Accurate Ordnance had no issues pillar bedding it, or inletting it for the Badger Ordnance parts and accessories installed.
The Grayboe Renegade features a beavertail forearm that’s wide and flat, perfect for shooting off barricades. The Action and barrel sit lower for enhanced stability and control with the Renegade, which I really like. My favorite feature of the Renegade is the trim pistol grip, which allows me to get a nice flat purchase with my supporting fingers and keep it in my shoulder pocket better. The stock also features a dual-purpose butt hook for either trapping a rear bag, or controlling the rifle with the support hand. It also only weighs 3.75 pounds and is fully ambidextrous for those “wrong” handed people.
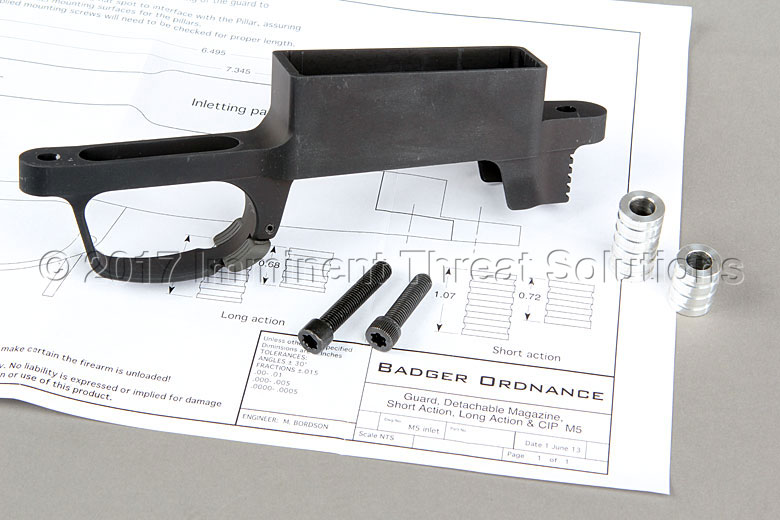
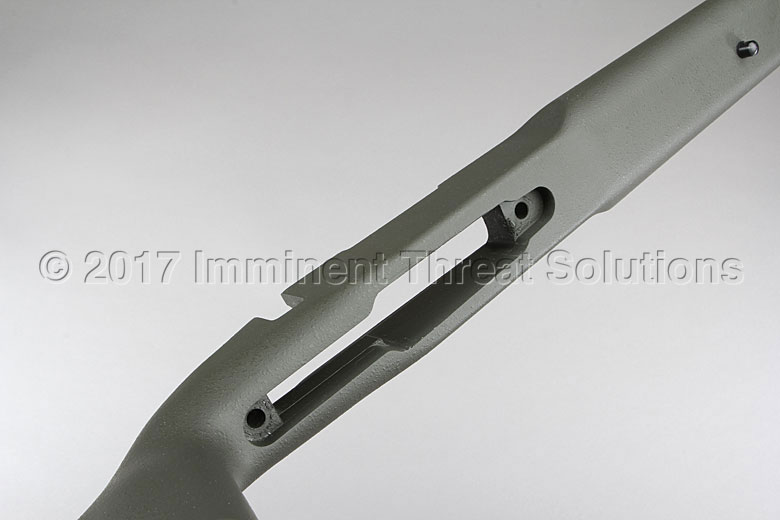
I went with the Badger Ordnance M5 Enhanced Detachable Magazine System, which AO pillar bedded into the Grayboe stock. Pillar bedding utilizes a rigid column between each of the two action screws. When the screws are tightened, there’s no chance they can be overtightened and put stress on the action. The M5 Enhanced features a low-profile ambidextrous magazine release lever that I really like, it also has a knurled barricade stop in front of the magazine well to prevent you from slamming your magazine into said barricade.
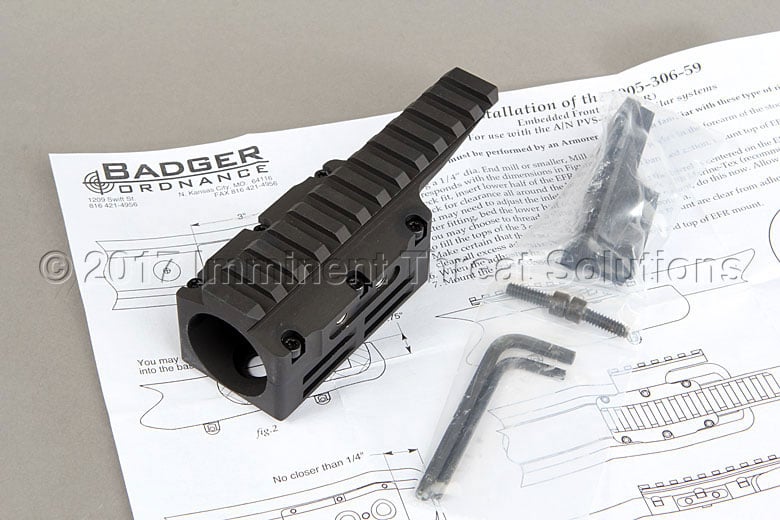
Accurate Ordnance also inletted the forend for the Badger EFR (Embedded Front Rail). While I can’t afford it now, I know one day I’d like to run a clip-on Night Vision scope in front of my Nightforce Scope. While a dedicated Night Vision scope can be the way to go for some, I’d prefer not having to remove my day scope and worry about my zero. The EFR handles mounting clip-on Night Vision or Thermal Imaging Systems through a 7” Picatinny Rail and also features the adaptability of adding side rails for IR Laser Aiming Devices.
Four flush cups were added in strategic locations at the advice of Mark, who recommended the left side rear cup sit higher so the rifle doesn’t feel top heavy when slung. The sling is mounted using the rear left and front left flush cups. For those not familiar with flush cups, they interact with the QD Push-Button Sling Swivels and make it easy to quickly disconnect things like slings and rear bags.
The right side front flush cup works great to retain my rear bag with when shooting off a barricade and the right side rear works well to retain it when shooting prone and using the rear bag to build a stable shooting platform.
It wasn’t necessary to mount it up high like the left side, so it’s in a lower position to allow my rear bag to travel more. The real benefit of having the bag connected in either location is that it’s attached when I move positions and I don’t leave it behind. This was a huge benefit at the Mammoth Sniper Challenge and the reason I didn’t leave my rear bag behind at a stage.
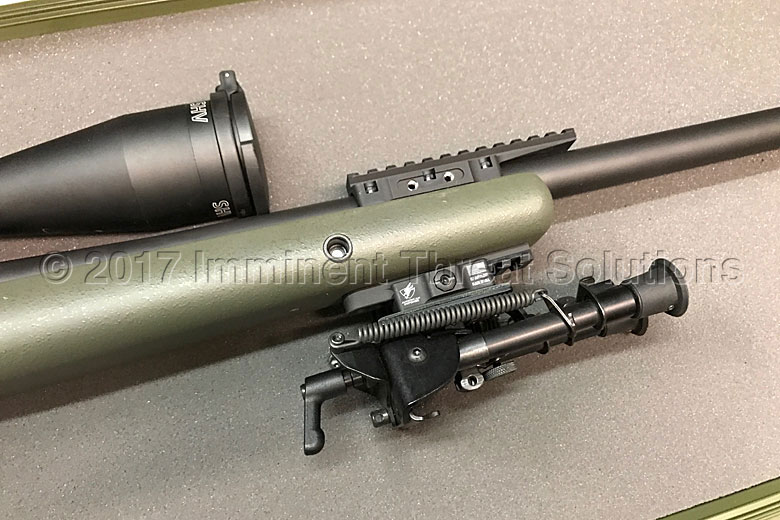
The last thing on the stock is the Badger Ordnance BAR (Bipod Accessory Rail,) which replaces the sling swivels that came on the stock, with a Picatinny rail (AKA MIL STD 1913 Rail) that allows the quick attachment and removal of a Bipod. I’m running a Harris HBRM Bipod attached to an American Defense Manufacturing Harris Bipod Mount, which adds a quick disconnect to the bipod for travel, matches that don’t allow bipods, or quickly changing to another bipod like an Atlas.
I’m also investigating a new offering that Badger released at SHOT Show this year, called the Low-Profile Harris Mount as a way to slim down the bulk I have in the bipod system I’m running.
Manufacturer: Grayboe
Model & Color: Renegade; OD Green
Bottom Metal: Badger Ordnance M5 Enhanced Detachable Magazine System (Competition M5)
Accessories: Badger Ordnance EFR Mount (Embedded Front Rail), Badger Ordnance BAR (Bipod Accessory Rail), Harris HBRM Bipod, American Defense Manufacturing Harris Bipod Mount.
Details: Pillar Bedded, Flush Cups on left front/rear for Sling; right for front/rear bags.
Optic
Nightforce released their SHV 4-14×50 F1 at the 2016 SHOT Show and I’d been excited about it ever since. I’ve always respected Nightforce’s reputation for quality and dependability, so the lower price point of the SHV really intrigued me. The SHV comes in at $1250, which is around half the retail price of their flagship ATACR line.
The SHV is a First Focal Plane scope, which was a desirable feature that I knew I had to have. Unlike a Second Focal Plane Scope, the reticle on a F1 scope stays the same size (relative to the target) through any magnification level. So measuring a target size through the reticle when milling targets for unknown distances is achievable at any magnification. To do this with a Second Focal Plane scope, requires you to have a specific power magnification set.
I knew I also wanted a Mildot (Milradian) reticle and not an MOA reticle. More importantly I wanted the reticle to be in Mils and the turret (elevation and windage) adjustments to be in Mils. The scope I learned on was Leopold MK4 that had a Mildot reticle and MOA turrets. This meant I had to do math way too much for my liking.
I prefer Mils for the simple reason that everyone I shoot with runs Mils and specifically my shooting partner. If he’s spotting for me, or vise versa I don’t want either of us doing math to make a correction. Do yourself a favor and whatever measurement you prefer Mils or MOA, ensure it’s Mil – Mil (reticle in Mil and turret clicks in Mil) or MOA – MOA (reticle in MOA and turret clicks in MOA). To quote Boondock Saints, “this mix n’ match $***’s gotta go.”
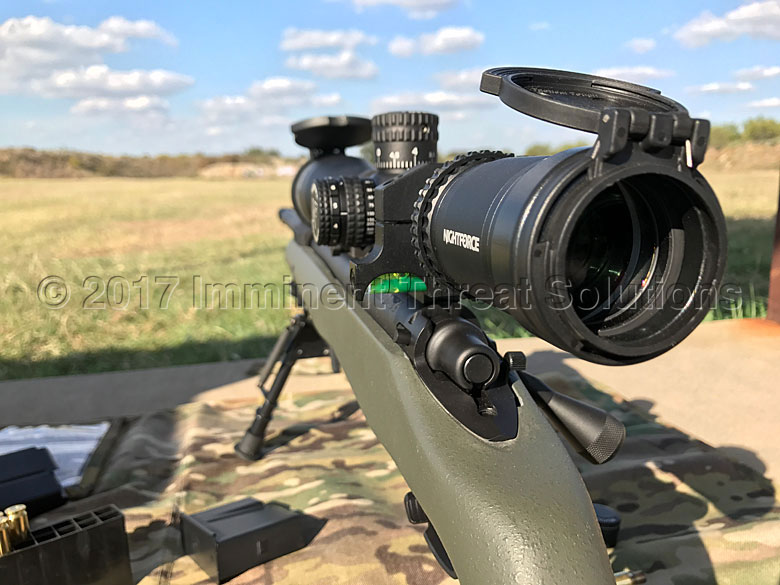
The Nightforce SHV scope has performed incredibly well and the 4-14 power has been great shooting at distances from 100 yards to 1,000 yards. During the chaos of the Mammoth Sniper Challenge it was easy to acquire targets and make split-second hold adjustments with ease. I also really like the parallax adjustment knob on the SHV, which has yardage measurements printed on it, rather than a numerical range. It provides a good starting point to effortlessly dial parallax to as a starting point at different yardage.
The 50mm objective is great to have and allows plenty of light into the scope in lower-light conditions. There’s also an illuminated reticle dial with 12 different brightness settings to help out as well. I was taught at Rifles Only to never dial for wind, so I really like the fact that the windage adjustment has a screw cap over it to prevent accidental adjustments.
I’m anxious to see if I can push this rifle out to 1,760 yards (1 Mile) and equally anxious to see if the SHV’s maximum magnification of 14x can support that distance. I just need to find space to make a shot like that happen.
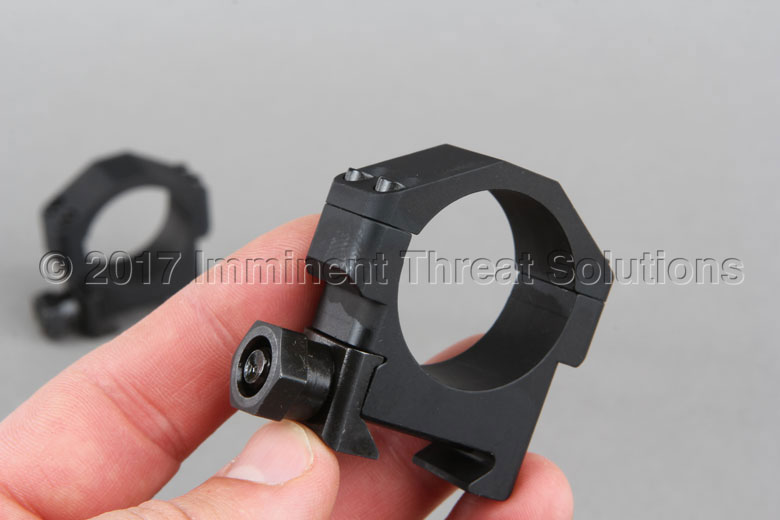
For the scope rings that mount the scope to the 20 MOA base on top of the AO Stiller Action, I settled on the Badger Ordnance Medium .885” height rings. While nothing on a rifle designed for precision leaves room for skimping, the rings are the life blood of a scope and a scope is only as good as the rings holding it.
Meaning that if your rings allow the scope to move in any way, your zero is screwed and you’re not making precise shots any longer. Badger was instrumental in helping me select the right rings and height for my scope and it’s a service they’ll help anyone out with. Don’t hesitate to reach out to them, they’re extremely helpful.
Details: Nightforce SHV 4-14×50 F1
Rings: Badger Ordnance 30mm Scope Ring – Medium .885”
Video Documentation and Info
Throughout the Accurate Ordnance Precision Rifle build, I documented the parts I received as they came in and discussed them on our weekly YouTube Gear Tasting show. This also included discussion after I received the completed gun. If you’re interested in additional build information, I’ve embedded the videos below:
Usage and Performance Notes
I’ve spoken specifically about the different parts of the rifle and the processes Accurate Ordnance used in crafting this precision instrument of awesomeness, but how does it shoot?
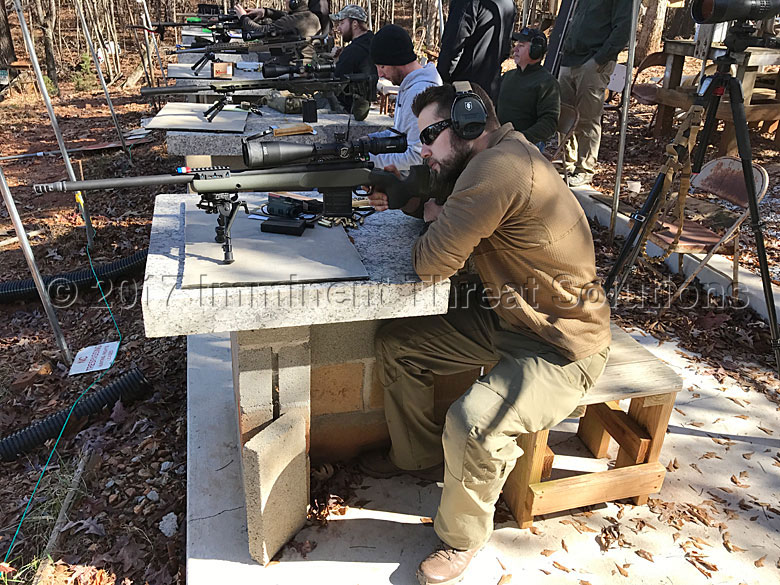
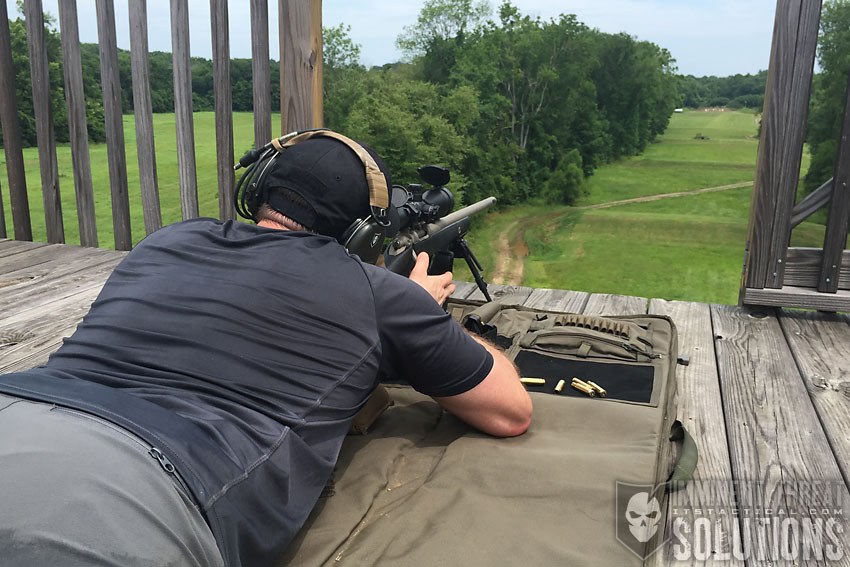
Despite the potential disappointment of some, I’m not a fan of going out and shooting from a bench at 100 yards to attempt a pristine group that I can then label as sub-MOA performance. I’m more of the opinion that performance should be judged on how the rifle has now run through the 166 rounds I’ve fired as of writing this article. Specifically, I’ll start by addressing the way it performed after zeroing.
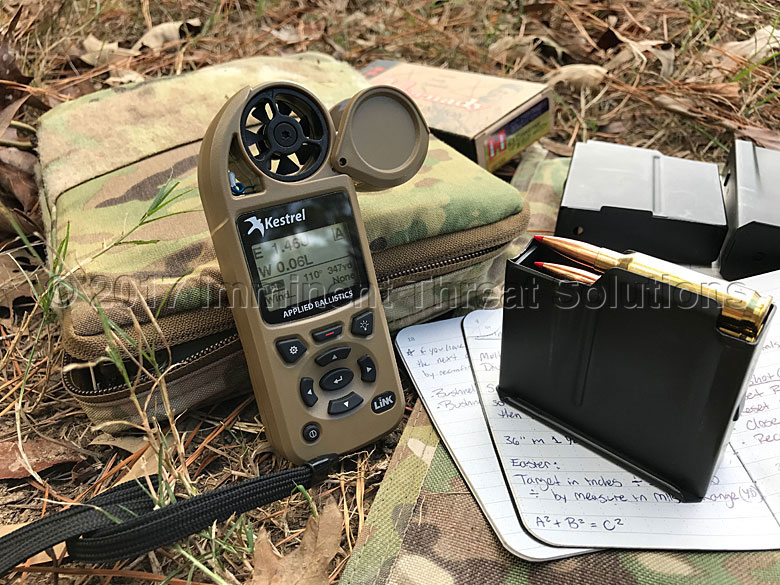
Once I picked up the rifle from my FFL, the first step was to build up the cheek rest, properly adjust the Nightforce scope to my eye relief, level the scope and torque everything down. Next it was time to head to the range and zero the gun. I also brought along my Kestrel Elite Weather Meter to add this new gun profile and see how well the integrated Applied Ballistics software was lining up with what the rifle was actually shooting.
I also set up a chronograph, so I could plug in the actual muzzle velocity into my 6.5 Creedmoor Kestrel profile as well. It took me about 15 rounds to zero and chrony the gun, which came out with an average MV of 2715. Pretty dead on, considering the Hornady 6.5 140g ELD has a stated MV of 2710. I plugged this value into the Kestrel and headed back to 300 yards to check the Kestrel’s given ballistic solution. The 18″ steel plate rang with a satisfying ping as I let the first round from 300 fly with a 1.0 MIL solution from the Kestrel. Success! I’d hit just slightly low and to the right of center and decided to send a few more.
More satisfying than my first round hit at 300 yards, was the fact that my Kestrel matched up with the performance of my rifle. I’d had some kind of issue with not being able to do that when shooting the .308 rifle. Needless to say I was extremely excited. After a few more successful shots from 300, I felt confident and decided to head all the way back to 1,000 yards. The Kestrel’s ballistic solution came back with 10 MIL, which I dialed and let one fly. Ping! There are few things as satisfying as a first round hit at 1,000 yards and that shot was definitely one I cherish. While I’ve been saving my 6.5 brass for reloading in the future, I quietly slipped that piece of brass into my pocket.
My shooting partner spotted me for a few more at 1,000 before we called it a day. I noted the DOPE I’d shot and how many rounds I’d gone through. With this rifle, I’ve been religious in keeping track of how many rounds I’ve shot, so that I can keep tabs for barrel life purposes.
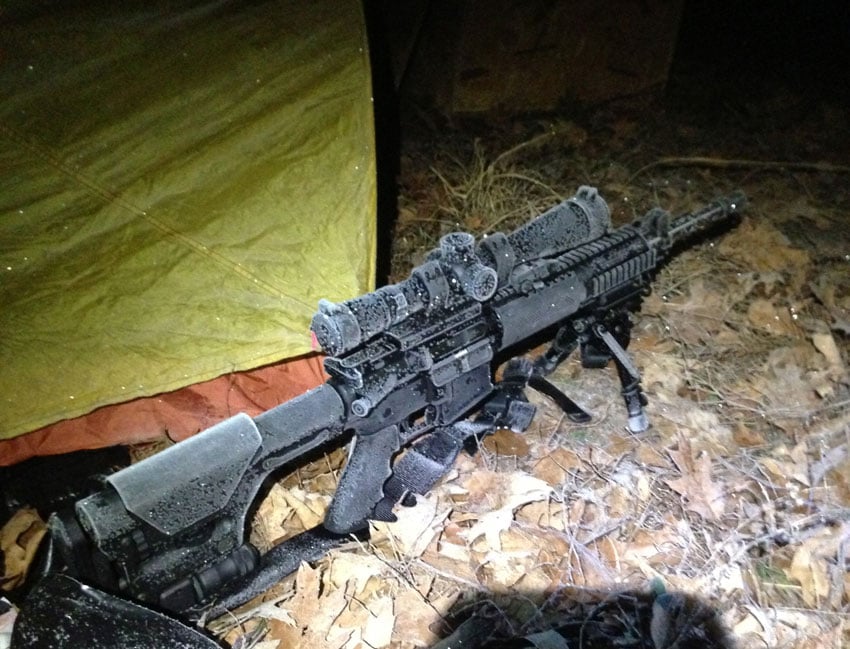
In all, I couldn’t ask for better results from this rifle from Accurate Ordnance. It’s performed incredibly each time I’ve asked it to and survived the freezing temps and abuse I threw at it during the 2017 Mammoth Sniper Challenge. I’m proud to say it’s a beast and is the most accurate and precise rifle I’ve ever owned or fired.
A looming question in your mind that I haven’t addressed yet, is more than likely cost. How much does a custom rifle like this cost to put together? The work that Accurate Ordnance did, along with sourcing the barrel, trigger and receiver through them, worked out to just over $3000 with shipping. The Nightforce SHV scope runs $1250. The Badger rings, bottom metal, BAR and EFR parts utilized, work out to around $700. With a few other accessories added in, you’d be looking at around $5,000 to build a rifle like this. There’s certainly areas you could modify to decrease the overall price, but building a Precision Rifle is no cheap endeavor.
Wrap Up
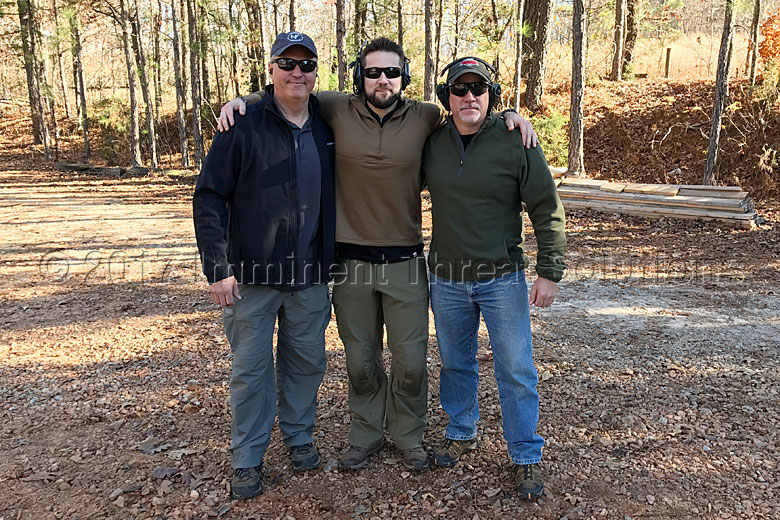
Bryan with Mark from Accurate Ordnance (Left) and Wayne from Nightforce (Right)
I’m happy to answer any questions you might have after reading through this build write-up, so please leave any comments below and if I don’t know the answer, I’ll do my best to find out.
This build would never have happened with the generous support and help from Accurate Ordnance, Badger Ordnance, Grayboe, Nightforce, Dead Air Armament and Rock Creek Barrels. I’ve learned more through this build than I ever imagined I would and it’s translated directly into my overall competency with Precision Rifle. I can’t thank those I spoke with directly at these companies enough for all they’ve walked me through. A huge thank you to Mark at Accurate Ordnance, Tyler at Badger Ordnance and Wayne at Nightforce.
Discussion