


The Complete Guide to Land Navigation with the Military Grid Reference System
The Complete Guide to Land Navigation with the Military Grid Reference System
The ability to navigate terrain with a map and compass is a skill-set that’s become lost in recent years due to technological advances like GPS and its integration into our smartphones. For many of us, navigating a city without a GPS would simply seem ridiculous. In a sense, we’ve become so used to the integration of our “devices” into every day life that we’ve lost the ability to perform a simple task, like leaving point A and arriving at point B without external help.
What if your life depended on your ability to navigate with a map and compass? Would you find yourself more alone than you’d hoped? Today, I’ll be going over the Military Grid Reference System (MGRS), which I feel is not only a better representation of our 3D world on a two-dimensional map, but also simple and easy to use. I’ll also tell you why it has an advantage over UTM.
With many Veterans returning home and leaving the service, MGRS has grown in popularity lately. This isn’t only because they’ve been taught this method in the military, but because it works and it’s simple. Even if you have your go-to method for navigating already, give MGRS a shot. When navigating in the wild, simple is usually better and you may find that you enjoy the experience much more than you’d think.
Refreshing the Basics
It’s always good to refresh the basics when talking about map and compass, but if you already feel confident with reading a map and shooting bearings with a compass, feel free to skip ahead to the MGRS section.
The Map
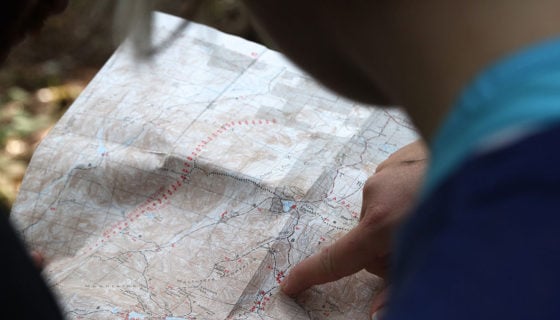
Lets start by talking about the most critical resource to have with you whenever you’re away from civilization, the map. Without one, it’ll be very challenging to move anywhere unless you grew up in the area and know it well. I highly suggest taking one with you, even if it’s a fishing trip just off of a road. The amount of information you can gain from referencing a map is actually pretty amazing when you break it down.
A few things that jump out at you are man-made objects such as railroad tracks, roads, power lines and more. These can be used as “handrails,” directing you to civilization if you come upon them while lost. You can also see natural landmarks, degrees of incline, lakes, rivers and even streams on the map.
For a good topographic map resource, check out USGS.gov to download topo maps you can print for free or pay to have certain printed topo maps shipped directly to you.
Water
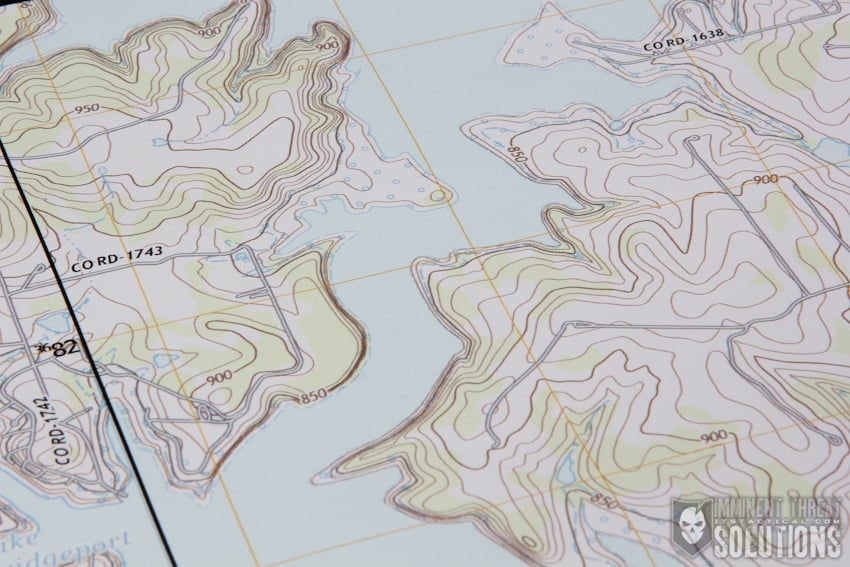
Knowing how to decipher these objects isn’t much of a challenge, but still worth mentioning. Water will always be shown in blue, whether lakes or small streams, this will remain true. Occasionally you’ll see small blue circles drawn over stretches of what appears to be land. This is to an intermittent water line. If you’re looking at a map of a Texas lake (like above) then you’ll see them in places which will be underwater after the rain season or without any water during a drought. You may also see small blue circles if you’re near an intermittent river. If these marks aren’t circles, but rather blue dashes, they represent large rapids. This is obviously important because knowing that the water is intermittent could tell you that in the late spring, after a snow melt, what would’ve seemed crossable is actually not. This is a mistake that anyone could make and the movie “Into the Wild” demonstrates the negative impact that it can have.
Please note that a topographic map stresses the importance of land, not water. If you’re interested in navigating larger sounds or inlets, then you may consider ordering a “chart,” not a “map.” Charts are for water navigation and will include sub-surface features.
Marginal Information
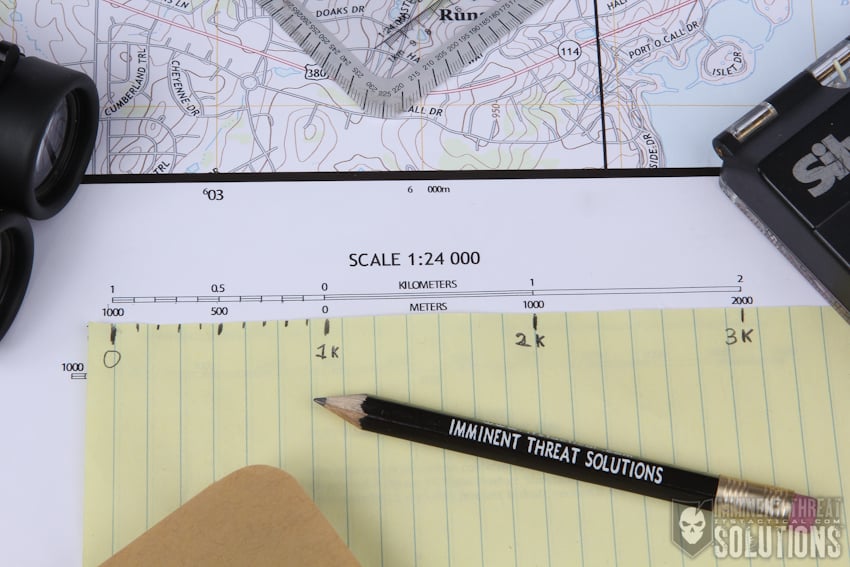
On the bottom of your map you’ll see some information meant to help you better discern what the map is telling you. One of the most critical pieces of information is the scale of the map. The two most commonly used scales are 1:24,000 and 1:50,000. What that means is that on a 1:24,000 map, one inch equals 24,000 inches on the ground. This also equals 2,000 feet, just in case you didn’t do the math.
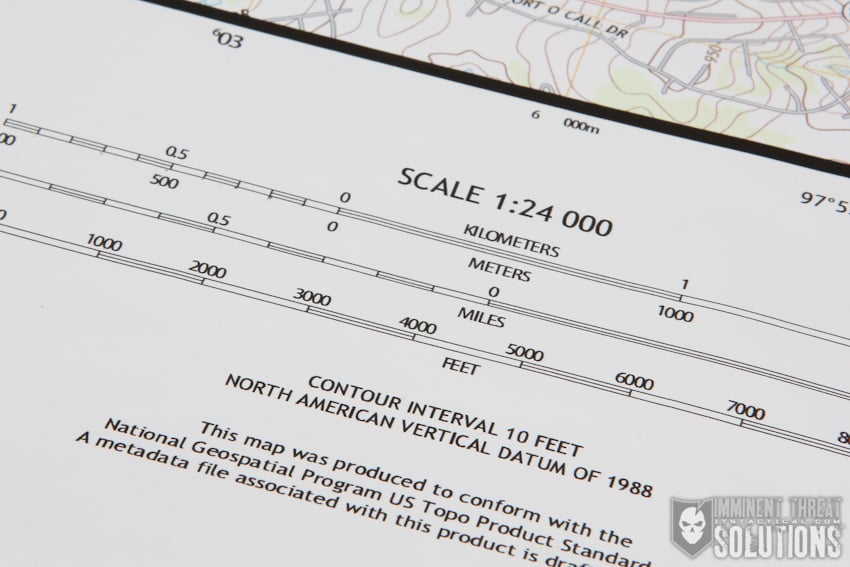
1:24,000 maps are also known as 7.5 minute quadrangles, due to their representation of an area that’s 7.5 minutes of longitude wide by 7.5 minutes of latitude high. Just to give you some perspective, there are thousands of these quads that make up every inch of just the United States.
Below the scale at the bottom of the map, you’ll see a line showing distance. There’s a scale for kilometers, miles and feet on a 1:24,000 map. I highly recommend taking a piece of paper from your notebook and drawing tic marks from the kilometer scale for later use. The reason we’re using kilometers is that when navigating with MGRS grid lines, distance is measured in kilometers, not miles.
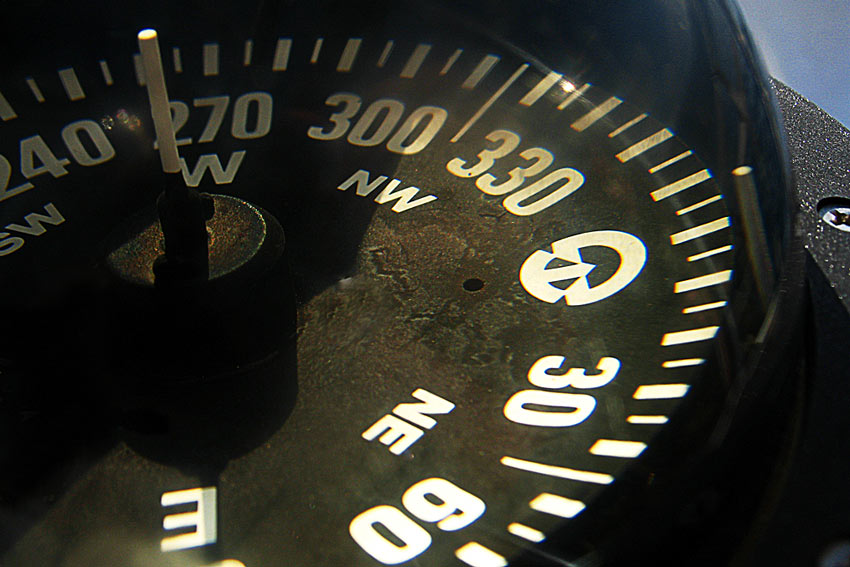
The Compass
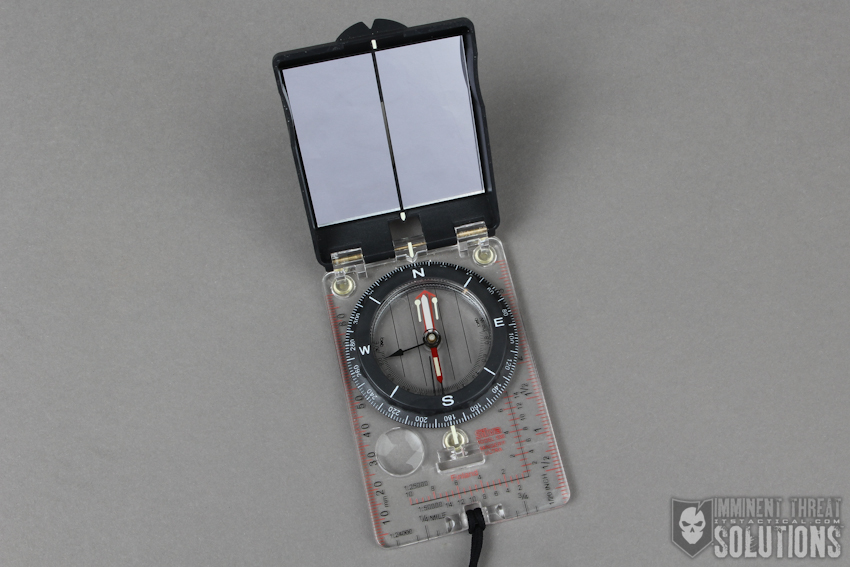
There are a few different schools of thought when it comes to choosing a compass that’s right for you, but I can tell you that you won’t be disappointed with a sighting mirror compass like the Silva Ranger or a sighting mirror compass with a global needle like the Suunto MC-2. In my experience these are the easiest to use and most efficient out there. The benefits are that the mirror will make it easier to get an accurate reciprocal bearing, as well as provide enough standoff for you to aim at a physical target while viewing your bearing simultaneously.
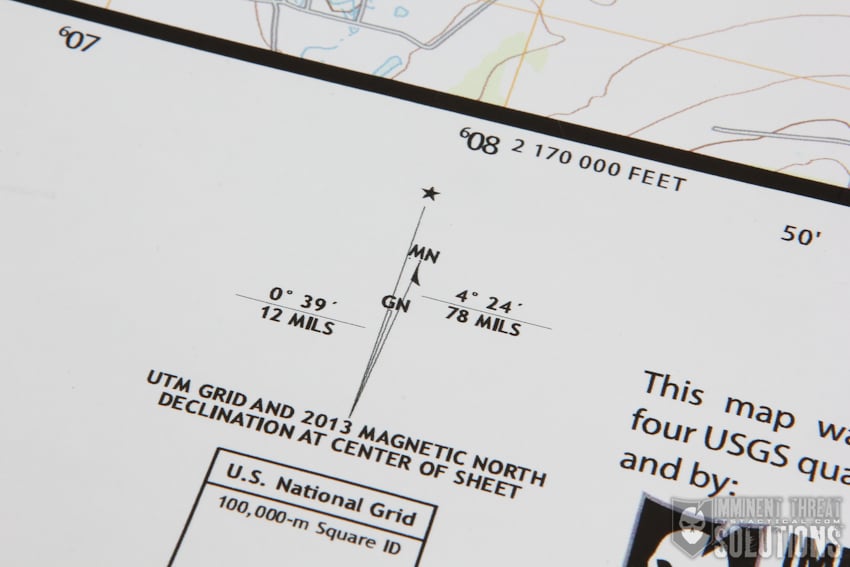
A benefit of a global needle is that it’ll function anywhere on the planet. It also has a declination adjustment if you’re in the camp that advocates changing your declination. If you’d like to read more about setting your declination and the reasons to do so, check out this ITS article.
MGRS
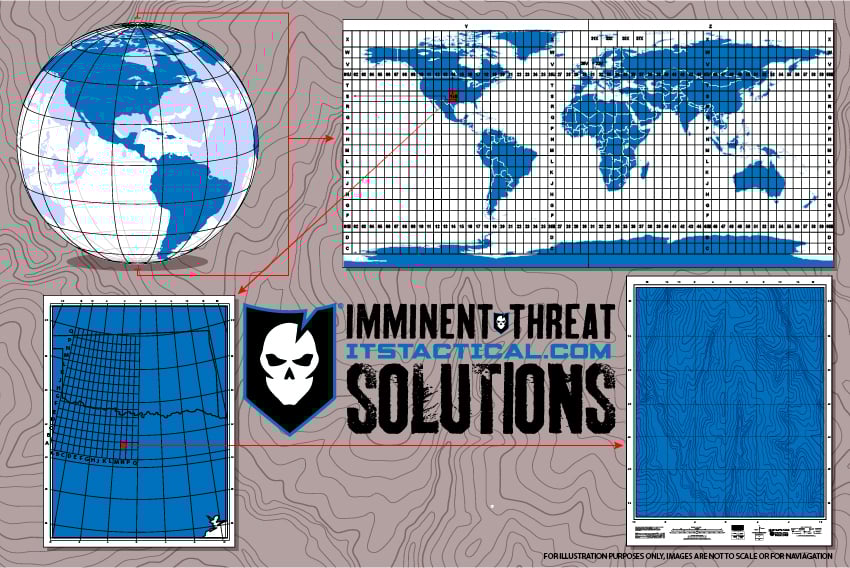
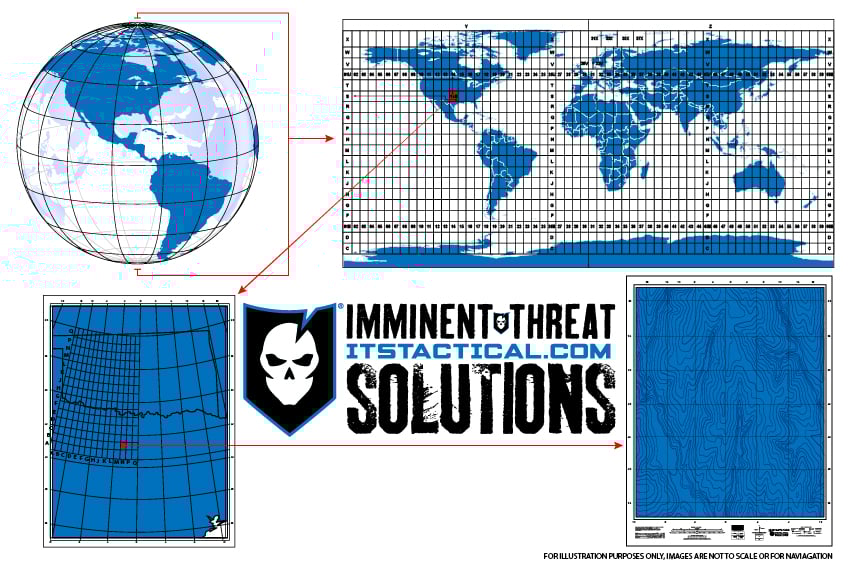
The Military Grid Reference System is a geographic coordinate system that comes from the Universal Transverse Mercator (UTM) grid system, which is based on a flat world, not a sphere. When you look at your map you’ll notice that the MGRS lines and the Latitude/Longitude lines won’t match up. This is to say that the distance between the two will be different from the top of your map to the bottom. This is because both Latitude and Longitude lines are drawn on the globe, which is a sphere. One of the key advantages of MGRS is that it provides a scale small enough to make perfect kilometer-length grid lines by depicting a round world as flat.
Making Sense of the Grid
An MGRS 8-digit grid coordinate will be expressed like this: 19TCG 3061 9196. Remember, we’re taking a projection of the entire Earth down to an object the size of a hot tub. Reading from left to right, you’ll be able to find a point as small as a ten-meter square from this number. If this was on a GPS then you’d have two extra digits and would be able to find a 1-meter location from the MGRS 10-digit grid.
Grid Zone Designation
The 19 refers to the grid zone. This means that your point is located somewhere in grid zone 19. The letter T refers to the Grid Zone Designation, which is a space measuring 6 degrees wide and 8 degrees high. There are 19 of these within grid zone 19. Note how the size of the grid squares near the Arctic are much larger than those near the Equator. This is because they’re actually covering the same amount of land space. The two dimensional depiction of our world is stretched at both poles out of necessity.
100,000-Meter Grid Square Identification
Next up you have a 100,000-Meter Square Identification that comes in the form of two letters. In our example grid 19T CG, the CG represents a 100,000-meter grid square within grid zone designation 19T. If you’re wondering, letters I or O don’t exist in the letter sequence in order to avoid possible confusion of the numbers 1 and 0.
If you’re already familiar with UTM, MGRS just simplifies this 2-digit portion of our grid by using letters rather than numbers. This avoids confusion by allowing you to quickly identify whether you’re looking at an 8-digit or 10-digit grid. If it was using all numbers like UTM, it’s harder to quickly identify.
10,000-Meter Square
Now the 100,000-meter square is divided into 10 parts. These separate parts consist of ten grid squares going west to east and ten more from south to north. If you look at the example coordinate again: 19TCG 3061 9196, the 10,000-meter grid square is the 3 in the first series of four numbers and the 9 in the second series of four numbers. This would be written out like 19TCG 3 9.
1,000-Meter Square
This is the scale that’s shown as grid lines on your 1:24,000 map. You’ll notice that once again the 1,000-meter square is separated into ten equal parts. 1,000 meters (or 1 kilometer) separates each grid line. The MGRS expression of this would be 19TCG 30 91.
As you can see we’re dialing it in. The last two numbers are what will bring you into the 10 square meters that you’re looking for. As you can probably guess, those numbers are referred to as the 100-meter identification 19TCG 306 919 and the 10-meter identification 19TCG 3061 9196.
For more information on how the UTM grid works check out an earlier article entitled “Understanding the Universal Transverse Mercator System.”
Plotting

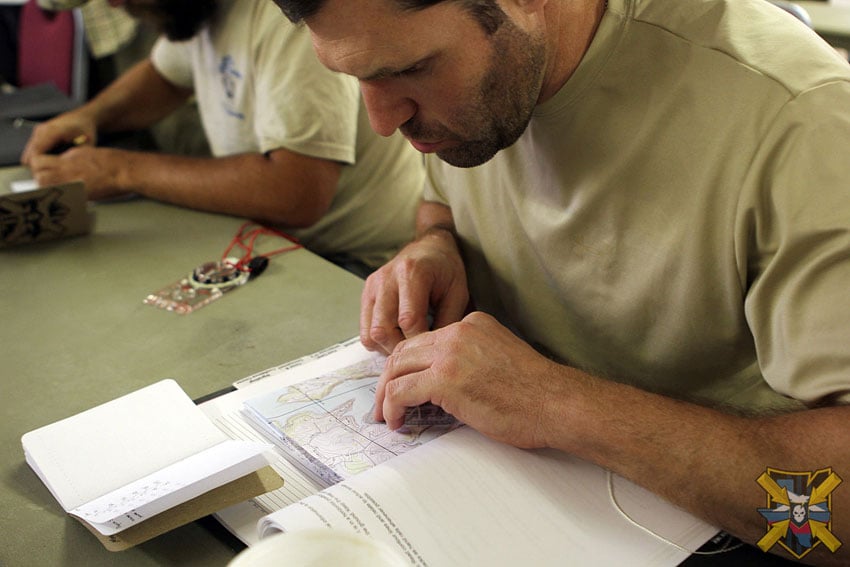
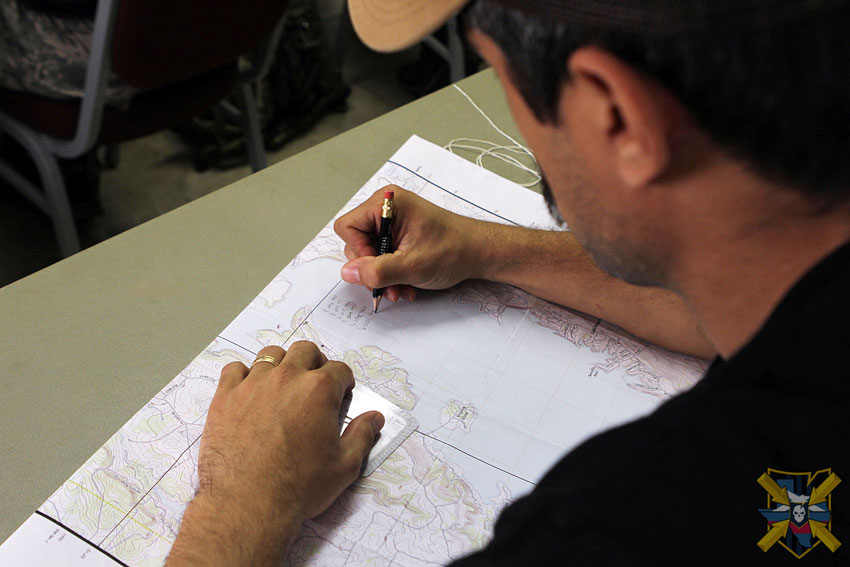
Now that we have our 8-digit grid, we’re ready to plot a point on the map. Start by getting all of the tools you’ll need ready to go. First off, you’ll need a protractor that has a scale that supports the scale of the map, we used the protractors included in our ITS Land Navigation Starter Pack. Most protractors have both 1:24,000 and 1:50,000 scales available and many have 1:25,000 for military topo maps. You’ll also need a pencil that’s as sharp as possible, so that your point is as accurate as possible. Next you’ll need a couple pieces of tape.
I highly recommend putting tape over the scales that you won’t be using on your protractor. This advice comes from a Muster attendee who accidentally plotted a point using the wrong scale and traveled a great distance over a 3,000 ft. elevation loss before finding out that he’d made a painful mistake.

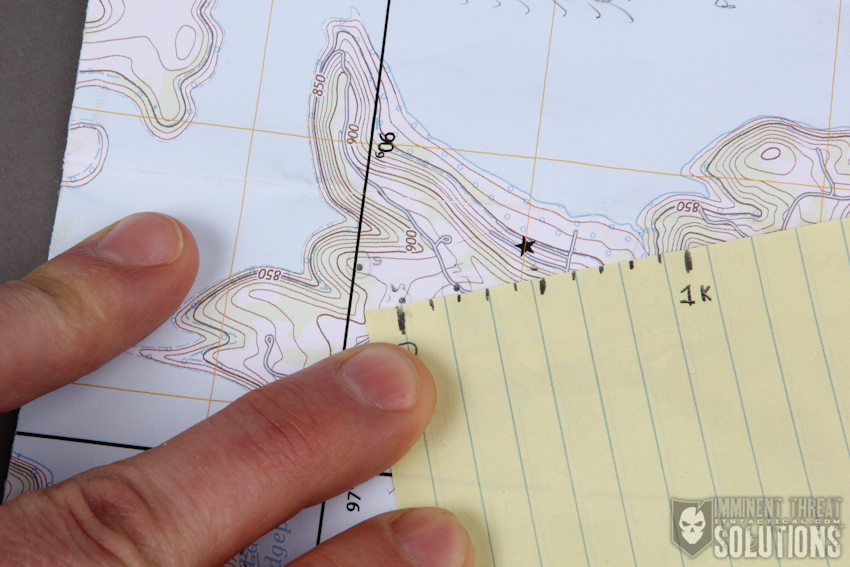
Find the grid square that you’ll be working with by using the first two numbers from both sets. 19TCG 3061 9196 means that your grid square is 30/91. To find square 30/91, start at the bottom left corner of your map and working from left to right, find grid line 30. The grid square you’ll be working with is to the right (east) of the line marked 30. Now move up within that grid square until you intersect grid line 91. The grid square you’ll now be working with is above (north) of the line marked 91. Remember that all numbers in an MGRS grid read left to right, bottom to top.
Now that you’ve identified the correct square, put the two zeroes that sit at the center of the right angle of your protractor’s scale on the bottom left corner of the grid square that you’ll be working with. Now you need the last two numbers of the grid.
19TCG 3061 9196. Once again you’ll plot from left to right first. Move the protractor to your right until the left grid line is directly under the tic marking 61. Now move the protractor up until the tic mark of 96 is sitting over the bottom grid line of your square.
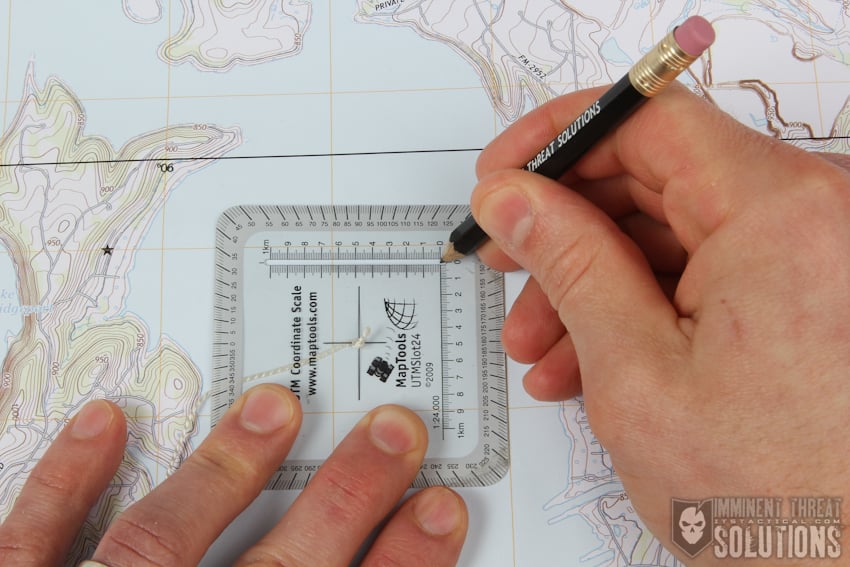
Note that this will take a couple of repetitions to feel comfortable with, so grab a few more points to plot. I firmly believe that unless you get your hands on the tools and practice the skill-set of plotting, you’ll probably never feel confident.
Distance
Once you have a couple points plotted, you’ll want to get the distance between the two. If your protractor has a distance scale then go ahead and use it. Just make sure that you’re marking your distance in kilometers, not miles. The way that I mark distance is to take a loose-leaf piece of paper and make tic marks based on the distance scale in the bottom margin of my map. This way I can mark four kilometers instead of being limited to the protractors one kilometer.
On the first 1 kilometer, I mark tic marks for every 100 meters. There are 10 total (remember that kilometer literally means “kilo meter” which translates to 1,000 meters). It’s nice to have smaller units for shorter legs of navigation. Now put the zero on your first point and mark where the second is on your home made scale. Log it in your notebook.
Bearing
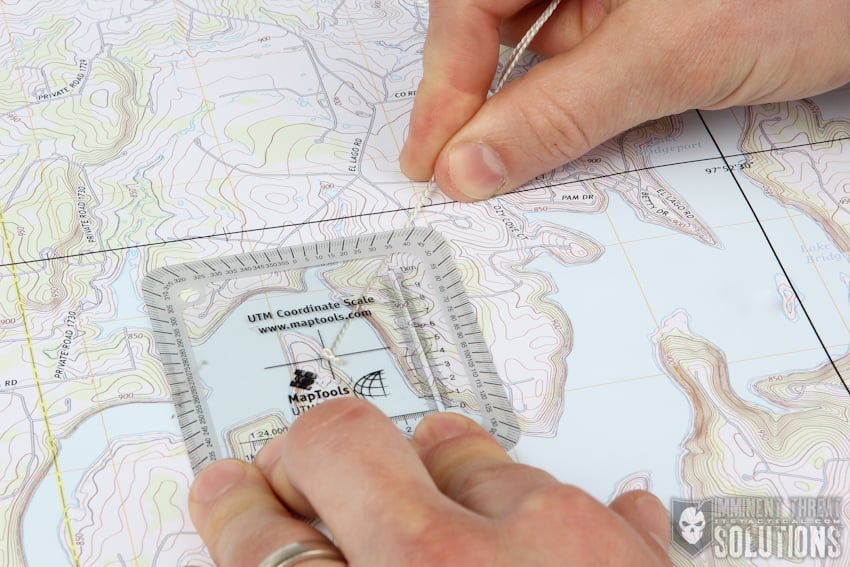
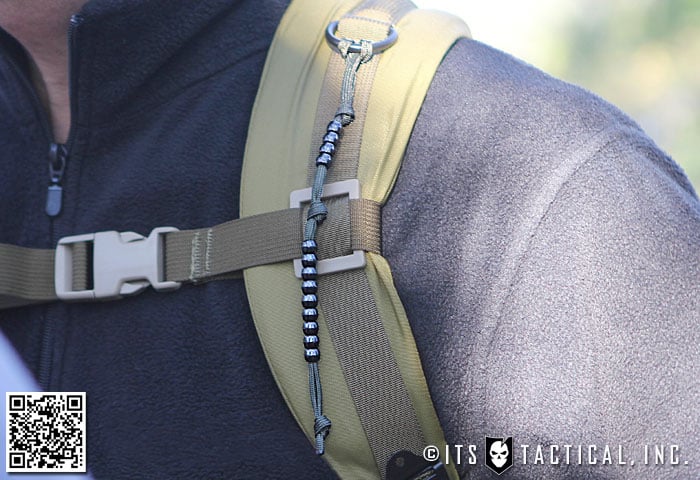
The final piece of information that you’ll need before you hit the road less traveled, is the bearing that you’ll be walking. The easiest way to do this is to take a single gut from a piece of 550 cord and tie a 12 inch section onto the center hole of your protractor. You want the knot as small as possible, so the best thing to use is a Figure-8 Knot. It’ll be wide enough not to pull through, but not as bulky as a double overhand. You’ll also want the knot on the top of your protractor so that it won’t interfere with you moving the protractor around, check out the photo below for a visual.
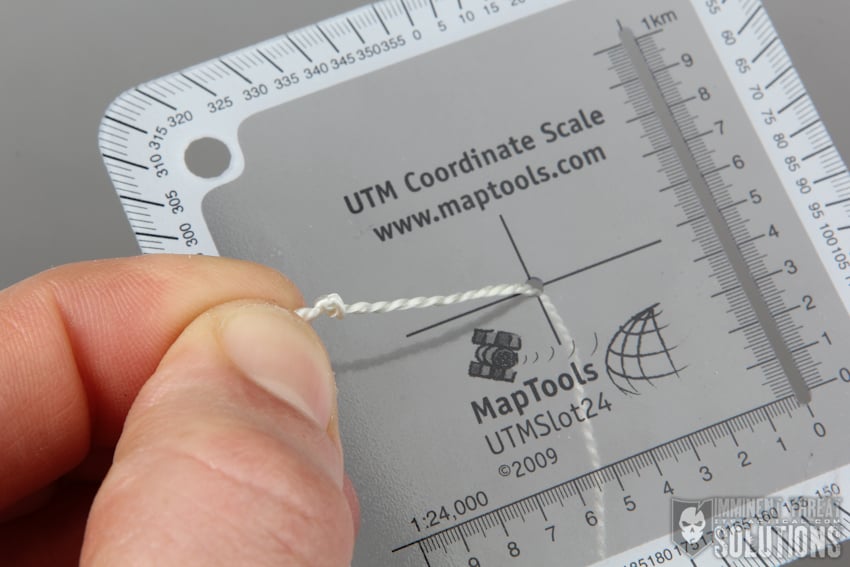
Once it’s tied, place the center hole of the protractor on your first point and line the left and right edges as close to parallel with the grid lines on the map. This ensures that the compass is oriented to grid north before you take a bearing. Now pull the cordage to the second point insuring that there’s no kinks in the line. Where your cordage crosses the outer compass rose is your bearing from point 1 to point 2.
I recommend logging the origin point, bearing and distance to the next point (as well as the second point itself) in both your notebook and on your map with pencil. This way the eggs aren’t all in one basket. and it gives you something to double check out in the field if you need to re-plot the point.
Navigating
Pace Count
The first step is to get an accurate pace count and to build a set of pace count beads, these will help you track your distance traveled, which is a crucial step in navigation. We have a great article on how to build your own pace count beads.
Measure out a 100-meter line and walk it several times to get an accurate pace count. I recommend starting a meter behind the beginning of the line so that you’re already walking your natural pace when you begin your count. Another piece of advice is to only count each time your right or left foot hits the ground during your pace count. This will cut the number in half and make it much easier to keep count in the field.
If possible, get a pace on flat ground as well as walking both up and down a hill. You’ll find that your pace will change greatly under different circumstances. When a hill is incorporated, your number will rise compared to your flat ground count. Adding vegetation and trees will change your pace as well. It’s not an exact science, but any chance to get a count with a different terrain variable should be taken as it’ll help you out down the road. Your pace is really a lesson in knowing yourself and when you should add or subtract paces in your planning.
For more on pace counts, check out “Land Navigation: Calculating your Pace Count”
Shooting a Bearing
Now that you’re out in the field and standing on your MGRS starting point, you’ll need to shoot a bearing to the point you’re traveling to. As a refresher, this step consists of turning the bezel on your compass to the bearing you’ll be walking, say it’s 090˚.You’ll line up 090˚ with the top indicator of your compass and then turn your body until “red is in the shed” or whatever way you remember to align the north facing needle into the red arrow of the bezel.
Once you have your bearing, put your compass in front of your face while keeping your arms in tight to your body and look through the top sighting notch of your compass. This is where the mirror comes into play on the top lid, adjust it down so you can see that the red is still in the shed and pick out an easily identifiable object as far away as possible. Although you won’t see your intended target you’re navigating to in the end, this is the object you can now walk to without having to continuously reference your compass.
Now that you’ve chosen your point, perhaps its a large recognizable tree, put your compass down and begin walking in as straight a line as possible towards the tree. Make sure to keep track of your pace count as you walk and to keep your eyes on the target so that you don’t lose your way. When you arrive at the object, get to the other side of it and shoot another bearing to a new target and start walking again. Don’t forget to resume your pace count and do not just start again.
When you’ve traveled to your known distance, stop and mark that location with whatever you have available. I recommend stacking three stones on top of each other, though others recommend dropping your backpack, or placing a marking panel on the spot. The goal here is to not let your original stopping point become lost if you have to search for a marker that designates the point you’ve navigated to. Again, I recommend using rocks because I never feel comfortable separating myself from my backpack.
Accuracy is key here. It doesn’t take as much degradation as you think to throw you off your bearing and take you completely off course. In fact, if you were to walk for 10 miles and you’re even 1 degree off, you’ll have traveled 280 meters off course. If you’re off by 10 degrees on your bearing, you’ll have traveled an amazing 2,795 meters off course.
Circle Search
From your closest known point you’ll want to begin your search with a small circle. The size of the circle is always dependent on the terrain you’re dealing with. In fact, most questions about land navigation end with the answer, “it depends.” This is because there are so many variables that will change your technique.
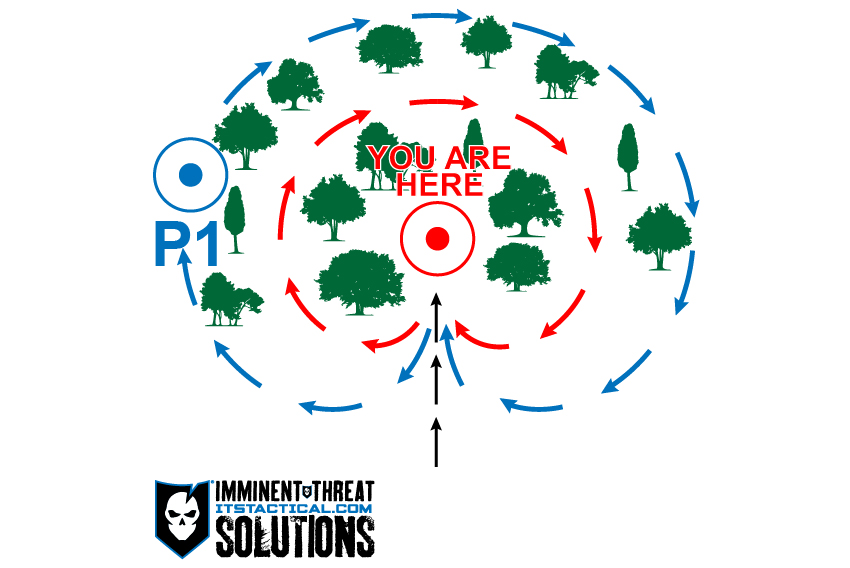
If the closest line of vegetation is far away and you can see that your target isn’t between you and the vegetation, adjust your circle to give you additional vantage points from varying angles. While the size of your target will also change the size of your circles, the circle itself will remain the same. If you complete one full circle and arrive back at your point then begin another larger circle, repeating larger concentric circles until you find the target.
Boxing
So what happens when there’s a large object between you and the target half way through your navigation leg? Since you’re dependent on the bearing and pace, you’ll need to find a way to get around it and wind up close to the same line of travel on the other side of the object in your way. This can be accomplished by using 90 degree turns and keeping a separate pace count for lateral lines of travel.
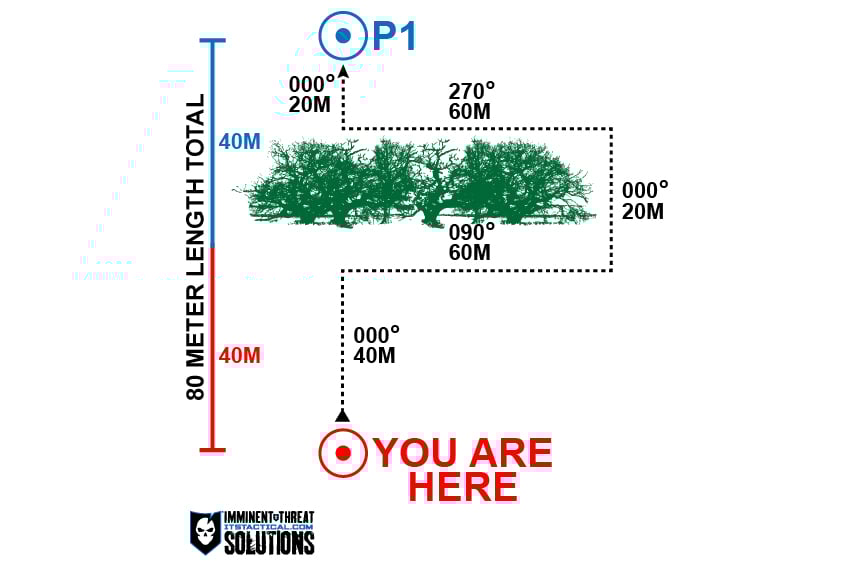
First take a 90 degree turn to the right (or left if applicable). Keep a pace count for the distance that it takes you to be free of the obstacle. Then take another 90 degree turn to your left. Now you resume your original pace count because you’re now walking in your original direction of travel. When you’re clear of the obstacle, make another 90 degree turn to your left. If your lateral pace count was 60 meters then you’ll need to travel 60 meters back in the direction of your original line of travel. When you get to 60 meters, turn 90 degrees to your right. Now you’re relatively close to your original line of travel. Take another bearing and resume your original pace count towards the target.
Offset Navigation
If you know that your next point is positioned next to a linear feature such as a road, river, power lines, or railroad track, you can deliberately offset your course to speed up your travel. For example, if your target is 200 meters away on a bearing of 050˚, then you can deliberately set a course of 045˚ so that you’ll hit the linear feature to the LEFT of your target. Now you can simply skirt the linear feature to the RIGHT until you find your point. This alleviates the need for a circle search. The reason why this tactic works so well is because it gives you two key pieces of information, it eliminates confusion and provides a backstop.
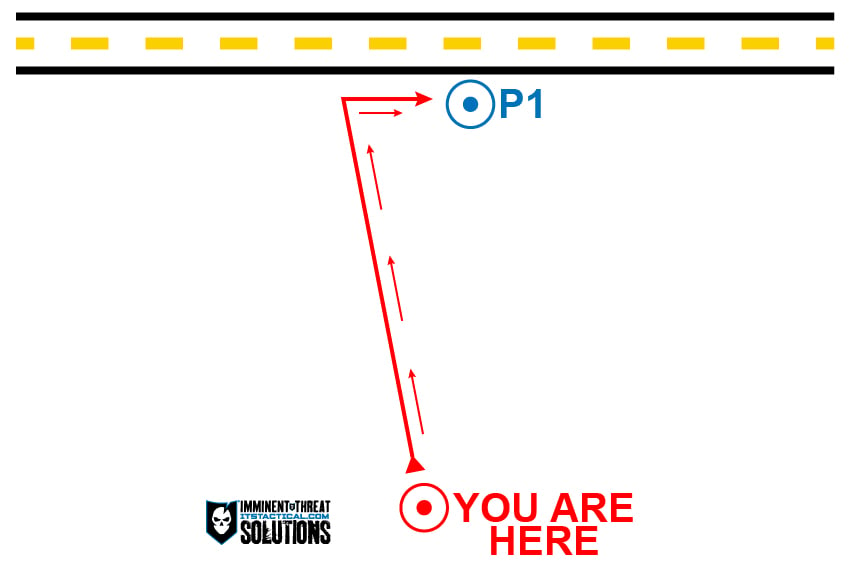
- No Confusion – If you were to use the linear feature as a backstop and walk your true bearing, you’ll have a good distance, but once you reach the road you won’t know which direction the point is. It could be to the left or to the right. When you deliberately offset your course, you’ll know without a doubt that you should turn right (according to the example above.)
- Backstop – You know you’ve overshot your point if your pace takes you across the linear feature. The linear feature will tell you “this far, but no further.”
Note that your degree of offset will be directly proportional to the distance of the leg. Meaning that if you’re traveling a 300-meter leg, you’ll use less offset vs. a 100-meter leg. Too much offset could take you too far off course and lead to confusion down the road.
Closing
With these tools and tricks you’ll be able to identify the correct map, use a proper MGRS plotting technique and find objects in the wilderness the size of a wooden stake in the ground. What a confidence boost! In a follow-on article, we’ll be discussing terrain association using the map and how to find your position when you become lost using a couple of different resection techniques.
Anyone figure out the location of the MGRS coordinates in the article?
Editor-in-Chief’s Note: Nick recently left the Navy after serving for 10 years as a Navy SEAL with multiple deployments, having been awarded the Bronze Star for operations in austere environments. Nick’s been with us since the beginning here at ITS on our Advisory Board.


Discussion