Knot of the Week: Snake Knot

Snake Knot

We continue our Knot of the Week with a decorative knot called the Snake Knot.

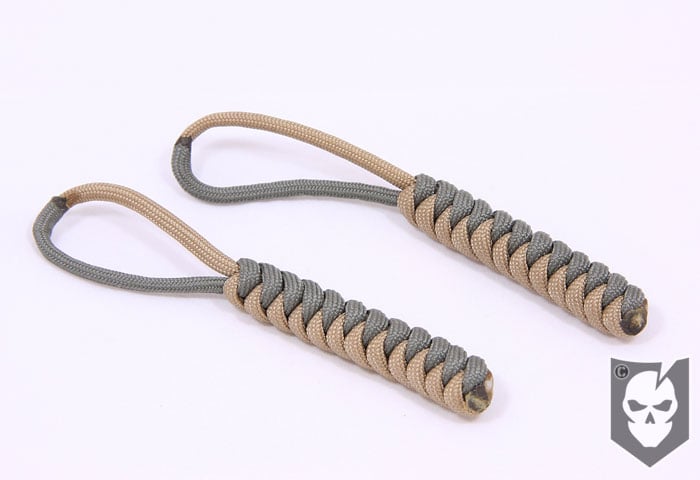
The Snake Knot is a common pattern in decorative knot work, and produces an almost round design.

We’ve constructed a Snake Knot Lanyard for this demonstration, with the intent to girth hitch it around something.

The method we used is just one way of attaching the lanyard. A lanyard knot, overhand knot or simply tying it on will work just as well.

Using paracord to make a keychain, bracelet or something else you carry daily, will ensure that you always have some readily available in an emergency.

If you remember back to our article on the Mini Survival Kit, we recommended that in addition to the kit, you also carry some paracord with you.

Snake Knot » Decorative

(Strength: 3/Secure: 3/Stability: 3/Difficulty: 3)

Please refer to our Knot of the Week introduction post for a description of what these ratings mean.

Uses:

  • Decorative knot work
  • Lanyards
  • Keychains
  • Carrying paracord for emergency purposes

Tying Instructions:

We tied this Snake Knot Lanyard using a 24″ tan length of paracord and a 24″ ACU length of paracord, which resulted in a 3″ lanyard pull.

  1. Start with two 24″ pieces of Paracord
  2. Ensure the ends are melted on one length, and only one is melted on the other
  3. The side of the paracord length that hasn’t been melted now has it’s sheath pulled back
  4. About 1/2″ of the inner seven strands is removed and the sheath pulled back down
  5. Slightly heat up the frayed portion of the sheath to prevent further unraveling
  6. Insert one side of the other length of paracord into the open ended sheath and melt to fuse
  7. You should have wound up with a bicolor single strand of paracord
  8. Using the joint of the paracord as a reference point, halve the paracord
  9. *These next few steps can be tricky to read, so follow along with the photos too*
  10. Make a loop with the right side, wrapping around the backside of the left, and over the top
  11. With the left side, come inside the loop you just created (from the backside)
  12. Around the back of the right side standing part, and again through the backside of the initial loop (see photo for clarification)
  13. Tighten the knot
  14. *The next few steps are a repeating pattern*
  15. Loosen the right side, take the right most strand, and go around the back of the left strand and down into the loose part
  16. Turn the knot over, loosen the right side, go around the back of the left most strand, and down into the loose part
  17. Repeat steps 15-16 until the desired length is achieved
  18. *At this point you can trim and burn the ends, or tie a stopper knot, such as a lanyard knot or overhand knot*
  19. Cut off the ends of paracord leaving about 1/16 of an inch
  20. Burn the ends and provide pressure while cooling to fuse the melted paracord into the surrounding paracord
  21. Show it off to all your friends!

View the gallery or YouTube video below and follow along with the steps above!

[flickrset id=”72157622494409765″ thumbnail=”square” overlay=”true” size=”medium”]

Click here to view the gallery on Flickr.

Posted in Decorative, Knots | Tagged , , , , , | 13 Comments

Reduced Light Shooting Tips

Light rayThe purpose of this article is to assist you in developing the skills necessary for effectively employing a semi-automatic pistol during a shooting confrontation in other than daylight conditions.

As a L.E.O. / Military / Security Professional, you will work in various low-light conditions. Therefore, you  must be prepared to properly perform in other than ideal conditions. Continue reading

Posted in Shooting | Tagged , , , , | 3 Comments

ITS Tactical Training Stand-Down

550 Cord Bootlaces 01We’ll be out of town this week gathering new article material, and attending training classes.

Have no fear, the regularly scheduled Knot of the Week will resume again next week, and we’ll try our best to throw up some teasers from our classes.

We have a few guest posts scheduled for this week as well, so stay tuned!

Thank you for your support!

Posted in ITS Information | Tagged , | 1 Comment

Reader Appreciation Contest #4 Winner!

dsc00148auWe’d like to announce the winner of our fourth  Reader Appreciation Contest.

ITS Tactical reader “rkuntz” (#47 out of 48 entries) is the big winner of a RskTkr Consulting “Top of the Food Chain” T-Shirt and Wiley X PT-1S Shooting Glasses!

As with all our contests, we used  Random.org to choose the winner to avoid any kind of trickery.

For the details on how you can enter to win, visit our  contest rules page, and stay tuned for our next  Reader Appreciation Contest.

Thank you to everyone who entered, we appreciate all of your support!

rkuntz, if you haven’t received our email yet, please contact us to claim your prize.

Posted in ITS Information | Tagged , , , , | 1 Comment

Reader Appreciation Contest: Giveaway #4

RskTkr ShirtWe’d like to introduce our fourth  Reader Appreciation Contest giveaway, sponsored by one of our more active readers “sigshooter.”

Doc, as everyone knows him, owns and runs RskTkr Consulting, which teaches Combative Pistol and Concealed Carry classes.

Today Doc has graciously donated one of his “Top of the Food Chain” shirts and a Pair of Wiley X PT-1S Shooting Glasses to the lucky winner.

The winner, will have their choice of size from an Adult Small up through XXL. Continue reading

Posted in ITS Information | Tagged , , , , | 49 Comments

An Everyday Carry Belt That Won’t Sag

Jones Tactical EveryDay Belt 02 08/29/16: Please read the update at the bottom of this article. Today on ITS we’d like to introduce the Jones Tactical Cobra 1.5″ EveryDay Belt.

Jones Tactical is becoming well known for his custom gear that’s handcrafted with the utmost attention to detail, and made in the U.S.A.

We’d seen pictures of his work and heard the praise before reviewing this belt, but words can’t describe the quality that Jones Tactical brings to the industry.

The EveryDay Belt is without a doubt one of the finest belts you can mount a concealed holster on. It does a pretty good job of holding up your pants too!

Description

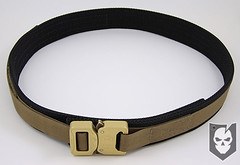
Jones Tactical EveryDay Belt 04Made with a double layer of 1.5″ Scuba Webbing for rigidity and support, this belt will not sag or allow a holster to roll.

It features 1″ accent webbing around the exterior of the belt to hold the Cobra buckle in place and facilitate the adjustment on the male side of the buckle.

A three inch hook-velcro tab allows the belt to be adjusted to a wide size range using the massive 11″ section of loop velcro.

The 1″ Cobra Buckle is an added bonus on this belt, which will not open under load. Not a tremendously important feature on a belt that’s not built as a lifesaving device, but awesome nonetheless.

Donning

Jones Tactical EveryDay Belt 11To wear the EveryDay Belt, the male portion of the Cobra buckle must be removed to thread the belt through your belt loops.

Once the belt is threaded, simply re-attach the male portion of the buckle, snap it in and make your adjustment.

There might be those of you out there that are thinking that it’s a pain to have to do that everyday, but the good thing is that it’s only once a day. Hardly more than a minute added to your morning routine.

Well worth it for an excellent belt like this.

Sizing and Colors

Jones Tactical EveryDay Belt 07The EveryDay Belt is custom built to your waist size.

From people who need to eat more, all the way up to people who need to eat less, Jones Tactical can accommodate any size.

Scuba Webbing is only available in Black, but the 1″ accent webbing  is available in Black, Coyote Tan, Foliage Green,  Marpat Brown, and Olive Drab.

Cobra Buckles are only available in Black and a limited edition  Desert Tan for about $10 more.

If you know much about the AustriAlpin Cobra Buckles, then you’ll know how much of the belt cost is rolled into those. They’re not cheap!

The Jones Tactical Cobra 1.5″ EveryDay Belt will run you $57 or $67, depending on the Cobra Buckle color.

Get one today, and enjoy the peace of mind knowing you’re wearing one of the most bombproof Everyday Carry belts on the market today!

Check out Jones Tactical on the Web and also on Flickr!

UPDATE 8/29/16: We’ve had numerous readers reach out to us to say that Jones Tactical has a tremendous backlog and have waited many months for their orders, some have not gotten responses to inquiries as well. Please look into this further for yourself before placing an order with Jones Tactical.

[flickrset id=”72157622536040798″ thumbnail=”square” overlay=”true” size=”medium”]

Posted in EDC, Load Bearing | Tagged , , , , , , , , , | 27 Comments

Remington Purchases Advanced Armament

114873180_300Hot off the heels of Remington’s recent introduction of the ACR and MSR, they further their grasp on the tactical market with the acquisition of AAC.

Remington Military Products Division will now oversee Advanced Armament Corp.’s production of American made silencers and products.

The AAC Blog is reporting that there are no plans to replace any of the staff and they’ll still keep doing what they do best.

Future plans do include moving to a larger building and having access to increased R&D and production resources, which will help mitigate stock and delivery issues.

How do you think the acquisition will affect the tactical industry?

Posted in News, Suppressors | Tagged , , , , , , | 1 Comment

Knot of the Week: Swiss Seat

Swiss Seat 12We return to our regularly scheduled Knot of the Week today with the Swiss Seat.  The Swiss Seat is also often referred to as a rappel seat, as it’s purpose is to serve as an emergency rappelling harness.

Many survival and E&E kits contain a carabiner and a 12 ft. section of rope just for this purpose.  Not to sound overly dramatic, but in an emergency, just these two items could mean the difference between life and death.

A Swiss Seat can also be used to transport an injured victim to safety if no rappelling harness is available to them.

We highly recommend that before carrying a 12 ft. section of rope for a Swiss Seat, you see if it’s the right amount of rope for you.

In the YouTube video below, the waist size shown is a 32″ and the rope is just the right length. Your mileage may vary.

Swiss Seat » Misc.

(Strength: 3/Secure: 3/Stability: 4/Difficulty: 4)

Please refer to our  Knot of the Week introduction post for a description of what these ratings mean.

Uses:

  • Emergency Rappelling Harness
  • Transporting an Injured Victim to Safety

Instructions:

Make sure you have enough rope left over to properly back up the square knot tied in the Swiss Seat.

  1. Find the center of the rope
  2. Hold the bight of the center against your left hip if right handed or right hip if left handed
  3. *The reason for this is that when tying the final square knot, you want it opposite from your rappelling brake hand*
  4. Drop the bight and wrap the rope around your waist
  5. If wrapped correctly you should now have one end that is longer than the other
  6. Make one overhand knot and a consecutive second wrap (it doesn’t matter which side)
  7. Allow the running ends to hang down
  8. Pull the running ends through your legs and around your backside, squatting to tighten
  9. Feed each side up and behind the waist wrap creating a half hitch to lock
  10. Tie a square knot off to the side of your body you originally started on
  11. Backup the square knot with an overhand knot in each working end
  12. If you have excess rope, consider carrying less or simply tucking it into a pocket
  13. Attach a locking carabiner through the initial wrapped portion of the Swiss Seat as well as the wrap with the square knot
  14. Ensure the gate is facing you to avoid it rubbing on the rope, and “screw down so you don’t screw up!”

View the gallery or YouTube video below and follow along with the steps above!

[flickrset id=”72157622392249745″ thumbnail=”square” overlay=”true” size=”medium”]

Video:

Posted in Knots, Misc. | Tagged , , , , , , , , | 31 Comments

Write a Guest Post for ITS Tactical

We’d like to officially extend an open invitation for guest posts on ITS Tactical.

Our intent with guest posting is to learn more about our reader’s interests, and give those who have knowledge in a skill-set the opportunity to share.

The discussion here has already been amazing, and we know what great readers we have. We’d like to hear from those who offer different viewpoints of the material presented here, so we can all learn and benefit. Continue reading

Posted in ITS Information | Tagged , , | Leave a comment

How to Build a Tactical Gear Stand

Tactical Gear Stand 04Today we’d like to show you how to build a cool way to store and display your gear.

This idea originally came to us after viewing the Marc Lee and Michael Monsoor memorial a few years ago on the SEAL Team Three Quarterdeck.

Under glass cases, they have Lee and Monsoor’s gear prominentley displayed for all to see.

We thought this kind of wooden stand would be the perfect way to hang up heavy body armor that typically breaks normal hangers, and also easily access your gear. Continue reading

Posted in DIY | Tagged , , , , , , , , | 25 Comments