Knot of the Week: Tape Knot

We’d like to introduce our first Knot of the Week mini-series, climbing knots. We’ll be reviewing some of the most common and useful knots used in climbing and mountaineering for the next few weeks.

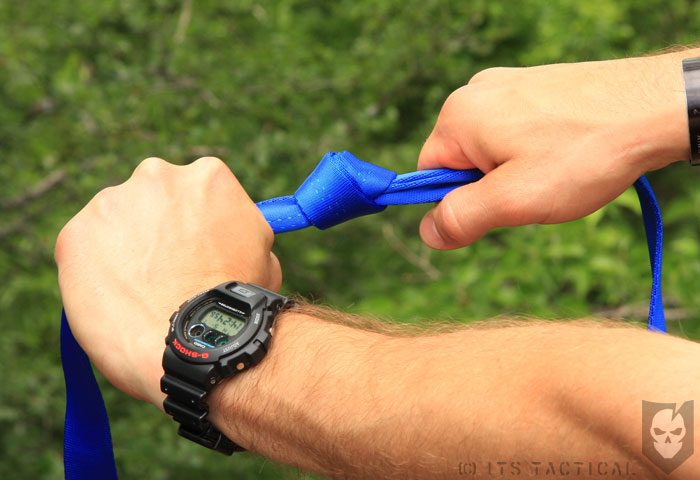
Today we start with the Tape Knot. The Tape Knot is a quick and simple knot which only slightly differs from the traditional overhand knot or water knot. A Tape Knot is tied with tubular webbing, which is sometimes  referred  to as tape. Tubular webbing is used in climbing to make slings, runners and anchors due to its strength, surface area and ability to lie flat.

We’ll be using the Tape Knot in our demonstration to not only show how to tie it, but also how to join opposite ends of webbing together to make a sling, runner or anchor.

Tape Knot » Bend

(Strength: 2/Security: 3/Stability: 2/Difficulty: 2)

Please refer to our  Knot of the Week introduction post for a description of what these ratings mean.

Make sure the initial Tape Knot is tied loosely so the opposite end of the webbing can be threaded through easily.

Uses:

  • Making a sling, runner or anchor
  • Join two ropes
  • A knot less likely to get caught when getting pulled over rocks

Instructions:

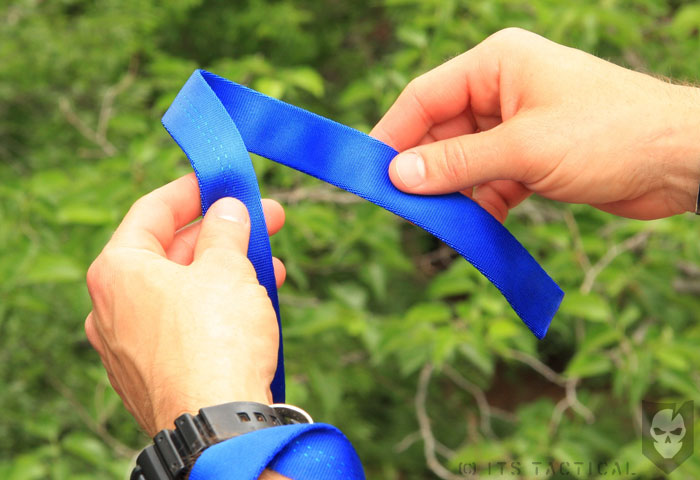
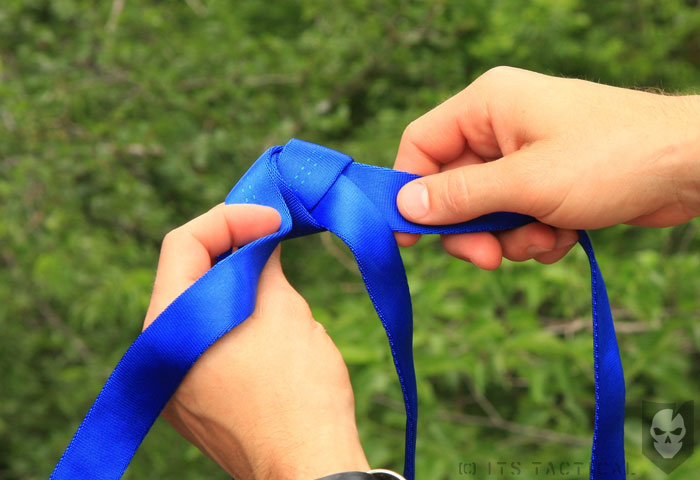
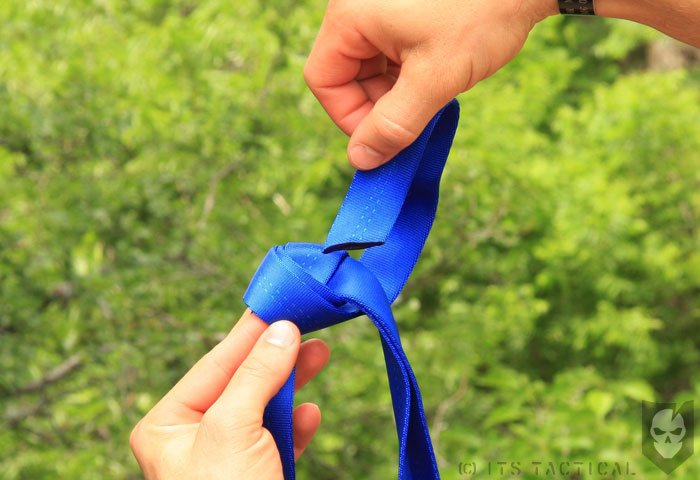
  1. Start with a simple overhand knot in the tubular webbing
  2. Ensure you leave at least an 8 inch tail on the working end
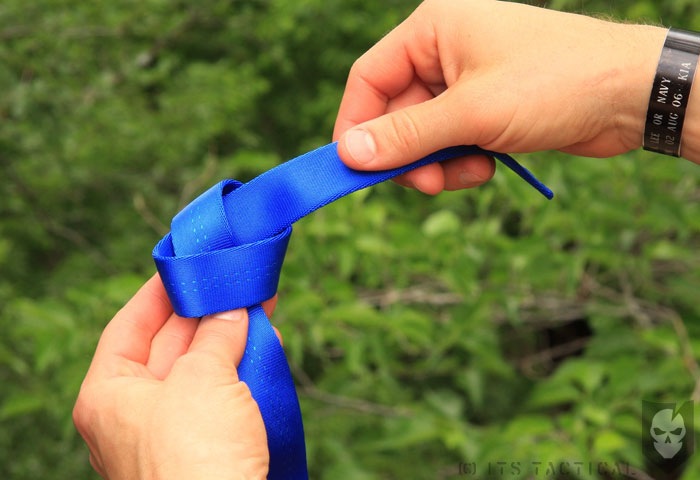
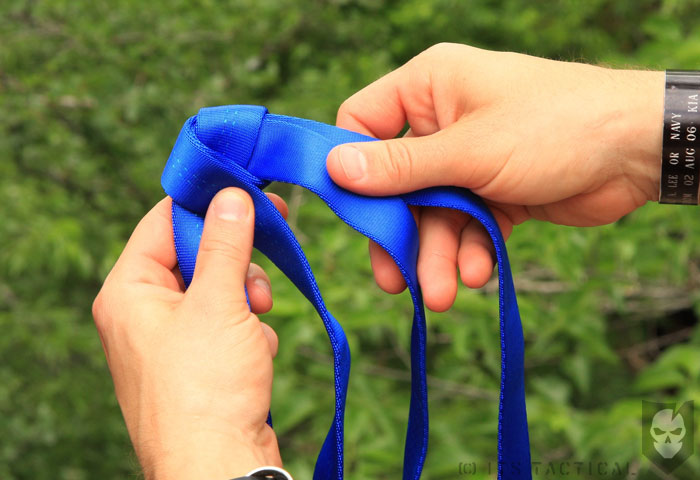
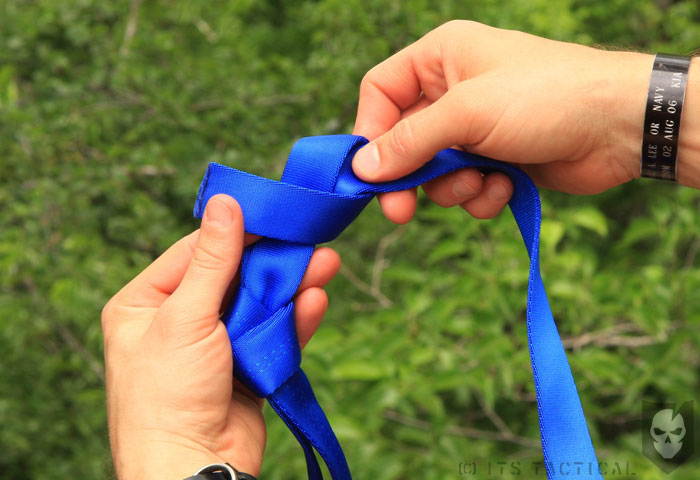
  3. Thread what was the standing end behind the working end
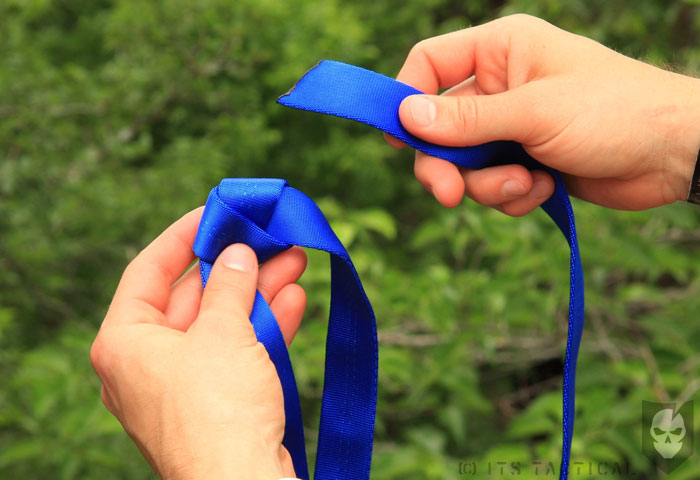
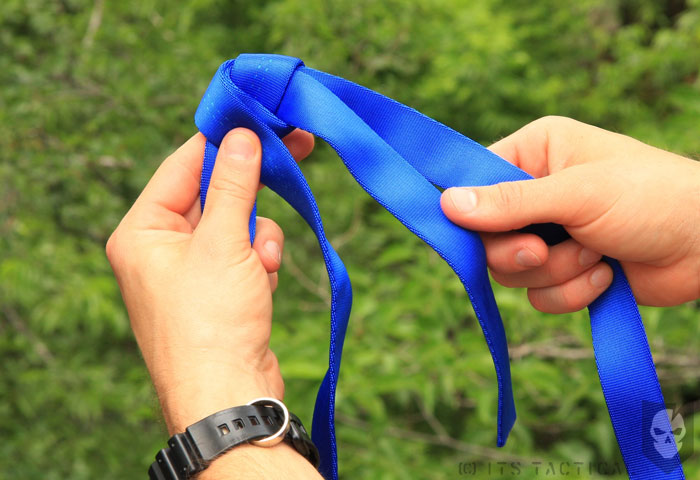
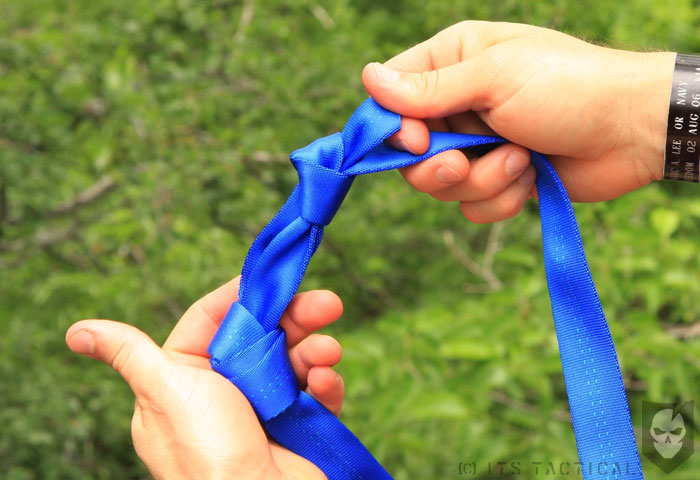
  4. Continue to trace the original knot ensuring the webbing is flat
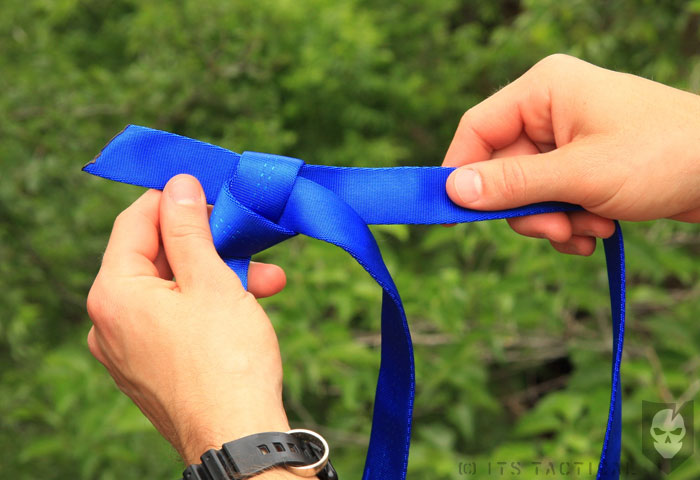
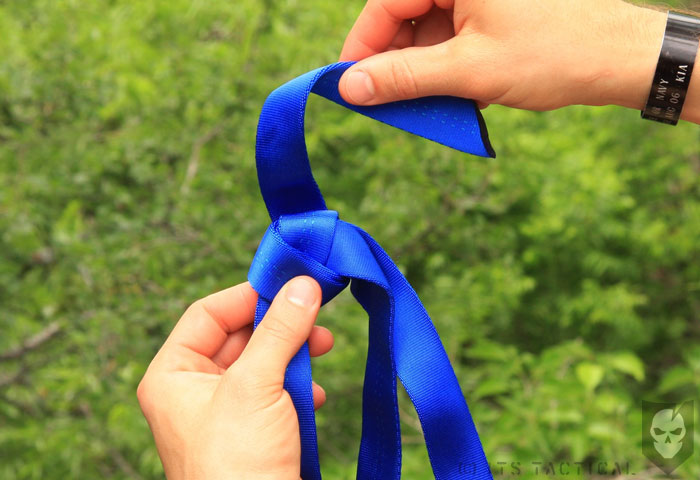
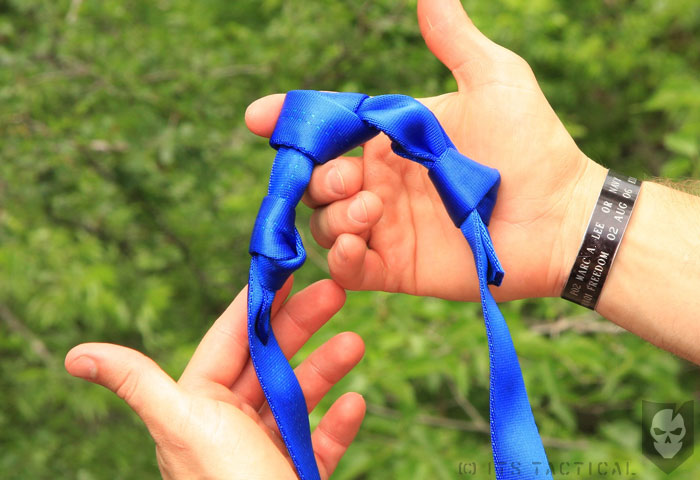
  5. Ensure you wind up with equal tails at least 8 inches in length
  6. Backup the knot with an overhand knot on each side of the tape knot

View the gallery below and follow along with the steps above!

Check back next week as we continue our Knot of the Week mini-series with the Figure Eight Knot

Posted in Bends, Climbing, Knots | Tagged | 4 Comments

How are we doing?

We’ve officially been live for a month now, and would like to see what you think of ITS Tactical so far.

[polldaddy poll=1592130]

Leave us a comment with any suggestions you have for the site, or articles you’d like to see. Thanks for voting!

Posted in ITS Information | Tagged | Leave a comment

Mini Survival Kit Update

Mini Survival Kit Update 01After writing about the Mini Survival Kit a few days ago, I started to rethink mine, and came up with some modifications. I stumbled on the Web site of John McCann’s Company, Survival Resources, which has some great products! McCann is the author of Build the Perfect Survival Kit which I quoted in the previous article.

For starters, I purchased three of the smallest pencils I’ve ever seen so I could throw one in my kit and use the plastic vial they come in for fishing supplies. I now have all the fishing hooks, leaders, weights and sewing needles in this tube and it organizes them quite nicely. Continue reading

Posted in Survival, Survival Kits | Tagged , , , , , , | 4 Comments

Safariland SLS Holster Hood Guard

ITS Tactical Safariland 01The Safariland SLS (Self-Locking System) Holster has proven itself in combat and on the streets, but for everyone that run a newer SLS, you may be asking yourself… What is THAT for?

Well, “THAT” is what Safariland calls the hood guard. We here at ITS call it a big turd. Yes, Safariland may claim “The Hood Guard helps protect the SLS from impact and premature release especially in an attempted takeaway.” But to us it’s more of a hinderance than a help.

The hood guard can get caught on all kinds of stuff, including your gear. It can also increase the time it takes to transistion from your primary weapon to your secondary, which isn’t a good thing. Continue reading

Posted in Accessories | Tagged , | 11 Comments

Stencil Your Gear

stencil01Stenciling is something the Navy hammered into our brains as a way to distinguish our equipment from the next guy. It worked most of the time, even though I lost several pairs of  skivies during laundry… go figure.

In the Navy they had a large stencil cutting machine that would punch letters and numbers out of card stock making a perfect stencil. You’d then use Texpen Fabric Markers to color in the stencil on whatever you’d need your name on. There were times that the stencil markers just didn’t cut it (crap out) and you’d resort to a Sharpie. Continue reading

Posted in DIY | Tagged , , , | 12 Comments

Knot of the Week: Terminology

knot_terminology_01_bightBefore we start delving any further into our “Knot of the Week” series, we wanted to go over some terminology which is commonly found in knot tying. The purpose of this review is to make it easier to understand the words that get thrown around with some visual examples.

Another thing we’d like to quickly mention is a bit of housekeeping on our series. Up until now we’ve just lumped all the knots together as a Knot of the Week in our categories. We’ll now be categorizing them by their appropriate respective categories (Bends, Loops, Hitches, etc…) We’ll still keep the rating system on their properties the same. Continue reading

Posted in Knots, Terminology | Tagged | Leave a comment

Giveaway Winner!

blueforcegearvickers02We’ve tallied up the entries and chosen a winner for our Blue Force Gear VCAS Giveaway, and the winner is “BootlegGucci.” To make things fair, we assigned each person a number based on what position they appeared in on the comments… for multiple entries you were assigned that many numbers.

We entered all the numbers into random.org to draw a number, there were 40 numbers and #36 was chosen, which belonged to “BootlegGucci.” (Please email us to claim your prize!)

Thank you to everyone who entered the contest and those who signed up for our site, newsletter or RSS feed. We sincerely appreciate all the success we’ve had with the site so far and couldn’t have done it with readers like yourselves. In the little over two weeks we’ve been live we’ve had over 4,000 visitors!

Posted in ITS Information | Tagged | 3 Comments

Giveaway Update

Just a reminder that our giveaway ends in 24 hours, and if you haven’t left a comment yet in the giveaway post, you’re not entered to win. Good luck!

Posted in ITS Information | Tagged | 1 Comment

Gates of Fire

gatesoffire01Gates of Fire by Steven Pressfield is another one of those books on the top of our list here at ITS Tactical. We’ve all talked about how this book should be on the required reading list for anyone attempting any type of Spec Ops training. Pressfield gives an in depth look into the Greek’s way of life and their suicide mission at Thermopylae.

Gates of Fire is all about brotherhood, camaraderie, integrity and grit told through the Spartan’s perspective. Anyone that’s ever been around a group of hard charging knuckle draggers can relate to Pressfield’s words, and the sick, twisted and warped sense of humor that comes in the face of adversity.

While it’s been a little over 10 years since it’s first publishing, the words still ring true… Continue reading

Posted in Mindset, Reading | Tagged | 2 Comments

Tactical Driving: J-Turn

jturnIn Tactical Driving the ability to perform a quick, calculated turn is an important skill, but what about while your vehicle is in reverse? Enter the J-Turn… This little maneuver can be traced back to the prohibition days when bootleggers called it the moonshiner’s turn. Can you picture those old cars performing a J-Turn? It must have been quite a sight!

While the terminology is somewhat confusing, the bootlegger’s turn is a different maneuver that is performed while the car is facing forward, the J-Turn is done while in reverse. We’ll be covering the bootlegger’s turn in a future article.

The J-turn’s end product is your vehicle maintaining its course, but turning 180 degrees in seconds. You’ll end up pointing forward without loosing too much of the vehicle’s momentum. It’s important to know how your vehicle operates, and its limitations… please refer to our introductory article on Tactical Driving.

Let’s go over the steps to complete a successful J-Turn

Automatic Transmission

  1. Start with the vehicle in reverse and remember “when you reverse, things come from behind you
  2. Make sure you have plenty of room on both sides of the vehicle, from your starting position, to where you want to end up
  3. Accelerate the vehicle to a speed of 30-35 mph and don’t let off of the gas
  4. Position your hands at the 2 o’clock and 8 o’clock position on the steering wheel
  5. In one quick motion come off of the gas and turn your steering wheel counter-clockwise at least 1/2 of a turn (more is better)
  6. This will turn the vehicle very sharply to the driver’s right
  7. While the vehicle is almost through the 180 degree turn, use another quick movement in the opposite direction of the turn to bring the vehicle’s wheels back in line
  8. Quickly put the car into drive and accelerate

If you don’t maintain the required speed, or turn the steering wheel sharply enough, the vehicle won’t complete the turn.

Manual Transmission

The directions are exactly the same as above, but while selecting first gear to make your getaway, you’ll need to double clutch

  1. Press the clutch in
  2. Shift to neutral
  3. Clutch out
  4. Clutch in and shift into first

This adds more of a challenge to the maneuver, but if you practice the double clutch it can be done easily

Here’s a YouTube video we put together showing the J-Turn

Check out our YouTube channel for additional instructional videos on the J-Turn

Hit us up with any questions you have in the comments, and stay tuned for more Tactical Driving articles!

Posted in Driving | Tagged , | 20 Comments