How to Obtain a Duplicate Passport and Passport Card

Passports

If you’re like me, you have meticulous records, backups of everything, and are always war gaming everything. “What would happen if the house burnt down and I wasn’t able to get anything out?”

I seriously go through these scenarios all the time, especially when it comes to important documents. I’ve recently started investigating the steps to obtaining duplicate passports and passport cards for myself and my family.

There are many reasons why you’d want to have a duplicate passport and even one of the new U.S. Passport Cards.

Why a duplicate?

The primary reason I’m getting duplicates is redundancy. Two is one and one is none, as the saying goes. I live by this. A duplicate allows you to have a passport stored where a friend or family member can access it and send it to you. This is important if your passport is stolen overseas and you need to get home.

I always carry color copies of my passport, but nothing beats having the real thing to receive in an emergency situation.

Here’s some other reasons to consider a duplicate:

  • When applying for a visa for international travel to certain countries, you will be required to send off your passport to a consular. During this time, you will be without your passport and unable to leave the United States, unless you have a duplicate passport.
  • Having a duplicate passport will allow you overlapping dates of expiration, so that you’ll be able to always have a valid passport, even if a renewal is taking longer than it should. I did this with my Concealed Handgun License. I have my TX CHL with one expiration date, and a Florida permit with a different date.
  • Traveling to sensitive countries with certain stamps can cause delays, this is where a second passport comes in very handy.

How to obtain a duplicate

  1. Fill out Form DS-82 on the U.S. Department of State Website. This is the basic form for applying for a U.S. passport by mail, and is not specific to a duplicate passport. Once the application is filled out, print it out, as you’ll need to mail it or bring in person when applying for a second passport.
  2. Write a letter explaining your need for a duplicate passport. Just one paragraph is all you need, but it helps if you have travel plans that help your case. Providing a history of trips where a duplicate passport would have been needed will work too.
  3. Submit Form DS-82, two passport photos, passport fees, and the letter explaining your need for a duplicate. Currently the fees for a duplicate passport are $135, but they’re changing by July 13, 2010, so act quick. It will take 4-6 weeks to find out if your duplicate passport has been approved.

Passport Cards

Passport Card

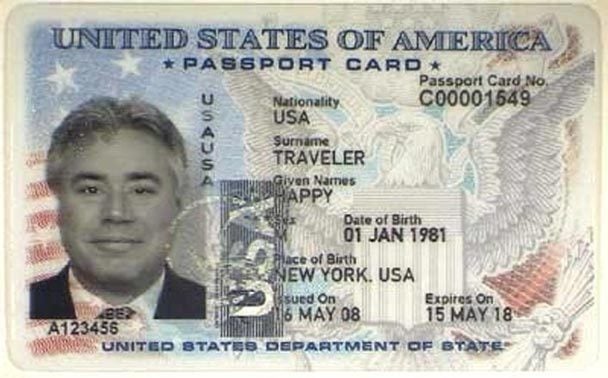
U.S. Passport Cards have only been around for two years now, but are a great way to have official backup identification in an emergency. If a duplicate passport is more than you’d like to bite off right now, a Passport Card might be the way to go.

The Passport Card can be used to enter the United States from Canada, Mexico, the Caribbean, and Bermuda at land border crossings or sea ports-of-entry and is more convenient and less expensive than a passport book. The passport card CAN NOT be used for international travel by air.

Even though there are limitations with Passport Cards, they’re a great item to have. Other than your travel being logged by the Government, there’s no stamp placed on a Passport Card like there is on the Passport Book. That’s not really as important as it is with sensitive countries and the Passport Book.

The current cost is only $20 if you have a valid Passport Book, but that price is going up to $30 when the new fees go into effect.  Here are some great FAQs on Passport Cards, including instructions on how to obtain a Passport Card.

RFID

Passport RFID Chip

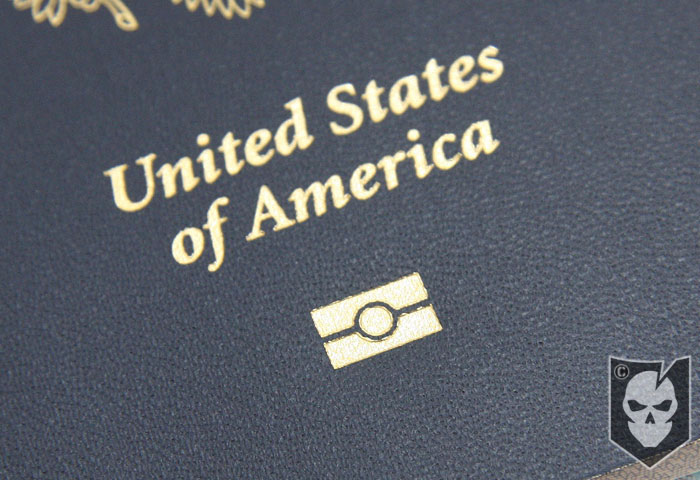
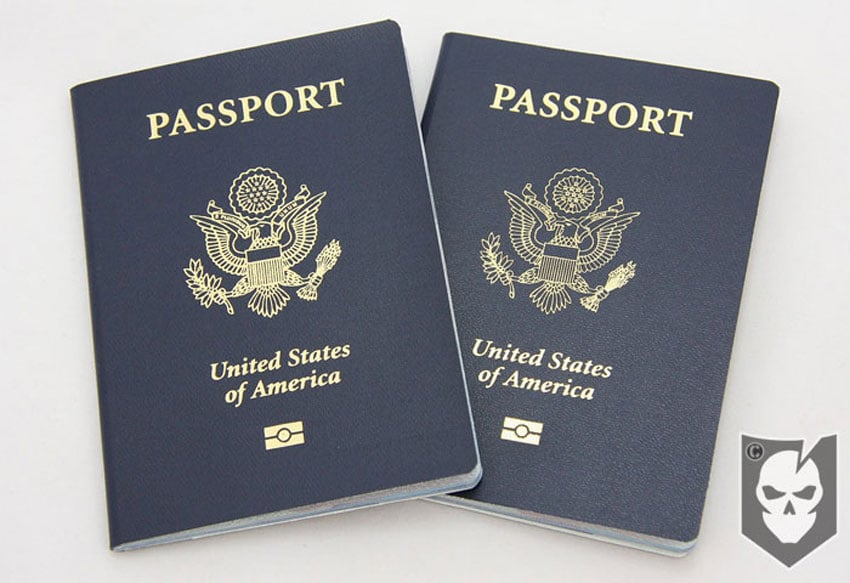
Just a note that all new Passport Books AND Passport Cards contain RFID (Radio Frequency Identification) chips in them (denoted by the mark in the photo to the right). While the Department of State says there’s no personal information  written on the electronic chip itself. The chip does contain a unique number which identifies a stored record within secure government databases.

A protective RFID-blocking sleeve is provided with each passport card to protect against unauthorized reading or tracking of the card when it is not in use. I’d recommend a RFID blocking sleeve for your Passport Book too, or just disable it if you’re paranoid about it (Warning: tampering with your passport could land you 25 years in prison, and land you a strip search each time you travel).

State Department Admits RFID Passports are Insecure

Notes

So I’m curious what you guys do when you travel? Do you make copies of your Passport to take with you and to leave with friends or family?

Can anyone here add more information about duplicate Passports, I’d love to hear your comments and opinions.

Posted in DIY | Tagged , , , , , | 15 Comments

Using Lashings for Weight Bearing Structures

After a brief hiatus, the Knot of the Week returns this week with the first of a few articles on lashings.

Lashings are an important part of any knotty professor’s repertoire, and an all around good skill to have. Today we’ll begin with the most common type of lashing, the Square Lashing.

A Square Lashing is used to bind two (timber) poles together, and commonly seen in use by the Boy Scouts on those massive pioneering projects. Weight bearing sections of these structures utilize the Square Lashing.

We’ve briefly touched on lashings in our article on Common Rope Seizing, which is technically also referred to as a Round Lashing.

Square Lashing » Lashings

(Strength: 5/Secure: 4/Stability: 3/Difficulty: 3)

Please refer to our Knot of the Week introduction post for a description of what these ratings mean.

Uses:

  • Binding two timber poles together
  • Weight bearing joint in structure building

Tying Instructions:

  1. Start your Square Lashing with a Clove Hitch on the vertical pole directly beneath the horizontal one.
  2. Working right to left with the working end, take it under and around the back of the horizontal pole, across the top of the vertical pole, down and around the back of the horizontal again and across the top of the vertical.
  3. Duplicate this at least three times, more if the poles are thicker.
  4. Ensure you’re creating tension with every wrap.
  5. Now make at least three frapping turns between the two poles, ending close to the opposite side of the vertical pole you started your initial Clove Hitch on.
  6. Finish off the lashing with another Clove Hitch and tuck in the excess working end into the wrappings.
  7. Optionally before creating the last clove hitch you can individually make turns around each section for added support, but it’s not necessary (this is demonstrated on the video but not photos).

[flickrset id=”72157624400276870″ thumbnail=”square” overlay=”true” size=”medium”]

Click here to view step by step photos on Flickr

Posted in Knots, Lashings | Tagged , , , , | 2 Comments

Chicago Gun Ban Overturned by Supreme Court

In case you didn’t catch the news on Monday, the Supreme Court ruled in a 5-to-4 decision that Chicago’s 28-year ban on handguns violated the right to keep and bear arms.

While the decision doesn’t remove  any other gun control measures currently in place, it paves a legal path for gun restriction challenges across the country.

This decision confirms that the Second Amendment binds state, local, and federal domains like the District of Columbia. You may remember a small case called D.C. v. Heller that overturned a similar gun law. Here’s the complete decision in .PDF format. Continue reading

Posted in News | Tagged , , , | 2 Comments

You’ll Never Look at Hay Bales the Same…

These photos were sent over to us in an email from a reader, in what looks to be a Border Patrol bust of a vehicle carrying two round hay bales containing drugs.

We were pretty impressed with the ingenuity of the smugglers and wanted to share the photos below, as we have many Law Enforcement Officers that frequent the site.

Around here in Texas, vehicles containing hay bales are extremely common, and now I’m always going to wonder when I see one on the back of a truck! Continue reading

Posted in News | Tagged , , | 2 Comments

How to Open a Padlock with a Coke Can

Padlock Shimming

If you’re like millions of Americans, you put a lot of trust in simple padlocks to secure your valuables.

Today we’re going to continue to break down the veil of security by showing you how easy it is to shim open a padlock with a coke can.

Again, as with all our lock picking and security articles, we’re not advocating anything illegal and this information is for educational purposes and Locksport only.

Single Lock Padlock

Padlock Shimming

The first thing you’ll need to take note of when shimming a padlock is whether it’s a single or double-lock shackle. This can often be hard to determine just by looking a a padlock, but a general rule is that most numerical combination padlocks are just a single lock.

What this means is that only one side of the padlock shackle engages with the internal locking mechanism within the padlock. See the photo to the right for an example.

Double-Lock Padlock

Padlock Shimming

On a double-lock padlock, there are two locations on the shackle that engage with the internal locking mechanism. This is important, because this kind of padlock will require two shims to open.

Each side of the shackle will need to be independently shimmed to allow the locking mechanism to release. See the photo at the right for an example of the double-lock padlock.

Creating Shims

To create the shims needed to open padlocks, you’ll first need a coke can. Take the can and trim off the top and bottom, leaving the middle piece. Make a single cut vertically in the can to create one long piece of aluminum (You may have done this already when trimming off the top and bottom).

Padlock Shimming

Cut the remaining strip of aluminum lengthwise creating two long strips. From here you’ll need to cut multiple pieces approx. 2.5″ in width and 1.5 to 1.75″ in height. You should end up with around six shims out of a single can.

Once your blanks are cut, you’ll need to make cuts in each blank to create an “M” looking shape. The mid-point of your “M” can either be rounded as shown in the video below, or angular as shown in the photos. Either will work, but the rounded mid-point seems to wedge itself better into the locking mechanism.

After the “M” shape is cut, simply fold the top quarter in half and fold the legs of the “M” up and around (see photos and video). You can also shape the completed shim around a pen to give it the necessary curvature it will need to slide into the shackle.

Shimming a Padlock

Shimming a single or a double-lock padlock is essentially the same, but with the double, you’ll be using two shims. Notice that the locking mechanism for the single-lock padlock is to the inside and on the left.

What you’ll need to do is insert the shim into the space between the padlock body and the shackle, on the side opposite the shackle’s locking grove. Once this is inserted, simple turn the shim while working the shackle up and down.

Padlock Shimming

This will allow the shackle to almost pull the shim into the locking mechanism as you’re turning it. The shim acts as a bypass by moving the locking mechanism out of the way and opening the lock. For a better description of how to use the shim, take a look at the embedded video below.

The double-lock padlock again is just the same, but you’ll be working with both sides of the shackle to disengage both locks. The video will really help you to understand how this works, as words are simply not enough to convey these techniques.

Notes

Padlock Shimming

It’s important to practice on junk locks that you don’t care about, because your shims WILL break off and fall into the lock or get stuck. This will require you to open the lock to get these pieces out, or the lock could be rendered useless. At least useless to practice with until you get that piece of shim back out.

Remember to always get permission before opening any locks that don’t belong to you, and keep up your lock picking skill set! It’s depreciable!!

Posted in Lock Picking | Tagged , , , , , | 33 Comments

Honoring Operation Red Wings and Meeting Marcus Luttrell

I distinctly remember the news circulating around the Naval Special Warfare Center on June 28th, 2005, that four SDV SEALs were missing following a SR (Special Reconnaissance) mission in North Eastern Afghanistan.

Later that day I also learned of a downed MH-47 Chinook carrying a QRF (Quick Reaction Force) of 8 SEALs and 8 Night Stalkers attempting a rescue mission. It was a bone chilling realization that I had just heard about the greatest loss of life the community had seen since WWII.

It briefly flashed me back to the events of September 11th, as I had many of the same feelings of wanting to do something, but being unable to. All I could do is stand by for further news of the tragedy.

Everyone in the office I was stationed at huddled around the computers and telephones eagerly awaiting news of the four missing SEALs. By the end of the day that Tuesday, we still had no confirmation that any of the four SEALs had survived. Continue reading

Posted in Memorial | Tagged , , , , , | 18 Comments

Door Devil Giveaway Winner!

We’d like to take this opportunity to announce the big winner in our Door Devil Giveaway.

Thank you to everyone for your participation, and especially to Door Devil for their support and generosity!

As always, we’ve used random.org to draw the winner for this contest. Continue reading

Posted in ITS Information | Tagged , | 1 Comment

Tactical Distributors $100 Gift Card Winner!

We’d like to take this opportunity to announce the big winner in our Tactical Distributors Giveaway.

Thank you to everyone for your participation, and especially to Tactical Distributors for their support and generosity!

As always, we’ve used random.org to draw the winner for this contest. Continue reading

Posted in ITS Information | Tagged | 8 Comments

Smuggle Intel in your Cufflinks

Are you looking for that perfect accessory to complement your James Bond wardrobe?

Tux? Check. Walther PPK? Check. Martini, shaken not stirred? Check. USB Cufflinks? Yes, now you can carry those important files on Pussy Galore in your Cufflinks!

The 4GB USB Flash Drive Cufflinks (2GB each)  from Cufflinks.com measure 3/4″ x 5/8″ and can even be engraved with your agent number.

Thanks to Aaron for the tip!

Posted in IT | Tagged , | 3 Comments

40 Unique Places to Stash Firearms

Hidden Gun

Editor’s Note: We’ve updated this article and the new version can be found here.

Today’s article comes to you from the ITS Forums via Doc of RSKTKR Consulting. We thought this was such a great topic that we wanted to throw it up as a main article.

Where have you stashed a handgun in your home or car that you feel is an especially clever stashing place?

Here is a list from a very popular internet thread where all these ideas are collecting.

Hiding Places

  1. Empty cereal box in pantry, back when I lived in the ‘hood’. Was hoping thieves wouldn’t be hungry! Kaboom cereal in Kill Bill
  2. Hanging upside down from a hook under the bathroom cabinet, just above the door. Inside a closet (not a walk-in) up over the door. Most closets are “shallow” and while a Burglar might go thru your clothes and items on shelving, he probably won’t look straight-up over his head.
  3. Behind a decorative blanket hung like a cheap tapestry
  4. Non-locking hideaway picture frame.
  5. False bottom in bedside drawer.
  6. Fake electrical outlets.
  7. Some folks split the upholstery seam on the rear of the passenger’s seat toward the driver–insert a small holster and appropriate handgun, sew Velcro on the seams to reseal.
  8. Along with my storm door, my main entry door is steel with only a small window at the top. I have a nylon holster with my Colt Detective Special velcroed to the inside of the door, just above the doorknob, canted toward me about 45 degrees, when I open it. I can open the door to someone, & they never know my hand is just inches from a weapon. Should I invite them in, I simply close the storm door and leave the main door open, which puts the gun back against a wall and is never seen by a guest.
  9. At my desk is a scanner. It has no guts. Lift up the top, and remove handgun.
  10. A good method in general when you’re away from your home is to take whatever you want to hide, stash it in a garbage bag, and put it amongst dirty clothes. NO ONE looks through dirty clothes…unless they’re a perv…then they’re not usually looking to rob you in that case.
  11. On the road, usually hide them in with my dirty underwear…… Go ahead, grab yourself a big handful of that!
  12. One day when I was replacing the sagging cloth under the couch (you know, the flimsy cloth that covers the couch’s framework?), and realized it would be a great hiding spot. I was surprised by how much room there is under there. I got the dremel and hack saw out and after a little work; I made a horizontal system of hooks with belt fasteners (actually milsurp canvas belts) that can hold four rifles lengthwise. I also made a small wooden cubby-hole and screwed it to the framework near the arm rest. That’s where my barbeque revolvers go. Now it’s not a practical place to store your “go-to” weapons, but it is very discreet place to store your valuable rifles. I attached Velcro along the cloth and underside of the couch so all you have to do is flip the couch back, undo the Velcro and you have full access to your hidden rifles. It’s funny to have guests sitting on your couch, clueless to the fact that they’ve got four rifles and two S&W’s 9″ from their butts.
  13. The Sportsman guide has a wall clock that opens up to store a med. to small handgun in. Runs about $55 after shipping. And the clock works!
  14. Back when I lived in Chicago I used to keep a fairly short, folding-stock 12ga situated diagonally in a clean extra-extra large pizza box lodged between my trashcan and my kitchen cabinets. It looked like it was just trash waiting for trash-day…
  15. In the closet, on a CHEAP plastic hanger (easily broken), (through the trigger guard, no round in chamber), covered with a button up shirt.
  16. Under the towels in the master bath.
  17. I met a woman today who’s designing a holster for a derringer that will go between her uh………….mammary glands……
  18. In an inside jacket pocket on a jacket on a hook in the closet.
  19. Under the skirt of a spare toilet paper girl in master bath where no guests go.
  20. My brother in law hid his revolver in the brown paper grocery bags that he had folded next to his refrigerator — you know how they get stuck in that space between the cabinet and fridge. He put it in a bag and folded it up.
  21. Between the window curtains and the wall above the windows. Can’t be seen from the outside and if your curtains are heavy, can’t be seen from the inside. Yet the gun can remain on a hook just waiting to be used.
  22. I used to have a 12 gauge in a soft gun case hanging from a hook, centered on the back of my bedroom door. I would then throw/tuck/hang a flannel robe over it. I kept the door open, so no one ever noticed the added “heft” of the door.
  23. Inside a trophy. If you lift up the brass plate it’s hollow inside. If it’s big enough, anyway. This one was one of my parent’s bowling trophies.
  24. I used to keep an old Colt Police Positive in a Ziploc bag under some frozen veggies in my freezer. Can still shoot thru the bag…if ya need to…
  25. I bought a good-sized pistol safe (a foot square, or a little bigger) that uses a credit card swipe to open electronically. I use an outdated credit card for it. I have the card hidden nearby, in a place that I don’t think anyone could accidentally find. Yet, it’s so close, that I’m positive that I can grab the card and swipe it faster than I could punch in a combo, even on a finger touch safe. It was less than $100 as well. You could carry a backup identical card in your wallet. Fingerprint ones now too.
  26. Old shoebox under the bed at night. Gun safe when I leave the house during the daytime.
  27. I did this at home and it works great! A typical nightstand or dresser has room between the drawers and the outer paneling. This opening is the thickness of the frame of the cabinet. I removed the bottom drawer, drilled a hole in front of the rear frame and inserted a wooden peg so that the gun is along the side of the cabinet. The peg is on an angle so that when the barrel is fully seated it creates a slight interference with the bottom of the opening. I have a Ruger SP101 .357 that fits perfectly onto the peg and is held tightly. The drawer can be pulled out and dumped, the whole nightstand could be dumped forward and the gun stays tightly in place. I know it is there and because I shoot it almost every weekend and can grab it without looking, however a bad guy would have to get down on all fours and shine a flashlight into the open to see it.
  28. How about behind a vent or cold air return? Before I got a safe, I would put a cased pistol in the vent work. I placed it out of sight, so if they pulled off the vent cover, they couldn’t see it. The cold air return was next to the bed, so it was easy to get to in the night.
  29. Dancers carry dance bags for shoes. One side pocket is exclusively reserved for a loaded Glock 29 in 10mm that is put inside a Fobus belt holster. This obviates any danger of putting a finger inside the trigger guard while withdrawing the handgun.
  30. I use a small CD wallet to keep my trusty little Kel-Tec 380 and a reload in. Makes for a handy place to slip the pistol and holster into when I have to take it out of my pocket for a little while or while I’m driving…stick it right between the seat and console so it’s more accessible than being in my pocket.
  31. I bought a/c grills at my old house and made boxes 4″ deep to fit in the stud walls, and placed them up towards the ceiling line like the old wall registers. That way they were high enough the boys couldn’t reach them but low enough my wife could. The grill stayed on with a rubber band. Was there 11 years and no one ever knew.
  32. Ever thought of using an electrical box? I keep a spare set of keys in a dummy electrical disconnect box outside my house.
  33. A/C vents/ducts/intakes. Usually A/C vents are mounted high and require a stool or ladder to get access. Unscrew panel, tuck in gun, replace panel.
  34. While most of my firearms are in my safe, I have the usual few scattered out and hidden in strategic locations similar to those already mentioned. To add confusion to the would be thief, I give him what he wants, upfront. To “express myself” I have several desirable nonfunctioning/unloaded firearms in plain sight as an art form. Upon arriving home, it’s easy to see if any of these are moved or missing, which would indicate that someone unwelcome has entered my home. If any of my “indicator guns” where disturbed/missing upon my arrival, I’d back out and call the Sheriff.
  35. Another one that I have seen but not used is a hollowed out water heater complete with pipes that disappear into the wall. The door is hidden on the back side.
  36. I keep a 1911 in an old boot that is with a bunch of other shoes on the floor of my closet.
  37. I collect beer steins, and have a Davis 22mag derringer in my favorite one.
  38. In a special place buried outside, just in case I come back to the house unarmed and have to defend it.
  39. When we had tiling installed, I specifically created a false tile. Get on the floor? Sure, can you turn around for a second?
  40. Pull the carpet back, grab a hammer & chisel and get to work!

Do you have a favorite place to stash your firearms? Add it to the comments in numbered order and we’ll continually update this article!

Posted in Firearms | Tagged , , , | 293 Comments