Situational Awareness: Put the Damn Phone Away and Pay Attention!

NYC Cell Phone by Flickr User FaceMe

Every day brings on new adventures and today I’ll share a few I had on a recent trip to New York City. In particular, some have forced me to rethink and change my perspective on a couple things. Being in New York, my armament was obviously different. As a result, my situational awareness was off the charts.

Complacency. Who Me?

The bad news is that this trip really got me asking why I’m not always completely in tune with my surroundings. The best answer is simply, complacency. One of my personal takeaways is that staying on my toes and not getting flatfooted is paramount, but more on that later.

Travel Realities

After landing in New York, I immediately did a site survey of our training area, which is where I’d be spending my time at. Because of this, I wound up getting to the hotel pretty late on the first night to check in. This is when I realized that the hotel has offsite parking, requiring me to cover several blocks early in the morning to get to my vehicle and again late at night after parking to return to the hotel. The directions were pretty easy, but the ground I’d be covering on foot was in an unfamiliar area.

A while back I wrote an article called Hard vs. Soft Target, where I mentioned that situational awareness isn’t a combat mentality, it’s an everyday mentality. This philosophy was put to great use while on this trip, where I adopted the hard target stance.

How can you apply some of these lessons to your everyday life?

Take a Message

First off, start by putting the damn phone away. In fact, go one step further and disable the ringer or put it on silent. In other words, pay attention! You need to keep your focus on the terrain in front of you in an effort to pick up on pre-incident indicators. These indicators can range from subtle to pretty damn obvious. You actually want to be distracted, you want your attention to be diverted. In this case, your attention is diverted because something was out of the ordinary and is a possible threat.

One of These Just Don’t Belong

Even in a place you haven’t been before, there are recognizable patterns and it’s important to pay attention to those patterns. Once you can see these at play, then you’ll notice when something doesn’t fall into the pattern (the deviation) and that it deserves your full attention. A great application of this is the “tactical pause.” Take a moment and acclimate within your surroundings; look, listen and feel. I know it sounds a bit odd, but trust me it works.

This was a habit ingrained into me as a young Frogman after our insertions, in an effort to get in sync with the terrain. You want to notice people, places and potential danger areas well in advance, then develop a plan on how to deal with them.

Contingencies, For Real

It goes without saying that you want to keep your head up, study your route and have a plan. Something that radically changed my perspective came from thinking about possible contingencies. Two of the big ones are whether to stand and fight or escape. Both required physical exertion (and lots of it) and at the time, my gear selection sucked.

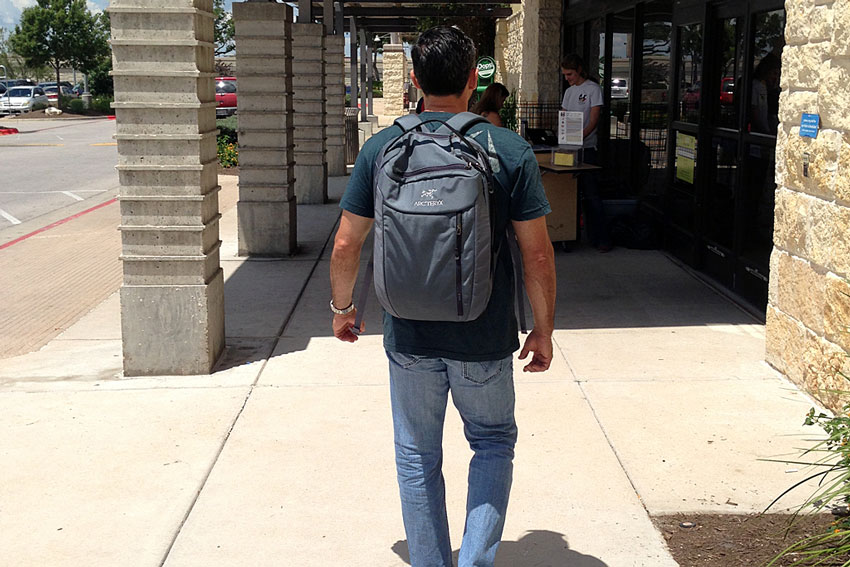
I’ve been carrying a courier-style bag as my carry-on now for several years. At first I really liked it but I hadn’t ever thought of needing to fight with it or run with it, both of which would’ve been major fails on this trip. There wasn’t much I could do about it on the trip, but I’ve since remedied the situation with an Arc’teryx Blade travel system pack. I love the new pack and while I haven’t had to fight or run, it’s a sleek and low-profile package that wears incredibly well. Putting all of my gear on my back totally frees my hands, or more importantly allows me to carry improvised weapons discreetly. I know that seems pretty obvious, now.

Situational Awareness

Being distracted is pretty easy for most guys and it can have negative outcomes for sure. However, if you can tune your ability to be distracted towards danger, you’ll soon develop a solid early-warning system. Think about patterns, even in the hustle and bustle of a major metropolitan area. Also know that when you see a disruption in the pattern, you need to pay attention and start developing a plan.

Editor-in-Chief’s Note: Jeff Gonzales was a decorated and respected US Navy SEAL, serving as an operator and trainer who participated in numerous combat operations throughout the world. He now uses his modern warfare expertise as President of Trident Concepts, LLC., a battle proven company specializing in weapons, tactics and techniques to meet the evolving threat. Bringing the same high-intensity mindset, operational success and lessons learned from NSW to their training programs, TRICON has been recognized as an industry leader by various federal, state and local units. Organizations interested in training with TRICON can call 928-925-7038 or visit tridentconcepts.com for more information.

Title photo © faceme

Posted in Mindset | Tagged , , , , , , , | 6 Comments

You May Be Strong . . . But Are You Tough?

You may be strong but are you tough

As a little boy, I was scrawny, weak, and prone to illness (much like a certain former president). For a long time, I thought I was just doomed to be pathetic, until my dad took me canoeing. In the mucky, hot, poorly maintained trails and portages of the Boundary Waters in the north woods of Minnesota, I learned that I could be tough, scrappy, and indomitable. I took a brutal pleasure in carrying the heaviest pack I could over long and steep portages, willing my toothpick legs to take one step, then another, then another, until I saw the blue expanse of the next lake peeking through the trees. That was all I had to work with: a willingness to push myself harder than anyone else, to charge headlong into the roughest terrain, and to ignore cold, rain, heat, bugs, and my own internal discomfort.

With the popularity of high-intensity workout programs, military-inspired training, and brutal adventure races, mental toughness is in the spotlight. The gold standard of a hardcore athlete is how much pain they can tolerate. But what about simple, plain old ruggedness? What does it mean to be physically tough, as well as mentally tough? Is it enough to simply be strong, or is there something more to it?

Strong But Weak

I will always remember the day I dropped in on a CrossFit class and went out for the warm-up jog with no shoes on. One of the other guys there, massively strong and musclebound, was shocked and asked me if it hurt or if I was scared of broken glass. I explained that I’d toughened up my feet over the last few years and it didn’t bother me at all. If I was caught shoeless in an emergency, the few seconds I needed to put on shoes could make the difference between life and death. It didn’t matter how fast I could sprint if my feet were too tender to handle the asphalt.

I see that reaction all the time: big guys with lots of muscles who wince as soon as the shoes come off or who insist on wearing gloves whenever they lift weights. They are immensely strong within their particular domain, but have very strict limits on their comfort zone. As soon as they are forced out of it, their performance drops drastically.

Defining Toughness

Men in particular often confuse toughness with strength, thinking that being strong is automatically the same as being tough, when in fact the two are distinct qualities. As Erwan Le Corre, founder of MovNat, says, “Some people with great muscular strength may lack toughness and easily crumble when circumstances become too challenging. On the other hand, some people with no particularly great muscular strength may be very tough, i.e., capable of overcoming stressful, difficult situations or environments.”

Toughness is the ability to perform well regardless of circumstances. That might mean performing well when you are sick or injured, but it also might mean performing well when your workout gear includes trees and rocks instead of pullup bars and barbells. “Toughness…is the strength, or ability, to withstand adverse conditions,” according to Le Corre.

Being able to do that requires both mental and physical toughness. No amount of mental toughness alone will keep you from freezing in cold temperatures, but if you’ve combined mental training with cold tolerance conditioning, for example, then you’ll fare much better.

Toughness is a Skill

It is a myth that you’re either born tough or you’re not. The truth is, toughness, both mental and physical, can and should be trained and cultivated, just like any other skill. There are certain mental techniques that help you cultivate an indomitable will, patience, and the ability to stay positive and focused no matter how bad things look. There are also certain training techniques you can use to condition your body to withstand discomfort and tolerate environments that would normally cause injury.

Mental Toughness

Mental toughness boils down to how you respond to stress. Do you start to panic and lose control, or do you zero in on how you are going to overcome the difficulty?

Rachel Cosgrove, co-owner of Results Fitness and a regular contributor to Men’s Fitness, stated in an article on mental toughness, “World-class endurance athletes respond to the stress of a race with a reduction in brain-wave activity that’s similar to meditation. The average person responds to race stress with an increase in brain-wave activity that borders on panic.”

Similarly, the biggest determining factor in whether or not a candidate for the Navy SEALs passes training is his ability to stay cool under stress and avoid falling into that fight-or-flight response most of us drop into when we’re being shot at. Developing ways to counteract the negative response to stress helps us stay in control of our bodies so that we can maintain the high performance needed to do well in any situation. That is real mental toughness.

Another way to look at mental toughness is willpower. When everyone else has decided they are too tired, you decide to keep going. In sports, this is called the second wind, when an athlete determines that they don’t care about their fatigue and decides to push harder despite it. When a football team is behind two touchdowns but picks up the effort anyway, determined to win despite all signs to the contrary, that’s an example of willpower in action. They may still lose, but they are much more likely to make a comeback with this approach.

So, how can you cultivate mental toughness?

Small Discomforts

One of the best ways to develop mental toughness is to accept small discomforts on a regular basis. Take only cold showers or occasionally fast. In the book Willpower, Dr. Roy Baumeister recounts the training regimen of famed endurance artist David Blaine. Before a stunt — some of which have included being encased in ice for over 63 hours, being suspended over the Thames in a clear plastic box for 44 days, and holding his breath for 17 minutes on live TV — Blaine will start to make up little inconvenient routines for himself to maintain, simply to test his willpower. These are usually small things, like touching every overhanging tree branch on his walk to work, but they get his mind in the habit of exercising will, to do something when it would be inconvenient or uncomfortable.

Examples of this include sticking to an inconvenient diet, living without a car, or shaving with a straight razor.

There’s a lot to be said for simple acclimatization to discomfort as well. The little nicks and bruises you get from training in wild environments can be hugely distracting when you’re just getting started, but if you keep heading back out, you eventually find them little more than useful feedback on positioning and technique.

Think Positive

Most of us have an internal monologue going on in our heads, telling our own story. How this sounds depends on our view of ourselves and external stimuli. If you’ve always been good at schoolwork, you might envision yourself as “smart,” but maybe not “strong” or “charming.”

The thing is, these definitions are mostly arbitrary. Anyone who works hard enough at academics can do well in school, and anyone who trains hard enough can do well in sports. Whether or not we are willing and able to push ourselves hard enough to do well often depends on that internal story.

So, the simple solution is to only accept positive self-talk. This is a common tactic of the super-successful, and is standard fare in such personal development classics as Dale Carnegie’s How to Win Friends and Influence People, Napoleon Hill’s Think and Grow Rich, and Stephen R. Covey’s The 7 Habits of Highly Effective People.

Have a Reason

One of the most powerful motivators in training and life is knowing why you cannot fail. Jack Yee, who writes specifically about mental toughness and has been featured on T-Nation and Mark’s Daily Apple, remembers his time at the famous Gold’s Gym in Venice Beach, where he saw not only old school greats like Tom Platz, Lou Ferrigno, and Arnold Schwarzenegger, but also a large number of promising amateurs, many of whom had more impressive physiques. However, they rarely lasted long: after one defeat at a competition, they would give up. One discouraging setback was enough to shatter their confidence.

The antidote is to remind yourself why you’re out there in the first place. A common trick I used to use in my running when I was feeling defeated was to imagine that my girlfriend was being threatened by kidnappers and if I didn’t get to her in time, they would kill her. Since my motivation for exercising was to be useful to those I cared about, this worked for me. No matter how beat up I felt, I would always run faster. Another trick for this is to use an iPhone app called “Zombie, Run!” You perform missions related to outrunning zombies — another great motivator!

Mental Toughness Training Summary

  • Allow (or seek out) small inconveniences and discomforts in your everyday life. Learn to tolerate them.
  • Start to judge your internal monologue, rather than simply accepting it for what it is. Actually listen to what you’re saying and decide if it’s a belief you want to let into your life.
  • When you’re feeling tired and talking yourself out of your workout, remind yourself why you’re training. Weigh the importance of the inconvenience against the importance of the why and get out there.

Physical Toughness

Compared to mental toughness, there is considerably less talk about physical toughness out there, probably because it is wrapped up into strength and conditioning. But the truth is, being physically tough is very different from being strong, fast, or powerful. Physical toughness includes the ability to take abuse and keep functioning, to recover quickly, to adapt to difficult terrain and contexts, and to tolerate adverse conditions without flagging.

Le Corre’s method of training, MovNat, emphasizes the value of developing a tough body by training in environments that do not accommodate the trainee. Training outdoors, in adverse (or simply not climate-controlled) conditions, is a core tenet of MovNat’s methods. Le Corre says of physical toughness, “[it] is the ability of the body to withstand hardship, such as food or sleep deprivation, harsh weather conditions such as cold, heat, rain, snow or humidity, and difficult terrains (steep, rocky, slippery, radiating heat, dense vegetation etc.).” Click here for a complete primer on MovNat.

Physical toughness boils down to the changes your body makes to make it more resilient. This has the effect of unloading your willpower so that you can push yourself harder mentally, since your threshold has effectively increased.

Thicker Skin

A very simple example of physical toughness — and one that is used as a euphemism for toughness in general — is thick skin. Men who train hard in gyms rarely develop calluses beyond those along the base of the fingers that are the result of the bar pinching the grip. Men who train with tough objects, like stones, logs, or in nature tend to develop thick skin all over their fingers and palms. The same goes for the feet. Accompanying this change is an alteration in the sensitivity of the pain receptors in those areas. As you become accustomed to walking barefoot, what used to be painful becomes a comfortable massage.

Exposure to the elements is the best way to develop this very real form of physical toughness. Train barefoot with minimal clothing, with rough implements. Start with shorter durations and forgiving surfaces so you don’t get to the point of actual injury, and increase the time and ruggedness of the environment. You will learn to tell the difference between discomfort and real pain. You’ll also learn how to be gentle when dealing with rock and dirt, but you’ll get tougher as well.

Supple Joints

An oft overlooked form of toughness combines mobility, flexibility, and durability. Hard training puts a lot of stress on the body, but this stress is multiplied when every movement stretches a muscle close to its full range or pushes a joint near its limit. Flexible joints can move farther without incurring stress on their support structures, reducing fatigue and the wear and tear that adds up to leave you sore and whimpering on the ground.

To that end, give mobility training serious consideration in your workout routine. Not only will it save you pain, it will allow you to absorb more punishment and do more reps without feeling the effects, which makes you that much harder to bring down.

The Art of Manliness recently published an article on an excellent method to develop mobility: self-myofascial release.

Hormonal and Adrenal Changes

Another example of physical toughness is harder to see. It consists of the metabolic and hormonal changes that go along with hard training. These can manifest in better energy management, so that you fatigue more slowly, and recover quicker, so that you can come back hard with surprisingly little time to recuperate. When most people would be down for the count, you’re back in the ring, having already caught your breath and cooled off.

The simplest way to train this kind of toughness is by limiting your rest between workouts or exercises, sometimes even at the expense of your performance. Be careful, however: there is a fine line between stimulating adaptation and overtraining, so remember that you need to give your body time and resources to build itself up stronger than before. Eat well and sufficiently, and get enough sleep. These habits will build up a store of resources you can lean on when rest isn’t so easily available. Occasionally, apply an acute stress, like intermittent fasting, to teach your body to adapt quickly and be efficient with energy, or train with little sleep. But in general, you’ll be able to handle more if you’re well-rested and well-fed.

Another interesting technique I’ve recently been using to improve my cardiorespiratory durability is nasal breathing. This involves restricting myself to only breathing through my nostrils, even during hard workouts. The result is more efficient oxygen usage. This technique causes me to regulate my pacing somewhat, but I’ve noticed that I don’t get out of breath nearly as quickly, even when I switch to regular breathing for a particular workout.

Environmental Tolerance

A relatively rare form of physical toughness is environmental tolerance. The most well-known variety is altitude acclimatization, in which athletes train at elevation and compete at sea level. This is normally seen as a way to gain an advantage in sports, but adaptation to low oxygen is also an example of physical durability, the ability to handle a difficult environment.

Another example is cold tolerance. The body will literally increase its ability to generate heat if you habitually go without excessive clothing and expose yourself to acute cold shocks. Even in the winter, it is possible to train with only a t-shirt and shorts. You’ll learn to distinguish between the superficial sensation of cold on your skin and the deep chill that threatens hypothermia. The first gives you feedback about your environment while the second is an indicator of potential danger.

In addition to training with less clothing, I also only take cold showers, which has also improved my ability to tolerate a wider range of temperatures without feeling real discomfort. Of course, both of these are pretty uncomfortable at first, but over time, they become less so, and you will find yourself becoming noticeably more hardy in general.

Physical Toughness Training Summary

  • Expose yourself to rough environments and forgo the usual protection, increasing the intensity of exposure slowly over time.
  • Learn and implement mobility and self-maintenance exercises into your regular training routine.
  • Train with less rest between sets or workouts, but take excellent care of yourself in the meantime.
  • Train outside in all weather with as little protection as you can tolerate.

Conclusion

My favorite way to develop pure toughness, both physical and mental, what I call ruggedness, is through outdoor training with minimal protection. Inspired by Erwan Le Corre and the MovNat method of training to approach exercise the same way I approached camping as a kid, I frequently train in a wild environment with nothing on but a pair of shorts, climbing trees, hoisting and throwing rocks, scrambling up and over boulders, and running over gravel-covered trails.

The constantly shifting terrain and objects challenge my body, but they also challenge my patience and focus. When a relatively small rock becomes nearly impossible because of its shape, it is frustrating. When I’m trying to sprint up a hill but keep slipping on loose sand, it is frustrating. When a gnarly tree branch makes pull-ups into a twisted mockery of the pristine movement I rock at the gym, it’s really frustrating. Slight pain from scratches or harsh ground is a constant, and with no clothing, the cold is often an issue, especially if there’s snow.

Everything is harder, or rather, I should say everything is more complex. The result is that I learn how to tolerate stress, both mental and physical, and how to adapt to make something work despite the fact that the environment is not cooperating. I deal with it or fail. When I’m out there, it doesn’t matter that I can deadlift 3x my bodyweight on a bar, because that doesn’t change the fact that a rock is completely off-balance and seems to be actively trying to roll onto my toes. And that doesn’t change the fact that I’m picking it up and carrying it up the mountain anyway.

That is the definition of tough.

Editor-in-Chief’s Note: This is a guest post originally written by Khaled Allen on The Art of Manliness. The Art of Manliness is a fantastic Website dedicated to uncovering the lost art of being a man. It features articles on helping men be better husbands, better fathers and better men. Khaled writes about the psychology and the realities of living up to your potential with integrity at Warrior Spirit. He is also a MovNat trainer and a self-defense coach living in Boulder, CO.

Posted in Mindset | Tagged , , , , , , , , , , , | 2 Comments

Knot of the Week: How to Tie an Ocean Plait Mat

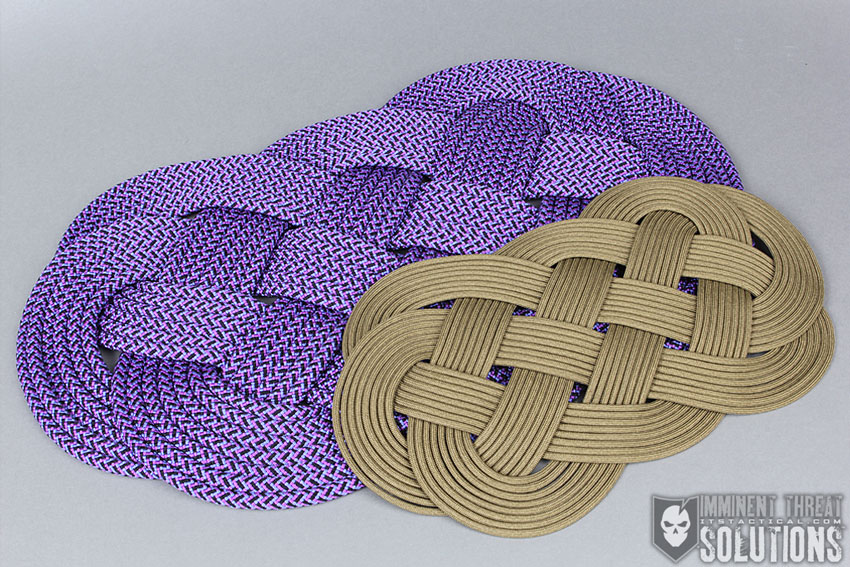
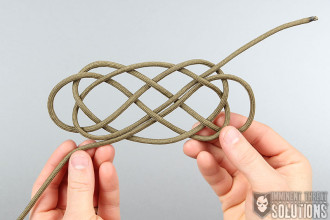
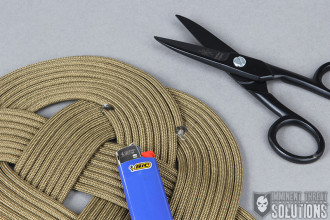
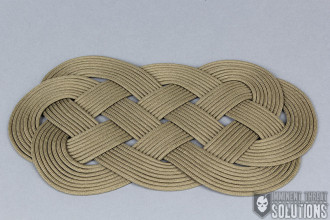
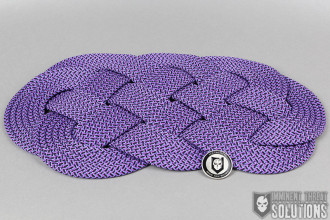
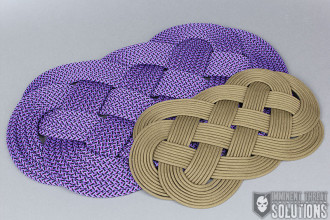
Ocean Plait Mat Knot of the Week

The Ocean Plait Mat, or Thump Mat was originally woven by sailors and hung at various locations around a ship to take the “thump” of a jib sheet (line), movement of traveler blocks or even to protect a bulkhead (door) opening. During high winds or normal movement, these locations needed to be protected. However, many other uses were found for mats like this on board a ship.
Ocean Plait Mats make excellent hot pads, cushion covers, door mats, you name it. The possibilities for these are endless. What we’ll be demonstrating today is the method described in the Ashley Book of Knots, (page 362, #2243) which as many of you may know is the bible of Knot Tying and a book that’s definitely worth adding to your library.

How to Tie an Ocean Plait Mat » Decorative

(Strength: –/Secure: –/Stability: –/Difficulty: 4

Please refer to our Knot of the Week introduction post for a description of what these ratings mean.

Uses:

  • Hot Pads
  • Cushion Covers
  • Door Mats
  • Protection

Tying Instructions:

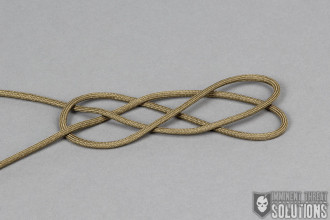
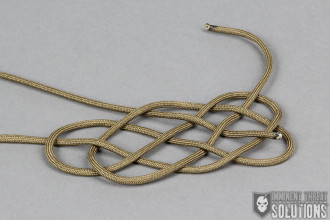
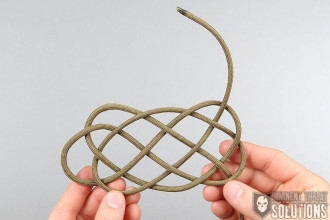
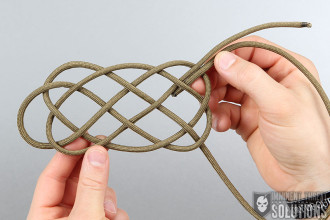
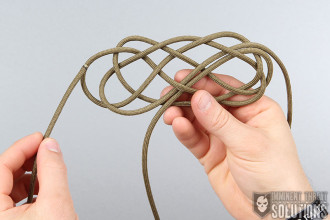
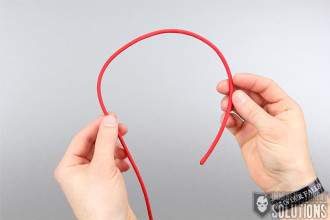
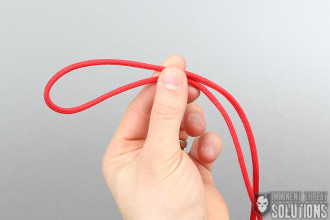
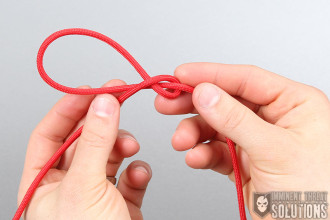
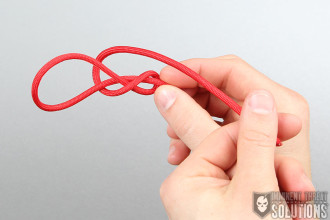
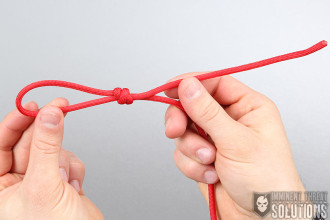
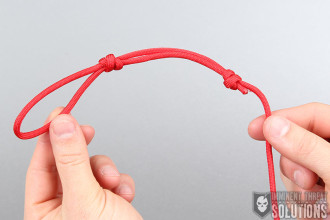
  1. Starting with an overhand knot, enlarge both bights of the knot.
  2. You’ll want one of the standing ends of this pattern to contain the overall length of your line.
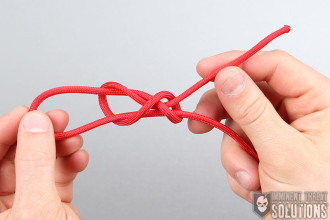
  3. Twist each bight and cross them over each other.
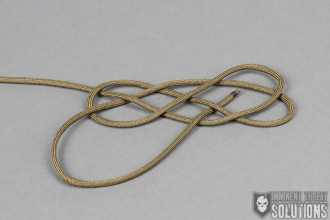
  4. Find the working end of the side that contains the short length of line.
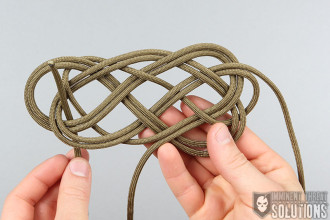
  5. *Refer to the photos for the sequence that shows the over/under pattern and thread it though.*
  6. Repeat this step with the longer working end of your line, referring to the photos.
  7. This will now lock in the pattern you’ve created.
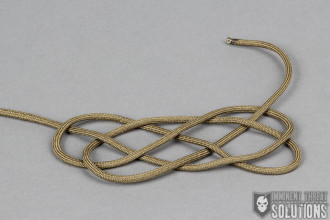
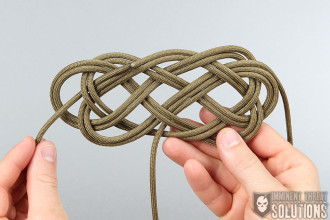
  8. Using the working end of the longer line, start tracing the pattern along the outside of the shorter strand you just finished with.
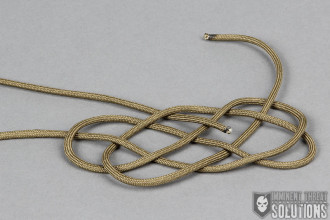
  9. Once you get a complete trace and are back parallel with your starting point, continue successive traces staying to the outside of the inner strands.
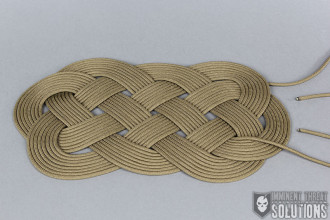
  10. Optimally you’ll want at least four complete turns through the mat, before tightening everything up, but there’s no set number of turns.
  11. *This all depends on how much line you have to work with.*
  12. Cut the ends and fuse them under the mat after you get the desired tightness.
  13. When everything is complete, you should have the same number of turns at each stage.
Posted in Decorative | Tagged , , , , , , , , | 3 Comments

Ridiculous Dialogue Podcast: Episode 01

Ridiculous Dialogue Episode One


Ridiculous Dialogue was created to share the banter that takes place at Imminent Threat Solutions on a daily basis. It’s us; candid, unedited and talking about everything from what movies we’re watching to the general geekiness that keeps us laughing here at ITS HQ.

While we generally keep the vibe in our articles PG rated, be warned, it may not be safe to blast over your speakers at work. We hope you enjoy the insight into ITS and who we are behind the scenes as a company; pull up a chair and tune in to Radio ITS.

Episode 1

In this first episode we talk about so many different things that it’s hard to narrow down the topics, but to provide a brief overview, there’s old school video games, first jobs and even first fights. Tune in to hear something you probably won’t expect to about Kelly and her first fight!

Episode 1 features Bryan, Kelly, Mike, Rob, Nick and Matt. You’ll also hear from Lang in future episodes, along with some other guests that will make an appearance. After you listen, let us know what you think in the comments below. We appreciate your continued support and hope you enjoy the look into the day-to-day banter here at ITS.

Ridiculous Dialogue Podcast Cast of Characters

Posted in Podcast | Tagged , , , , , , | 8 Comments

Take Nature’s Eye Test and See if You Have The Eyesight of a Warrior

If you’re not keeping up with the new TV show, Cosmos: A Spacetime Odyssey, you’re truly missing out. It’s a fantastic series hosted by Neil deGrasse Tyson, that not only talks about the history of our solar system, but relates it to interesting and useful information for us to use down here on Earth.

One of the tidbits that recently caught my attention was the episode Sisters of the Sun, which ran a few weeks back. In the episode, Tyson describes a star cluster named Pleiades and how it’s been referred to as nature’s eye test.

Made up of seven stars and also known as the seven sisters, Pleiades is found in the constellation Taurus. Legend has it that if you could see five of the seven stars you had normal vision and if you could see all seven you were a warrior suitable for battle.There are actually even more in the cluster, but it would take binoculars or a telescope to pick them out.

Orion Taurus Pleiades

Image © Winter Sky Tour

Finding Pleiades is relatively simple, depending on the time of year. The easiest way is to find Orion’s Belt, which you’re hopefully familiar with. Scan the right of his belt and you’ll notice a V shape, which is the head of the constellation Taurus (the bull). Continue just a bit further to the right and there’s Pleiades, around where the bull’s shoulder would be. Since the direction of Pleiades can vary from south west to south east, depending on the time of night, the easiest way to find it is to start with Orion’s Belt.

Pleiades can best be seen in the Northern Hemisphere during late fall and winter, but it’s also visible during spring. Right now as this article is written, you may still get a glimpse of it in the early evening sky, but it shouldn’t be much longer until it can be seen in the early morning sky. The sun passes through Taurus from May 14th to June 21st and it’s hard to see when the sun is within it.

Winter is the best time to see Pleiades, with November being the optimal month. November is often referred to as the month of the Pleiades, due to it shining from dusk until dawn and being visible nearly everywhere humans inhabit the planet.

Test your eyesight the next time you find yourself staring up at the stars and see if you can pick out all seven sisters of Pleiades.

Posted in Navigation | Tagged , , , , , , , , , , , , , , , , , | 1 Comment

Gaining Traction with Teva’s De La Vina Boot for Women

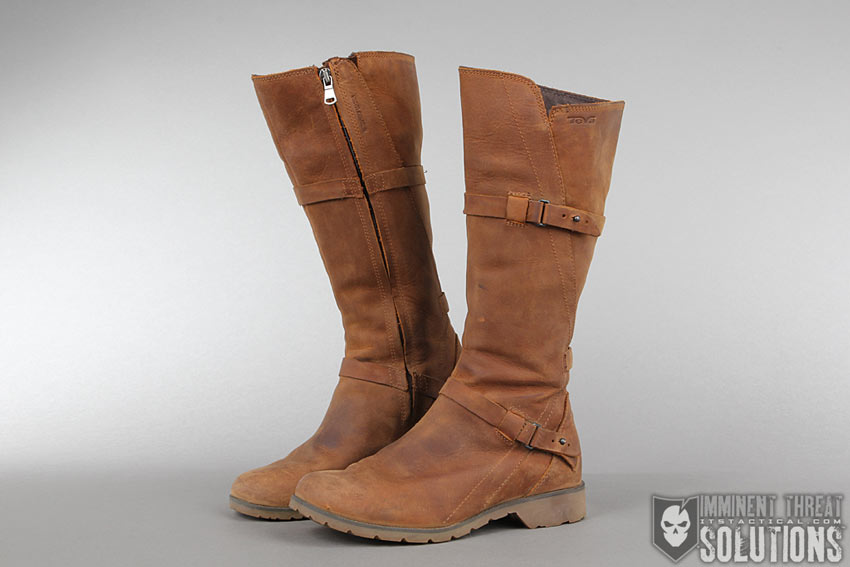
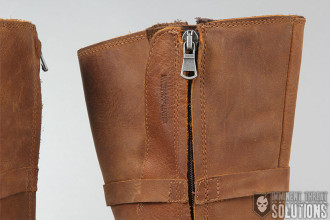
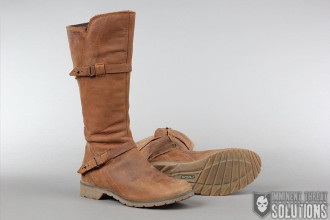
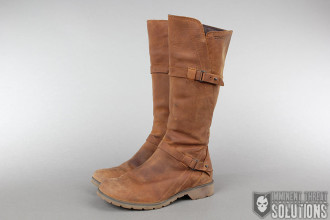
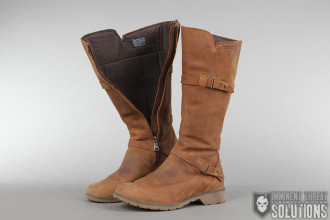
Teva De La Vina

Footwear for women can be challenging. Most of us want comfort and modern style, but have to forgo one for the other too often. Finding a picture of a boot that’s appealing is easy; finding a boot that looks good, is comfortable for hours on end and has ample traction, are other factors that aren’t always part of the deal.

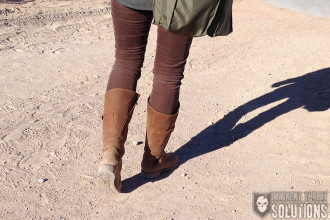
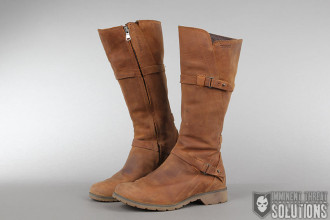
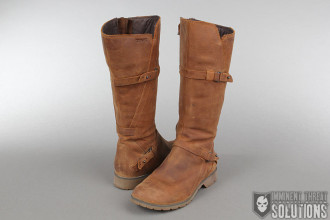
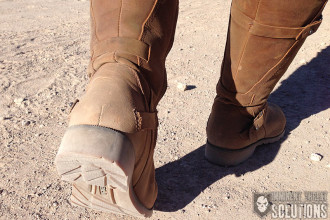
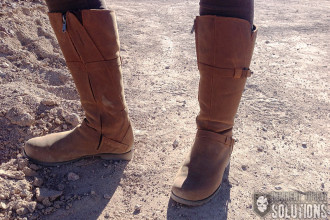
In September of last year, the Teva De La Vina boot caught my eye at REI. It was rugged, stylish, claimed to be waterproof and wasn’t clunky. After debating the pros and cons of trying it on, I opted to put it back on the shelf and walk away, but I couldn’t stop thinking about it for a few weeks. So, I eventually looked it up online at REI and saw they didn’t carry a womens size 5.5, which led me straight to Teva.com. My size was available, but I was still a little thrown by the $180 price tag. Fortunately, I found a 20% coupon online and placed my order for the De La Vina in Bison. UPDATE: Here on Amazon, these boots are much more affordable and just a little over $100! By the way, Bison is actually more reddish-brown than the yellow color shown in Teva’s pictures, hopefully that can be seen in our photos.

I had high expectations for these boots. Each year when we cover SHOT Show, I like to wear boots instead of regular shoes. Let’s face it, there just aren’t too many sexy, practical options when it comes to needing to walk (sometimes run) all over a convention center. Having shoes that remain supportive and comfortable all day, yet are versatile enough to go from gravel roads to carpeted convention centers, are ideal. This also helps me pack light and not have to worry about toting around extra shoes when we have to venture from one place to the next. Plus, I want to look like I have a bit of style while traipsing around.

Teva De La Vina

Daily Wearability

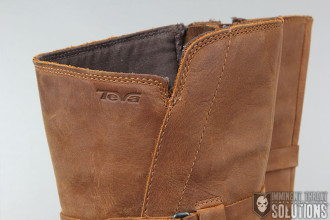
It was the end of October 2013 when I purchased the De La Vina boots and began wearing them in November. They quickly became part of my cooler weather uniform, even on rainy days. The upper portion of the boot is made of a waterproofed leather that really kept my feet dry and warm while out in the elements. The leather also dried without spotting or staining after each time they got wet.

The inside of the boot is lined with a very soft material, so on the few occasions that I wore the boots inside of pants instead of on the outside, my legs didn’t sweat or stick to the lining. Teva advertises in the product description that the sole “is a Mush® Infused Insole [which] brings the absurd comfort of a flip flop into a shoe” and I completely agree, it felt almost like wearing comfortable flip flops. Many times, even after wearing the boots all day long, I would forget to take them off when I got home and would just get started cooking dinner.

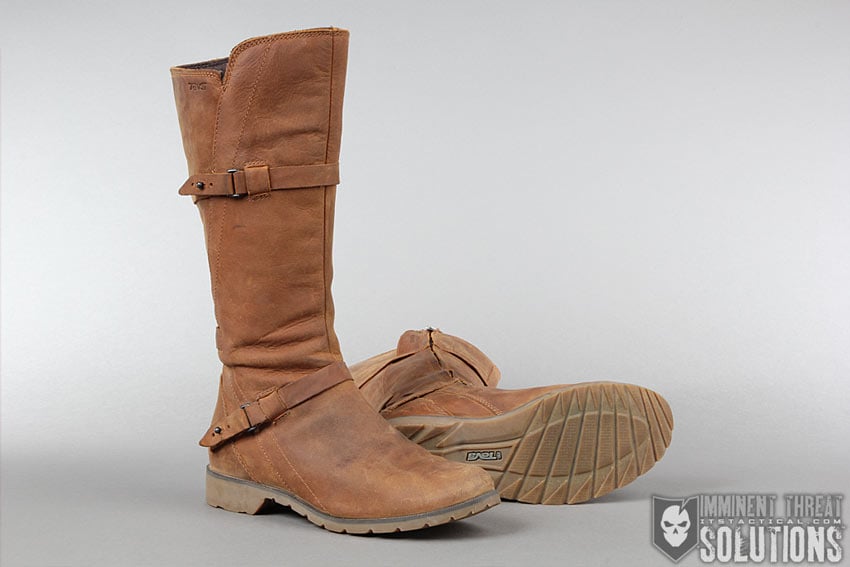
It’s worth noting that an extensive amount of time and research has gone into designing the Mush® Insole/rubber sole that together provide so much comfort and stability. Teva has their T.I.D.E. Lab “where we apply our 25 years of experience working and playing in water to create some of the most advanced footwear available in the outdoor market.” The Mush® technology began with sandals, but was added to other shoe designs for the ultimate comfort experience in Teva shoes and boots. The Spider365 rubber sole is what gives the De La Vina boot the excellent traction and durability that I experienced in multiple environments.

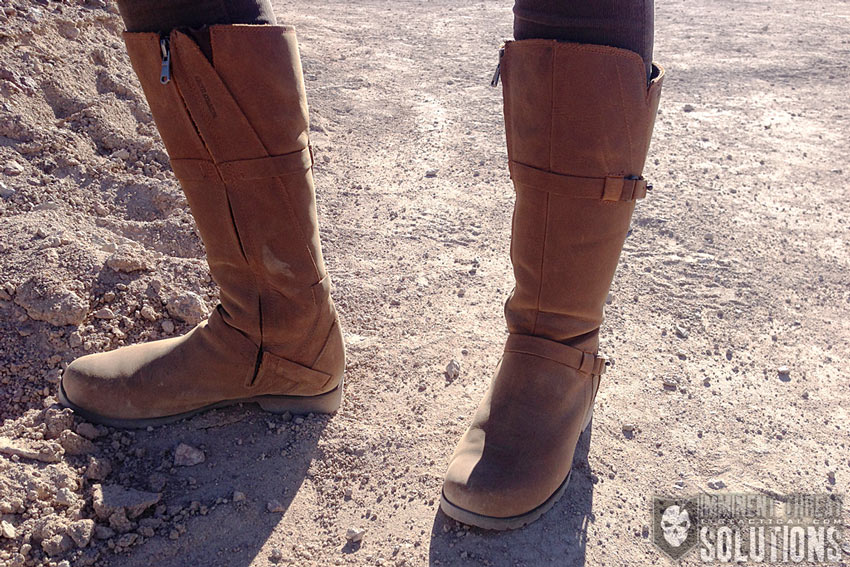
Another thing I noticed about these boots was that they age well. Sure they get scrapes and scuffs on them, but because of the type weatherproofing the leather has been through, the scuffs and scrapes fade and get absorbed into what became the natural patina of the leather. It’s worth noting that Teva recommends treating the boots annually with a non-silicone based water and stain repellent specifically designed for leather to keep the leather protected for the long term.

Range Day 2014

Teva De La Vina

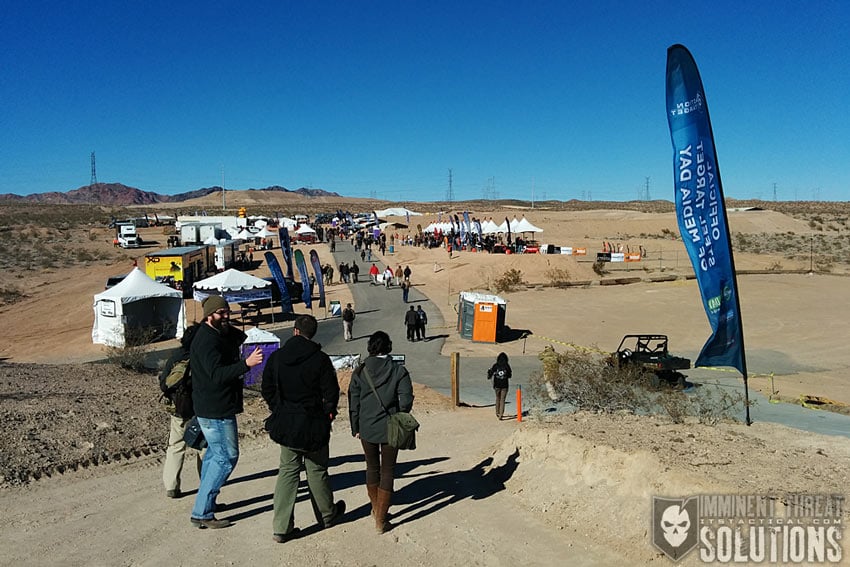
For anyone not familiar with the Boulder Rifle and Pistol Club range just south of Las Vegas, Nevada, it’s worth noting that the terrain is a bit rugged. The walkways are gravel and the rocks can be rather large and dense in some areas. Standing and walking on this type of ground can really be a pain if you’re not wearing the right shoes. There were also a couple of steep hills that were a mix of gravel and packed dirt to climb up and walk down, in order to move from one area of the event to the other. Without proper traction these hills could potentially cause a slip. We ended up walking more than five miles in the rugged terrain and I was able to maneuver in my Tevas without slipping or feeling any discomfort in my feet, legs or back. The leather was easy to wipe down after we got back to the hotel and the boots looked good as new for the next day of work.

Teva De La Vina SHOT Show 2014

SHOT Show 2014

Total walking time around the convention center each day of SHOT Show varied from the just over four miles, up to about seven miles, depending on where we needed to be. We were on our feet most of each day from 7:30 a.m. until around 5:30 p.m. Depending on which vendor booth we visited, there may have been some additional padding that we could stand on, but for the most part we stood and walked on concrete floors with a thin layer of commercial carpeting to help absorb the impact of each step.

Overland Expo 2014

I also took my De La Vina boots to Overland Expo this year. The terrain out at Mormon Lake Lodge was moderately grassy, but we mainly worked on dry, packed ground. Walkways were lightly graveled and dust was everywhere. I quickly found out that walking around in boots all day is a heck of a lot more comfortable than just standing around in a vendor booth. Overall my feet, legs and back didn’t ache from standing, but my toes definitely felt the impact since the toe box on this boot isn’t as wide as other boots. That’s a trade off I’m willing to make though, since I’m not on my feet all the time and this situation was out of the norm for me. The slender width of this boot is one of my favorite features since so many performance boots are wide and clunky.

Teva De La Vina

Details that Deliver Superior Performance

  • Spider365 Rubber sole provides traction in all kinds of environments
  • Waterproof leather and sole
  • Leather Upper
  • Adjustable straps offer a custom fit
  • Mush® Infused Insole brings the absurd comfort of a flip flop into a shoe
  • Zipper on the inner side of the boot provides quick in and out
  • Total weight for both boots 16.9 oz

Happy Customer

This has definitely been one of the best footwear investments I’ve made since I’ve been a part of the ITS Crew. Having gear that can function in multiple environments is essential. For me, part of that functionality must include comfort, durability, style and longevity of the product. The Teva De La Vina boots have worn amazingly well for me over the course of the past seven months and the many miles they’ve carried me through. After giving them a thorough dusting off and adding more waterproofing to the leather, I’m confident they’ll be ready for the next season of wear.

Posted in Footwear | Tagged , , , , , , , , | 3 Comments

What Does a Military Combat Tracker’s EDC Consist Of? John Hurth of TÝR Group Walks us Through His Loadout

Combat Tracker Load by TYR Group

A combat tracker squad needs to travel as light as possible, but still carry the right equipment to survive on the battlefield. In order for the tracker and his squad to successfully perform their combat tracking mission, mobility will be key. The trackers ability to react to the enemy is reduced when overburdened with a heavy load, which will cause physical/mental fatigue and place the trackers in danger when needing to rapidly react to enemy contact.

The trackers combat load is the mission-essential equipment required to fight and survive in the environment he’s operating in. He can’t be expected to carry gear for every possible contingency or combat situation, rather his loadout must be based on his particular mission and the ability to remain mobile but combat effective. When deciding on equipment, choose items that are light and multipurpose. Fighting loads must be light so that the tracker may remain alert, agile and stealthy.

Combat Tracker Load by TYR Group

Mission essential equipment is broken down into three categories:

  • Level 1: Describes the uniform and equipment that is worn by the individual tracker. These items are the uniform, boots, belt, dog tags, compass, tourniquet and any other survival items carried on his person.
  • Level 2: Describes the fighting load carried by the tracker which should not exceed 48 pounds. These items are typically the trackers individual weapon, basic load of ammunition and load bearing equipment.
  • Level 3: Describes the approach-march load carried for extended operations, which should not exceed 72 pounds (including your fighting load.)

Level 1

Combat Tracker Load by TYR Group

1. Camouflage Jacket. With 1″ square piece of infrared identification, friend or foe (IFF) tape attached.
2. Camouflage Headgear. With a 1″ square piece of Infrared IFF tape placed on the top of the headgear for identification by friendly air.
3. Signal Device. Phoenix IR-15 programmable transmitter with a 9V battery for marking one’s own position at night and a 10″x10″ orange signal square cut from a VS-17 Panel. This panel is used as a recognition signal device for linking up with other ground elements.
4. Identification Tags.
5. SAR Eclipse Signal Device. The SAR Eclipse device is very compact and has been tested and observed out to 10 miles during daylight conditions.
6. INOVA Microlight. This small flash light comes in white, green, blue and red colors and is perfect for signaling or conducting map checks at night.
7. Signal Mirror. Besides using a signal mirror for signaling, applying camouflage or shaving, it’s also a good piece of equipment to deflect and manipulate light in order to view details of an impression.
8. Whistle. A whistle comes in handy when having to signal commands to other friendly elements over gunfire.
9. Magnetic Compass. Although a GPS is a good piece of equipment, it will never take the place of good compass.

Combat Tracker Load by TYR Group

10. Camouflage Trousers.
11. Trouser Rigger’s Belt.
12. Lighter.
13. Notebook. This notebook is used to record information gained during the mission, along with footprint data cards.
14. Map, Protractor and Lead Pencil.
15. Field Expedient Patch Kit. To quickly repair minor rips or tears to the uniform during a mission.
16. Rations. Should be high energy food items.
17. Boots.

Level 2

Combat Tracker Load by TYR Group

1. Load Bearing Equipment (LBE). In this case a Tactical Tailor MAV, Split Front rig.
2. Radio.
3. Magazines. No more than a basic combat load of ammunition for the weapon system should be carried on the LBE.
4. Electrical Tape. To secure items together while in the field.
5. Colored Surveyors Tape. For marking the last known sign.
6. GPS. The GPS is a good piece of equipment that can track the route of the squad and give the squad’s precise location. However, don’t become over reliant on technology that’s battery operated. When not pinpointing your location, keep the GPS turned off to conserve the battery life.
7. Strobe Light with IR Cover. For signaling friendly forces.
8. Multi-Tool. These are great for making small repairs and typically have a knife, file, flat tip and philips head screw driver, can opener and pliers.
9. Spare Batteries. Enough for all your equipment during the operation. When acquiring equipment, choose items that require the same type of batteries. AA batteries are compact and common enough that they can be found just about anywhere in the world.
10. Weapons Oil and Brush. A bottle of oil to protect and lubricate your equipment is essential in any environment. A shaving brush is also useful for brushing dust and debris from equipment.
11. Measuring Device. For taking measurements of impressions or showing scale when taking pictures.
12. Headlamp. A headlamp is a good item to have when it’s important to have both hands free such as conducting a prisoner search or some other type of exploitation.
13. 550 Cord. 25-30 feet of cordage should be carried for repairing, tying or lashing items.
14. Knife Sharpener. Carrying a sharpener is essential, as your knife won’t do you any good if it’s not sharp.
15. Camouflage Face Cream.
16. Water Bottles.
17. Knife. A multipurpose knife that has at least a six inch blade should be carried. The knife should be heavy, sharp and versatile enough to use for building shelter, various survival tasks or in use as a fighting knife. The knife pictured above was a collaborative design between the author and custom knife make Jeff Crowner.
18. Smoke Grenade. For screening or signaling.
19. Fragmentation Grenades. At least two fragmentation grenades should be carried when on patrol.
20. Individual First Aid Kit. This kit provides the necessary equipment to perform Self-Aid/Buddy-Aid and addresses the two leading causes of death on the battlefield, extremity hemorrhage and airway obstruction. Kit in photo includes: Tourniquet, (2) Elastic Bandages, Gauze Bandage 4-1/2″, Adhesive Surgical Tape , Airway Nasopharyngeal Airway, (4) Exam Gloves, (2) Pri-Med Gauze Bandages, EMS Shears, Triangular Bandage and Water Purification Tablets.
21. Gloves. Used to camouflage and protect the hands from sharp objects.
22. Mag-Lite Flashlight/Blast Match. The Mag-Lite is for tracking during night time conditions. A Blast Match is another great fire producing survival tool designed for all-weather use and can be operated with one hand in case of injury.

Combat Tracker Load by TYR Group

23. Rifle. The rifle that is issued. Contrary to popular belief, soldiers and Law Enforcement alike don’t get to pick and choose their weapon system or the caliber it shoots. No matter what type of weapon is issued, the operator needs to be an expert with it.
24. Weapon Accessories. Optical scopes or red dot sights may be required for the mission depending on METT-T. Also, a Target Pointer/Illuminator/Aiming Light is good to have for operations at night.

Level 3

Combat Tracker Load by TYR Group

1. Ruck Sack. This piece of equipment holds all mission essential equipment that’s to be carried by the tracker for extended operations. The size of this pack is dictated by the amount of equipment the tracker will need to sustain himself until a resupply can be requested. The estimated time on operation, terrain operating in and weather conditions the trackers will have to endure are all be factors to be considered.
2. Rations. Enough rations for 48-72 hours should be carried.
3. 3-Liter Hydration System. The tracker needs to carry enough water to last for the duration of the operation, or until a suitable water source is found, or resupply occurs. Water is always consumed from the pack first. Should the pack be dropped for any reason during the operation the tracker should have full canteens on his LBE.
4. Carlton’s CAT PAWS (Super Sneakers). CAT PAWS are a great item to place over the soles of the boot so the tracker can conceal his own tracks.
5. VIPER Hood. The Viper hood breaks up the recognizable and familiar outline and shape of the human head and shoulders. The best aspect of the Viper is that it is designed to be worn in conjunction with the trackers combat equipment without interfering with the trackers ability to get to the pouches on his LBE.
6. Large Trash Bag. For waterproofing or to store trash while on an operation.
7. Weapons Cleaning Kit. This kit should be capable of maintaining your weapon in a field environment. At a minimum, the kit should contain a bore brush, chamber brush, cleaning rod, slotted tip for patches, patches, CLP, lens brush for optics and an all-purpose utility brush.
8. Night Vision Device. Night vision is required when conducting operations at night.
9. Spare Magazines. Three extra loaded magazines.
10. Binoculars. Should be used whenever possible to detect the enemy from a distance. They also provide a larger field of view than a monocular or scope.
11. VS-17 Panel. The VS17 Signal Panel can be laid out on the ground to identify troop positions to friendly aircraft or to identify where help is needed.
12. E-Tool. The E-Tool is a lightweight collapsible spade shovel that can dig or chop.
13. Hammock. Depending on the operational environment, a hammock may be essential for staying dry when bedding down for the night.
14. Sewing and Equipment Repair Kit. This should include sewing thread, needles and safety pins.
15. Hygiene Kit. Minimal hygiene items such as nail clippers, tooth brush, tooth paste and small wash rag.
16. Compression Sack or Waterproof Bag.
17. Basha/Tarp. This needs to be large enough to provide protection from the elements as a shelter, or used as a makeshift litter to transport a casualty.
18. Sleeping Gear. Depending on the environment, this could range from a sleeping system with a ground mat for extreme temperatures, to a poncho liner for more tropical climates.
19. Gore-Tex Bivy. The bivy provides a waterproof, breathable cover that keeps out wind, snow and rain.
20. Bungee Cords. For quick lashing of items such as the tarp.
21. 550 Cord. 25-30 feet of cordage should be carried for repairing, tying or lashing items.
22. Spare Socks. Foot maintenance is imperative! Dry clean socks will help prevent blisters, hotspots and athlete’s foot.

Again, when deciding on equipment, choose items that are light and multipurpose. Fighting loads must be light so that the tracker may remain alert, agile and stealthy.

Editor-in-Chief’s Note: Please join us in welcoming John Hurth of TÝR Group as a Contributor on ITS. John is a retired U.S. Army Special Forces Soldier who served with 1st Special Forces Group at Ft. Lewis, WA where he participated in multiple deployments overseas to include two combat tours in support of the Global War On Terror. He now uses his years of tracking knowledge as the owner and lead instructor of the TÝR Group where he and his staff conduct training on various tracking techniques.

Posted in Load Bearing | Tagged , , , , , , , , , , , , | 36 Comments

Knot of the Week: Japanese Rope Restraint with Hojo Cord or Hayanawa

Hojōjutsu is the ancient Japanese martial art of restraint using cordage. This cordage is commonly referred to as Hojo Cord, but properly it’s called Hayanawa and also Torinawa. Respectively these mean fast rope and capture rope.

Used by Japanese Constables and Samurai alike, this method for tying cordage to restrain pre-dates handcuffs and is actually still taught to Japanese Police Officers today. These 30 ft. bundles of cordage would typically be stashed in a uniform blouse by constables, or carried by a Samurai on the Sageo. This was cordage that affixed a Samurai’s sword sheath to his obi (sash).

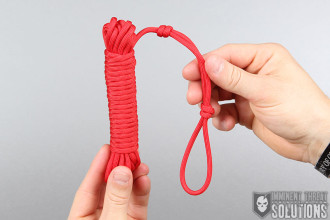
By simply grabbing the loop formed in the working end of the cordage, a quick slip knot could be pulled to place over the wrist of the prisoner. This served as the initial starting point to intricate rope work that would bind the person for transport. Additionally, Honnawa (main rope) was applied after the initial capture rope was applied to further secure the prisoner long term. Honnawa was typically a thicker natural fiber rope that would allow the Hayanawa or Torinawa to be removed after it was applied.

We’ll go over how to tie up the Hojo Cord bundle on today’s Knot of the Week using paracord, as well as demonstrate a quick handcuff knot on the video embedded below. The article and video won’t get into how to necessarily restrain someone with Hojōjutsu, but there’s plenty of resources out there if you’re interested. It’s still practiced today by schools of Jujutsu.

Hayanawa / Torinawa / Hojo Cord Bundle » Misc.

(Strength: –/Secure: –/Stability: –/Difficulty: 2Please refer to our Knot of the Week introduction post for a description of what these ratings mean.

You many notice how similar the Hojo Cord is to the Paracord Deployment Lanyard we’ve demonstrated on a previous Knot of the Week. The wrapping is done in a similar fashion, but there are some subtle differences.

Uses:

  • Japanese Art of Hojōjutsu – Rope Restraint
  • Storing Paracord for Quick Deployment

Tying Instructions:

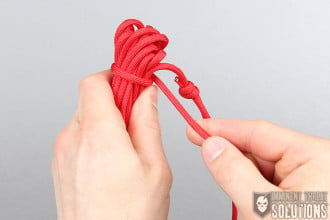
  1. Grab the working end of your paracord and measure a 12-14″ section.
  2. Form a 2-3″ bight at the mid-point of that section.
  3. Wrap the working end over the standing part and around the backside.
  4. Cross over your previous wrap and again around the backside.
  5. You’re not going to pull this working end through the inside of the figure-8 shape you’ve created on top of the standing part.
  6. Tighten this fisherman’s knot, measure off another 2-3″ and tie a second fisherman’s knot.
  7. Ensure the working end you wind up with after the second fisherman’s knot is as small as possible and trim/fuse if necessary.
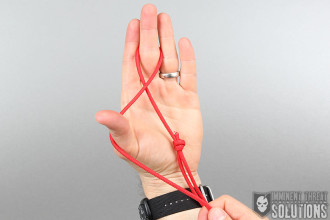
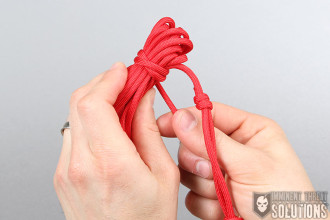
  8. From this point, suspend the cordage over a “C” shape created by your fingers, with the tied portion hanging below the “C”.
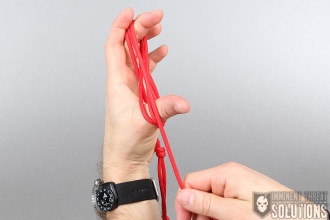
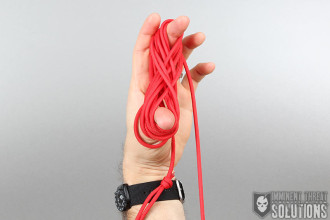
  9. The remainder of the cordage is now wrapped around your fingers in a Figure-8 pattern to prevent binding as it’s payed out on deployment.
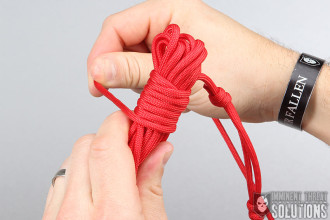
  10. Once the bundle is formed, ensure you leave 4-5 feet for the wrapping that follows.
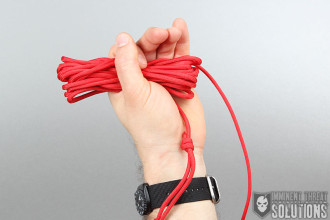
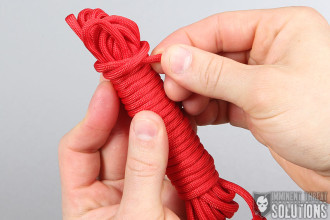
  11. Start the wrapping near the top of the bundle and lock off the first wrap as show in the photos, before progressing with the consecutive wraps.
  12. After the wrapping is completed, lock off the last wrap by routing it trough the previous wrap (see photo).
  13. Trim and fuse the working end for security.
  14. You’re now a ninja, congratulations!

Video and Photo Instructions:

Posted in Misc. | Tagged , , , , , , , , , , , , , , | 12 Comments

New Lapel Daggers, Midnight Collection Waterproof Notebooks and Black Single-Point Koozies Now Available

New ITS Shop Products

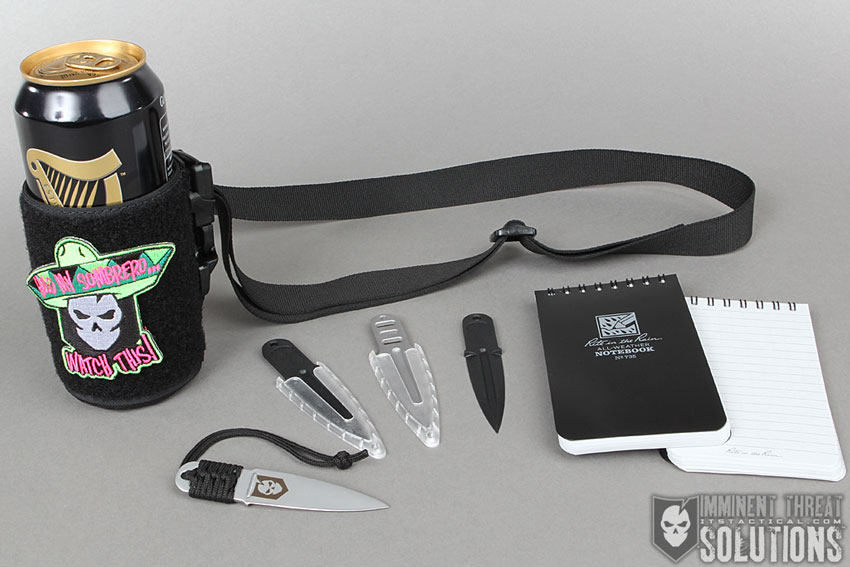
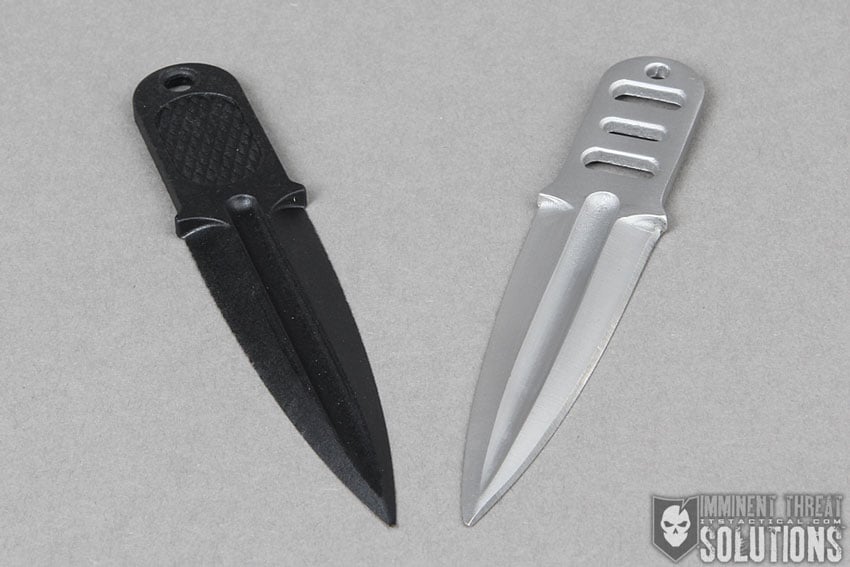
Today we’re excited to announce a few new products to the ITS Shop that are sure to enhance your cloak and dagger collection. The ITS Lapel Dagger is a highly-versatile Cold War classic with a modern twist. Whether you sew it into a jacket lapel or add to your survival kit, we’re sure you’ll find the perfect place to keep one handy.

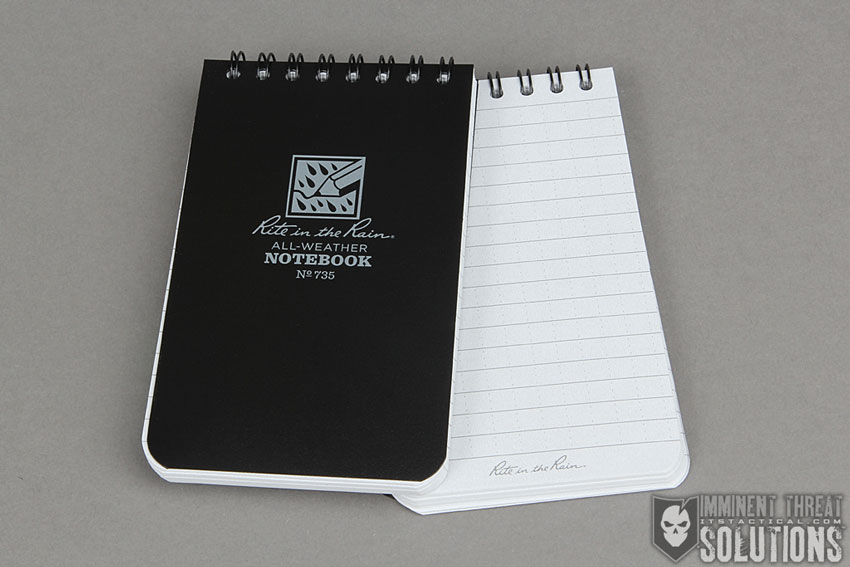
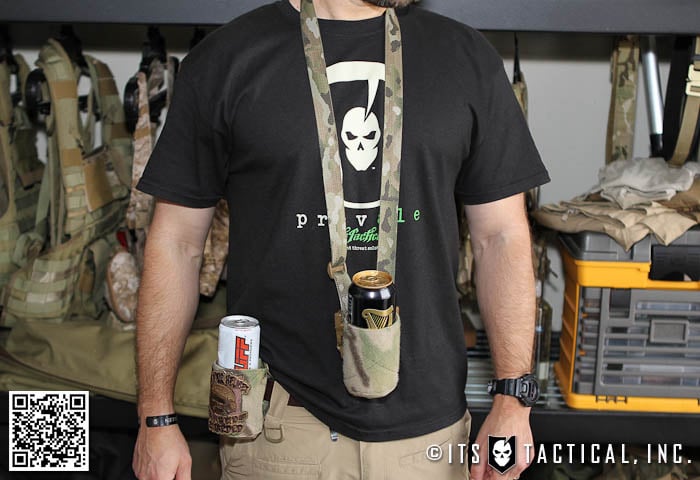
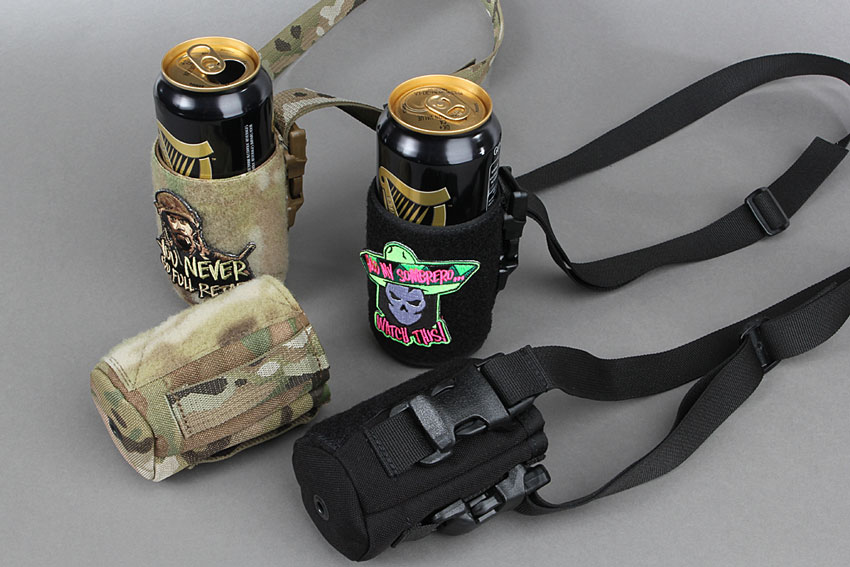
Also added to the store is a new weatherproof pocket notebook that’s ready to handle your outdoor adventures. The top spiral feature on the 3″ x 5″ Rite in the Rain Waterproof Notebook makes taking notes easy without having to hold your place like a standard bound book design. We’ve also brought back an old favorite, the ITS Single Point Koozie is now available in a new black colorway. Whether you sling your brew like a rifle, add it to your belt, or even remove the buckles and simply handhold it, this koozie is ready to party.

ITS Lapel Dagger

ITS LD

ITS LD

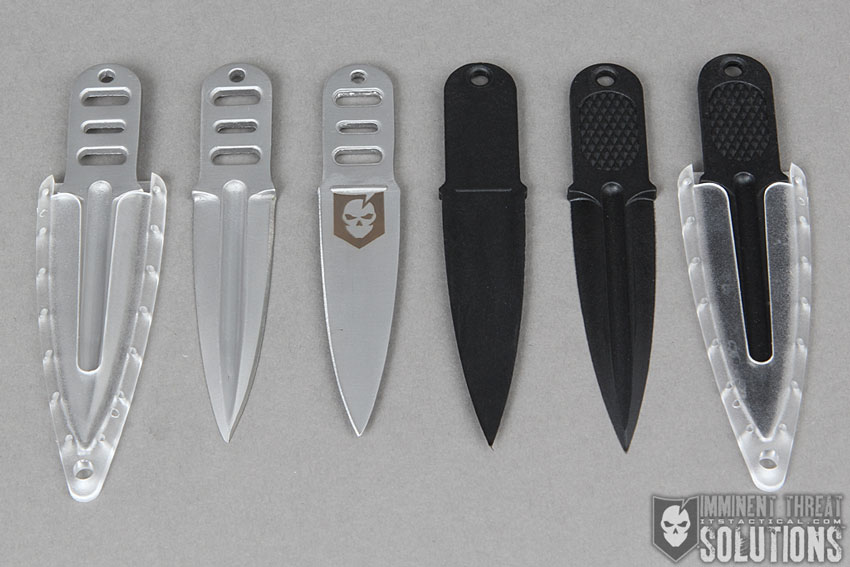
The ITS Lapel Dagger is modeled after the OSS (Office of Strategic Services) lapel or thumb dagger, with a few modern upgrades. The original cloak & dagger tools were clandestinely carried for a few different reasons. From being used by spies to break contact during a search, to having a surreptitiously accessible weapon in an emergency.

Available in either cast stainless-steel with one sharpened edge and laser engraved ITS logo on the back side, or glass-filled nylon (non-magnetic high-strength plastic) with no markings. These ITS Lapel Daggers are chisel ground (flat on one side) and feature a 2.5” blade and an overall length of 3.75”. Each includes a glass-filled nylon slip sheath with positive retention through a raised detent that interfaces with a groove in the sheath.

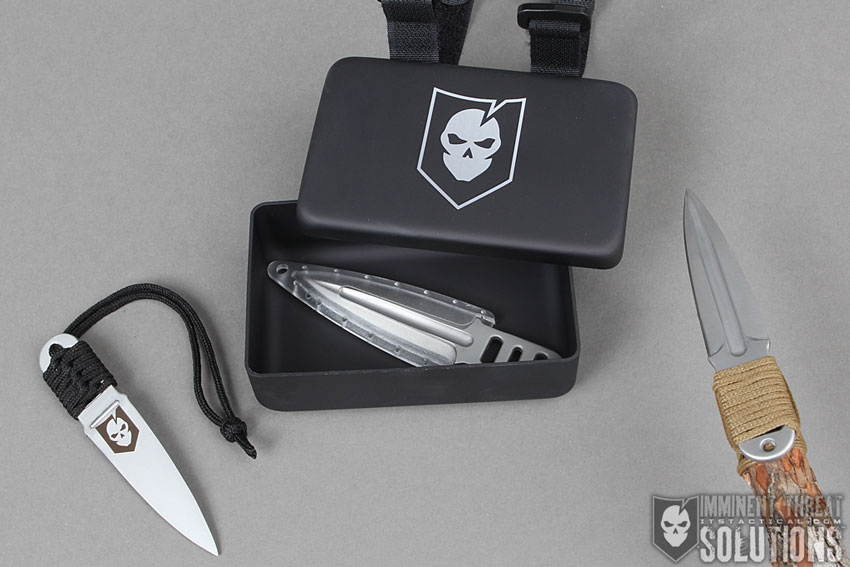
Sheaths also feature 14 holes to enable sewing it onto the lapel of a jacket or other locations, just like the original OSS lapel daggers. There’s also a dummy cord loop on the sheath to anchor it during quick removal of the blade. Total overall length with the sheath is 4.25”.

ITS LD

For added grip retention, the metal version features a skeletonized handle, which also enables wrapping it with cordage, like our ITS Dummy Cord (as shown in photo). It can also be lashed to a stick to create a spear for survival situations and fits perfectly in our ITS Multi-Purpose Survival Container. There’s also a lanyard loop for tying your own finger lanyard. The glass-filled nylon version features a diamond texture for grip retention and a lanyard loop as well.

Click here to order a Stainless Steel or Glass Filled Nylon ITS Lapel Dagger


Rite In The Rain Waterproof Notebook (Midnight Collection)

Rite In The Rain Notebook

Rite In The Rain Notebook

Rite In The Rain Notebook

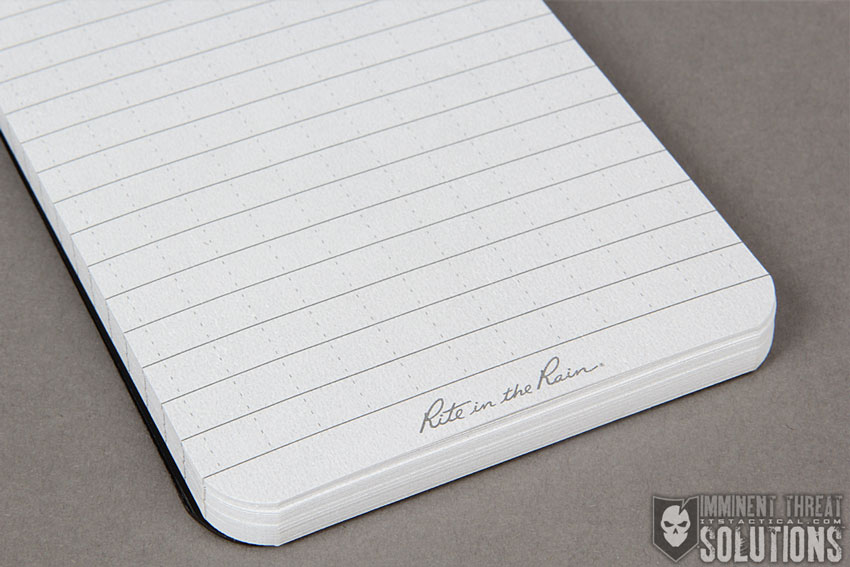
Sold individually and part of the new Midnight Collection, the 3″ x 5″ top-spiral Rite in the Rain Waterproof Notebook is discretely sophisticated with its black Polydura Cover and subdued light gray tinted paper. Each book contains 100 pages (50 sheets) of a dark gray Universal page pattern. The Midnight Collection is easy on the eyes, delivering the reliability you have come to expect from Rite in the Rain.

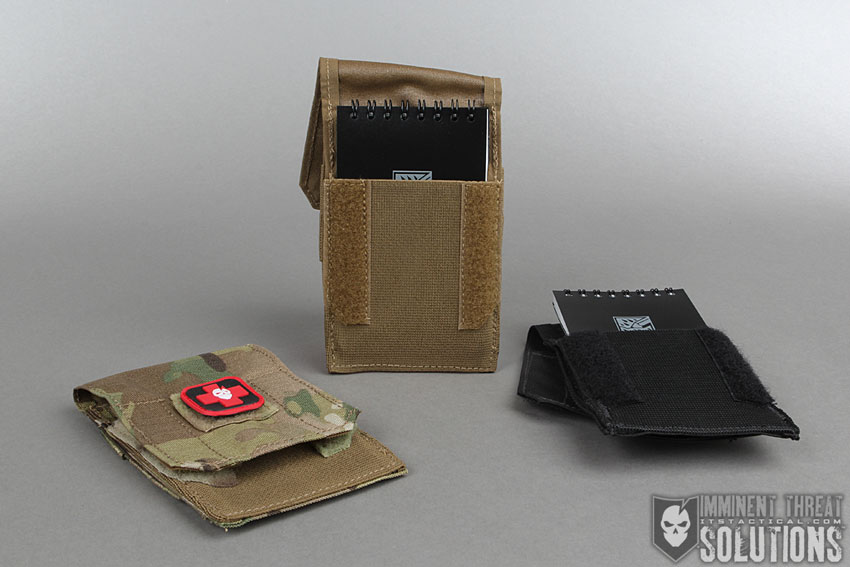
The pages of a Rite in the Rain notebook are made of recycled wood-based paper that won’t get ruined when exposed to rain, sweat, grease or even the laundry machine. This is the perfect pocket notebook to carry while camping and hiking or even add to your vehicle or travel bag without having to worry about your notes getting lost. These waterproof notebooks also fit in our EDC Slimline Pouch for carrying on a belt or MOLLE compatible gear.

Click here to order an individual 3″ x 5″ top-spiral Rite in the Rain Waterproof Notebook 


ITS Tactical Single Point Koozie

ITS Single Point Koozie

Single Point Koozie

ITS Single Point Koozie

The ITS Single Point Koozie draws its inspiration from the coolest piece of kit from a past ITS Hog Hunt. Each koozie features an adjustable 1″ webbing strap that enables hands-free stowage of your favorite beverage. It can even be removed with the included ITW QASM buckles for easy belt mounting. The interior is lined for better insulation and features a drainage grommet, while the exterior features a large loop area to affix your favorite morale patches or identifiers.

Click here to grab a ITS Single Point Koozie in the new Black Colorway

Posted in ITS Information | Tagged , , , , , , , , , , , , , , , , , , , , , , , | Leave a comment

Living Better: Tips for Balancing Your Digital Life

Balancing Digital Life

For many people, finding a balance between their digital life and their physical life is similar to the difference of a busy, nonstop city street and a quiet country road through the mountains.

I feel as if I keep reading about people who are ditching their smart phones in favor of “dumb” phones, limiting their electronic use, or even taking a year off of the Internet altogether. I have nothing against that. I understand why they’re doing it and I feel it’s a good thing for people to do from time to time. As someone who is admittedly always on his phone, I’m actually a bit jealous.

The problem I have with this “drastic” measure of switching from digital to analog is not that technology is bad, but that the entire idea seems to be a “throw the baby out with the bathwater” type of situation. More specifically, an issue of self control.

There’s a few reasons why I’ve tried to use so many smart phone apps and social networks. The main reason is because I want to document my life with a digital footprint so I can go back and look at it when I get older. Simply put, the variety of digital resources available have made keeping a journal a lot easier.

I also think it would be pretty fun for my kids and grandkids to see where I checked in on Foursquare, what photos I’ve Instagrammed, or even what time I went to bed and woke up the next morning (through the private social network, Path.) I’m sure they’ll make fun of what I said or what I’m wearing, but that’s going to happen regardless.

Just a quick note: This isn’t an article on social media privacy, but it’s worth mentioning that you can still create digital memories without sharing everything publicly. As always, use common sense and don’t rely on privacy policies. Only share (public or private) what you don’t mind everyone in the world reading.

Some might look down on me while I’m Instagramming my kids baseball game and write it off as not paying attention, but I’d argue that snapping and saving a photo only takes a minute and that the photo I take will most likely last longer than my memory. Well, maybe not last “longer” but it will certainly help me to remember that moment easier and in greater detail.

Truth be told, isn’t Instagramming my kids baseball game the same as video taping it like dads did during the 90’s?

The Ugly Truth

It’s becoming more and more clear that the majority of us use our smart phones as a boredom crutch. If I’m idle for more than 12 seconds, I often pull out my phone and thumb around a bit. Most times I’m not even doing anything in particular, just wasting time really. That needs to change.

What are some ideas to help change this? When I had my iPhone, I used the Do Not Disturb feature to keep distractions minimized. Sometimes when I’m in the car, I’ll put my phone in the glove box. It’s far enough out of reach to keep from constantly fiddling with, but I can still hear it ring if needed. Next time you’re at a traffic light, see if you don’t pull your phone up to just “check” on things real quick. It’s a bad habit that also ruins your situational awareness.

Most phones seem to have a type of “Do Not Disturb” feature, which basically silences your phone for all notifications and calls except from those people in your favorites list. Specifically regarding the iPhone, if there’s an emergency and someone that’s not in your favorites list tries to call, your phone will ring if they call more than once within 3 minutes. I want to explain it because it shows how you can limit distractions while still being within reach if needed. Putting your phone in Airplane Mode is also a great way to stop distractions from reaching you, but there’s also no way to be contacted in an emergency.

Technology has certainly evolved to make things a lot easier and also more invasive at the same time. We’re always just a text/tweet/tag/poke away from someone and coupled with the sense of immediacy we all have, it can be a disastrous combination. Just knowing that it takes a conscious effort of balance in knowing when to use that technology will benefit you whether you’re disabling notifications to get work done throughout the day or going off the grid to enjoy the peace and quiet of a nature walk.

Know What Tools to Use and When

Illustration by Grant Snider

Illustration © Grant Snider

While I really like this illustration by Grant Snider, I also agree with what Walter Kirn is saying in his article, “Technology Can Enhance Your Wilderness Experiences.” It’s completely possible to use your digital tools in the outdoor world and in some cases it may be perfect for the situation. It’s ok to share moments, but it all comes down to balance.

People often forget that you can use a smartphone app without advertising it. You can check-in on Foursqaure at the local park and get a digital “badge” but you don’t have to auto-post that news to other networks. When sharing publicly, I always try and add a little extra value in my social media updates when possible. Give a caption or description as to what you’re doing. You can even keep your posts private if you feel as if you’re being too noisy. Just because you don’t want to publicize your digital footprint doesn’t mean you can’t have one.

In addition to creating a history for my family to look back someday, another reason I use so many digital tools over analog ones is that they’re often faster. That and my handwriting sucks. Being able to quickly speak a note into my phone saves me a lot of time and helps keep me organized. I still always have a pocket notebook and pen on me though, because sometimes you just have write or sketch things manually.

Stay Focused

Don’t let digital tools take over everything, use them to their advantage by augmenting what you’re already doing. Sometimes it’s best to completely unplug and take a “Tech Sabbath.” Taking some time away is perfectly fine and essential to staying healthy.

Always focus on the true reason behind what you’re doing and do things for yourself. If you haven’t taken a good hard look at your digital habits yet, I encourage you to do that now. Are you collecting memories or simply creating a highlight reel of your life to make your online friends/followers/fans envious?

Posted in Mindset | Tagged , , , , , , , , , | Leave a comment