Protect Against CBRN with the NH15 Escape Hood from Avon Protection

If you’ve ever wondered how you’d escape during a Chemical, Biological, Radiological or Nuclear attack, look no further than the NH15 Escape Hood from Avon Protection.

Marketed as the world’s smallest NIOSH-certified emergency escape hood, the compact unit protects your face and respiratory system during these occurrences and provides you 15 minutes to evacuate the contaminated site.

We’ve been fortunate enough to obtain a loaner unit from Avon Protection in order to demonstrate donning the mask on video, which you’ll find below. Continue reading

Posted in Gear | Tagged , , , , , , | 5 Comments

Don’t Forget the Tactical Pumpkin Contest!

TacticalPumpkin

There’s less than three weeks left until Halloween and we’ve already got some great entries into our 1st Annual ITS Tactical Pumpkin Carving Contest!

We have some fantastic prizes to give away, so don’t forget to get those pumpkins carved by midnight on the 30th!

Click here for more details on how to enter and to get a look at the prizes.

Posted in ITS Information | Tagged , , , , | Leave a comment

PSD Concepts: How to Detect Surveillance and Counter

2 of 4 in the series PSD Concepts

There are  many types of  surveillance detection  and today we’ll be continuing to apply concepts and tactics used by Personal Security Detail (PSD) teams, with ways to detect  static and mobile surveillance along your routes.

In our last article  about Route Surveys we focused on going from home to work and we’ll be doing the same in this article.

I’m sure everyone wants to dive right into how you can ditch a “tail” and other counter surveillance techniques, but before you can do that you have to have a understanding how the surveillance process works.

What is Surveillance?

One definition I like is “The secret, continuous, periodic watching of persons, vehicles, places or objects to obtain information concerning the activities and identities of individuals.” It’s all about information gathering.

As I stated in the first article, you probably  won’t to have to worry about a well organized group of terrorists following you from home to work, but even common burglars use basic surveillance methods  to figure out when the best time to break into a residence is.

When we talk about terrorists or other  organized criminals, they use a planning process that assures their success. If you are attacked they have already assessed your physical  security and  routines. Surveillance detection  is using countermeasures to deny them information during the selecting and collecting phases. You also want to appear as a hard target, so they move on to someone else.

There is a common sequence of events that takes place during surveillance:

  1. Attackers  select a potential victim and begin collecting information.
  2. Surveillance continues as the attack is planned and practiced.
  3. Attackers deploy according to the information received.

Surveillance is also used to confirm your arrival immediately prior to an attack. Once the attack has begun the attackers have a huge advantage. They have set the time and place that you are the most vulnerable and most exposed. The key to  beating them is to identify and exploit their information gathering process (the surveillance itself)  and hopefully end the attack before it begins. Make them move on to the easy target or make them realize they are going to have a fight on their hands. I know I keep saying “make them move on to someone else”, but that is exactly what you want to have happen.

Surveillance may take weeks, months, or even years. During the collection phase attackers are vulnerable to detection. This is also where you can use misinformation to confuse  and delay their information gathering.

The duration of  the surveillance is a major factor and shows why it’s difficult to detect the common burglar or crime of opportunity. Their surveillance is normally just hours and  they may not be open to detection over that short  period of time. This is where being a hard target comes into play.

Detection Techniques

Your driveway

  • Be dialed in and keep your head on a swivel. Even the appearance that you are looking around can be helpful. Looking around may make the person watching you think you are looking right at them. This is  referred to as being “hot,”   when conducting surveillance there is nothing worse than feeling like the target is on to you or your vehicle.
  • This may make them have to “cool off” and switch out the “eyeball” (the person watching you). They are susceptible to detection when they switch personnel out. One vehicle may leave a position and be replaced by another in a different location. If both of these have a good vantage point to your front door or street that may indicate you are being watched.
  • One of the upcoming articles will be about checking your vehicle. I won’t get into that yet, but one story I’ve heard  comes to mind. An officer was stationed overseas and each morning before leaving for work he would lift the hood of his car and look around and under the engine. He had no idea  he was being watched during the selection phase of a surveillance. The terrorists thought he was dialed in and was checking for bombs each morning. What they didn’t know was he had an oil leak and he was just trying to figure out where it was coming from. He was passed over and they moved on to someone else.
  • This shows how the small things you do can confuse and mislead the information collection process.

The take-away

  • By far the toughest part of a surveillance is what’s called the take-away. This is when the target (you in this case) leaves a location and starts moving. If the eyeball isn’t paying attention and the other members aren’t ready, you can lose them right from the start. I speak from personal experience on this one as I’ve dropped the ball on a take-away or two. As I  mentioned in  the route survey article, you cannot be alert 100% of the time. This also goes for someone who is attempting to  watch you.
  • You have some factors working for you as well. Your direction is not usually known (since you switch things up), evasive moves can be made early, they are not sure when you may move and you may  move quickly. You want to disrupt the take-away.
  • Every once in awhile you can leave as normal and circle around the block right back to your house. Look around for vehicles or people moving. I do this all the time as I’m on a corner lot and I can take the alley way to make a loop.
  • Since you are using different routes, once you clear your first choke point you will make it difficult for them to find and follow you again.
  • Keep in mind you  can still be picked up when you arrive at work or the last choke point on your route. But the key here is not to let them gather information on the routes you take.   There may be a great attack site on one of your routes, but if you deny them the opportunity to follow you on that route they may not know about it.

En route

  • Since you have conducted your route reconnaissance you know where your choke points and  ideal attack sites are. These are the areas where you need to be vigilant. These are also the areas where you can attempt to detect if  someone is following you, which is called “checking yourself”.
  • There are numerous ways to check yourself and it’s only limited by your time and creativity. You do have to use common sense though, driving into that ten story parking garage, parking your car, going up and down  two separate elevators and then driving out the same entrance you just drove in is not going to work.
  • Speeding up, slowing down, making three right turns, stalling at a green light, taking a one way street,  and making a dead stop are a few techniques you can use. You have to pay attention to what is going on around you and how people/vehicles are reacting to what you are doing. If not you are just wasting your time.
  • The TAC  team I’m  assigned to  once followed a guy who was making all those moves. It wasn’t that  difficult to keep an eye on him because he was doing those things without even glancing out of his rear view mirror. He wasn’t effective at all since he was just being a putz and not watching how we were reacting and adjusting. We were able to follow him and all those moves were made  in vain.
  • SPEED: Just because you drive like Ken Block through traffic doesn’t mean you can’t be followed. I would say unless you know for an absolute fact you are being followed, drive  your normal speed. Employ your counter-moves to try to detect the surveillance, but unless you’re coming under attack, crashing your car or getting a citation  isn’t worth it. It’s going to be impossible to tell an Officer you thought you were being followed so you were going 30 over (unless you actually were and called 911 to report it).
  • Since we are talking about individual techniques you won’t have the luxury of having “agents” set up a  Surveillance Detection Route. An SDR is used to detect surveillance along your route  but you have to have someone as your eyeball for it to be truly effective. I’m pretty  sure your significant other won’t be thrilled with the thought of sitting on a street corner everyday for a month to see if the same car keeps following you to work.
  • A simple SDR you can set up for yourself would be in a residential area you are familiar with. Find a route that snakes you deep into the neighborhood and ends  in a cul-de-sac. The best end location would be a cul-de-sac that has a sharp or continuous turn going into it, the kind that surprise you  when you drive into it.
  • Once you enter the cul-de-sac get in a position to exit quickly if someone follows you in. If they do make sure to write down the description of the vehicle and people.
  • This type of SDR is only going to work if you are the only one that knows the area or if the person following you  doesn’t have  GPS. If they figure it out they will just set up and wait for you to leave. Also if you are unknowingly in the attack phase you may have just backed yourself into a corner. This shows that you really need another eyeball to use an SDR correctly.
  • Look at the people along your route. Do they have a valid reason to be there? Is that guy at the bus stop watching you or simply waiting for the bus? Do they fit in to the environment, meaning does that guy in the construction hat look like he knows what he is doing? It takes a lot of practice doing surveillance to be able to use a ruse or disguise effectively. If you’re sharp you should be able to pick out that odd person that just doesn’t fit.
  • Does a vehicle move when you move? Does a parked vehicle leave the area in the opposite direction each time you pass? Multiple sightings  of the same person, vehicle, or activity may confirm you’re being watched.

The arrival

  • Just like leaving your residence, your arrival requires your attention. So does the last choke point along your route.
  • Since you may have ditched your tail at the take-away, someone may have leapfrogged to your destination. That is one of the golden rules of surveillance; if you lose your target go to where you know they will show up. In this case it’s your work address.
  • Switch up your  parking spots and take different entrances into the parking area. Can you find a spot that would make it difficult for the eyeball to see your vehicle? This can help with your take-away.
  • If you’re dealing with  a one person  surveillance he/she is most likely going to be in the same vehicle. If the same car shows up at home and work, that’s called a clue.
  • If you are dealing with trained subjects you have to show them you are switched on when you arrive at work just like you are at home.

So what does all of this accomplish? If you can deny information gathering and show yourself as a hard target you will force the attackers to make a couple of choices.

  • They will move on to someone else (sounds familiar I know).
  • They will be forced to choose attack sites that are in your favor and give you the tactical advantage.
  • Even if they pick out the first and last choke point in your route, you will be ready and have a plan in place if a attack happens. Of course, the best plan goes out the window when the bullets start to fly, but you will greatly enhance your (and your families)  chances of coming out alive.

Wrap-up

The take home message from this article is that if you suspect surveillance you should alter your route and times to avoid a possible attack. This will cause unpredictability and confuse the attackers. You should also take notes of suspicious activity, vehicles and persons. This will let you put the pieces of the puzzle together and confirm your suspicions.

If warranted contact the police and report the suspicious activities. You may just catch that burglar during his surveillance  after all!

I would highly recommend taking a class on how to conduct  surveillance from a reputable source such as SCG International. This will help you immensely and only through truly understanding how surveillance works can you learn how to counter it.

When Bryan and I discussed writing this series of articles I had to think carefully about  what information I was going to put out, as I want this information to be used to keep you and your family safe and have it become an important part of your overall security plan. That is the intent of these articles and discussing ways to keep you safe is the foundation of ITS Tactical.

That being said, there are plenty of places on the Internet where you can find information on how to conduct surveillance and surveillance detection. “Bad guys” have a  lot of resources and I don’t feel writing these articles will help them any more than they can already help themselves.

Stay tuned for our next article on attack recognition and post up any questions in the comments below.

Posted in Physical Security | Tagged , , , , , , , , , , | 22 Comments

LandNav 101: Compass Selection and Recommendations

4 of 6 in the series LandNav 101

Today we are going to continue from our last article on Reading and Associating Terrain and discuss compass selection for use in land navigation.

Compass selection is often driven by personal preference, much like some prefer one vehicle make and model to another.

Our goal with this article is not to suggest which compass to buy before you know how to use it, but rather to show you the different options out there. We feel it’s important and necessary to have a compass at your disposal during this series.

Categories

Many manufacturers will often group their compasses into three categories: professional, sports, and recreational. In reality, there are effectively only two broad categories of compass types: clear base plate models used for orienteering and lensatic compass, effective for distance sighting with mirrors.

Virtually every book and instructor will go out of its way to point out that in experienced hands, either type of compass can be highly effective–a point worth emphasizing here. As this series is about getting back to basics, we aren’t going to cover the plethora of digital compass solutions that have shown up in the market over the last half-dozen years.

Why? Because batteries fail and you should always have a “manual” compass with you anytime you are relying on a digital one, including GPS!

Manufacturers and Features

Three of the dominant compass manufacturers include Suunto, Brunton and Silva. Between the three of them, there are about 40 different compass models to pick from, each with a different combination of features.

Let’s take a look at the features available on compasses and what you should look for in the compass you choose to purchase.

Base Plate
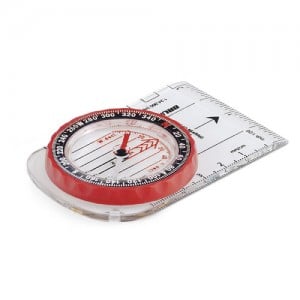
A no frills base plate compass, like the Brunton 7DNL ($15.00 list) or the Silva Starter 1-2-3 (list $9.99), are simple compasses that provide the navigator with the basic essentials and no more.

These essentials include an orienting arrow with orienting lines, a degree dial bezel at 2 ° graduations, and usually one or more scales or rulers along the edges of the compass.
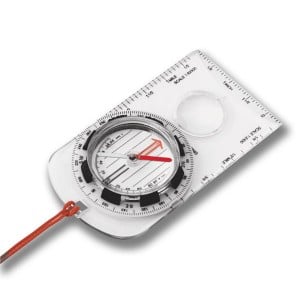
In contrast to these base plate models, middle-tier models like the Silva Explorer Pro (list $27.99) provide additional features that simplify land navigation tasks. For example, on long journeys at certain latitudes forgetting about magnetic variation (declination) can be very costly.

The basic models provide a declination scale, but lack the ability to physically adjust the compass so that it operates at a given declination. The Explorer Pro is a compass that provides a gear driven adjustment mechanism. If you’re going to purchase a new compass, this is a highly recommended feature.

Global

Further up the price tree are base plate models like the Suunto M-3 Global (retail $42 @ Amazon.com). This compass includes anti-slip rubber pads, a magnifying lens, and luminous markings for those occasions where you’re moving at night.

One unique marketing feature that Suunto promotes is that many of their compasses operate against two geographical balancing zones. These balancing zones are important because the vertical intensity and direction of the earth’s magnetic field fluctuates as you move around the globe.

Ensuring your compass is properly balanced for the part of the world you are going to use it in cannot be an afterthought. In Suunto’s case, they have balanced most of their product offerings for two zones, instead of the five zones that the globe is typically sliced into. If you don’t plan on heading over the equator, you’ll only need to purchase a compass balanced for the northern hemisphere.

Adventure Racing

Brunton offers the 8096-AR, a compass marketed explicitly toward adventure racers. The base plate includes a latitude, longitude and UTM template for critical details, but it lacks in two areas. I speak from first-hand experience.

The 8096 compass was intentionally designed without orienting lines, and the circle-over-circle alignment system isn’t very user friendly. Judging if the circles are properly aligned can lead to a 2 ° to 4 ° degree variation.   That makes a HUGE difference on long waypoint hikes.

The bottom line: unless you are using this compass to compliment a GPS, taking advantage of GPS features (like the five confidence circles along the edge) this compass is outright hard to use with a map. Keep this in mind if this compass makes your short list.

Lensatic
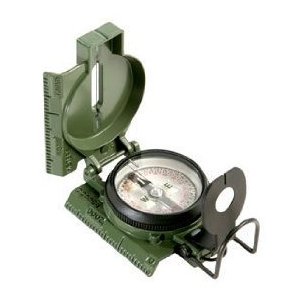
The lensatic compass differs from the base plate model in many ways. First, instead of a clear and rigid plastic base, the lensatic compass has articulating pieces, including a cover that protects the floating dial.

Second, the lensatic compass comes with a sighting mechanism for navigating across great distances by shooting headings at distant landmarks. Shooting headings is possible with a base plate, but the lensatic allows the user to line up very specific targets using its sighting lens.

Most base plate compasses provide 2 ° increments on their dial, while lensatic compasses contain 120 clicks when rotated fully; each click represents a 3 ° shift. Instead of looking down directly at the floating dial, the user relies on the lens to read the dial.

Recommendations

Admittedly, it has been years since I’ve worn a uniform and used a lensatic compass like I was trained on back in the day. My transition to civilian life included switching over to a base plate compass.

My personal preference in a compass is a simple base plate model, complimented with the MadAthelete.com UTM plotter, available at Amazon.com for the meager price of $7.50. This plotter is the size of a credit card and convenient to carry. If you’re still using MGRS as your primary navigation means, check out the MGRS/UTM Coordinate Grid Reader & Protractor instead for $6.95.

To reiterate an important point from the introduction, either compass in experienced hands will get results. The key to this sentence is experienced hands.

Notes

If you’re confused on some of the features we’ve described, we’ll be getting into how to properly use them in a future article in this series. Each of the articles in the LandNav101 series are building blocks and are to remind each of us that land navigation is a perishable skill. Learning to use a compass and then letting it collect dust for 5 years does not equate to experienced hands regardless of the compass category.

Next week we are going to formally introduce the UTM grid. We’ll be using our topo map for Sam Houston National Forest, a base plate compass with orienting lines, and the handy UTM plotter.

The LandNav 101 series is using the Sam Houston National Forest as the training grounds for most of its cartographic adventures. If you’d like to download a PDF of the referenced topo map, it is the Huntsville 7.5 x 7.5 1997 map. It has an alternate ID of TTX1823, ISBN 978-0-607-93473-1. A printed version can be purchased from the USGS Store for $8.

Posted in Navigation | Tagged , , , , , , , , , , , | 7 Comments

Door Devil Anti-Kick Door Security Giveaway!

A few months back you might remember that Door Devil sponsored a giveaway as a thank you for our unsolicited linking to their product during our Protecting Against Home Invasions article.

Today, they’re back again and offering two Door Devil’s to a couple of lucky ITS Tactical readers! Something we’d also like to mention is that they have an awesome contest running on their Facebook page as well, where they giveaway a Door Devil per week to one lucky fan as well as some cold hard cash!

They offered to send us a free Door Devil ($89 value + $9.99 shipping), and we explained about our giveaways on ITS and they were excited to participate!

Plank Owners and Crew Leaders, don’t forget about the 20% off Discount Code available on your resources page! Continue reading

Posted in ITS Information | Tagged , , | 104 Comments

Remembering 9/11 with the Nashville Stair Climb

September 11, 2001 is a day in U.S. history that will never be forgotten. Over 2,700 people were killed that day, including 343 firefighters. These firefighters, without hesitation, ran straight into the World Trade Center to begin evacuations, as well as fire fighting operations on the upper levels.

Firefighters wearing full turnout gear, self contained breathing apparatus (SCBA), and carrying hose and tools marched up 110 floors to reach the top. These firefighters never made it out of the building alive.

While on shift one afternoon in July, a fellow brother approached me about the Nashville Stair Climb (previously announced on ITS Tactical). The event would be a memorial to the 343 firefighters that gave their lives on 9/11.

Before I even had a chance to think about possibly doing this event I was on the website signing up. The climb had two main priorities: to memorialize the 343 fallen brothers and to promote firefighter wellness. Continue reading

Posted in News | Tagged , , | 6 Comments

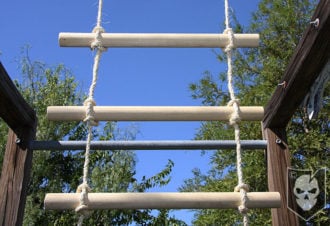
Easily Create your own Rope Ladder with a Ladder Lashing

Rope Ladder Lashing

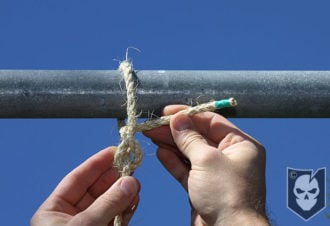
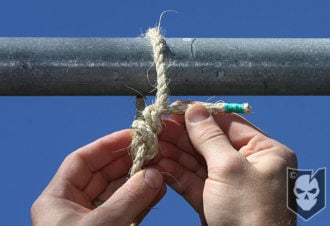
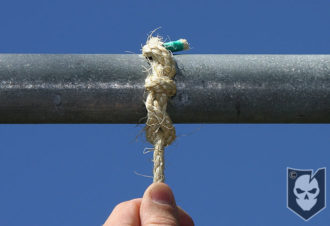
In today’s Knot of the Week, I’ll show you such a simple way to create a Rope Ladder, you’ll wonder how you never knew about it!

That’s the way I felt when I was shown this technique at Boy Scout Adult Leadership training I attended this past weekend. I’ve lashed together a Rope Ladder before, but never with this simple of a technique!

What you’ll see is a field expedient way to quickly throw together a ladder in a rescue situation or to complete the final touches on a Pioneering project. A truly a versatile technique that you should throw into your knotty toolbox.

Ladder Lashing » Lashings

The ladder lashing should be created with natural fiber rope like Manilla, due to it gripping wooden rungs better. Natural fiber is always superior to nylon (or even paracord) in lashing situations, because of how it bites into wood that you’ll typically be using. This of course is dependent on rough wood and not slick wood. Natural fiber rope can also be soaked in water prior to lashing for a stronger hold when it dries in the lashed position.

Something to note on this lashing, that I also mention in the video below, is that there are other ways to lash together a ladder that are more stable. You’ll see in the ratings below that under abnormal load this lashing isn’t stable. This is because the rungs can move out under abnormal load. Even though I mention rescue applications for this lashing, please note that this would ONLY be in situations where putting a ladder together as quickly as possible is required.

(Strength: 3/Secure: 3/Stability: 1/Difficulty: 3)

Please refer to our Knot of the Week introduction post for a description of what these ratings mean.

Uses:

  • Field Expedient Rescue/Climbing
  • Ladder to reach heights on Pioneering Projects

Tying Instructions:

  1. Start by using two equal strands of natural fiber rope that you’ve whipped the ends on (dental floss works great!)
  2. Secure each strand to a fixed point with a Timber Hitch explained in the video and photos below
  3. *For the next steps you’ll need some kind of sturdy post or wood to create as many rungs for the ladder that you’ll need (The rungs we used are approx. 16″ each)*
  4. Ensure the two strands you’ve secured with Timber Hitches are spaced apart so that when tied, there’s a few inches left over on the left and right sides of each rung
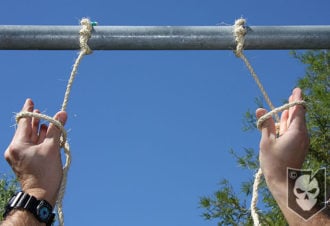
  5. Reach towards the two strands with both of your hands turned thumbs down
  6. Let each strand sit in the groove of your thumb/index finger so that your fingers wrap around the strands (see photos and video)
  7. Turn your thumbs rightside up, creating loops with each hand
  8. Insert your thumbs into the loops and grasp the standing part of each strand and pull it through the loop in each hand
  9. Have a buddy insert the rung into the gap created behind the standing part you pulled through each loop (see photos and video)
  10. Repeat steps 5-9 equally spaced down the rope strands to create additional rungs
  11. *This method can be done without a buddy, but each side must be done one at a time so you’ll have a free hand to grab and insert the rung*

Click here to view step by step photos on Flickr

Posted in Lashings | Tagged , , , , , , , , , , , , , , , | 8 Comments

Do We Really Lose Fine Motor Skills under Shooting Stress?

There is a growing minority of firearms industry professionals that are tired of the status quo. Some professionals refuse to question things that are considered “commandments” in regards to firearms training. We are questioning these things, learning, and changing the industry; challenging ingrained habits bit by bit.

For example: the “Weaver” stance versus “Modern Isosceles” stance.

The “weaver” stance came about in 1959 and gained popularity in the ’60s. While it’s been an accepted standard since then, about 10 years ago a growing group came onto the scene using the “modern isosceles,” which is now slowly taking over as the standard.

We are now seeing more and more industry professionals thinking outside the box. Thanks to Internet-based communications and the sharing of ideas, we are seeing rapid changes in the industry. This is a good thing.

This article centers on a statement made in most firearms training classes of all types including mine (in the past, but not lately):

“Under stress we lose the ability to use fine motor skills. Therefore, keep things as simple as possible: don’t use the slide release, palm slap the “paddle” (on an AR), etc.” Continue reading

Posted in Firearms | Tagged , , , , | 25 Comments

Staff Sgt. Robert J. Miller Posthumously Awarded the Medal of Honor Today

President Obama will posthumously award the Medal of Honor to Staff Sgt. Robert J. Miller today, for “exceptionally valorous conduct” during an Afghanistan combat reconnaissance patrol with ODA 3312 on January 25th, 2008.

Please take a few moments out of your day to honor SSG Miller by visiting the U.S. Army’s Website they’ve put together to tell his story, despite what the mainstream media may be covering today.

Fair winds and following seas brother…

Posted in Memorial | Tagged , , | 12 Comments

Top 25 Most Dangerous Neighborhoods in America

There’s an excellent report that Walletpop.com has put together using FBI data from 17,000 local Law Enforcement agencies and neighborhoodscout.com, showing the top 25 neighborhoods in terms of violent crime.

What’s truly interesting about the approach to this data, is that these results are narrowed down into neighborhoods. Dr. Andrew Shiller from neighborhoodscout.com makes a great point when he states that “even the cities with the highest crime rates can have relatively safe neighborhoods, and thus it is less useful to generalize about an entire city.”

While Chicago is listed as the number one most dangerous neighborhood, Atlanta has the most neighborhoods in the top 25 with four.

Are you in one of the most dangerous neighborhoods in America? Find out below. Continue reading

Posted in Physical Security | Tagged , , , | 31 Comments