How to Treat a Venomous Snake Bite from a Crotalid

SnakebitesMainTexas has its fair share of venomous snakes. Most encounters can be managed, but not totally eliminated. Growing up in west Texas I’ve seen more than my share of snakes, both venomous and non-venomous, and as a paramedic I’ve treated many snake bites.

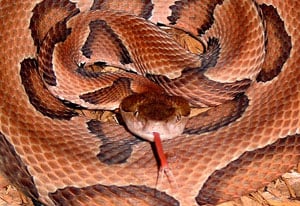
Here in Texas the venomous snakes fall into two categories: crotalids (the most common) and elapids. We’ll discuss elapid envenomation in a future article. Crotalinae is the subfamily for all rattlesnakes, cotton mouths, and copper heads. These are the snakes that come to mind when we think of snakebites.

Most snake bites occur for typically one of two reasons. The first being that the patient did not see the snake and accidentally stepped on it. The second reason is that they were trying to pick up the snake or play with it. This sounds very stupid but it does happen. A lot.

Don’t Panic

When most people encounter a snake, the first thing that usually happens is a healthy dose of adrenaline is dumped into their system. This can cause them to react in numerous ways, most commonly in panic. That’s without even getting bit! Now imagine how most people react once bitten.

The most important thing to remember once you are bit is to stay calm. I know this seems counter-intuitive, but trust me: this is the best thing you can do for yourself. Make sure that you have either killed the snake or backed away far enough that the snake is no longer a threat.

Signs and Symptoms

With the typical Crotalinae envenomation, the patient will have sustained any number of puncture wounds from the snake’s fangs. Other signs and symptoms include:

  • Immediate burning pain
  • Tachycardia (fast heart rate)
  • Dyspnea / tachypnea (fast respiratory rate / difficulty breathing)
  • Diaphoresis (sweating)
  • Nausea and vomiting
  • Generalized weakness
  • Rubbery, minty, or metallic taste in mouth
  • Erythema and edema (swelling and redness)

Treatment

The best treatment that you can initiate is to get your cell phone out and call 911!

If it is at all possible, wash the bite with soap and water. Make sure not to get any venom that is around the bite into any open wounds. Always keep the site of the bite below the level of the heart. This will help slow the spread of the venom.

It is extremely important that you can describe the snake to medical personnel. This will help determine the course of treatment.

DO NOT try the old cowboy method of taking out your knife and cutting the wound to try to suck out the venom! This only causes more tissue damage and if you have open wounds in your mouth you have just essentially received a snake bite to your mouth.

DO NOT tie a tourniquet above the bite. This just reduces oxygenated blood flow to the site and will make the envenomation worse.

DO NOT apply ice or cold compresses to the site. This will just cause more tissue damage due to the blood vessels constricting.

Snake Bite Kits

Snake bite kits can be bought in most sporting good stores. DO NOT waste your money on these. They typically have a scalpel, suction device, constricting band and alcohol wipe. The only thing of any benefit in these kits is the alcohol wipes, which can be used to clean the bite.

Antivenom

The only way to treat a Crotalinae envenomation is with an antivenom called CroFab. CroFab is only available in hospitals. It is given intravenously and only under strict observation by a doctor. It is very important that you advise the medical personnel if you have any preexisting medical conditions such as bleeding disorders, heart, lung or kidney conditions. These conditions will play a factor in your overall treatment.

Common Sense

Most of the information that I have shared with you is just good old fashioned common sense. Just remember to stay calm, call 911 and get to the hospital for definitive treatment.

Editor’s Note: Please join us in welcoming Jody Farr RN, LP, FP-C, CCEMTP as a contributor on ITS Tactical. Jody has been a paramedic since 1992, certified flight paramedic since 2006, critical care paramedic since 1998 and a RN since 2010. He currently works as a flight medic for an EMS flight service in the D/FW metroplex.

Jody is also going to be at the 1st Annual ITS Tactical Hog Hunt, presenting some info on proper usage of our ETA Kit for those of you attending!

Posted in Medical | Tagged , , , , , | 26 Comments

Surveillance Photo Contest Winners!

Wow! That was a fun contest! We had some great answers and fantastic participation and this is something we’re definitely doing again. If nothing more than it being a great exercise!

That photo really threw you guys! Even though Patrick S. was the first person to realize it was Stacey Peralta with the clue we gave to the Powell Peralta Animal Chin movie, the winners were the first to throw everything in the proper format. Winners?

So do you want to know who won? Continue reading

Posted in ITS Information | Tagged , | 9 Comments

4Sevens Redefines the Budget EDC Flashlight

The market is saturated with flashlight brands, each trying to carve out their own niche or specialty. 4Sevens is relatively new to the marketplace, showing up only three years ago.

It’s easy to get lost in marketing speak, but 4Sevens’ slogan, Redefining the Flashlightâ„¢, is so far an accurate description of many of their products. I bought my first 4Sevens flashlight, their Quark 1232 Turbo ($75 retail), back in April of this year. Since then, I’ve purchased three different 4Sevens models.

Recently, 4Sevens introduced a remarkable new light, the Quark MiNi AA2 ($43 retail). Continue reading

Posted in Gear | Tagged , , , , , , , , | 12 Comments

New Products Up in the Store!

We know you guys have been eagerly awaiting a few of our new products like the options on our ETA kits to either purchase without a Decompression Needle, or to add the new QuikClot Z-Fold Combat Gauze.

While those options are now live in the store, we’d also like to introduce something you guys have been asking for! Smaller ITS Stickers!

We now have an ITS Sticker Pack that includes two regular sized stickers, two small sticker and two mini stickers!! Now you can show your support on everything from your vehicle to your pistol mags!

Member Additions

Crew Leader Rocker PatchWe’ve now created Plank Owner and Crew Leader pages specifically for our membership to purchase exclusive items we’ve created that are not available in our store.

For instance, we have some Plank Owner shirts left over and are now stocking the Plank Owner and Crew Leader Rocker Patches for purchase.

To check it out, just visit your resources page with the link on the Membership section of the sidebar to your right.

While our founding Plank Owner Membership slots have been filled, it’s not too late to get in on all the awesomeness that is the Crew Leader Membership!

Thank you to everyone for your continued support and we sincerely appreciate each and every one of our readers!

Posted in ITS Information | Tagged , , , , | 9 Comments

Carry a Cloaking Device for your Cell Phone anywhere you go

NEMO Equipment has just released a fantastic new pouch called the EMFX-47 that acts as a cloaking device for your cell phone.

Designed to block cellular phone signals using a specialized conductive textile lining, the EMFX-47 can prevent your transmissions from being maliciously intercepted to track your location.

Let us provide you with a demo of how the pouch functions and some further information on how you can stay safe. Continue reading

Posted in Privacy | Tagged , , , , , , , , , | 32 Comments

LandNav 101: Understanding the Universal Transverse Mercator System (UTM)

5 of 6 in the series LandNav 101

In its essence, the Universal Transverse Mercator (UTM) system divides up the globe into small, manageable segments. Rarely is someone going to set out and hike from Oregon to Maine and most planned adventures, even when spending a week in the backcountry, won’t require more than a handful of quads.

Latitude and longitude is obviously a very valid way of referencing your position on the globe, but most recreational outdoorsmen have moved on to UTM. Likewise, the military uses MGRS, another type of globe grid system, in lieu of latitude and longitude. MGRS is a topic which will be covered in-depth in the future.

Dividing the World

UTM divides the world into 60 north-south zones, each 6 ° wide in longitude. The zones are numbered consecutively, Zone 1 through Zone 60. Based on this width, the entire US is represented with just 10 zones, Zone 10 on the west coast through Zone 19 on the east coast.

UTM coordinates are two-dimensional and they are referred to as an easting and a northing. Northing values originate at the equator and count up from zero as one heads north. Heading south, the equator is assigned an arbitrary northing value of 10,000,000 meters–simply to avoid negative numbers when heading south of the equator.

Northing numbers are found on a map’s left and right margins, Easting values are found on the map’s top and bottom margins. Easting values originate from a central meridian drawn through the middle of each zone; they are assigned the value of 500,000. Any location west of this meridian is a value less than 500,000; east has a value greater than 500,000.

All USGS 7.5-minute quadrangle maps, 1:24,000 scale, include UTM ticks around the map margin. The tick lines are indicated at intervals of 1,000 meters, typically using the color blue. The full UTM meter value is displayed for the ticks nearest the southeast and northwest corners of the map.

Referencing the Huntsville quad’s northwest corner, we can see a northing value of 3404000 meters, and an easting value of 249000 meters. Based on the easting, we can tell that we are west of the Zone 15 meridian because we are counting up towards 500,000 meters.

The rest of the map uses only 4 digits to represent the UTM location. The first 2 superscript numbers in the northing, for example 34, represent the 1,000,000 and 100,000-meter grids. The last two numbers represent the 10,000 and 1,000-meter grids. Therefore, 3404 on our quad means 3,404,000 meters north of the equator.

Plotting

Navigating against the UTM grid requires an interpolator, commonly known as a plotter. My personal preference is either the MadAthelete.com UTM plotter, available at Amazon.com for the meager price of $7.50, or this Grid Scale Reader, which is marginally larger. The purpose of the interpolator is to allow you to easily break the 1,000-meter grid down into 100-meter chunks.

UTM coordinates are always presented Easting/Northing. In other words, we form our UTM coordinates by starting from the left hand side of the map, working right, then moving upward from the bottom of the map to the point of interest. The common phrase to remember is read-right-up. Now, let’s see this in practice.

We want to rendezvous at the Bethel Church Cemetery so we can jump on the nearby hiking trail. Starting at the left side of the map, we navigate towards the east to the cemetery. Using a straight edge, we can mark the closest easting position–in this case 249. We move the interpolator into position moving from the left side of the map towards the east as well. The result is a reading of 49550.

LandNav 101: Understanding UTM 01Next, we repeat the process to retrieve the northing value. Using a straight edge, we mark a horizontal line from which we can measure the northing–the closest northing is 3394. We slide the interpolator up, obtaining the reading of 94200.   We would give the UTM grid as 4955/9420. Collectively, the 8-digits of accuracy represent a point to within 100 square meters, a measurement that is usually more than adequate for most land navigation requirements. The photo shows how the interpolator helped me determine the granular reading.

You’ll notice that the easting/northing reading usually omits the superscript values. If you are passing these coordinates to recipients who may not have any idea where on the globe you are, you would want to give them a full reading that includes the zone and 10-digits, something like, “Zone 14, 49550 94200.” The 10-digit reading describes a point to within 1 meter.

Magnetic Declination

LandNav 101: Understanding UTM 02Knowing that we like to go off-trail, we decide grab our map and trusty compass for the trek. The first thing we need to do to prepare for our hike is to lookup the declination for the area. Using the app on my iPhone that we setup previously, I punch in the zip code of the area I’m heading to (because I know it off the top of my head, and I don’t know the lat/long off the top of my head). NOAA reports that the declination is 3 ° 21′ E, changing by 0 ° 7′ W per year . Armed with this data, I set out to update my compass.

My personal preference is the Suunto M3; it includes a mechanical declination adjustment capability. Flipping over my compass, I adjust it from its default setting of 0 ° to approximately 3 ° E. The compass helps take the guess work out of which way to turn, labeling one side “E Decl” and the other side “W Decl” for me. Gently, I turn the gears so that I line up as reasonably close as I can to 3 ° 21′ E. Now, I can make my heading calculations on the map using the default grid lines of true north, yet know that when I shoot an azimuth with my compass in the field I’ll be heading the correct direction.

Orientation

LandNav 101: Understanding UTM 03Once I get out to the cemetery, I need to orient my map.   I do this by following a couple of steps:

  1. Lay out my map on a flat surface, not the hood of your truck! Remember, your compass doesn’t behave well around large metals objects!
  2. I turn my declination-adjusted compass bezel to due North.
  3. Find an adequate reference line, lining up the orienting lines–the red parallel lines running in the middle of the bezel–with north-south meridians on the map. On your map it should be easy to notice how the direction of travel arrows are all parallel with the meridian lines or ticks–it is difficult to see that in my photo due to the photographic angle.
  4. Finally, turn both the map and the compass together until the compass needle is “boxed” inside of the orienting arrow. Some people refer to this as red in the shed.

It’s worth nothing at this point one of the subtle challenges of using the Brunton 8096-AR compass that I pointed out in last weeks compass selection article. That compass lacks the orienting lines, making this process much more challenging than it need be.

At this point, we are ready to mark our starting location on the map, and begin the decision process of figuring out where to go on our hike. That’s where we’ll pick up next time, as we talk about shooting azimuths, identifying waypoints, tally counting, and more.

Notes


For the truly motivated, the LandNav series uses the Sam Houston National Forest as the training grounds for most of our cartographic adventures. If you’d like to download a PDF of the topo map we’re using to follow along, it’s the Huntsville 7.5 x 7.5 1997 map. It has an alternate ID of TTX1823, ISBN 978-0-607-93473-1. A printed version can be purchased from the USGS Store for $8.

Posted in Navigation | Tagged , , , , , , , , , | 4 Comments

Door Devil Giveaway Winners Announced!

We’d like to take this opportunity to announce the big winners in our Door Devil Giveaway.

Thank you to everyone for your participation, and especially to Door Devil for their support and generosity!

As always, we’ve used random.org to draw the winners for this contest. Continue reading

Posted in ITS Information | Tagged , , | 1 Comment

Take a Step Back in Time with the Japanese Square Lashing

You may be saying to yourself, “You guys have already covered Square Lashing before!” That we have, but today we’d like to introduce you to an alternate way to tie lashings called the Japanese Square Lashing.

This method we’ll show is tremendously faster to tie and yields the same secure results that a traditional Square Lashing does. In addition to being faster, we feel that it’s also an easier way to lash together two spars/poles.

If you’ve ever looked at traditional Japanese architecture, you’ll have no doubt seen a Japanese Square Lashing. The traditional Japanese culture has always favored using natural fiber rope to secure bamboo structures and many other architectural wonders.

We’re so certain that you’ll appreciate the simplicity of this lashing, you may never go back to using a Clove Hitch to start a lashing again!

Japanese Square Lashing » Lashings

As we’ve mentioned in previous articles on lashings, it’s always best to lash with natural fiber rope like Manilla. Japanese are also fond of using Hemp rope as well. This version of the Japanese Square Lashing is commonly known as the Japanese Mark I (Mark 1). There are a few other versions of this lashing that we’ll be covering soon.

(Strength: 5/Secure: 4/Stability: 3/Difficulty: 2)

Please refer to our Knot of the Week introduction post for a description of what these ratings mean.

Uses:

  • Binding two timber poles together
  • Weight bearing joint in structure building

Tying Instructions:

  1. Start by using a 6 ft. section of natural fiber rope that you’ve whipped the ends on (dental floss works great!).
  2. Double the strand and find the midpoint.
  3. Ensure your two spars have the topmost spar crossing horizontally over the bottom spar.
  4. Take the midpoint bight and loop it over the lower portion of the bottom-most vertical spar.
  5. Taking both strands together, wrap to the upper right and around the backside of the vertical spar.
  6. Taking the working end and cross on top of the horizontal spar and down/around the backside of the vertical spar.
  7. Wrap back on top of the horizontal spar and around the back of the vertical spar again.
  8. At this point your next wrapping is going to split and the strands will split as you wrap towards the right side of the horizontal spar (see photos and video).
  9. The bottom strand completes the X pattern in the middle of the horizontal spar and the upper most strand meets it, starting your first frapping turn.
  10. Cross the working ends between the spars creating the frapping turn and heading in the opposite direction.
  11. A second frapping turn is then created opposite to the first and the working ends wind up on top of the vertical spar at the bottom.
  12. A square knot is now tied to secure the lashing.
  13. Security hitches can be now placed by creating a single half hitch with each working end on the respective side of the horizontal spar (see photos).

[flickrset id=”72157625187005668″ thumbnail=”square” overlay=”true” size=”medium”]

Click here to view step by step photos on Flickr

Posted in Lashings | Tagged , , , , | Leave a comment

Surveillance Photo Contest: How good are your Eyes?

Surveillance Photo Contest

Due to the overwhelming amount of questions that have been pouring in about the photo we used in our article PSD Concepts: How to Detect Surveillance and Counter, we’ve decided to come up with a contest.

In this contest we want you to name each item in the photo as well as what kind of vehicle (make & model) is shown in the photo.

This isn’t going to be our typical reader appreciation contest, so keep reading to find out all the requirements and details.

Contest

First off, let’s get into what we need in your entry:

  • Visit and Join our Flickr ITS Reader Photos Group! Feel free to share a photo while you’re there too.
  • Look and Observe in the Group, where you’ll find a hi-res image from our article you can use. There’s also an important hint in the photo description!
  • Post your Entry either back here in the comments, or in the photo comments on Flickr. List all the items in the photo (see the hint)
  • Win Big with the first correct answer naming all the items!

Prizes

The first correct answer stating all of the items wins a free ITS Tactical Challenge Coin, ITS Tactical Patch (your choice of color) and ITS Tactical Sticker. We’re going to let this contest go until someone wins!

Winner must be a member of the Flickr ITS Reader Photos Group to be eligible to win.

Thanks for your participation and supporting ITS Tactical! Good Luck!

Posted in ITS Information | Tagged , , | 31 Comments

Increase your Medical Mojo with new offerings from Combat Medical Systems

We’d like to draw your attention to a brand new product combo from Combat Medical Systems called the Mojo Medical Shears and Retractor.

While medical shears haven’t come too far since their original design, CMS has truly added fantastic new features to not only their shears but to their retractors as well.

As many of you probably know, a good set of medical/trauma shears is a must for a first responder and today we’ll show you why CMS has raised the bar. Continue reading

Posted in Gear, Medical | Tagged , , , , , , , , , | 14 Comments