An Important Announcement from ITS Tactical

The purpose of this announcement today is to clear the air on not only what we stand for, but what ITS Tactical was created for.

We’d like to ask that you please take a few minutes and watch the following video first before continuing…

As the video mentions, we’ve been accused in the past of creating videos and content so that people can evade Law Enforcement. Our primary purpose behind these videos is to ensure people are not illegally detained by amateurs and Law Enforcement Officers are not using inferior products.

Our Escaping Zip Tie videos, which you can review here again, not only shows the different methods of restraint, but notes the hand positions where people are most likely to escape from.

We firmly believe that plastic zip ties have NO business being used in a potentially dangerous situation where lives are on the line. Use handcuffs, in fact, for dangerous situations use two pairs. Why? because that antiquated crap design for handcuff locks you’re using is left over from 1862! Please don’t trust your life to this either, as we showed here that these can be defeated with a simple bobby pin (single and double lock).

So we’re stating the obvious, right? Every Officer Safety Bulletin across the country already talks about how to get out of these, and how unsafe they are. Great, so we can organize a Space Flight to Mars, but can’t invent a pair of handcuffs that are unpickable? Have you seen what a handcuff key looks like?

Jersey Cuffs

2ndGen1.JPGAs I mentioned in the video, I went to SHOT Show this year where I met up with the owner of Jersey Tactical, who manufacturers Jersey Cuffs. This is a description from their Web site:

“Almost every flexible restraint on the market is currently being defeated by criminals. They are being “slipped”, broken or picked. The Jersey cuff was designed to prevent most of these issues!”

2ndGen6.JPGJersey Tactical had been in contact with us about a month prior to the SHOT Show inquiring about sending us some for T&E. We’d agreed to meet up at the show so they could pass us some product. At the show, the owner gave me a personal demo of the second generation cuffs by placing them on me with my hands in front of my body, wrists together. These are the new model that features the small metal bar that acts as a “double lock.”

He then challenged me to try and get out of them. Now mind you this is in front of a crowd of people in the path of SHOT Show traffic, which if you know the show, it’s busy!  I then asked him twice if he was sure he wanted me to do that right in public like this, and answered with a resounding, yes. I raised my arms above my head, just like the in the first video we show. SNAP! the product immediately broke apart at what we feel is the weakest link of restraints like these, (the locking mechanism) and fell to the floor.

NTOA Approved

ntoa-logoSo let me say this, if you’re a Law Enforcement Officer and you’re reading this you should be  concerned that Jersey Cuffs are now being marketed as “NTOA Member Tested and Approved.” From what we can tell these are only available to Law Enforcement and Military.

In this video on YouTube, which the company had as a promotional video on their site before the SHOT Show, shows the common misconception that everyone is a complete moron when it comes to plastic restraints. I know I had a good laugh at this video, its ridiculous.

To Jersey Tactical’s credit, after the demonstration that I broke, the owner asked if I’d come out into the hallway away from the crowd and try breaking out of them behind my back. He affixed a new pair and I attempted it twice with no success. I feel that these have the potential of being defeated behind the back as well, even though I was unsuccessful at my attempt. In our videos another member of ITS is demonstrating the behind the back method because the truth of it is I suck at that technique. I haven’t perfected it yet, so we went with him in the video.

Jersey Tactical has this disclaimer in small type at the bottom of their site:

“Warning: Wrist and Ankle restraints are considered temporary restraining devices. This also applies to the Jersey Cuff. Restrained subjects must be under constant supervision for both officer safety and the safety of the subject. The subjects wrists are to be secured behind his or her back when using the Jersey Cuff. If applicable use more then one Jersey Cuff in order to secure the subject due to an injury or physical deformity.”

Negative Reviews

We don’t normally waste your time reviewing any inferior products on ITS Tactical, but in this circumstance using Zip-Tie like products could potentially get someone killed.

If your department is staking their lives on disposable zip-tie like restraints, you should implore them to think twice.

If you’re a sleaze bag down on the border of Mexico attempting to take people hostage, please use these, because some day you’ll restrain someone like me who will get out and break your neck.

Are all Law Enforcement grade disposable restraints bad? I don’t know, we haven’t tested all of them, but the one being marketed as superior doesn’t work.  If you think there’s a product we can’t get out of, send them to us and let people who truly don’t have a motive other than saving lives test them. When we actually find some that can protect the Law Enforcement Community, we’ll endorse them.

Imminent Threat Solutions

ITSheaderLogoWe put our Zip Tie videos and content out so that people who are accosted, or become the victims of a home invasion, have the ability to fight back. Also, so that Law Enforcement Officers know about inferior products and don’t trust their lives to them.

We’re a lot like hackers in the 80s, who pointed out the holes in operating systems not so someone could steal money from a bank, but so the operating system’s manufacturer could make it better.

Today, we’re drawing a line in the sand and you either support what we do here on ITS, or we don’t want you as a reader plain and simple. If you’re a Plank Owner reading this article and don’t feel like you can continue to support what we do at ITS Tactical any longer, please contact us and we’ll give you a refund.

Thank you for your time and support,
Bryan Black, Editor-in-Chief

Please take the time to share this article and get this information out to those that need it!

No comments will be moderated in this post, everything written will be displayed (with the exception of the comment that just said “Kill:::” give me a break…)

Posted in ITS Information | Tagged , , , , , , , , , | 102 Comments

Get Satisfaction!

We’ve recently installed a new resource at ITS Tactical called Get Satisfaction. You may have already noticed the tab labeled “Feedback” sticking out of the upper left hand corner of the site.

The purpose of this widget is to quickly ask us a question, share an idea, report a problem, or just plain tell us how awesome we are! All this feedback becomes part of our publicly available support community on Get Satisfaction and there for everyone to see.

Its another step toward the transparency were working toward at ITS Tactical, and we want you to be a part of making this site the best it can be.

Seriously, give it a shot, we’d love to hear from you!

Posted in ITS Information | Tagged , , | 2 Comments

District Court Dismisses Heller II Case

D.C. Gun Registration, “Assault Weapon” Ban, and “Large” Magazine Ban Upheld.

Today, District Judge Ricardo M. Urbina, of the U.S. District Court for the District of Columbia, dismissed Heller v. District of Columbia, NRA’s case challenging D.C.’s prohibitive firearm registration requirements, and its bans on “assault weapons” and “large capacity ammunition feeding devices.” Mr. Heller was, of course, lead plaintiff in District of Columbia v. Heller, decided by the Supreme Court in 2008.
Continue reading

Posted in News | Tagged , , | 5 Comments

Knot of the Week: Hasty Webbing Harness

Hasty Harness

This week’s Knot of the Week features two different ways to tie a hasty webbing harness that can be used as a backup rappelling harness in case of an emergency.

Tied with 1″ Mil-Spec Tubular Webbing, these featured harnesses have a rating of 19 kN or 4,200 lbs. Tubular Webbing is commonly used in climbing and readily available in either Mil-Spec or Climb-Spec. You’ll find that these are very similar and maintain roughly the same 19 kN rating.

If you’re looking to source 1″ Tubular Webbing, here’s a  great resource that aggregates pricing and availability from popular online retailers like REI, Amazon, Summit Hut and many more.

Method #1

Hasty Webbing Harness 01The first way that we’ll show to tie a Hasty Rappelling Harness is very similar to the Swiss Seat, but as the name implies, hasty. There are ways of reinforcing this harness with tape knots, which we point out in the video below.

This first harness example is tied with 18 ft. of Tubular Webbing and is easily stored in a cargo pocket. One of the main benefits of this harness is that storing the webbing coiled and flat minimizes space and takes up much less room than 18 ft. of rope. Tubular Webbing is also more comfortable to use as a harness, but the purpose of backup harnesses like these is for emergencies, and comfort really shouldn’t be a concern in those situations.

Method #2

Hasty Webbing Harness 02The second method we’ll show to tie a Hasty Rappelling Harness is something we’ve come up with recently. It utilizes 12 ft. of pre-knotted Tubular Webbing (a Tape Knot that’s been backed up) to make a runner of sorts that can be easily donned in a hurry. This method is much faster than the first example and uses less webbing.

It’s not as secure as the first harness, but if seconds count, it will get you down. It’s also more compact and easier to store than the first, and as you’ll see in the video, it fits very nicely into the flashlight cave of a TAD Gear Fast Pack in conjunction with their Cable Retractor.

What really makes this method shine is its ability to augment a Rigger’s Belt. As you can see from the picture to the right  it would be very easy to clip this into the loop. When used in combination with the Rigger’s belt you’ve truly got a bombproof backup system. No leg support has been a common complaint with a Rigger’s Belt, but when used in combination with this method, it will be sure to satisfy.

Notes

Both of these harnesses utilize Rigger’s Rubber Bands to hold them together for quick deployment when needed. Here’s a link to an article we wrote on Rigger’s Rubber Bands, they’re definitely the right choice for this application.

Always use a locking carabiner when tying these harnesses and remember to “Screw Down, so you don’t Screw Up.” That’s something helpful to memorize so that you’re always screwing the locking gate on a carabiner “down.” If gravity comes into play it will rotate the carabiner closed, not open.

Hasty Webbing Harness #1 » Misc.

(Strength: 2/Secure: 3/Stability: 2/Difficulty: 3)

Hasty Webbing Harness #2 » Misc.

(Strength: 2/Secure: 3/Stability: 2/Difficulty: 2)

Please refer to our  Knot of the Week introduction post for a description of what these ratings mean.

Uses:

  • Hasty emergency rappelling harness for you or a victim
  • Transporting an injured victim to safety

Tying Instructions:

  • Please refer to the YouTube video below for instructions

Rappelling is inherently dangerous. This information is provided for educational purposes only, and should not replace training from an experienced guide.

Posted in Climbing, Knots, Misc. | Tagged , , , , , , , , | 27 Comments

Resource For National Park Firearm Regulations

Since February 22nd, those that are legally able, have been allowed to carry a concealed firearm in National Parks. However, the law is not all encompassing.

The NRA-ILA has recently put together an outstanding resource list of the links to the NPS Firearm Regulations for each individual National Park.

While it may be legal now to carry in National Parks, federal law continues to prohibit the possession of firearms in designated “federal facilities” within national parks, for example, visitor centers, offices, or maintenance buildings.

These places are posted with “firearms prohibited” signs at public entrances. The new law also does not change prohibitions on the use of firearms in national parks (which is prohibited) and does not change hunting regulations.  If anything, this list will save you some time when selecting your next vacation spot.

It’s also important to note that it’s still illegal for bears to possess firearms!

Posted in News | Tagged , , , , , | 7 Comments

Win a Free Plank Owner Membership!

PlankOwnerContest

To Enter and win, follow ITS Tactical on Twitter and Tweet this:

PlankOwnerContestTwitter2

Read the details and find out why your last chance to become a Plank Owner ends April 1st! Continue reading

Posted in ITS Information | Tagged , | 13 Comments

Mouth-Wateringly Awesome Manly Cupcakes

A Bakery in New York has built a brand around men who like cupcakes, and not the frilly pink-frosted sprinkles-and-unicorns kind of cupcakes! They make manly cupcakes, for manly men.

Butch Bakery was born when David Arrick felt it was time to combine a masculine aesthetic to a traditionally cute product-the cupcake. When a magazine article mentioned that cupcakes were a combination of everything “pink, sweet, cute, and magical,” he felt it was time to take action, and create a company where “Butch meets Buttercream.”

After all, what’s more manly than a cupcake topped with bacon, covered in camouflage, or beer-infused? Continue reading

Posted in Humor | Tagged , , , , | 5 Comments

How To Keep Your AR Running, Part 1: AR History

1 of 3 in the series Keep Your AR Running

Many people own AR’s, but unfortunately don’t know the first thing about the history, functionality or even what spare parts to have on hand to ensure success.

We hope to change that with this multi-part series focused on the simple things you can do to keep your AR15/M16 running.

Today we’re going to look at a brief history of the platform and what makes it tick. We feel that only by truly understanding the history and functionality of the weapon, will you be able to master the AR and depend on it.

History

m14_1The development of the AR weapon system dates back to the reluctant need for a replacement of the M14, the go-to Military Rifle coming out of WWII that itself replaced the M1 and Browning Automatic Rifles.

Need to find a replacement for the M14 was due to the heavy weight of the system, a soldier’s inability to carry large amounts of ammunition and its effective range. As we’ve witnessed with the recent Army transition to MultiCam, there was a strong hesitation to find a different platform.

AR10

ar10Eugene M. Stoner’s 7.62 mm AR10, which he’d developed while working for ArmaLite, had been a success in trials for an M1 replacement but had failed to become adopted. Based on Stoner’s design, the Army contacted him in 1956 to develop a smaller version of the AR10. By 1957, Stoner had produced the AR15 in .223, a small caliber Rifle Cartridge that was given the designation after he’d requested the Remington .222 be made to fire a 55-grain bullet.

While the AR15 was licensed to Colt Manufacturing Company in 1959, they retained the ArmaLite nomenclature. All markings on early Colt AR15 rifles, magazines and manuals were marked with ArmaLite’s name. In fact, the AR designation still in use today stands for ArmaLite.

Originally turned down for M14 replacement in 1958 tests, the AR15 was continually pushed via the Air Force. General LeMay, USAF Chief of Staff, requested an order of 80,000 AR-15s, but was turned down by President Kennedy after being advised against having two different calibers in the military system.

With a push from ARPA’s (Advanced Research Projects Agency) AGILE Program, an initial ten AR15s were fielded to South Vietnam. After an enthusiastic reception, another 1,000 were sent for testing by U.S. Army Special Forces and the South Vietnamese.

M16

m16Due to the overwhelming response and killing power of the AR15, Secretary of Defense Robert MacNamara ordered M-14 production to stop in 1963 and an adoption of the M16 in two variants.

The XM16E1, which included a disputed addition of a forward assist, and the standard M-16 without the forward assist.

An order of 85,000 XM16E1s were purchased in 1963 destined for Vietnam, as well as 19,000 M16s for the Air Force. This original procurement was despite reports of deficiencies and lack of a chrome-lined bore and chamber.

M16A1

m16a1As the newly manufactured XM16E1 rolled out it was renamed to the M16A1. By 1965 it was the Military service rifle, but it would not be without faults.

This is where it becomes increasingly important to understand the history, as these early problems that plagued the M16 led to future developments. In fact, the original M16s from Colt were never issued with a cleaning kit, as Colt stated they didn’t require as much maintenance as other rifles.

M16 Malfunctions

m16covsmWhen developing the .223 (5.56 mm) cartridge, Stoner used a type of gunpowder known as IMR powder. With the IMR powder, the then AR15 was highly reliable, but the Army had converted to the use of ball type powder in its cartridges, which was cheaper to produce and had completely different ballistic characteristics.

Between 1965 and 1967, several major problems, centering on the direct-gas action and the lack of maintenance equipment, occurred with the M16 in combat. The use of cheap ball gunpowder left a very sticky residue in the barrel and the gas tube.

Since the barrel wasn’t chrome-lined and no cleaning equipment and/or lubricants were available, it hardened quickly and soon made the rifle inoperable. The residue also caused spent casings to become stuck in the chamber and the rifle suffered a rim/shear extraction failure, where the bolt’s extractor tore off a portion of the end of the spent casing, leaving the rest of the case stuck in the chamber.

The case often had to be removed by the untrained troops with a cleaning rod shoved down the muzzle. The “untrained” nature of the typical grunt proved to be yet another blow to the M16.

A Congressional Subcommittee ruled in 1967 that the malfunctions were largely caused by Army mismanagement. To correct the M16’s fouling problems, the formulation of the ball gunpowder used in the 5.56mm M193 Ball cartridge was changed by reducing the level of calcium carbonate (CaCO3 – limestone, used as an acid neutralizer to extend shelf life) from 1% to .25%, less than half the amount shown to clog the M16’s gas tube.

Additionally, a new heavier weight buffer was developed to reduce cyclic rates back to normal and the chamber and bore eventually received a chrome-lined treatment. A cleaning kit was finally developed as well, along with a new butt-stock able to store the cleaning kit in the rifle. Finally, a massive training program on how to properly maintain the M16 was instituted using a rifle maintenance comic book.

CAR15

XM177.JPGAs early as 1965, Colt engineers first designed a carbine version of the M16, called the CAR15. It utilized a collapsible, sliding butt-stock, 10″ long barrel and a long flash hider/muzzle compensator to control the loud report and huge muzzle flash of the weapon.

Combat use of the test rifles, called the XM177 in the Air Force version without the forward assist and the XM177E1 by the Army, showed it was very well suited in its role. Special Forces units especially liked its light weight. After experience showed some erratic performance with most ammunition types, the barrel was lengthened to 11.5″ and renamed the XM177E2 by the Army and the GAU-5/A/A in the Air Force version without the forward assist. But this version ultimately proved to not be viable enough for the military and further development was stopped.

M16A2

M16A2.JPGIn March of 1970 the U.S. stated that all NATO forces would eventually adopt the 5.56 x 45mm cartridge and be issued the M16. NATO standardization efforts were carried out in 1977 and the Belgian SS109 round was adopted with inclusion of a small steel tip added to improve penetration. To accommodate the need for tracer versions of the ammunition, a 1:7 twist rate was chosen to stabilize the longer tracers.

The U.S. Marine Corps was the first to adopt the M16A1E1 in 1982, designated as the standard military rifle M16A2. The NATO 5.56 x 45mm ammunition produced today is designated M855 for the ball round using the SS109 projectile (commonly referred to as “green tip”) and M856 for the tracer using the longer L110 projectile.

Additional changes were also seen in the M16A2 which included:

  • 1:7 twist rate to accommodate the tracer rounds
  • Stronger, durable, more ergonomic butt-stock
  • Interchangeable top-and-bottom hand-guards
  • Rear sight adjustable for windage and elevation
  • Redesigned flash hider for less muzzle rise and dust signature when fired.
  • Fully automatic mode replaced with a three round burst, to conserve ammunition in combat.

M4

m4a1_1After the military conflicts in Panama, the Persian Gulf and Somalia, the need for a shorter version of the M16A2 again appeared. Colt engineers shortened the barrel back to 14.5″, re-contoured the barrel to mount the M203 grenade launcher and added a modified version of the collapsible, sliding butt-stock of the earlier XM177 (CAR15) rifle.

Colt also created a new upper receiver using a modular sight mounting system for use on a sub-variant. In August, 1994, both variations were adopted. The M4 in 5.56mm NATO, uses the new barrel and collapsible butt-stock, but was first issued with the standard M16A2 upper receiver and sights to streamline production. However, now it’s made with the new modular flat-top upper receiver.

m4a1_m203The M4 could be fired either semi-automatically or with three round bursts. The M4A1 uses the new barrel, collapsible butt-stock and the new upper receiver for mounting a wide variety of sights, optics, night vision and IR lasers. It’s also capable of fully-automatic fire, like the M16A1.

The military has also been procuring both the M16A3 and M16A4. The M-16A3 and the M16A4 are identical to the M16A2, but both have the modular upper receiver. The M16A3 is capable of fully-automatic fire, like the M16A1, while the M16A4 uses the M16A2’s three-round burst.

Notes

In addition to all the above changes, the most notable is the AR15/M16’s increased reliability. Not 100% reliability, but that’s what we’re going to help you achieve in the continuation of our “How To Keep Your AR Running” series.

Drop a comment, let us know what you think and Stay tuned for more!

Posted in Firearms | Tagged , , , , , , , , , , , , , , , , , , , , , | 34 Comments

OC Tactical Now Carrying Mirage Camo Material

OC Tactical is now carrying Mirage Camo for your custom gear manufacturing pleasure. Be sure to head over and check out Mike’s Custom work!

He’s been making Ear Pro Covers for Cap’n Troy on Lightfighter and the work is outstanding, look for a review from us soon!

Posted in Camouflage | Tagged , , , , , | Leave a comment

The Gas Laws and Physics of Diving

So now that we’ve got the diving introduction out of the way, let’s jump right into what we feel is a major issue. When it comes to SCUBA Diving, it is important to know your Gas Laws. In Dive Physics, during the Second Phase of BUD/s, they teach you that these laws are very important to a diver. A diver must be aware of the physics affecting him underwater. Without the knowledge of what happens to the human body underwater, circumstances could easily become disastrous.

In this article, we’re going to cover six important diving laws and principles that every diver needs to be aware of. We urge you to study this article and develop a full understanding of how these laws work and to draw your own opinions about why they’re important. The definitions are taken from documents provided in BUD/s training, and we can’t think of anyone better to talk to about the water than the SEALs.

Boyle’s Law

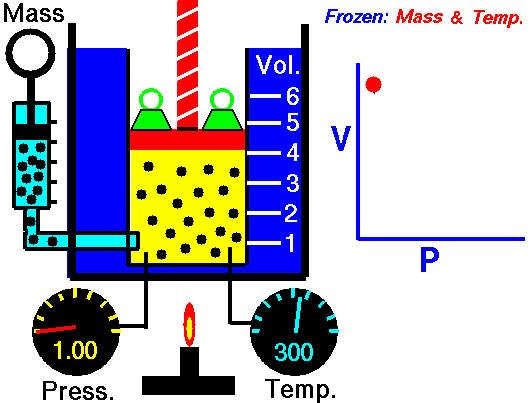
Boyle’s Law states that “given a constant temperature, the volume of a gas varies inversely as the absolute pressure.”

This law can be interpreted any way you like, but we should stress that this law is dependent on the absolute pressure. That means that as the pressure increases, the volume decreases. It would be silly to think that you could decrease the absolute pressure simply by increasing the volume of a gas, so it is fair to say that as pressure decreases, the volume will increase.

To illustrate this law, we take a bottle full of air down to a depth of about 100ft (30m), 3 ATM (atmospheres gauge) or 4 ATA (atmospheres absolute). As the bottle descends, the absolute pressure around the bottle forces the gas (Air) inside the bottle to compress therefore allowing for less volume. This happens because as you go deeper into water, the pressure increases at a rate of one ATM every 33ft (10m). This is the pressure that decreases the volume of gas inside your bottle.

Lets say we take that bottle up into the air 36,000 ft. (10,970m), cruising altitude for a standard commercial jet liner. The air in the atmosphere actually has a lower absolute pressure than we do here on the surface. You may have heard a little rumor about how space is a vacuum, well this is that transitional point from our perfect living conditions. Now, using Boyle’s Law we can conclude that the bottle will actually grow as the absolute pressure around it decreases. The difference here is that the pressure changes are not as drastic in the atmosphere of planet Earth as they are in the water.

Charles’s Law / Gay-Lussac’s Law


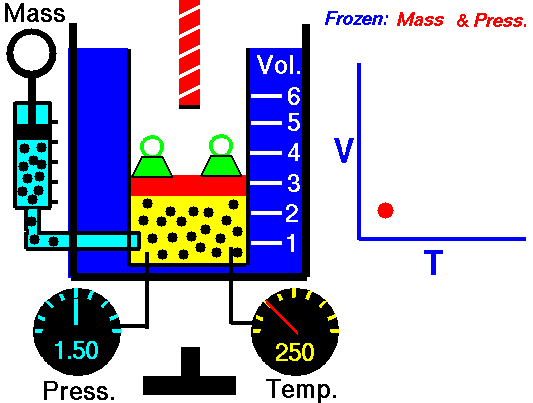
Charle’s law states that given a constant pressure, the volume of a gas varies directly as the absolute temperature. This law is sometimes referred to as Gay-Lussac’s Law.

This is probably one of the simpler laws. The same principles are in play most often in your daily life. Most of you know that as metal gets hot or cold, it expands and contracts (more notably than other things like plastic). Well gases do the same thing.

What Charles’s Law says is that if you take a volume of air, and keep it at a constant pressure, you can increase your volume simply by heating it up. You could also effectively reduce the volume by putting it in a deep freeze, or setting it outside if you live up north. So to illustrate this law, we use a SCUBA tank.

When a SCUBA cylinder is filled, the friction of the air entering the cylinder heats things up from the inside out. This makes the surface of the cylinder warm to the touch. Just about all of your shops will overfill cylinders by about 10%, which is the maximum allowed by the DOT. There is a reason for this.

Every cylinder model has a different “working pressure,” which means that they can handle being filled to lets say 3000 psi (206 bar), plus 10% of that pressure. So then we have a cylinder that gets filled to 3300 psi (227 bar). This is not a safe working pressure for the cylinder (theoretically), so why do we fill a cylinder to more than its safe working pressure? They are overfilled because of Charle’s Law. Friction heats the cylinder and that cylinder will eventually cool off, thus, decreasing the volume of air inside. So to counter this effect, dive shops put more air in the cylinder than would be necessary for a typical dive.

Dalton’s Law

TanksDalton’s Law states that the total pressure exerted by a mixture of gases is the sum of the pressures exerted by each of the gases.

This is pretty straight forward. It becomes most useful for anyone qualified to fill a scuba cylinder. Lets say your target working pressure is 3000 psi (206 bar) for a typical SCUBA cylinder fill. Normally, you would take the air from the room you are standing in, compress it down, and pump it into a cylinder. Some people prefer the use of different breathing gases. For simplicity’s sake, we’ll use the breathing gas “NITROX.” There will be an article on the different gases, so don’t panic if you are a little confused by this. The air we breath is an average 21% Oxygen 79% Nitrogen. Nitrox is a gas with an oxygen content of 22%-40%. The benefits of breathing oxygen rich gas are numerous, but we’ll cover that as well at a later date.

So, to reach a higher oxygen content, there are formulas that need to be followed. Many factors go into consideration, such as working pressure, cylinder volume, percent of O2 desired, etc. The basic formula says this: start with Xpsi of 100% O2, and then fill to 3000 psi (206 bar) with air. This gives the desired percentage of oxygen in your nitrox gas. So we have a hypothetical 400 psi (27 bar) of pure oxygen, and we will top off the cylinder with 2600 psi (179 bar) with air, leaving 3000 psi (206 bar) of pressure in the cylinder. 400 + 2600= 3000psi (27+179=206 bar). The total pressure is equal to the sum of the pressure of each part of the mixture.

Henry’s Law

Henry’s Law states that the amount of gas that will dissolve in a liquid is directly proportional to the partial pressure of that gas.

Here is a law that goes much deeper than mixing gases and heating SCUBA cylinders. This is the mother of dive laws in our opinion, but we believe others would agree. This law does not reference any of what has been discussed previously. We could think of ways to get gases to dissolve into fluids, but this law should be presented in the manner it was intended.

If you’ve taken a diving class, you know that nitrogen is your biggest opponent underwater. Nitrogen happens to be a gas, but we’re not so worried about the nitrogen absorbing into the water at higher pressures. Not hardly. You see, while you’re on the surface, nitrogen absorbs into your skin. This is not a real issue while you’re walking around, driving your cars, etc. Take that body down to 100 ft (30 m) of water and you change the circumstances dramatically.

During your time underwater, the pressure around your body forces nitrogen into your blood stream. This can (but not always) lead to a rather pleasant narcotic feeling at depth we refer to as “nitrogen narcosis.” Nitrogen has a narcotic effect on the brain which can be alleviated by ascending to a shallower depth until symptoms pass. The longer you stay, and the deeper you go, the more nitrogen will be forced into your blood stream. If you don’t get narcosis easily, then you will most likely not notice the build up of excess nitrogen in your blood. We know this gas is present because of very extensive research conducted by Navies around the world, more notably the US Navy which releases nearly a thousand page manual on diving to certain jobs.

The nitrogen at depth is not the issue, but rather when you complete your dive and begin your ascent to the surface. As you ascend, the nitrogen gas that has dissolved into your blood stream will begin to form bubbles as the gas expands. If you were to acquire an excess of nitrogen and immediately get out of the water, within about 15 minutes you would begin showing symptoms of DCS (decompression sickness) which can be fatal if not treated. This sickness has been dubbed “the bends,” or “Cassien’s disease” by divers in the past. This build up of nitrogen is removed from the body by ascending to a shallower depth and allowing the nitrogen to pass through your blood stream, and into your lungs. Once in your lungs, the nitrogen returns to its undissolved, gas state and passes from your body as you exhale. The depth and amount of time required for “off-gassing” is directly related to the amount of time, and depth of your dive.

Dive Tables

To prevent death or nerve damage, the US Navy released what is a called a “dive table.” If you are a certified diver, you will have been required to dive from a table to acquire your certification. For those who may be unfamiliar, a standard air diving table basically lets you know how much nitrogen you will build up at any depth for any amount of time. This basic table is a “no-decompression dive table,” which means that at any depth (to 130 ft or 40m) for any time allotted on the table, you will not be required to stop and off-gas nitrogen since you have not acquired any excess in your bloodstream. Tables can be quite confusing if you have never used one before so I will break it down for you.

In a nutshell, you select the depth at which you plan on diving. Always use the deepest point of the dive, even if it’s only for a minute unless you are using a planning wheel which will be covered at a later date. The depths are typically listed in both feet and meters so everyone can safely understand them. Next, move down the row to the corresponding number of minutes you plan on staying. You may notice that the deeper you plan on going, the less time you have available for the actual dive. The numbers represent the maximum amount of dive time allowed per dopplar no-decompression diving limits. Any longer, and you are in a decompression dive, which is not necessarily a dangerous situation, but you must be prepared for decompression stops. Some dive tables have mild decompression diving information on them used generally for emergency situations.

The tables help you understand how much nitrogen has been absorbed into your bloodstream, and what precautions must be taken to prevent serious illness that may prevent you from diving in the future. Going beyond the dopplar limits without proper training could prove to be fatal.

Archimedes Principle

ArchimedesPrincipleArchimedes Principle states that and object wholly or partially immersed in a liquid is buoyed up by the force equal to the weight of the liquid displaced.

This one is very simple to understand. Lets say we fill a cup with water until it’s about to spill over the edge. Then we take a rock, and drop it in that cup, the water would begin to flow over onto the table. Now to find the value referenced by Archimedes Principle, we would simple take the water that spilled, and weigh it. Lets say for the sake of argument the displacement of the water weighs eight grams. That means, according to the principle in discussion, that the rock is being pushed back up with a force of 8 grams.

This law is similar to Newton’s law of relative motion which states: for every action, there is an equal and opposite reaction. This is basically the same theory, we are just talking about objects being immersed in fluid, rather than friction and motion.

We use this law for many different things while in the water. It is mostly used to calculate the specific buoyancy of an object. This will be important for anyone that spends time underwater. For instance, if your Buoyancy Compensation Device does not have the lift capacity to bring up your steel SCUBA cylinders, you will surely be stuck on the bottom. We can set values to plan these things because of Archimedes Principle.

This law doesn’t only apply to the underwater community. Naval Architects will use this principal to calculate many different requirements of a ship’s hull. An aircraft carrier is made mostly out of steel, but because of the way she’s designed, she floats. If you were to place any discrepancy in the hull of a carrier below the water line, the consequences could be dire. The same goes for the laws of density. If you have two pieces of bread, and you throw one in the water like it is, then it will float, but if you crush the other into a ball and toss it, it will surely sink. This is the issue with ships as well, if we use Archimedes Principle along with other amazingly simple laws, we have enormous metal structures floating and moving under their own power.

Notes

We’d like to thank Derek Gill for his help in getting these gas laws rounded up into an article for ITS, and appreciate all his help. Please let us know if you have any further questions regarding any of these gas laws, and be sure to throw up a comment. We look forward to bringing you more information in the future regarding diving, and would like to hear what you’re interested in!

Disclaimer

ITS Tactical cannot be held responsible for any attempts at any form of diving without first seeking professional training and advice. The following article is not intended as a replacement for proper training and equipment used in any water sport activity. Diving is inherently dangerous, and introduces a unique set of risks not typically present in everyday life. We urge you to seek proper instruction from a qualified, and certified agency before attempting any sport requiring a life support system, namely: SCUBA. It is likewise very important that you contact your health care provider before attempting any training classes to ensure you are in good physical condition. Those with pre-existing medical conditions may be at a higher risk for certain complications that may become present while SCUBA Diving.

Posted in Diving | Tagged , , , , , , , , , , , , , | 26 Comments