New ITS WWII D-Day Morale Patch Collection Added to the ITS Store

ITS WWII D-Day Morale Patch Collection

On June 6, 1944, Allied Forces launched their invasion of the German-occupied western Europe. Code named Operation Overlord, this successful invasion was a turning point in World War II. 

To commemorate Operation Overlord and the U.S. divisions that landed that day, we’ve created the ITS WWII D-Day Morale Patch Collection. Five patches are included in this collection that pay tribute to the 1st Infantry Division, 4th Infantry Division, 29th Infantry Division, 82nd Airborne Division and 101st Airborne Division. These units were involved in the initial beach assault and were supported by many other partial divisions and individual units. 

ITS WWII D-Day Morale Patch Collection

Included with every collection is a collectible Operation Overlord Insert that includes information about each division and a map of their landing locations. Only 500 of these limited-edition collections have been produced. We’re donating portion of the proceeds from the sale of each set to The National D-Day Memorial in Bedford, VA., which features the names of the 4,413 Allied soldiers who died in the invasion. It’s the most complete list of its kind anywhere in the world.

For more information about the Normandy Invasion and to see a full listing of all the U.S. forces involved, visit this U.S. Army feature on D-Day.

ITS WWII D-Day Morale Patch Collection

ITS WWII D-Day Morale Patch Collection

Click here to order the ITS WWII D-Day Morale Patch Collection!

Posted in ITS Information | Tagged , , , , , , , , | 1 Comment

Ridiculous Dialogue Podcast: Episode 27

Ridiculous Dialogue Episode 27

Episode 27

On our 27th episode, we answer more Twitter questions including, “What’s your favorite pickup line?” and “What does everyone do at ITS?” We also discuss Snapchat, HBO Now and the origins of the infamous Blue Bear.

Matt debuted another segment of “Sh***y Movies with Matt” and tore into November Man, Snowpiercer and The Babadook. His new rating system finally gives some context to just how sh***y a movie is.

Keep poundtagging us your questions on Twitter with #ridiculousdialogue so we can discuss them on the show! Thanks for listening and be sure to pick up your official Ridiculous Dialogue Podcast T-Shirt.

Ridiculous Dialogue Episode 26

Ridiculous Dialogue was created to share the banter that takes place at Imminent Threat Solutions on a daily basis. It’s us; candid, unedited and talking about everything from what movies we’re watching to the general geekiness that keeps us laughing here at ITS HQ.

While we generally keep the vibe in our articles PG rated, be warned, it may not be safe to blast over your speakers at work. We hope you enjoy the insight into ITS and who we are behind the scenes as a company; pull up a chair and tune in to Radio ITS.

Posted in Podcast | Tagged , , , , | 3 Comments

What My Feet Think of the New Arc’Teryx Acrux FL Approach Shoes

Arc'teryx Shoes 06

I was given the opportunity last year to attend the worldwide unveiling of the Arc’teryx Technical Performance Footwear line and for the past few months, I’ve been putting a pair of the Acrux FL Shoes (formerly Alpha FL) through the ringer.

While my pair of Acrux FL shoes were an advanced sample, I’m happy to say that the production shoe has some modifications that make it even better. Within the past two months, I was also sent a pair of the Acrux2 FL GTX shoes, which feature the removable liner. You may remember this feature from my write-up on the footwear launch last year. I’ve included notes on these in this review, but at the time of publishing, I haven’t had enough time in them for a proper evaluation. Therefore, the focus here will be on the Acrux FL Approach Shoe.

Arc'teryx Shoes 11

Before jumping into the details, I’d like to go over all the available models to familiarize everyone with what’s out there. Just remember that if you’re referencing my previous article, the “Alpha” nomenclature has changed to “Acrux,” which is how Arc’teryx refers to the low-cut shoes versus the Bora mid-cut boots. This review won’t include the Bora mid-cut boot options, but I’m looking forward to trying these out as well.

There are five primary styles of low-cut approach shoe options, which include the Acrux FL and Acrux FL GTX (with Gore-Tex) in both men’s and women’s versions and the top of the line Acrux2 FL with removable Gore-Tex liner in just a men’s version. Just to note, the Acrux FL and Acrux FL GTX do not have removable liners.

Comprehensive Perspective

First off, I’ll be right up front and address the elephant in the room. Yes, the two pairs of shoes I’m discussing in this review were sent to me for review by Arc’teryx. Hopefully if you’ve been reading ITS for the past six years, you’ll know that I’m always honest with my opinion of a product, whether it’s been purchased by ITS for review or sent to us. I’m always careful with my endorsement of a product and my opinion isn’t influenced by simply receiving something for review.

Arc’teryx Footwear Lineup.

I usually don’t address this type of information in reviews, but in this case I wanted to be completely up front, as my combined experience with the Arc’teryx Footwear line is something pretty unique. Getting the chance to attend the worldwide launch last June in Chamonix, France provided access to not only get hands-on with the new Arc’teryx footwear, but to also talk one-on-one with the designers and development team that made it all happen. It’s rare to actually see how a product is manufactured and speak to the people that had a hand in brining it to life.

Experiencing this type of in-depth access to Arc’teryx footwear has given me a comprehensive perspective on how revolutionary this type of product is to the footwear market. That being said, I was glad to receive an advanced sample of the Acrux FL shoes and get plenty of time in them before writing up my thoughts. It’s only been a little over a month since the Arc’teryx footwear officially launched for purchase, but I’ve been wearing this pair of Acrux FL shoes for around eight months now.

Purpose Built Approach Shoes

During the unveiling, I wasn’t able to do much more in terms of use, other than to try on a pair of Arc’teryx shoes for sizing. However, I was still able to notice that the Acrux FL and all the other Arc’teryx shoes are purpose built. This was more evident when I was sent my sample pair and I started wearing them. What do I mean by purpose built? These are approach shoes and that’s the biggest thing that I want to drive home with my review here today.

Arc'teryx Shoes 07

Approach shoes by definition are made to get you through challenging approaches to a climb, where you’d then put on climbing shoes to tackle the route. Approach shoes often look like a hybrid of running shoes and climbing shoes, as they need to be comfortable for long distance approaches. Anyone who’s spent time in climbing shoes can attest to their discomfort after hours on the rock. You certainly wouldn’t want to wear your climbing shoes on approach.

The difference between dedicated trail running, running or hiking shoes is that an approach shoe shares a common characteristic with climbing shoes and that’s a sticky/grippy sole that extends above the toe box and wraps up and around the heel. The sole can be particularly useful for light climbing, bouldering and even hiking over uneven terrain. Normally, approach shoes aren’t recognized for their durability because of the abuse they take.

Arc'teryx Shoes 08

As the Acrux line of footwear from Arc’teryx was designed as an approach shoe, the EVA midsole is also designed for stability and impact protection on varied terrain. This is an important detail and one you might not be used to if you’re not already familiar with approach shoes. The midsole will seem a whole lot stiffer than you might think if not. While the midsole’s role is to cushion and support the foot while still providing flexibility and traction control, don’t discount the Acrux as capable in this role. It’s just less flexible than a typical midsole and that comes back to the purpose built nature of approach shoes.

What I’m getting at is that these aren’t your new every day kicks. They’re made for the great outdoors and getting you up and over obstacles on the way to your destination, not getting you up and over speed bumps in a parking lot.

Durability and Sure-footedness

As mentioned above, approach shoes aren’t associated with being durable, but Arc’teryx has changed that game. I’ve found the Acrux shoes to be extremely durable, thanks to a seamless thermolaminated one-piece upper that’s actually made from four different layers. My experience thus far in the Acrux FL shoes has been limited to mud, dirt and rock to test abrasion protection, but I have no doubt that the durability characteristics would extend to the snow and ice as well.

Arc'teryx Shoes 10

I’ll also mention here that the lack of seams means less of a chance of a failure point popping up. Those that have ever had a seam bust on hiking shoes or boots can hopefully attest to that. Another elimination of potential failure was Arc’teryx producing molded three-dimensional caps that are individually crafted for each size shoe. This resists cracking, prevents collapsing and adds protection to the most exposed areas of the upper and midsole.

Arc'teryx Shoes

Sure-footedness comes from working with Vibram to design the Arc’teryx Approach Outsole that combines the grip of a climbing shoe with the stability and rolling stride of a hiking sole. I can honestly these are the best scrambling shoes I’ve even worn too, I’ve had them in conditions that required a substantial amount of scrambling across rocks and boulders, where I saw first hand that the anti-slip lugs lived up to their namesake. Your feet can take a pounding when jumping from boulder to boulder and not only did the Acrux FL shoes stick to the rock, they cushioned my impact very well.

Arc'teryx Shoes

Arc’teryx noted that the Y shape of their rounded heel strike-zone and its assembly without adhesive, allows for each side to flex independently of the overall midsole. This is supposed to better cushion impact on rough, uneven terrain and I found this to be completely accurate. Arc’teryx also custom designed the Ortholite footbed for maximum comfort, breathability and arch support.

Arc'teryx Shoes

I really like that Arc’teryx chose to incorporate twin eyelets into the upper to facilitate lock lacing. By simply threading the shoelace further through this last eyelet in each side, a loop can be made to run the opposite side lace through to create additional leverage like a pulley. The helps to prevent heel slippage and excessive movement, thus increasing ankle support during technical maneuvers commonly encountered on just the type of terrain these approach shoes were designed for.

Arc’teryx Adaptive Fit

The comfort level of the Acrux FL shoes is off the charts, I haven’t worn socks once with them and never will. I’ve always been a strong proponent of socks too, especially wool socks. In fact, I bit the bullet a few years back and upgraded all my socks to wool, even the socks I wear with my running shoes. It was a big change for me to try out the Arcux shoes without socks, but I gave them a shot right out of the box.

I’ve found that the reason not wearing socks is working really well for me is all thanks to the stretch monomesh liner. Arc’teryx claims that this Adaptive Fit liner “forms to your foot for an exceptional fit with no pressure points and delivers the ventilation required for long days in warm, dry conditions.” I’ve found this to be true not only in warm, dry conditions, but also in humid and wet conditions. Meaning that for me, the ventilation did its job even in wet conditions. Granted I was avoiding the water as best I could, but I feel that the liner excelled here, shedding moisture enough so that my sockless feet didn’t feel like they were sliding around in a layer of excessive moisture.

Arc'teryx Shoes

Speaking of water resistance, the PU coated nylon upper is pretty air permeable itself and hydrophobic at the same time, meaning it dries quickly. This is one reason why I actually prefer non Gore-Tex footwear, I’ve always found that shoes and boots I own with Gore-Tex seem to trap more moisture than necessary. I’m very familiar with Gore-Tex as a material and its properties, I just have my reservations with it on my feet. I am anxious though to get more time in the Acrux2 FL GTX shoes, I’m optimistic that the concept of having the Gore-Tex material in the removeable liner of the shoe and allowing the upper (shell) to remain vented will be superior to traditional manufacturing for footwear. Time will tell though.

Just to clarify again, it’s just the Acrux2FL GTX shoes that feature a removable liner, the Acrux FL shoes have a non-removable liner.

Notes from the Road

Something I noticed on the Acrux FL shoes, where that small rocks from the trail would get into the space between the liner and the shoe interior. This wasn’t often, but it did occur. On the production version of these shoes, Arc’teryx added what they call the Rock Stopper. This is a flexible mesh webbing that stretches across the top of your foot to prevent this issue occuring. The mesh runs about 3/4 of the way up, where the tongue of the shoe would normally be.

You can see the Rock Stopper in the photo below, it’s the blue mesh still visible in the shell with the inserts removed. I was glad to see this change with the Acrux2 FL GTX shoes and see that it was also incorporated into the Acrux FL production model shoes. I haven’t encountered the issue with my limited use of the Acrux2 shoes.

Arc'teryx Shoes

Something else that I want to mention with the Acrux2 FL GTX is that while I’ve been really excited to use the removable liners, there’s been a learning curve. I’ve found thus far that removing my feet from the shoes while keeping the liners on is a bit of a pain. If I don’t make the laces extremely loose when pulling the liner and my foot out, it causes discomfort when putting my foot back in. This is due to the liner getting contorted during insertion and bunching up around the heel.

Arc'teryx Shoes

If I’m not removing the liner and it’s just my foot that’s being removed, there’s no issue. It’s not a huge deal, but something worth bringing up. At least for me, it’s meant more time to ditch and don my shoes if I’m using the liners as intended, which is as camp shoes.

The inserts also have their own rubberized sole that’s thick enough to resist puncturing from most thing you might step on around camp. Being made with Gore-Tex means that dirt and other debris won’t get through them too.

Arc'teryx Shoes

I’m getting more used to the process of removing my feet with the liners as I wear them, but there just something about being able to untie a shoe and slip your foot in and out with relative ease. I’m just not sold yet on the increased time being worth the versatility of having a removable liner.

However, I do see the value of the removable liner potentially reducing hot spots from friction because the liner and outer are moving as two separate pieces. There’s also the option of purchasing the taller mid-cut liners and using them with these shoes for shallow water crossings or to further keep the elements out.

Arc'teryx Shoes

Overall the Arc’teryx Acrux FL Approach Shoes are a win in my book and have been added to my quiver of footwear for the great outdoors. With the caveat to use them as intended, I feel these approach shoes will be well suited for your next outdoor adventure. Check out the full line-up of Arc’teryx Footwear here.

Posted in Footwear | Tagged , , , , , , , , , , , , , , , , | 37 Comments

Win the Travel Prize Pack from Huckberry and ITS! *Update*

Huckberry Giveaway

See below for winner announcement.

ITS Tactical has partnered with Huckberry to give away this Travel prize pack! With exclusive sales and original story-telling, Huckberry is our go-to online shop for awesome new gear and apparel, etc.

While members of ITS get a special deal of $10 free credit for their first purchase on Huckberry.com, we’re giving everyone a chance to get in on an awesome prize pack. Grab your good luck charm and get ready to enter!

What’s Up for Grabs?

One lucky individual will win the Travel Prize Pack from Huckberry that includes:

This contest is only running for one week so make sure to get your entries in!

a Rafflecopter giveaway

Click here if contest widget doesn’t load.

Good Luck!

Contest Fine Print:

  • One winner will be selected at random and will receive prize pack listed above.
  • Winner will be notified by email. Once contacted, they have 24 hours to claim their prize. If we do not receive a response from within 24 hours, we will select a new winner.
  • Contest ends at 11:59 PM CST on 5/26/15
Posted in ITS Information | Tagged , , , , , , , , | 151 Comments

Join ITS This Memorial Day and Help Carry the Load

Carry the Load 2014

ITS has assembled a Carry the Load team for the fourth year in a row and we need your support! We’d love to have you walking with our team on Sunday May 24th in Dallas, but even if you’re not local, you can still help us spread the word.

Carry the Load is a 20 hour, 15 minute event that has participants walking or running as long or as little as they can in the 20-hour period. Like the service members they honor, participants carry more than they have to, longer than they think they can. Carry The Load extends remembrance of our fallen from America’s Military, Law Enforcement, Firefighters and Rescue Personnel. The purpose is to not only remember but honor and celebrate our nation’s heroes.

While you can donate to our team here directly, we’d also like you on our ITS Tactical Joint Task Force Team if you’re local to the Dallas/Fort Worth area (or even if you want to make the drive.) The event is free and everyone is invited, regardless of fitness level or ability. It’s also not required that you have a weighted ruck or backpack, yet everyone is encouraged to carry something physical to make the emotional connection.

Carry The Load Morale Patch

Join the ITS Team

Head over to the ITS Tactical Join Task Force Team page and join up!

  • Sunday, May 24th – Monday, 25th
  • Reverchon Park, Dallas

Opening ceremonies for Carry The Load begin at 3:30 pm on Sunday, May 24th and the walk begins at 4 pm. The walk will conclude at 12:15 pm on Monday, May 25th and is followed by closing ceremonies at 12:30 pm.

We’ll also be handing out the ITS Carry The Load patches shown above to all those that can make it out to the event, so be sure to meet up with our ITS Team! Details of where our team will meet up will be sent to you prior to the event by our team captain, Tommy Whitmore, so keep an eye out for correspondence from him later this week if you’re registered.

Get Prepared

We hope to see you there and your support is very much appreciated! Here are some articles to help get you prepped for the event:

Posted in ITS Information | Tagged , , , | 19 Comments

New ITS Challenge Coin and Cat Eye of Texas Patch Added to the ITS Store!

New Shield Coin and Cat Eye Patch

Today we’re excited to launch our newest Challenge Coin, the ITS Shield 1776 Challenge Coin! These coins have been a long time coming and represent a design that’s near and dear to us.

We’re also adding a new version of our extremely popular Cat Eye patch, the ITS Cat Eye of Texas Morale Patch! Keep reading for more photos and information on how to order yours!

ITS Shield 1776 Challenge Coin

Shield-Challenge-Coin-2

Not only does our new ITS Shield 1776 Challenge Coin’s overall shield shape symbolize the defense against imminent threats, but the notch signifies knowledge, information and solutions being acquired. The mouthless raised skull in our logo represents the individual and the importance of keeping your eyes and ears open to absorb new information.

The full-color stars and stripes on the reverse side of the coin, reminds us to remember our forefathers and their fight for independence, which was declared in 1776. We the People has long been a descriptor for all people that reside in America, but it’s also included as a reminder that the United States Government gets its power from the citizens, not the other way around; PREVAIL!

Click here to order the new ITS Shield 1776 Challenge Coin!

ITS Cat Eye of Texas Morale Patch

Cat Eye of Texas Patch

ITS Cat Eye of Texas Glow GifCat Eyes traditionally hail from certain branches of the military utilizing glowing or reflective strips to help identify friend from foe and are typically seen in sets of two. Our ITS Cat Eye of Texas PVC Patch features a Glow-In-The-Dark Texas Logo on a black 3/4″ x 3/4″ rounded-edge and velcro-backed patch.

Using a flashlight or exposing the ITS Cat Eye of Texas to a light source, will help keep them glowing and let your friends distinguish you from foe!

Click here to order the new ITS Cat Eye of Texas Morale Patch!

Posted in ITS Information | Tagged , , , , , , , | Leave a comment

US Optics Academy: Two Days in the Dirt Shooting Long Range Precision Rifle

US Optics Academy

The US Optics Academy began as an idea to incentivize US Optics dealers. If they met certain goals, they’d be able to send two employees down to Apple Valley, California to the US Optics Academy for a two-day long range shooting class.

While figuring out the numbers on how the program would work, Nick Baroldi, co-owner of US Optics, told us the idea came up to offer the class to civilians as well and the idea for the US Optics Academy and the Long Range Precision Rifle course was born. In order to reveal their new shooting school to the world, US Optics invited a handful of media folks to head down to Apple Valley and attend the inaugural course. I was fortunate enough to attend on behalf of ITS and am what some would call a “long range shooting enthusiast.”

I’ve never shot long distance for a living and had previously been self taught until around 2011, when I took a seven day “Advanced Sniper/Counter-sniper” course down in Arizona. There I learned just how much I’d been doing wrong for so long. Since then, I’ve competed in a few long-range shooting contests, including the inaugural “24 Hour Sniper Adventure Challenge” put on by Competition Dynamics. While I’ve had some experience, I’m far from being a professional and was able to learn a ton of new things from the experience at the US Optics Academy. I was also able to brush up on some concepts that had become a little rusty over the past few years.

US Optics Academy

US Optics Academy

US Optics Academy

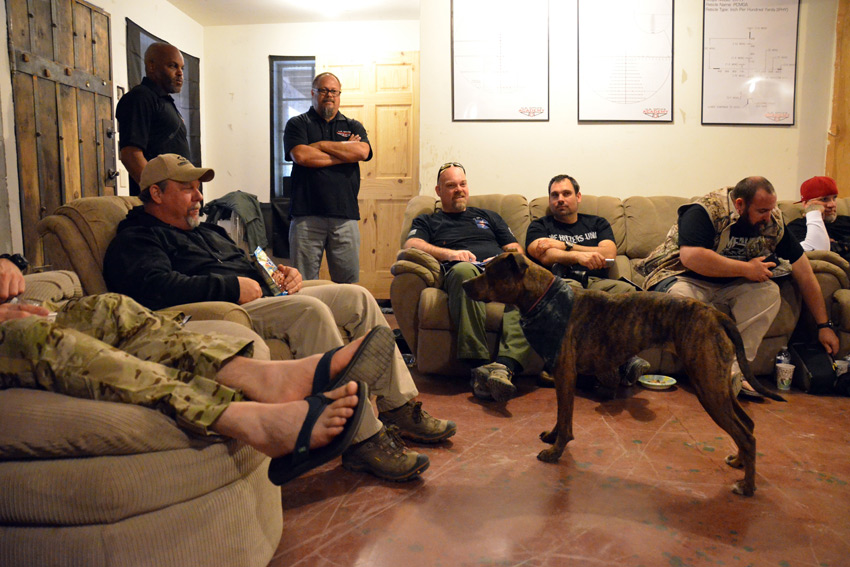
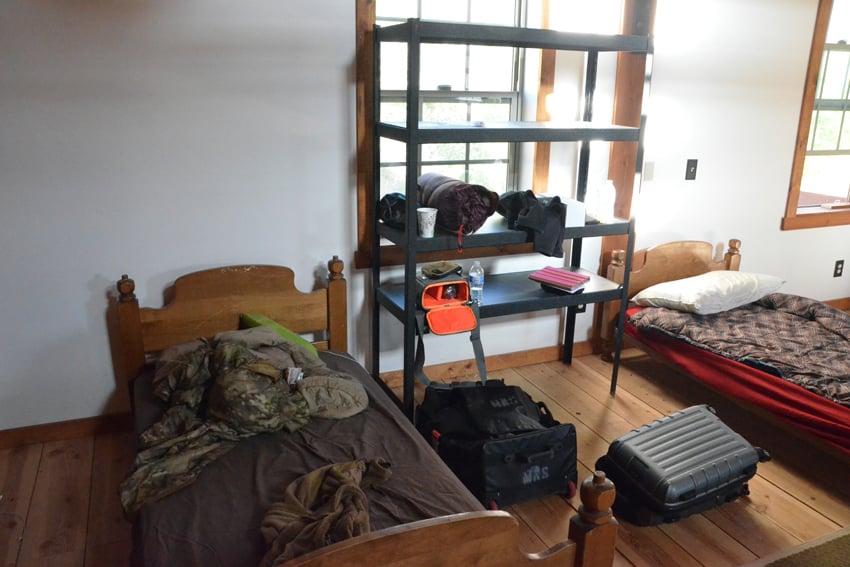
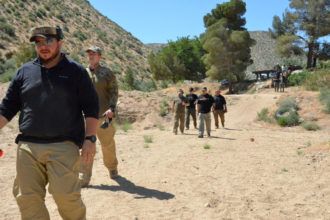
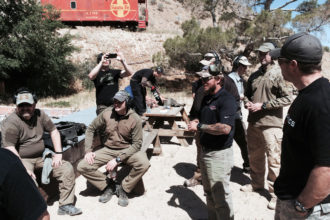
Monday night, we were picked up at Los Angeles International Airport and driven out to the lodge where US Optics Academy holds the training. It’s about an hour and a half from LA, up in the high desert, within the mouth of a horseshoe-shaped valley. The lodge itself was a colossal building, originally started as a silver mine shack for mine workers and eventually growing to the size it is now. We all grabbed a bunk upstairs on the third floor, dropped off our gear, socialized for a bit down in the main room or outside on the deck and then hit the rack in order to be ready for class the next day.

As it does every day, my internal alarm clock woke me up at 0555 hours, which gave me plenty of time to slowly get ready for the day. George from US Optics cooked up a massive breakfast of bacon, eggs and some great coffee, which we gobbled down before the 0800 start of the classroom portion of day one.

US Optics Academy

US Optics Academy

Classroom Time

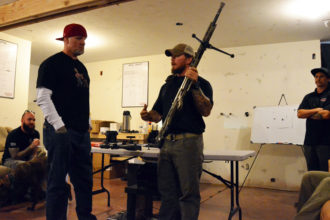
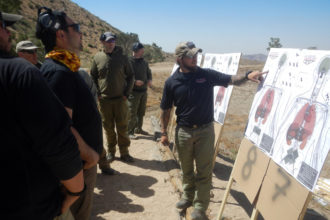
When class started we were formally introduced to Tyler Hughes, who was leading the inaugural academy, as well as all the US Optics people who were there to help. Tyler is a former Marine with ten years of combat experience as a Scout Sniper, Scout Sniper Team Leader, Scout Sniper Platoon Leader and a host of other positions here in the United States, Iraq and Afghanistan. Tyler has succeeded in pretty much every class the Marine Corps offered in long range shooting, graduating with honors from Scout Sniper Training, Mountain Sniper and Urban Sniper courses.

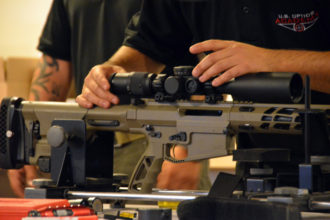
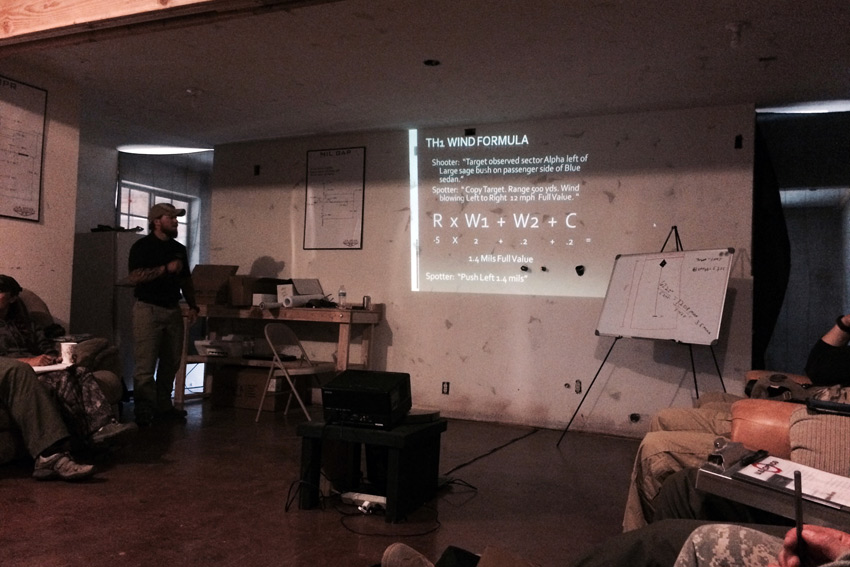
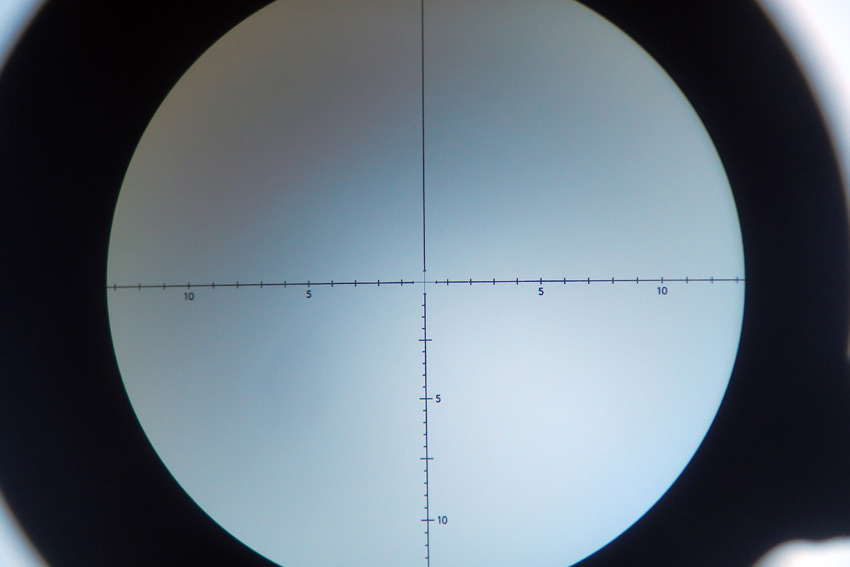
During the classroom time, we covered basic scope nomenclature and scope function; how the scope itself works and how the user of the scope adjusts it. For this class, the scopes we were using were mainly US Optics glass, though that isn’t a requirement to take the class; any scope that has adjustable elevation and windage turrets will work. Dual and single focal plane scope functionality was explained, as well as the benefits and drawbacks of each. Additionally we dug into Minutes Of Angle and Milliradians, which is where mathematics made its first appearance.

For many shooters, one of the most intimidating aspects of long range shooting is the math involved. This portion of instruction can be like “drinking from a firehose,” where you’re presented with a great deal of information at a rapid pace, but repetition will usually make these things clearer to most.

US Optics Academy

MOAs and MILs

MOA, or “Minute Of Angle,” is an angular unit of measure describing a standard portion of a degree. There are 60 Minutes of Angle per degree and 360 degrees in a circle. This makes for 21,600 minutes of angle per circle. With a circle of 100 yards, one true Minute of Angle (tMOA) equals 1.047 inches. For simplicity, this is usually rounded down to 1” at 100 yards, 2” at 200 yards, 4” at 400 yards and so forth.

There are several types of scopes capable of a variety of adjustments of Minute of Angle, from 1 MOA adjustments down to 1/8 MOA adjustments. The most common type of MOA adjustment for most tactical/precision shooting is ¼ MOA, meaning each click of adjustment is equal to .25” at 100 yards. There are also a few other measurement types, IPHY (Inches Per Hundred Yards) and SMOA (Shooter Minutes of Angle). These were explained, but weren’t really pertinent to our class, as everyone would be dealing with normal MOA adjustments on the scopes we were using.

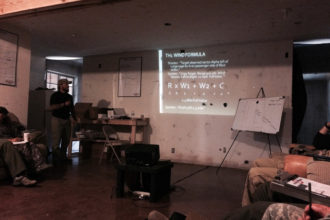
Then there are MILs, or Milliradians, which are a unit of measurement dividing radians in a circle. A radian is equal to 57.3 degrees, with 6.283 radians in a circle. There are 1000 milliradians in 1 radian and therefore 6,283 milliradians (or Mils) in a circle. Thus, 1 Mil at 100 yards is equal to 3.6” inches (or 10 centimeters). Milliradian scopes are adjustable by either 1/10th Mil or 2/10th Mil increments (1 or 2 cm adjustments, respectively). Furthermore, 3.438 MOA is equal to 1 Mil at any distance or rounded down for simplification, .3 Mils = 1 MOA at any distance. To convert Mils to MOA, you can use this formula:

Mils x 3.438 = MOA

To convert MOA to Mils, this is the formula:

MOA / 3.438 = Mils

Why would you ever want to do this? Well, if you’re shooting with a spotter and one of you has a Milliradian scope while the other has a MOA scope, converting between the two can be crucial to making proper adjustments. It also comes in handy when using off the shelf ammunition that may have data on your ammo’s drop (at given yardage), in a unit of measurement your scope isn’t setup for. Luckily for our class, everyone was using MOA scopes, so the adjustments weren’t necessary as they would be if some had MIL scopes.

Fresh off the math deluge, we moved on to reticle variations (MIL GAP, PC MOA, MPR, HORUS H-37 and others) before learning how to mount a scope.

US Optics Academy

US Optics Academy

Mounting a Scope

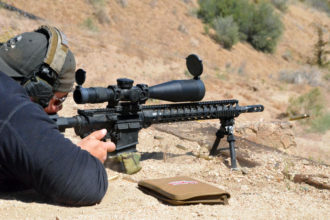
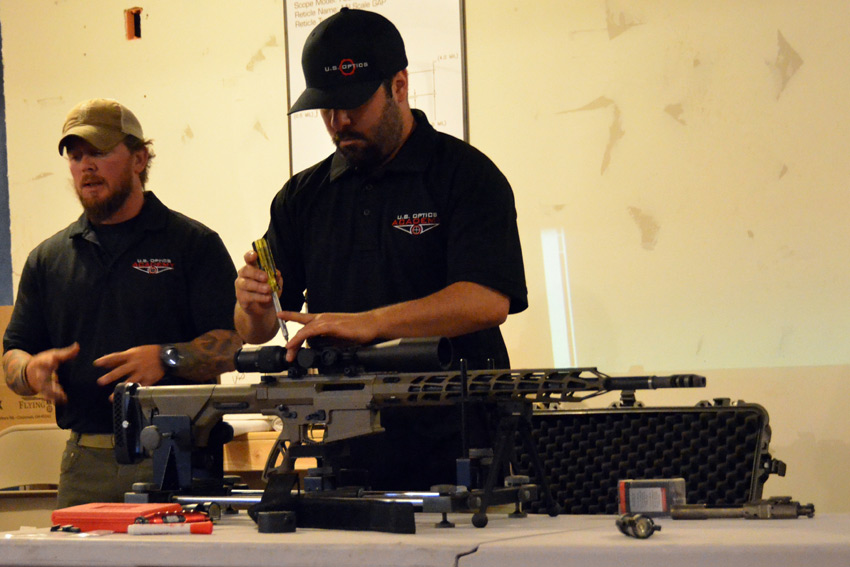
Next on the agenda was the proper technique for mounting a scope on a rifle. Tyler handed the class over to Chris Rohan from US Optics, who walked us through the process of how to properly mount a scope on a rifle. He placed key emphasis on determining the proper length of pull (distance between the inside of the elbow and the trigger finger), selecting the best location on the top of the rifle to attach the scope for use with a proper sight picture (based on the shooter’s intended cheek weld) and the importance of maintaining a level rifle throughout the process.

Confirming that the scope is level, is important so that both are parallel with each other. Chris also showed us how the objective lens absorbs light above and beyond what is viewed through the ocular lens and the difference in size of the “exit pupil” between different scopes. This light gathering function of the objective lens allows for snipers in the field to tape off significant portions of the objective lens, reducing the likelihood they will be spotted by reducing the reflective surface area of the objective lens.

US Optics Academy

US Optics Academy

Aspects of Fundamental Marksmanship

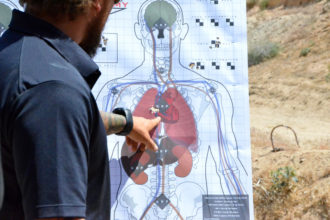
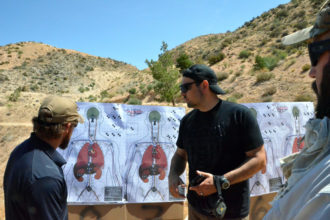
After Chris finished mounting a scope on Jesse James’s rifle as an example, he handed the metaphoric microphone back to Tyler, who went through a thorough explanation of fundamental marksmanship aspects. Bone support, muscular relaxation and a natural point of aim, all work together to ensure a shooter can accurately operate the rifle with the greatest stability and minimum margin of potential error.

The aiming process, encompassing good eye relief, solid sight alignment, sight picture and effective control of the parallax effect (the apparent movement of the reticle across the target with slight head movement), was explained in great detail. He then covered conditions to fire, including natural breathing, shooting when you have exhaled entirely, trigger control, cardio-pulmonary pause shooting (between heartbeats), proper trigger finger placement, motion and follow-through.

Before we moved out on the range to start shooting, we went over the various aspects of external ballistics. For example, how a bullet flies, drops and the various factors that effect it enroute to the target. This includes gravity, drag, atmospheric variables, temperature, humidity and others. We also briefly touched on high angle shooting, though we didn’t get around to exercising the high angle principles in the field.

US Optics Academy

US Optics Academy

BRASS: Breathe, Relax, Aim, Sights, Shoot

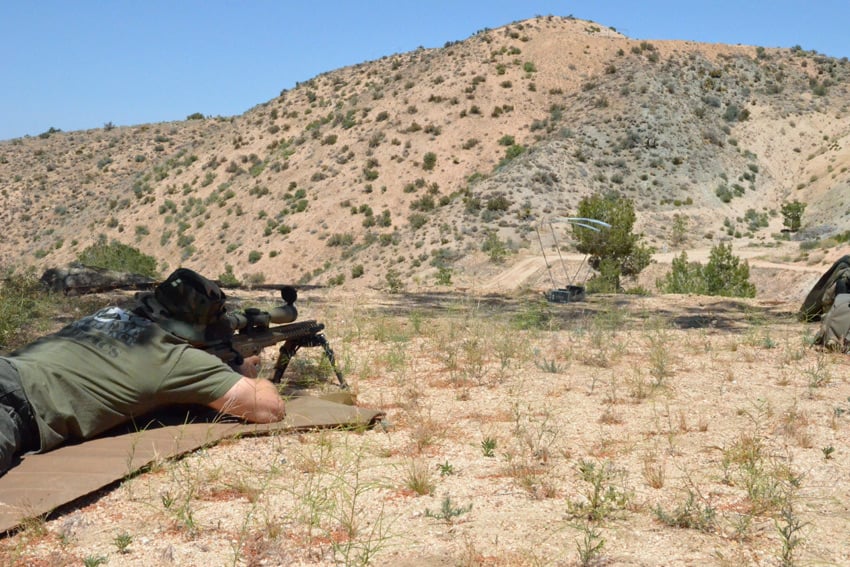
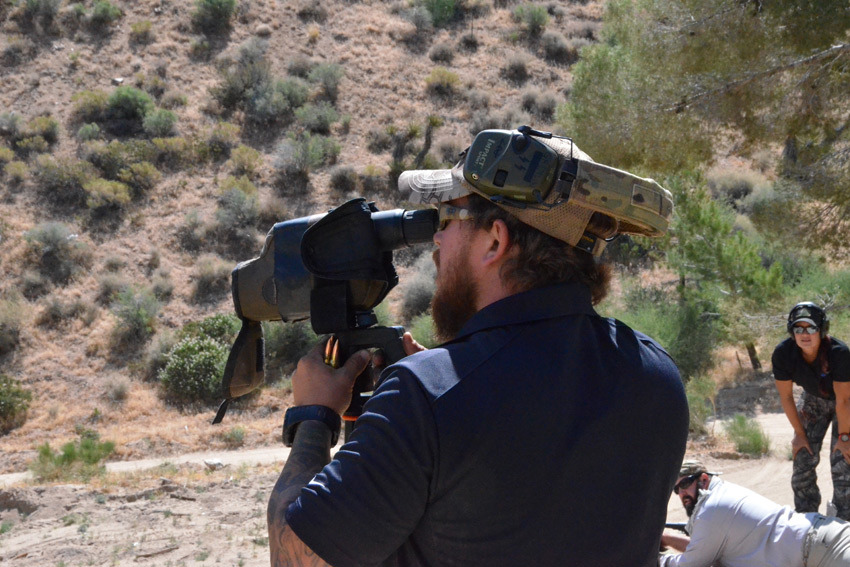
After lunch, we moved out to the 100 yard range and everyone went through the process of shooting through the chronograph to get an accurate reading on muzzle velocity for the ammunition they were shooting. This went fairly smoothly, aside from Monkey (of Four Guys Guns) accidentally shooting one of the chronograph’s arms, causing a small delay (and a series of jokes amongst the attendees). We then set about zeroing our rifles on the 100 yard paper targets set up for us.

US Optics Academy

US Optics Academy

Range Time: Drills and Exercises

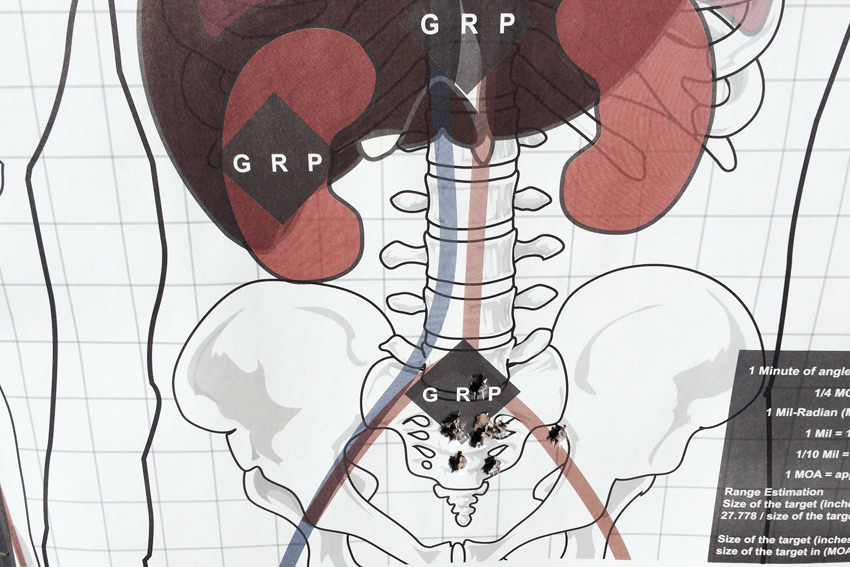
After everyone had a fairly accurate zero, we ran some grouping exercises including a blind-shot natural point of aim/sight picture exercise and a mild-stress sight-picture exercise. In this exercise, the shooter would fire, get up, run back to get another single round of ammunition from their hat on the ground 10 yards behind them and then return to the rifle to fire each subsequent round. During all of these exercises, the importance of the fundamentals became more and more evident.

After the grouping exercises, we had a competition where two shooters shot at a “dueling tree” from about 150 yards with the goal of knocking all the plates over to the other shooter’s side. The bolt action rifle people battled each other one by one and then the semi-automatic shooters battled each other. At the end, the champion of the bolt rifle shooters went up against the semi-auto champion. Monkey took the honors for the bolt-action shooters, winning against Clint Walker for the semi-auto shooters. Thus illustrating that in precision shooting, chambering your next round is not necessarily the determining factor in the combination of accuracy and speed.

US Optics Academy

US Optics Academy

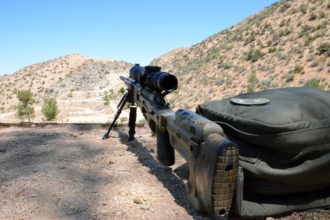
The Long Range Platform

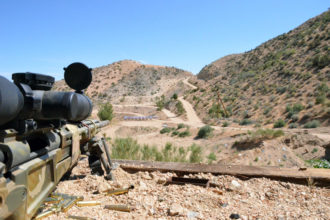
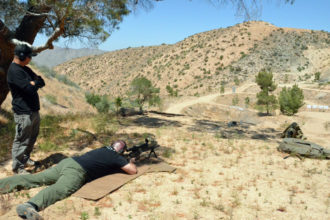
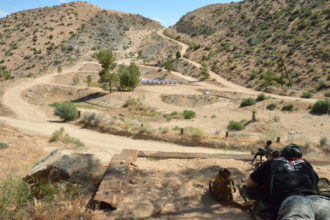
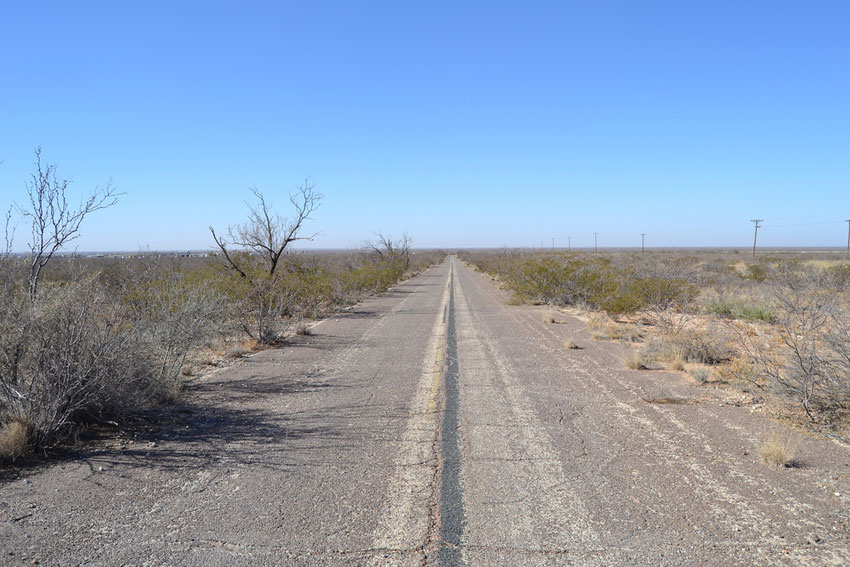
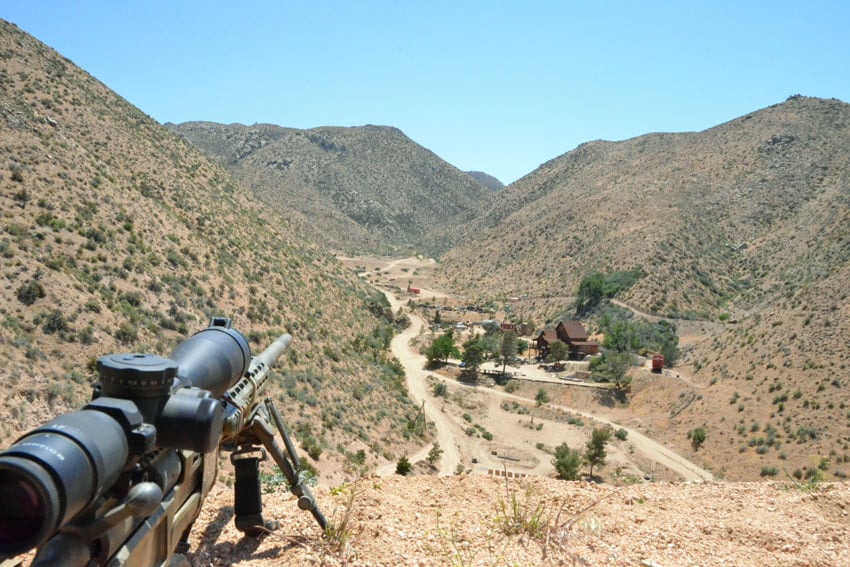
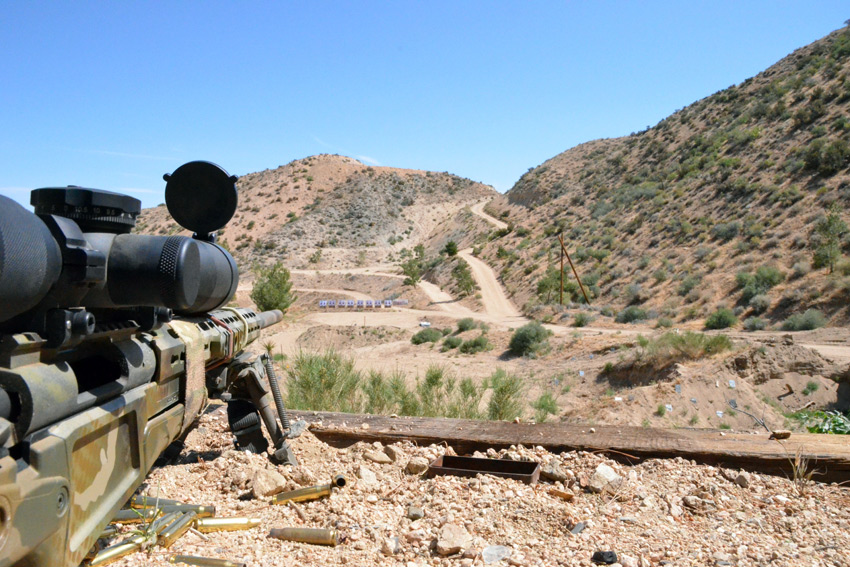
After this friendly competition, we headed up the hill for the long range platform to gather elevation data on our rifles and ammunition. We ignored wind calls for the day, as we’d be covering wind the next morning. Shooters worked with each other, Tyler and the US Optics folks, to get precise data on elevation settings for targets at 200, 300, 400, 500, 600, 700, 800, 900 and 1000 yards spread throughout the horseshoe valley.

The wind picked up the longer we were there, resulting in mouths or eyes full of dust and small rocks, but most of us were able to record data in our DOPE books. This made the next day’s exercises a lot easier. We then returned down the hill to the lodge and enjoyed a fine dinner of catered Chipotle options. After the food, beverages and socializing, everyone hit the rack in order to prep for the next day’s training.

Into the Mysteries of Wind

US Optics Academy

US Optics Academy

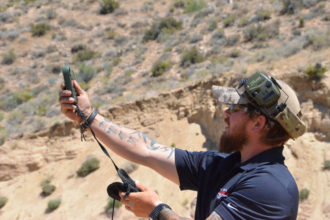
Wednesday morning we awoke to the sweet smell of bacon and coffee, which we consumed prior to our 0800 classroom start time. We started off by digging into various engagement skills, starting with wind. Determining wind speed at the location you’re shooting from is important, but it’s also important to have an idea of the wind speed at the location of the target and everywhere in between.

Wind is not a unidirectional force and tends to move through terrain much the same way water does. Tyler taught us visual indicators to look for to help determine the direction and speed of wind further down range. We then tried the wind formula we’d learned in a few different example exercises and found it fairly effective in offering accurate adjustments for shooting in any given wind speed and at any given distance. However, it’s a little more complicated than I want to dig into with this article. I’ll simply say that I learned more about making accurate wind calls in this two-day course than I did in a much longer course I’d taken previously.

We also went over the effects of spin drift, with the basic take-away being that it becomes a factor at about 600 yards. You’ll find the bullet moving .2 mils right per 100 yards at that point. We then touched on how to read wind at distance, by looking for mirage effects and were provided diagrams to estimate the speed at the location of the mirage between 0 MPH and 12 MPH. Winds any faster than that will effectively sweep the mirage effect away.

US Optics Academy

US Optics Academy

Back to the Range

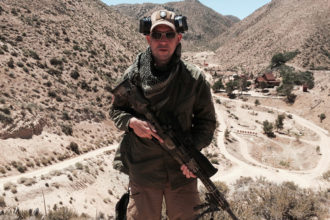
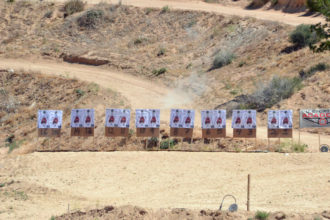
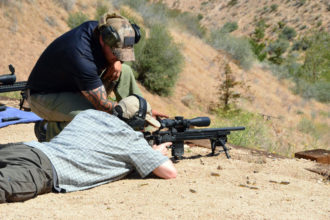
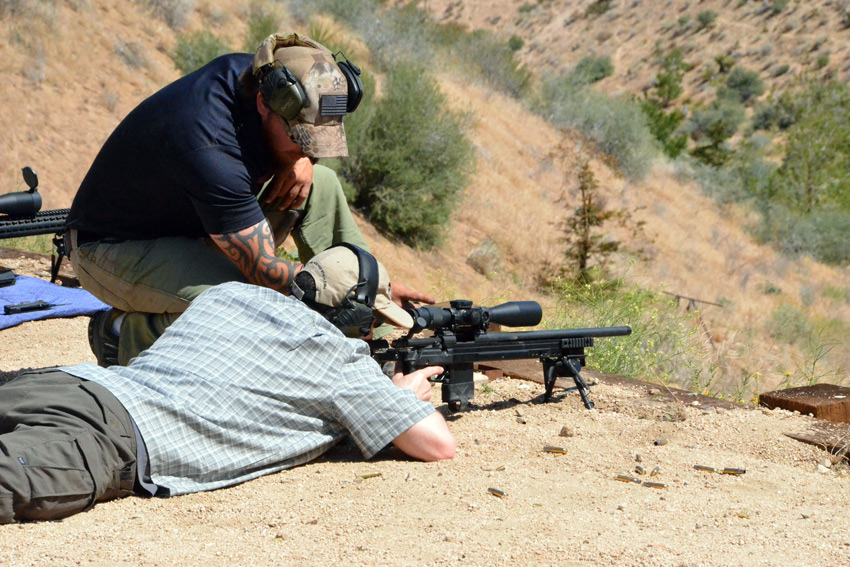
At this point in the morning, we moved out to the 100 yard line again in order to confirm zero on our rifles and then engaged in a 10 round competitive grouping exercise. After this competition, we headed up to the long range platform, ate some lunch and then partnered up to begin the process of getting each shooter to hit those same targets we had gathered elevation data on the day before.

Since we were partnered, the goal was to have half of the people shooting, with the other half spotting for them. The US Optics Academy personnel also spotted as backup with spotting scopes, in the event the shooter’s spotter didn’t have a call to suggest. I was in the first group of shooters and with the help of good spotting, was pleased to hit every target from 200 yards, out to 1000 yards. One thing that becomes readily apparent in an exercise like this is the importance of making an easy-to-understand adjustment call. “You hit left and low of the target” is not nearly as useful as “Hold right shoulder.” Short, informative and uniformly worded hold-calls enable the shooter to take a follow-on shot before the wind changes, rendering such a call inaccurate.

Before the shooters and spotters swapped roles, we took a brief break and felt the wind picked up quite a bit. According to Tyler’s Kestrel readings, what had been between 15-20 MPH, quickly became 20-32 MPH. You could feel the difference on your face with the bursts of dust and small rocks that would pelt it. However, the second group of shooters were pretty effective at hitting those same targets despite the near-constant 30 MPH winds.

We finished up mid-afternoon at the long range platform and headed back down to the 100 yard line for a little morale-boosting competition before shutting down and packing up our gear. Amusingly enough, our dinner delivery driver had no trouble getting out to the lodge to make his delivery, but got a little confused trying to get back out of the lodge. She insisted she could figure it out as she had her map application on her phone. It wasn’t much use to her though, given the lack of cellular coverage in the valley. She did eventually figure it out on her own though.

US Optics Academy

Summary: The Nitty Gritty Details

As I mentioned earlier, I took a 7 day “Advanced Sniper/Counter-Sniper” class a few years ago from another school and learned quite a bit. However, that class costed over three times as much, before calculating hotel and car rental expenses. It also covered a lot of material that as a civilian, I’ll likely never see the opportunity to use. While things like building a ghillie suit, constructing an urban hide are great, it was also a full seven days of instruction.

A lot of people who may want to learn how to effectively shoot long distances, may be hesitant to spend that kind of money and invest that much of the limited vacation time they have to do so. That being said, the US Optics Academy offers a fantastic value to just this sort of person. If you’ve ever wanted to extend your accurate shooting radius to 1000 yards (or even to 1500, as there are targets at the facility out to this distance) and learn some solid fundamentals that will more than likely improve all the shooting you do, the US Optics Academy might be right up your alley.

They’ll also be offering a Long Range Precision 2 class covering more advanced topics, with the prerequisite of taking LRP1 before you sign up for LRP2. The class material is solid and Tyler Hughes is a passionate and effective instructor. While they intend to announce the schedule of dates soon, at the time of writing this they aren’t online yet. The price will be $895.00 for a two-day course, which includes lodging and food. When I told friends I was headed to this media event, a number of them said that it was something they would love to do and having been through the course now, I can highly suggest that they do.

Editor-in-Chief’s Note: Matthew Sharp is a Plank Owner and Life Member at ITS and goes by the username “viator.” He lives in The People’s Republic of Northern California and enjoys long range shooting, carrying heavy objects great distances and fuzzy little puppies.

Posted in Shooting | Tagged , , , , , , , , , , , , , , , , , , | 10 Comments

Take Your Awesome Sauces To Go with PDW’s Versa Bear Squeeze Bottles

PDW Versa Bear 01

I can’t say that I’ve ever been more excited about a way to transport my condiments, as I am about the Versa Bear Squeeze Bottles, coming soon from Prometheus Design Werx. These compact and packable silicone squeeze-bottles are food-grade and 100% BPA-free to safely transport just about anything you can think of.

Whether that’s honey, jelly, Sriracha, soap, shampoo, lotions, or even scotch. That last one might not be what these were intended for, but it’s sure a good way to sneak booze into somewhere you’re not supposed to via picnic basket. You didn’t hear that from me though.

PDW Versa Bear 06

PDW Versa Bear 05

What I love the most about the Versa Bear Squeeze Bottles is that they look like gummi bears, which I’m a sucker for (especially the Haribo variety.) I couldn’t resist using some food coloring for the main photo here, to see what the normally translucent silicone bears would look like with different colored liquids.

You can also see below what they look like with some common condiments you might be storing in them.

PDW Versa Bear 11

Each 3-pack of Versa Bears comes with three containers that measure roughly 4 3/8 tall (with cap) x 1 7/8 wide x 1 5/8 deep. Each also features a flip top “no-drip” cap that’s nicely made. To fill, simply unscrew the flip top from the collar and replace to seal again.

PDW Versa Bear 08

PDW Versa Bear 09

PDW Versa Bear 10

The Versa Bears are carry-on approved and perfect for transporting your awesome sauces or liquids on your next picnic, backpack trip, overland trailblazing, epic adventure or interstellar journey. PDW will also be donating a portion of the proceeds from the sales of the Versa Bears to various honeybee and wildlife conservancies.

PDW Versa Bear 04

Look for these soon on the Prometheus Design Werx website!

Photo Gallery

Posted in Load Bearing | Tagged , , , , , , , , , , , , , | 11 Comments

Coast to Coast: The Bankhead National Highway and Its Importance in History

Bankhead Highway

With all of our modern conveniences, it’s easy to take simple things for granted. Interstates and highways facilitate quick travel over long distances and the network of roads means that we can travel almost anywhere easily. However, up until the early 1900’s, crossing a state the size of Texas was a daunting affair that could take weeks or even months.

Bankhead Highway

Where We’re Going, We Don’t Need Roads

As automobiles became more prevalent and affordable in early 1900’s, people were able to cover more distance than they previously could on horseback. As the automobile took over as the dominant form of transportation, the need for better road systems emerged. A national road program didn’t exist, which meant that cities, counties and even private individuals were individually maintaining the roads that existed. Early roads commonly followed railroad systems and the location of many highways today reflect the paths of the railways.

The first road systems were incredibly difficult to navigate due to lack of organization and planning; the same road could have multiple names as it ran through different townships. Roads that ran through areas of private property weren’t maintained often and occasionally, the property owner might even put obstacles in the road to discourage travel.

Bankhead Highway

Auto Clubs, Roll Out

With the growing popularity of the automobile, car enthusiasts began to organize and lead the charge for constructing new and improved roads. In 1912, the Fort Worth – El Paso Highway Association was formed to promote road development between Fort Worth and El Paso. The association hired a surveyor to inspect the route and find the best method to combine the existing roads and new construction. The highway system that was being created would eventually be adopted as part of the Bankhead Highway, named for Alabama Politician John Hollis Bankhead, an early leader in the national road building movement. Auto Clubs were instrumental in the development of road systems and helped to pass the Federal Aid Highway Act of 1916 through Congress.

The act meant that the federal government would supply funding to improve highways and forced states to create highway departments. In Texas, the Highway Commission identified 25 highways that would comprise the Texas Highway System and at the top of the list was the Texarkana, Dallas, Forth Worth and El Paso Highway, named SH 1 (State Highway 1).

Bankhead Highway

 The Bankhead National Highway

Formed in 1916, The Bankhead National Highway Association’s goal was to create a transcontinental highway running from Washington D.C. to San Diego. The association set out to designate the newly formed state highways as an official route along the Bankhead Highway. The recently designated SH 1 was selected in Texas as the official highway for the route through the state.

Bankhead was extremely useful for commuters, the Postal Service and even the Military. Upon its completion in April of 1920, it became one of the first transcontinental highways in the United States. Traffic levels that began at 200 cars per day traveling the road, quickly rose to above 1,000. As the highway grew in popularity, the route along it saw a booming growth of industry.

bankhead-highway-07

Industrial Strength

The Bankhead Highway was also an integral part of the growth in the United States Industry. The highway gave companies the ability to quickly transport raw materials and finished products between cities and states. Many companies built facilities along the route of these highways to increase the speed of travel between locations.

In addition to private industry, the United State Military extensively used the highway in the build up to World War II. With many World War I era military installations being located on the route and after running several tests on the highway, the US Army designated the Bankhead Highway as a route of primary military importance. This designation meant that many new military facilities were constructed along the route and also led to increased federal funds to maintain the highway.

As more and more families gained access to automobiles, a new tourism industry emerged. The idea of a road-trip was exciting to many people that hadn’t even ventured out of their own counties. This new found tourism saw the creation of state parks and other historic sites along the Bankhead Highway, as well as tourist-centric filling stations and attractions. After World War II the Interstate Highway system saw even more expansion, as locations sprang up that catered to tourists. Things like roadside attractions and motels meant that more people were treating the road-trip itself as a vacation and not just the destination.

Bankhead Highway

The Highway Today

With the rise of Interstates, highways like Bankhead declined in popularity and many people aren’t even aware that a historical highway might run right through their town. In fact, after looking into it, we discovered that the Bankhead Highway actually ran right through our front yard. We now know it as Highway 180, or Lancaster Avenue, which is just across the tracks from where ITS HQ is now. Our original location, after ITS moved out of Bryan’s garage years ago, was actually on Lancaster. Running parallel to the railroad tracks, there are still many small shops and old motels dotted along the highway, but they’re quickly disappearing as other businesses and facilities pop up.

Later this year, The Military Vehicle Preservation Association will be re-tracing the route of the historic Military convoy along the Bankhead Highway. They’ll be stopping along the way to discuss the history of the vehicles and the highway itself. Activities like this are important for keeping history alive and are a good reminder of how instrumental highways like the Bankhead were.

It’s also a good reminder of days when businesses were built on the backs of the newly created highways. Where roadside vendors would travel miles just to sell their wares alongside a bustling roadway and when the destination wasn’t as important as the route you took to get there.

Posted in History | Tagged , , , , , , , , , | 6 Comments

Ridiculous Dialogue Podcast: Episode 26

Ridiculous Dialogue Episode 26

Episode 26

In this episode, Bryan talked about his journey to Silicon Valley and his Wi-Fi Issues. Tesla’s new and amazing Powerwall was also discussed, as was our mission to make the switch to Poundtags rather than Hashtags.

Our childhood nicknames, failed advertisements and whether beards are bacteria breeding grounds, were a few of the other topics we debated.

Don’t forget to send us a question or comment, so we can bring it up on a future episode. Just use our Poundtag #ridiculousdialogue on Twitter! Thanks for listening and be sure to pick up your Ridiculous Dialogue Podcast T-Shirt.
Ridiculous Dialogue Episode 26

Ridiculous Dialogue was created to share the banter that takes place at Imminent Threat Solutions on a daily basis. It’s us; candid, unedited and talking about everything from what movies we’re watching to the general geekiness that keeps us laughing here at ITS HQ.

While we generally keep the vibe in our articles PG rated, be warned, it may not be safe to blast over your speakers at work. We hope you enjoy the insight into ITS and who we are behind the scenes as a company; pull up a chair and tune in to Radio ITS.

Posted in Podcast | Tagged , , , , , , , , | 3 Comments