ITS Discreet Messenger Bags Back in Black with New Padded Inserts, Spy Coins and Lock Pick Trainers

There’s quite a few new items available today in the ITS Store! We’ve first got a restock of our Discreet Messenger Bags in Black to go along with our new Padded Inserts, which provide protection for camera equipment or any fragile equipment you might want to store in your Discreet Messenger Bag!

We’ve also received in a new run of the Spy Coins edition of our ITS Challenge Coins and a few different types of Lock Pick Trainers to help you improve your skill-set! You can find all these items now in stock at the ITS Store while supplies last!

[flickr id=”5877498540″ thumbnail=”medium_640″ overlay=”false” size=”medium” group=”” align=”center”]

[flickr id=”8232423229″ thumbnail=”medium_640″ overlay=”false” size=”medium” group=”” align=”center”]

[flickr id=”8233486368″ thumbnail=”medium_640″ overlay=”false” size=”medium” group=”” align=”center”]

[flickr id=”6231995608″ thumbnail=”medium_640″ overlay=”false” size=”medium” group=”” align=”center”]

[flickr id=”6231995126″ thumbnail=”medium_640″ overlay=”false” size=”medium” group=”” align=”center”]

[flickr id=”8232411309″ thumbnail=”medium_640″ overlay=”false” size=”medium” group=”” align=”center”]

[flickr id=”8232409739″ thumbnail=”medium_640″ overlay=”false” size=”medium” group=”” align=”center”]

[flickr id=”8232414987″ thumbnail=”medium_640″ overlay=”false” size=”medium” group=”” align=”center”]

[flickr id=”8232415659″ thumbnail=”medium_640″ overlay=”false” size=”medium” group=”” align=”center”]

All these items are available here in the ITS Store!

Posted in ITS Information | Tagged , , , , , , , , , , , , | 2 Comments

Tips for Cold Weather Running: Layer Up and Stay Motivated!

Depending on where you are in the country, Old Man Winter has either moved in or is just around the corner. The temperature may be dropping but that doesn’t mean you have to stop running outside.

We’re all guilty of pulling the covers back over our heads on those blustery mornings but armed with the right mindset and gear, running in the cold can be just as rewarding as usual.

Continue reading

Posted in Running | Tagged , , , , , , , , , , , | 6 Comments

NEMO Gogo LE: A Lightweight Inflatable Tent for Your Next Backpacking Trip

NEMO Gogo LE

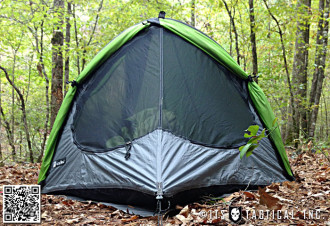
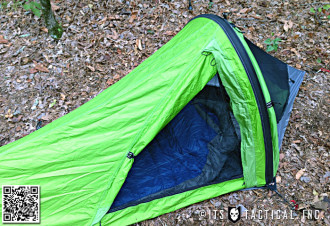
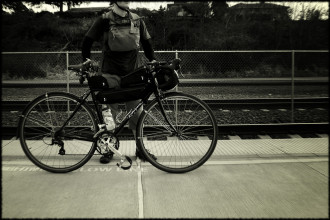
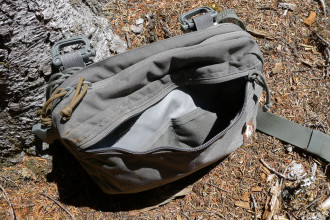
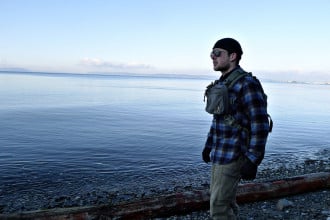
Inflatable tent? Yep, you definitely read that right. I’ve had the pleasure of thoroughly putting the NEMO Gogo LE though a number of multi-day backpacking trips over the last 14 months and I’ll be sharing my thoughts in this comprehensive review today.

The NEMO Gogo LE has been an extremely reliable and durable lightweight backpacking tent that I’ve really grown to love (with a few additional enhancements I’ve made along the way.) This review is an honest assessment of both the positives and negatives I’ve found with the Gogo LE. I’ve tried to illustrate my points with detailed photos throughout the article. Let’s get right into it!

Lightweight?

NEMO GoGo LE TentI’d like to provide a bit of a background into NEMO’s categories for their tents, as well as some notes on backpacking weight classifications. Some terms that get thrown around in backpacking are lightweight (LW – pack weight under 25 lbs.), ultralight (UL – pack weight under 15 lbs.), super-ultralight (SUL – pack weight under 10 lbs.) and extreme-ultralight (XUL – pack weight under 5 lbs.).

These weights can be debatable depending on who you talk to, but I’ve provided this info as a guideline. It’s also partly based on Brian Green’s excellent ongoing Lightweight Backpacking series on ITS Tactical. Check it out if you’re interested in learning more about lightweight backpacking!

NEMO groups their tents into quite a few categories, but the ones that apply the most here are Backpacking, Ultralight Backpacking and Featherweight Backpacking. It can be a bit confusing if you’re purely following those categories as you’ll see a “featherweight” single-person tent that weighs close to three pounds.

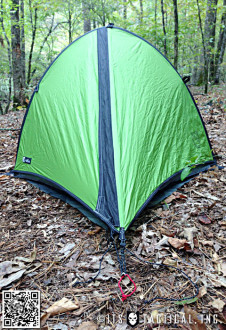
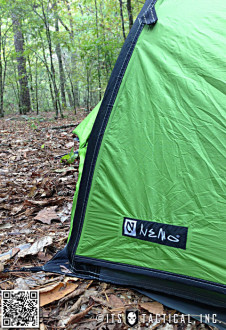
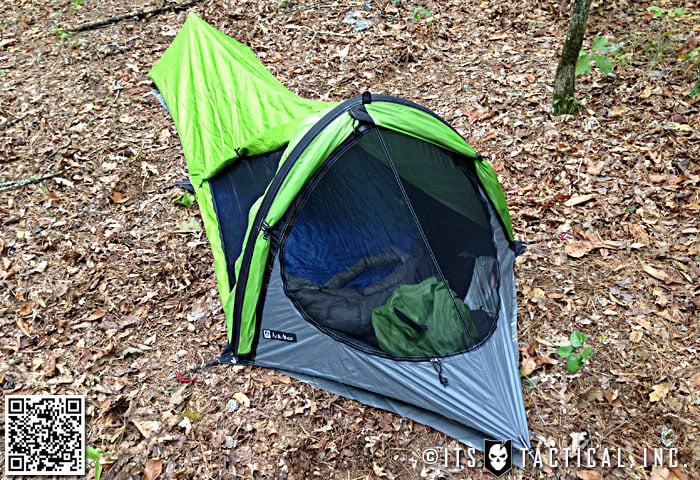
The Gogo LE fits into NEMO’s “1 Person Adventure” category and comes in at 2 lbs. 9 oz. packed out. They also offer the Gogo Elite, which comes in at 1 lb. 11 oz. packed out and is essentially the same as the Gogo LE without the side door and 6″ less length overall.

NEMO Gogo LE Tent
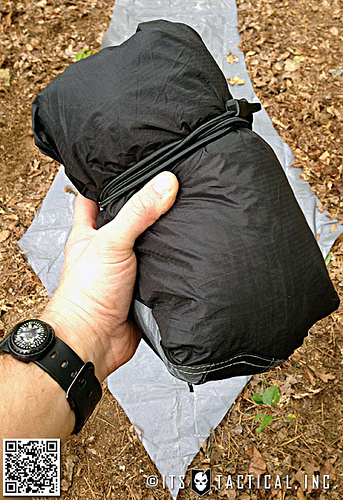
These weights can be a bit deceiving though, so allow me to explain. The Gogo LE came with 5 tent stakes, but to fully set it up, you’ll need an additional three tent stakes, an optional ground sheet (not carried at NEMO) and a stick to prop up the foot end. The waterproof stuff sack that comes with the Gogo LE is nice, but weighs 3.5 oz. alone.

The configuration I carry the Gogo LE in, with the extra stakes, ground sheet, pump and a bungee (1 oz.) rather than the stuff sack, comes in at 2 lbs. 11.8 ounces. I cut my ground sheet from a larger piece of Eureka Floor Saver material and it weighs 5.4 ounces by itself. If you do the math, you can see that 2 lbs. 6.4 oz. is what my weight came out to by removing the stuff sack and before adding the ground sheet.

NEMO Gogo LE Footprint

Just a note on the removal of the waterproof stuff sack, I already carry a lightweight waterproof stuff sack in my pack and the tent just gets placed inside this. I’ve also used a white trash compactor bag, but the 1.9 oz. Sea-to-Summit Ultra-Sil Nano Dry Sack I have is actually lighter weight than the 2.4 oz. Husky trash compactor bag. By the way, I’m not an advocate of waterproof backpack covers and like to waterproof the actual contents rather than the pack. Those things never completely cover/waterproof the pack anyway. Besides, do you really care if certain things like a compass get wet?

Stake Out

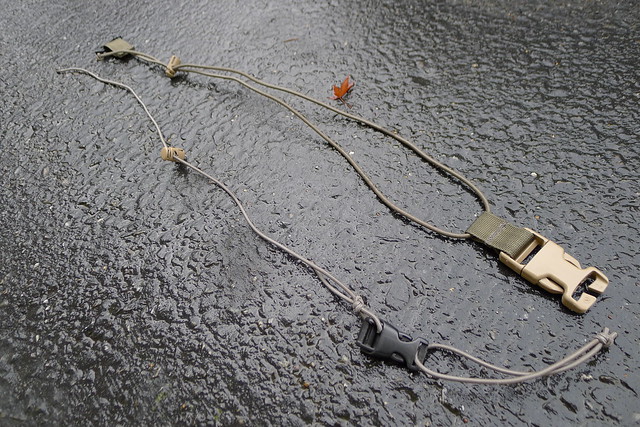
As mentioned previously, the NEMO Gogo LE comes with the minimum amount of tent stakes to set it up. I’ve found through trial and error, that having those extra three stakes makes my backpacking experience more enjoyable. The minimalists out there will probably say you could always carve your own from sticks, but I’d rather carry them.

NEMO Gogo LE Stake Out

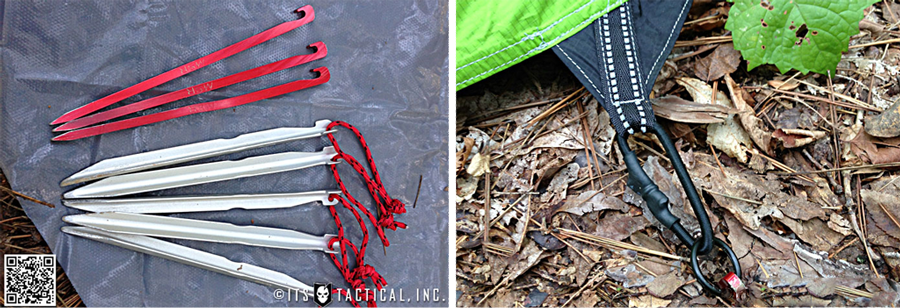
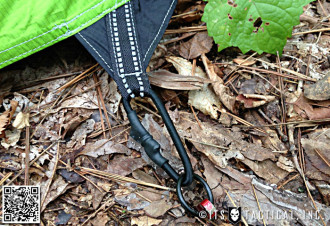
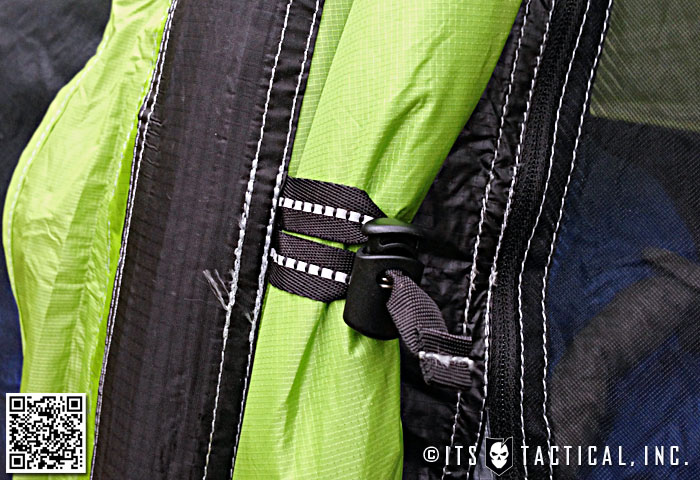
The spots where the missing stakes go are at the mid-points of each long side and a third at the foot-end guy line. The mid-point of each side has a place for those stakes already, with a loop of bungee and a plastic ring. I really like the bungee here, as when these points are properly staked, it allows some flex for those that toss and turn during the night (like me.) The addition of these stake out points also keeps the sides taught and prevents the subtle sagging that bothered me until I added the extra stakes.

NEMO Gogo LE

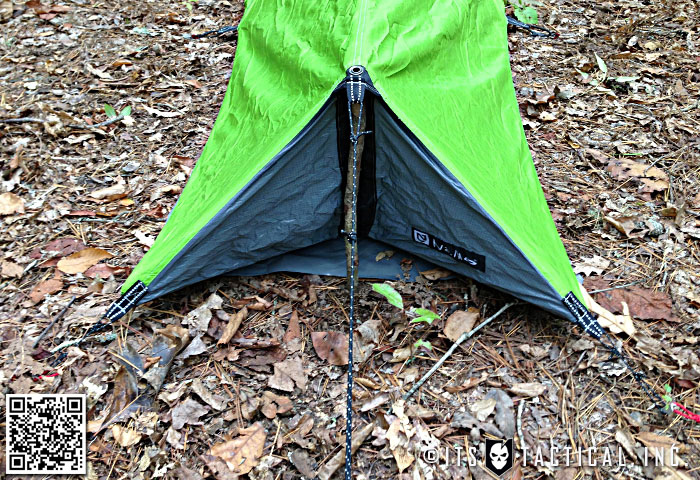
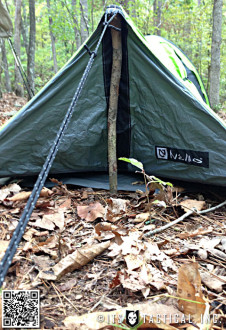
At the foot end, it’s very easy for your improvised stick to fall over without the third stake to attach to the provided guy line. Before adding this stake I was either tying the guy line around a tree, fashioning my own stake, or going without. This is how I learned how easy it is to knock over the stick. You’ll see in the photos exactly what I mean about the improvised stake being necessary. Without this the foot-end would collapse.

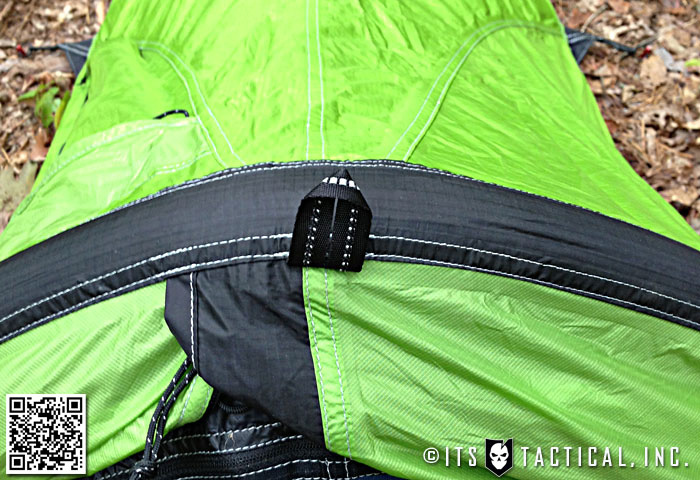
The last thing I did was to tie taut-line hitches at every guy line, there’s quite a few of them. This enabled me to really tweak each individual line to properly adjust the overall tightness of the Gogo LE. I feel this last part is really important and totally worth the time. The taut-line hitch is the one knot I use more than any other I know. Seconded by the Bowline. The front two tie down points on the tent (zippered flap and main tent tie down) feature an adjuster on each of the lines that functions like a taut-line hitch.

NEMO Gogo LE

I’ll get on a soap box here for a minute and say that there’s no good substitute for a well tied taut-line hitch. All those devices on the market (there’s tons of them) that attempt to “do it for you” are nonsense and unnecessary. I would have rather seen instructions included in the Gogo LE for tying a taut-line hitch. I used the provided adjusters to simply hold one side of the line and tied my own taut-line hitch to the other.

I don’t know how much this is actually true, but it seemed that when everything was properly staked down with the extra stakes and the addition of taut-line hitches, it seems to resist condensation build up overnight much better, even when all the flaps were fully closed.
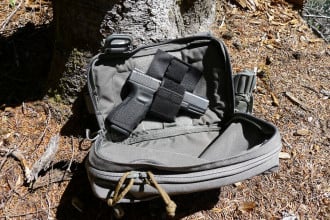
Inflation

NEMO Gogo LE Tent Air Beam
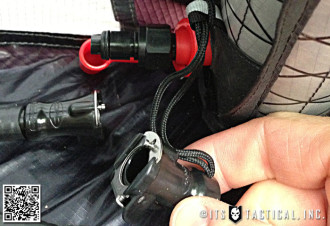
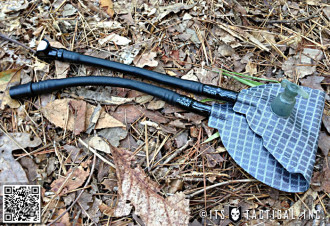
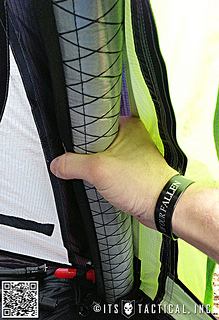
Something I’ve never seen in a tent before the NEMO Gogo LE, is the use of an inflatable beam. With the included Integrated Pump, the 2″ diameter Airbeam that runs right over your head as you sleep, can be inflated and eliminates the need for any poles.

I think it’s a fantastic concept and one I admittedly first discounted, due to the questions that formed in my mind. “What if it leaks?” “What if it gets punctured while in my pack?” I quickly let those questions go after a few uses. The Airbeam is incredibly strong and I haven’t noticed any loss of inflation overnight or even after a few days of it being set up. The material used to protect the beam is seemingly puncture resistant and I’d be surprised if it ever did get punctured. It hasn’t happened yet (knock on wood!)

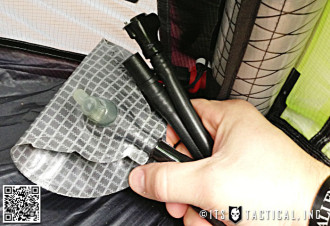
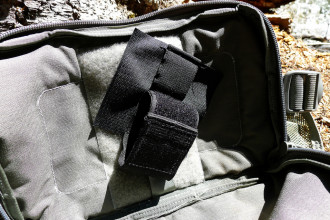
The Airbeam is actually two parts, the X-Ply fabric that encloses it and the actual bladder. A spare bladder is available for ten bucks if you’re nervous about leaving home without an extra. A spare only weighs 1.6 ounces too. Personally, I’m content with the small repair kit that’s included if something ever happened. It can fix a rip in the tent or patch the bladder in a pinch.

NEMO Gogo LE Inflate System

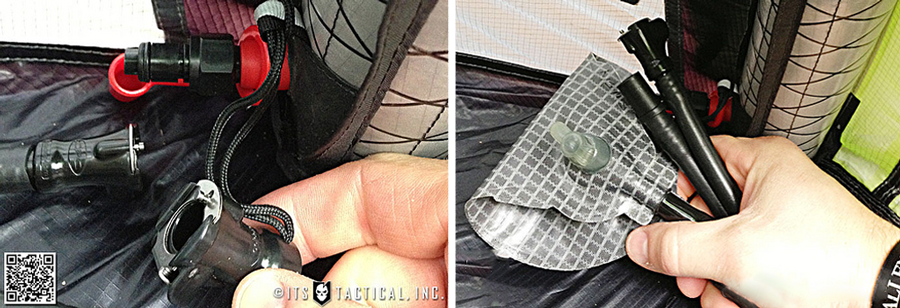
To inflate the beam, all you have to do is dock in the female-side quick disconnect fitting of the Integrated Pump with the male end fitting, located at the base of the tube. Ensuring the moisture-release valve is closed, simply blow into the other end. This will inflate the chamber that you’ll now squeeze to force the air into the tube. This combination movement is quite easy once you get the hang of it and is MUCH easier than simply blowing into an air valve like a pool floatie. I have pondered that if NEMO found a way to not need the pump it would shave off some weight. I’ve actually wanted to try hacking the pump to exclude the chamber and see how hard it is to inflate the tube without it.

NEMO Gogo LE Pump

NEMO offers a few different types of pumps for their other Airbeam tents too. The Integrated Pump (2.4 oz.) that comes with the Gogo LE isn’t the lightest option they make, that’s the Ultralight Integrated Pump, with shortened tubing and lighter weldable fabric. It’s 39.95 to upgrade to it and boasts a 50% weight savings.

Deflating the tent is also the fastest I’ve ever seen for doing so. By simply placing a dummy-corded cover onto the quick-disconnect fitting the air immediately flows out within seconds. It’s that easy!

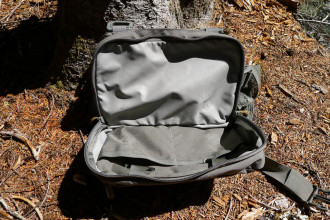
Measurements and Comfort

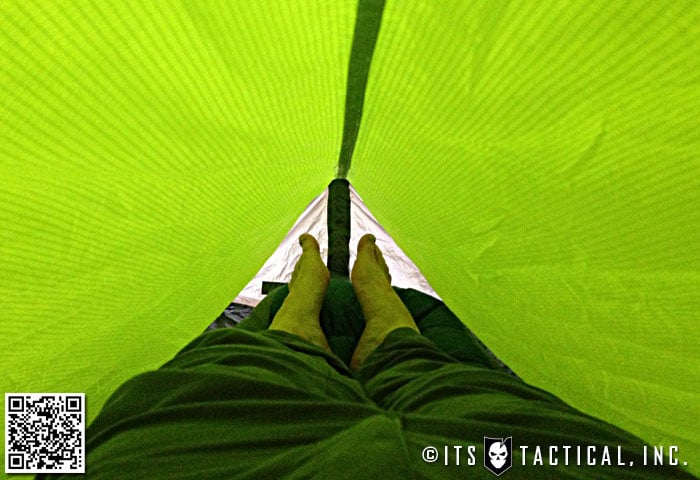
Since we’ve already gone over the weight on the Gogo LE, let’s take a look at the measurements. I’ll say first that I wouldn’t change a thing on the measurements, I think they’re perfect for a person of my size and even much bigger. I’m 5’10 / 185 lbs. and it’s got plenty of spare room at foot, width and head. That’s even with my pack and boots stored in the nose. This is why I said earlier that I like the side door on the LE version of the Gogo. It allows me to enter/exit without disturbing my pack inside the nose. However, I do like the option come morning time to open the nose and stand up to put on my boots on. Stepping into them one at a time without having to hunch over out the side door is more comfortable. Take what you can from that.

NEMO Gogo LE

NEMO Gogo LE

I’ll also mention that while there’s plenty of room, I’m hard pressed at my size to change a pair of pants inside of the tent. I’ve done it, but it’s certainly not fun and I can only imagine what my tent looked like from the outside during the process!

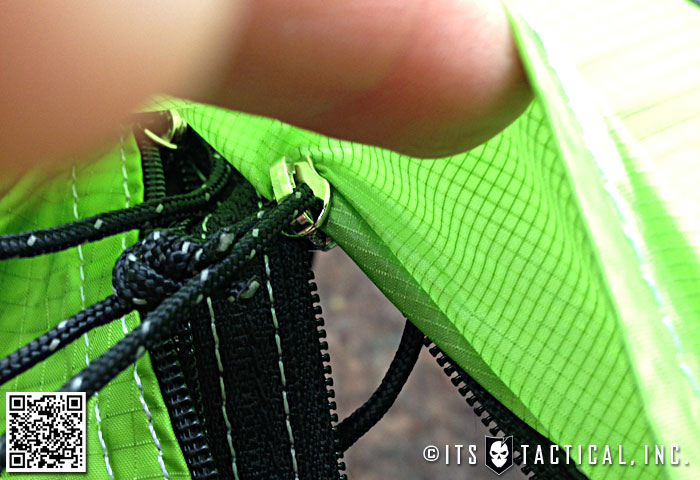
While we’re on the subject of the side door, I’d like to voice a complaint. While I’m not sure if this has been fixed yet, the flap over the side door zipper gets stuck in the zipper track almost every time I zipped it open or closed. I have to hold the flap while zipping it to keep it out of the track. This sticking has also happened to me while I’m in the tent. Trying to open the side door in the morning irritates me when I have to reach my hand to the outside to pull the flap out of the way to finish opening the door. Hopefully this is a non-issue now and has been addressed.

NEMO Gogo LE

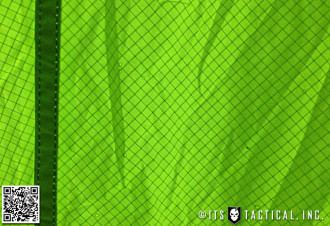
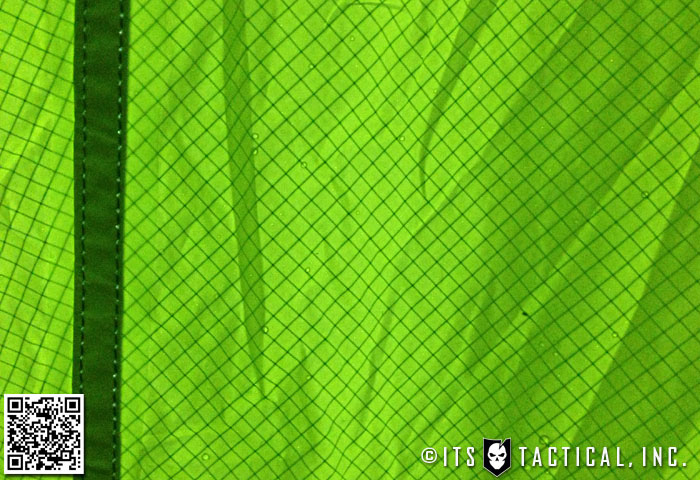
The overall length from head to toe on the Gogo LE is 114″ and the width at its widest point is 41″. The height at the peak of the Airbeam is 27″ and the width at the end of the foot is 24″. The tent shell fabric is 40D OSMO, a high-tenacity polyester ripstop. NEMO states that OSMO remains breathable across a broad range of humidities, is naturally UV-resistant, doesn’t sag when wet, highly durable, chemical-resistant and abrasion-resistant. I definitely haven’t found anything contrary to this and agree that is does seem to sag less than other tent fabrics I’ve seen. I haven’t been in a torrential down-pour with the Gogo LE yet, but the rain I have been in has simply beaded up and rolled down.

NEMO Gogo LE

NEMO Gogo LE

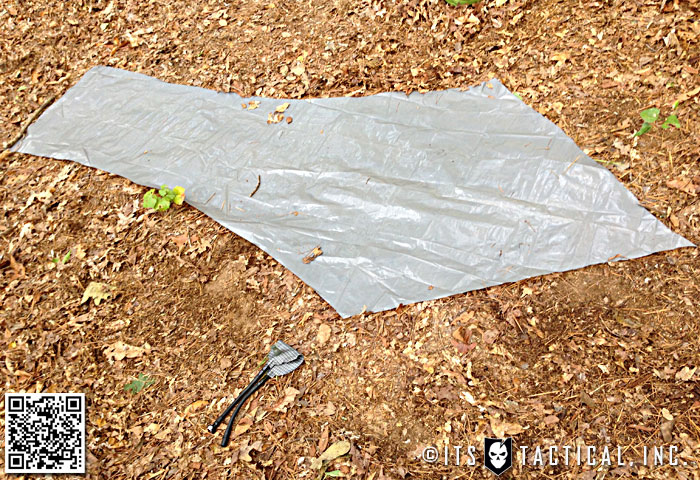
20D PU Nylon is featured on the Fly/Vestibule and 30D PU Nylon is stitched on as the floor fabric. From the description of the 30D floor fabric, it would seem there’s no need for a ground sheet, but I won’t be giving mine up anytime soon. I like the added protection it affords the bottom of the tent and I don’t want to spend the morning letting the floor dry before rolling up the tent. I’d rather roll the tent up, stuff it in my bag and wait on the ground cloth to dry off before shaking it out and rolling it up. Personal preference.

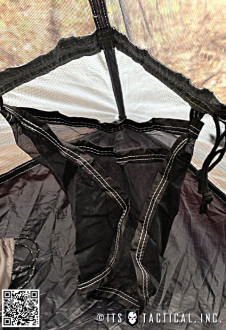
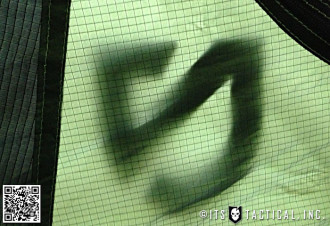
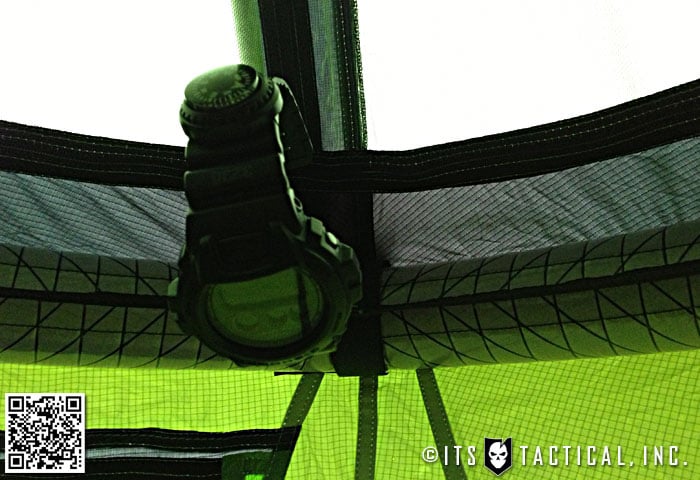
Bemis seam tape is also used on all NEMO tents to provide a uniform waterproof barrier to the stitching on the inside of the tent. The nose of the tent features a small pocket and there’s a clip above your head on the Airbeam that’s perfect for clipping a watch onto so you can hear your alarm in the morning.

NEMO Gogo LE

NEMO Gogo LE

NEMO Gogo LE

A last detail I really like is the addition of reflective zipper-pull cordage, guy lines and stake out loops. It definitely helps to find your tent in the middle of the night after nature calls. There’s also a top loop, which i suspect is for tying up the top of the tent to a tree limb in the unlikely event the Airbeam failed.

Final Notes

NEMO Gogo LEI’ve owned and used about half a dozen bivy-like tents in all my camping/backpacking experience and while some have had more space and some have had more features, if you’re looking to save weight and retain functionality, you’ll be hard pressed to find a better value than the NEMO Gogo LE. The small issues I’ve had aside, I’d highly recommend it to anyone. I just hope that the zipper sticking issue has already been taken care of.

I think I’ve also got Kelly convinced to downsize our family camping tent to a NEMO OBI 2P, which is a two-person tent that weighs just 3 lbs. and is capable of being backpacked. While it doesn’t have a screened in porch like our current family camping tent, our son is old enough now to camp in his own tent and there’s just no reason to keep using a larger tent. Plus, it makes me feel more manly sleeping in a smaller tent. Ironic, isn’t it?

I’d like to thank NEMO and Tactical Distributors for allowing me the time to thoroughly test out the Gogo LE and provide my feedback here to everyone. If you have any additional questions, please feel free to leave them in the comments below and I’ll do my best to get them answered for you.

Photo Gallery

Posted in Gear | Tagged , , , , , | 19 Comments

ITS Tactical Turkey Deals and Black Friday Sales Around the Internet

Happy Thanksgiving from ITS Tactical! There’s a lot to be thankful for this Thanksgiving and primarily we’d like to recognize our Military, Law Enforcement and First Responders that put their lives on the line each and every day for all of us! Please keep those that can’t make it to dinner on Thursday in your thoughts.

We’re also thankful for the fanatical support you guys have shown us this past year and the growth we’ve been able to achieve! Our  membership  reached new levels and we can’t thank everyone enough in getting the word out about ITS Tactical! We wouldn’t be here without each and every one of you, or be able to continue to  bring you the definitive online resource for gear reviews, skill-set information and DIY projects!

We’d like to make a shameless plug for our  Amazon Affiliate account  this holiday season. As you might already know, we get a small percentage of sales when you buy from Amazon after clicking our affiliate link  here. If you’re doing any holiday shopping on Amazon and click our link before you do, you’d be helping to support ITS. There’s no cost to you and it helps us to keep bringing you the awesomeness!

There’s a ton of great deals out there this holiday season for all you tactical turkeys out there. While we’ve rounded up what we could find as of now, please post others you hear about in the comments so we can all check them out!

ITS Tactical 15% off store-wide with additional Cyber Monday Savings!

First thing on Black Friday (12 a.m. central time) you’ll be able to get everything in the  ITS Tactical Store  for 15% off thru Cyber Monday. On Cyber Monday starting at 12 a.m. central time, we’ve got some awesome additional savings on select items!

Click here to view our Black Friday / Cyber Monday Flyer!

Please Note: Black Friday/Cyber Monday deals are our lowest prices and cannot be combined with existing membership discounts. The Black Friday discount code excludes all items for the Cyber Monday sale, all memberships and Gift Certificates. Sale prices are limited to stock on hand, sorry no rainchecks.

Tactical Distributors

Tactical Distributors  is taking 25% off the Entire Site and Free Shipping (on orders $75 or more) from Black Friday through Cyber Monday! Use promo code “STUFFED25” at checkout for the Sale running November 22nd thru November 26th!

Revision Military

Now through Monday November 26th, when you place an order of $99 or more in the Revision online store, you’ll receive a free Revision Swag Kit. Use the code “ITS”  to get 30% off on your order.  http://www.revisionmilitary.com/store/

The Swag Kit includes an ACU-pattern goggle case, a red Revision bandana, a black Revision bandana, a Revision Velcro patch and tab, Revision anti-fog wipes, Revision stickers, and a discount card.

SKD Tactical

The SKD Tactical 4-Day Thanksgiving sale is running from Friday through Cyber Monday. Each day you can save even more (No coupon necessary) Friday – 10% off, Saturday – 11% off, Sunday 12% off and Cyber Monday save 13% off!

215 Gear

From Friday at midnight to Monday morning 9:00 a.m. (EST), select items will be on sale at 215gear.com from 15-50% off.

Panteao Productions

At Panteao Productions, from November 23rd thru December 26th, all DVDs are 25% off retail. Their yearly subscription is also 25% off.

TYR Tactical

Get 15% off your entire order at TYR Tactical with the code “BUSTER12” and free bonus gifts with qualifying purchases. The TYR Black Friday Blowout starts midnight on Thursday November 22nd and runs thru 5pm Cyber Monday November 26th.

ITS Membership Discounts

Don’t forget about our anytime discounts for our Plank Owners and  Crew Leaders! For more information on how you can join our membership for  less than 14 ¢ a day  and take advantage of these discounts,  click here!

Have an awesome and safe Thanksgiving holiday from all of us here at ITS Tactical! Please post up a comment with any deals we may have missed!

Posted in ITS Information | 2 Comments

How to Fold a Topographic Map and Other Techniques

DIY Flat Fold Topographic Map

Hopefully many of you are not only familiar with Topographic Maps, but have had some experience folding them. I say this to relate to how much of a pain they can be to manage.

Today, I hope to show you a few new techniques for folding a topo map, or any map for that matter. These are universal and can be used on any map.

I’ll even show you a great way to take an 8.5″ x 11″ sheet of paper and turn it into a simple booklet to access information more efficiently.

Why is Folding Important?

Most topo maps are quite large and in the case of the example map I use throughout this article, can measure 24″ x 29″ or larger. Not exactly pocket sized.

While there’s not necessarily a “wrong” way to fold a map, there are some methods that will allow you faster access to different “quadrants” of information on your map.

With minimal refolding you’ll be able to fold up the necessary information to the forefront for quick reference.

Folding vs. Cutting

The first thing to decide, is if you’re comfortable cutting your map. Topographic Maps can be expensive and you’ll more than likely want to make it last as long as possible.

Personally, I feel cutting the map isn’t necessary, but I do see the benefit in it. While I’ll do my best to explain folding and cutting through the words and photos in this article, it may help you out to watch this video we’ve put together first.

Steps for Folding a Map

Through folding, you’ll be creating 16 quadrants with your Topographic Map. On this particular example map in the photos, each quadrant measures roughly 6″ x 7″.

First off, something I feel really helps when folding a map is to always crease one side, then flip it over and crease it on the opposite side too. This creates a deeper crease which, in my opinion, makes the map fold easier.

DIY Flat Fold Topographic Map

As mentioned, since you’re creasing both sides, the side that’s up doesn’t really matter. The first fold you’ll make is to the very center. Crease the map so that it’s split in half. Next, with the map split in half, bring the bottom up so that the bottom edge is touching the crease you just made in the middle. Doing the exact same thing to the top, (the next step) will divide your map into four creased sections.

DIY Flat Fold Topographic Map

Now simply duplicate this same method running lengthwise. Find the middle, crease it and then fold up the bottom and the top to the middle. You’ll now be left with those 16 quadrants I mentioned earlier. I personally like to now z-fold the map so that the first four quadrants (top of the map) are visible. Then z-fold it again so A is on the top.

Looking at the photo below, what will be visible are quadrants A, B, E and F. I’ll now explain that funky lettering system.

DIY Flat Fold Topographic Map

Each of the 16 quadrants on map in the photos you’ll see below is labeled from left to right (A-Q) A thru Q actually equals 17 not 16, but the letter I is eliminated to avoid confusion.

The lettered quadrants will be important when I describe how to cut your map and how it folds afterward.

Cutting Your Map

Now that you have everything folded up, let me explain what putting a cut in your map will allow you to do. By taking an X-Acto Knife, (my preferred method) or a pair of scissors, cut the horizontal crease line that runs between quadrants D, G, K and N.

DIY Flat Fold Topographic Map

This may seem a bit unorthodox at first, but here’s where it pays off. Grab the map and pull up on the middle vertical crease, allowing the left and right sides of the map to remain flat.

You should now be holding the vertical middle crease and be looking at A, C, J and L running from top to bottom on the left side and F, H, O and Q running from top to bottom on the right side.

DIY Flat Fold Topographic Map

Now simply allow the top of that middle section you’re holding to fold to the left (B and D drops on top of A and C). The lower middle section folds in the opposite direction to the right (N and P drops on top of O and Q).

The last step is to fold the map in half so that you’re now looking at A, B, C and D.

DIY Flat Fold Topographic Map

What you’re now left with is a four quadrant folded map that will allow you to quickly flip to the next four quadrants by “turning the page.” Try it. You’ll now be easily looking at E, F, G and H. Now turn the map to the other side. You’re now staring at J, K, L and M. Turn the page again and you’re staring at N, O, P and Q.

DIY Flat Fold Topographic Map

DIY Flat Fold Topographic Map

DIY Flat Fold Topographic Map

DIY Flat Fold Topographic Map

DIY Flat Fold Topographic Map

You’ve now accessed the whole map, four quadrants at a time, very quickly. You can even now glue the map together at the corners (A to L, C to J, F to Q and H to O. The only problem with gluing it is that while you’ll still be able to pull it out to half a map, you’ll never be able to view the whole map at once. This can be particularly troublesome if you need to draw a line that bridges the horizontal mid-point of the map.

Again, cutting isn’t necessary and just another option. There’s one last thing I’d like to describe and that’s a neat trick you can use to turn a 8.5″ x 11″ sheet of paper into a booklet for quick reference.

Making a Booklet

Interestingly enough, now that you know how to fold a larger Topographic Map, this is a piece of cake.It uses the same concept as the topo map, but folds a sheet of paper into eight quadrants instead of 16.

DIY Flat Fold Topographic Map

This is beneficial because with the folds we’ll make you can view everything on one side of a piece of paper by simply flipping the pages.

Just like before, I find it easier to crease both sides, so it doesn’t quite matter which side you start on. Start with a fold in the middle lengthwise, followed by a fold in the middle crosswise. Now pull up the bottom edge to the middle crease you just made, creasing again. Repeat the step with the top, pulling it to the middle and creasing.

You’re now left with a “W” shape. Make a simple cut to the W along the center fold, stopping before you get to the next fold line on each side.

DIY Flat Fold Topographic Map

DIY Flat Fold Topographic Map

Now just simply ensure the side you want to display in your booklet is facing out as you fold the piece of paper lengthwise again. This gives you a booklet with four sections.

DIY Flat Fold Topographic Map

We found this pretty handy during the Muster to give out to the staff with a copy of the schedule on one side and a quick-reference map on the other.

Notes

Again, there’s no right or wrong way to fold a map, but there are some methods that will help you access information quicker than others.

Hopefully you’ve learned a few new techniques for folding a map and even a piece of paper!

Posted in Navigation | Tagged , , , , , , , , , | 12 Comments

Hill People Gear Kit Bag: Concealed Carry in the Backcountry

Hill People Gear Kit Bag

The Hill People Gear Kit Bag is a platform for concealed carry of a handgun in the backcountry.

Carrying on the waist isn’t an option when you’re wearing a pack with a belt. In order to do its job, the pack belt needs to wrap tightly around the waist, which makes any bulky items between the waist and the pack belt inappropriate. A holster could be mounted to the pack belt itself, but then you drop your gun whenever you drop your pack. If you choose to carry a handgun in the backcountry, you probably want it with you and readily accessible at all times.

The Kit Bag addresses this problem by allowing the handgun to be carried on the chest. It’s supported by its own harness, worn underneath the pack, which allows the user to drop their pack without removing the Kit Bag.

When I first purchased the Kit Bag, I intended to use it only in the backcountry. After I received it, I discovered that not only is it great in its intended backcountry use, but it’s also the best platform I’ve found for carrying a handgun on a bike or while running. I’ve had a Kit Bag for over a year now. I run regularly and commute every day on my bicycle, which means I wear a Kit Bag for some period of time almost every day and have been doing so for as long as I’ve owned one.

Origin

Evan and Scott Hill developed their initial concept of a chest-mounted carry platform before Hill People Gear was born. They brought this idea to Kifaru, where Patrick Smith made some changes of his own and began selling the bag as the Kifaru Koala. Later on, the Hill brothers decided to sell their own version, closer to the ligher and smaller pack that they had originally envisioned. They worked a royalty deal with Kifaru and started Hill People Gear, with the Kit Bag being their first product.

Design

All Kit Bags are sewn in the US by First Spear. They are made of 500D cordura and available in Hill People Gear’s standard color offerings of Coyote, Ranger Green, and Foliage Green.

The Kit Bag features three zippered compartments. The frontmost compartment is a flat pocket that provides two internal pockets and two ribbon loops for dummy-cording gear. The rearmost compartment is the handgun pocket. This pocket includes a single ribbon loop on the bottom center, intended to be used to dummy-cord a Raven Concealment Systems Vanguard holster. Current Kit Bag models also include a 1.5″ wide strip of loop material running vertically down the center of the compartment. This allows someone with a small mouse-gun to affix a velcro holster in order to prevent the small gun from bouncing around in the large compartment. The middle compartment is the main organizational pocket. It features two internal pockets with two ribbon loops for dummy-cording gear, similar to the frontmost compartment.

A mesh-backed harness is included to support the Kit Bag. The lower right strap of the harness features a 1.5″ side-release buckle, which allows the harness to be easily donned and doffed.

Access

The key feature of the Kit Bag is its quick access, tear-open gun compartment. This is achieved by aligning the gun compartment zippers in the middle of the right strap attachment point. The zippers for the main compartment are aligned in the same spot. The zipper pulls of the main compartment can then be yanked in the direction of the left hip, which causes the gun compartment to rip open, providing access to the handgun. The setup can be reversed for a left-handed draw.

This process is quick and simple. I don’t think that it will ever be as fast as drawing from the hip (I, at least, haven’t been able to train myself to that same speed), but considering that the Kit Bag is used when carrying on the hip is not an option, it’s an excellent compromise. As with any new holster, it takes some practice to get used to. The only trick to it is to remember to pull your support arm far enough back at the end of the ripping motion that you don’t sweep yourself on the draw.

It is also possible to open the gun compartment without yanking on the main compartment zipper. The gun compartment zippers can be aligned on the right side of the Kit Bag, but with a gap of a couple inches left between them. The user can then jam their hand into the gap, which opens the zippers wide enough to allow the gun to be drawn. This allows for a one-handed draw. When wearing gloves, this method can be a little easier, as you don’t need to grasp the zipper pulls of the main compartment with the support hand. It’s also a little easier to achive in the dark, as you don’t need to see the main compartment zipper pulls.

Lifter Kit

The Kit Bag includes a Lifter Kit which allows the bag to be docked to the shoulder straps of most backpacks. The straps attach to the pack shoulder straps via slik clips and attached to the Kit Bag via grimlocs.

When using the Lifter Kit, the Kit Bag is initially donned as normal with the included harness. The pack is then put on over the harness, and the docking straps are attached to the Kit Bag’s included grimlocs. When the docking straps are tightened, the Kit Bag is lifted off of its harness and all the weight of the bag is transferred to the pack’s shoulder straps — which, with a good pack, means that the weight is transferred to the hips via the pack frame and waist belt. This makes for a comfortable way to carry the Kit Bag and its contents. It does require that the two grimlocks be opened whenever the pack is dropped and closed whenever the pack is worn, which adds a few seconds to the pack donning and doffing procedure. I prefer to loosen all pack straps whenever I remove my pack, even if it is only for a short time, so unhooking the docking straps does not introduce much of an inconvenience for me.

Stabilizer

The Kit Bag remains stable with just the harness during activities like hiking and biking. When running, the bag has a tendency to bounce around annoyingly. Some sort of stabilizing strap is absolutely required.

Hill People Gear sells their own Stabilizer Strap for use when running with the Kit Bag. This attaches via two webbing loops on the bottom corners of the Kit Bag and runs around the user’s back. When I first bought the Kit Bag, the Hill People Gear Stabilizer Strap was not yet available. I opted to make my own out of some shock cord, a cordlock, and a side-release buckle salvaged from an old bicycle helmet. Having used both, I prefer my own stabilizer strap to the Hill People Gear strap. It maintains a lower profile and avoids the bulky 1″ hardware of the Hill People Gear strap. Both straps work to stabilize the Kit Bag equally well.

Hill People Gear

HPG model on top, DIY model on bottom. 

Hill People Gear

DIY model on the Kit Bag, HPG model on the Snubby

With the stabilizer strap, the Kit Bag itself remains stable on the body while running. I carry a Glock 19, which is significantly smaller than the Kit Bag gun compartment. The result is that, although the Kit Bag doesn’t bounce, the Glock does move around within the compartment while running. This is more of an annoyance than anything else, but it was annoying enough for me to decide to do something about it. My Kit Bag is one of the older models without the 1.5″ strip of loop material on the inside. I chose to sew in my own 4″ x 6″ piece of loop material onto the rear of the gun compartment. This allows me to take an ITS Holster Insert and affix it inside the Kit Bag. Carrying my Glock 19 in the ITS holster prevents all movement and makes for a completely stable, comfortable, and quiet running platform.

The ITS Holster Insert also provides a place for me to carry a spare mag. There is really no good place in the Kit Bag to carry a spare magazine. Any location within the front or middle pocket is difficult to access with the gun compartment hanging open (as it would be if you needed to reload). Affixing it in the gun compartment with ITS Holster Insert is the best compromise that I’ve found.

Models

The Kit Bag which has been discussed thus far is the original model. Hill People Gear has also produced three other models, all based off of the original. The Runner’s Kit Bag is like the original, but lacks the middle compartment. This makes for a bag that is thinner and lighter, but lacks the capacity of the original. The Recon Kit Bag is like the Runner’s, but features a PALS grid on the front. The Snubby Kit Bag is similar to the Runner’s, in that it lacks the large middle compartment, but has smaller overall dimensions. The original, Runner’s, and Recon are all 11.5″ wide and 7.5″ tall. The Snubby is only 8.5″ wide and 6″ tall.

Hill Peole Gear

Kit Bag on the Left, Snubby on the right. 

Out of the three alternative models, the only one that I’ve purchased is the Snubby. It is just large enough to fit a Glock 19, my daily carry. When running or biking, the most I carry in the Kit Bag is my gun, wallet, keys, and cell phone. I can fit all of this in the Snubby and because it is sized to fit the Glock 19, I don’t need to use a velcro holster to stabilize the gun.

Despite the smaller dimensions of the Snubby Kit Bag, the harness is identical to the other models. This means that the corners of the Snubby are less rounded, which alters the draw slightly. I’ve also found that the small size of the bag causes the zipper that runs along the width of the bag to occasionally run into the rear sight and get stuck. Overall, my draw from the Snubby is a bit slower than with the original Kit Bag. Despite this, the convenience of the smaller platform is such that I’ve barely ran or biked with the original Kit Bag since I purchased the Snubby last August. I appreciate having a more svelte bag. I don’t use the Snubby in the backcountry. In that setting, I appreciate the ability to carry more items in the Kit Bag, such as my compass, GPS, fire gear, and camera. That requires the larger capacity of the original Kit Bag.

Comfort

Wearing something on your chest will never be as comfortable as wearing nothing on your chest. That said, I think the Kit Bag is about as comfortable as any chest pack can ever be. In hot temperatures it will cause a damp spot to form on the front of your shirt, but I think that’s an acceptable trade-off for being able to carry a concealed handgun with a pack. Between hiking, biking and running I wear a Kit Bag almost every day and am happy to do so. If you don’t intend to carry a handgun and are only considering the Kit Bag for use as a chest-mounted possibles pouch, I would avoid it. Stick with a few pouches attached to your pack’s waist belt for quick access items, and your pant pockets for items that you want attached to your body. The Kit Bag only really becomes appropriate when you wish to carry a handgun and can’t do so on your waist.

Hill People Gear Kit Bag Photo Gallery  

Posted in Packs | Tagged , , , , , , , , , , , , | 25 Comments

Sons of the Flag Burn Foundation Honors U.S. Veterans in Legacy Skydive

A unique opportunity to honor United States veterans is underway. The Sons of the Flag Burn Foundation has organized an event to raise money for the rehabilitation of soldiers returning with severe burns as well as researching and developing new skin technologies. Overall, they aim to improve the lives of burn survivors across the nation and we want to raise awareness of their program.

The skydivers are United States veterans of every war from World War II to Afghanistan.  They will jump in tandem with a member of the Army Golden Knights parachute team from of a WWII era plane. Continue reading

Posted in News | Tagged , , , , , , , , | 1 Comment

Skeletonized Bottle Holders and ITS Cat Eye Morale Patches Now Available!

Designed and manufactured by ITS Tactical and Zulu Nylon Gear right here in America, the Skeletonized Bottle Holder represents a fresh new approach to the typical bottle carriers on the market today. We set out to break the mold of current pouch-like designs that add unnecessary weight and bulk.

We’ve accomplished this by creating a lightweight minimalist design that features true one-handed operation, full adjustment to handle any container size and mounting to either MOLLE/PALS, or a standard belt. Continue reading

Posted in ITS Information | Tagged , , , , , , , , , , , , , , , , | 12 Comments

Crocheting and Nesting Your Paracord for Storage Alternatives

Over the years you’ve more than likely come to the conclusion that different tools you have around the house can be used for more than one purpose. Sometimes, we figure this out by necessity in an urgent situation and other times a light bulb goes off in our heads as we look at something and think up a new idea. The latter is what happened to me one day while I was looking at coiled Type 3 Paracord sitting on my desk.

As I looked at the loose paracord and a tool I had within reach, I pondered a way that would help me make a better use of the unused cord. Tools and rope have gone hand-in-hand for a long time. Rope work can require the use of tools, like marlinspikes and fids, when it comes to rope manufacturing, splicing or repair. Even though paracord isn’t quite the same as rope, I wondered if the this idea would transmogrify. Continue reading

Posted in Misc. | Tagged , , , , , , , , , , , , , | 22 Comments

New Thorntail Offset Mount from Haley Strategic and HSP Blog Reboot

Last week, Travis Haley announced the latest weapon light mount to come out of Haley Strategic called the Thorntail Offset. It’s essentially the same principle as their Thorntail mount but the offset design aids in greater ergonomic control and weapon manipulation.

The Thorntail Offset was designed to fit all picatinny rail mounted weapon lights such as the INFORCE WML, SUREFIRE X200, X300, X400, Streamlight, and Insights weapon lights. It can also be mounted at the front and rear of your rifle for back up iron sights. The angle isn’t  exactly 45 degrees but it’s close. More of a 1 o’clock offset.

Check out the video below as Travis breaks it down and goes over a few examples and scenarios with the Thorntail Offset mount.

I’ve been running the HSP Thorntail and Dropwing on the 14.5″ AR we built here in the DIY AR-15 Build and my 10.5 LWRC M6A2, respectively. I’m very happy with the way these two mounts have performed and I’m excited to see the new offerings in the line of mounts developed by Haley Strategic and built by Impact Weapons Components.

By utilizing the Thorntail and Dropwing I’m able to keep my support side hand in what I consider to be the most desirable position and simply extend my thumb to depress the tail cap on my surefire weapon lights. Considering my LWRC is a carbine length rail and the 14.5″ is mid-length, it’s impressive that I can run the exact same extension for the weapon lights on both weapon systems.

As you can see in the photos the light extends slightly past the flash hider on the 10.5″ and while it’s running just fine for me, HSP now offers the Thorntail SBR to accommodate short barreled rifles. With so many options now through HSP, there’s bound to be a mount that’s perfect for your setup as well.

It’s great to see the Thorntail Offset, as it fills a void in what’s available on the market today. This is exactly what HSP accomplished with the Thorntail and Dropwing, providing solutions that didn’t exist for mounting weapon lights. The void that the Thorntail Offset fills is the ability to use existing rail mounted pistol weapon lights in a new configuration.

I used to use a YHM Slot Angle Riser on my 10.5″ before the Dropwing came along. I’d mount my Surefire X200 to it attached to the top rail and have to rotate my hand up to access the switch. Now with the Thorntail Offset, that same configuration can “come down to earth” and get mounted in a more accessible position.

If you haven’t been following our friends at Haley Strategic, Travis just released an update on the direction of HSP. This “reboot” reviews the past year as well as plans for next. Stay tuned to the Haley Strategic blog as there is bound to be some great things on the way, including a great new product from ITS and HSP that Travis hints at in the video.

Posted in Accessories | Tagged , , , , , , , , , , , , , , , , , , , , , , , , | 7 Comments