The Kitchen Sink of Range Boxes

MTM Case-Guard Shooting Range Box

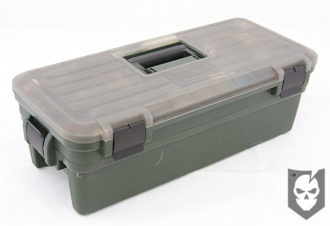
A fantastic product we’ve been running for a little more than a year is the MTM Case-Guard Shooting Range Box.

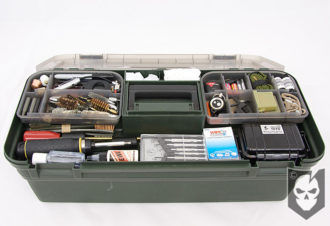
This thing is HUGE! It stores all of our cleaning equipment for multiple weapon platforms, as well as the parts and tools needed to make repairs if necessary.

The Shooting Range Box is great to take for a day of shooting, or a multiple day class located far away from help if your rifle goes down.

Most classes we attend do their best to help a shooter out in the case of a problem with their weapon, but the ability to have the parts and tools needed to make the repairs yourself is invaluable.

Even if you’ve never assembled your own rifle, just knowing and having the right parts could mean the difference between an experienced individual being able to fix your gun or not.

MTM Case-Guard Shooting Range Box

We primarily run this range box as an AR-15 / M4 platform and keep the necessary parts to completely rebuild up to two weapons, depending on where we’re going.

Obviously we don’t carry large items like barrels or even gas tubes, but the primary parts that have the greatest chance of wearing out, are all included.

Description

MTM Case-Guard Shooting Range Box

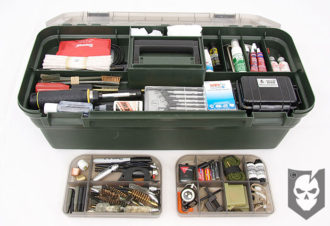
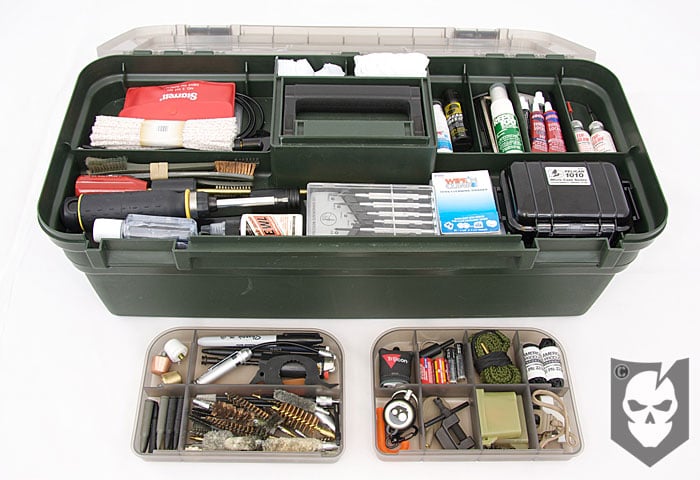
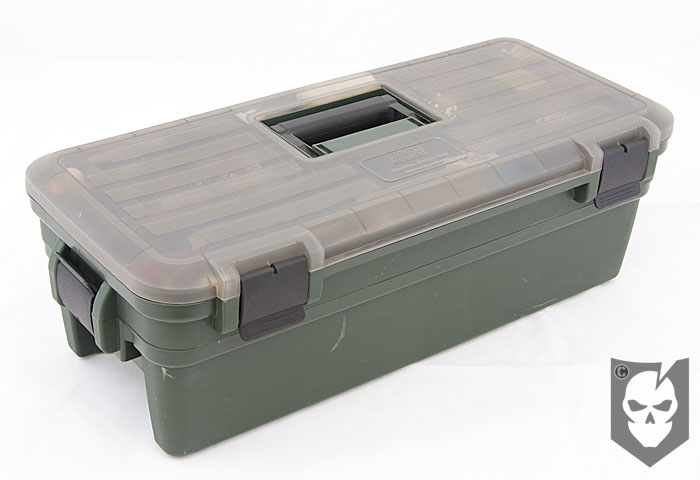
The upper section of the case features 18 different compartments for storing cleaning gear, two removable trays and is detachable from the lower section.

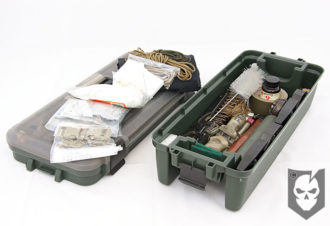
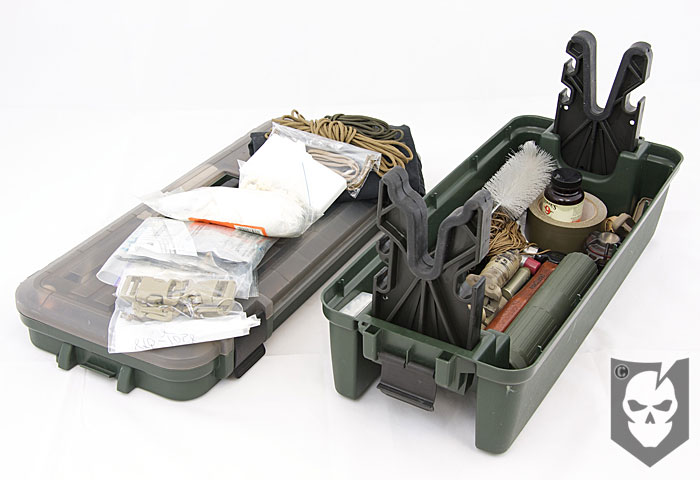
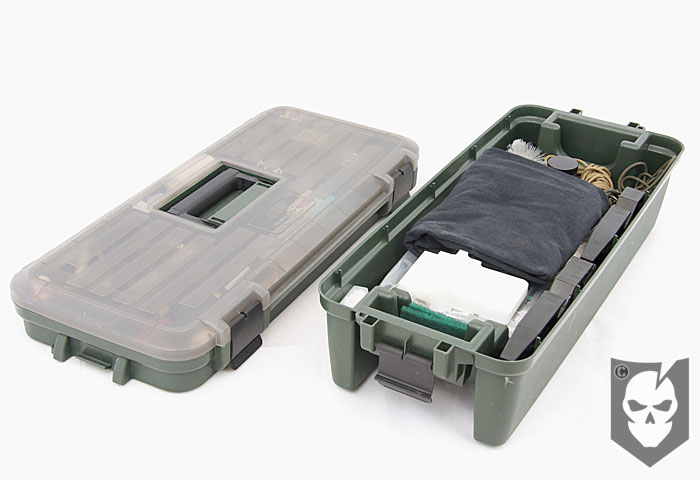
Releasing the clips on both sides of the case allow you to access the deep storage area underneath, which houses removable fork brackets that form a rifle rest to aid in making repairs and diagnosing problems.

Fork brackets are rubber coated, and non-marring for all you guys who care about gun finishes.

The case measures a whopping 25″ long x 11.5″ wide x 8.75″ tall, the lower section is about an 1 to 1.5 inches smaller in length and width than the upper section.

It’s made in the USA from chemical-resistant polypropylene.

What We Carry

For the sake of brevity, this won’t be an all-inclusive list, but will touch on the primary components of our setup.

The basics we recommend that everyone running an AR carry with them are as follows:

  • Extractor Spring Assembly (Extractor, Copper Extractor Spring, Black Extractor Buffer, Retaining Pin)
  • Firing Pin and Firing Pin Retainer
  • Gas Rings (Minimum of three)
  • Cam Pin
  • Complete Bolt (Headspaced)
  • Hammer / Trigger Pin Set
  • Action Spring (Referred to as Buffer Spring or Recoil Spring too)

Whether you have a large range box or not, just having these basic parts will take care of most of your problems.

Additional items we carry in our range box:

  • Pens / Pencils / Sharpies / Notepad
  • Flashlight
  • Lighter
  • LaRue Dillo!
  • Broken Shell Extractor
  • Magpul Dummy Rounds
  • Various Caliber Jags, Brushes, Mops and cleaning rods
  • Pipe Cleaners (w/ Bristles)
  • Starrett Drive Pin Punch Set
  • Starrett Center Punch
  • Roll Pin Punch Set
  • Bolt Catch Pin Punch
  • Various Caliber Cleaning Patches
  • Lens Cleaning Cloth and Solution
  • Various Batteries
  • Bore Snake (Multiple Calibers)
  • Nitrile Gloves
  • Sinclair AR Cleaning Link
  • Tango Down Grip Chip Tool
  • Spare Hearing Protection
  • Sight Adjustment Tools
  • Bore Light
  • Various Sized Allen Wrenches
  • Locktite (Blue)
  • Craftsman Screwdriver w/ Multiple Bits
  • Slip 2000 EWL (Extreme Weapons Lubricant)
  • Hoppe’s #9 Solvent
  • Bore Rod Guide
  • Dewey Chamber Cleaning Rod
  • Castle Nut Wrench
  • Precision Screwdriver Set
  • Q-Tips (Lots)
  • Hand Sanitizer
  • Pelican 1010 Case for Spare Parts
  • AR Upper/Lower Vise Block
  • 550 Cord / Dummy Cord
  • Repair Fastex Buckles
  • Spare PMAG Followers, Springs and Plates
  • Upper Receiver Chamber Brush
  • Riggers / 100 MPH Tape
  • AR Armorer Wrench
  • Multi-Tool
  • Spare Charging Handle
  • Spare Buffer (H)
  • Trauma Shears
  • Ballpeen Hammer
  • Hammer w/ Nylon, Brass, Plastic and Rubber Heads

Notes

MTM Case-Guard Shooting Range Box

Our only critiques of the range box would be adding a dedicated “deep” area for truly storing all sizes of brushes upright, and also coming in other colors, but that’s us being picky.

The MTM Case-Guard Shooting Range Box is available from Amazon for around $50, and is a great deal for this all-in-one range box that outperforms anything we’ve ever used.

Let us know in the comments if you’d like any clarification on what we’re carrying and why.

Posted in Accessories | Tagged , , , , , | 3 Comments

9/11 Never Forget

2847932679_eac990db6c_oWe’d like to take today to mark the 8th anniversary of the attacks of September 11th 2001, and to implore each and every one of you to never forget what happened.

Our thoughts and prayers go out to all who were directly or indirectly affected by the attacks, and to all those who were lost.

Let us never forget.

Posted in Memorial | Tagged , , , | 4 Comments

How to Pick Your Way Out of Handcuffs

Today we’ll be showing how to pick your way out of Handcuffs using only a bobby pin. We realize this may be a sensitive issue to some out there, as this information in the wrong hands could be detrimental; here’s our take.

The current “swinging bow rachet – type” adjustable handcuff design dates back to 1912 when the Peerless Handcuff Company patented it. Even the “double lock,” that we’ll get into later in the article, came about shortly after this. First off, why are we still using relying on this deprecated technology to keep our officers safe? Why are law enforcement grade handcuffs readily available at nearly any surplus store, readily available to be used on someone during a home invasion? Lastly, why is this simple key design still being used?

It’s an undisputed fact that handcuffs can be picked with a simple bobby pin, which reveals a fundamental problem with the lock design. We feel the more awareness that is brought to this issue, the better.

How to Pick Your Way Out of Handcuffs

Handcuffs, like the Model 100’s made by Smith & Wesson that we’ll show, are in use by Law Enforcement across the United States and abroad and available to purchase by nearly anyone for around $25.

We hope that articles like this help to convince Law Enforcement that changes need to be implemented. Unfortunately one of the main reasons it would take a fundamental change across the country, is the simple key design that almost every model of handcuffs use. Changing the locking mechanism on cuffs would require every single officer to switch to new keys, this could be the main reason no change has ever come about. Especially today, when most law enforcement officers aren’t even issued a trauma kit and solely dependent on EMS in an emergency situation.

Our reason for presenting this information is not only from an awareness perspective, but also a skill-set perspective. The chances of ever winding up in a situation where you’re unlawfully handcuffed against your will (which means not by a law enforcement officer) are slim, but with the knowledge you’ll gain from this article, you might not ever leave the house without a hidden bobby pin again.

At the very least, one stashed in your wallet will provide some peace of mind.

Lock Mechanics

How to Pick Handcuffs 05The way a handcuff key works is simple, the key gets inserted into the lock to its stopping point. The stopping point is just enough to allow the key to slip past the handcuff housing and turn free in the lock.

When the key is resting the the proper position, a turn towards the cuff’s direction of travel will release the single lock. The reason we state “towards the cuff’s direction of travel” is that the direction to turn (clockwise or counter) varies with each cuff.

The double lock is set by taking the opposite side of the handcuff key (pin-like end),inserting it into the horizontal slit in the cuff, and pressing it away from the cuff’s direction of travel.

This engages the double lock and prevents the single lock from releasing until the double lock is unlocked. To do this the key must now be turned away from the cuff’s direction of travel.

Once the double lock is unlocked, the key can not be turned towards the cuff’s direction of travel to release the single lock.

Prepping the Bobby Pin

Bobby Pin Handcuff

The first step in picking handcuffs is to prep a bobby pin. This is done by bending the bobby pin into a 90Ëš angle and removing the plastic tip at the end of the straight section.

After removing the tip, insert the straight sided bobby pin into the upper portion of the lock on a handcuff. Only insert the pin halfway into the lock, if the pin is inserted all the way in, the proper bend will not be attained.

Next, bend the bobby pin to the left, creating a 90Ëš bend. Insert the pin again halfway past the first bend, and bend to the left 90Ëš. This will create a modified “S” shape (see photo).

Picking the Single Lock

To pick the single lock, insert the pick (bobby pin) into the upper cutout of the lock pointed towards the cuff’s direction of travel.

Once the pick has been inserted and is resting under the handcuff housing, add tension and press the pick towards the cuff’s direction of travel.

This motion will recreate the key’s raised area pressing against the locking mechanism and release the cuff.

It will take a while to become proficient at this, and it truly is a skill, so be patient. We’ve added the video below to help illustrate the technique, as well as a few photos.

The photo that shows the cut-away view of the handcuff above, illustrates where your pick will press in order to release the single lock, as well as the double lock.

We highly recommend that you become proficient at the single lock before moving on to the double lock.

Picking the Double Lock

We’ll start explaining picking the double lock by looking at the aforementioned cut-away view of the handcuff. In the photo you can see the arrow pointing at a bar that appears to have a tooth pattern to it.

As we understand it, when the double lock is set, a spring is pushed away from the cuff’s direction of travel taking the tooth-pattern bar along with it. The tooth renders the single lock inoperable .

When the double lock is unlocked the bar slides back over and the single lock can be released again.

To mimic the key unlocking the double lock, insert the pick into the upper cutout of the lock as the single lock, but this time point the pick away from the cuff’s direction of travel.

What must be done is to manuever the pick under the handcuff housing and turn in the direction the key would turn to release the double lock.

The double lock takes more pressure to move and thus requires more tension against the pick. What happens is the pick, when in the right location, presses the bar on the double lock and releases it.

After the double lock is disengaged, you’ll still need to pick the single lock too.

Notes

The best thing to do is get your own pair of handcuffs and study the movement of the key while it’s unlocking the single and double locks, which will give you a better idea of how to maneuver your pick.

Please let us know in the comments if you have any questions regarding this topic, and anything we can elaborate further.

These lock picking tips and techniques provided in this article are only to be used in accordance with all local, state, and federal laws and provided for lock sport (recreational lock picking) use only. Lock sport should be used to learn about the illusion of security, and how to properly protect yourself and your possessions. Don’t do anything illegal.

Posted in Lock Picking | Tagged , , , , , , , , | 34 Comments

Attach MOLLE Pouches to Your Belt With Ease

Down Range Gear Belt Stabilizer 02It’s the simple things in life… Down Range Gear recently blogged about a new product in development they’ve dubbed the  Belt Stabilizer.

We live for reporting on revolutionary designs like this, and are truly excited about this product.

The Down Range Gear Belt Stabilizer is something we took one look at and laughed. Laughed that no one had thought of this sooner! Continue reading

Posted in Load Bearing | Tagged , , , , , , , | 1 Comment

How to Tie Knots Like a Navy SEAL: Part 3

Photo U.S. Navy (Released)

Photo U.S. Navy (Released)

This week’s “Knot of the Week” continues with the third of five knots taught to Navy SEAL candidates at  BUD/s for their Underwater Knot Tying Test.

During the test, the students must tie each knot on a single breath hold at the bottom of a 15 foot pool.

The instructors descend with the students to the bottom of the pool to observe and check that each knot is tied correctly. Continue reading

Posted in Bends, Knots | Tagged , , , , , , , , | Leave a comment

Free Labor Will Win!

free_labor_will_winHave a safe, relaxing Labor Day from everyone at ITS Tactical!

Our usual Knot of the Week will be moved to tommorow, and we leave you today with the WWII image “Free Labor Will Win.”

The image was created in 1942, and served as a reminder that enemies were using slave labor from all the occupied countries in their war effort.

Posted in ITS Information | Tagged , , | Leave a comment

We Want To Hear From You!

ITS Uncle SamWe’ve been going strong at ITS, and would like to take today to ask our readers to give us some feedback.

What do you like that we’re doing and what do you dislike? Are there topics we’ve been neglecting that you want to hear about?

How about articles you’ve read that you would have liked to had a little more information on.

Throw us a comment, and help us grow into the best tactical resource around.

We appreciate your support!

Posted in ITS Information | Tagged , | 16 Comments

Cut Your Way Out in An Emergency Situation

Benchmade Rescue Hook 01Today we’ll share our thoughts on hook knives with a review on the Benchmade Rescue Hook Model 7.

We consider a hook knife to be an invaluable piece of equipment in almost any situation.

The purpose of a rescue-hook type tool is to not only enable you to provide assistance in a rescue, but to also aid in self-rescue.

There are a myriad of different applications for a hook knife, which we’ll outline below, but primarily a hook knife provides a safe way to cut danger out.

Description

Benchmade Rescue Hook 10The Benchmade Rescue Hook Model 7 is made from 440C Stainless Steel with a black oxide coating.

It features a rubberized coating on the handle, spine gripping threads, finger hole and an integrated cutting-edge guard.

The Model 7 weighs 1.6 oz. and measures 4.5″ tall by about 2″ at it’s widest point of the grip with a 0.5″ blade.

An optional MOLLE Compatible soft sheath measures 5″ tall x 2″ wide and attaches with a single MALICE Clip.

The sheath is available in Black, Olive and Coyote. It also has a nice bottom elastic-retention band which further secures the Rescue Hook in the sheath.

The Model 7 is made in the USA and has an NSN number, which stands for National Stock Number. It basically means that it’s a standard item available for military purchase, but is also available commercially.

Versions

Benchmade Rescue Hook 03Benchmade also offers three other versions of the Rescue Hook. The Model 5, which is essentially a shorter version of the model 7.

The model 8, which is much longer than the model 7 and the Houdini Pro, a pocket-knife like tool which features a folding hook, LED flashlight and spring-loaded glass breaker.

The Model 7 is the only hook available with rubberized coating, which we feel helps trememdously when wearing gloves or working around water. It’s also the perfect size for carrying attached to your gear or on a belt.

Uses

  • General Troop/Safety

Individual troops can use it as a strap cutter to help egress from vehicles after roll-overs, IED’s, etc. It can also be used to cut seat belts, uniforms and any other gear that gets hook up inside a vehicle. Also useful for cargo webbing, shrink wrap, cardboard boxes, etc.

  • Medical

Used to remove clothing, boots and gear from wounded soldiers for initial evaluation and immediate treatment of injuries. Also ideal for cutting bandaging, medical tubing, casts, etc. We recommend when cutting pants to start at the cuffs and cut up rather than trying to cut down from a pocket.

  • Airborne

Use it as a cut-away tool during parachute malfunctions or during a line-over situation during a jump. You certainly don’t want to pull out your knife and start cutting your way out of a malfunctioning chute, because chances are that you’re going to cut yourself in the process.

  • Military/Police

Use on detainees to remove flexi-cuffs to provide a safe alternative to using a fixed blade or folding knife, which could cut the detainee or be taken and used as a weapon against the officer/MP.

Here’s a YouTube video we made showing the Rescue Hook Model 7 in action:

Benchmade also offers a lifetime warranty and LifeSharp service on every edged weapon or tool they sell, which we’ve personally used.

All you have to pay is $5 to cover the handling and return shipping and you’ll get a nice factory-sharp knife sent back to you.

What other applications for the Rescue Hook can you think of?

[flickrset id=”72157622200009754″ thumbnail=”square” overlay=”true” size=”medium”]

Posted in Knives | Tagged , , , , , | 13 Comments

Camouflage Comparison: Mirage, MultiCam and UCP

brick-wallStrike-Hold! has just published an excellent visual comparison of camouflage patterns on their blog.

The three patterns compared are Bulldog Tactical Equipment’s Mirage, Crye Precision’s MultiCam and the Army Universal Camouflage Pattern (ACU).

Instead of voicing our opinions, take a look at the article on Strike-Hold! and let us know what you think in the comments here.

We’d love to hear from you.

Posted in Apparel, Camouflage | Tagged , , , , , , , , | 20 Comments

Shoot Quietly and Loudly Benefit Wounded Warriors

AACsilencerShootJoin Advanced Armament for their fifth Silencer Shoot September 18-19, 2009.

Experience the advantages suppressed firearms have to offer while checking out  silencer product demos, explosives, door-prizes and giveaways benefitting the  Wounded Warrior Project! Continue reading

Posted in News | Tagged , , , , , | Leave a comment