Fresh off the heels of ITS Muster IV, I’ve taken some of what I learned on building a Bolt Bag and applied it to my home “Bolt Bag,” which generally speaking, I always have with me. A Bolt Bag contains mission essential equipment that you’d never want to be without, no matter what your “mission” happens to be.
At home, such a bag might be less useful than when away from home, since you would generally have access to everything you have at home. However, if your house were to catch on fire, aside from making sure your loved ones (including, in my case, my wife and my awesome-but-slightly-crazy dog) are safe, a Bolt Bag would provide an easy to grab kit to utilize until you can find a safe place to start thinking more long-term.
When away from home, your Bolt Bag can provide you with things you may need in order to get home safely; medical supplies, a means of containing water, survival tools, methods to communicate or signal for help and anything else you might want to keep around you all the time. This can be a small backpack-sized kit, or an even smaller bag you can grab from a larger bag if you’re traveling with a larger loadout.
Known-Knowns, Known-Unknowns and Unknown-Unknowns

There is, of course, no planning for every contingency. There’s a limit to how much equipment you can carry and a limit to your imagination in regards to the countless things that could potentially go wrong. Especially in situations where you might have to leave in a hurry and head for safer ground.
Every individual’s situation is going to be unique; what may be more likely here in the San Francisco Bay Area, may not be likely at all where you live and vice versa. One major concern here is earthquakes. If I lived near Yellowstone Park, or Finland, I might be more concerned with volcanic eruptions. If I lived below sea level in a marshy swamp near a major river, I’d be more concerned with flooding.
The Mission Defines The Gear
Each situation is different, so every person’s loadout should be different. However, there are some basic principles that can help you decide what to keep in your Bolt Bag. You also want to keep in mind that simply assembling and having your emergency gear with you at all times is a small part of the battle; you absolutely need to be comfortable using that gear as well. In addition, you’ll need to have mental plans in place so you’ll know what to do when the proverbial fecal material makes impact with the proverbial aerodynamic directional magnification device.
Gear alone won’t save you, but having a functional mind-state, thinking about the situation and relying on your knowledge to be able to use your gear, might just give you the right advantage. Add in practicing your exit strategy until you’ve got it committed to memory and you’ve just boosted those chances even more.
Threat List
One of the most important aspects of developing and populating a Bolt Bag is to assess what dangers you could potentially face and to think through what could go wrong given those circumstances. In the Bay Area, the biggest concerns are earthquakes and associated earthquake problems like tsunamis, mass fires, electrical grid failure and infrastructure collapse.
Also on the list, but lower in priority and likelihood, are things like terror attacks on major landmarks (e.g. the Golden Gate or Bay Bridges). Historically, there was a threat that the Soviet Union would launch a nuclear attack over the San Francisco Bay to maximize damage to buildings by air burst and super heat the waters of the Bay, compounding damage for the entire area. Obviously, this is less of a concern today.
Your own AO (Area of Operation) probably has different concerns than my AO does. Think about all of the possible disaster scenarios for where you live. Are you in the path of Hurricanes? Tornadoes? Do you live somewhere that criminal elements might launch a large scale siege? Is the country you live in suffering from, or on the verge of suffering from internal unrest?
If so, who are the players in that unrest and how might large scale actions taken by said groups cause problems for you? Whatever the concerns are, list them and prioritize them. Once you’ve done this, you can start thinking about what your plan of action in any given situation would be. Only then will you be able to come up with a useful list of equipment you might carry to better facilitate dealing with those potential incidents.
Route Planning, Route Recon
The primary purpose of my Bolt Bag is to enable me to get home in the event a potential disaster occurs. Home is where I keep all of my supplies, so if these things happen when I’m there, I’m already prepared. Everything I need is there. I live on a rock that’s significantly higher in elevation than the landfill area between us and the Pacific. However, I also live in a house that was built in the early 1900s, so it’s still entirely possible that I may need to leave my house in a hurry.
If the house collapses, I may be able to salvage some of my equipment and set up camp in the yard or nearby woods. I happen to live near an old Nike missile site that sits on top of a tall hill comprised of solid rock. If the house catches fire, I can still grab my Bolt Bag, my wife, my dog and head out to someplace safe. Therefore, I want to have the tools I’ll need to provide basic necessities for my family.
That means making sure I can create a shelter, have a little food, have the means to get drinkable water and can start a fire for warmth. If you live someplace with actual seasons and more importantly, an actual winter, you may want to add things like warm clothing or an emergency blanket to your kit. That’s less of a concern for me here, as it rarely dips below 40 degrees and even then, that’s generally only at night.
You’ll want to have a planned route to either get back home or to a specific location away from home, in case yours goes belly-up. You might not be able to use Google Maps to pick the route once the disaster happens, so the time to make this plan is now. I personally prefer to use printed maps and plot out my course to my alternate location from home.
It’s also highly useful to take that trip on foot after you’ve plotted your path. Do some recon and look around, keeping your eyes peeled for what could go wrong with your proposed route. Are you crossing bridges that might cease to exist in an emergency? What would a downed tree do to your ability to get to your alternate location?
You may want to come up with an entirely separate secondary route to your alternate location and even a tertiary route. Then perform that same foot recon process with your other routes. Think of anything that could potentially happen that would render your plan useless and correct as needed.
As for route planning, in the event the disaster happens while you’re away from home, make sure you know where you are. When I say “make sure you know where you are,” I don’t mean “make sure online maps or your GPS can tell you how to get home from where you are.” I mean keep your eyes open.

Be familiar with the general location and how it relates to where you live. Are you South of your home? North? Do you have any idea? Are there any visual landmarks you can use to navigate your way back home? In San Francisco, I use Sutro Tower, a colossally large radio and television tower built in 1973. It’s visible from almost anywhere in San Francisco and even from Marin County or down in the Peninsula. It’s also within a thousand yards of my home, so as long as there isn’t a thick blanket of fog (or smoke), I can always use that as a landmark to guide my progress.
Even if that 977 foot tall tower breaks and falls, it’s still going to be a large, noticeable item on the skyline. However, what I’ve found much more useful is the sense of comfort that comes with having thoroughly explored the area where you live. Go walking every chance you get. Become familiar with the various landscapes of your home. You should be able to tell where you are by what you see.

In a city, you should be able to tell what neighborhood you’re in by sight. If you live out in the country, you should become familiar with the natural features and terrain. Not only is this skill crucial to your ability to get home in a disaster, you’ll also learn a lot about where you live by walking in that area. It’s entirely too easy to miss so much by relying on driving; you have to pay attention to the road and only see things that are visible from that road anyway. Get out, walk around and really check out where you live. Learn it, explore it and know it.
These days, no matter where I am in San Francisco I can easily figure out where I am, where I’m going and how to get there. I know this is a perishable skill and we as a culture are slowly losing it by relying too heavily on search engines and mapping software to handle navigation for us. Those things may not be there when you need them, so make sure you don’t actually need them. While beneficial to all of our lives, they’re also something that you shouldn’t bet your survival on. Cell towers stop working, data centers can burn and networks can go down.
Ounces Equal Pounds, Pounds Equal Pain
I certainly suffer from a tendency to over-pack. Whether I’m going on vacation, camping or just heading across town to meet up with friends, I often take more stuff than I need. This isn’t a helpful tendency in constructing a Bolt Bag. Travel light and remember that whatever you bring, you could be carrying for an unknown time period.
If your bag weighs 20 lbs., you probably won’t have much of a problem carrying it indefinitely. If it weighs in at 80 lbs. though, it’s going to hurt sooner rather than later. I’m not saying that 20 lbs. is the right weight; I’m just saying that every ounce you add to that bag is going to add up as you keep adding more things. Strip it down to what you really need.
I used to carry a GPS in my bag, kept my tools all together in a HSGI Taco, put my rolled up change of clothes in a pouch and tethered things together with pull-out MOLLE panels. I ditched all the unnecessary containers for tools and instead started using the pockets my pack had, as well as my dry bag. This has enabled me to shave off four pounds from the total weight of my pack. Four pounds may not seem like that much weight, but it’s a sizable percentage of the total and the reduction makes a difference in ease of carry.
While walking at a normal pace with the stuff may not make me break a sweat, running with all of it certainly did. This is yet another thing to consider in regard to weight; when you think you’re done, take that pack for a run. If it’s kicking your ass, come back home and think about what you can shave off. Maybe you carry less backup batteries or ditch the separate pouches for everything. Maybe you don’t need one item or another.
The more you reduce, the happier you’ll be. You should definitely be able to run or walk with your Bolt Bag without pain. This is because you might have to run with it at some point. The wrong time to find out your pack is not run-friendly is when you’re running for your life.
Bag Selection
This is really a huge, separate subject on its own and better men than I have written about it. If you’re ready for the fire hose of information, point your gob at Brian’s Backpacking Blog. Brian has written a lot of useful information here at ITS, like his Introduction to Lightweight Backpacking. I’m an obsessive pack-collector and over the years, it’s gotten to the point that I’m a little embarrassed about how many I own.
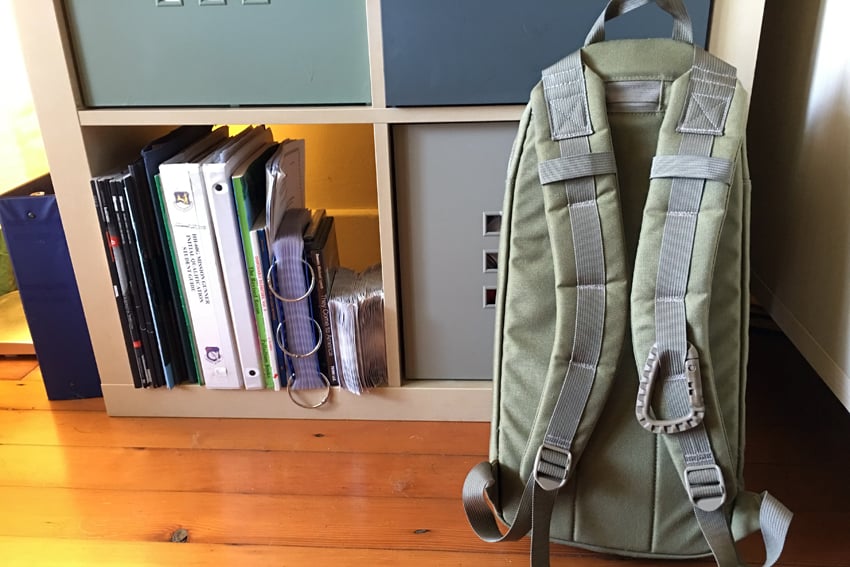
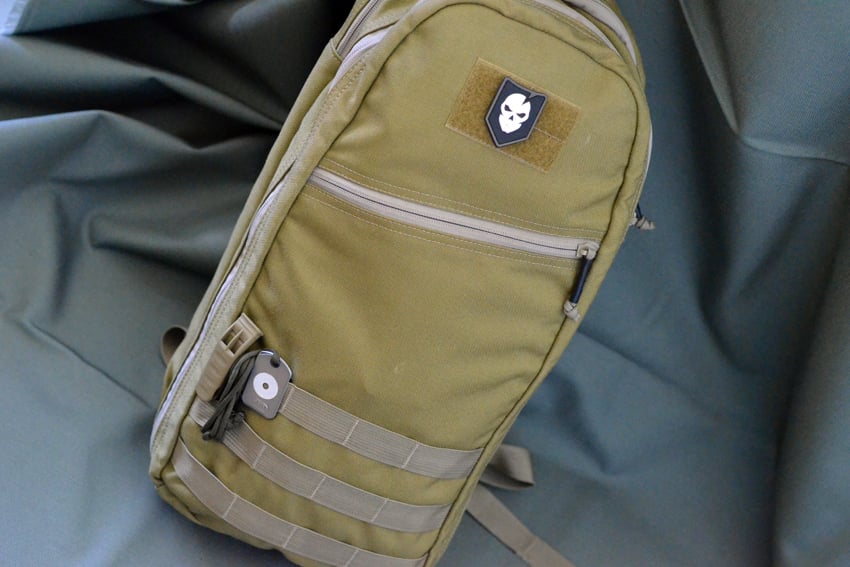
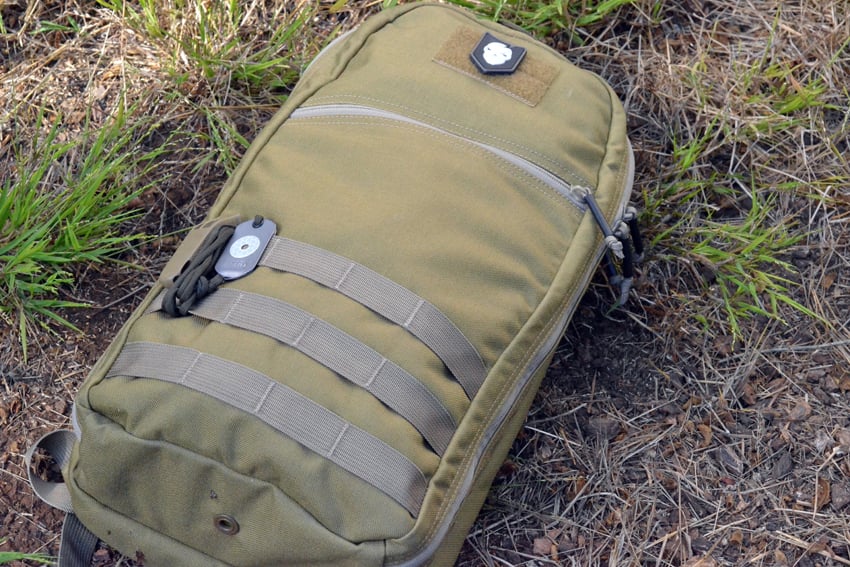
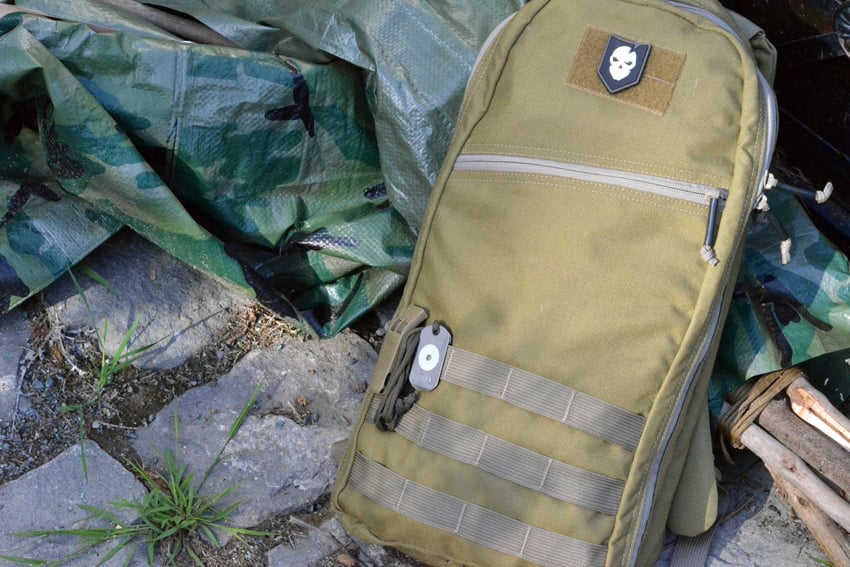
I’m also a little proud of myself though for having amassed such a wide selection of packs with different purposes. For my Bolt Bag, the important thing to me thing was comfort, followed by utility and then reduced size. I’ve gone through a number of different types of Bolt Bags, but lately find myself using GORUCK’s 10L Bullet Ruck. Mine is Coyote Brown, but currently it appears they’re only shipping black out.
Color choice for your pack is largely irrelevant, though you do want to consider your environment and whether or not your bag is going to make you stand out in a crowd. The GORUCK Bullet is almost pushing it visibility-wise, with the couple rows of MOLLE and the Velcro patch area at the top.
Basically, you want to match your environment socially, rather than literally. If you live near a military installation, maybe MultiCam is going to stand out less. Use your head. If you’re “bolting,” chances are that other people will be too and some of those people are going to be looking at someone who’s obviously prepared as a potential victim. Don’t look like a potential victim when you don’t have to.
Modularity, Accessibility and Packing Order
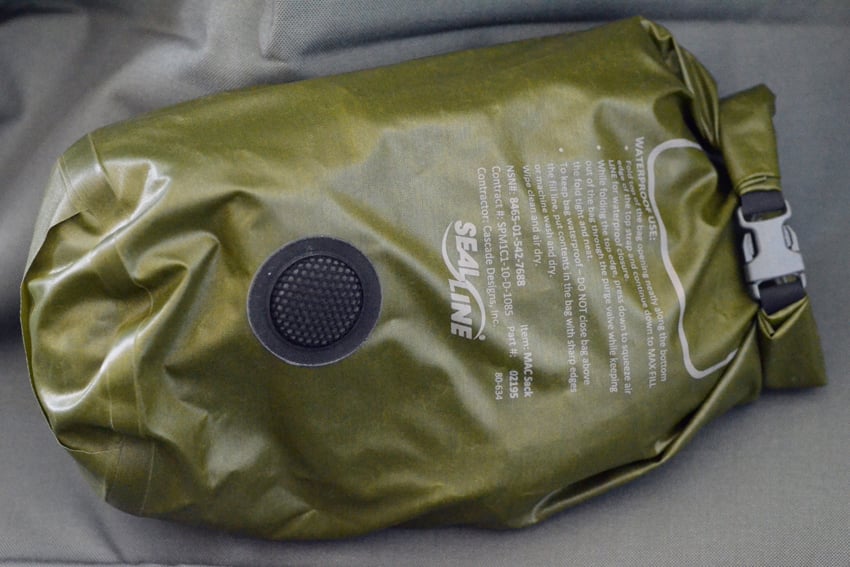
Once you’ve assembled the gear for your Bolt Bag, consider sorting it into various groups. I’ve divided my gear into two main categories, Things That Shouldn’t Get Wet and Things That Can Get Wet and also into a few sub-categories; Medical Stuff, Food and Water, Clothing, Electronics, Tools and Signaling Stuff. For all the things that shouldn’t get wet, I’ve put them in a dry bag made for the USMC day pack. Once I put all that stuff in there, I can then compress the hell out of it since it has a one-way air valve.
As a result, it takes up less space in the Bolt Bag. All of the items that shouldn’t get wet are items that I would generally be able to stop for a while if I needed them. Because of this, it’s not really a problem to have them packed away in a dry bag, further inside the Bolt Bag. I put the clothes in the bottom of the dry bag, then the electronics (including satellite phone), then the pouch filled with small tools on top of that, as that’s generally the order in which I’d need all that equipment.
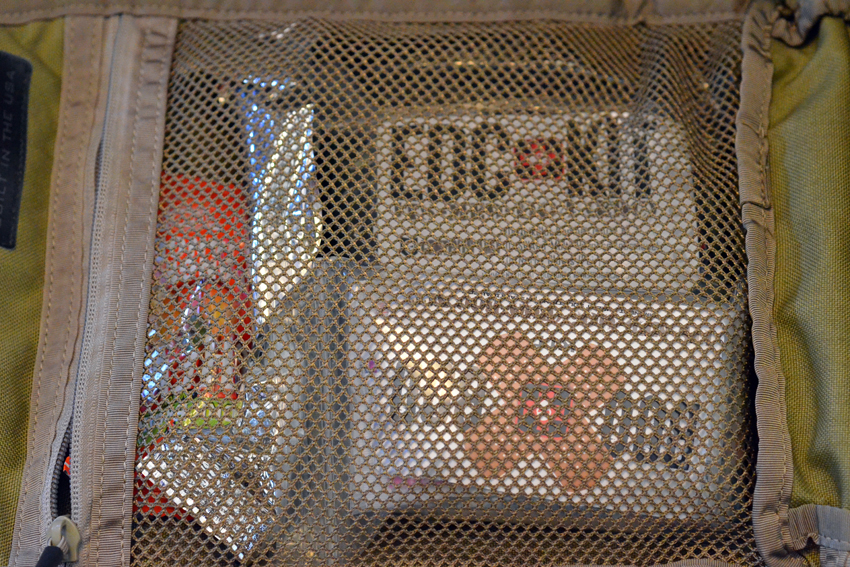
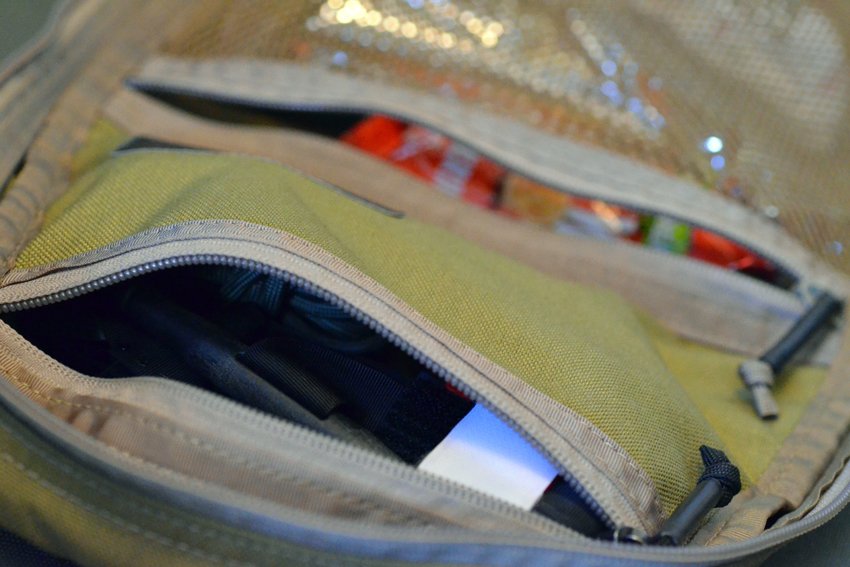
My medical supplies and food are stored in the lower interior pocket of the Bolt Bag so that they can be quickly accessed. I also like that the contents are visible through the mesh when you open the bag, so that if for some reason I can’t talk and need medical care, whoever is helping me can open my pack and see where the medical stuff is without having to dig around for it.
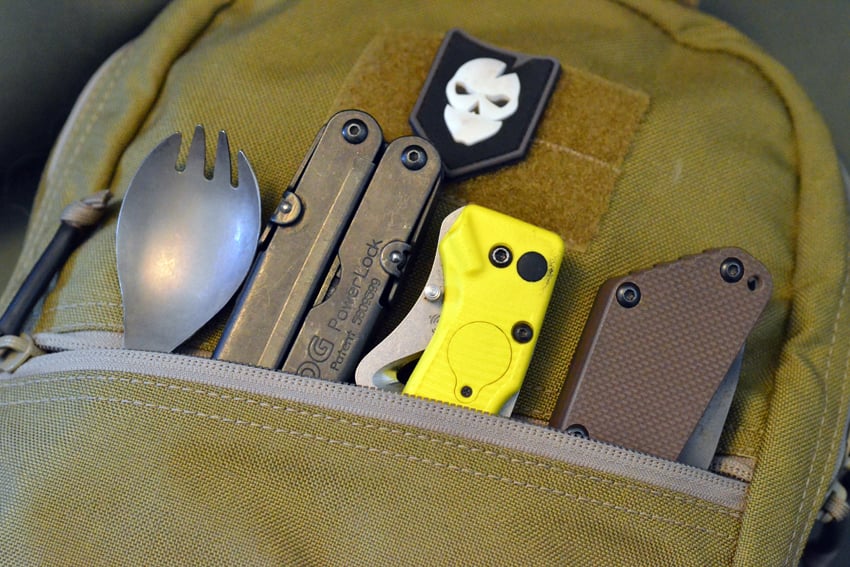
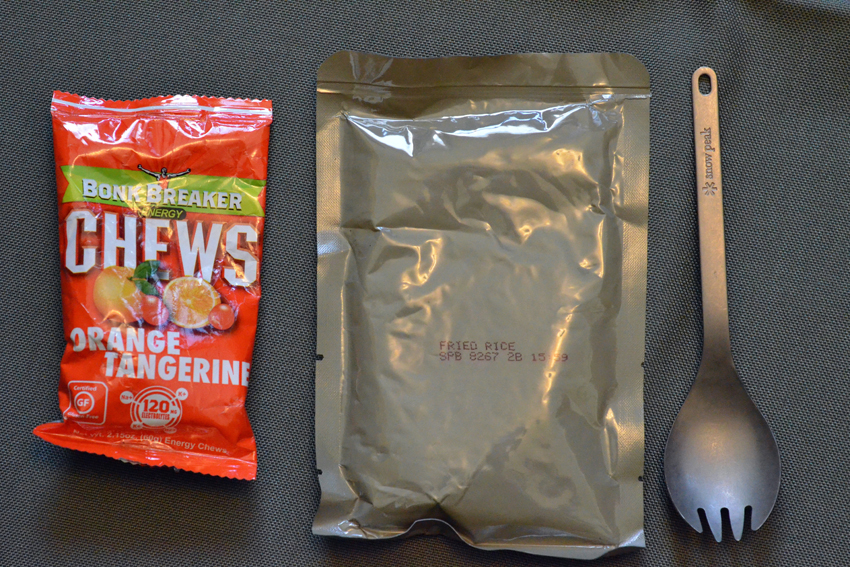
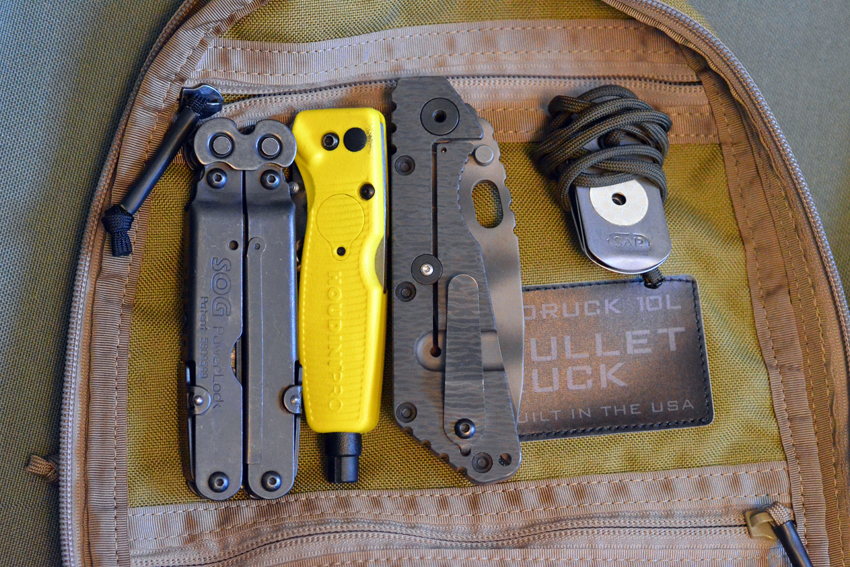
In the outside slash pocket of the pack, I keep four tools; a knife (this is an additional knife I have with me, since I always have a knife in my pocket as well,) a window-breaking/seatbelt cutting tool, a utility tool and a spork. Three of those things are in that slash pocket so I can easily get to them. The spork is in there because it was roughly the same size as the other things, plus I like keeping the inside lower pocket clean, since it has my medical stuff in it and storing a device that is eventually going to be in my mouth in the same pocket as the med kit stuff seemed like a bad idea.
Your loadout is going to be different from mine. Just keep in mind the order in which you may possibly need things and make it easier for yourself by packing accordingly. Also there’s merit in the idea of approaching this from a modular angle; separating the various gear into groups is going to make it much easier to know where to find something when situations aren’t nice and calm. It might also enable you to know which items you can safely leave behind and which items you’re taking with you if things get so bad you need to leave that Bolt Bag behind.
No Camping
If you’re not familiar with the term “gypsy camp,” it’s a pejorative term for the technique of attaching any and every damned thing to your pack you can think of. If you find yourself using shock cord to strap things to the top, bottom, sides and back of your pack, or you’ve got five carabiners holding water bottles, beer opening tools or every other gadget you thought you might possibly need to the shoulder straps of your pack, you’re a walking “gypsy camp.” My preemptive apologies to any Gypso-Americans who might take offense to the term; it isn’t mine, I promise you. If you can figure out who said it first, you can take that issue up with them.
Regardless, the reason you don’t want to set your pack up like that is because you need to be able to get through potential debris, wooded areas or spaces that might be a tight fit and you don’t need your Bolt Bag getting caught on things. Also, items attached to the outside of your pack are going to make noise when you walk.
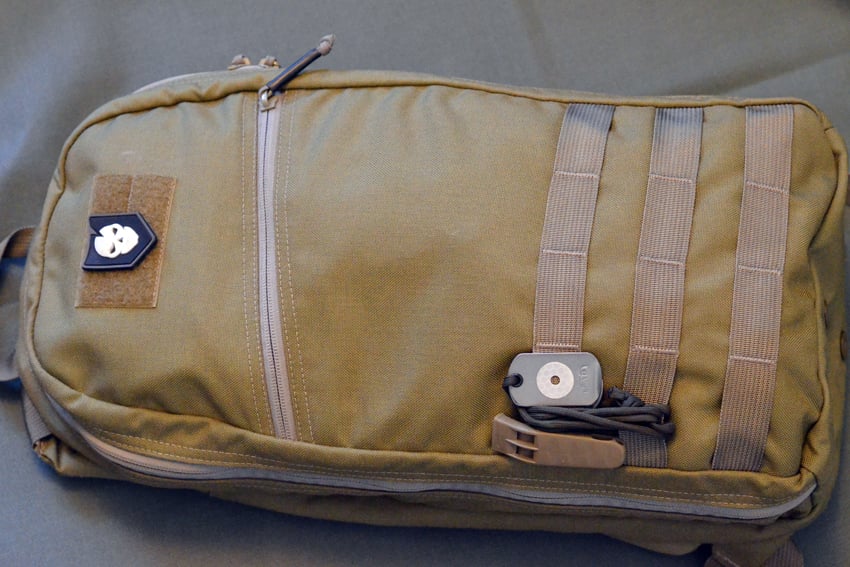
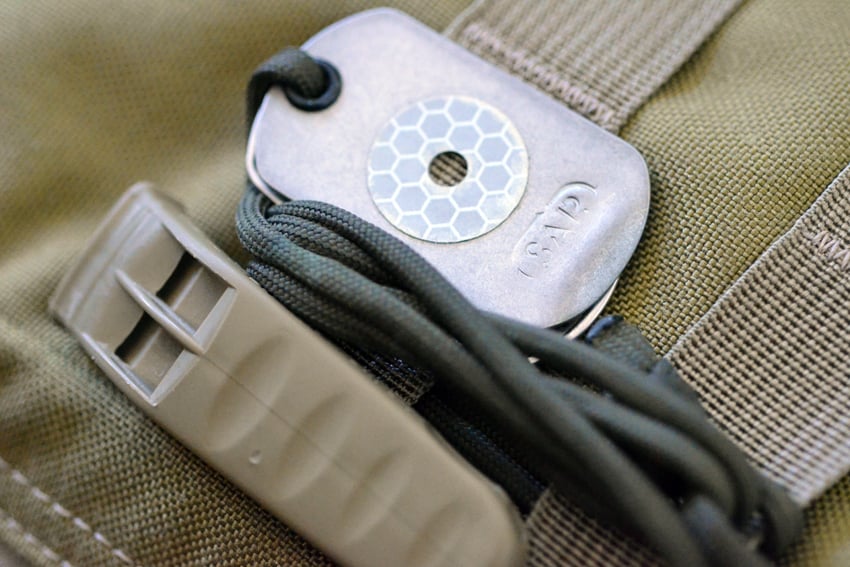
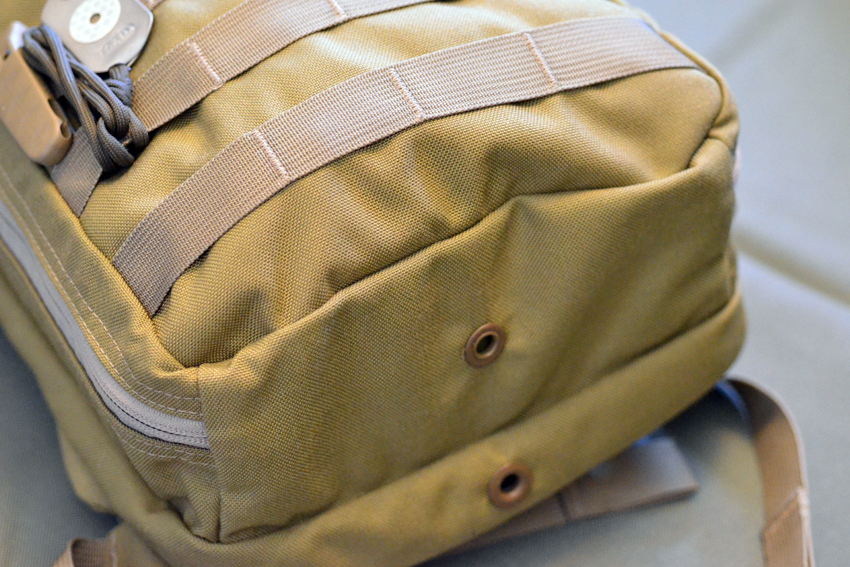
The less attention you draw to yourself, the better off you are. Keep it simple. I basically have three things attached to the outside of my pack; on one shoulder strap, I have a plastic ITW carabiner, which holds the hose of my hydration bladder out of the way. I also have a SAR signaling mirror and a plastic ITW whistle tightly and firmly attached to the MOLLE row on the back, because I want both to be fairly accessible and because I was able to secure them pretty snugly.
Russian Nested Eggs (EDC vs. Bolt Bag)

One thing to consider with regards to your Bolt Bag is size; the smaller it is, the easier it is to fit it inside a larger pack. I often carry a GORUCK GR1 as my “daily carry” pack, as it allows me to put my laptop, a soft armor insert and various things I might need in non-emergency situations (aka “life”).
I can easily fit my Bolt Bag inside that GR1 with room to spare and as a result, if things go haywire and I need to “bug out” and leave that daily carry stuff behind, I can with relative ease. I don’t need to unpack and repack to optimize; I just pull that Bolt Bag out of the main pack and ditch the rest of the stuff, possibly in a cache I might return to later if the situation merits it.
Security Considerations
If in the course of your work or other day-to-day activities, you enter secure premises on a regular basis, you may have to adjust the contents of your Bolt Bag accordingly. I recently learned the hard way, when heading down to the San Francisco Federal Building to get a list of every place I’ve ever worked for a background investigations packet I needed to complete, that knives are a big no-no when entering a federal building.
Since they were unwilling to hold on to my knife (or knives, as the case may be) and let me have them when I was leaving, I had to come back the next day with a stripped-down pack, free of both knives and everything else I thought security might find objectionable.
Constantly Rethink Your Choices
Once you’ve built your Bolt Bag, take it with you everywhere you go. Periodically reassess your current situation with an eye towards how you can improve it. Building a Bolt Bag is roughly the same as building an AR-15; you’re never really done building it.
You’re always going to be able to streamline and you’re always going to want to add things you hadn’t previously considered. Nothing is written in stone; analyze your load out constantly and adjust on the fly. If you’re going to a new area, you may want to bring an entirely different set of equipment. Adapt to change.
My Bolt Bag: An Almost Comprehensive Breakdown
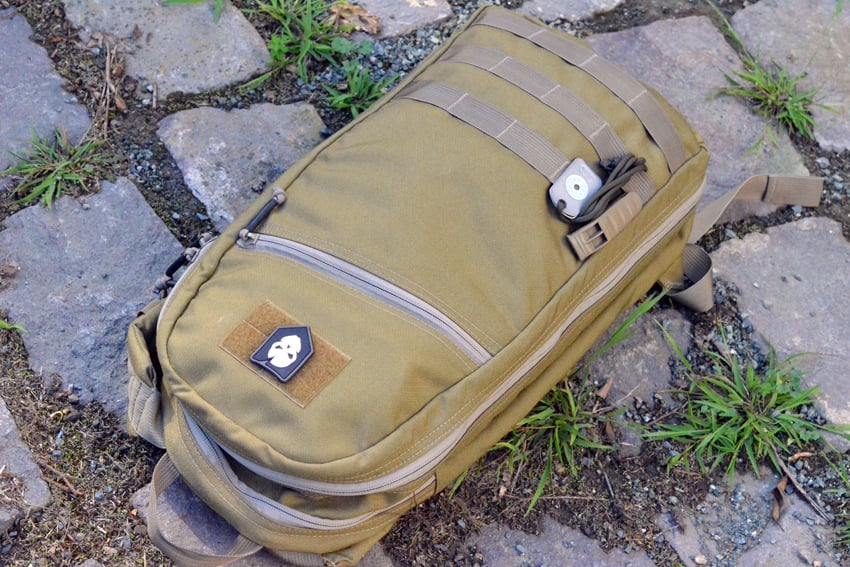
Backpack: GORUCK Bullet, 10L
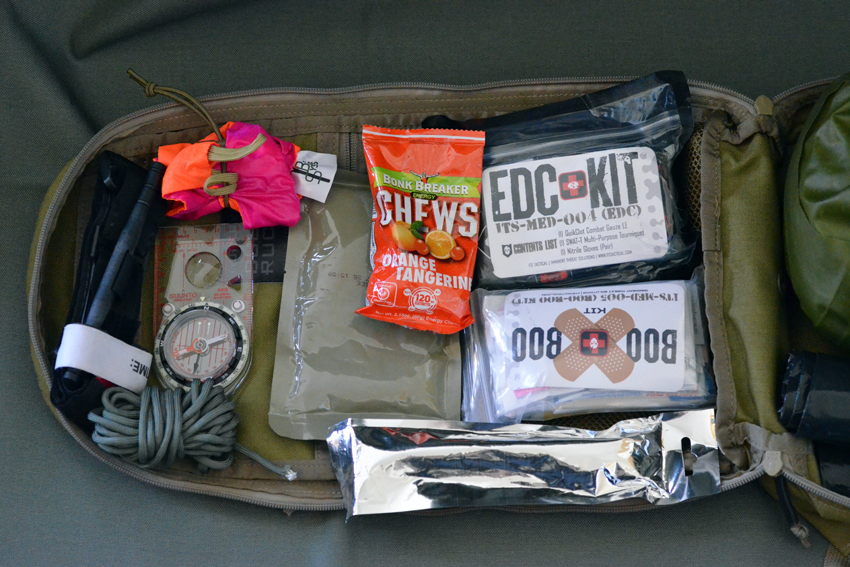
Lower Inside Pocket
Food:
• Bonk Breaker tangerine/orange energy chews
• MRE Rice, Fried
Medical Supplies:
• ITS EDC Trauma Kit
• First Aid Kit
Signal:
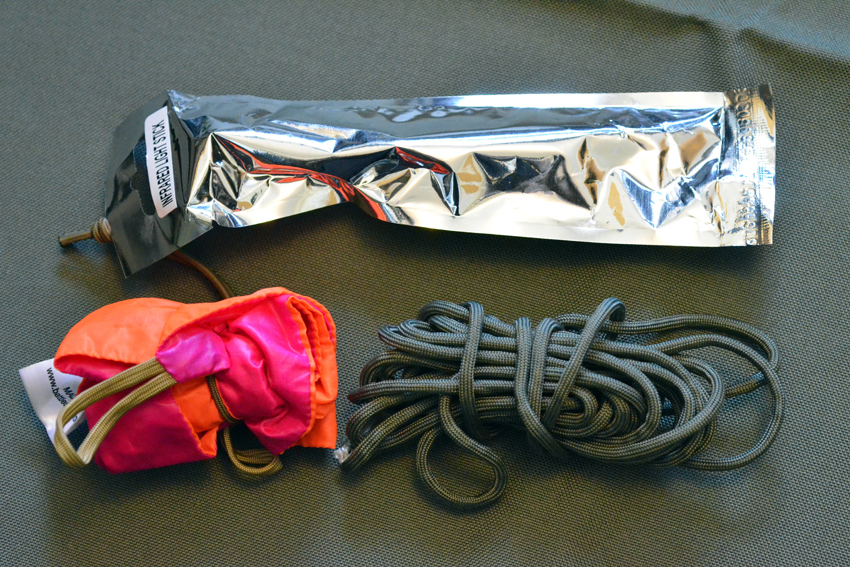
• IR Chem Light
Upper Inside Pocket
• CAT (Combat Application Tourniquet)
• MPIL
• Type III Paracord
• Suunto M3 Compass
Main Compartment
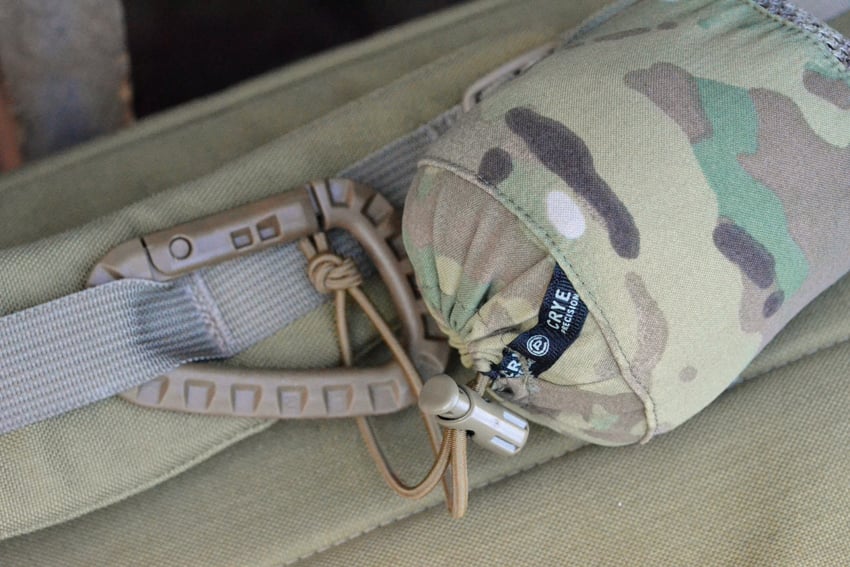
• Crye Compact Assault Ghillie
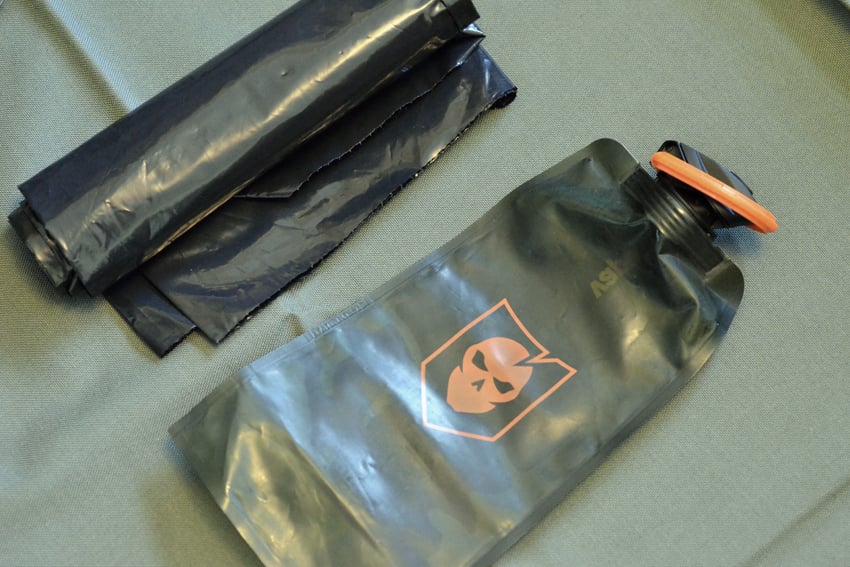
• Vapur Eclipse Anti-Bottle:
• Contractor bag
• Sealine Military dry bag containing the following:
Clothes:
• Patagonia M.A.R.S. Capilene Boxers
• Darn Tough Mountaineering Socks
• 5.11 loose fit crew shirt
Diamondback Tactical AK double-magazine pouch containing:
• Motorola P4000 Power Pack
• Iridium 9555 Satellite Phone
• (1) USB 2.0 Type B charging cable
• (1) USB/Lightning iPhone charging cable
• Triple Aught Design OP1 Admin Pouch (currently sold out), containing:
Lower Jaw of OP1
• Surefire G2X Pro
• Phoenix Jr 123 Infrared Beacon
• Pegasus 2AA IR Signal Device
• Exotac nanoSTRIKER XL
• Auto Jigglers
Middle Bottom of OP1
• Jute Paracord
Top Jaw of OP1
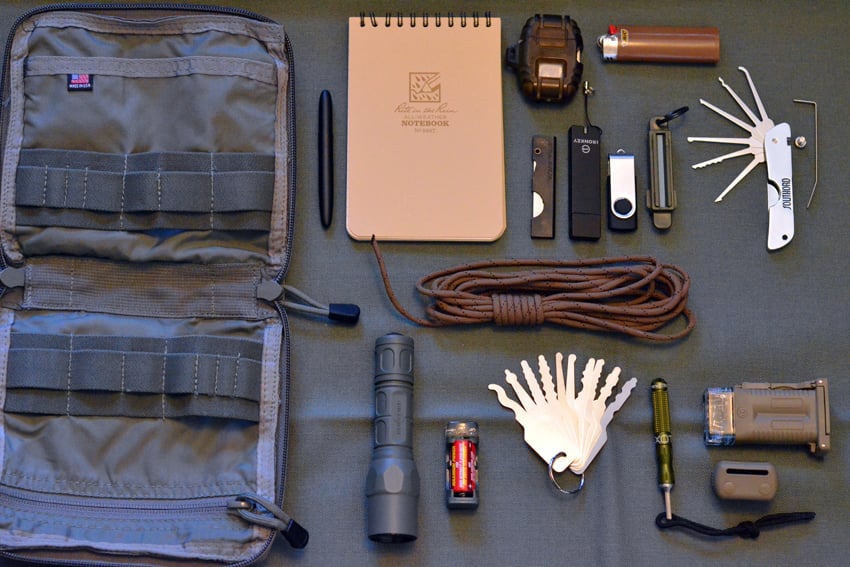
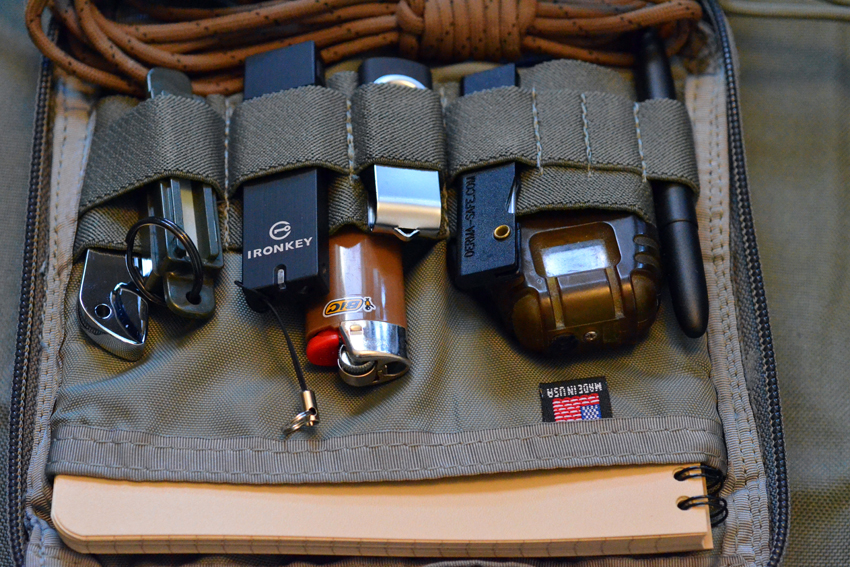
• Rite in the Rain Black Bullet Pen
• Rite in the Rain pocket 3×5 notebook, spiral top
• Pocket Straight Razor Survival Tool
• Windmill Delta Stormproof Lighter
• Ironkey Secure Flash USB Drive
• Unknown vendor, Generic 8GB USB Drive, Tails Linux
• Government issued knife sharpening stone
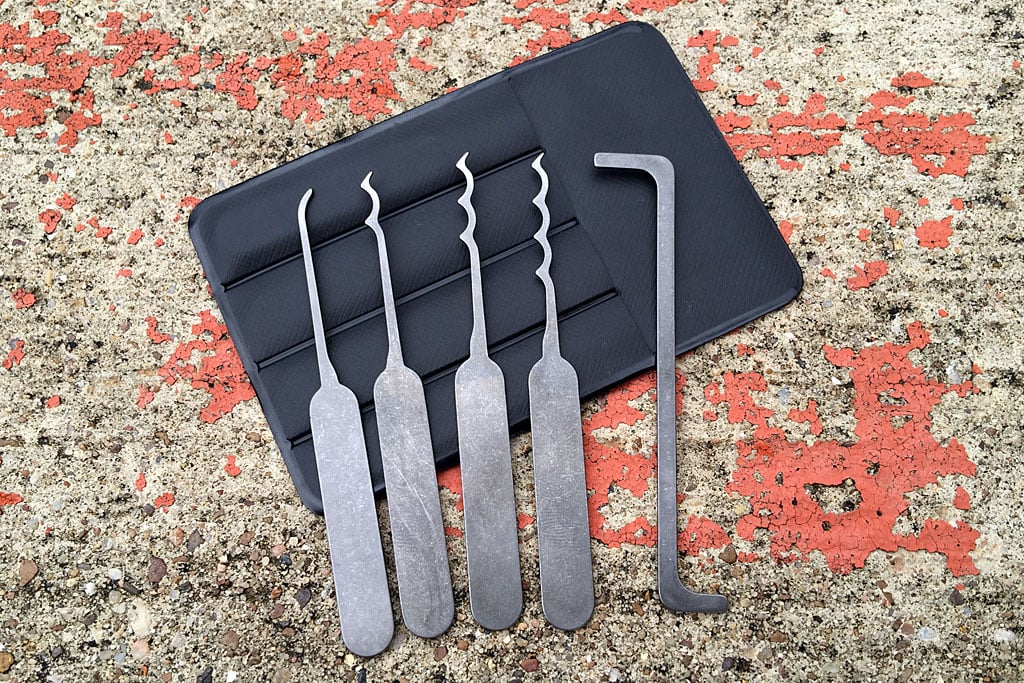
• Southord Jacknife Pocket Lock Pick Sets JPXS-6
• Bic disposable lighter, brown
Outside Flap Pockets of OP1
• CR123 4-battery case with batteries
• AA 4-battery case with batteries
Outside of the GORUCK Bullet
Mounted on the top row of MOLLE:
• SAR Eclipse Dogtag System
• ITW Survival Whistle
Contents of the slash pocket:
• Snowpeak Titanium Spork
• SOG Power Lock
• Benchmade Houdini Pro
• Strider SMF, Tanto blade
My Own Reassessment
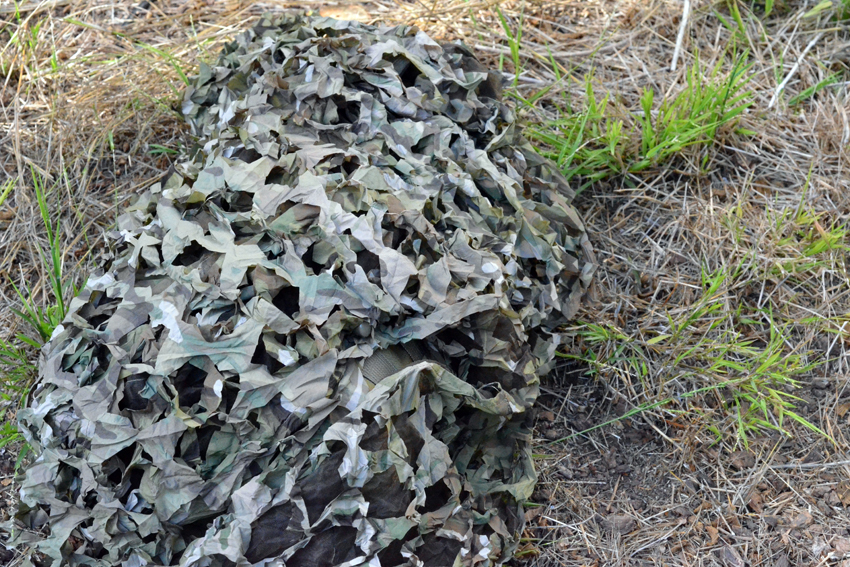
There’s currently only one thing I intend to add to my Bolt Bag; a small Mini Survival Kit. I go back and forth on whether I really need that Crye Compact Ghillie or not, but it’s small enough that I don’t mind it taking up space in the pack. The benefit of it would be if I needed to move through a wooded or other natural open area with stealth, or if I needed to stash the bag someplace in an area like that, unnoticed for a while.
Generally, though it isn’t listed in the bag breakdown above, I also have a 3-liter Source hydration bladder. It allows me to have fresh, drinkable water without taking the pack off and provides a nice cushion on my back. I’ll also stuff a hat or two inside the pack, depending on weather. An Outdoor Research beanie and a waterproof “boonie” hat allow me to adjust to chilly or rainy weather while taking up almost no space.
Hopefully, what I’ve written above will help you think about how you might build your own Bolt Bag. There may never be a disaster that would facilitate using such a bag and I hope you never encounter one, but if things ever do go haywire, wouldn’t you rather be prepared?
Editor-in-Chief’s Note: Matthew Sharp is a Plank Owner and Life Member at ITS and goes by the username “viator.” He lives in The People’s Republic of Northern California and enjoys long range shooting, carrying heavy objects great distances and fuzzy little puppies.