Knot of the Week: Modern Samurai Armor Knot Work with the Dragonfly Knot

KOTW Samurai Dragonfly Knot

While recently visiting the Japanese Samurai Armor Exhibit at the Kimbell Museum in Fort Worth, the intricate cordage and knot work really caught my eye. Being that we have a Knot of the Week series here on ITS, I wanted to see if I could reverse-engineer these ancient knots and not only demonstrate how to tie them, but adapt this style to modern day armor.

Gone are the days of metal and chain, now replaced with the nylon and plastic found in traditional body armor and plate carriers. I wondered while looking through the exhibit, how all the braided cordage they had tied on their armor didn’t get caught up in things. I then had an idea to weave these same kind of knots through PALS Webbing on the back of a MOLLE Plate Carrier. Using the Agemaki or Dragonfly Knot as the main element, I’ll be walking you through how to tie this knot (there’s actually two different versions) and how I created the back piece you see in the main image above.

The Dragonfly Knot gets its naming convention from the finished product looking like a dragonfly with spread wings. My inspiration for this decorative knot project came from the photo below and the stunning art that the Japanese created on the back of their battle dress. As you’ll notice, the cordage used in my representation is a mix of paracord and 3/8″ diameter polypropylene cordage. The poly rope is an inexpensive cordage that really has no purpose other than decoration in my book. The material used in the “guts,” or inner strand(s), make me question its strength rating.

KOTW Samurai Dragonfly Knot

Samurai Armor Knot Work – Agemaki/Dragonfly Knot » Decorative

(Strength: –/Secure: –/Stability: –/Difficulty: 3

Please refer to our Knot of the Week introduction post for a description of what these ratings mean.

Something to note with the Agemaki or Dragonfly Knot is that there’s two different ways to tie it, with two different results. I saw it tied both ways at the Samurai exhibit. At first I though it was merely the backside of the way I learned to tie it, but soon found out the “mirror image” of the knot required a different method for tying. The photo below shows the result of both methods of tying and the gallery includes the step-by-step instructional photos. The embedded video is the best resource though, as it demonstrates both methods in great detail.

KOTW Samurai Dragonfly Knot

Uses:

  • Decorative Knot Work for Display

Tying Instructions:

  1. The first step in tying the Dragonfly Knot is to girth hitch a section of cordage around an object, this will help when tightening the knot during the last step.
  2. Starting with the right side of the two strands, tie an overhand knot.
  3. Pay special attention to the orientation of the loop and the working end tail by observing this in the photos or video.
  4. Take the left side working end and pass it through the loop created on the right side.
  5. Ensure this is passed through the top of the loop. See photo.
  6. After the working end is passed through the loop, pass is behind the standing part of the left side cordage.
  7. Now continue with the remainder of an overhand knot, ensuring the working end is in the position shown in the photos.
  8. *The orientation of these lines is very important and creates the difference in the two versions of this knot that can be tied.*
  9. Taking the loops that meet in the middle, pass the right side loop through the upper wrapping in the left side overhand knot.
  10. Reverse this and now take the left side loop and pass it through the bottom wrapping in the right side overhand knot.
  11. *This can be a confusing step, so please refer to the photos or video.*
  12. Pull on each loop and the standing parts of each section to tighten the knot.
  13. *The mirror image of this knot can be tied by noting the difference in the loops in further photos from the gallery below.*
Posted in Decorative | Tagged , , , , , , , , , , | 9 Comments

The Handy Dandy Backpacking Checklist for Summer Adventures

Do you feel like going backpacking this summer, but haven’t streamlined the packing and planning process?

Today I’m sharing the checklist I use for backpacking with the hope that you’ll be able to use it during your own planning. With food, water and Nikon DSLR, my pack that this list is based on weighs in at about 28 lbs. This list is certainly not all-encompassing, so feel free to edit and tailor it to your climate (mosquitos? hot/cold/humid/dry?), legalities (bear cans?, no ground fires?, CCW permitted?) and style (comfort on foot vs comfort at camp?). Just to give you an idea of what kind of backpacking I’m doing with the gear in this checklist, I’m usually in California’s Eastern Sierra during the summer on easy well-traveled terrain where navigation is a no-brainer.

Aside from the necessities, I allow myself one indulgence which is usually my DSLR. Sometimes I ditch the DSLR and pack a point-and-shoot camera with a flask of rye whisky instead. Some may opt for a camp chair frame, the kind where you slide your mattress inside for a padded seat with a minimal weight penalty, but I just sit on my bear can. Your adventure is your own; pack what suits you.

This article is split into two templates. First, a packing checklist. Copy this into Google Docs, Evernote or wherever you keep all your notes and documents. Second, a Google Docs emergency contact template that I share with others in my group. I have them add in their personal information (to include emergency contact information like a family member or girlfriend) and then right before we punch out of work on Friday, I copy, paste and mass-mail it to their emergency contact.

Without further ado:

Procedural Stuff to do at Home Before Heading Out

  • Freeze leftovers
  • Unplug stuff from walls
  • Buy topo maps
  • Email emergency contact info to friends/family of party members
  • Enter emergency contact emails into SPOT messenger contact list
  • Find dogsitter
  • Take out trash and recycling
  • Clean camera lenses
  • Top off batteries (camera, headlamp, SteriPEN, SPOT Messenger, etc.)

Jeff More Skunkabilly Pack Dump

Stuff to Pack

Navigation

  • Topographic Map/s
  • Suunto Ambit (currently field testing this, but have been wearing a Suunto Vector for the previous nine years for the altimeter. Most will opt for a compass and possibly a GPS with topo base maps such as the Garmin 62St)

Sun/Bug Protection

Clothing

  • Liner Gloves
  • Shell Jacket
  • Down Jacket
  • Base Layer Hoodie
  • Spare Socks (seasonal)

Illumination

  • Headlamp (sewn to beanie, this is two items for normal people)

First Aid

Fire

Repair

Food

Hydration

  • SteriPEN
  • Hydration Bladder and/or Bottles
  • Drink Mixes (1x Emergen-C, 1x Starbucks Via, 1x herbal tea per-day)

Shelter

  • Ground Pad (Big Agnes Insulated Air Core or Therm-a-Rest NeoAir)
  • Sleeping Bag (Big Agnes 40°)
  • Tent (Big Agnes Fly Creek UL2)

Other Stuff

  • Trekking Poles
  • SPOT Messenger
  • Toiletries (toothbrush, toothpaste, Gold Bond, floss)
  • Baby Wipes
  • Trash Bag/s
  • Bear Spray
  • Camera

Stuff to Throw in the Car

  • Extra Food
  • 7-Gallon Water Jug
  • Day Pack (if trailhead quota is exceeded and party decides on day hike instead)
  • Titanium Mug (pot substitute if sharing Jetboil with another party member)
  • Clean T-shirt and Flip Flops for the Ride Home

Emergency Contact Info Template

Copy and edit this spreadsheet to suit your trip and email to each party members’ significant others or family. This example is for a backpacking trip at 20 Lakes Basin.

This is the emergency contact information for your spouse/SO/child regarding the backpacking trip they are going on with me. See below for relevant information.

“We will be off the grid and therefore out of cell phone contact from mid-morning Saturday until noon Sunday. Do not call Search and Rescue unless we have not checked in by Monday morning. Inyo National Forest Ranger station: (760) 873-2485.”

Camping Emergency Contact List

View in Google Docs

Summary of Activities

Weather Forecast

Visit NOAA.gov to find the forecast for your location.

Route

It’s best to snap a photo with the topographic view of your destination and share the route information with your emergency contact.

“We will trace counter-clockwise on the loop towards the top. Weather is expected to be clear with zero precipitation, highs in the 80s and lows in the high 40s or low 50s.”

20 Lakes Basin Backpacking Trip

© Google Maps

Schedule

Friday

  • 1830 – Depart Los Angeles after Hicks and Spunkmeyer leave work and arrive at my place. Dinner is on our own: either on your way here, fast food enroute, or Mountain House at camp.
  • 2300 – Arrive at camp at dispersed camp near Lone Pine at the usual spot. Weirzbowski will drive up from San Diego and meet us there at his own pace. Send SPOT beacon.

Saturday

  • 0645 – Break camp, Mountain House for breakfast or Jack-in-the-Box in Bishop.
  • 0730 – Line up at Bishop permit office to attempt walk-in overnight permit.
  • 0930 – Hit trailhead. We’ll park our car wherever the designated overnight/backcountry trailhead parking lot is. My Sulaco is the one with the Yakima rack and surfboards.
  • Afternoon – Camp at Shamrock Lake. Send SPOT beacon. Instant noodles for lunch, Mountain House for dinner.

Sunday

  • 0800 – Break camp at our own pace. Mountain House for breakfast.
  • 1000 – Arrive back at trailhead.
  • 1600 – Arrive home. Each person should check in with their emergency contact when they arrive safely home.

Estimated Cost

  • Please bring cash in small bills to reimburse your driver.
  • Gas: for those riding with me: 620 + 5% miles = ~650 miles / 21 mpg = 31 gallons @ $4.50/gal = $140 total / 3 pax / car = ~$47ish
  • Food: n/a, on your own.
  • Lodging: $0
  • Park fees: $5 bear can rental if you don’t own one. I will put my food into Hicks’ bear can. Wierzbowski and Spunk don’t have one, so you guys decide amongst yourselves who will do the rental and divvy up your food/toiletries and other scented items.
  • Total Estimated = ~$60ish per head

Plan Your Own Adventure!

This article should serve as a great starting point to help you plan your next weekend adventure. Feel free to customize the packing checklist to fit your own needs be sure to send us a postcard.

“I am a happy camper so I guess I’m doing something right.” – Henry David Thoreau

Jeff More Skunkabilly Campfire

Editor-in-Chief’s Note: Jeff lives in Los Angeles and serves as our resident Eastern Sierra correspondent. He’s buckling down for the next Sharknado, but in the meantime is throwing the occasional blog post up on skunkabilly.com.

Posted in Camping | Tagged , , , , , , , , , , , , | 7 Comments

Squawk Box Broadcast 010: Warriors, Simplicity and Inspiration

Squawk Box Broadcast 010

The Squawk Box Broadcast aims to highlight a few of the stories that have caught our attention recently. It’s also a way to broaden your horizons and explore new ideas.

Trikos International >> Warrior Dog Foundation

http://vimeo.com/99602780

“Since militaries have existed, man has used dogs to augment them in combat.” Even with weapon technology increasing on a daily basis, dogs are still relied upon by special operations units in the Military today. After serving as a multipurpose K9 trainer for U.S. Navy SEAL Teams, former active duty Navy SEAL Mike Ritland founded Trikos International to bring the best personal protection dogs to his clients. In case you weren’t aware, we’ve teamed up with the charity Mike established, The Warrior Dog Foundation, to produce a K9 Morale Patch.

Simplicity is Beauty >> A Continuous Lean

Ernest Wright & Sons of Sheffield Handmade Scissors

If you’re the type of person that marvels over a beautifully built everyday object, check out the video and article on A Continuous Lean. All too often we settle for something disposable simply because it’s inexpensive but we really should be focusing on quality. Ernest Wright & Son have been hand-making scissors and shears in England since 1902 and offer a life-time guarantee. While just one example, it’s eye-opening to see what goes into crafting a high quality common household item built to last.

How to Make an Improvised Rifle Cheek Rest >> Lucky Gunner

Lucky Gunner DIY Cheek Rest

We’re always interested in a good DIY and former Recon Marine Kyle Eggimann has put together a simple and effective tutorial on how to make your own rifle cheek rest. Having a solid cheek weld is important to shooting proficiency and allows you to be comfortable while observing through the scope for a significant amount of time. What’s also great about this DIY is that it’s cheap to make and easily removable without leaving any kind of adhesive residue behind.

Want to Change the World? Start by Making Your Bed >> Art of Manliness

Admiral William H. McRaven, former Commander of SEAL Team 3 and JSOC (Joint Special Operations Command) during Operation Neptune Spear, shares some incredible life wisdom to the graduating class of the University of Texas at Austin. You may have never thought that by making your bed you could begin to change the world, but it’s possible.

Feast your eyes on these rare aircraft cutaway drawings >> Sploid

X-15 Aircraft Cutaway

As a kid, many of us wondered how things worked. The majority of us were most likely drawn to large and high-tech machinery, such as fighter jets and spaceships. There was no better way to gain an understanding than to see through the “skin” and take a look at what’s underneath. Sploid has put together a few aircraft, spacecraft and weapon cutaways for your visual enjoyment.

Like these posts? Stay up to date by following the Squawk Box daily.

Posted in ITS Information | Tagged , , , , , , , , , , , , , , , , , , , , , , , | Leave a comment

Understanding Concealed Carry Loadouts and Equipping for Any Threat Condition

Jeff Gonzales EDC

Do you have a default gear list of items you always carry? Is there a benefit for changing up your daily concealed carry equipment selection?

What’s Under the Hood?

If you ask people why they carry a certain loadout, a lot of times you get a shoulder shrug and/or a “because.” There doesn’t appear to be a lot of thought that goes into the why “this” or “that” and on the flip side, why NOT “this” or “that.” My point is that we all need to weigh our perceived threat(s) and balance that perception with the loadout of your choosing. If we were to truthfully tackle this subject, I think we can all agree that if we really thought we were going into harm’s way we would:

  1. Not go.
  2. Grab a rifle and…
  3. Grab some friends with their rifles.

So, this perceived threat we envision is largely based off being able to handle a lethal encounter with a pistol only. Just the other day I penned an article where I talked about your Qualify of Life as someone who carries concealed for personal protection. It had some great insight into balancing your life with the need to carry concealed, but it did leave a few gaps in the “how” or “why” you’re carrying your standard loadout . Let’s try to tackle the why.

Threat Conditions

The first thing we need to do is define the perceived threat condition. Is it high, medium or low? High means that you face a high probability of loss of life, limb or eyesight. An example of this might be verifiable threats against your life or injury. Whether it’s a personal encounter, a threat over the phone or one on the Internet, you have something tangible that gives you a reason to be concerned.

A medium threat might have more to do with the location or time such as heading into the infamous “bad part” of town, or it’s extremely late at night. It can even be a combination of the two. While there’s no directed threat against you, the location and or time increase it to a medium level.

At the bottom of the scale is a low threat, basically the whole reason why you’re carrying in the first place. It’s for that off chance of being in the wrong place at the wrong time. This isn’t an all inclusive list, but it should get the juices flowing and I encourage you to consider your own definitions of high, medium and low threats.

The Kitchen Sink

Next is the armament loadout and I break these down into light, standard and heavy. This provides me with some flexibility within the perceived threat condition. In other words, you have three different levels of armament within each threat condition. So, if I’m in a medium threat condition but I want to go heavy, it might mean I bring a spare weapon as a backup, maybe on my weak side hip.

My loadout starts with a low threat and light armament. This means a subcompact firearm with a magazine capacity of 10 rounds or more, a small tactical flashlight and a folding knife. From here, I might move up to a compact firearm with higher magazine capacity at the standard level and then carry a spare magazine at the heavy end.

Jeff Gonzales Concealed Carry

The Stay Puft Marshmallow Man Syndrome

There’s also the level of concealment that needs to be addressed. Typically when you have a heavy loadout, it’s difficult to truly be concealed, so don’t forget that while you may obscure the presence of your choices, they’re not really obscured. Kind of like the physical application of cover versus concealment.

Threat Matrix

If you take a closer look, this theory has a total of 9 squares, which makes up our Threat Matrix. I would encourage you to sit down with a piece of paper and draw out 3 columns and then 3 rows. Label one Threat Conditions and the other The Armament. Then fill it in with your available loadout. It may be nothing more than a paper drill and you wind up deciding to eliminate several squares, but the point is that you have put some thought into the concept.

Threat Matrix

Editor-in-Chief’s Note: Jeff Gonzales was a decorated and respected US Navy SEAL, serving as an operator and trainer who participated in numerous combat operations throughout the world. He now uses his modern warfare expertise as President of Trident Concepts, LLC., a battle proven company specializing in weapons, tactics and techniques to meet the evolving threat. Bringing the same high-intensity mindset, operational success and lessons learned from NSW to their training programs, TRICON has been recognized as an industry leader by various federal, state and local units. Organizations interested in training with TRICON can call 928-925-7038 or visit tridentconcepts.com for more information.

Posted in Firearms | Tagged , , , , , , , , , | 11 Comments

Build Your Own Ghillie Suit for Under $75

Last time, we explained the rationale behind the need to have a ghillie suit in one’s arsenal. This segment will explain the construction methods of one of the easiest ghillie suit designs, the decoy bag suit. The title may be a little misleading because the ultimate decision on the total cost for this project will depend on your ability to hunt for a bargain. Between Amazon, Wal-Mart, eBay and other craft or sporting goods retailers, there’s a good chance that you can come in quite a bit under budget.

Materials

DIY Ghillie Suit Supplies

One of the most affordable homemade ghillie suit designs is a ghillie suit constructed from a mesh decoy bag. When used in conjunction with ghillied headgear, this design is well-suited for outdoor sports and hunters who need the maximum amount of concealment, while offering enough mobility throughout the field or stalking prey without worrying about tripping hazards. Essentially, the decoy bag suit provides 360° torso coverage with some distinct advantages.

Benefits and Drawbacks

One of the greatest advantages of this suit is that it’s one of the fastest suit designs to construct. Because this suit isn’t attached to a base uniform, some of the preparation work required by other suit designs isn’t needed. The only major modification for the decoy bag ghillie suit is the removal of the shoulder straps with a seam ripper and cutting the openings for the head and arms. All other steps focus upon preparing the camouflaging material and tying it to the suit.

The suit does have some drawbacks, but most of these are easily overcome. Because of the sleeveless design, the arms may not be adequately camouflaged for certain applications. However, this design does allow bowhunters to enjoy the advantages of a ghillie suit without worrying about the bowstring catching material on the arms. Additional options like pockets are harder to engineer for this particular suit, but because of the options for clothing underneath the decoy bag suit are numerous, this isn’t an issue for most users. You may wish to cut slots into the bag to access the pockets of other clothing without having to remove the ghillie suit. A single, centralized access slot in the chest or abdomen area is sufficient for reaching necessary gear stored in the pockets with either hand. The legs are also more exposed with this suit, but tying longer lengths of camouflaging material at the leg opening will help remedy this drawback. Crouching is a natural action to take while stalking or even hiding from others and the suit will cover more of the legs when this technique is used.

Overall body style and shape doesn’t affect the effectiveness of this suit design for most individuals. Average people who are 5’6” or taller, who normally wear large or extra-large size shirts/jackets and have a waist size of 32” – 42” size pants should have no problem with this design. You’ll also still have room for additional layering in colder climates and environments. The larger 36″ x 50″ size decoy bags will easily accommodate big and tall sizes. This design is also adaptable to the growth spurts of teenagers and can be worn well into adulthood.

Build Your Own

Step 1: Obtain a mesh decoy bag that will allow you to wear it without restricting your movement. Common bag sizes are 30″ x 38″ and 36″ x 50″. Some bags have camouflage patterns, but most are olive drab or brown. These bags are inexpensive and found at most sporting good stores with even a modest hunting department.

DIY Ghillie Suit

Figure 1: Carefully remove the carrying straps from the decoy bag with a seam ripper.

Step 2: Using a seam ripper, carefully remove the shoulder straps. A sharp pocket knife or razor blade will work in a pinch, but a seam ripper (available at any fabric store for about $3) is the safest tool. Try to avoid cutting the mesh. After the shoulder straps are removed, you may choose to spray paint a couple of vertical or diagonally-oriented lines or splotches to break up the solid color. If you intend to cover 80% or more of the decoy bag with camouflaging material or the bag has a camouflage pattern printed on the mesh fabric, spray painting is unnecessary.

Step 3: Lay the bag flat on a table or suitable workspace with the bottom end of the bag towards you. Divide the bottom in equal thirds with a marker. Using a pair of scissors, cut open the center portion, leaving the two end portions intact.

Step 4: From the bottom edge of the bag, measure 10-14 inches on each side towards the bag opening and mark your measurements. Taking the scissors again, cut both sides of the bag starting from the bottom and cutting towards the measured points.

DIY Ghillie Suit

Figure 2: Preparing to cut the head and arm holes.

Step 5: After you’ve cut the head and arm openings, pull the decoy bag over your head to check for proper fit. The bag should have plenty of room to don the suit over layers of other clothing if necessary. If the openings are too large, you can tie the edges together with camouflaging material, yarn or string to reduce the size of the openings.

Step 6: The mesh is large enough to pass small bundles of stranded camouflaging material through the holes, but adding netting accommodates larger strips and materials. Adding random areas of netting will allow for the addition of wider strips of burlap or other materials if you choose. Lay the netting over the desired area of the decoy bag and tie it with 550 paracord or strands of camouflaging material through the openings of both the netting and the decoy bag.

Step 7: Choose the environmental colors needed for the suit. Determine the most dominant color in the environment, which will be your base color for the camouflaging material. Use all the other colors in the environment for blending.

Step 8: If hand dyeing, begin preparing the camouflaging material by shredding natural colored burlap material into individual strands. Save about one yard of burlap for cutting larger strips and dye them if desired. After obtaining four to five pounds of burlap, divide the strands into piles for the colors you selected for your decoy bag suit.

Set aside two pounds for the base color and use the remaining material for the blending colors, using about one half pound per color. Jute twine works well for this suit and cutting it into 10 – 14 inch lengths prior to the dye bath ensures even dyeing. After dyeing the material, allow it to dry and begin tying the material to the suit.

DIY Ghillie Suit

Figure 3: Worn like a smock, the ventilated decoy bag works well in warmer climates. This decoy bag ghillie suit has netting on both sides and contains both natural and synthetic burlap, jute twine, screen-printed mesh, raffia grass and artificial foliage.

Step 9: When tying the camouflaging material to the decoy bag, start at the leg opening and work upwards toward the neck and shoulder area. Bundle 4-8 strands together, pass one end through the mesh and bring the strands back through an adjacent hole in the mesh. Vary the lengths of the bundles as you go and tie a half-hitch or square knot to secure the material. Continue this procedure, spacing the bundles about an inch apart while going up and around the decoy bag 360 degrees.

Burlap isn’t the only material you can choose to use on your decoy bag ghillie suit. Yarn reduces some of the fire hazards associated with burlap, but treating the suit with a fire retardant after completion is still recommended. The major disadvantage with yarn is that it’s too warm for most ghillie suit applications. However, in late autumn or winter, hunters may find the added warmth a welcome presence, while in a static position. Unless you plan to use synthetic burlap, all other material choices will not be fire retardant or water repellant unless specifically treated.

Step 10: After completing the base color, rotate through the other colors, tying them randomly around the suit. Assemble bundles consisting of 3-4 individual strands, but this time, tie the knots towards one end and allow most of the bundle to hang freely. This will help develop the contrast of the suit and provide more texture. Adding the camouflaging material takes time and can be done while watching television, listening to music or some other activity that doesn’t require your full, undivided attention.

Step 11: Next, apply vegetation loops along with any artificial or natural vegetation to blend into the environment where you will be using your ghillie suit. Earth colored elastic hair bands or natural colored rubber bands work very well. Rubber bands are cheaper and will dry out over time, but are easily replaced.

Natural Vegetation

The use of natural vegetation is the single most important customizing option you can employ on your ghillie suit. It would be foolish to construct a ghillie suit and not use vegetation native to the environment where you use the suit. The major pitfall of natural vegetation is that it starts to wither and brown after just a few hours. Certain types of natural vegetation are available at hobby and craft stores. Dried raffia grass is very popular and suitable for dyeing. It’s extremely effective in grassland, desert and winter environments. Spanish moss is another option that is available in different colors and adds another element of texture to your suit. Carpet moss is also available at hobby stores in either the model train or silk flower sections.

Not all natural vegetation types work however. You should avoid plants that cause skin irritations such as poison ivy, poison sumac, nettles and certain varieties of cacti. However, if you’re trying to conceal a secret cache of supplies, fabricating some foliage to look like poison ivy may keep the casual investigator away. However, if you’re in an area known to have poison ivy, wear long sleeves and gloves. If you know you’ve come in contact with the oil from the plant, generously wipe down the effected area with isopropyl alcohol to remove the oil. This will prevent the development of the painful rash associated with its contact.

Artificial Vegetation

If you’re going to use your ghillie suit in a certain area for an extended period, the use of artificial vegetation may be an option. One of the advantages to this method is the amount of fresh vegetation required to blend your suit into the environment. This also means that it takes less time to ‘”veg up” prior to putting on your suit and will last considerably longer than natural vegetation. Unless someone is practically on top of your position, or a botanist, chances are they won’t be able to tell the difference. There’s a wide selection at most hobby stores, but the selection typically corresponds with the current season. This means that during the spring and summer months, you typically won’t find fall and winter items displayed and vice versa.

One minor drawback to artificial vegetation is the glossy appearance commonly associated with most plastic plants. The use of a flat spray-paint of a matching color will remedy this. Not only can you paint the vegetation to reduce the glossy appearance, you can adjust the color of the leaves to match the season as well. The vegetation can be painted and repainted as often as needed. Leaves rapidly change color before and after they fall, so you might want several different shades, especially browns and yellows. Keep in mind that leaves never turn a uniform color all at once and that the color varies slightly on each side.

Step 12: After adding all the camouflaging material to the suit, blend the overall appearance of the suit by lightly applying spray paint or leftover liquid dye from a spray bottle. The trick is to use just enough to achieve the desired look without using too much. Allow the paint or dye to dry.

DIY Ghillie Suit

Figure 4: Attaching an elastic hair band to the netting for a vegetation loop.

Step 13: Hand wash the suit in a scent-free, UV brightener-free hunters soap and treat your completed decoy bag ghillie suit with a fire retardant spray specifically designed for natural and/or manmade fabrics, depending on the fabric you used. After you’ve washed to suit, you can choose to weather or season the suit by partially burying or dragging the suit through dirt or mud. This will help the suit blend into the environment better, as it will pick up dirt and ground debris, providing more effective coloration. A lightweight flame/fire resistant balaclava is highly recommended to protect the head and face, especially if the removal of the garment still requires the user to pull the suit over the head.

Editor-in-Chief’s Note: Please join us in welcoming Matthew Dermody of Hidden Success Tactical Concealment as a contributor on ITS Tactical. If you would like to learn about personal camouflage, concealment fieldcraft or even more information about ghillie suits, check out hiddensuccesstactical.com

Posted in Camouflage | Tagged , , , , , , , , , , , , | 4 Comments

Ridiculous Dialogue Podcast: Episode 03

Ridiculous Dialogue Episode 3


Episode 3

In Episode #3 of Ridiculous Dialogue we’re joined by Lang for the first time, where he asks the infamous question “who’s Wes Anderson?” We also discuss movies that we’d pick if we could go back and watch something again for the first time.

Have you ever asked yourself why our moon doesn’t have a name? Join us and hear our answers.

Episode 3 Cast of Characters

Ridiculous Dialogue was created to share the banter that takes place at Imminent Threat Solutions on a daily basis. It’s us; candid, unedited and talking about everything from what movies we’re watching to the general geekiness that keeps us laughing here at ITS HQ.

While we generally keep the vibe in our articles PG rated, be warned, it may not be safe to blast over your speakers at work. We hope you enjoy the insight into ITS and who we are behind the scenes as a company; pull up a chair and tune in to Radio ITS.

Posted in Podcast | Tagged , | 5 Comments

Prometheus Design Werx: Crafting Equipment for Uncommon Adventures

PDW_Chris_Whitney_Patrick_Ma

It’s not often I write about what companies bring to the industry as a whole, but as my own company grows, I feel it’s more important than ever to help get the word out about those who not only represent a ripple in the fabric that is the tactical industry, but also embody the spirt, vision and integrity that I strive for here at ITS.

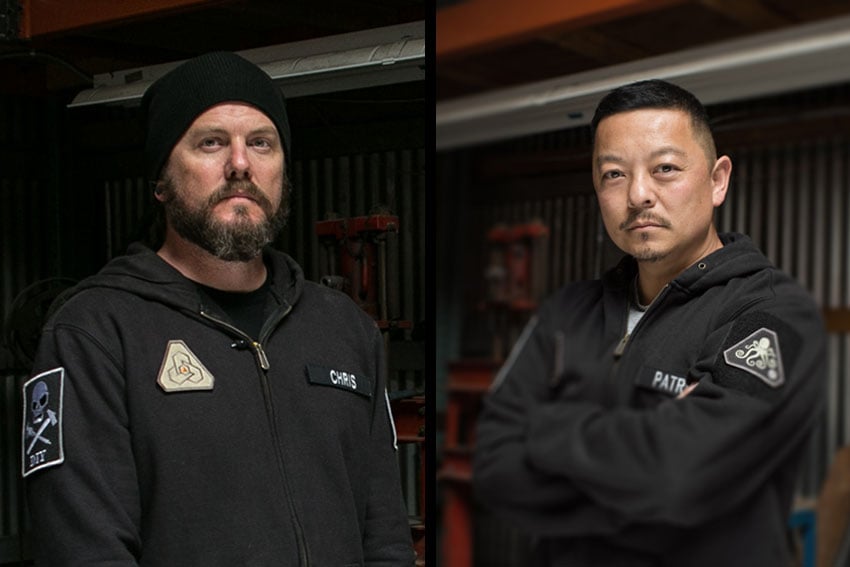
I’ve been patiently waiting to discuss what Patrick Ma, along with his co-founder, Chris Whitney, have been developing over at Prometheus Design Werx. Today, I’ll be sharing what I’ve learned from Patrick and Chris during an exclusive interview I had the opportunity to conduct with them recently.

Before I get into the all the exciting news from PDW, I’d like to provide a bit of context for those of you who might not know who Patrick is and what the implications of this new venture will bring to the market. Rather than dilute the article with that information, click here to read my write-up from last year.

Prometheus Design Werx

pdw

For Patrick and Chris, the connection to the Greek mythical figure of Prometheus, has been a long standing one. Prometheus, the original rebel, fought against the status quo by snatching fire for all of mankind to build a life for themselves outside the shadow of the gods.

Rebels can be persecuted at times for wanting to shake things up to benefit others and I thought this was a fitting analogy that I’ve been all too familiar with at times.

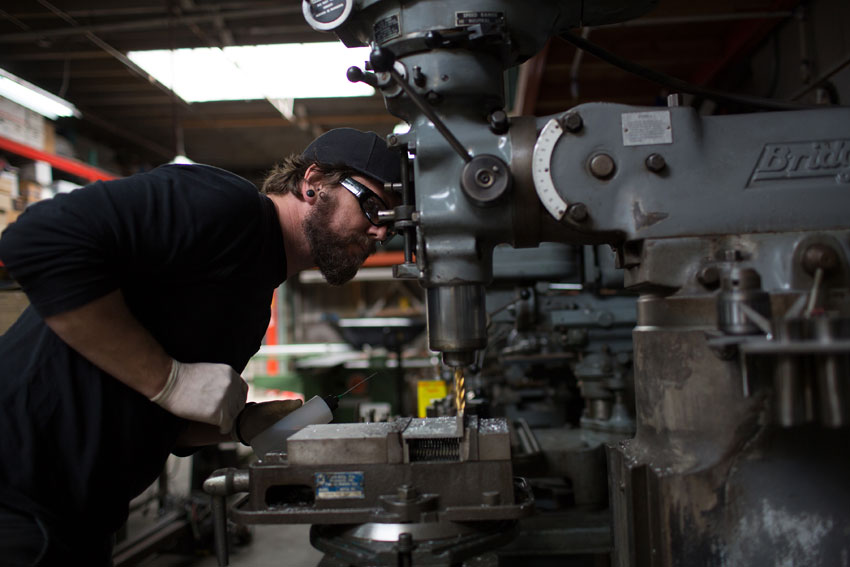
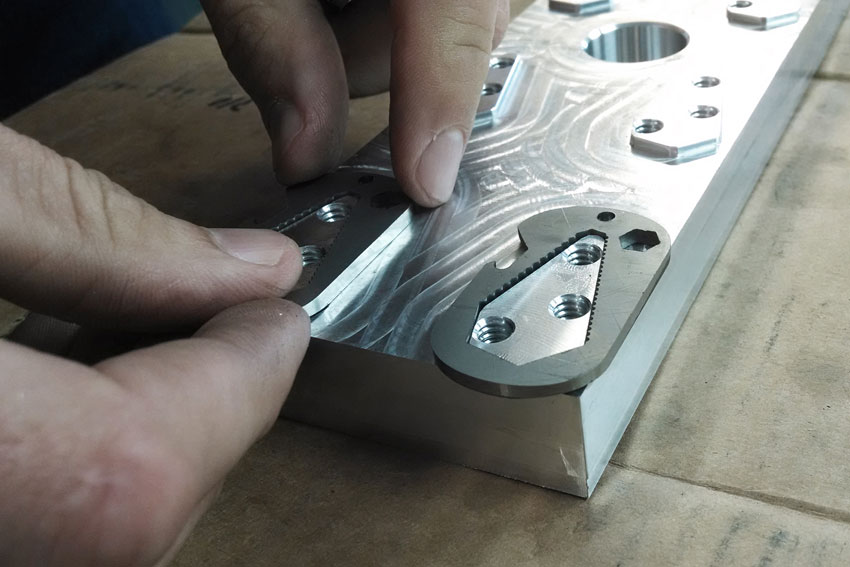
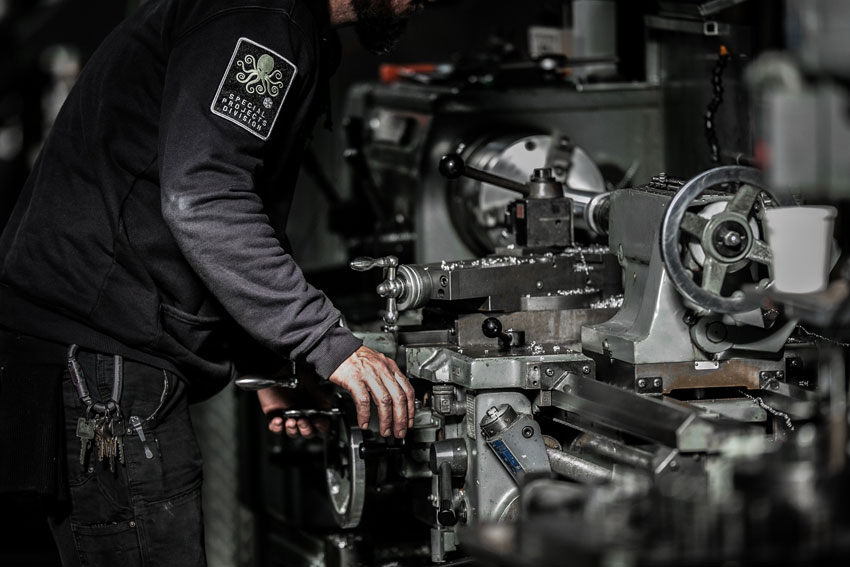
Chris Whitney, the co-founder and director of Research & Development for PDW, has owned and operated a welding and machine shop since 1995. His primary focus was modern high-end architectural work, but he also did prototype work in the furniture field and even product development in alternative energy and self-contained vertical food growing systems.

Patrick and Chris wound up meeting when Patrick needed a custom part for his motorcycle and was introduced through a friend to Chris and his machine shop. The connection was immediate, when Chris realized he’d been buying knives at Patrick’s store for quite awhile.

Chris_Whitney_8x12h

Chris also has an extensive martial arts background that started young in his life, but he considered himself a “martial tourist” until discovering the Filipino art of Escrima in 2002. Since then he’s become a Guro in Giron Arnis Escrima and has taught throughout the US and in Europe, being trained himself under Grand Master Tony Somera.

Patrick and Chris are self-described craftsmen, who grew up learning to work with metal, wood and fire. They’ve always had an innate resonance with Prometheus from Greek Mythology and why they were drawn to this as the basis for naming their company.

While only officially being in existence as an operating company since January 2nd 2014, they’re charging uphill and are full of excitement and passion to bring great products to market. Today also marks the official launch of Prometheus Design Werx and their website, www.prometheusdesignwerx.com

Products for the People

standard_issue_dog_tag_9_6h

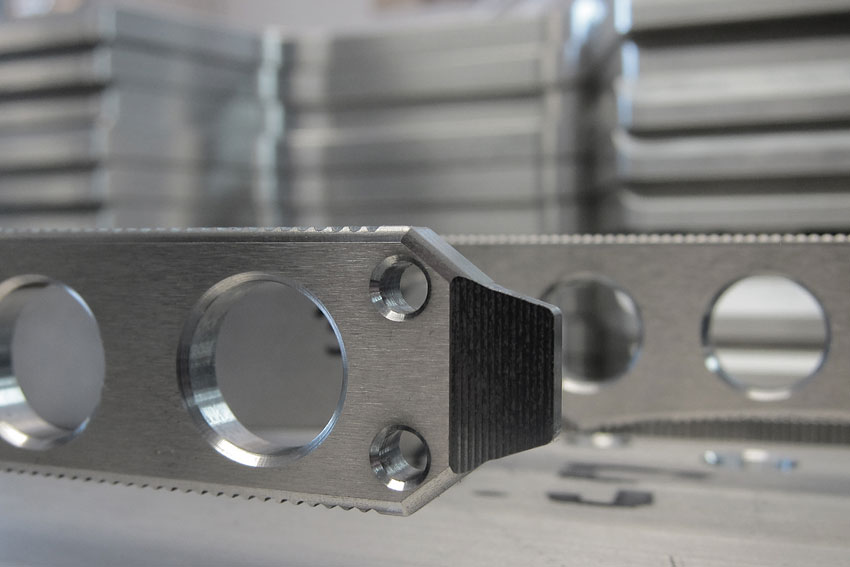
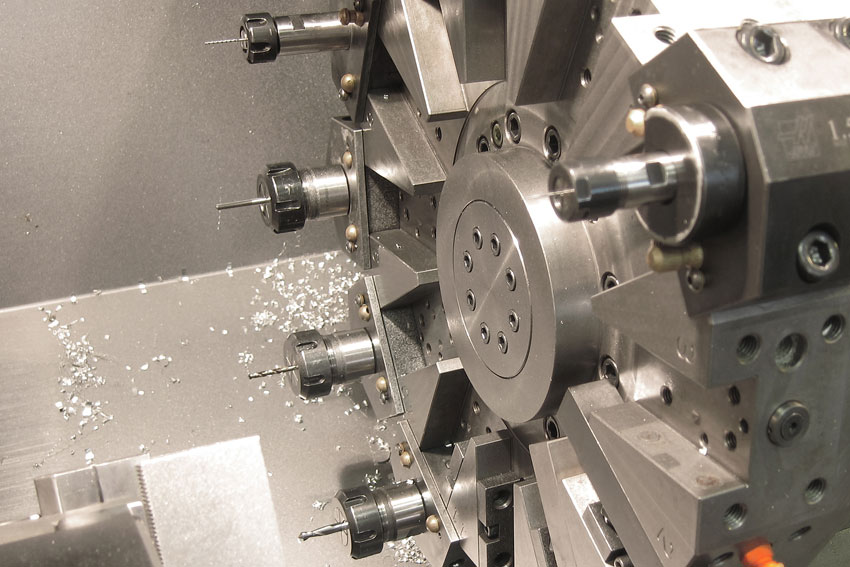
Starting out, PDW will be producing what Patrick and Chris describe as their first passion, hard goods. This includes different types of knives, pocket tools, OPTs (One Piece Tools) and is how Patrick started 17 years ago in the industry. PDW’s focus on edged tools and hard goods is a rebirth of sorts, while staying closely focused on their roots.

Despite Chris being involved in Escrima for the past 12 years, they’re not focusing on a particular martial discipline for the tools they’re crafting. They expressed the desire for the user to have the ability to apply and dictate how the edged tools they’re creating will be used. There’s no singular focus or message other than to say they’ll be versatile, capable and useful.

standard_issue_dog_tag_3_7h

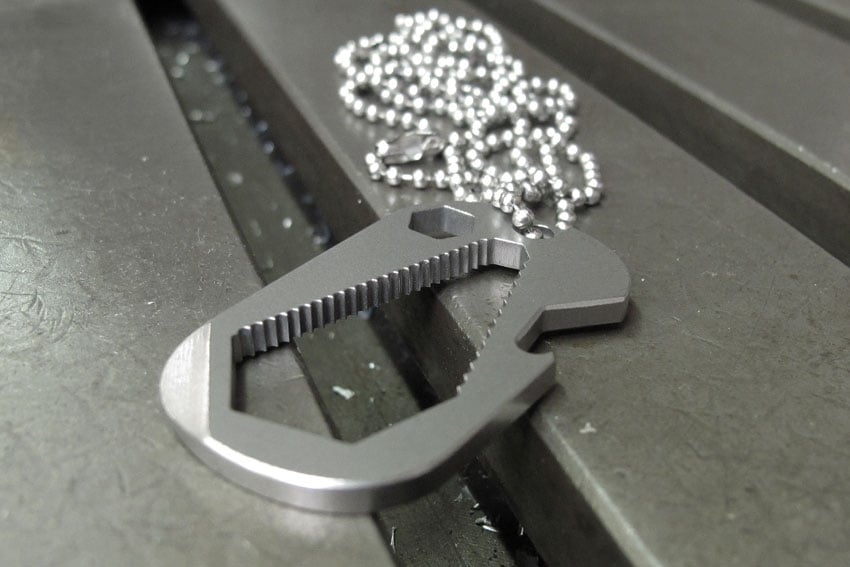
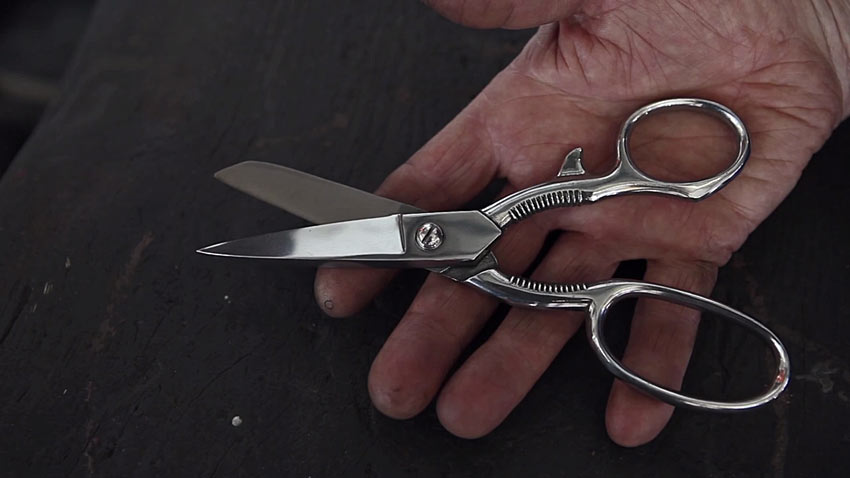
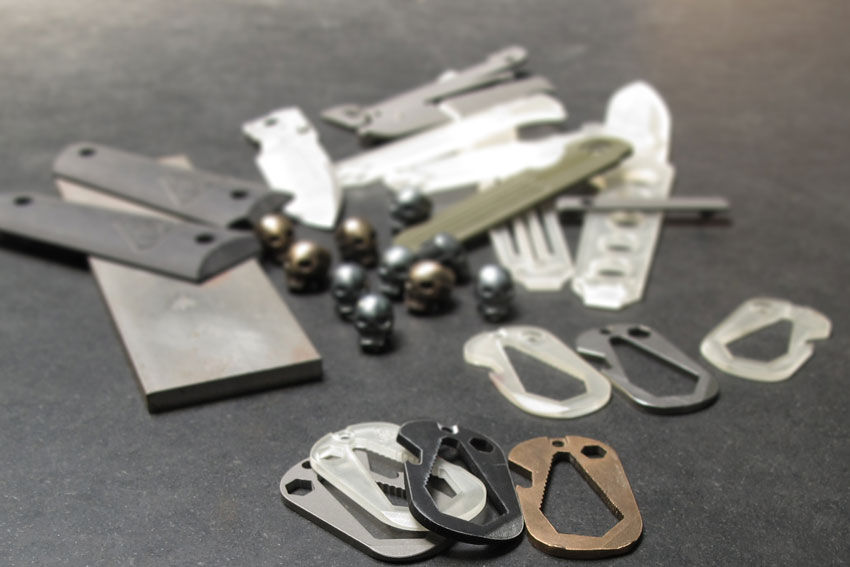
Their first OPT (One Piece Tool), the Standard Issue Dog Tag Tool, is a versatile pocket tool following in the profile of the venerable Military Dog Tag. Featuring a familiar footprint, the challenge they overcame was how to build the desired functionality into the small piece of real estate while keeping it as useful as possible.

standard_issue_dog_tag_6_7h

standard_issue_dog_tag_5_6h

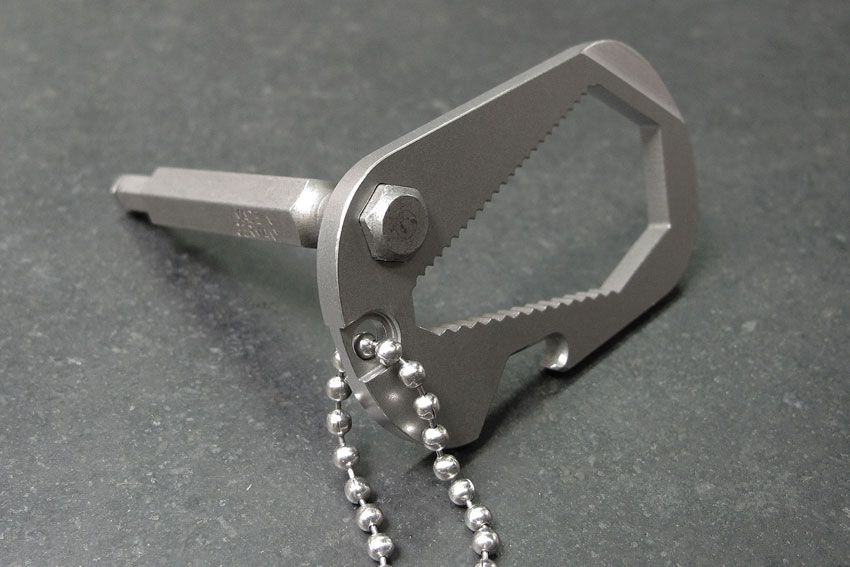
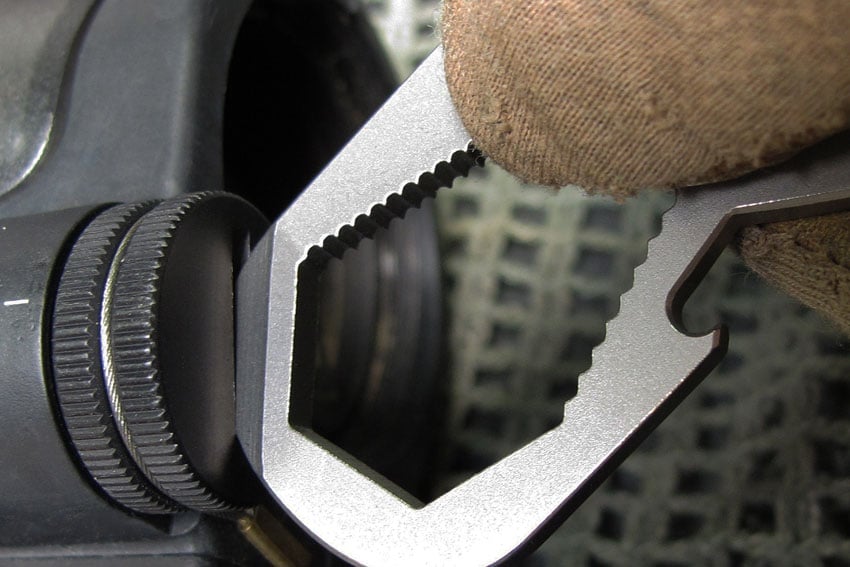
What PDW managed to create is a universal closed-end wrench that fits both standard and metric hardware, thanks to precise jimping located inside body of the Dog Tag Tool. Many tools on the market break these wrench sizes into two separate tools.

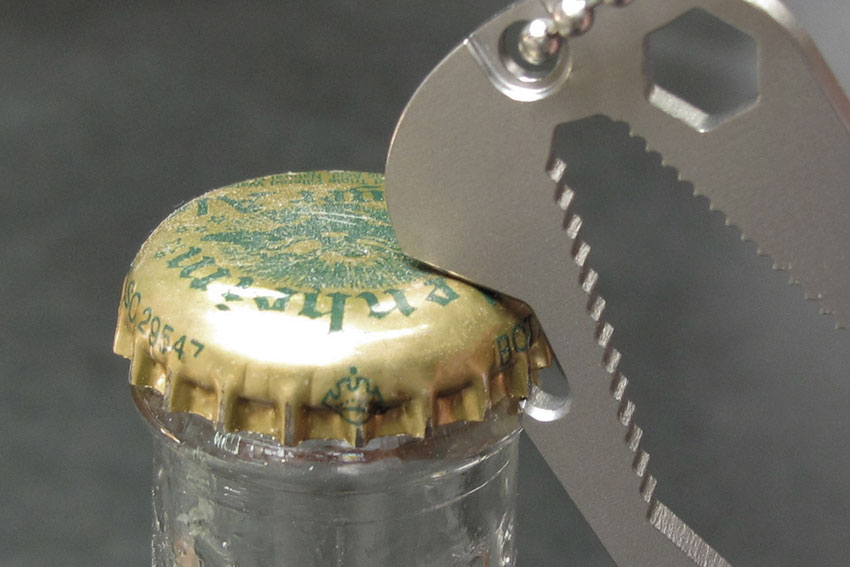
Additionally, the PDW tool features one of the lowest profile bottle cap lifters around. But wait there’s more! A 1/4″ bit driver was machined into the tool and accepts a multitude of bits. There’s also a double ground corner for light prying, opening the battery bay on an optic, removing the batteries from an Apple Bluetooth Keyboard or even opening the bottom of a classic 35mm camera.

standard_issue_dog_tag_7_4h

The Dog Tag Tool was constructed to be lightweight, weighing just 0.4 ounces and CNC machined out of Grade 5 Titanium (6AL-V4). Featuring a three-stage scratch-resistant finish, it comes with a Stainless Steel Mil-Spec Ball Chain to be worn standalone or added behind issued dog tags. It’s also designed and made in the San Francisco Bay Area.

More Hard Goods to Come

The Dog Tag Tool follows the same design ethos that PDW has set forth to follow in all the products they’re creating; striving to not only make their products simple enough to be intuitive to the end user, but also creating intelligent innovations that drive the industry forward.

techbro_1b_6h

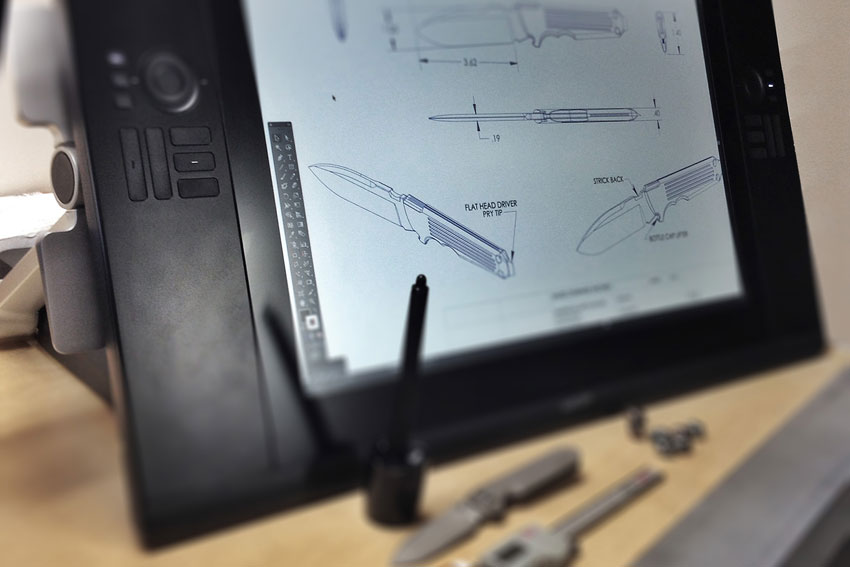
When I asked Patrick and Chris about what other hard goods they had up their sleeves, they responded with a universal “it’s all about the knives.” They’re not only working on what sounds like a beautiful 4″ fixed blade with a skeleton handle and a few other intriguing features, but are devoting many resources into a folding knife as well.

The folder is in the prototype phase now, but Chris mentioned that “those that have been drawn to Patrick’s previous knife designs are going to love what PDW is coming up with now.” Patrick added that the folder represents their most exciting and biggest challenges yet as a company, but it’s what drives them; making cool and innovative stuff they want for themselves.

standard_issue_dog_tag_8_7h

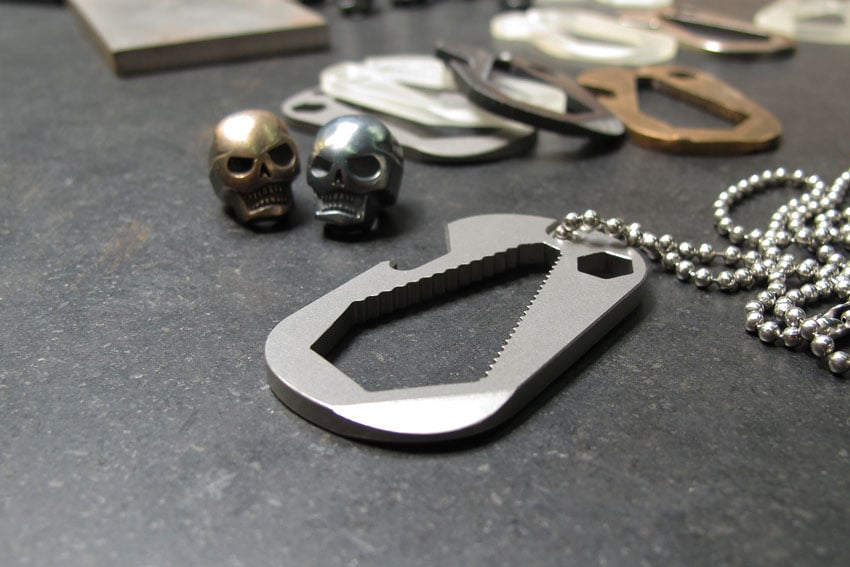
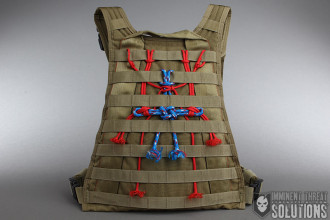
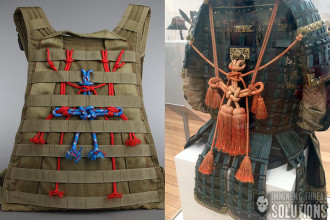
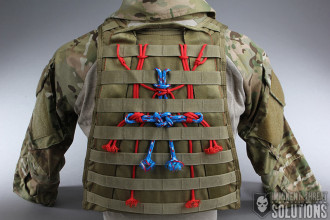
There’s many other innovative products on the way too. While you’ll see the Memento Mori Skull Beads they’ve released on the website, there’s also Titanium Skull Beads in the works that double as a 1/4″ bit driver. To add even more functionality, they’ll even seat into a 1/2″ wrench for additional leverage.

Something the guys at PDW stressed is that they’re developing products with interconnectedness in mind. They’re part of a family that will complement each other in terms of use, whether used alone or with each other.

prototype_2_5h

Inspiration

I wanted to get at what inspires Patrick and Chris on a daily basis and what follows is what they see as molding their design instincts over time.

cnc_1_7h

Patrick’s inspirations included military hardware, aerospace, scuba diving documentaries, South African safari’s, safari equipment and vehicles, tranquilizer guns, tools to clean a rifle, the best kind of axe to fell a tree and even sharpening a chainsaw. A self confessed Sci-Fi nerd, Patrick mentioned that ideas and concepts from movies like Space Odyssey 2001 and Star Wars are inspirational because of what the future could be and what products might be found there.

Chris’ inspiration focused more on the potential and beauty from staring at base material. Meaning the potential for an object like a piece of metal or wood to become another object. Admittedly, he also mentioned vehicles, motorcycles (Ducati’s in particular) and 4×4 adventure rigs. There was also the coining of a new phrase Chris threw out there “Japandanavian used future aesthetic.” I’m still digesting that one!

Chris and Patrick both share an affinity of Japanese pop culture and agreed that inspiration can be as simple as seeing a new camo pattern emerge from staring at a leaf.

Influence

Another question I fielded at the guys was if there was one person, tool, or book that’s influenced them. I got two; Leonardo Da Vinci and Dieter Rams.

dtt_1_5.5x10h

Patrick mentioned that Leonardo Da Vinci’s body of work through his lifetime is one of the most impressive that man has ever seen and that they believe heavily in Da Vinici’s declaration regarding simplicity and sophistication. “Every part, component, and detail that goes into a design serves a purpose. Its whole is greater than the sum of its parts.”

Dieter Rams is best known for his 10 Principles of Design, which PDW follows closely and feels still stand up today. “Even with all the history lessons and the aggregate tenets of good design, we give ourselves the room and latitude to check around unseen corners, read the subtext and weave in design sensibilities that are uniquely our own. The future of design is an open book…”

Advice for Designers

My last question to Patrick and Chris was some parting advice for designers and I feel there’s a lot of take home in the following answers they provided.

PDW_shop_2_5x7h

Chris said that in regards to new technologies like 3D Printing, “steer clear of the gear stuff, it can dictate what you’re designing. Your job is to be creative and create and it’s the tool’s job to facilitate that creation.”

He also mentioned that it’s easy to tell the difference between someone who designs with a pencil first and someone who designs with a machine first, “their process is very different, learn how to make your brain do it first.”

In regards to the process, Patrick commented that “you can’t let the trend of tools constrain you in your creativity, if you do that, you’ve already failed as a designer.”

Patrick went on to say that “designers are a dime a dozen. What makes design relevant is having the wherewithal to turn those designs into actual marketable consumer product. That’s the real challenge, no design is worth its salt unless you can make it into a tangible product.”

“Additionally, if you can’t get your hands dirty and manipulate some materials, being a grounded designer is going to be a challenge. You need to understand the limitations of materials.”

I’d also like to mention that combined, Patrick and Chris have spent over 40 years working with their hands and they credit that to making them better designers. One last parting thought from Chris was that “Less is more; while not a secret, it’s frequently ignored and overlooked.”

In Closing

I’m excited about the opportunities in front of Prometheus Design Werx and wish them the best. On a personal note, Patrick’s passion, ingenuity and focus on design has been an inspiration for me as I’ve grown ITS the past five years; I couldn’t be happier for him as a friend and as a peer.

Posted in Interviews | Tagged , , , , , , , , , , , , , , , , | 8 Comments

Tips from a Military Combat Tracker to Jumpstart your Tracking Knowledge

TYR Group Combat Tracker Suggestions

The purpose of a Combat Tracker is threefold; establish or re-establish contact with an elusive enemy, gather information about the enemy and if necessary, recover lost or missing friendly personnel. Tracking is the skill of following a person or animal by the signs they leave behind. When a man or animal moves over or through the natural environment, they alter the appearance of that environment and create disturbances in it. By detecting these disturbances or “sign”, and determining whether or not his quarry (target) created it, a tracker is able to follow the quarry.

Tracking is a simple skill in observation. It makes no difference where a tracker comes from, just because they grew up in a rural area doesn’t necessarily mean that they’ll be a better than one who comes from an urban area. It’s true some people will always be better than others, but most people can master the basics of tracking. Below are some suggestions that will help beginner trackers or those wanting to get into tracking.

Use Your Senses

It’s essential to understand that tracking is more than simply following sign. A tracker uses all of his or senses (visual, auditory, olfactory) to:

  • DETECT and continuously identify the correct sign by the regularity, size and shape of the impression, flattening of a surface, color change of the medium the quarry passed through in contrast to its surroundings, transfer of one medium on to another, amount of disturbance made within an environment or litter discarded that may be associated with the quarry.
  • FOLLOW the track line and reacquire the track if lost.
  • INTERPRET the sign and track picture. This is the most important capability of the tracker. Anyone can learn how to follow sign, however, a true tracker thinks critically to interpret what he or she sees. This then forms a picture or hypothesis as to what the quarry did, is doing, or might do.
  • ANTICIPATE the quarry’s intentions and where the track line is leading.
  • LOCATE the quarry.

Know Your Environment and Target

Be honest with yourself and others. Be patient and persevere. Know your quarry, its characteristics, habits and gait pattern. Learn about the local flora/fauna and how sign affects the environment’s natural state of appearance.

Understand Natural Lighting

Learn and understand the importance of light and shadow and how to use it to your advantage. As the sun rises in the morning, it casts longer shadows that bring out visible details of impressions made on the ground. As the sun continues to climb, the details of the impressions will gradually fade away. When the sun’s position is directly over the earth’s surface (noon time), little or no shadow will appear. As the sun begins to fall after mid-day, again the shadows lengthen allowing the details of impressions to be identified more easily.

During the day, a flashlight can also help bring out impression details in a track trap that may not be seen from available sunlight, especially if you’re working under a forest canopy or the sky is overcast.

Be Mindful of the Track and Surroundings

Always be aware of your position as it relates to the track and track line. Never walk on top of or contaminate the sign and always keep the tracks between you and the sun.

Know Sign Variations

Know the difference between conclusive and inconclusive sign. Conclusive Sign is one that can be directly traced to the quarry you’re following such as a footprint with a specific sole pattern and size. Inconclusive Sign may be broken twigs, bent grass or an foot impression with no discernible sole pattern.

Learn the “Step-by-Step” Method

When learning to track for the first time, the most important technique for becoming track aware is through learning the step-by-step method of tracking. This teaches new trackers to detect each footstep (and every other footstep from then on) in succession by the disturbances made in the natural environment. This method is primarily a learning tool and a great learning tool at that. However, it’s not practical to use when time is a factor in pursuit of humans who may be lost, need help or have to be apprehended.

Follow The 7 Basic Tracking Principles

  1. Positively identify the tracks you’re going to follow.
  2. Keep the track-line between you and the light source.
  3. Observe and track as far out as the sign can be recognized.
  4. Never move further than the last known sign (LKS).
  5. Never contaminate the sign.
  6. Never track faster than your own ability will allow.
  7. Get into the mind of the quarry.

If you’re looking for hands on training to better hone your skills as a tracker, consider signing up for one of the many classes offered by TÝR Group. In addition to multi-day combat and visual tracking classes, they offer instruction on small unit tactics (rural or urban), weapons training, combatives, force on force, bushcraft and survival training.

Editor-in-Chief’s Note: John Hurth is a retired U.S. Army Special Forces Soldier who served with 1st Special Forces Group at Ft. Lewis, WA where he participated in multiple deployments overseas to include two combat tours in support of the Global War On Terror. He now uses his years of tracking knowledge as the owner and lead instructor of the TÝR Group where he and his staff conduct training on various tracking techniques.

Posted in Navigation | Tagged , , , , , , , , , , , , , | 7 Comments

NEMO Obi 2P Tent Review: A Lightweight and Spacious Backpacking Tent Perfect for Couples

NEMO Obi 2P Tent

Lightweight and spacious? Does a tent that features both of these descriptors actually exist? It most certainly does and it’s called the Obi 2P from NEMO. You have to love how much that sounds like a Star Wars character too.

I’ve been putting the NEMO Obi 2P through the ringer for the past year and today I’ll be sharing my experience of using it while camping in quite a few places across the country.

Upfront Thoughts

Kelly and I had been looking for a backpacking tent that was not only lightweight enough for us to both carry (split up into pieces,) but also spacious enough to sleep both of us and still have the room to sit up and change clothes. As mentioned in my NEMO Gogo LE Review a few years back, I’d been trying to talk Kelly into getting the NEMO Obi 2P and we wound up having the opportunity to put one through its paces, thanks to NEMO.

NEMO Obi 2P Tent

I’ll first say that your mileage may vary when it comes to what you consider comfortable in terms of space. There are certainly limitations of space in the tradeoff for decreased weight and bulk, so just be aware of that if you’re looking into the NEMO Obi 2P for yourself. I’ll be talking more about overall size compared to Kelly and I too, later on.

Weight and Measurements

NEMO Obi 2P Tent

For a 4 lb. 2-Person Backpacking Tent that compresses to the size of a small pillow (8″ Long x 8″ Wide x 5″ Deep), I feel the Obi 2P is an exceptional option. The weight I provided includes the footprint (ground sheet) and poles, but the pole bag measures 20″ Long x 2″ Wide x 1″ Deep on its own.

NEMO Obi 2P Tent

What’s nice about the provided storage bags that come with the Obi 2P, is that they nicely split up the poles and tent so that each person can carry their fair share. The tent storage bag features a dry-bag style closure that helps keep the elements out. In the aforementioned configuration, the person with the tent body would be carrying 2 lbs. 6 oz. and the person with the poles, footprint (optional) and stakes would be at a weight of 1 lb. 10 oz. Not too bad at all!

The separate tent pole bag actually docks with the tent storage bag through an elastic loop on the rear of the tent bag. Additionally, it has a snap that gives it some positive retention.

NEMO Obi 2P Tent

For the true Ultra-Lightweight Backpackers, there’s plenty of ways to further trim weight with the Obi 2P. Just to illustrate a few options, the stuff sacks could be ditched and you could replace the stakes with smaller titanium stakes. NEMO states that just carrying the bare essentials to make a waterproof shelter would bring the weight to 3 lbs. even (tent body, poles and fly.) Taking just the fly, poles and footprint to make a lightweight tarp structure, would net you 2 lbs. 4 oz. in weight.

Obi 2P Specifications

  • Capacity: 2P
  • Minimum Weight: 3 lbs, 0 oz / 1.4 kg
  • On the Fly Weight: 2 lbs, 4 oz / 1.0 kg
  • Trail Weight: 3 lbs, 10 oz / 1.6 kg
  • Floor Dimensions: 83 x 50 in / 211 x 127 cm
  • Floor Area: 27 sq ft / 2.5 sq m
  • Vestibule Area: 18 sq ft / 1.7 sq m
  • Interior Height: 40 in / 102 cm
  • Number of Doors: 2
  • Frame Description: 1 DAC 8.5 mm Featherlite® NSL
  • Packed Size: 7.5 x 6 in / 19 x 15 cm (17 in / 43 cm Pole Bag)
  • Vestibule Fabric: 20D PU Nylon Ripstop
  • Fly Fabric: 20D PU Nylon Ripstop
  • Canopy Fabric: No-see-um Mesh / 20D PU Nylon
  • Floor Fabric: 30D PU Nylon Ripstop
  • Color: Birch Leaf Green

Details and Setup

The first thing I’d like to mention about the overall Obi 2P system is the frame that makes it all possible. NEMO integrated a couple of innovations into the Obi 2P from a company called DAC, which provide the ability for an effortless setup and takedown of the tent.

The first integration from DAC is the use of 8.5mm Featherlight NSL Tent Poles, which in the configuration of the Obi 2P integrate with two DAC Sunflower Hubs to provide a thin and lightweight frame setup. The frame nearly looks seamless when assembled and uses internal shock cord in the poles to aid in quick assembly.

NEMO Obi 2P Tent

To attach each of the four ball-cap pole corners to the tent body, NEMO utilized the DAC “Jake’s Foot” attachment system, which is essentially a ball and socket that creates a solid lock-up in each corner. This foot then gets staked out with the included cordage loop. Another awesome feature to the Jake’s Foot is the integration it has with clips sewn into the optional footprint.

NEMO Obi 2P Tent

NEMO Obi 2P Tent

NEMO has made it super simple to not only attach a footprint, but to adjust each corner with a webbing strip. This gives you the ability to make the Obi 2P sized footprint taught if desired. To throw one more feature into the mix, the Jake’s Foot also has a spot for each of the four corners of the tent fly to clip in and again features an adjustable webbing strip for making the fly taught. The Jake’s Foot is a fantastically modular design that I can’t speak highly enough of.

NEMO Obi 2P Tent

NEMO Obi 2P Tent

Before adding the fly though, you’ll need to clip on a few Twist Clips, which are another DAC invention. These make it easy to attach and remove the sewn attachment points to the frame system with a simple snap in and twist-off.

Tent Fly

NEMO Obi 2P Tent

It can be a bit confusing at first to find the correct orientation of the tent fly, but after you associate the big logo with the front of the tent, it makes it easier on successive setups. The Obi 2P comes with six stakes, which are the minimal number of stakes needed to completely stake out the tent. This gives you four stakes for each of the corners and another stake for each vestibule.

NEMO Obi 2P Tent

NEMO Obi 2P Tent

One of my favorite features is the two large vestibules that are created when adding the additional stake to each side. It provides plenty of room for a good sized pack and a pair of boots in each side vestibule. There’s also separate side entrances/doors which are another nice feature.

NEMO Obi 2P Tent

NEMO Obi 2P Tent

There’s a total of four extra guy-out loops sewn on the fly of the Obi 2P and two extra guylines included. I’ve only found myself using one of these extra guylines and an extra stake (self-provided) to help the fly at the front of the tent. I feel adding this here helps out with airflow inside the tent as well. I utilized a Taut-Line Hitch to secure this guyline and it’s actually what I recommend for all guylines.

NEMO Obi 2P Tent

The taut-line hitch is the one knot I use more than any other I know, seconded by the Bowline. I’ll get on a soap box here for a minute and say that there’s no good substitute for a well tied taut-line hitch. All those devices on the market (there’s tons of them) that attempt to “do it for you” are nonsense and unnecessary. I would have rather seen instructions included in the Obi 2P for tying a taut-line hitch instead of the provided adjusters on each vestibule stake-out point, but I digress.

Usage and Comfort

As mentioned Kelly and I have used this tent quite a bit and I’ve also been in some nasty weather with it. Our usage started at the 2013 Overland Expo near Flagstaff, AZ where we camped in some of the worst wind we’d ever experienced. The tent blocked the wind amazingly well, but the dust wound up coming through the No-See-Um Mesh and gave us a nice “coating” inside the tent. This was of course a worst case scenario with being in a windy and dusty location, but still something I wanted to mention.

NEMO Obi 2P Tent

NEMO Obi 2P Tent

I’ve yet to have that happen again in any other location I’ve been with this tent, but I feel the open-air nature of the vestibules can be a double-edged sword. It can allow fine dust through in abnormal wind conditions, but I feel that design also takes the credit for helping the interior of the tent stay condensation free for the most part.

I also liked the subtle details on the interior of the Obi 2P, like the mesh interior pocket and the Light Pocket. There’s also a loop on the ceiling to hang a headlamp or other light from.

NEMO Obi 2P Tent

Being 5′ 10″ and weighing 185, it was fairly easy for Kelly, who comes in at 5′ 1″ and 100 lbs., to fit next to me. I won’t speculate on what others may feel about this space, other than to say we fit pretty comfortably with a bit of room to spare. Just make sure to check the dimensions provided above.

Overall we’ve been very happy with the NEMO Obi 2P and I wouldn’t hesitate to recommend it, based on the information I’ve discussed here. While the Obi 2P is made overseas, it comes with a lifetime manufacturer’s warranty and was designed in the USA.

Where to Get It

Posted in Gear | Tagged , , , , , , , , , , , , , , | 11 Comments

New ITS Stickers and International ETA Trauma Kits Now Available

New ITS Shop Products

Today we’re extremely excited to announce a few new products to the ITS Shop. One of those new products is an International version of our hugely popular ETA Trauma Kits. Previously, we were limited on what we could send overseas due to certain restrictions but after some work and negotiation, we’re now able to ship international versions of our Fatboy and Tallboy ETA Trauma Kits outside the USA starting today!

We’ve also added a couple of new stickers to our Morale lineup. You can show your continued support of ITS with the 5th Anniversary Logo Sticker Pack as well as your support for this great country with the ITS Spirit of ’76 Sticker Pack featuring new and completely awesome artwork.

International ITS ETA Trauma Kit

ITS ETA Trauma Kit Tallboy

ITS ETA Trauma Kit Tallboy

We’re now offering an International version of our ETA Trauma Kits for non-US/APO/FPO addresses. Developed by our 18D Corpsman and following the TCCC Guidelines, the ITS Tactical ETA Kit combines the best products on the market to treat the three leading preventable causes of death in the field. These are Extremity Hemorrhage, 60%; Tension Pneumothorax, 33% and Airway Obstruction, 6%.

Every item in our ETA Kits is carefully selected to complement the others and serve multiple purposes.We stress the importance of having an ETA Kit within your reach at all times and these have been made to conveniently fit in a cargo pocket, glove box, backpack, laptop bag, briefcase, you name it. Our ETA Trauma Kits are available in a tall vacuum-sealed configuration referred to as the “Tallboy” or a wide vacuum-sealed configuration referred to as the “Fatboy.”

Click here to purchase either a new International ITS ETA Trauma Kit in either Fatboy or Tallboy configuration.


ITS Spirit of ’76 Stickers (2-Pack)

ITS Spirit of '76 Stickers

ITS Spirit of '76 Stickers

The Continental Army was formed by men of the original 13 colonies and led by General George Washington throughout the revolt of Great Britain’s rule. Each Spirit of ’76 Sticker is USA made and features an ITS Continental Army soldier holding a musket in front of the U.S. flag designed during the American Revolution.

Also on the background is the text from the Declaration of Independence. This statement announced that the thirteen American colonies regarded themselves as thirteen independent states that were no longer part of the British Empire.

Each sticker measures 3” wide x 4” tall at their edges and are high-quality digital printed on UV coated vinyl, which makes them perfect for affixing to a vehicle. These stickers are built to last!

Click here to order a 2-pack of the new ITS Spirit of ’76 Stickers


ITS 5th Anniversary Logo Stickers (2-Pack)

ITS 5th Anniversary Logo Stickers

ITS 5th Anniversary Logo Stickers

This limited edition ITS 5th Anniversary Sticker Set was created to commemorate 5 years since the beginning of Imminent Threat Solutions. ITS has accomplished more than imagined and it’s all thanks to you. Without our daily readers and members that support the site, we wouldn’t be here today. Here’s to many more awesome years to come!

Click here to order a 2-pack of the new ITS 5th Anniversary Logo Stickers

Posted in ITS Information | Tagged , , , , , , , , , | 1 Comment