The MegaPatch Book can serve double duty as not only a place to display your patch collection, but also a discreet case for a concealed weapon using the MSM Loop Panels. Similar in function to a gun rug, but with removable panels to truly customize the layout. Continue reading →
We’re going to start rolling out a new series on ITS Tactical soon, doing live interviews with individuals, companies and whomever you guys would be interested to talk to in the industry.
We had such great success with our last Plank Owner Roundtable via Ustream, that we’ve decided to expand its use here on ITS Tactical. We’ll be using the comment feature available on Ustream to let you guys ask live questions to whomever we’re interviewing! Click here to check out the show and bookmark its location.
What we need to know from all of our readers is what time would be the best for you to tune in to these live broadcasts? Our first interview in the series will be Monday, June 7th with A-TACS ! Of course all our broadcasts will be recorded and available for your viewing pleasure at a later time, but to get your questions in, you’ll need to tune in live. Click here to RSVP to attend!
There’s a poll below, so let us know what time works best and also leave a comment with any suggestions on who you’d like to see interviewed! We’ve got some great interviews coming up for you! Continue reading →
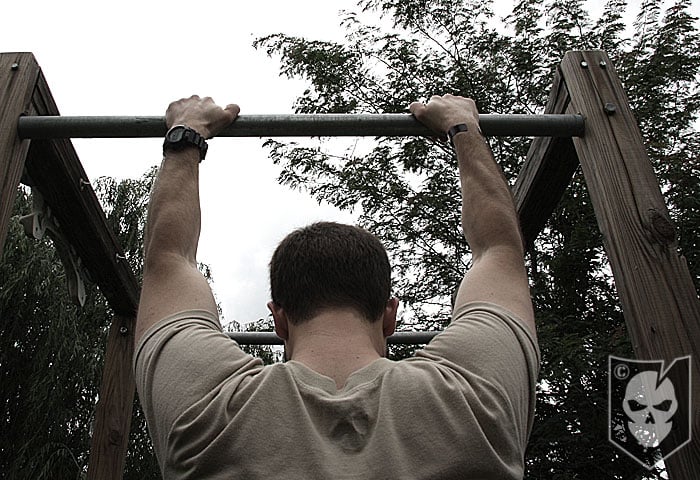
We’ve recently talked the importance of physically being able to save yourself, and one of the most important aspects to this is upper body strength and the pull-up.
Again, functional strength movements are movements the body makes naturally. Let’s talk realistically here for a second, is the guy that grunts and groans way to loudly while bench pressing 400 lbs. going to be able to climb a rope? Probably not unless he’s devoting some time to working on his functional strength.
Is that ogre going to be able to get his ass over a wall in a hurry? Again, probably not. Now don’t let size fool you because I’ve seen some pretty huge dudes able to do 20+ pull-ups. It all comes down to one thing, practice. Yes, practice. There’s no pill, shake or other dietary crap that will help you here, despite what infomercials say. Having good functional upper body strength is what’s going to help pull you out of harms way. The bench press is dead to me.
Before I go any further, I’ve been doing pull-ups now for a very long time and have a lot of time invested into technique and mastering the pull-up. When I started though, I couldn’t do one. Now on a good day I can hit around 24, but there was a time when I could do 30. I say that because it’s all about repetition and practice, your numbers will be directly proportional to your time spent training.
Mine have decreased because of the frequency I do pull-ups now. I’m not actively training for a program or a standard that i’m trying to meet, so for me right now its about maintenance. This article though will give you some good techniques to develop your pull-up whether your goal is good functional strength, or to crush the next Military Fitness Test.
Proper Technique
When we’re talking about pull-ups in this article, we’re talking about grabbing the bar with your palms facing out, thumbs next to your index fingers, arms shoulder width apart, starting from a dead-hang position (arms fully locked out) and pulling yourself up until your chin is over the bar. Coming back to a dead-hang before starting the next rep is also proper form.
You should always focus on looking up at the bar to help lift your chin over the bar and to also help to activate your shoulders. Active shoulders start from the beginning of the movement and the video below will help you understand what active shoulders means. The video also explains how your elbows tuck behind your body helping to open your chest and propel you further up and over the bar.
Let’s deviate for a second and I’ll explain what a pull-up is not. A pull-up is not done by bending your legs while hanging and using momentum to carry you over the bar. A pull-up is not using a swinging motion to propel you over the bar. A proper pull-up is not done by kipping, despite what CrossFit says.
I’m a CrossFit Certified Level 1 Instructor, and you’ll never hear me say that a kipping pull-up counts. Yes, after getting out of the service I was naive enough to try to implement them, but quickly dismissed them as a real pull-up. If you know anything about some of the ridiculous times that people claim to do workouts like “Fran” in, go watch the YouTube videos of what their pull-ups look like.
Here’s a demonstration video I put together for this article:
Negatives
If you’re starting with nothing, can’t do one pull-up, think you’re too overweight to try, think again. It’s never too late to start developing functional strength because your body is already making these movements, you just have to build on them. Having a ton of extra weight around is never a good thing, and obviously you’re going to be working harder than you should.
For starters, you can do negatives, negatives will help your arms get used to supporting the weight of your body. To do a negative, stand on something or get a friend’s help to get your chin over the bar. Once you’re holding that position, slowly lower yourself down until you’re in the the dead-hang position. It’s important that you not come down to quickly either, shoot for about 5 or 6 seconds.
If this is all you can physically tackle, then stick with negatives. If you’re not able to last 5-6 seconds coming down, let that be your goal. You have to set small goals for yourself, and building on those is what’s important.
You should be working on pull-ups at least 3 times a week, and it’s important to give your muscles time to recover between pull-up days. For negative workouts, again you’re building so start small. Go for two sets of 10 three times a week.
Assisted Pull-Ups
No, I’m not talking about that pull-up machine in the gym or lat pulldowns. Neither of these will replicate the natural movement and balance your body has to have while doing a pull-up. The assisted pull-ups best for replicating the true pull-up form are either a friend pressing-up/holding the toes of your feet, or finding a low hanging-bar and pulling yourself up.
There are also big rubberbands that can be girth hitched onto a bar and you can stick your feet in to assist you. Again, I’m not a fan of these because they are a crutch and not letting the body balance on its own.
When a buddy holding your feet there’s still a pivot point where some balance is lost, but not the same as with the other assisted methods. It’s important that while I say “holding your feet,” your buddy really isn’t holding your feet. Really they’re just providing a surface to give you some lift from and not trying to grasp and stabilize your feet.
The low-hanging bar can be anything 3 to 4 feet above the ground that you grab and lift yourself up to. It’s important here to bend your legs behind you and pivot off your toes as you come up, not press off your toes. The assist comes from the decreased height, not the lift from your feet.
Pyramids
Once you’re able to successfully complete a pull-up, it’s time to really start increasing your numbers. There are a few workouts I’ve always followed that have helped me along the way.
A pyramid workout is very simple, yet powerful. If you look at the diagram to the right you’ll see a series of numbers increasing up the left side of the pyramid and decreasing down the right side of the pyramid. These are the repetition numbers. So in the case of this pyramid workout, you’d do 1 pull-up, rest, 2 pull-ups, rest, 3 pull-ups, rest, etc. When you reach the top, you start falling back down the pyramid with 4, 3, 2 and then back to 1 pull-up.
A good rest period to start out with is 1 minute to 1:30. The pyramids can be as easy or complex as you’d like, and just to give you an idea, I typically do a 1-10-10-1 pyramid or 2-4-6-8-10-10-8-6-4-2 repeating 10 at the top.
Obviously again the importance here lies with building. Don’t put your max rep number at the top of the pyramid, you’ll never make it up and down. By the time you’ve done a complete cycle of the 1-10-10-1 pyramid, you’ve knocked out 110 pull-ups. Not too shabby for a pull-up workout. It takes time to get there though, so don’t get discouraged.
Different Grips
A second workout I do is almost like a mini pyramid but using the five different kinds of pull-up grips. These are regular, reverse (chin-up), close, wide and commando (or mountain climbers).
Using a 2-4-6-8 pattern, you do that for each of the five grips. So regular 2-4-6-8 then once finished with regular grip, you move on to reverse grip and do 2-4-6-8, etc. This workout also gives you 100 pull-ups total, but can be scaled up or down very easily. Simple doing a 2-4 with each of the five grips is a great way to start.
Lately I’ve been sticking with the 2-4-6-8, but can be bumped to 2-4-6-8-10 or 2-4-6-8-12 if you’re feeling frisky.
Notes
I definitely can’t take credit for designing these workouts. They were first shown to me by Stew Smith’s 12-Weeks to BUD/s book which I used to follow religiously. These are great foundational programs for increasing your pull-ups and I’ve had a lot of success with them over the years.
I also want to mention that these workouts are not just for guys, women can also show tremendous gains using these workouts and not worry about looking like the cover of muscle magazine. Functional strength is for everyone and should not be overlooked in planning your fitness goals.
How do you guys implement functional strength training? Do you have a favorite pull-up workout?
After discussing it with our Plank Owners in the last Roundtable, we’ve decided to make the Forum available to everyone. If you’ve ever registered with ITS Tactical as a Crew Member or even before that when we required registration with ITS to enter into our giveaways, you’ve got that same username and login for the Forum.
There’s still exclusivity for our Plank Owners and Crew Leaders with private boards, an personal upload folder for hosting images, ability to edit your own posts forever, no captcha required to post, and the ability to use signature images to display the Membership badge. Don’t worry Crew Leaders, one is coming for you too!
Take a second and visit our Forum and add to awesomeness going on inside!
The Bogota Entry Toolsets in Titanium and Stainless are now back in stock! They flew off the shelves in under two hours Thursday night, so be sure to get your order in!
With more than hundreds of home invasions happening every year here in the United States, we’d like to present some tips on what you can do to not only protect yourself and your family, but how to fortify your home to better resist becoming a victim.
There’s a notable difference between a burglary and a home invasion, that being you. If you’re home, it’s a home invasion. If you’re not, it’s a burglary plain and simple. Criminals don’t always know what they’re walking into during the day, but at night its a different story. Most home invasions happen between 6 p.m. and 6 a.m. on weekdays and weekends.
A criminal that breaks into a residence at night is expecting a confrontation of some kind. Hopefully it will be short lived when you shoot them dead, but as we’ve mentioned before in “Dealing with Violent Confrontations” you should always avoid a confrontation if possible. This is the same in a home invasion scenario, not by using the same methods, but by using some forward thinking to deny criminals the opportunity.
Using the tips we’ll share below will help you in avoiding this kind of confrontation and better protect you and your family. Continue reading →
Just a quick heads up for those that have inquired on when we were going to start carrying the Bogota Entry Toolsets in our store.
These are now available to everyone 18 years or older. Act quickly, as there are just a few sets in both Titanium and Stainless available for the time being.
Many of you had some great suggestions on doing something more like donating money into a fund to get those in need the gear they need.
I’ll be honest, it’s going to be a tough job to figure out who really needs this gear we’re giving away the most. It’s something we’ve discussed and no easy task by any means.
So what I’d like to do with this post is start a place for some dialouge in the comments where we toss some ideas around about how best to improve upon what we’re already doing (thanks to Eric). As there are many legal issues surrounding collecting funds for donations, we’re hoping to especially get some opinions from those who know about these kind of things.
We’re not sure what exactly to do yet, but we know that we want to continue to help our guys in harms way get the gear they need. We know of quite a few organizations that do similar things like American Snipers.org but none that we’re currently aware of that cover LE, MIL and Contractors. If you know of one, please leave a comment.
Let us know your thoughts and big thank you to all that protect us!
Today we’ll wrap up the last part in our Knot of the Week mini-series on rigging a tarp shelter.
I left off in part 2 with explaining how the tarp is attached to the trunk line with Prusik Loops and Prusik Knots, and introduced the guy-line system. We’ll get more in-depth into that system as well as demonstrating the Alpine Butterfly Loop and the Taut-Line Hitch.
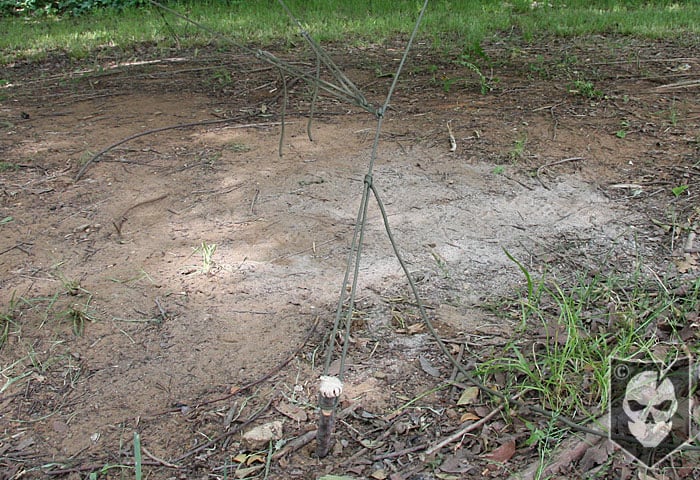
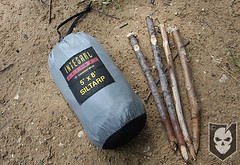
To create the guy-line system you’ll need at least five attachment points on each side of the tarp and quite a bit of paracord. As mentioned previously you’ll also need four stakes, but those can be made with a knife and some sticks you can typically find wherever you’re setting up at.
Guy-line Requirements
Before we get into how to tie these knots for the guy-line system, let’s talk paracord. I like using paracord for everything on this tarp, because I know I’ve always got 100+ feet of it at all times.
For each primary guy-line, that will be hitched around one of the four stakes, you’ll need 8-feet of paracord. The secondary guy-lines, on the next closest attachment points, will each require 5-feet and the tertiary lines need 6.5-feet.
In the video below, I’ve tied in each of the guy-lines to their respective attachment points using two half-hitches. Lately though I’ve been considering retying them with bowlines or something similar. The two half-hitches hold just fine, but taking the tarp in and out of the stuff sack I’ve noticed that I occasionally have to re-tighten them.
Cutting all the necessary paracord for the entire tarp shelter will take some time, but once its in place you can set-up and tear-down the tarp in a matter of minutes. Practice makes perfect though, so throw the tarp up in your backyard on occasion to practice setting it up.
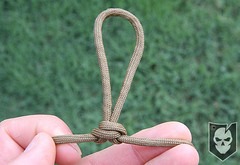
Alpine Butterfly Loop
(Strength: 5/Secure: 5/Stability: 3/Difficulty: 4) The first step after tying in all of the guy-lines, is to tie your Alpine Butterfly Loop in each of the primary guy-lines. The Alpine Butterfly acts as a anchor for the pulley system that is created by the secondary and tertiary guy-lines on each corner of the tarp. That pulley system is what evenly distributes the tension on each of the respective attachment points to stabilize the tarp in windy conditions.
An Alpine Butterfly is used to put a loop in a line that has tension coming from both ends. This knot will not weaken the strength of the line and is used by climbers and mountaineers to tie in a climber for protection against a fall.
Tying Instructions: Please refer to the photos here and YouTube video below.
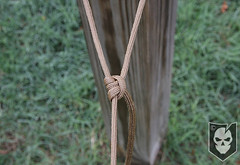
(Strength: 3/Secure: 3/Stability: 3/Difficulty: 3) After each primary guy line has the Alpine Butterfly integrated, it’s time to stake them down. The best way to tie off these guy-lines to that stake in the ground is with a Taut-Line Hitch, this will allow you to adjust the tension on the line if needed. While this is the optimal knot to use in this situation, be aware that under heavy loads the hitch can release.
Not only will the primary guy-line have a Taut-Line Hitch, but each secondary and tertiary guy-line will also use one after being routed through the Alpine Butterfly Loop. This will again allow you to individually adjust the tension on these guy-lines to mitigate the amount of flex the tarp has in windy conditions.
Tying Instructions: Please refer to the photos here and YouTube video below.
I hope you’ve enjoyed the series and not only learning how to tie all these great knots, but also seeing how they all come together into a practical application.
Knot tying truly is a depreciable skill-set, and one that I hope everyone takes an interest in and passes along to friends, family and co-workers. With today’s generation of people that are completely dependent on all the fancy gadgets and electronics (guilty), developing skill-sets like these and retaining them is even more important.
Let me know if you have any questions about any of the knots used in this mini-series, and I hope you’ve enjoyed it. Now get a tarp and practice!
Oh, and before anyone asks, I don’t know why I said “happy tarping” at the end of the video, I know it’s absurd and I couldn’t edit it out!
Links to Part 1 and Part 2 of the series in case you missed them!
*Update* Thanks everyone for sending in your comments and emails. Unfortunately, all of the gear has been spoken for. Thanks for your support and your service. Stay safe!
One of our Plank Owners, Eric Chevalier, recently contacted us about using ITS as an outlet to donate some gear that he no longer needed. Eric personally sent over two huge boxes to us so we could distribute it as we saw fit to those in harms way.
While we were able to get a few things out to our brothers down range, there’s still a log of gear that needs a good home. So, piggybacking on Eric’s awesome gesture, we’ve thrown in some gear and ITS merchandise into the pile of awesome.
ITS is going to cover the shipping to send this stuff out to whomever we feel has the most need for the gear, regardless of where they’re at in the world. We want this to get to those who need it. While we’d prefer it went to deployed Military or Contractors, our Law Enforcement brothers at home are no less deserving.
How to enter
If you’d like to throw your name in to claim a piece of gear, just leave a comment with a brief description of what you do, what you feel you could use and an email address so we can contact you to send out your gear. All the gear is numbered, so please reference numbers when throwing in your name for something.
Please pass this information out to all those you know in need and either have them come here to leave a comment, or leave one yourself with who you’re nominating to receive the gear. Again this is all free of charge and open to anyone in need, please be honest and don’t abuse this.
We’ll try to spread the gear out to everyone, so truly only throw your name up for what you know you can use (you can request more than one item). Also, if you have things you’d be willing to ship out to those in need, add that into the comments and people can roger up for what you’re offering as well.
Let’s all work together and show our appreciation for those fighting the good fight!


 With more than hundreds of home invasions happening every year here in the United States, we’d like to present some tips on what you can do to not only protect yourself and your family, but how to fortify your home to better resist becoming a victim.