The Associated Press is reporting that SO1 Huertas was found not guilty on charges of dereliction of duty and attempting to influence the testimony of another service member.
While these heroes shouldn’t even be on trial in the first place, this is wonderful news to wake up to this morning! One down, two to go.
Here’s some interesting information from the AP story: Continue reading →
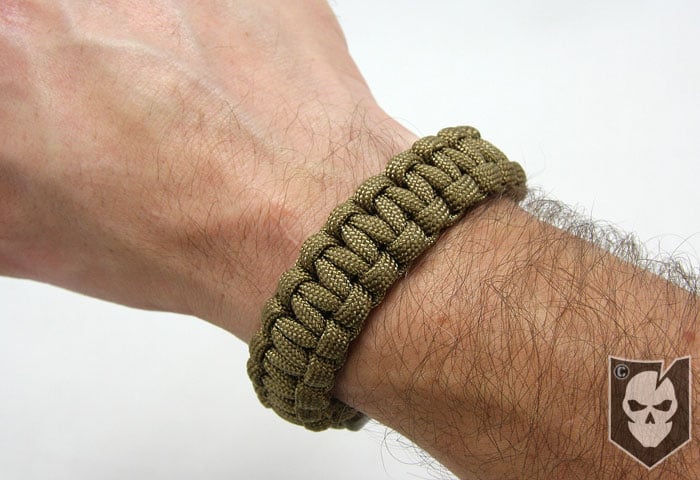
After today’s Knot of the Week, you’ll officially have no excuse not to always have paracord on you.
Yes, everyone and their mother has a paracord bracelet nowadays, but seriously. Either carry some instead of shoelaces, stuff some in a pocket, or keep reading to find out how to make a bracelet using a continuous 8-10 ft. section of 550.
Most tutorials you may have seen for these go through the process of using two different strands of paracord in order to facilitate the closure method. Do yourself a favor and pick up some of these small 5/8″ Weinerlock contoured buckles (yes, you read that right), made by National Molding and get yourself a real way to secure your bracelet.
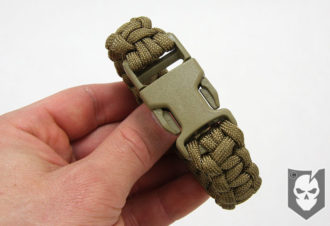
We’ll show you how to weave the Soloman Bar, aka the Cobra Knot, through these buckles to create a bracelet that’s both easy to make and easy to take apart in an emergency situation. You never know when and where you may need 550!
Paracord Bracelet » Decorative
(Strength: 4/Secure: 4/Stability: 3/Difficulty: 4) **Ratings shown are for Solomon Bar Knot, not the Paracord Bracelet**
Note: The buckle we show in the demonstration is a 3/4″ ITW Nexus buckle that lacks the contour of the Weinerlock buckles. While these work fine, the contoured buckle is definitely nice to have when you’re wearing your bracelet all day.
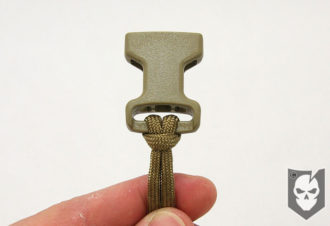
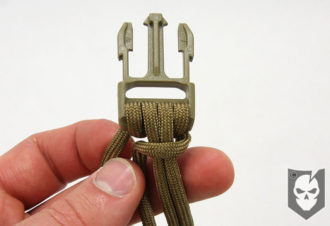
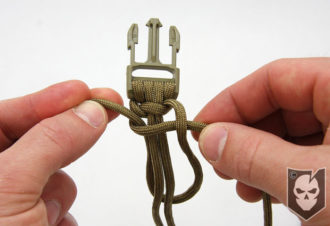
Find the middle of a 10 ft. section of Paracord and halve it
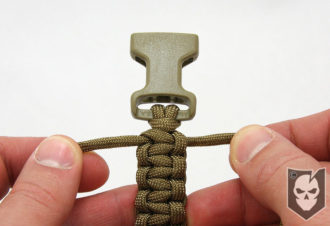
Take the middle and girth hitch it into the female portion of the buckle
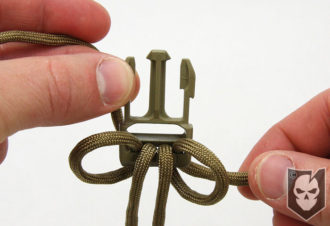
Thread the two working ends through the bottom bar of the buckle
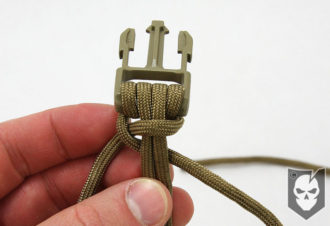
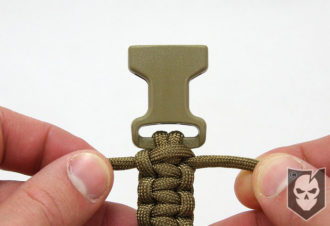
Create a wrap (loop) with both working ends to the respective right and left of the initial working end entry
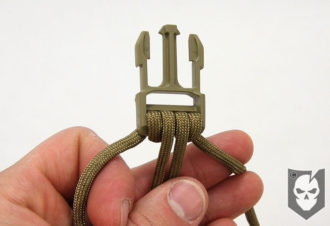
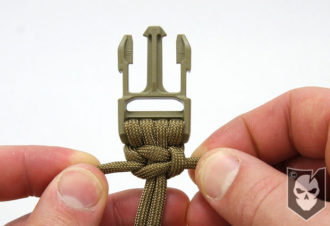
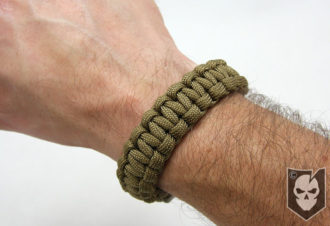
Now place what you’ve created around your wrist and tighten the working ends until you have the desired size
*You’ll want it snug, but not tight, as the pattern we’ll be creating will add some girth to the bracelet
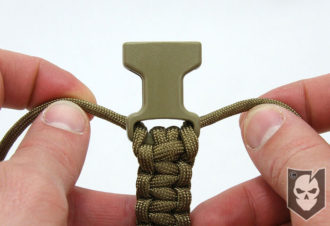
Once the size is determined, you’re ready to start the pattern.
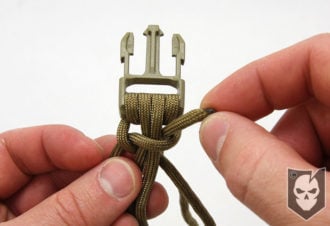
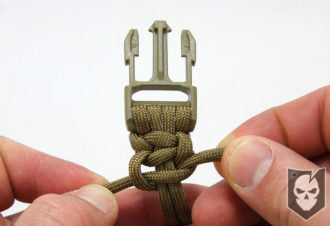
Take the right side working end and bring it over the standing center part
Take the left side working end and ensure it runs on top of the right side working end you just brought over
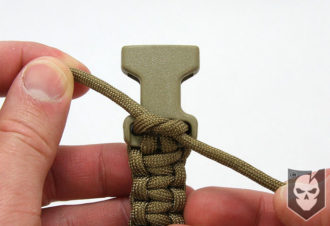
Take the left side working end and bring it around the back of the standing center part and up through the space left near the right side working end (see photos)
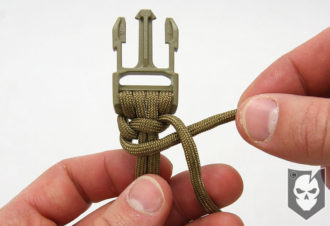
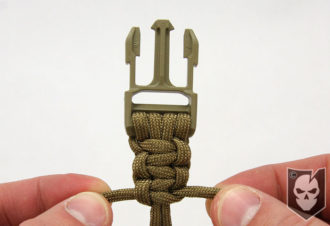
Now you’re just repeating those steps, but the opposite starting with the left side working end instead of the right
And after that, you’re just alternating which side you start with, much like weaving or braiding
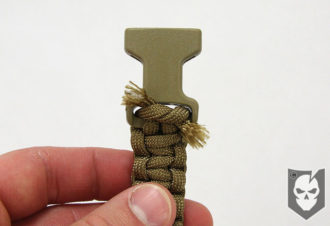
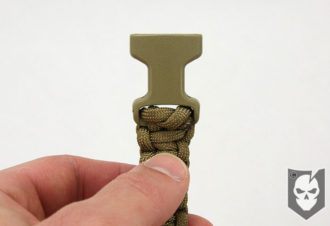
As you make your last wrap near the female buckle, you’ll take your working ends through the buckle and tie a simple overhand knot
Cut the working ends close to the overhand knot and fuse them as you desire
Too much fusing will keep the overhand knot tight, but make it difficult to unravel the paracord in an emergency
View the gallery or YouTube video below and follow along with the steps above, be sure to let us know in the comments if you have any questions!
You may remember in November of last year, when we covered the despicable news that three Navy SEALs were being court martialed for giving terrorist Ahmed Hashim Abed a fat lip.
Today, the trials of SO2 Jonathan Keefe and SO1 Julio Huertas start at Camp Victory, Iraq. The third SEAL being charged, SO2 Matthew McCabe is also at Camp Victory to testify on their behalf. McCabe’s trial doesn’t start until May, and will be held in Norfolk, VA.
Here’s a relevant video from Fox and Friends with former Navy SEAL Scott Taylor, who’s running for Congress in Virginia. We’d urge anyone in Virginia, or wanting to support a true candidate for Congress, to head over to his Website to learn more. Continue reading →
Following the footsteps of Alaska and Vermont, Arizona Gov. Jan Brewer signed a bill into law Friday, allowing Arizonians 21 and older to carry a concealed weapon without a permit, background check or training class.
Of course you’ll still have to legally be able to own and carry a firearm in order to take advantage of the new law, which won’t take place until the current legislative session ends around July or August.
Required by federal law, a background check will still be required to purchase a gun from a licensed dealer, but that doesn’t apply to sales by individuals that aren’t dealers.
While this is a major step forward in our 2nd Amendment rights, it still raises a few important questions. Continue reading →
Benefitting the Cancer for College Scholarship Fund, Will Ferrell has just launched his own sunscreen to help prevent burns while streaking through the quad to the gymnasium.
Available in three different 6 oz. bottles, Forbidden Fruit, Sun Stroke and Sexy Hot Tan, this 30 SPF sunscreen provides all-day UVA/UVB broad spectrum protection.
Head on over to Amazon or the Cancer for College site to purchase these, and you can even bring your Green Hat.
In recognition of the courage, dedication and outstanding service by America’s military and law enforcement professionals, FNH USA is offering a cash-back, mail-in rebate on the purchase of the selected models of FNH USA firearms below.
The offer runs through December 31, 2010 and all paperwork must be received by January 15, 2011. Continue reading →
Oakley knows they really hit the mark with their assault gloves. Their appearance and overall design got them a contract with the U.S. military Special Forces community and many private contracting agencies all over the world.
However, putting the name brand aside let’s take a non-biased look at how they perform operationally and in training. Continue reading →
If you’ve been following our articles here at ITS Tactical, you’ve no doubt heard my good friend Jack of The Survival Podcast being mentioned.
I was invited by Jack on Monday, to take part in the filming of the Advanced Ballistic Striking DVD Series that he and his business partner Neil are producing. They flew Systema (Russian Martial Art) expert Val Riazanov in from the UAE to film the DVD’s, and I was asked to assist Val during the weapons disarming portion.
Assisting Val basically meant drawing weapons on him, getting disarmed and thrown to the floor. I’ve trained in Systema before, a few years back when I lived in California, but have never trained with anyone quite like Val.
I learned an incredible amount of information in just the few hours I spent with him Monday, and would like to take this opportunity to share some of that knowledge. I’m also going to heavily note the incredible Podcast that Jack put together that prompted me to write this article of the same headline.
I’d like to encourage every one of you to get over and listen to Jack’s Podcast from yesterday. I feel this is one of his best and most applicable podcast’s to what we do here at ITS. Continue reading →
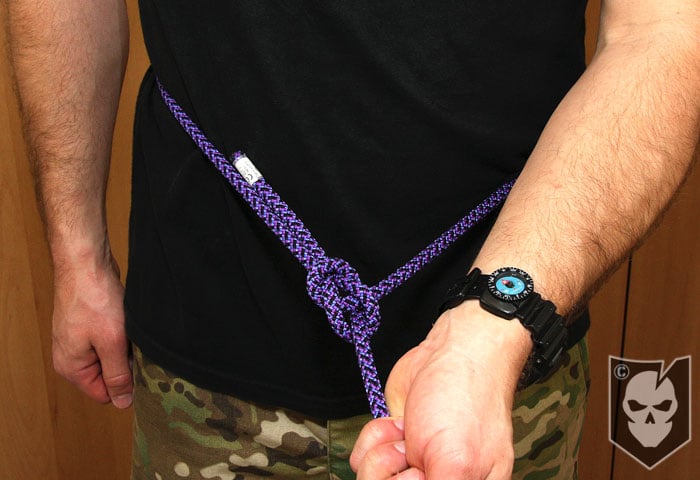
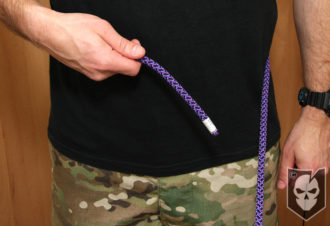
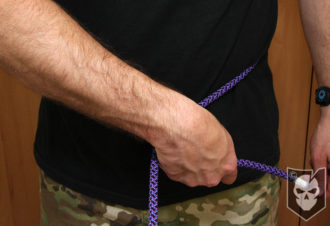
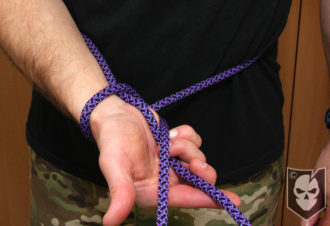
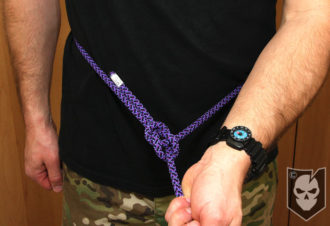
For this week’s Knot of the Week, we’ll be looking at a very important knot called the One Handed Bowline.
What separates this knot from a traditional Bowline is the ability to truly tie this knot one handed, and around your body in an emergency.
Say for instance you were hanging by a tree limb for dear life as raging rapids were attempting to sweep you downstream. Without letting go of the tree branch, you could grab a rope that was thrown to you, tie the One Handed Bowline, and be pulled to safety.
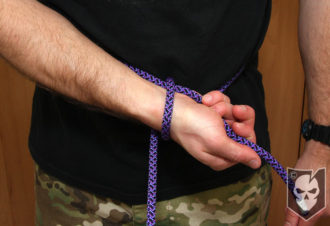
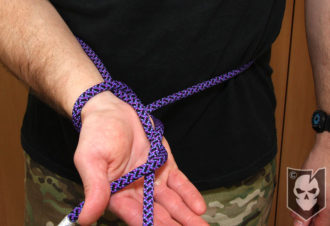
This use of the One Handed Bowline is more for water rescues, as attempting to pull someone up the side of a mountain with a line under their armpits could potentially asphyxiate them before they reach the top.
If you need to hang suspended from a rescue line, simply tie the One Handed Bowline and step onto it with you foot and hang on to the line. Be careful with the application of this knot in emergency situations.
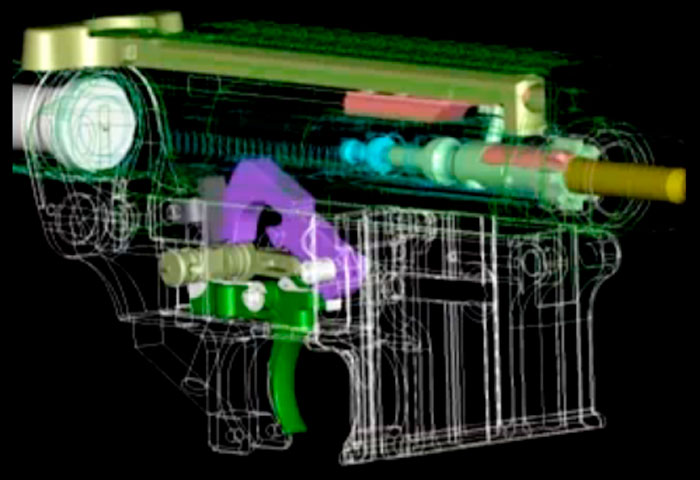
Today we’re going to continue our series on Keeping Your AR Running by looking into the AR nomenclature and Cycle of Operation for a Direct-Impingement Gas System.
We’d like to urge everyone to read our first part of this series on the History of the AR. These articles will all be building blocks, as it’s important to get a solid foundation.
Knowing the different parts of an AR and how they operate is essential to being able to diagnose a problem and ensure you’ve taken the necessary steps to prevent problems from occurring.
AR Nomenclature
To describe the different parts of the AR platform we’re going to break it down by what we refer to as the Upper Receiver Group and Lower Receiver Group.
Check out the embedded YouTube video below for a visual walkthrough we’ve put together of these parts and a simple field strip of the AR you can follow along with.
You can also click on the image to the right to see an expanded view of all the components of an AR.
Upper Receiver Group
Upper Receiver
Forward Assist
Brass Deflector
Ejection Port Cover
Barrel Nut and the other components that hold the barrel to the upper receiver
Barrel Extension (Feed Ramps)
Barrel
Flash Suppresor
Gas Tube or Piston (depending on your AR)
Sights whether they be fixed or BUIS (back up iron sights)
Optics (optional)
Inside the upper receiver we have the Charging Handle with latch and the Bolt Carrier Group.
Bolt Carrier Group
Bolt
Bolt Carrier Key
Firing Pin
Cam Pin
Bolt
Gas Rings
Extractor
Ejector
Lower Receiver Group
Magazine
Buttstock
Buffer Retainer
Action Spring
Buffer
Buffer Tube
Pistol Grip
Trigger Guard
Take Down Pins
Hammer, Trigger and Disconnector
Bolt Catch
Magazine Catch / Magazine Release Button
Cycle of Operation
Now that we’ve gone over the individual parts of the AR, lets examine the Cycle of Operation and how the AR functions.
Cocking
The first step in the cycle of operation for an AR is to charge the weapon, or “make ready.” This is done by ensuring a loaded magazine is present in the weapon, grabbing the charging handle, pulling it to the rear and releasing.
As the bolt carrier group is pulled to the rear by the charging handle, the action spring is compressed in the buffer tube, causing the buffer to reach its rearmost position inside the buffer tube.
While simultaneously moving rearward, the bolt carrier group rides over the hammer and forces it down into the receiver, compressing the hammer spring and cocking the weapon.
Feeding
As the bolt carrier group is thrust forward from releasing the charging handle (and the expanding action spring), the face of the bolt picks up a new round that is pushed into its path by the upward thrust of the magazine’s follower and spring.
Chambering
The bolt’s extractor now grips the new round, which also compresses the ejector and ejector spring as the round is seated in the chamber.
Locking
As the bolt carrier enters the last 1/2 inch of its forward movement, the cam pin emerges from the guide channel, moves along the cam track, turns the bolt counter clockwise (22.5 degrees) and locks the bolt into the barrel extension.
Firing
The weapon is now locked and ready to be fired. Depressing the trigger thrusts the hammer forward, striking the firing pin. The firing pin makes contact with the primer of the round and ignites the propellant in the cartridge, firing the round.
Firing then forces gas through the barrel carrying the round out and forcing a bit of the gas through the gas port. The gas is directed through the gas tube and into the upper receiver into the awaiting bolt carrier key.
Unlocking
As the gas traveling through the gas tube is directed into the bolt carrier key, it’s channeled into the expansion chamber in the bolt carrier. The gas is now trapped between the rear portion of the expansion chamber and the gas rings on the bolt.
The entire bolt carrier group now moves rearward as the gas expands and is contained by the gas rings. This causes the cam pin to rotate 22.5 degrees, “unlocking” the bolt from the barrel extension.
Extracting
While the bolt carrier group is moving rearward, the spent cartridge is pulled out of the chamber.
Ejecting
When the spent cartridge continues to move rearward with the bolt carrier group, it’s thrown out of the upper receiver chamber as it clears the ejection port. This is due to the ejector spring pushing on the ejector and the spent cartridge. This pressure from the ejector also causes the extractor to release and kick out the round.
Cocking
As the bolt carrier group moves rearward it rides over the hammer and forces it down into the receiver, compressing the hammer spring. Because the trigger is still depressed at this point, the hammer is engaged with the disconnector. When the trigger is released or “reset,” the hammer slips from the disconnector and is caught by the nose of the trigger.
The weapon is now ready to fire again.
Here’s a couple of YouTube videos that explain the cycle of operation
Closing Notes
Hopefully you’re now familiar with the different parts of the AR system, understand how they work and even how to complete a basic field strip.
in our next article we’ll look at the pros and cons of Direct-Impingement vs. Gas Piston, and get into an LTI or Limited Technical Inspection so you’ll know how to properly assess your AR parts for damage.
Let us know if you have any questions regarding what we’ve covered today, and we look forward to continuing this series!