How to Sharpen a Knife while Minimizing Mistakes and Maximizing Cutting Edge Performance

How to Sharpen a Knife

DISCLAIMER: I ask that you read the entire article and keep in mind that this is one of those discussions that rank up there with talking about religion and politics. And please, let the results speak for themselves.

I don’t claim to know everything there is to know about sharpening. It’s a lifelong journey and one that I feel isn’t perfected overnight. However, I will say that “shaving sharp” is only the beginning of the sharpness that can be obtained, a lot like how obtaining a black belt is only the beginning of learning in martial arts. I hope to get those that don’t already know, to that “beginning” point, where after I feel that they’ll continue to learn and grow.

First, before you go tearing off and grab your favorite knife to start, I’d like to mention four reasons why people fail at sharpening.

  1. They start off with a knife that is EXTREMELY dull to learn on.
  2. They don’t see progress and change their technique.
  3. They progress too soon from a coarser to a finer medium, or start out on too fine a medium.
  4. They have too steep of a sharpening angle.

Common Mistakes while Sharpening a Knife

Failure 1: Starting off with a knife that is EXTREMELY dull to learn on.

I suggest starting on a knife that you may actually think is sharp, even a new knife or one that is barely used. If you can’t do that, try having someone sharpen it who knows how to sharpen and then use your sharpening skills to maintain that edge just as soon as it looses it cutting ability. Even most new knives don’t have a truly sharp edge. By training and learning your skills on a fairly sharp knife, you make it easier on yourself because you’ll be able to see progress much quicker. You’ll also be able to tell what’s working and what’s not. Every time that edge starts to get a little dull, take it straight to your stone and put in a few minutes getting back that edge. It’ll be much less frustrating than spending an hour or more whaling away at a very dull knife, unable to see any progress.

Failure 2: Not seeing progress and changing technique.

This happens when you’re trying to learn how to sharpen and you start with a knife that should’ve been sharpened years ago. You start sharpening and you don’t see any change in the dullness or sharpness of the knife, so you try something else, which also fails to bring an edge within five or ten minutes, so you try something else – all without making any real progress in the long run. I consider myself proficient at sharpening, but even I don’t try restoring an edge by hand that’s extremely bad unless I have no other choice. Even then, sometimes it’s best to take a break if you haven’t established an edge and are getting tired. Then come back and keep working, using the same angle you had before until you get the edge you were working for. If you’re working with a hard steel and extremely worn edge, sometimes it can take well over thirty minutes of sharpening by hand just to establish an edge.

Failure 3: Progressing too soon to a finer medium or start out on too fine a medium.

Sharpening is no different than sanding wood. If you need to move a lot of material, it’s best to start out with a coarse grit and not move to a finer grit until you’ve removed all the steel you need to with the coarser grit. Learning the different grits like Japanese, CAM or Microns is an entire article in itself. I use a 1000 Japanese water stone for my coarse stone, which is equivalent to a 700 Grit or 14 Microns. This will produce a shaving sharp edge with practice, yet is still coarse enough to remove plenty of steel. However, if I were using sandpaper instead, I would start with 80 or 120 grit, which makes it very easy to move a lot of steel.

Failure 4: Using too steep of an angle.

There are several different factors that determine the proper angle to sharpen:

  • The purpose you’re using the knife for. Heavy cutting or light slicing?
  • The quality of the steel you are working with. Can it hold a steep edge?
  • Personal preference.

I prefer to hold a shallower angle on my knives than most, which sacrifices some of the edge retention or longevity of the edge for cutting performance. That being said, in defense of my position, I try to use my knifes for cutting, not plowing my way through things. I’ll discuss what angle you should sharpen your knives at next.

Where to Start

Now that I’ve warned you about the dangers that can discourage you while learning to sharpen, let’s talk about sharpening itself. The first thing we’ll talk about is the angle of the knife to the sharpening surface. Angles for knives can vary from ten degrees to thirty degrees or greater. I prefer fifteen to twenty degrees on each side, giving you a total of a thirty to sixty degree angle cutting edge, if you can visualize that in your head. There are a couple of ways to determine the angle you’re at while sharpening. With time and experience, you’ll be able to tell your angle just from holding the knife in your hands, but here are a few tricks that will help you get started.
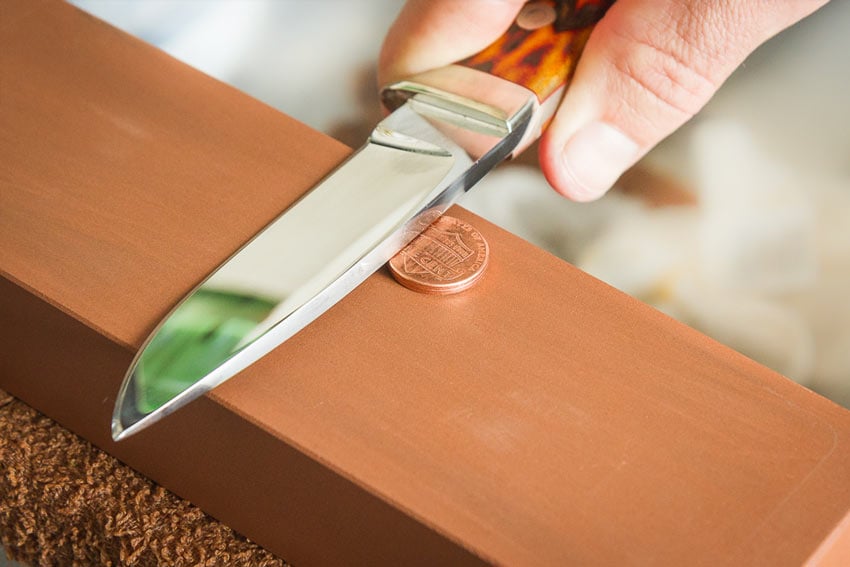
two-penny knife sharpening trick

First is the old two-penny trick. Simply place two pennies under the spine of the blade to get roughly a fifteen to twenty degree angle on most pocket knives. Don’t try to sharpen the knife with those pennies still underneath it, just prop the knife up on the coins so you can feel about what your angle should be while you are sharpening, then take the pennies off the stone and sharpen for a while. If you need a reminder, just pull out your pennies again and check how well you’re doing at maintaining that fifteen to twenty degree angle while you are sharpening.

Another way is to take a post-it note or a small, square piece of paper and fold it in half diagonally. By folding it diagonally, you have a forty-five degree angle. Fold it in half diagonally one more time and you have a twenty-two and a half degree angle. Simply place this paper under your edge and adjust accordingly. Again, the paper is just a reminder to yourself. You’re trying to train your hands and your brain to remember the angle you’re trying to sharpen so you can always find that angle again with any knife that you choose to work on.

using paper folded diagonally to remember the anle you're trying to sharpen

One last way is to use a matchbook if you can still find one around. This will give you a shallower, twelve to fifteen degree angle to use for a finer edge, like a filleting knife or something similar.

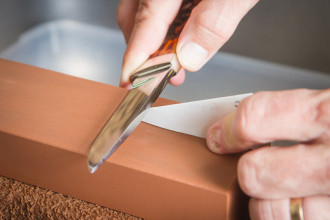
Once you’ve decided on the angle you want, it’s time to start removing steel. There are several techniques for doing this. Some like to act as if they were trying to cut a stamp off of the surface of the stone. Others like to go in circles. I prefer to go back and forth using the entire length of the stone. I find this the fastest and most efficient way of removing steel.

You will continue doing this back and forth motion, checking your angle frequently as you sharpen, until you’ve established an edge.

Go slow at first, concentrating on keeping the same angle. This brings me to the problem of compensating for the human element. Naturally, as you’re sharpening, you’re going to rock up and down on your angle to some degree. You should try to control the wrist or the forearm rocking as much as possible to keep the angle of the blade the same as you push and pull the knife from one end of the stone to the other. One thing to remember is that as your wrists or forearms rock back and forth, the angle of the edge you are creating will end up being the highest angle you’ve rocked up to during the process of sharpening. Simply put, you need to hold your angle a little lower than you want your final angle to be to compensate for your rocking motion. Do five to ten strokes and then check your progress, looking at the edge to determine where you’re removing steel from and how to correct it if needed. Then swap sides and do five or ten strokes on the opposite side of the knife to keep your edge symmetrical. Make an even amount of strokes for either side until an edge is established.
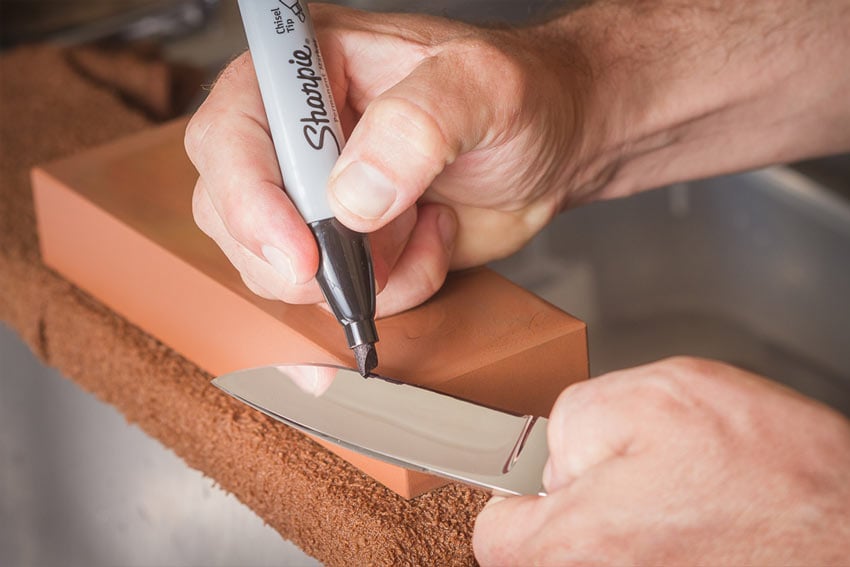
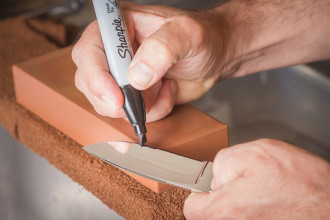
covering knife edge with permanent marker to see where you're removing steel

Tip: Sometimes it helps to cover the edge with permanent marker so you can see where you’re removing steel.

Here you can see that you’re holding too high of an angle to match the angle already on the knife. Notice the permeant marker is removed from the edge but not the top of the secondary edge. Lower your angle slightly and check again.

too high of an angle on your knife edge

Here we have the opposite problem too shallow of an angle raise up your angle slightly until you are removing steel at the proper angle.

too shallow of an angle on the knife edge

How can you tell when you’ve established an edge?

Trying to decide whether or not you’ve established an edge can be difficult, because sometimes when you’re sharpening you can create a small burr on the knife edge. The burr is made up of small particles of steel hanging on the very edge of the blade, like you would see if you cut a board with a chop saw and small pieces of wood hung off of the edge of the board. On the knife edge, these small pieces of steel can fool you into thinking your knife is much sharper than it really is. As soon as these small pieces of steel are knocked off during the use of the knife, you’re left with a dull edge. Here are two methods you can use to tell if you’ve gotten a really fine edge you can be proud of.

Using your Sight

I suggest getting a jewelers loupe to inspect the edge. Here you can see the slight burr produced and that I held my both my edges higher. You can feel the burr on the opposite side of the knife that you were sharpening on. This lets you know that you’ve established the edge. You want an even burr along the entire blade.

even burr on along the entire blade

One thing is for sure, if you have a true edge you won’t see any light reflect off of the edge when looking straight at the edge. This takes a good source of light and a little practice. Simply hold the knife with the edge straight up under a bright light (preferably sunlight) and rock the blade side to side and up and down looking for any reflection.

The light will only reflect off of flat spots or rounded spots on the blade. If the two sides of your blade meet in a true point, there will be no flat or rounded spots for the light to reflect from. If you see any light reflecting off of the blade, you still haven’t established a good edge. The two most commonly missed spots on a knife are the heel of the blade and the tip. Here is a photo showing an edge established everywhere except the tip.

forgetting to sharpen the tip of the knife

Feeling the Edge

This can be one of the most deceiving ways to determine whether or not you’ve established an edge. I can’t tell you how many times I have seen someone take their thumb and run it over the edge and say a knife is sharp, when in fact it isn’t. This is an example of just how deceiving that burr can be. The person felt the tiny metal particles along the edge and it certainly seemed sharp, but as soon as the knife experiences some resistance in the cut, these metal particles are gone. One way to get rid of that burr is to run the blade lightly over a piece of wood once or twice. This will remove the burrs without damaging the edge underneath and then you will be able to feel exactly how sharp the edge really is.

Knife Care and Maintenance

I cringe every time I sharpen a knife for someone and then they turn around and destroy all my work in seconds by abusing the knife. Much like someone putting a deep scratch in finished woodwork, you know it’ll take a lot of work to fix it and many times there was no reason for all that hard work to be ruined.

Maintaining a knife is easy. Just remember this:

A knife is for cutting things that are softer than the steel itself. It only takes the slightest pressure on something harder than the steel to remove the edge.

This includes glass, ceramics, other knives, steel, rocks, bones, dirt, etc. One little bump of the blade against any of these will remove the edge instantly. So don’t throw your knives in the sink, drawer, dishwasher or anywhere else the edge of the knife will come into contact with something harder than itself. Keep your knife in a sheath to protect the edge while not in use. Never cut on top of anything harder than the blade, such as a glass cutting board or a granite countertop or similar. And the minute your knife’s performance drops even the slightest, give it a couple of strops on a fine stone and bring the edge back. If you follow this advice, you’ll be amazed at how long you can keep an edge on most knives.

I could talk for hours about sharpening and maintenance of your cutting tools. If you’d like to learn how to get started on your own knives for under $10, tips on starting your own sharpening service, or even just more about sharpening in general, I’m putting together a DVD covering all of those topics. I am currently trying to raise enough support through Kickstarter to make this possible. I’d appreciate you taking the time to watch my short video to see what you can do with a sharp knife!

In closing, let me share a few words of wisdom with you.

Sharpening is 90% skill and 10% tools.

This is one of the reasons I feel so strongly about learning to sharpen free hand. Once you’ve mastered the skills of sharpening free hand with a set of stones, you can use just about anything to sharpen a knife. If it will dull the knife, it will sharpen it in the reverse manner. If you’re relying on a machine to sharpen your knives, you’re limited by what the machine can do and by your access to the machine. However, if you have the required knowledge and sharpening skills, then you can sharpen anything, under any circumstances!

Editor-in-Chief’s Note: Please join us in welcoming Patrick Roehrman as a contributor on ITS. Patrick runs MT Knives and has been making custom knives from his shop in the Ozarks of Missouri for the last several years.

Photo Credit: Elon Gane

Posted in Knives | Tagged , , , , , , , , , , , , , , , , , | 33 Comments

May The Fourth Be With You Morale Patch Collection II: Extremely Limited and Available Now!

May The Fourth Be With You Collection II

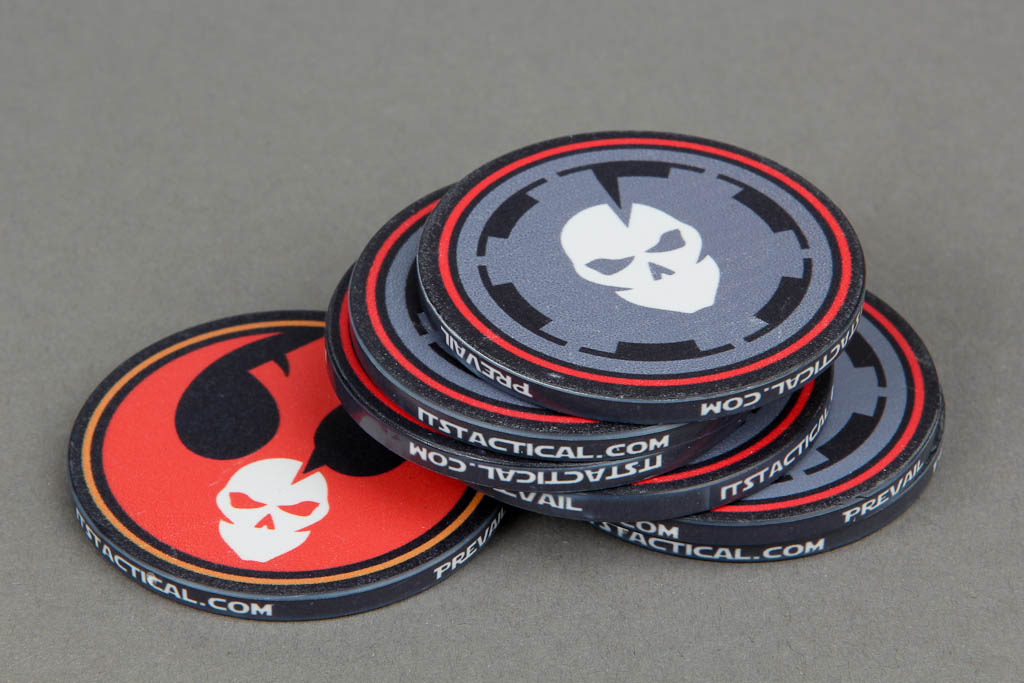
We’ve been getting requests all year long about bringing back our May The Fourth Be With You Morale Patch Collection, but like we said before, that original collection would never be made again. With 500 sets selling within hours, so many missed out on their chance to order that we made an entirely new set available today and have even upped the quantity on hand! Each May The Fourth Be With You Morale Patch Collection II pack includes 5 morale patches in the style of the ITS logo, as well as a free double sided “circular challenge device!” (poker chip) and a chance to send off for a free bonus Dark Side patch!

May The Fourth Be With You Collection II

May The Fourth Be With You Collection II

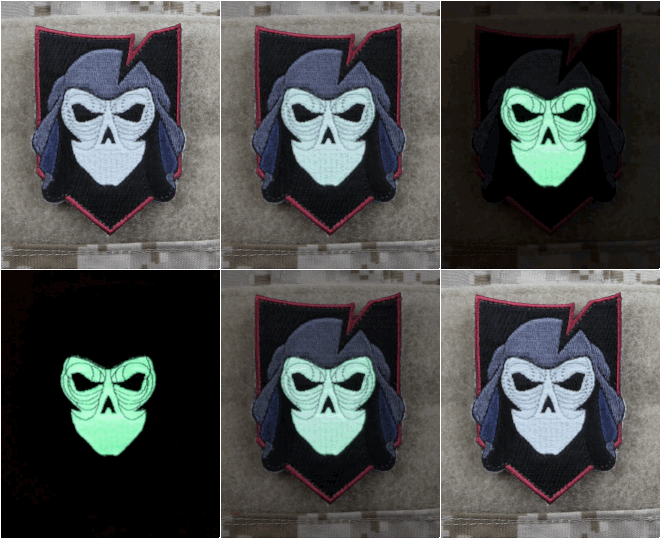
But wait, there’s more! We’ve also included a Mail-Away offer card for a Free Dark Side Morale Patch. By simply mailing in the included offer card and 5 ITS Tactical Card/Tag QR Codes with a self-addressed stamped envelope to the address on the card, we’ll send you back a Free Dark Side Morale Patch.

May The Fourth Be With You Special Offer

Dark Side Special Offer Morale Patch

This is an extremely limited offering and only 750 of the May The Fourth Be With You Morale Patch Collection II were produced and will NEVER be made again!

**ITS Header Cards and Hang Tags with QR Codes can be found attached to many ITS products in the ITS Store, such as ITS Morale Patches or ITS Nylon Goods.**

**ITS Dark Side Morale Patch is NOT Included in the Set, but available as a Free Mail Away offer.**

Posted in ITS Information | Tagged , , , | 3 Comments

What We’re Reading at ITS: A Glance at Our Nightstands

ITS HQ Reading List

“The man who does not read has no advantage over the man who cannot read.” – Mark Twain

The average reader of ITS may think we only read surplus U.S. Army Field Manuals or how-to’s on firearm maintenance and knot tying. However, the crew that makes up ITS is varied in both backgrounds and interests, which is evident when you ask one of us what we’re currently reading. Whether you’re reading for education or relaxation, there’s a lot of great books out there and we wanted to take a moment to share what each of us has on our nightstand.

Bryan Black – Editor-In-Chief

My reading list is much longer than I’d like it to be, but I typically have a few books I’m in the middle of that I switch to depending on my mood and how well a book is holding my attention in a given chapter. Lately, I’ve really been trying to make time at night to read for at least an hour. I’ve stayed so busy that its taken me budgeting time in to read. A few years back, I’d read in my downtime, which has been less and less these days. Here’s what I’ve had my nose in lately:

Frankenstein by Mary Shelley

FrankensteinI actually just finished Frankenstein and loved it. It’s not only a classic, but a vast departure from the electrically charged, neck bolted monster you’re familiar with from the screen. While electricity is what originally inspires animation for scientist Victor Frankenstein, his technique is eventually rooted more in chemistry than electricity when bringing life back to dead tissue.

When Frankenstein’s monster is eventually brought to life, it’s his grotesque features that drive Victor away and in turn, push the monster to give in to his animalistic killer instincts. I’d highly recommend picking up a copy and reading it for yourself, it’s certainly given me a new perspective on the creature known as “Frankenstein.”

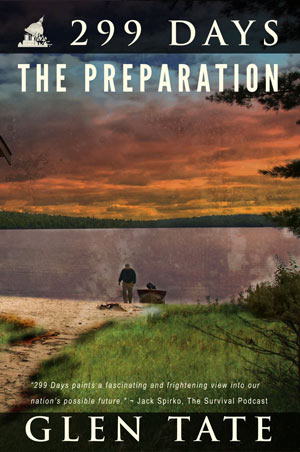
299 Days: The Preparation by Glen Tate

299 DaysI was first introduced to Glen Tate by my friend Jack Spirko of The Survival Podcast and I’ve really liked what I’ve read so far in his 299 Days series. It’s an interesting look into a partial collapse of the United States from a plausible perspective. What drew me into the series, now in its 7th book of 10, was the detail in which Tate describes the fallout from the collapse as gradual and not some earth-shattering immediate impact.

Something that I’d like to mention is to keep in mind that this is a ten-part series and not just a single book, If you’re ok with that up front, then dig in. I also attribute the fact that I’m not further along to some of Tate’s writing style. There’s nothing wrong with it, It’s just been hard for me to follow at times.

That being said, I’m still anxious to read more and already have other books in the series ready to start after this one. I’m really enjoying it so far and definitely recommend it. There’s also a Kickstarter Campaign going right now to produce a 299 Days movie, check it out here.

The Hobbit by J. R. R. Tolkien

The Hobbit“In a hole in the ground there lived a hobbit.”

After being less than impressed with the departure taken by the first two of three Hobbit movies, I decided to go back and read the Hobbit from the beginning again.

I know that a lot is different in the movies from the original novel by Tolkien, but It’s been years since I’ve read it and can’t quite recall everything that’s changed.

Mainly, I’m reading it to reconnect with the tale I loved as a kid and while just a few chapters in so far, It’s everything I remember it to be.


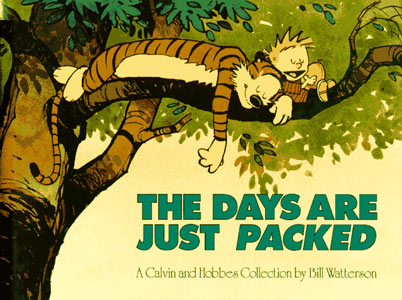
Calvin and Hobbes: The Days are Just Packed by Bill Watterson

Calvin and HobbesI’ve been re-reading the entire anthology of Calvin & Hobbes books starting from the very first collection of comic strips Watterson released in 1987, which I still have. I was missing a few books from collecting them in my youth and after completing the collection recently, I decided to start from the beginning.

There’s a bit of overlap occasionally, considering many books are simply collections of other stand-alone books, but I still love Calvin & Hobbes after all these years. It’s been fun to go back and read them again; they’re always good for a chuckle before bed.

Kelly Black – Chief Operating Officer

Yes, Your Teen is Crazy!: Loving Your Kid Without Losing Your Mind by Michael J. Bradley, Ed.D.

Yes Your Teen is CrazyThis is a book about the physical and emotional roller coaster ride of being a parent of a teenager. It has been one of the most educational and enjoyable books I’ve picked up since college. It’s a fun read thanks to the conversational and humorous perspective of Michael J. Bradley and it’s full of real stories and scenarios (not just a bunch of medical mumbo jumbo,) that helped me relate and feel like I could connect with other parents I’ve never even met. It’s also given me what feels like a bird’s eye view of what goes wrong in some parent-child relationships that causes severe separation.

Thinking about the memories I have of my teen years reminds me of fun and crazy, tumultuous and insecure times. I vividly recall the mixed emotional feeling that I’d reached a time in my life where I deserved freedom and respect, but still wanted to be taken care of on so many levels. Having my son enter his teens a few years ago helped to bring these thoughts back to the forefront of my mind. Dealing with those emotions as a teen is vastly different from looking at the same emotions and expectations from the perspective of a parent. Many times after my son entered this phase of development I felt that I was losing my mind, losing control of our relationship and made me fearful of losing him all together.

As a parent, I second guess myself regularly. This book has given me much needed perspective (and reminders) of what it’s like to be a teenager, plus what’s happening to a teen’s brain on a physiological level. It’s helped me to understand and be ok with the crazy arguments that come up out of the blue and the irrational demands a teenager can try to make. It’s also taught me not to take things personal and given me the inner confidence to continuously question what’s right, wrong, rational, applicable to the situation and demand more time to make a decision when I need to.

If you’re the parent of a teen, or have a child that will be entering this phase of development soon, I highly recommend adding this book to your library.

Heaven is Here by Stephanie Nielson

Heaven is HereBack in 2008 I stumbled across a mommy blog by Stephanie Nielson. She lived in a world that I admired; faithful to God and country, stay at home mom, adoring wife and mother, passionate blogger, an impeccable Anthropologie-style dresser who kept her creatively influenced home filled with family-centric projects and deliciously home cooked meals. In August of that year Stephanie and her husband Christian were involved in a plane crash that killed the co-pilot, broke Christian’s back and burned over 20% of his body and left Stephanie with burns over 80% of her body. The tragedy left this young couple with four young children in the care of family members and the uncertainty that they would be able to resume life as they had known it.
Stephanie was in a medically induced coma for several months before her mental and painful physical recovery began. Heaven is Here, published in 2012, captures her miraculous journey of survival and finding the will to continue living and recovering after everything in her life (her ability to be a wife and mother as she knew it) was shattered. It’s about finding new perspective on what’s truly meaningful in life, focusing on those things that truly matter and reveling in what brings inner contentment despite worldly and physical limitations.

Since 2008 I’ve learned so much from Stephanie even though I’ve never met her. She’s taught me about strength, faith, motherhood, being an adoring spouse and never giving up on what you believe in. This book is inspirational and her blog, which she continues to update daily, is the first and sometimes only website I visit each morning to help start my day. She shares her daily life that sometimes includes the struggle to force her body to function as normally as possible, so she can continue with her daily routine as wife and mom. Also to visiting the range with her husband to practice shooting her AR-15. The Nielson’s are proof that life is what we make of it, as they’ve made it through some of the worst imaginable and are making life work for them every day.
The Reason I Jump: The Inner Voice of a 13-Year Old Boy with Autism by Naoki Higashida

The Reason I JumpThis book is an eye-opening glimpse into the world of a severely Autistic boy. Modern technology helped Naoki to utilize an alphabet grid to communicate his thoughts, building words and sentences to share with the world what an Autistic person may be thinking and feeling, but just can’t communicate the right messages to family members, care givers and teachers.

My exposure to Autism has been limited, however this book has given me a better understanding of questions similar to ones I’ve had and heard others ask. Questions (answered in the book) such as: “Why do people with autism talk so loudly and weirdly?” “Why do you line up your toy cars and blocks?” “Why don’t you make eye contact when you’re talking?” and “What’s the reason you jump?” Naoki’s answer to this question was, “When I’m jumping, it’s as if my feelings are going upward to the sky.”

Naoki’s gentle personality invites anyone and everyone to try and understand the differences of his perceptions, feelings and frustrations as a child with Autism, regardless if we have or know a child also effected. It’s a heartwarming conversation that has left me educated and better prepared for the future, living with all types of humanity.

Neither Wolf nor Dog: On Forgotten Roads with an Indian Elder by Kent Nerburn

Neither Wolf nor DogKent Nerburn was contacted on behalf of an Indian Elder named Dan to share a different perspective of the seemingly forgotten Native American roots in our modern world. This book is the story of the two men traveling together through Indian country as they struggle to understand and identify with each other and share real experiences. Dan shares not only history of how his people and other Indian tribes were displaced from their home lands, but how populations were decimated, forced to live in designated communities and how that translates to how some Native Americans live today.

Reading this book has given me a totally different perspective of land ownership, the sanctity of all land and the history of America and her native people. Nothing I’ve ever been taught in any history class offered as much personal insight as this book did. But, Neither Wolf Nor Dog isn’t just a history lesson; it’s a lesson for all humanity.

Rob Henderson – Community Support

The Runaway Jury by John Grisham

The Runaway JuryI’ve always been fascinated with law and as a child desperately wanted to be a lawyer. This was partially fueled by the writings of John Grisham and before graduating High School, I had read every book he had written. Recently, I’ve been working my way back through his works and I’m currently reading my favorite “The Runaway Jury”.

“The Runaway Jury’s” story focuses on a multi-million dollar big tobacco trial in the deep south. While the tobacco companies are pouring mountains of cash into the trial, they’re unaware of a lone wolf in the jury. I love the storyline because it blends a great deal of real law practices with an exciting dramatic plot line underneath.

Reading Grisham’s books is also an escape for me. I tend to read mostly non-fiction but it’s nice to kick back once in awhile and enjoy a book that’s informative but fun at the same time. Grisham has several non-law themed books available and they’re great reads as well.

Mike Petrucci – Community Manager

While I try to stick with just one book at a time before moving onto the next one, I’m actually reading two and a half books at the moment. Even though I often have better reading comprehension when sticking to a single book, I’ve found that certain moods are better suited for different subjects.

Zen and the Art of Motorcycle Maintenance: An Inquiry Into Values by Robert M. Pirsig

Zen and the Art of Motorcycle MaintenanceI’ve really been taking a long time to get through this book and it’s not because of the style or the format but simply that I’m trying to truly digest what I’m reading. The author can get so philosophical at times that it takes a bit of reflection to fully take in what’s being read.

Throughout the book, Pirsig raises thoughtful and interesting points as he attempts to define the concept of quality. When you start to truly investigate it, defining “quality” may make your brain hurt a little.

It’s also worth mentioning that despite the title, the author makes it clear that the book isn’t very factual on the subject of zen or even motorcycles. Don’t let that sway you from reading it though.

As someone who used to ride a motorcycle a lot, I for one really enjoy and relate to what Pirsig shares about life on two wheels. The feeling of freedom on a motorcycle is incredible and the view is unique; one that I wish many people in “cages” could experience sometime in their life.

“Mountains should be climbed with as little effort as possible and without desire. The reality of your own nature should determine the speed. If you become restless, speed up. If you become winded, slow down. you climb the mountain in an equilibrium between restlessness and exhaustion. Then, when you’re no longer thinking ahead, each footstep isn’t just a means to an end but a unique event in itself. This leaf has jagged edges. This rock looks loose. From this place the snow is less visible, even though closer. These are the things you should notice anyway. To live only for some future goal is shallow. It’s the sides of the mountain which sustain life, not the top. here’s where things grow.”

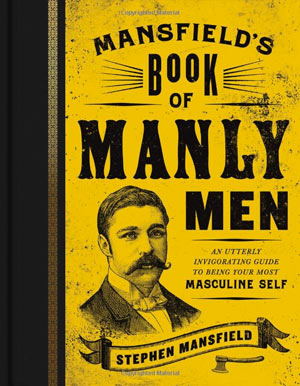
Mansfield’s Book of Manly Men by Stephen Mansfield

Mansfields Book of Manly Men“If a man does not have an ideal and try to live up to it, then he becomes a mean, base and sordid creature, no matter how successful.” ~ Theodore Roosevelt

Manliness today appears to be a trend or a fad, but what’s most often seen in ads and websites are not representative of true manhood. My dad bought me this book as a gift and advised I read it slowly and thoughtfully and I also recommend doing just that.

It’s time to reclaim our lost honor as men and focus on the virtues, the habits, the duties and actions of manliness. True manhood doesn’t have a consistent physical appearance; it’s much deeper than beards and testosterone. Manhood is attainable by every man if they know what to look for and the author provides examples of great men all throughout history.

Mansfield explains that this book isn’t one that reduces the role or importance of women, it’s just simply not a book for girls. He even explicitly mentions that the book is mainly about how a man is measured by who he is for the women in his life. Overall, it’s a guide to illustrate what moral standards men should strive for.

The New American Road Trip Mixtape by Brendan Leonard

The New American Road Trip MixtapeEarlier I mentioned that I was reading two and a half books and this qualifies as that “half book.” I only have an Amazon Kindle sample but so far, I’m enjoying it.

My desire of wanderlust is the same as many others out there as I feel that visiting new locations and meeting new people will broaden your view of humanity. Leonard is on the hunt for the true American Dream and road trips are a fantastic way to accomplish this.

“The driver’s seat of a car might be the last sanctuary for many of us to actually think, or, if we have a passenger, to actually talk.”

For every road trip I’ve been on, this has proven to be thoroughly true and I look forward to reading the rest of the book someday.

What books are you currently reading?

Posted in Reading | Tagged , , , , , , , , , | 4 Comments

Squawk Box Broadcast 008: History, High-Tech Vehicles and How-To’s

Squawk Box Broadcast

The Squawk Box Broadcast aims to highlight a few of the stories that have caught our attention recently. It’s also a way to broaden your horizons and explore new ideas.

A Life Underwater >> Danny Cooke

Ray has spent nearly his whole life exploring the ocean. Since retiring as a commercial diver, he’s focused on enjoying the underwater atmosphere and searching for anything lost or tossed by passing ships or wrecks. Editor and Director of Photography Danny Cooke has put together an excellent video showcasing one man’s passion and we’re sure you’ll find Ray fascinating.

The Most Honored Photograph >> PetaPixel

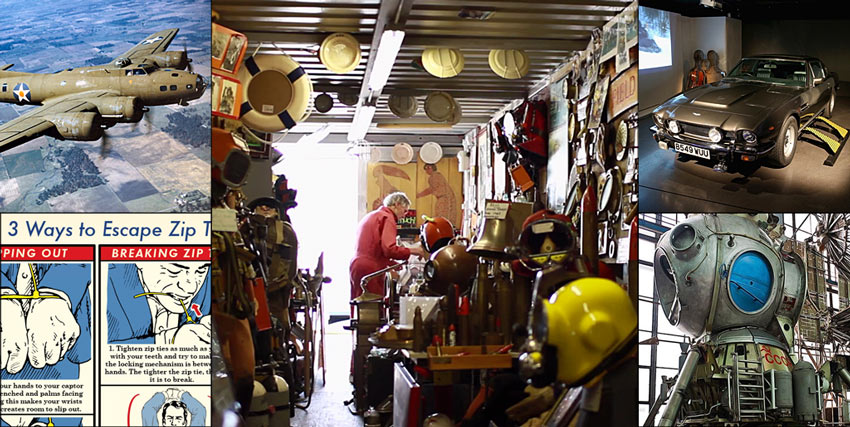
Eager Beavers Recon

A recruited crew of goof offs took a shot up and nearly scrapped B-17 Flying Fortress and transformed it into the most heavily armed bomber in the Pacific. The mission was a photoreconnaissance run that would prove their modifications lifesaving. Read the entire story on how a vital but volunteer only mission resulted in the most decorated combat flight in U.S. history.

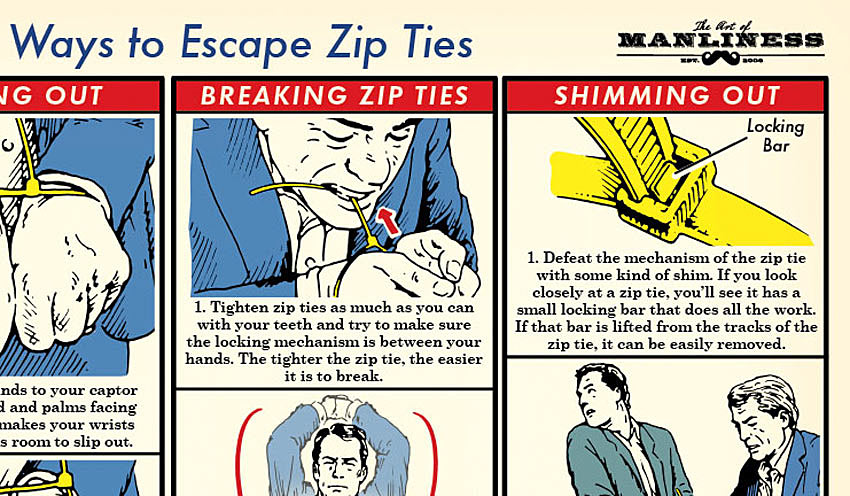
3 Ways to Escape Zip Ties: An Illustrated Guide >> Art of Manliness

Art of Manliness Zip Ties

The crew at Art of Manliness asked to use our series on escaping illegal restraints to create an illustrated guide to go along with it. They made a simple yet very informative cheat sheet to help you master this skill-set. Be sure to revisit our video walkthroughs if you’re looking for more information too.

The killer vehicles of James Bond >> The Verge

James Bond Vehicles

The largest collection of original 007 vehicles are currently parked under one roof at London’s Film Museum. Not a single one is a replica, these are the real deal and most are on a loan from the production company that built them. In addition to the actual vehicles on display, there’s also never-before-seen concept art and storyboards from the James Bond franchise. If you’re not lucky enough to visit in person, at least you can enjoy the eye candy from their photos and online tour.

Inside the Soviets’ Secret Failed Moon Program >> Wired

Russian Lunar Lander

Russia is credited for launching the first satellite into orbit, sending the first man in space, landing the first probe on the moon and launching the first space station of any kind. Even with all of those milestones, the U.S. beat Russia to getting the first man on the moon and back. How come Russia didn’t win that accomplishment? Basically, they had the hardware built but lacked a stable launch vehicle. As setbacks and costs continued to rise, the program was scrapped. Currently though, you’re able to get a glimpse of the Soviet lunar lander as it sits inside of a Moscow lab.

Like these posts? Stay up to date by following the Squawk Box daily.

Posted in ITS Information | Tagged , , , , , , , , , , , , , , , , , , , , , , , , , | Leave a comment

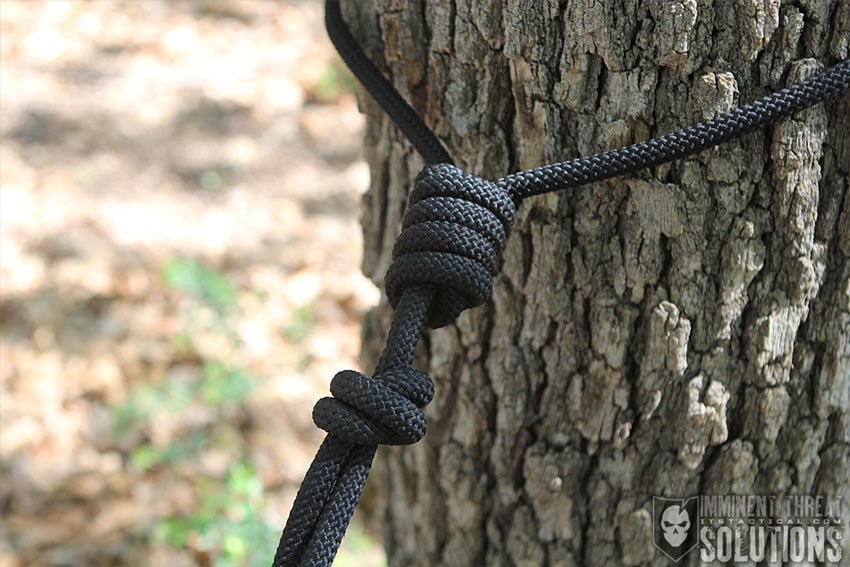
Knot of the Week: Tying a Barrel Knot for Single Line Rappelling

Urban Rappel Equipment

In one of our more recent articles on setting up an urban rappel, we went over two methods for tying off a static rope for single-line rappelling. Today, we’d like to go over the Barrel Knot and how it’s tied.

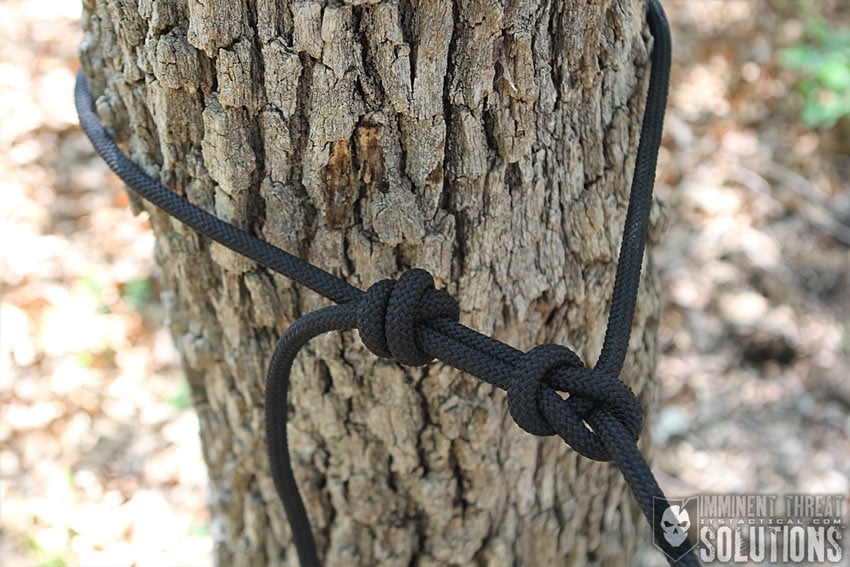
The other knot we mentioned in that urban rappelling article is a Bowline, which we’ve gone over before on our Knot of the Week series. The Barrel Knot is preferable to the Bowline, for the simple reason of it being a friction knot (or slip knot), meaning that as it’s loaded, it will self-tighten around the stationary object it’s tied off to. An important note here is that while tying this for rappelling purposes, you should always use a large diameter tree or object that you’ve deemed sturdy enough to rappel from. Small trees have no place in a proper rappelling setup.

Tying a Bowline for single-line rappelling is acceptable as well, but with a Bowline being a fixed loop, it will move around much more than a Barrel Knot and again is why the latter is preferred.

How To Tie a Barrel Knot » Bends

(Strength: 4/Secure: 5/Stability: 3/Difficulty: 3)

Please refer to our Knot of the Week introduction post for a description of what these ratings mean.

The Barrel Knot is somewhat similar to the Double Fisherman’s Bend and shares much in common with a hangman’s noose, although that uses a different tying method. The Barrel Knot is also great for tying off a rescue line to a stationary object before throwing it or lowering it down to the someone being rescued.

Uses:

  • Single-Line Rappelling
  • Affixing a Stationary Rescue Line

Tying Instructions:

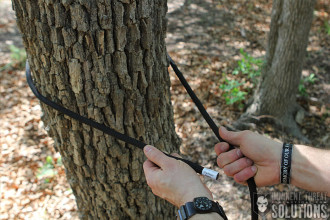
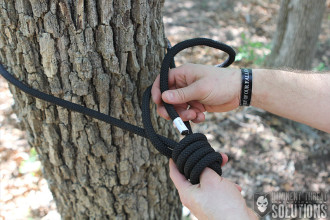
  1. Start by wrapping the line around your stationary object with the working end off to your left (this instruction set can be accomplished from starting the other direction as well.)
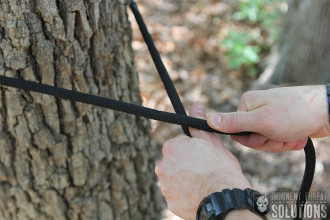
  2. Pass the working end up and over the standing part of your line, where your extended thumb rests.
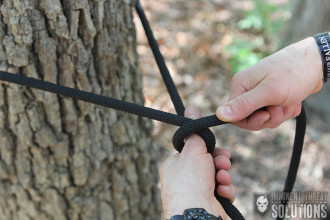
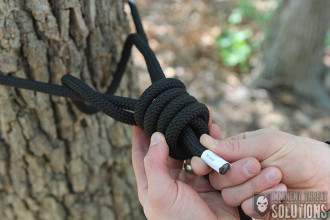
  3. Wrap over your thumb, up and around the standing line with four passes. Ensure your thumb stays in one place.
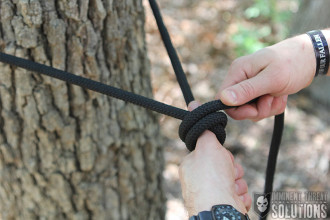
  4. With the excess working end, feed it into the void created as you remove your thumb.
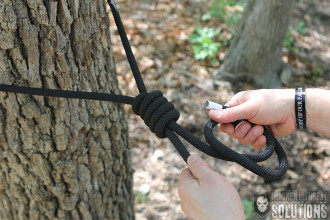
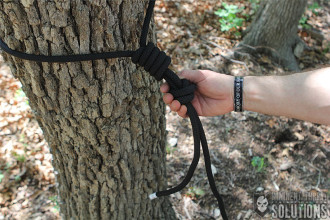
  5. Grasp the barrel knot in your left hand and pull the working end with your right as you tighten the knot against the object you’re tying off to.
  6. Once secure, tie a safety knot with the remaining length of your working end. Ensure this is close to the start of the barrel knot as well.
  7. The safety knot can be an overhand knot, but a Fisherman’s Knot is preferred and is what’s shown in the photo.
  8. For more on a Fisherman’s Knot, refer to our KOTW article on the Double Fisherman’s Knot. A single Fisherman’s is just one side tied.

View the gallery below and follow along with the steps above!

Posted in Bends | Tagged , , , , , , , , , | 15 Comments

Balancing Preparedness and Clutter while Living Efficiently in Small Spaces

Room Organization

Chances are, if you’re a regular reader of ITS, you enjoy a combination of recreational shooting, camping/hiking and are at least nominally self-sufficient. Each of those alone, even in moderation, require a fair amount of storage space. ITS readers and contributors are a fairly diverse bunch and more than a few of us live in smallish spaces by necessity, or even by choice.

The living space which I rent in Los Angeles, including the bathroom, adds up to more or less 180 square feet. This is where I keep all my worldly belongings, other than my car in the garage, food/beer/water in the pantry and a humble collection of kitchen gadgets such as a cutting board and blade.

If you’ve been at this outdoor and preparedness stuff for any length of time and live in a smallish place like me, you know that piles of gear can easily get out of hand. The things we’ve accumulated that enable us to enjoy the great outdoors, plus the little extra necessitated by a nominal disaster preparedness plan, can crowd us to the point they may be a hindrance to us at home.

Quelling Material Desires

I’m not here to wax on how a life of asceticism can free our spirits to meditate the oneness and thatness of tactical nirvana; I love gear. Equipment today does more for less weight than ever before and we should be grateful to have access to magic ultraviolet wands that can produce clean drinking water.

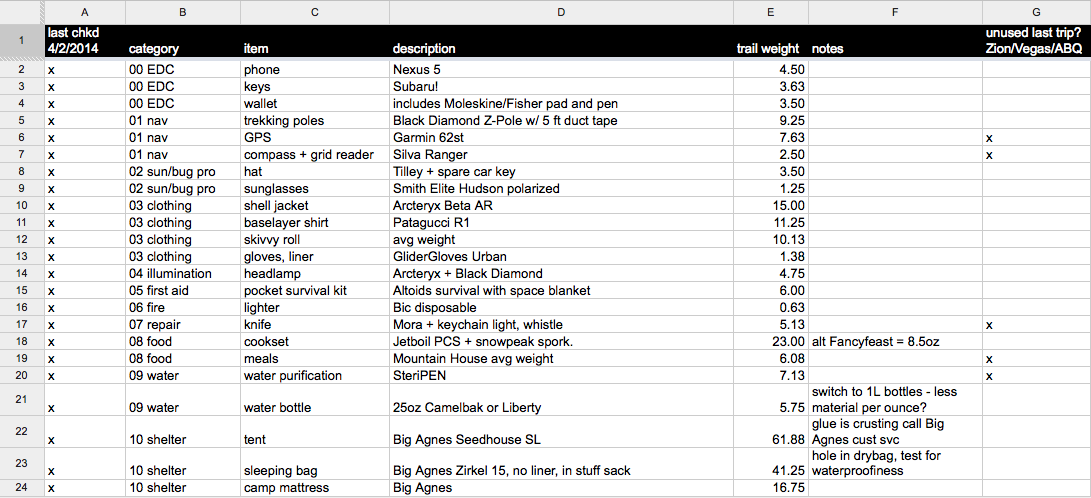
However, I believe there’s a fine line that must be walked in our relationship with things made of molecules. A possible method of tempering your gear lust with reason and logic is to put together a weight table of your camping or backpacking gear. Remember the Scientific Method in 8th grade? Each item on your packing list is a hypothesis, each camping trip is an experiment testing that hypothesis and whether that item stays, goes or gets adapted/modified is the resulting data and conclusion.

Gear Checklist

I joke with friends that the easiest way to make an earthquake kit is to go camping, then when you get home, don’t unpack. Your list of gear should allow you to survive without outside aid.

My checklist spreadsheet has columns for Date Last Packed/Inspected, Category (based on the Ten Essentials for easy sorting), Item, Description, Weight and if something was Unused on my last trip.

If there’s something on the list that gets broken, lost or I simply want a newer, lighter and shinier version of it, I make a note in the spreadsheet and add it to my Amazon Wishlist. I wait around until the 15th of every month (when the paycheck that’s not used for rent comes in) before pulling the trigger. More often than not, after a week or three of sitting in my wishlist, I cool off a bit and decide I don’t really “need” it after all. My gear purchases have decreased somewhat since I’ve implemented this system.

The last column is an indicator that something is habitually unused and should be purged in the next round of decluttering; which brings us to our next subject.

So You Want to Declutter?

There’s plenty of content out there dedicated to reducing clutter for the purposes of a simplistic lifestyle. Whether or not one ought to strive for simplicity for spiritual benefits is a personal decision, but for practical purposes, clutter hinders all of us in two ways.

First, clutter and disorganization reduce our state of preparedness. A power outage is the wrong time to find out your flashlight is dead then stumble over and rummage through your belongings trying to remember where you kept all the spare batteries.

Second, that pile of stuff you don’t want/need/love is using storage space and capital that could otherwise be reallocated to another jug of water or another case of freeze-dried meals, extending your supplies for a grid-down event another week.

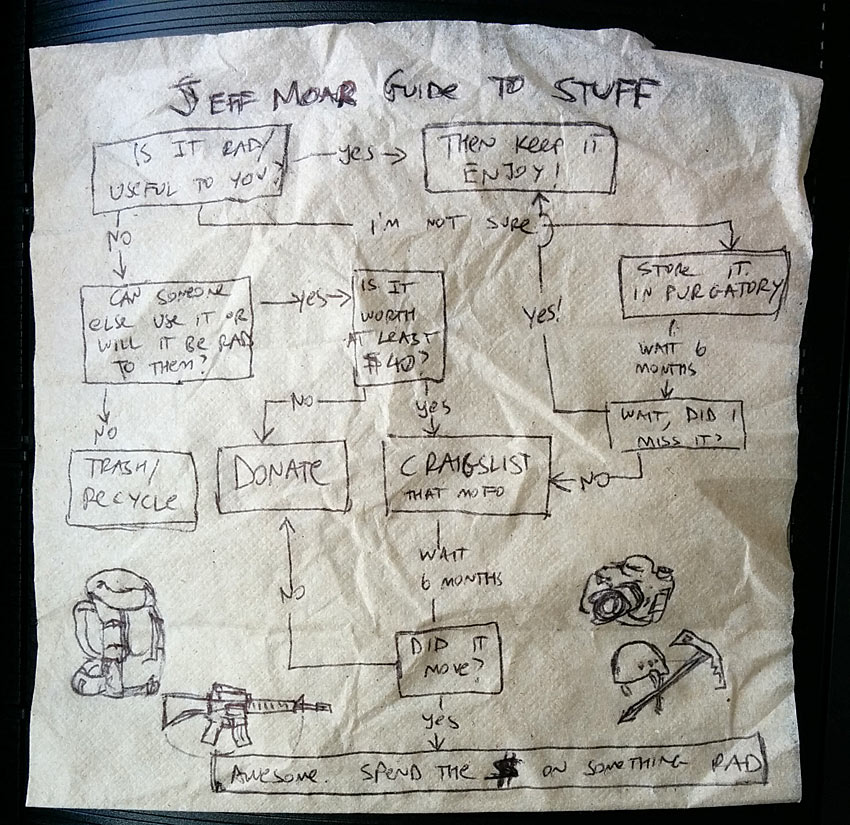
Can’t decide what to purge? I made this flowchart with my personal methodology, which will hopefully give you some ideas of your own (apologies for the poor penmanship):

Napkin Guide to Stuff

Your mileage may vary depending on the quality of your Craigslist community, but I’ve had good luck buying and selling junk on there. I admit it’s a daunting task to deal with and if it were easy, I wouldn’t have the pile of crap in my doorway the way I do now. If you’re new to the process of selling unloved/unused gear online, here’s some pointers:

1. Create a Craigslist account. It makes renewing an expiring listing as simple as a middle mouse click.

2. For photos of your gear, snap pictures with a big open window nearby with indirect sunlight coming in (side note for those starting to dabble in photography, if you were paying attention during high school Art History, this is similar to Renaissance era portrait lighting.) This gives your photos a soft, pleasing lighting.

3. Go on Amazon to get an idea for the fair used market value of your item. I like to start off listing it for $50 below the going price.

Trash or Donate

Practical Solutions for the Stuff that Stays

So now you’ve culled all that unnecessary crap, but you still have a pad full of sweet gear and it’s a tad unruly. What next?

1. Leave your bugout/roadtrip bag packed, if it isn’t already.

All that camping stuff takes up space. It’ll do you more good to not only have it in a prepared state in the form of a bugout bag, but also eliminate the hurdle of having to pack before a camping trip. Attach a luggage tag with a note of things to do and items to pack last minute. For me, these would be to pack cash in small bills, weapons and ammo, my sleeping bag which is otherwise stored in a breathable sack and uncompressed and pack my external hard drive (you’re backing up your personal data, right?) Everything else is inspected and packed in the go bag, at least in theory.

If you like to keep spares of your critical gear, consider assembling a secondary bag for your vehicle and/or for a family member.

2. Consider utilizing vertical space.

I’m testing out an over-door organizer to maintain immediate accessibility of consumables such as batteries, paracord, first aid, etc. The whole contraption can be quickly removed from the door and hastily packed into a duffel bag. Right now though, I’m leaning towards keeping critical items like handgun plus magazines and JHP ammo, batteries, cash and whatnot in my bedside nightstand. If the need arises, I know to dump everything from my nightstand into my go-bag, but if your nightstand is otherwise committed, you may want to give the over-door organizer a try.

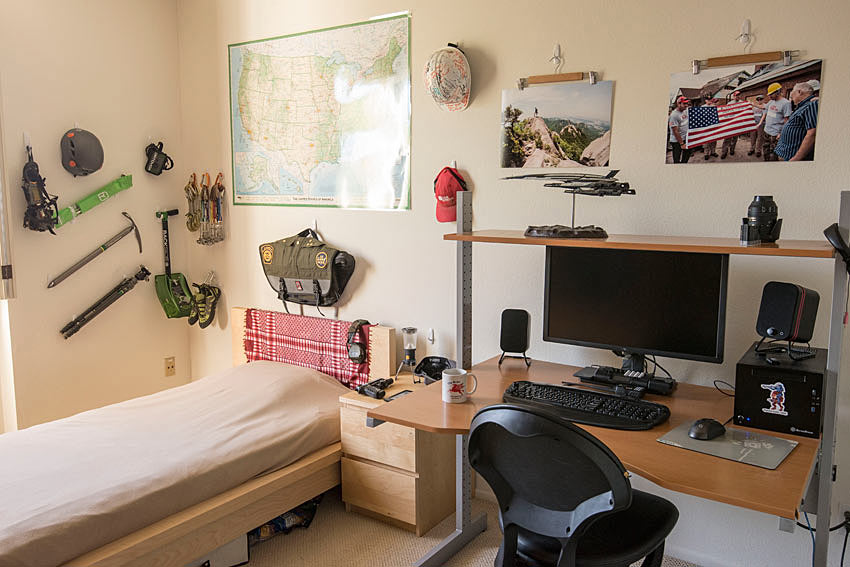
For bulky sport-specific such as ice axes, cams and meaningful memorabilia such as old uniform items like my Smokey Bear hat, hang them up on walls. It gives your pad a ski hut vibe and items with personal stories attached to them make for more interesting conversation with guests than store-bought decor. If you’re in earthquake country, remember not to put heavy items above your bed! I use 3M Command hooks and skirt hangers as a lightweight substitute for picture frames to display prints of my photography because I’m ugly enough without shards of glass in my face.

I also have an underbed organizer, which I use to slide part of my stockpile of freeze dried food underneath my bed. This is also where I have an, ahem, ample supply of ammunition. Unfortunately, I made the mistake of buying a low-riding bed on Craigslist, otherwise I would put my entire stash of food down there. As a last resort, you can slide six 14-18 gallon plastic totes under your mattress and use that in lieu of a bedframe for very space efficient storage, but word has it the ladies find this somewhat unappealing.

3. Standardize and stock up on consumables and collect vertically not horizontally.

Trunk EssentialsOnce you’ve put the list of what you think you can or cannot survive on through the test by camping/backpacking a few times, don’t buy horizontal and spend money on superfluous gear–buy vertically and spend it on consumables for your next roadtrip or to extend your time period in which you can maintain self-sufficiency in the event the grid goes down.
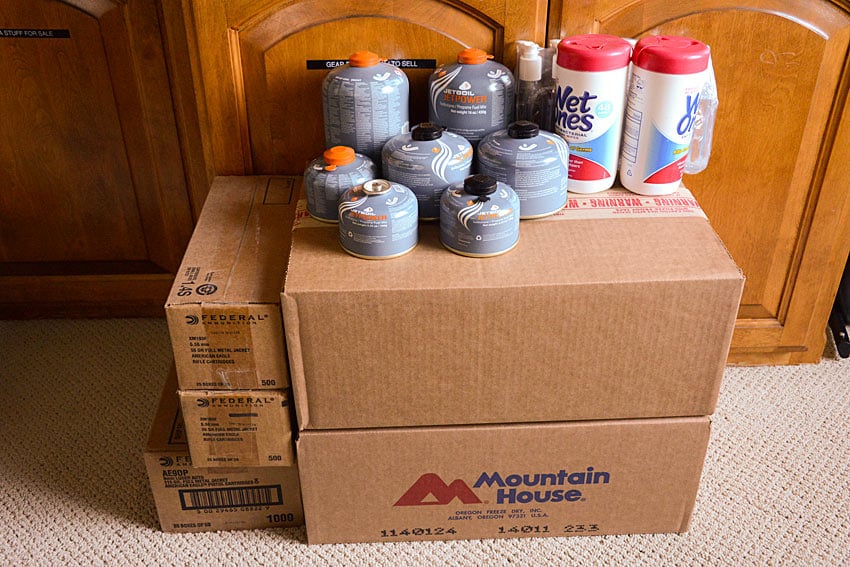
Consumables I recommend stocking up on:

1. Water. I like these blue Reliance 7-gallon containers. Our pals at the Art of Manliness just ran a great piece on water storage you should also check out.

2. Food. I stock up on Mountain House freeze dried meals and isobutane fuel canisters compatible with my stove system.

3. Ammunition. “You can never have too much ammo, unless you’re on fire or trying to swim.” I’ve standardized on 9mm and 5.56mm. You get extra credit if your blasters have magazine compatibility.

4. First Aid and other stuff for your personal survival kit such as bandages, matches, duct tape and paracord that tend to get used up on camping trips.

5. Hygiene items such as baby wipes, hand sanitizer and trash bags. Baby wipes replace paper towels, soap, sponge, a shower and unlike toilet paper, still function when wet.

6. Batteries: AAs and CR123s for many of us, or whatever batteries you’ve hopefully standardized all your portable electronics on. Collecting vertically, not horizontally, applies to battery compatibility too.

Ammo, fuel and food

Don’t let your lack of square footage get in the way of or become an excuse to not have the sport-specific gear you need to enjoy your weekends. Nor let it prevent you from building up a supply of preparedness items you’d need if basic necessities got cut off. Remember that skills and experience don’t weigh anything or take up any space.

As I’m often on the road for various trips, there’s perpetual unpacking, sorting and repacking going on. I always seem to be trying something new to keep in check what could potentially degenerate into a mess. I think I speak for us all here when I say that we’re open to any ideas you might have. If you have specific tips, or questions, post them in the comment section below!

Editor-in-Chief’s Note: Jeff lives in Los Angeles and serves as our resident Eastern Sierra correspondent. He’s buckling down for the next Sharknado, but in the meantime is throwing the occasional blog post up on skunkabilly.com.

Posted in Mindset | Tagged , , , , , , , , , , , , , , , , , , , | 11 Comments

Don’t Just Rub Some Dirt on It, Pick up an ITS First Aid Kit™!

New Products Boo Boo Kit LOKSAK Bags

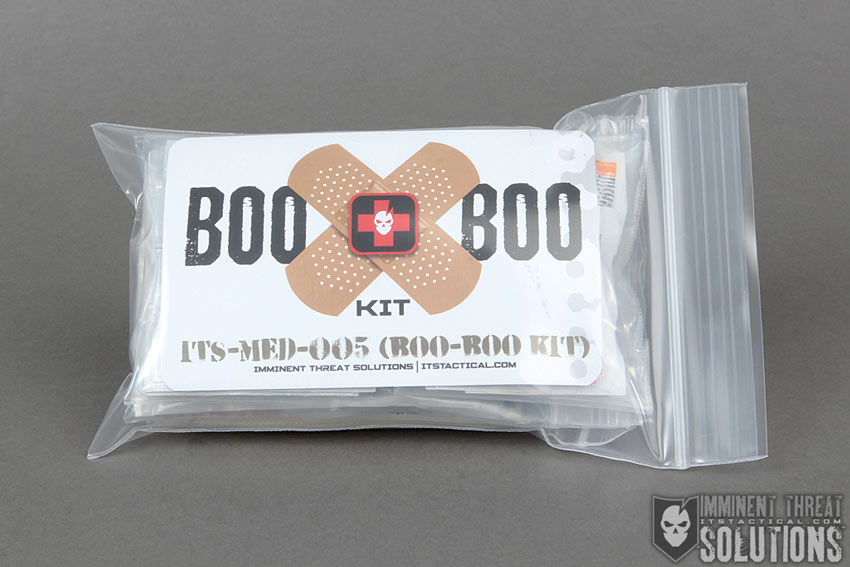
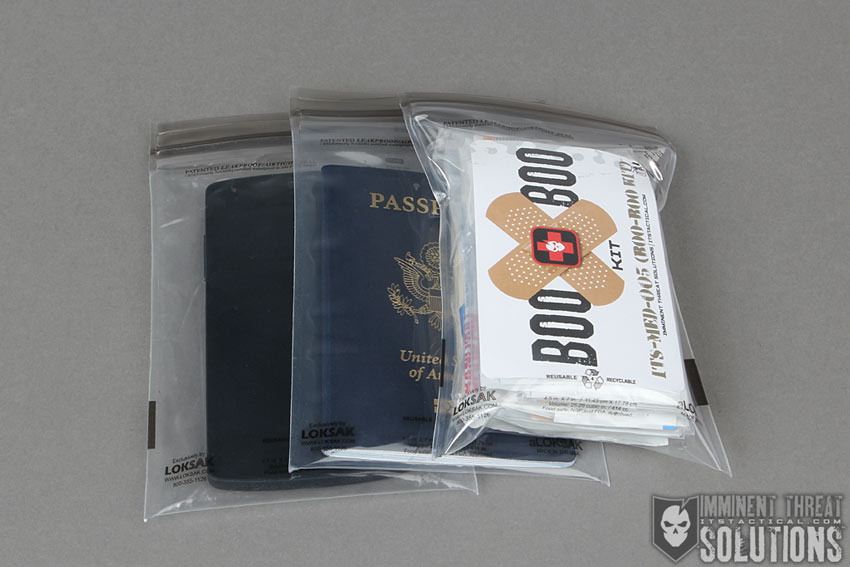
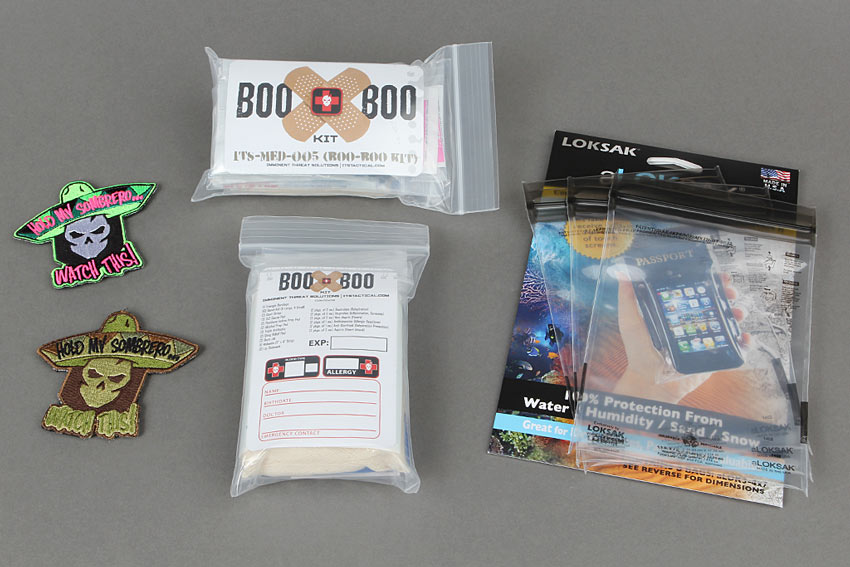
We’re excited to release the ITS First Aid Kit™ today after months of development. This fully featured First Aid Kit exceeds the quality of typical kits you’ve seen on the market and still fits in your pocket or our ITS EDC Slimline Pouch. Whether you’re looking for an extra durable bag for the ITS First Aid Kit™ or are simply looking for something to protect sensitive objects from the elements, we’re also now carrying the aLOKSAK Element Proof Storage Bag 3-pack. Additionally, with Cinco de Mayo around the corner, we’ve restocked our Hold My Sombrero Morale Patches in both colorways.

ITS First Aid Kit™

ITS Boo Boo Kit

ITS Boo Boo Kit

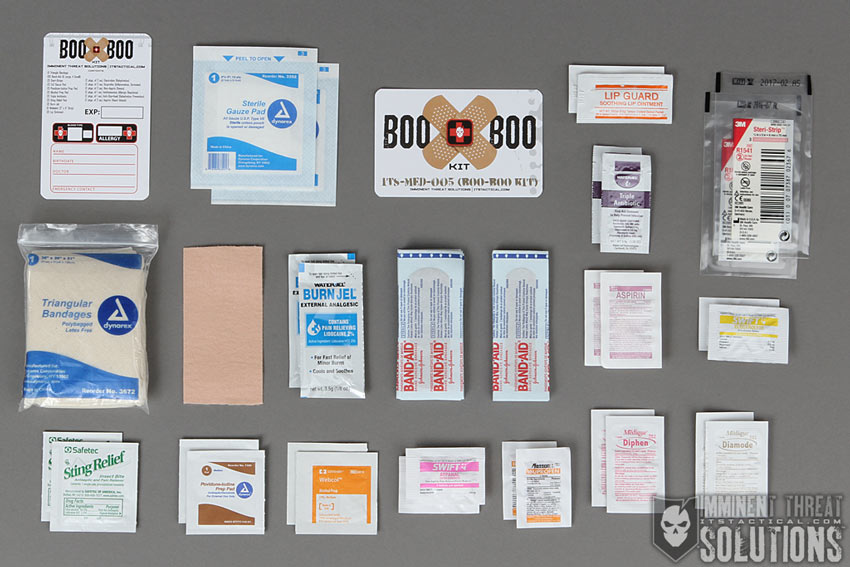
The ITS First Aid Kit™ is our solution for the ultimate pocket First Aid Kit that’s full featured, cost efficient and utilizes quality components. Not every medical situation calls for a Trauma Kit and the likelihood of you needing a Band-Aid is going to occur more often than you’ll need Combat Gauze, but we have you covered for that too with our line of Trauma Kits.

The contents of the ITS First Aid Kit™ cover just about all of the simple First Aid issues you might encounter on a daily basis. There’s also enough of each item to keep you from having to restock all of the time.

All the items included come contained in a heavy-duty poly bag that allows you easy repetitive access to the components. We’ve also grouped certain items into additional interior poly bags for increased organization and included two insert cards which feature a reverse side listing contents and space to fill in your emergency contact information if you’d like to.

Click here to get your ITS First Aid Kit™

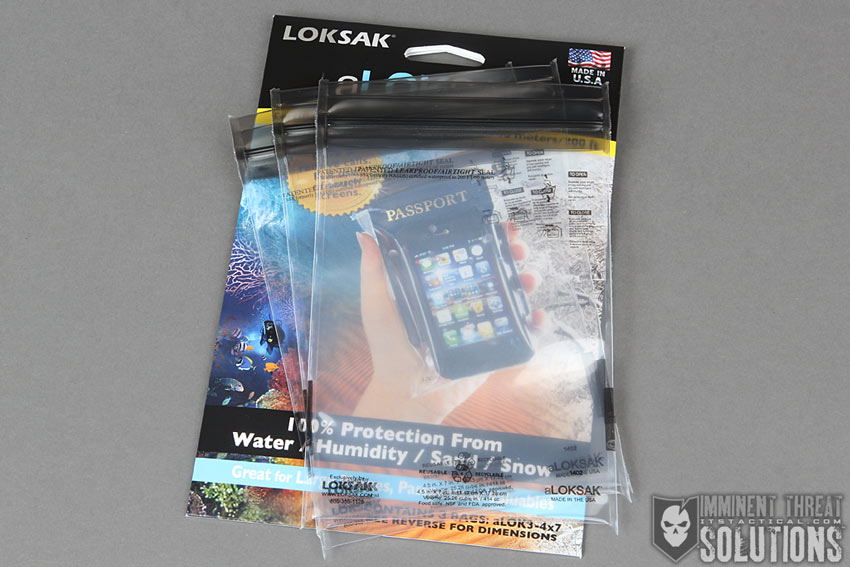
aLOKSAK  4” x 7” Element Proof Storage Bag (3-pack)

aLOKSAK Bag 3 Pack

LOKSAK Bags

aLOKSAK bags are resealable element-proof storage bags featuring a hermetic seal. That means absolutely no water, air, dust or humidity permeates the closure. The transparent bags are designed for a wide range of applications and environments and are flexible yet puncture resistant. They can be sealed over and over again and the materials, closure systems and manufacturing techniques used to fabricate the aLOKSAK surpass even the most rigorous testing standards.

Our ITS First Aid Kit™ includes a strong poly-bag to secure the contents, but for those wanting the ultimate in protection, we offer aLOKSAK Element Proof Storage Bag 3-packs. You’re able to use these on a wide range of products as we certainly have done ourselves too. If you’re using your phone, you’ll find that they are tough sensitive allowing you to still access your phones features while keeping it protected from the elements.

Click here to order your aLOKSAK Storage Bag 3-Pack

ITS Hold My Sombrero Morale Patch

Borrowing a classic quote from our Inaugural ITS Tactical Muster, our “Hold My Sombrero… Watch This!” Morale Patch is perfect for those times when you know things are about to get serious. What started as an inside joke, was just too good for us not to turn into a patch.

Hold My Sombrero Morale Patch

Available in either full color or subdued, each Hold My Sombrero Morale Patch measures 3″ tall x 3.5″ wide and features hook Velcro on the back to stick them wherever you’d like. You can also easily remove the velcro backing with a seam ripper to sew these on.

Click here to get your Hold My Sombrero Morale Patch

Posted in ITS Information | Tagged , , , , , , , , , , , , , , , , , , | 5 Comments

Forecast the Weather Like Daniel Boone

Daniel Boone

Technology has brought the world a long way, enabling us to consume more information in a few short minutes on Google Mobile than folks decades ago could locate in a week by plowing through books at the local library. And yet, with all this readily available information and the focus on being able to find information, the need to actually know and retain information has been decidedly diminished. There is still something to be said, however, for retaining the knowledge and skills that the men of yesteryear needed to survive, such as navigating by compass or starting up a respectable campfire. With that in mind, and with hunting season just around the corner, let’s look to the skies and sharpen up our skills in forecasting the weather.

“Weather forecast for tonight: dark. Continued dark overnight, with widely scattered light by morning.” -George Carlin

Now keep in mind that if the national weatherman equipped with Doppler radar and satellite imagery gets it wrong from time to time, you will too. Taking that into consideration, it is probably best to avoid making high dollar wagers with your buddies when you are confident that it will begin storming in the next few minutes. And yet, by utilizing nature’s telltale signs, you can make some fairly safe assumptions regarding what is around the corner weather-wise. Let’s take a look at some of the basics:

Cloud Signs

As far as nature’s weather signs go, clouds will provide you with the most accurate indicators of things to come. Clouds are essentially water droplets or ice crystals (depending on altitude) that mass together in the atmosphere. There are many types of clouds, far too many to list, but some of the basic cloud types can indicate what weather patterns to be prepared for.

Cumulus

Cumulus Clouds

Cumulus clouds themselves are most often associated with pleasant weather. It is cumulus clouds that often take the shape of various characters in the imagination of creative youngsters as a result of their puffy, continuously changing appearance. While they are a sign of agreeable weather, it is not uncommon for cumulus clouds to form into cumulonimbus clouds, aka thunderheads, which are a sure sign that it is time to batten down the hatches.

Stratus

Stratus Clouds

Stratus clouds are flat and featureless and often completely blanket the sky. As opposed to cumulus clouds, which are flat on the bottom and rise dramatically on the tops, stratus clouds are flat both above and below. While they usually do not indicate extreme weather to come, they do often produce a light drizzle or flurries.

Cirrus

Cirrus Clouds

Cirrus clouds are high altitude clouds which resemble wispy brush strokes. When the wisps curl at the end, they are often referred to as mare’s tails. These clouds are regularly associated with approaching storms, but can also come directly after a thunderstorm has passed.

Nimbus

Nimbus Clouds

Nimbus clouds can refer to any of the above clouds which have taken on a dark color, thus indicating high moisture levels within the cloud and rain to come. For example, a cumulonimbus cloud is a cumulus cloud that is uncharacteristically dark and foreboding, and is associated with thunderstorms. Cumulonimbus clouds often rise like towers into the sky and sometimes take the shape of an anvil, with the longer end of the anvil head typically pointing in the direction the storm is heading.

Proverbs That Stand the Test of Time

Weather proverbs are likely nearly as old as language itself, with the earliest recorded proverb dating back to the New Testament of the Bible when Jesus noted that “When evening comes, you say, ‘It will be fair weather, for the sky is red,’ and in the morning, ‘Today it will be stormy, for the sky is red and overcast.’’’ (Matthew 16:2). While some proverbs add up to nothing more than old wives’ tales, many are based in scientific fact. Here are some notable examples of the latter:

“Red sky at night, sailor’s delight; Red sky at morning, sailors take warning.”

and

“Evening red and morning gray, help the traveler on his way. Evening gray and morning red bring down a rain upon his head.”

When looking west in the evening, a visibly red sky can be taken as a clue that dry weather is coming (or staying). The red sky is caused by dust particles in the atmosphere, which only occur in dry weather. Since weather systems typically move west to east as a result of jet streams, you can safely assume that this dry weather is heading your way. A morning red sky in the east, however, denotes that the dry weather has passed you by and that a moisture rich weather system is likely to follow.

“Flowers smell best just before a rain.”

and

“When ditch and pond offend the nose, look for rain and stormy blows.”

Everyone is familiar with that smell that occurs after a good summer rain, when the air is rich with the smell of plant life. This is a result of an increase in air moisture or humidity, which drastically increases the strength of smells in the air and the distance they carry. Also, it is believed that the smells of swamps and marshes are held down near the surface when atmospheric pressure is high, but low atmospheric pressure allows these foul odors to rise and carry. Both the increase in humidity and the drop in atmospheric pressure associated with these proverbs are signs of wet weather to come.

“Chimney smoke descends, our nice weather ends.”

Keep an eye on the smoke from that roaring campfire you just built. If the smoke rises in a straight stack, you can anticipate fair weather to come. If the smoke rises in a stack as normal, but appears to be buffeted downwards once it reaches a certain height, you can bet that a storm’s a-brewin’.

“Beware the bolts from north or west; in south or east the bolts be best.”

As mentioned above, most weather systems travel west to east. This proverb simply infers that visible storms in the west are most likely headed your way, while those in the east have passed you by.

“A ring around the sun or moon, means rain or snow coming soon.”

The visible ring sometimes appearing around the sun or the moon is a result of ice crystals in cirrus clouds refracting the light off these celestial bodies. Since cirrus clouds generally indicate foul weather to come, you can assume that it is time to start waterproofing your camp.

“When clouds appear like rocks and towers,
The Earth’s refreshed by frequent showers.”

A reference to the cumulonimbus cloud patterns mentioned above, this proverb serves as a simple reminder that such clouds indicate that a storm is likely coming your way.

Tools of the Trade: The Barometer

Some of nature’s signs cannot be understood simply by observing them but require tools to measure. By utilizing a barometer, you can measure the atmospheric pressure which can provide you with a great deal of information on what type of weather is just around the corner. In the most basic sense, a barometer indicating high pressure in the area lets you know that fair weather is likely, while low pressure is a sign that you can anticipate wet weather to come.

Before you can get started you’ll need to be sure you have the proper equipment. Most personal use barometers are known as aneroid barometers and contain no liquid. These barometers contain a spring which is calibrated using a dial or knob located on the back of the unit. In order to calibrate your barometer properly you will need to head over to weather.gov and get a local weather report, which will include the current barometric pressure. Adjust your barometer to match.

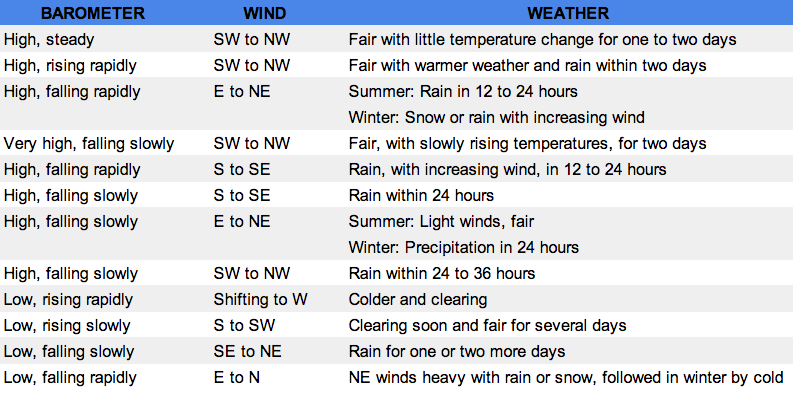
While a general understanding that high pressure is good and low pressure is bad is a start, more advanced and accurate information can be gleaned from the barometer as well. The following barometer reference card, taken from Skills for Taming the Wilds by Bradford Angier, will assist you in your short term weather forecasting forays (Keep in mind that these measurements and what they indicate are only representative within the U.S. and Canada).

Weather Spreadsheet Tips

Source Material/Further Reading:

Skills for Taming the Wilds by Bradford Angier

The Book of Survival by Anthony Greenbank

National Geographic’s Complete Survival Manual by Michael S. Sweeney

Editor-in-Chief’s Note: This post was written by Chris on The Art of Manliness. The Art of Manliness is a fantastic Website dedicated to uncovering the lost art of being a man. It features articles on helping men be better husbands, better fathers and better men. Check them out and be sure to subscribe!

Posted in Survival | Tagged , , , , , , , , , , , , , , , , , , , , , , | 3 Comments

Urban Rappelling Equipment and Considerations

Rappelling is an often under-appreciated skill for use in an emergency situation and one that could potentially save your life one day. A common misconception of rappelling is that it’s only for fun and thrill seekers of all kinds. While it’s that and much more, my hope is that after this article you’ll start to think more outside of the box about applications for Rappelling.

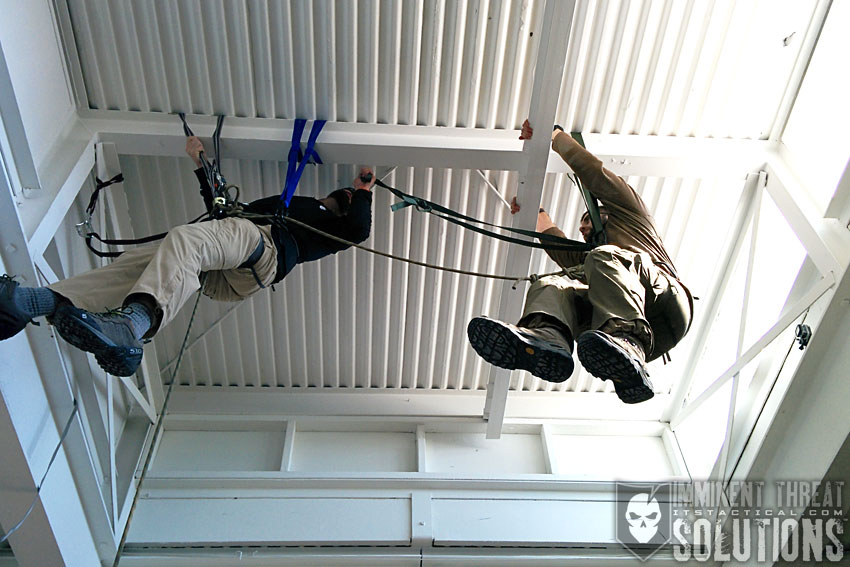
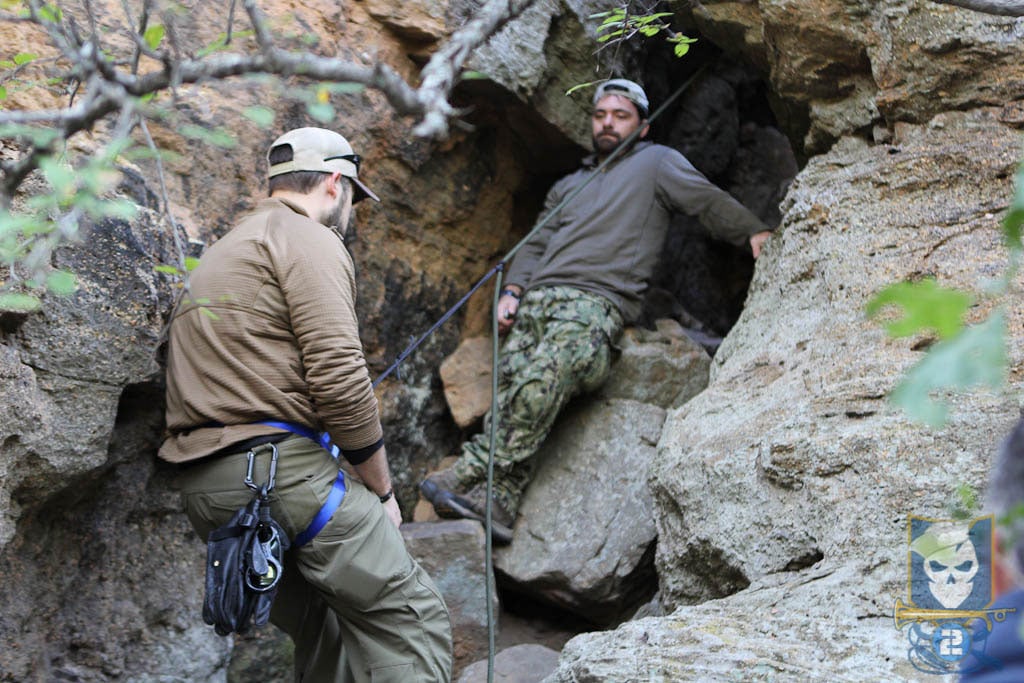
I recently had an opportunity to join Kyle McCleery, the head of Trident Response’s Search and Rescue department, to film an overview of some things to keep in mind when setting up an urban rappel and the equipment you’ll need to make it happen. This article isn’t going to cover exact rappelling technique, but more the setup of anchors within urban environments. We’ve previously shared the video Kyle and I filmed on ITS, but if you haven’t had the chance to check it out yet, I’ve embedded it below:

As you’ll see in the video above, Kyle and I go over options for anchors, knots, rope, webbing and more to try and cover all the bases in regards to what you’ll need to know. However, no article or video is a replacement for real hands-on training when it comes to something like Rappelling. While the techniques we discussed aren’t much different than setting up an outdoor rappel, there’s a few things you’ll want to keep in mind when it comes to setting anchors.

That being said, below I’ve expanded on the video with some written information that reviews the principles discussed in the video and also goes a bit more in-depth in some areas. The reason we’ve taken the time to go over an urban setup with rappelling in the first place, is because it’s a different animal. Not so much with the equipment or techniques, but more with the anchor attachment points. Don’t worry, I’ll go over equipment selection here too.

Urban Anchor Systems

While everything is important to rig properly in rappelling, the foundation is setting proper anchor points. Redundancy is the key here so that in the event of a failure with an anchor or piece of hardware in your system, you have built in redundancy. Some consider three anchor points paramount, but a minimum of two is what we recommend. As we went over in the video, when searching for urban anchor points, you want bombproof looking steel beams or piping that’s solid. You’re not going to find big trees or large boulders to sling here. Look to see where the beam or pipe is coming from and where it’s going. Yank on it like you’re going to have to depend on it with your life, because technically you are.

Rappel Rigging

That being said, do your own due diligence and don’t just trust someone else’s system, check it yourself and put your own trust in it. In an emergency this might not be feasible, but I’ve seen so many instances of climbers at the local outdoor climbing park I go to just jumping from one setup to another. This is also with just having met the people that rigged it and not checking out their rigging for themselves first. Don’t be that person.

If you’re lucky, you’ll find window washer anchor points on the roof of a building to anchor to, these are commonly installed to rig window washing scaffolding to, but they also exist as anchors for building inspection clip in. Here’s a link to a company that I found during my research that carries different building anchors if you’re interested in learning more about them. There’s even residential roof anchors that are perfect for security during roof work. I’ll admit to wanting to install one on my roof for making putting up Christmas lights more enjoyable. I’ve often though about slinging my chimney for that, but always quickly dismiss that idea because I don’t trust that it would support my weight in a fall.

Roof Anchor

Image via Safety Equipment Solutions

Keep in mind that anchors need to be placed on the sturdiest part of a building available. What follows are extreme examples of what you might have available in an emergency and aren’t recommend for anything other than an emergency situation where you have the equipment necessary for a hasty evacuation. That being said, in a pinch you could sling a piece of a building like a skylight or even an air conditioner, do your due diligence here too though and ensure it’s sturdy. Something important that Kyle mentioned in the video is to be cognizant of the height of the ledge you’ll be rappelling over. If the height of the ledge is greater than the height of the object you anchor around with a sling, it could slip off.

One last thing to mention applies to a hotel room or the interior of a building in an emergency evacuation. If you can get the glass out of the window, you can bust through the drywall to find studs to sling for anchor points. In an emergency situation like this, where your primary and even secondary exits are blocked, the objective is to remain calm and think outside the box. Where there’s a will there’s a way.

Webbing Slings for Anchors

Urban Rappel Equipment

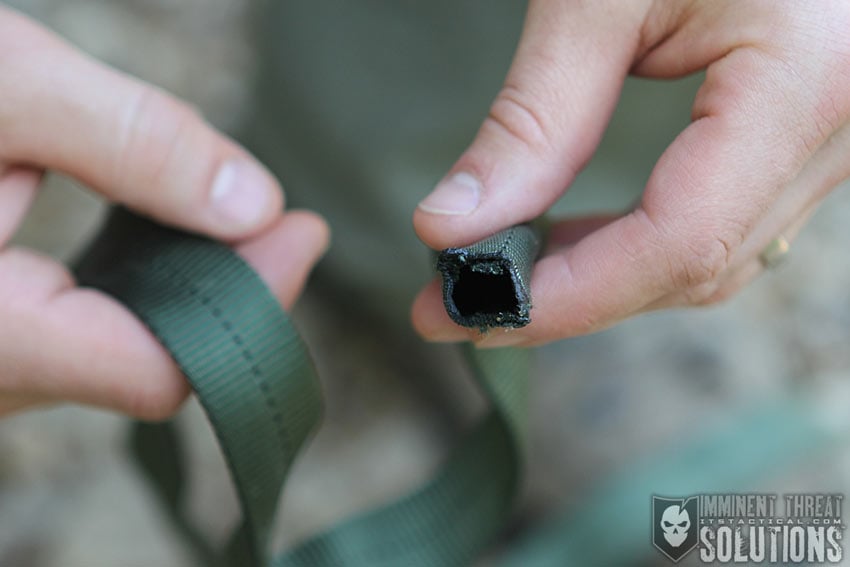
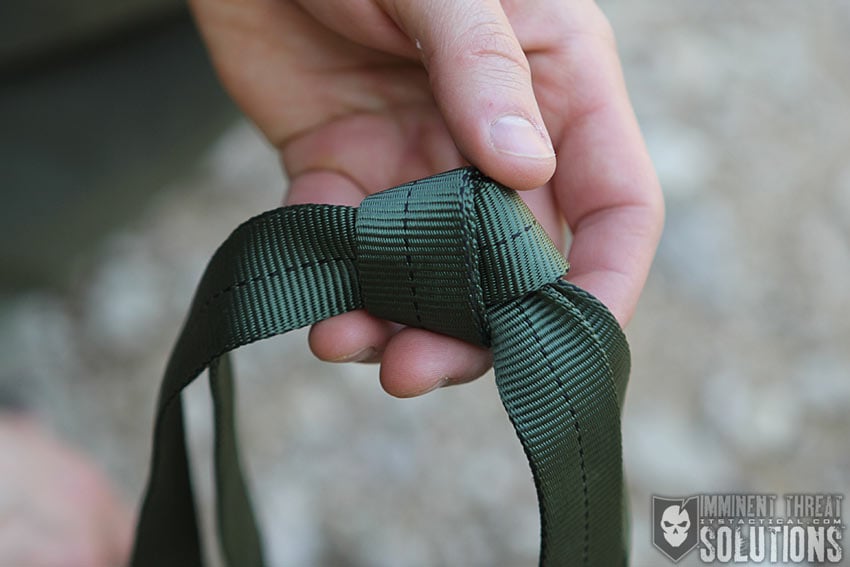
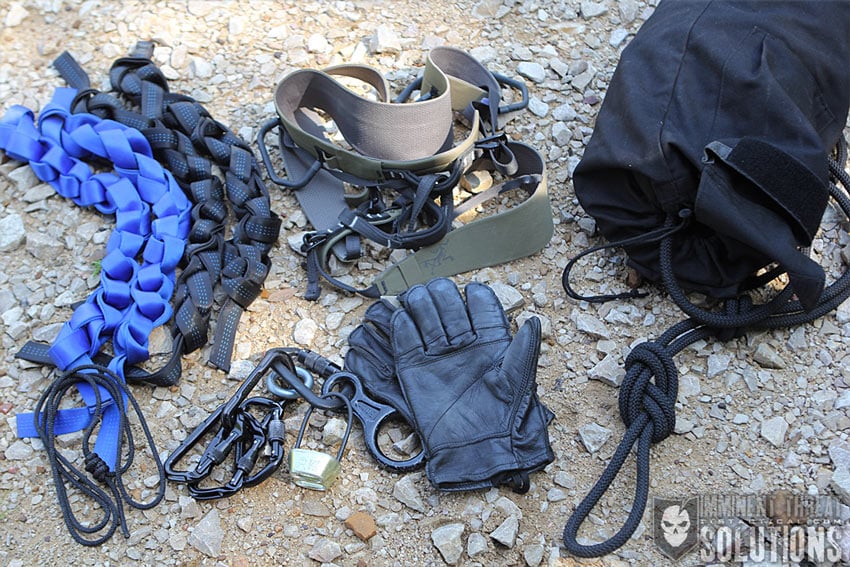
I’ve thrown the word “sling” around a lot and I’d like to take a minute to go over just what that is and how to create and use a webbing sling. Climbing has popularized tubular webbing and its strength, surface area and ability to lie flat has solidified it as a great option for building anchors. The context we’ll be discussing it here is turning a single length of webbing into a fixed loop using a Tape Knot. A tape knot is a simple knot that only differs slightly from an overhand or water knot. The Tape Knot is also great for joining two equal diameter ropes together.

Urban Rappel Equipment

The Tape Knot has been covered in our Knot of the Week series here on ITS and we also go over it in the video above, but if you need a refresher, click here. Utilizing the Tape Knot and remembering to leave a 6-8 inch tail at the end of each side of the knot, you’ve now created a sling. By using a simple girth hitch you can now attach this to your anchor point and remember the redundancy I talked about earlier and use at least two slings for anchors.

Urban Rappel Equipment

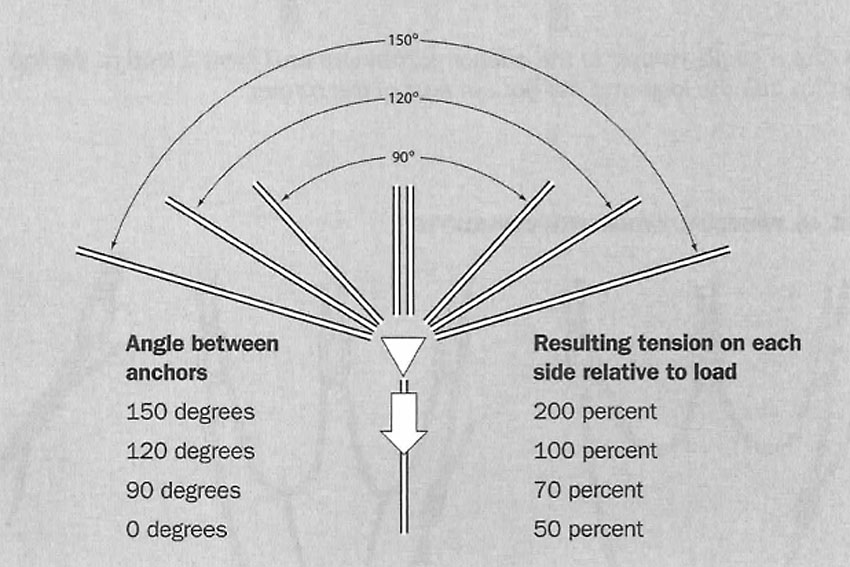
Angles matter and I’ll go over some basics you’ll need to keep in mind when building anchors. Using the redundancy model and building at least two anchors, the load is going to vary on each anchor depending on the angle of pull between them. Another thing to keep in mind is that you also want the anchors as equalized as possible correlating to the direction of pull. This will reduce the strain on any one point and reduce the chance for failure.

For instance, if you had a 100 lb. load and your anchors were each at a 0˚ angle, meaning they each ran straight down to the load, it would be balanced and each anchor would effectively carry a 50 lb. load. The more you spread this angle, the greater the load is placed on each anchor. For instance, at 90˚ you’re now forcing each anchor to carry 70% of the load, or 70 lbs. At 120˚ which isn’t recommended, each anchor is now carrying 100% of the load or 100 lbs. each. Another thing to drive angles home is that once you exceed 120˚, you’re now forcing each anchor to carry a load greater than you weigh. Stick with an angle of less than 90˚ and the “less” is stressed here.

BSA_Topping_Out_Angles

Image © 2010 BSA Topping Out Climbing/Rappelling Manual

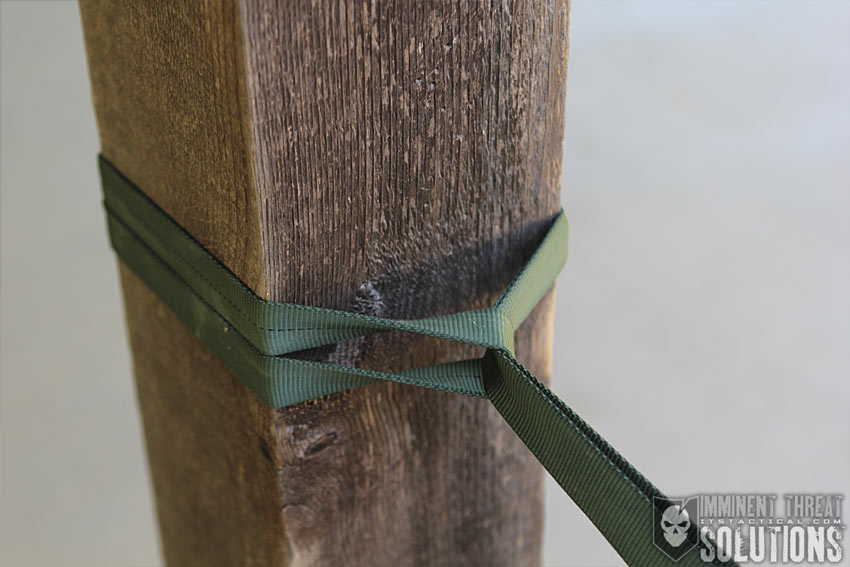
Once you have your slings built you can either loop them around the object you’re anchoring to, or girth hitch them, which will self-tighten the anchor around the object as it’s loaded. As mentioned you want to the length of these anchors to be equalized to the direction of pull, meaning you want them to come together in a V shape with the point of the V being where the rope will be attached you’ll be rappelling from. This might be accomplished with two equal length anchors or depending on where your second anchor point is located, it might require a longer length of webbing. Just keep your angle in mind. This is also called a pre-equalized anchor and it’s only designed to work with one direction of pull.

Urban Rappel Equipment

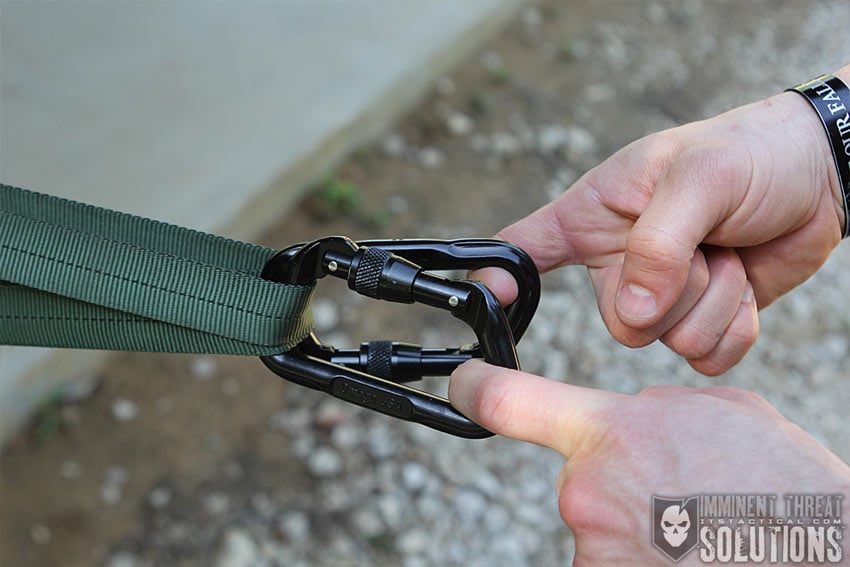
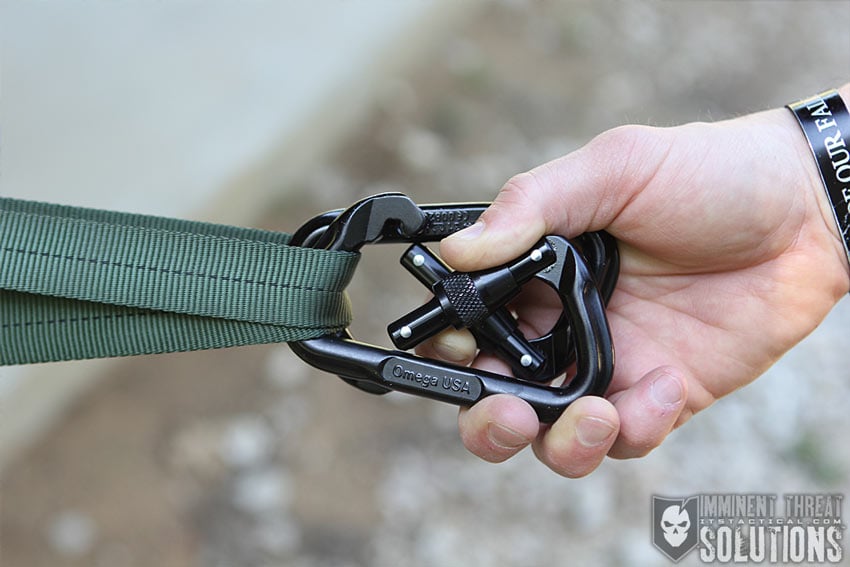
Once you have the two slings girth hitched you’ll need to join them together and create the point your rope will feed through and this is done with two carabiners. Two are used for redundancy and Screw Gate Carabiners are preferred here. This can be done with two opposing gates using non-locking carabiners. Opposing gates mean that if you were to open each carabiner, their gates would form an X shape. This prevents the rope from coming out if the gates were to open for some reason. Just another reason to use locking carabiners.

Urban Rappel Equipment

On locking carabiners, I’m also a big proponent of “screwing down, so you don’t screw up,” this was taught to me a long time ago and the idea here is that if gravity somehow carries that locking gate down it will get carried down to tighten rather than loosen the gate if it’s flipped upside down.

Another tip is that when you have the carabiner’s locking gate screwed all the way down, give it just a slight 1/8 of a turn back so that it doesn’t bind up and become impossible to unscrew.

Double Line Rappel vs. Single Line Rappel

With a double line rappel, the mid-point of your rope is clipped into the carabiners that connect your anchor system. This is the method I’ve just described setting up. Using this mid-point, you’ll now have two lines of rope running down to use to rappel with.

Urban Rappel Equipment

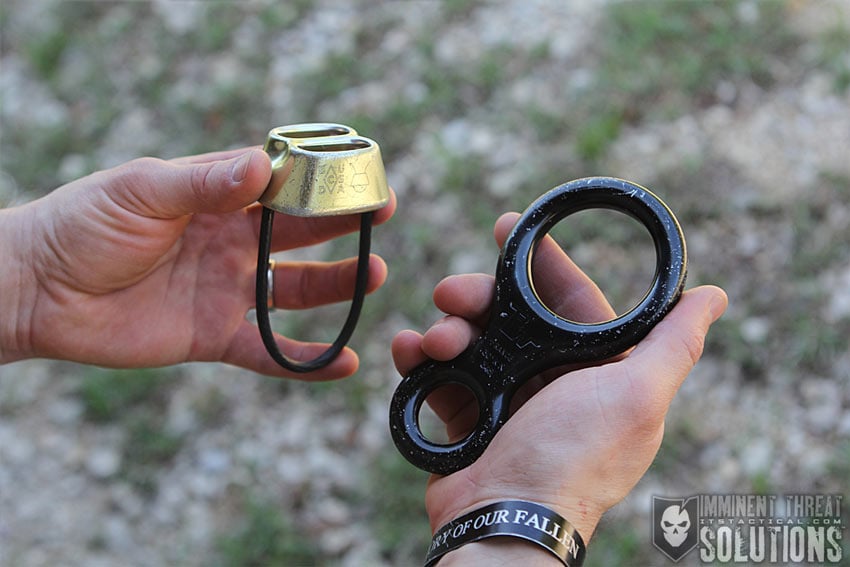
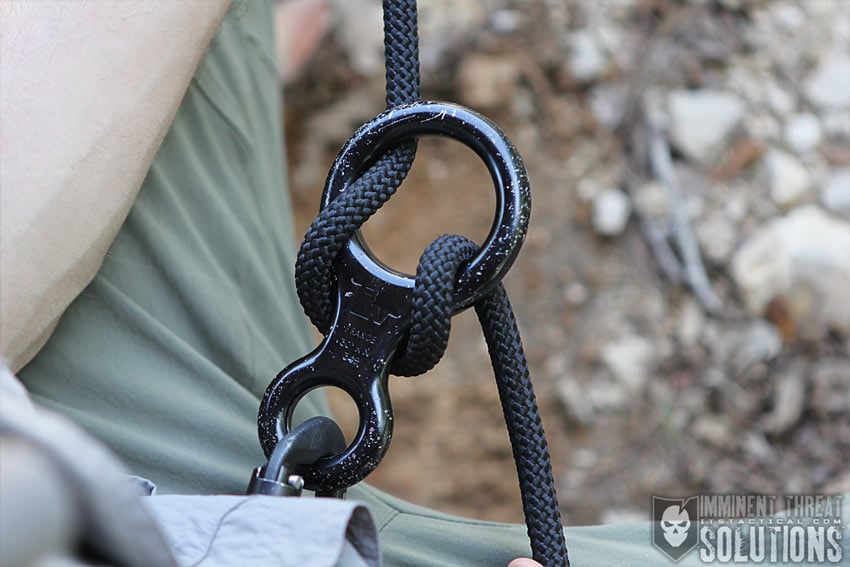
The benefit of a double-line rappel is a slower, more secure descent utilizing a friction belay device like a Figure 8 or an ATC (Air Traffic Control,) but you’re only utilizing half the overall length of your rope. This is where knowing your rope length is extremely important. You’ll need to visually watch that both ends of the rope hit the ground or have the mid-point on your rope marked for easy identification.

Urban Rappel Equipment

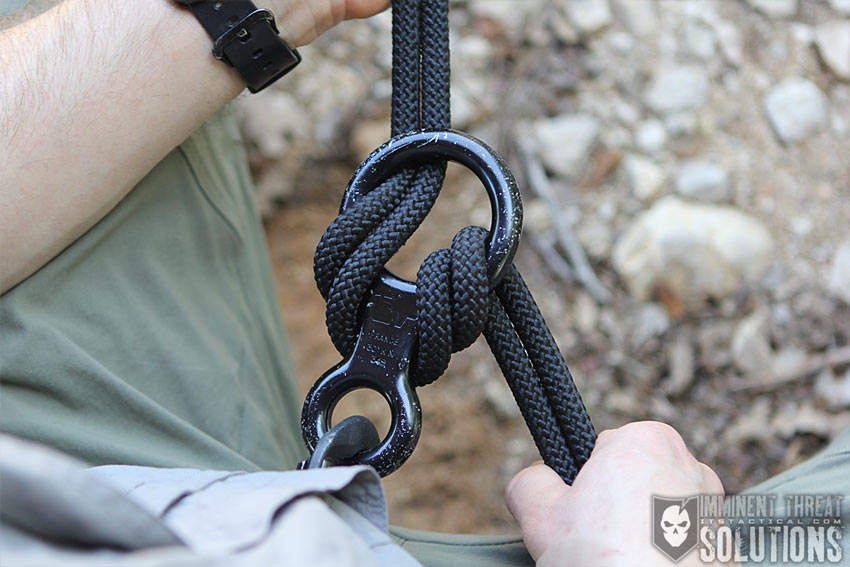
Also, a good point that was brought up in the comments of the video article we originally posted is to tie stopper knots in end of each side of your rope. This is a redundancy just in case your rope decides to pull through before you’re attached to it or ensuring you don’t rappel off the end of your rope in the event one side winds up not being as long as the other. Going back to the ATC, Figure 8, or belay device, ensure that the bight of both strands of your rope are being fed into the device.

Urban Rappel Equipment

If you don’t have the time and opportunity to build a proper anchor system with webbing slings, there are a few methods we recommend for attaching your rope directly to your anchor points, or those bombproof pieces of urban anchor like steel beams and piping. This is where a single line rappel comes in.

Bowline vs. Barrel Knot

Tying a Bowline around an anchor point isn’t as preferred as a Barrel Knot, as a Bowline creates a fixed loop that doesn’t self-tighten onto your anchor point like a Barrel Knot will. As you can see in the photos below, a Bowline allows your rope to “walk” vs. the Barrel Knot that’s at least providing some friction on your anchor point.

Urban Rappel Equipment

Urban Rappel Equipment

Our tutorial on tying the Barrel Knot is coming soon to our Knot of the Week Series, but the video embedded at the top of this article shows tying both the Barrel Knot and the Bowline. For a more detailed description of tying a Bowline, check out this KOTW article.

Static vs. Dynamic Rope

The best way to easily sum up the difference here in static and dynamic ropes is by saying that dynamic rope has give and static does not. Meaning that in climbing, where you’re depending on your rope to catch you in the event you fall, you want the 5-10% give that dynamic rope offers. In rappelling, you don’t want that give, so a static rope is preferred. You also don’t need to worry about water with static ropes, which are often used in water rescue and other situations around water environments.

Dynamic rope also has a dry and non-dry rating, but it’s best to stick with static rope in rappelling situations. I mentioned earlier that you need to know your rope and its length, particularly in a situation where you’re trying to determine the height of the building you’re on vs. the mid-point of a rope. A common rope length bundle like the BlueWater Assaultline I have is 46 meters / 150 feet, but lengths can range anywhere from 30 meters to 60 meters.

Static ropes are best for rappelling, ascending and for use in rescue situations where you’re raising or lowering a person or load.

Harnesses

Urban Rappel Equipment

There are quite a few options when it comes to harnesses and I’ve really been impressed with an Arc’teryx X-350a harness I’ve been putting through its paces. It’s the harness I wore in the video above and Kyle also had an Arc’teryx harness on. I don’t say this to try and convince you to buy one, only that we both like them as options. As we’re talking primarily here about emergency rappelling and an urban environment, you might not even have a harness at your disposal, or might just have a rigger’s belt on. While companies aren’t in the business of advocating rigger’s belts for emergency rappelling much anymore, it can be done, albeit at your own risk. Here’s an older article I wrote about rappelling with a 215 Gear Ultimate Rigger’s Belt.

muster-2-rappel

There’s also the option of tying a Swiss Seat from webbing or rope. I’ll tell you up front that tubular webbing makes for a more comfortable Swiss Seat. Technically though, with nothing more than rope and a carabiner you could potentially cut a 12-15’ section off your rope, tie a swiss seat, hook up a carabiner and evacuate a building. This is obviously a worst case scenario and also in the situation where you’d have a rope and a carabiner at your disposal. If you’re already carrying these items, a proper harness doesn’t take up that much more room and neither do gloves, webbing and a few more carabiners for rigging anchors, but I digress.

I’d also like to mention that an auto-block like a Prusik is advisable for a back up during descent if available. Again, emergencies are emergencies and the goal might just be to get down as quickly and safely as possible. Situation will always dictate. Click here for our KOTW on tying a Prusik.

Notes

This article is far from comprehensive when in comes to rappelling technique and I’m always going to recommend you don’t try anything here without in-person training from a professional first. Take the time to properly learn techniques and spend time building anchors, even if you’re not rappelling. Repetition is important here and knots can potentially save your life, so practice those too. Start looking at your surroundings differently when you’re multiple floors up and ask yourself “what around me would make a bombproof anchor right now if I needed one?”

Rappelling is inherently dangerous, neither ITS Tactical or Trident Response assumes any responsibility or liability for injury incurred by the viewer. The information presented here is for educational purposes only. Always seek the instruction of a certified climbing or mountaineering guide.

Posted in Climbing | Tagged , , , , , , , , , , , , , , , , , , , , , , , | 6 Comments

Plan, Execute and Vanish: Everyday Red Teaming

City Street

While “Red Team” often refers to a group of experts testing or infiltrating a physical or virtual perimeter of an opposing force, anyone can benefit by employing their same mindset in non-technical aspects. Think of everyday activities such as work or school. The goal is to enhance decision making.

Red Teaming can solve problems through an indirect and creative approach, using reasoning that isn’t immediately obvious. It also involves ideas that may not be obtainable solely through traditional step-by-step logic.

Using “Ridiculous Thinking,” a Red Teamer plays with the different sides of the problem, looking as if it were a hollow cube: you have the 6 external sides to check, however you can’t forget the 6 internal sides. The idea here is to go beyond the visible, the obvious and check also those extra things that no one bothered to look at before.

The application of this, coupled with other alternative analysis techniques provide a comprehensive set of potential adversarial attacks on a given concept, or in everyday parlance: it helps you decide whether something makes sense or not, whether something is right or not. It helps finding potential (or actual) problems with any given thing.

The Red Team Attack

Red Teams attack the classic three fronts: digital, physical and human. Exploit each front and its weaknesses separately and you might bring some insight, however exploit them as a whole to generate a more successful view of a real scenario where the adversaries win. Take this and apply it to everyday activities. When confronted with a problem, try to look at it as if the problem has an external and an internal side. What can you see from the outside? What’s the view from the inside? Where do the two fronts meet? Or where don’t they?

Once you have all of the facts and you’ve collected enough intel, you can then either attack the problem, or if something isn’t right, make a decision based on better information.

The same can be applied to your own plans. If you make it a habit to red-team your own thoughts and plans, you’ll be surprised with what you find. More often than not you’ll find ways around a solution you previously thought was the best and air-tight. It becomes relatively easy to look at things with a Red Team Mindset after doing it for a while. Once it’s second-nature, it’s almost impossible to shut off.

Red Teams play with situational awareness or lack thereof. Like an adversary, they identify patterns that lead to the breaking of the target. A good Red Team often exposes alternative ways to test policies and plans by using misdirection: using a noisy attack and let the target follow it, while having a secondary, stealthy attack that is the one which exploits the vulnerabilities found.

This often disrupts the way organizations react and more holes are found. Think about this when you’re faced with a decision: what’s the underlying reason for what’s in front of you? Is there something else you’re missing?

A Dynamic and Proactive Approach

Ultimately, you want to have a general posture of being proactive, being aware and thinking one or two steps ahead. It’s a good idea to be prepared and establish problem detection measures as well as deception traps. Make a future attack harder. The more you think this way, the easier it is for you to start seeing the signs and markers of problems coming your way. The more you analyze and assess your own plans and strategies, the easier it will be for you to spot weaknesses in the plan or future problems emerging from things that seemed trivial during the planning phase.

A proactive mindset will push you to seek better solutions for you and your friends and family. Your adversarial thinking provides the early problem detection that will not only help you make better decisions, but help those around you have a better understanding of what they face.

Apply the Red Team Mindset as:

  • Plan: Get your facts right, analyze the potential problems and make a plan.
  • Execute: Once you get the plan ready, go for it. Stop occasionally to see if you missed anything on the initial assessment, but just execute.
  • Vanish: Complete your plan and when you’re done, move on. Focus on the next thing.

I hope this helps in understanding the Red Team Mindset. Like with everything, you need to practice and practice. Some people are born with the proper mindset; others need to learn it.

Oh, and don’t forget Rule 1: Always have an escape plan.

Editor-in-Chief’s Note: U. Fridman is a senior information security consultant that specializes in detection of information security threats and response to security incidents. His background includes extensive experience in red team activities and management, information warfare, counter cyber-terrorism, industrial espionage, forensics analysis and other security services.

Posted in Mindset | Tagged , , , , , , , , , , , | 1 Comment