LifeProof Nüüd: A Waterproof Phone Case That Let’s You Touch Your Touchscreen

lifeproof-nuud-13

Much has changed since my original LifeProof Case review back in 2012, namely a new version called the LifeProof Nüüd. What’s different about the Nüüd vs. the old style (which has been upgraded too and now sold as the Frē,) is that they fixed the problem with screen protector I addressed in the last review by completely removing it! All this while still retaining all the awesome features of a LifeProof Case; waterproof, dirt proof, snow proof and drop proof.

So you’re asking yourself, how it it still waterproof if there’s no screen protector? Simple. There’s a gasket that skirts the edge of the glass that keeps everything out. The home button is an actual button and still sealed with its own gasket.

I should mention that the Nüüd is also available for these devices: iPhone 5s, 5, 5c, iPad Air, iPad Mini, Samsung Galaxy S4, S3 and more than likely coming soon for the S5. The LifeProof Frē is also available for these models, but again that has a screen protector.

The Benefits of LifeProof

lifeproof-nuud-4

In my previous article I mentioned what led me to the LifeProof in the first place was a careless early-morning fumble-fingers accident that involved checking email while standing over the toilet relieving myself. Since then, I’ve been hooked on the LifeProof case and not having to worry about water, dirt, dropping, you name it. I’m the Bobby McFarrin of mobile phone users.

Protected by The Four Proofs:

  • Waterproof: Fully submersible to 6.6 feet (2m)
  • Dirt proof: Totally sealed from dirt and dust
  • Snow proof: Completely closed to snow and ice
  • Shockproof: Survives drops from 6.6 feet (2m)

The other benefits in this upgraded Nüüd case are that with the iPhone 5 Lightning Connector, there’s no issue with the fit. Previously when plugging in the old style Apple charger, I struggled from time to time and felt like the charger was going to snap off. The charge port door on the Nüüd is significantly smaller as well and the gasket is much more robust.

LifeProof has also found a way to integrate the screw cap that seals the headphone port, right into the body of the case. It’s retained on the case so there’s no way to lose it and they don’t have to include a spare like they did with the prior version of the case. The actual button that covers the home button of the iPhone is very well done too and has great feedback when depressed.

lifeproof-nuud-7

lifeproof-nuud-2

It’s amazing being able to still retain the tactile feel of the iPhone glass when typing, yet still know the case is extremely well protected. LifeProof included an optional screen protector with the Nüüd, but that defeats the whole purpose of the case in my opinion and I haven’t used it.

There’s a significant lip around the screen so that even if you dropped it face down, which I’ve done, the glass won’t ever meet the surface. I suppose there’s always the possibility it could drop glass-down on a jagged rock, but you could what if that scenario to death.

lifeproof-nuud-6

Usage Notes

As you saw with the video above, the LifeProof Nüüd survives water and I’ve been swimming with this version just like with the last. It’s still just as entertaining to listen to music underwater on a breath-hold. With the previous LifeProof case, I was able to utilize all the functionality of the iPhone while underwater, including pushing buttons and even recording sound. However with the Nüüd, you can’t utilize any functions that depend on touching the glass while underwater.

As a side note, LifeProof offers a Total Water Protection Plan that costs just $10 the first year and offers free repair/replacement of your device should it fall victim to water damage. Since I don’t have this, I can’t comment on it in detail, but it looks like it’s just for the first year and has to be purchased from LifeProof directly at the time you buy your case.

lifeproof-nuud-5

I can’t tell you how many times I’ve dropped this case and it’s protected my phone each and every time. There’s a bit of scuffing all over and some places that the concrete ate away at the soft rubber part, like in the upper right of the case front and one of the protective tabs around the controls on the side. However, this case has worked and is still ticking. That’s all the really matters to me. I can deal with cosmetic blemishes.

There are still a few downsides with this case, actually two. The first is that an adapter is still required to listen to music with certain headphones. The upgraded Apple iPhone 5 headphones will still fit, but models like the Bose Headphones I run with don’t fit without the adapter.

lifeproof-nuud-10

lifeproof-nuud-11

The second issue I have is more of a pet peeve, but because the back of the clamshell designed case is hard plastic and has no rubber coating around it like the front of the case does, anything that causes the phone to vibrate is extremely noisy.

Alarms, calls, etc. all become ten times more annoying than when the phone is placed face down so that the rubber coating is making contact with the surface you set your phone down on. Setting it on a coaster of some kind is a fix for this and so is just leaving it in a pocket.

lifeproof-nuud-12

With the evolution the LifeProof design team has already proven they’re capable of, I’m looking forward to the future of LifeProof offerings for our devices that truly have become a necessity in our lives.

lifeproof-nuud-14

I’ll close with this. In my opinion, nothing beats the natural feel of the iPhone without a case and even with the increased height of the iPhone 5, it’s still small and compact. That being said I’d love to see an offering from Lifeproof that fixes the things I’ve mentioned, but with an even smaller form factor. It’s certainly not as bulky as the previous LifeProof case I had on my iPhone 4, but it’s sure a big difference over the phone without a case.

To me, the added bulk is still worth the trade-off when it comes to the peace of mind in knowing that my phone is protected.

Read more about the LifeProof Nüüd and pick one up here on their Website.

Posted in Comms | Tagged , , , , , , | 18 Comments

Knot of the Week: Eliminate Zipper Jingle with Paracord Pulls

paracord-pull-1

On today’s Knot of the Week, we’ll be demonstrating three different options for silencing your zippers with paracord pulls. As many of you have more than likely experienced, zipper jingle can get annoying and there’s no way you’ll ever attain Ninja status when you’re running around like a jingle truck.

The options we’ll go over for replacing zippers pulls with paracord include a Lanyard Knot (AKA Diamond Knot), Heat Shrink Tubing with an Overhand Knot and a standard Overhand Knot. Our instructions show paracord that retains the guts, or internal strands, but you might want to experiment with gutted paracord as well by removing those inner strands. It will make the end result a little more low profile and reduce the overall size of the knot at the end.

We’ll also be demonstrating the Lanyard Knot here in detailed steps with photos and video. We’ve previously gone over the Lanyard Knot on our Knot of the Week Series a few years back, but since we’ve upgraded our camera and video equipment since then, these instructions might be a bit easier to follow along with.

The Lanyard Knot is great for creating a fixed loop in a single strand of rope. This comes in very handy when making a Solomon Bar keychain, key rings, knife lanyards and anything that needs some kind of pull. The history of the Lanyard Knot comes from Sailors using it to fashion a fixed loop necklace to hold a neck knife. You may run across the Lanyard Knot being referred to as a Knife Lanyard Knot and now you know why.

Paracord Pull Materials and Tools

paracord-pull-2

We’ve used a different length of 550 Paracord for each of the three options presented for replacement zipper pulls. The Lanyard Knot Zipper Pull uses a 20″ length to ensure you’ve got enough slack to properly tie it, but with practice you can reduce this size requirement. The Heat Shrink Tubing Zipper Pull is best with a 12″ to 15″ length of paracord accompanied by a 2″ section of  1/4″ Heat Shrink Tubing. You’ll also need a heat gun or a hair dryer to shrink up the tubing once applied. The standard Overhand Knot Zipper Pull is tied with a 10″ length of paracord in the demonstration here. All these lengths are subjective and depend on what you’ll be adding a pull to and how long you like them to be.

paracord-pull-5

paracord-pull-6

paracord-pull-7

With the majority of zippers, all you’ll need is a pair of dikes (diagonal pliers) to snip the pull off and replace it with paracord. You may also want to consider Dummy Cord for smaller zippers, which is a smaller diameter cordage that’s useful for tying a tether onto gear you don’t want to lose in the field. As a note, the ITS Store carries Dummy Cord, 550 Paracord and our proprietary Jute Paracord for fire starting.

paracord-pull-3

paracord-pull-4

The video below shows examples of all three methods of tying paracord pulls, followed by detailed instructions for tying the Lanyard Knot Zipper Pull.

Lanyard Knot » Bends

(Strength: 3/Secure: 3/Stability: 3/Difficulty: 4)

Please refer to our Knot of the Week introduction post for a description of what these ratings mean.

Uses:

  • Decorative knot for lanyards
  • Pronounced zipper pull replacement for a larger knot to pull
  • Knot can also be used to join two strands of rope

Tying Instructions:

  1. Hold the rope in your hand using your pinky to stabilize
  2. With the working end, form an underhand loop (shown in the photos by first making a “q” shaped loop)
  3. The standing end becomes your new working end and gets placed underneath the underhand loop so that its running directly under the loop
  4. Continue routing the working end around the top and ensure it tucks behind the standing part, or tail, of the original underhand loop
  5. The working end is now going to get tucked down under and back through that standing part of the line that was placed underneath the underhand loop
  6. *The fid in the photos illustrates the direction the working end will run*
  7. At this point you’ll have created a Carrick Bend, featuring a diamond pattern in the center of the knot
  8. Starting with the top, thread the standing end, which now becomes a working end, clockwise and down around the lower standing part of the fixed loop and through the underside of the diamond pattern center
  9. Repeat this step for bottom, but bring this working end up and around the upper standing part of the fixed loop
  10. *Now both ends should have been fed though the underside of the diamond*
  11. Grasp the working ends and fixed loop and pull, forming the lanyard knot
  12. Clean up the Lanyard Knot by tracing individual strands and see the video above for specifics on shortening the fixed loop once tied

View the YouTube video above or the photo gallery below to follow along step-by-step.

Posted in Misc. | Tagged , , , , , , , , , , , , , , , , , , , | 4 Comments

How To Create a Link-Up Plan for Your Family and Loved Ones

mall-directory-01

The chances of being involved in a real active-shooting event are still pretty low, despite all the media attention we’ve seen lately. That being said, have you given any thought to how you and your family would handle the situation? How would you react and what procedures should you have in place to ensure everyone’s safety?

First off, the sky is not falling. Just because I’m taking the time to discuss this topic doesn’t mean there’s an escalation of these events. This all came about during a discussion during a recent break in a class I was running. One of the students asked a candid question about what should they do and my response was probably not what they wanted to hear. I tried to present it in bite size pieces and it went something along the lines of this:

Link-Up Planning

Planning is probably the most important action you can take towards lowering your stress level and increasing your survivability. Even if you don’t suddenly find yourself being shot at, having a plan to link back up with your loved ones is very important. My family has had to do this on more than one occasion to corral children. First and foremost, keep it simple; “meet at this location, at this time.

A major mistake is what to do if you’re at the predetermined location, or rally point, but no one else has arrived. Now what? You need to have a condition, something like “wait five minutes, then move to this location.” There are actually a lot of reasons why someone might not have been able to make it to the rally point, such as having to cross a major danger area, like the attack site, that didn’t exist beforehand.

If members of your group, or even you yourself, don’t make it to the rally point by the given time, the next step is to fall back to a secondary rally point. The objective with each successive bounding action to the next rally point, is to ensure you’re moving closer to your escape with each movement. The predetermined time limits give you and the rest of your group the opportunity to link up during a fluid and chaotic situation. It doesn’t hurt to even rehearse this plan at a local mall or school event, just make sure everyone knows it’s a drill.

Returning Accurate Fire

The next course of action in a situation like I’ve described, would be to determine if you’re the subject of the active shooting, in the crossfire, or just in the general area. If you are the subject, which isn’t always as easy as you might think it is to determine, it would then seem pretty obvious what you need to do. Return accurate fire to neutralize the threat and then initiate your link-up plan to get a full headcount of your family and loved ones. Once that’s completed, medical aid would be the next thing that comes to mind, but is it safe to do so? Err on the side of caution by at least getting your family to permanent safety, which will more than likely require getting them off site. This is similar to the line you might have heard before, “Get Off The X.”

If you’re in the crossfire your first move should be looking for cover, or at the least concealment, trying to obscure your presence. Remember, your primary objective is the safety of your family. If they’re not in imminent danger, your first action should be to consider getting them off the attack site. That can be problematic if you’re in the crossfire, so use the best judgment based on the situation at hand. Sometimes neutralizing the threat, even if you’re not the target, isn’t a bad idea. It’s a good way to ensure your family gets to safety.

If you’re in the general area of an attack and moving towards safety, try to keep something between you and the danger. Try not to mistakenly move into the crossfire and when you do move, consider moving in smaller chunks, from one piece of cover to the next. Almost in a bounding overwatch, or leapfrog manner.

You can’t afford to bury your head in the sand, or look to the government to protect you and your family. They’ll always be in a reactionary mode. You’ll need to become self-sufficient and take action yourself; the first action should be coming up with a decent link-up plan.

Editor-in-Chief’s Note: Jeff Gonzales was a decorated and respected US Navy SEAL, serving as an operator and trainer who participated in numerous combat operations throughout the world. He now uses his modern warfare expertise as President of Trident Concepts, LLC., a battle proven company specializing  in weapons, tactics and techniques to meet the evolving threat. Bringing the same high-intensity mindset, operational success and lessons learned from NSW to their training programs, TRICON has been recognized as an industry leader by various federal, state and local units. Organizations interested in training with TRICON can call 928-925-7038 or visit www.tridentconcepts.com for more information.

Title photo © Steven Damron

Posted in Mindset | Tagged , , , , , , , , , | 5 Comments

Streamline Your SOFTT-W Tourniquet with this DIY Flat Fold Method

softt-w-flat-18

I’ve always appreciated the quality and craftsmanship that goes into each SOFTT-W Tourniquet and feel they’re the best on the market. That being said, their bulkiness right out of the package has always bugged me. As an aside, if you’re storing your tourniquets in the package; DON’T! In the critical situation where you’d need a tourniquet, you don’t want to mess around with having to open a plastic wrapper.

After plenty of practice refolding the SOFTT-W over and over again, I feel that I’ve come up with a good repeatable method for folding that I’d like to share with you. The benefits to this technique, which I’m dubbing “flat fold,” are that it reduces the overall profile of the SOFTT-W from 2″ to 1″ while still maintaining the same 5″ overall length. The length of the SOFTT-W is longest at the windlass, which is where the 5″ measurement comes from.

SOFTT-W Tourniquet Flat Fold

We’ve created a video below where I show how to fold the TQ below and we’ve also added detailed photos showing each step. The only other addition I’d like to make is to mention that the flat fold method shown here uses a 7″ tail, or bitter end when folding. There’s certainly not a right way or a wrong way to do this, but this is just the best method I’ve found for making the SOFTT-W as compact as possible.

Final Notes

A few additional points to mention with the flat fold method are that the TQ is now more streamlined to help it from getting caught on things. It’s especially beneficial if you’re wearing a TQ on the shoulder strap of your plate carrier or affixing it to the side of a MOLLE Pouch, like our ETA Trauma Kit Pouch. The flat fold is also perfect for storage in our EDC Slimline Pouch to always have a TQ available on your belt.

Hopefully the photos and the video together make it easy to understand the folding method, but if you have any questions, feel free to leave them below in the comments.


Posted in DIY, Medical | Tagged , , , , , , , , , , , , | 15 Comments

My Love-Hate Relationship with Salomon Shoes

Salomon-Shoes-5

I feel like I’ve been everywhere with Salomon shoes; I’ve hiked a mountain, run trails, completed a GORUCK Challenge with them and even walked 34 miles in a 20-hour period during the 2012 Carry The Load Event. While this certainly wasn’t all in the same pair, I’ve been wearing Salomon shoes for 3+ years, purchased 6 pairs and logged quite a few miles.

My goal with this article is to speak honestly and help you make a more informed purchase decision, should you want to purchase Salomons for yourself. It’s written from my personal experience and your mileage may vary.

Salomon Shoes

My first foray into Salomons was a few years ago, after they were recommended to me by a good friend that had just returned from a deployment to Afghanistan. I’d heard about Salomons before and had even tried on a pair at my local REI. My hesitation, before my friend’s recommendation, was that I didn’t think the laces would hold up. They were thin and designed in such a way that it would be a pain to replace them if they happened to break. Don’t get me wrong, I loved the shoes and thought they were incredibly comfortable, I just didn’t trust the laces.

Salomon-Shoes-1

As I discussed my friend’s experience wearing them exclusively for an entire 6-month deployment, the first question I brought up was about the durability of the laces. He said he hadn’t had a single issue with the laces breaking, nor had any of the other guys from his platoon that were wearing them. That intrigued me and I soon found out that they were made of Kevlar. If you’re not familiar with the strength of Kevlar, it’s the same material we include in our Urban Kits to friction saw out of Zip Ties, should you become illegally restrained, but I digress.

The laces were no doubt strong and definitely put my mind at ease about my initial roadblock to purchase Salomons. I chose a pair of Speedcross 2 shoes, which pre-date the currently available Speedcross 3. I wore them everywhere when I got them; running, out in town, you name it. I was loving them, that is until the outsole (or tread) started wearing down quickly. If you’ve ever had experience buying running shoes and been properly fitted for them, you’ll know what I mean when I say that I have normal pronation, or that my foot makes pretty even contact all over. I only mention this to point out that my wear pattern on the tread doesn’t wear more on one side than the other. That being said, I found the Speedcross 2 to be wearing faster than I’d normally had running shoes wear.

SHOT Show 2012 Day 1 Live Coverage 043

Salomon-Shoes-9

As any good runner knows, running shoes are running shoes and not daily use shoes. You should have another pair for daily use. I was certainly guilty of wearing my Salomons for everything and I knew it. It had been about five months and I could feel the pavement a bit too much for my liking and knew it was time for a new pair.

Design

Before I move on in my Salomon journey, I’d like to point out the other features of Salomon Shoes that I’ve neglected to mention. The line that the Speedcross 2 and all the Salomons I’ve purchased belongs to, is their Mountain Trail line. These are primarily described for increased performance on trails. More on this later the article.

Salomon-Shoes-3

I’d also like to describe their lace system, which is unique and one that I really like. As you already know they’re made from Kevlar, so let’s focus on the Quicklace System, described as a “minimalistic and strong lace for one-pull tightening. Easy-on, easy-off.” You grasp the lace cover, a rubberized piece that hides the spot where the lace is stitched together and pull. Then simply pull down towards your foot with the toggle to lock the lace into your desired tightness. You then take the extra lace and stuff it into the lace pocket, a mesh opening on the upper tongue. To loosen the system you simply pull up on the toggle, releasing the “lock” on the lace.

Salomon-Shoes-4

Salomon-Shoes-14

On all three pairs of Speedcross shoes I’ve purchased, the rubberized piece that hides the spot where the lace is stitched together has slipped off and rode down the lace. This doesn’t seem like a big deal, but when it’s not in the optimal position and I’ve gone to grab the lace to tighten, it’s caused the lace to favor one side over the other for tightness and caused me to readjust. On my second pair of Speedcross shoes I wound up finally putting superglue on the lace joint and sliding the rubberized cover back over to fix the problem. Not a huge deal, but worth mentioning.

Salomon-Shoes-7

As I mentioned with the outsole wearing out above, this wear has also affected the toe of the Speedcross shoes. The outsole wraps over the toe and creates a toe cap for extra protection. Four out of the six pairs of Salomon shoes I’ve bought have had this area come unglued and start flapping within the first two months. Nothing a little Shoe Goo wouldn’t fix, but still something to bring up.

Salomon-Shoes-15

Each pair I’ve had has also featured an OrthoLite Sockliner that creates a “cooler, drier, healthier, better cushioned environment under the foot. It won’t break down or lose effectiveness over time.”  I’ve found this statement to be fairly accurate, but they do hold stink pretty well. I don’t consider myself as someone that has “stinky” feet, but after time I wind up needing to wash these out more so than any other brand of running shoes or everyday wear shoes I’ve ever owned. I’m not sure if its the OrthoLite that causes this or not.

I’d also like to mention how lightweight the Speedcross Salomons are, as a pair they weigh about 24 ounces. The other pairs of Salomons I’ve owned are a bit heavier, but I’ll list specifics when I get into those models. They also dry out fairly quickly, should you submerge them in water, like I had to during the GORUCK Challenge. I remember it taking about an hour to run them dry.

Buying More

After my first pair of Salomons wore out, I researched the Salomon line a bit more and settled on a shoe that seemed to have a thicker outsole with a more aggressive tread. I thought that this was a good move, considering there would be more there and would therefore last longer. I settled on the XA Pro 3D Ultra GTX, the GTX standing for Gore-Tex. They’re described as having “a unique blend of light weight, durability, stability and protection for running and fast hiking on rough terrain and technical trails.” It’s also quite a mouth full for a product name.

Salomon-Shoes-12

Salomon-Shoes-16

With this pair of Salomons, I vowed to use them solely for running and PT to increase their life expectancy. Despite my best efforts, I made it about six months of running a few times a week and working out the other days before the tread wore out. I also found that the Gore-Tex was making this pair stink even more than the Speedcross 2’s, at least that’s the only thing I could think would be causing that.

Salomon-Shoes-11

Salomon-Shoes-10

I then decided to move to the non Gore-Tex lined XA Pro 3D Ultra shoes, figuring I’d give them another shot without the Gore-Tex. Another six months and they were done for. Something I mentioned earlier is that all the Salomons I’ve bought have been from their Mountain Trail line and made for trail running. I wasn’t doing much trail running. A little, yes, but my running was primarily on concrete and asphalt. My point in saying this is that it was in the back of my mind as a reason I might be burning through Salomons so quickly.

Salomon-Shoes-13

I will say this, I’ve never been a huge runner, but I’d never had a pair of the Asics I was buying before Salomons wear out as quickly as the Salomons were. The Salomons were certainly more comfortable and are what kept me in them, rather than go back to Asics. I was getting about 9-10 months out of Asics before I needed a new pair. Enter Salomon pair number four, again I bought the non-GTX XA Pro 3D Ultra 2. The two meant they were now in generation 2 and again I was optimistic they’d made changes for the better. I’d like to mention here that with the XA Pro Salomons, I didn’t have that lace problem that I’d experienced with the Speedcross shoes, but I was still getting the toe issue peeling away though. The pair of XA Pro Salomons weighed in at about 30 ounces in both GTX and non-GTX.

It may seem strange that I was logging my time in these various pairs of Salomons, but I honestly wasn’t really doing a good job of that. I am, however, good at saving receipts and when going back to write this article I was able to look up when and what I’d purchased for shoes in the past few years. That and I still have the majority of my worn out Salomons. I tried logging actual mileage I was putting into the dedicated pairs for running and working out, but it’s not accurate enough to quote here.

Salomon-Shoes-2

I’ve thrown half of my pairs of Salomons away over the last few years but still had three pairs to use to photograph for this article. The outdoor photos you see of the Speedcross 3 shoes are what I’d like to touch on next and were shot when I’d just purchased my first pair of Speedcross 3’s few years back.

After my second pair of XA Pro Salomons wore out (again in six months) I noticed that the Speedcross 3 had been released and hoped that they’d fixed the issues that were annoying me and subsequently that they had some feedback on the outsole and beefed it up a bit. Much to my disappointment, this wasn’t the case. They were nearly identical to the Speedcross 2 and after some time I had the same lace issue, toe peeling issue and outsole wear.

Salomon-Shoes-6

Something else that I began noticing more in the Speedcross 3 was that the laces started squeaking and creaking. What I mean by this is that as I’d take a step and pushed off from my toe, I could hear the laces move inside the eyelets. I certainly wasn’t going to be sneaking up on anyone like that, so I tried using some wax and putting it where the lace ran through each eyelet. This seemed to work well, but after time would go back to creaking again. I did this about twice in a month and then gave up. I will note that the XA Pro’s have a plastic insert on the eyelets and I didn’t notice that they had this noisy lace issue.

I tried to make Salomons work for me, honestly I did. As a last ditch effort, I even bought a second pair of Speedcross 3’s and had a daily wear pair with my worn down pair and used the second pair for running.

Mike even commented a few years ago at SHOT Show that he thought it was ridiculous that I brought two identical pairs of shoes with me. One to workout in and one to wear each day on the show floor. You may be thinking to yourself that you would have given up on Salomon a long time ago with the issues I was having, but I truly loved the comfort and that was outweighing the other problems. Keep in mind that the six pairs were over about three and a half years, so it wasn’t as bad on my bank account. I also believe in having the proper equipment for working out to avoid injuries, even if it means an investment.

Moving On

I’ve been Salomon-free for exactly six months now and have moved on to the Adidas Outdoor Terrex Fast X shoes. I wanted to ensure I’d been wearing them for at least six months before I added them to this article and gave my thoughts on them.

SHOT Show 2012 Day 1 Live Coverage 034

Overall, I’m happy with them and feel they’re still comfortable like the Salomons are, but just not quite as comfortable. They still feature the OrthoLite Sockliner like Salomon uses, which is why I feel they’re still comfortable. As opposed to every pair of Salomons, I felt the Adidas Terrex shoes needed more break-in time out of the box, where the Salomons were ready to run in immediately.

Salomon-Shoes-18

Salomon-Shoes-19

The biggest benefit has been the outsole wear, or lack thereof. Six months in Salomons and the tread was nearly worn down, whereas with the Adidas, you can see in the photo below that there’s still plenty of tread left. I’ll update this article when I wind up needing to replace them, but I’m betting I get another few months out of them. I’m also trying my best to use these just for working out, but I have been guilty of wearing them daily more times than I’d like.

While I don’t have the issue with the laces from the Speedcross shoes, a few new issues have popped up. First off, let me explain the Adidas speed lace-up system. Similar to the Salomon Quicklace system, you grasp a pull tab and pull down on a toggle to lock the lace to your desired tightness. Instead of a pocket on the tongue to stuff the extra lace into like the Salomons feature, there’s a strap of elastic near the toe of the shoe that you tuck the excess lace under. I’m less than impressed with this feature, as the weight of the pull tab causes the extra lace to fall out of the end of the shoe and you get a nice flopping lace that gets quite annoying.

Salomon-Shoes-20

In all honesty I don’t usually notice it when running, it’s mostly when walking. The other issue is that the kevlar laces in the Adidas Terrex shoes are getting severely worn out. The sheath is starting to fray quite a bit and there’s even a place in the sheath where the yellow kevlar underneath is starting to come through. I’m positive that Adidas is using an inferior sheath yarn compared to what Salomon uses and the issue is getting worse. The sheath fraying was never even once an issue with any pair of Salomons I had.

Salomon-Shoes-22

Adidas counters the lace squeaking and creaking Salomon Speedcross shoes have by putting a plastic insert into their lace eyelets, like the Salomon XA Pro has. I haven’t noticed any issues with my Adidas laces making noise. Something more I’d like to add is that the pair of Adidas Terrex Fast X shoes weigh 34 ounces and are considerably heavier than the Salomon Speedcross shoes, but only four ounces more total than the Salomon XA Pro.

Wrap Up

The overall point I’d like to make is that I’ve found that there’s been trade-offs in moving away from Salomons. I’m not sure that I’m going to buy more Adidas when the pair I have wears out, but I’ll make that decision when the time comes. I’m just hoping my laces last as long as the tread does.

Salomon-Shoes-23

As an aside, all the Salomons and Adidas shoes I’ve mentioned here are made overseas. The only US made running shoes that I know of, are specific New Balance styles. If you’re wondering about the history of Salomon and Adidas, they used to be the same company and referred to as Adidas-Salomon until Amer Sports acquired the Salomon brand from Adidas in 2005. Amer Sports also acquired Arc’teryx in the same deal that brought them Salomon. Adidas-Salomon had acquired Arc’teryx in 2001 and thus they went with Salomon when it was sold. Amer Sports also owns Suunto, Wilson, Precor, Atomic and Mavic.

I hope you’ve gotten something out of the information I’ve presented here on Salomon Speedcross, Salomon XA Pro 3D Ultra and Adidas Terrex Fast X shoes. I’m still on the hunt for the perfect shoe, but I’m not sure I’ll ever find something that fits my wants across the board.

Salomon Speedcross and XA Pro 3D Ultra

  • Pros: High comfort level, strong laces with no visible wear to sheath material
  • Cons: Short tread life, tread on toe peels, lace cover slides around (Speedcross only), laces make noise when walking (Speedcross only), hold stink more (particularly in Gore-Tex model)

Adidas Terrex Fast X

  • Pros: Longer tread life, overall comfort, lace toggle easier to use, no lace noise, no lace cover sliding
  • Cons: Long break-in time, lace sheath wears quickly, excess lace flops around due to storage method
Posted in Footwear | Tagged , , , , , , , , , , , , , , | 67 Comments

AR-15 Spare Parts Organization Schematic for the Obsessive Compulsive

AR-15 Spare Parts Organization

In my previous article about AR-15 Spare Parts Organization, there were a lot of comments from readers that wanted to see a detailed photo of the layout, as well as links to each specific part. It was a lot of work, but I’ve managed to put together a list of links to every spare part in the organizer and have even created interactive, clickable photos below with links and a description of each part as you hover over them.

For those of you just now seeing this for the first time, my previous article highlighted my addiction for organization, which carries over to the spare parts I take with me shooting. When I’m at a course or even shooting with friends, I like to have everything I need to keep everyone’s guns running. While I’ve never come close to needing everything in here, I follow the Boy Scout motto; “Be Prepared.”

If you’re looking for the same Made in USA plastic organizer that I used, you can get the Akro-Mils 6318 Case, available here from Amazon for around $20. The top section has 42 individual small compartments and the bottom section has another 20 compartments. The top section compartments are also secure enough to keep small parts from rolling into another compartment and get mixed around. The section dividers are adjustable as well, should you find yourself with odd shaped items.

Top Section Organization

Ejector Spring Extractor Spring Charging Handle Pin Charging Handle Spring Gas Tube Roll Pins Safety Detent Detent Spring Pistol Grip Screw Pivot/Takedown Pin Spring Pivot/Takedown Detent Spring Ejector Extractor Insert Charging Handle Latch Bolt Catch Plunger Safety Selector Triggerguard Roll Pin Pivot/Takedown Pin Detent Hammer/Trigger Pins Ejector Roll Pin Extractor O-Rings Carrier Key Screws Bolt Catch Springs Magazine Release Sling Swivel Buffer Retainer Spring Trigger Springs Gas Rings Extractor Pin Cam Pin Bolt Catch Roll Pin Magazine Catch Spring Taper Pins Buffer Retainer Hammer Springs Retaining Pin Extractor Crush Washer Bolt Catch Magazine Catch Ejection Port Cover Spring Ejection Port Cover Clip Disconnector Springs Firing Pin Carrier Key Ejection Port Cover Pin Ejection Port Cover

Click here for high res image or hover/click individual compartments of image above for product links/descriptions.

This list is based on Column format of Top to Bottom. 

Column 1

Column 2

Column 3

Column 4

Column 5

Column 6

Column 7

Column 8

Bottom Section Organization

Image Map Handguard Cap Barrel Nut Delta Ring Weld Spring Snap Ring Trigger Guard Charging Handle Buffer Castle Nut Receiver End Plate Action Spring Rear Sight Rear Sight Hammer/Trigger Assembly Flash Suppressor

Click here for high res image or hover/click individual compartments of image above for product links/descriptions.

This list is based on Row format of Left to Right. 

Row 1

Row 2

Row 3

Row 4

AR-15 Spare Parts Organization

Most of the links above are from Brownells, which has great deals on individual parts. Bravo Company USA is another one of my spots to shop for parts and is where I buy my complete MPI’d AR Bolt Assemblies from.

If you haven’t seen it yet, be sure to take a look at our DIY AR-15 Build Series for tips on parts to purchase and of course how to build your own complete AR-15 from a stripped lower receiver.

Posted in Accessories | Tagged , , , , , , , , , , , | 34 Comments

Is Blackphone the World’s First NSA Secure Phone?

Blackphone

If you’ve ever used PGP encryption to communicate over the internet, you may be familiar with its creator, Phil Zimmerman and his new venture, Silent Circle, which we’ve previously covered here on ITS.

Silent Circle and Geeksphone have teamed up to create Blackphone, which is a smartphone that puts privacy and security ahead of everything else. Geeksphone, a smartphone manufacturer based in Spain, is best known for their technology to enable users to choose the operating system their phone runs on.

Blackphone runs a customized version of Android called “PrivatOS” for an operating system and is described as being built to “offer unparalleled security and privacy to workers, executives, private figures and anyone else unwilling to cede ownership of their privacy to other authorities.”

As we don’t have any hand-on experience with Blackphone, we can’t offer any feedback on actual usage, but the promise of a purpose-built secure communications platform is definitely intriguing and we’re looking forward to learning more.

Blackphone Details

Blackphone is powered by a >2 GHz quad-core SoC and features a full set of premium features, such as a 4.7″ HD IPS screen, LTE, HSPA+, 2GB DDR3 RAM, 16GB of storage, >8MP primary camera with flash and 1.3MP front camera, Bluetooth 4.0, 802.11n WiFi, GPS, and more. Certain specifications are subject to change and may be adjusted prior to shipping the first phones later this year.

Selling for US$629 (plus shipping and any local taxes or duties for the destination address), Blackphone is a real no-excuses solution for traveling executives looking to BYOD, families concerned about personal security, and anyone else who understands the value of maintaining personal privacy rather than giving it away for free.

Blackphone comes unlocked and features several pre-installed privacy tools, all of which are fully enabled for at least two years of usage. These tools include the Silent Circle suite of apps, including Silent Phone, Silent Text and Silent Contacts. It also features anonymous search, private browsing, VPN from Disconnect and secure cloud file storage from SpiderOak. In addition, Blackphone ships with the Smart WiFi Manager from Mike Kershaw, Chief Architect for SGP Technologies and a powerful remote-wipe and device recovery tool.

Hardware

  • 4.7″ HD IPS Screen
  • >2 GHz Quad Core CPU
  • 2 GB RAM
  • 16 GB Storage
  • LTE
  • HSPA+
  • Front camera >8Mpx with flash, plus rear camera

Software

  • Silent Circle Apps
  • Silent Phone
  • Silent Text
  • Silent Contacts
  • Blackphone-built apps
  • Blackphone Firewall
  • Blackphone Activation Wizard
  • Blackphone Remote Wipe
  • Select 3rd-party apps
  • Disconnect Secure Wireless
  • SpiderOak Blackphone Edition
  • Kismet Smart Wi-Fi Manager
Posted in Privacy | Tagged , , , , , , , , , , , , , , | 18 Comments

New to the ITS Store: Mini Survival Kits and Pebble Leather Morale Patches

ITS Mini Survival Kit

Today we’re extremely excited to introduce our Survival Kit lineup that we’ve been working on for some time now. The ITS Mini Survival Kit and Multi-Purpose Container were designed to complement each other or stand alone to fulfill the basics of survival, yet being affordable and quality made. They’re compact, lightweight and fully featured. We’ve also added a new leather morale patch to the Store. The Pebble Brown Leather Logo Morale Patch is a much darker and more rich alternative to the Natural Leather Morale Patch we offer and both will age nicely over time.

ITS Mini Survival Kit (MSK)

ITS MSK

The ITS Mini Survival Kit is our solution for a small pocket-sized survival kit which is based on years of evaluating and tweaking the contents we feel belong, yet keeping it minimal, lightweight and cost efficient.

While we still recommend augmenting this kit with a few extras mentioned in the video below, the MSK is full featured and ready to provide you with tools that can mean the difference in prevailing over imminent threats. The kit includes contents that cover all of the survival basics:

  • Fire & Light
  • Signaling
  • Navigation
  • Water & Food
  • Knives & Tools
  • Medical
  • Multi-Purpose & Other

The majority of the items in the MSK are individually poly-bagged for added water-resistance. We strongly recommend that you practice and familiarize yourself with the contents of this kit before you “need” to use it.

Another note of recommendation is augmenting this kit with Paracord, a Survival Blanket and your Every Day Carry Knife. There’s also enough room in this kit to add a few of your own personal items, such as a mini flashlight or fishing kit, if desired.

Click here to order the new ITS Mini Survival Kit today!

ITS Mini Survival Kit

ITS Multi-Purpose Container (MPC)

ITS MPC

100% Made in America, the ITS Multi-Purpose Container (MPC) is a deep-drawn aluminum container that’s Type III Hard Anodized and features a tight fitting lid, internal gasket for water resistance, Velcro securing straps and an internal lid lined with 3M Reflexite.

These containers are heavy duty enough to handle anything you can throw at them. Whether you just need a bombproof container to store the contents of a survival kit, or a case that can do double duty as a shovel, this covers it all. Dig holes, cook food and even boil water right in the ITS MPC!

ITS MPC

The lid of the case is laser engraved with the ITS Shield Logo and features two rear slots that the velcro straps pass through and allow them to be retained when the lid is open or removed completely if you desire.

Not only will the MPC fit all the contents in our ITS Mini Survival Kit, but will also house the ITS Urban Kit if you’d like to combine these into one kit for Survival, Escape and Evasion.

Click here to get your new ITS Multi-Purpose Container today!


ITS Leather Morale Patches

ITS Leather Morale Patches

Laser cut and hand-stitched in the US, the ITS Leather Logo Morale Patches are made from American full-grained vegetable-tanned saddle leather. Available in Natural Leather and Pebble Brown Leather, they develop a nice patina and age amazingly over time. We’re excited about this new medium and look forward to doing even more with it.

Each patch measures 3.5″ tall x 2.5″ wide and features a sewn hook velcro backing to affix them to anywhere you’d like. The velcro can also be removed with a seam ripper, to sew them on a jacket, etc.

Click here to pick up the new ITS Leather Morale Patches today!

Posted in ITS Information | Tagged , , , , , , , , , , , , , , , , , , , , , , , | 8 Comments

Lessons in Manliness from Harry Houdini

Harry Houdini

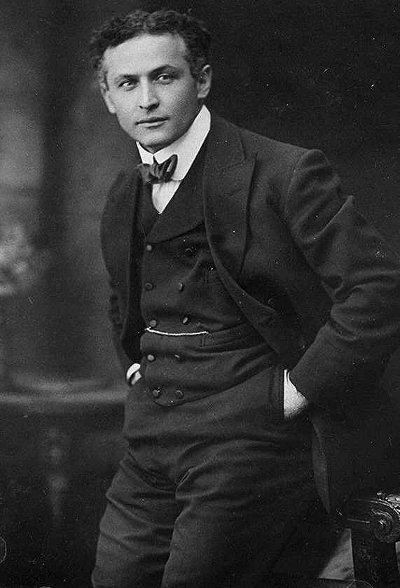
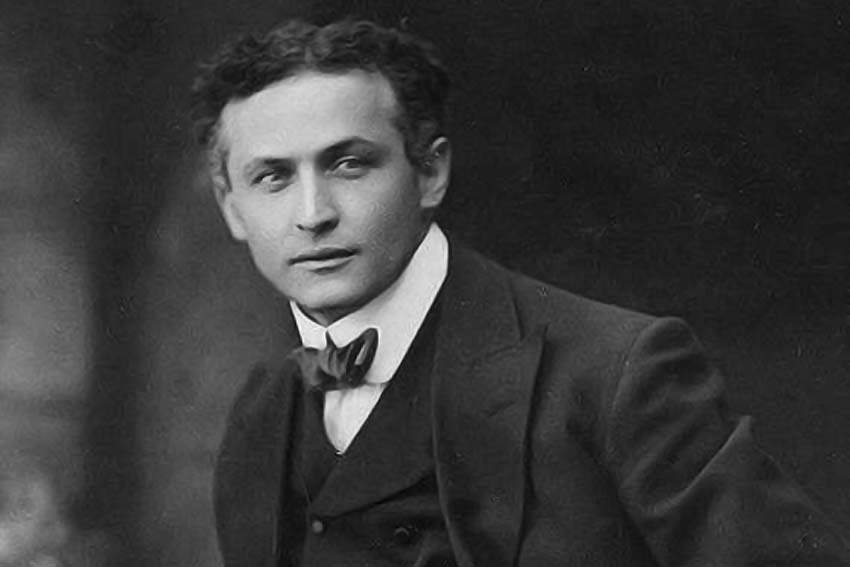
Harry Houdini. “The Handcuff King.” “The Man Who Walked Through Walls.” Master Magician. Escape Artist Extraordinaire.

Almost a century has passed since his death and Houdini, who was the most famous entertainer of his time, is still a name nearly everyone knows and reveres. He was king of the “Golden Age of Magic.”

His enormous popularity can be traced to the human desire to defy death. Houdini seemingly flirted with death again and again, only to laugh in its face and emerge in the land of the living. It didn’t matter how many chains you bound him with, how strong the handcuffs, how tight the ropes; it didn’t matter whether you placed him in a crate or a vault or a safe or a prison; he would always find a way out. Nothing could hold him; he seemed truly invincible. He refused to be bound not only by ropes and chains, but also by the constricting assumptions of what is possible for an “ordinary” man to do. He has rightly been called America’s first “superhero.” And therein lies the heart of his appeal; he seemed in every way superhuman, but he was still one of us. He showed the enormous potential of man when he knows how to hustle and push the boundaries of his capabilities.

Houdini’s life and deeds could potentially provide enough fodder for a dozen posts; today we present just a few of his lessons in manliness.

Deliberate Practice Is the Key to Greatness

Throughout his entire career, fans speculated as to how Houdini accomplished his amazing feats. There was a camp that believed he was in touch with the spirit world and that supernatural powers allowed him to dematerialize to effect his escapes.

But the secret to Houdini’s success was not mystical, or even magical. It was his determination to pour every ounce of blood, sweat and tears into being the very best in the world. In short, he was a master of deliberate practice.

When Harry first started practicing magic as a young man, he would have his brother tie him up in ropes and would then spend hours on the roof of his family’s tenement apartment attempting to free himself. He took up running and biking long distances to build his body and endurance. Having learned to converse on the streets of New York City, he worked to drop the “youse” and “aints” that revealed his lack of formal education. He took classes on speech and debate to hone his skills as a charismatic showman.

By age 18 he had trained himself to hold his breath for 3 minutes and 45 seconds.

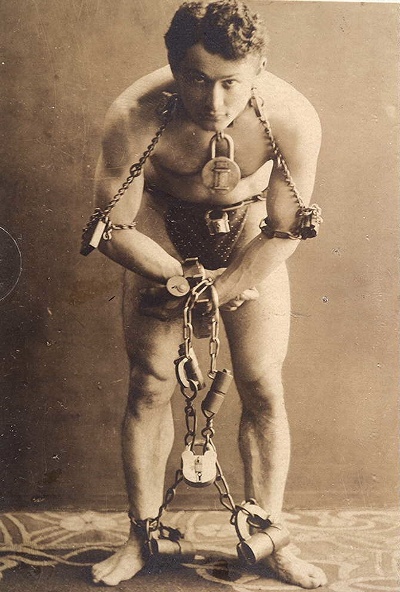
He set out to learn the secrets of every lock in the world, unable to rest until he knew how to pick them all with ease. He collected every kind of handcuff he could find and pored over drawings of every lock made in the US and Europe, studying them until had he acquired an encyclopedic knowledge of every key and lock in the world.

Harry Houdini

“vigorous self-training, to enable me to do remarkable things with my body, to make not one muscle or a group of muscles, but every muscle, a responsive worker, quick and sure…” -Houdini on one of the secrets to his success

In his home, he built a large sunken tub in which to practice holding his breath and escaping underwater. To train himself for stunts in which he would jump into frigid rivers while handcuffed and shackled, he would add ice to the water to build up his stamina. He actually learned to like these freezing dips, to the point he could say, “I only feel good after one of these baths.”

He practiced using his toes to untie knots until they had the dexterity of the average man’s fingers. He practiced swallowing objects and bringing them back up again. He practiced sleight of hand and misdirection in front of a large mirror.

He rarely slept more than 4 hours a night and kept a notebook by his bedside in case he awoke with an idea.

His practice sessions were so constant, so all-consuming that he would frequently forget to eat and bathe; his wife Bess had to remind him to change his underwear.

He built himself into the man he wanted to become, element by element.

Conquer Fear and Pain

While Houdini may have made his escapes look so easy that people thought spirits were aiding him, the truth was that his exploits were often grueling, highly physical endeavors. The stunts were designed with safeguards and had “tricks” as to how they were done, but they still involved a great deal of strength, flexibility and steely courage.

Houdini said that without the ability to conquer his fears, the result would not only be public embarrassment, but potential death:

“When I am stripped and manacled, nailed securely within a weighted packing case and thrown into the sea, or when I am buried alive under six feet of earth, it is necessary to preserve absolute serenity of spirit….If I grow panicky I am lost.”

Harry Houdini

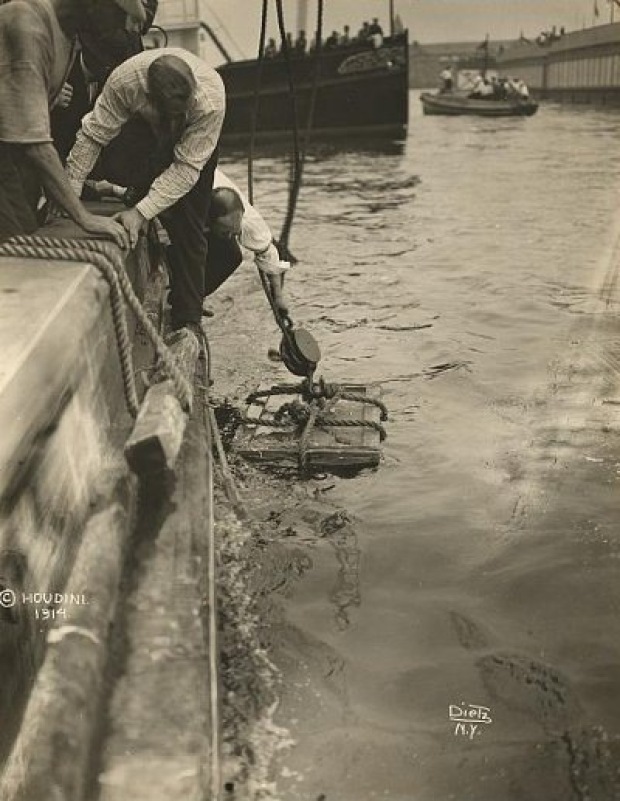
Crate containing Harry Houdini lowered into New York Harbor, July 7, 1912.

Success also required the ability to endure pain. Houdini would accept nearly any challenge thrown at him. Audience members would bring all manner of handcuffs, locks and chains to his shows and groups would come up with bizarre tests of his prowess, like asking to chain him to a lit cannon. Every performance was his Waterloo; Houdini knew that if he failed a challenge, his reputation, his aura of invincibility would be ruined. He had to escape–no matter the cost to his body. Thus, while many escapes would only take a minute or two, others could require an hour and truly test his endurance and mind; he would emerge sweating and gasping for breath, his clothing torn and eyes bloodshot. Ropes would be tied so tight they would cut off his circulation, cruel shackles would leave his ankles and wrists bruised and cuffs and locks would pinch his skin; freeing himself from them necessitated the tearing of his flesh. But for Houdini, the show would always go on.

Harry Houdini

“While the manacles and shackles are being adjusted so that my limbs are powerless to move, I look down at the water flowing so far below; then I make up my mind I am going to do it. From the time I let go till the moment I strike the water everything is blank and my ears are filled with strange songs. If the season be winter with the temperature of the water in the vicinity of freezing, the ordeal is one to be dreaded. The bitter cold of the first plunge seems to cut right into my heart and I very often bite my lips almost through, so great is the shock.”

Jumping 31 feet into the Woolloomooloo Bay, Houdini hit face-first; the impact caused two black eyes and loosened several teeth. On another occasion, he let young men tie him up and cover him with tar. He freed himself in 41 minutes, but it “Hurt like hell.”

When his ankle snapped while being lifted into the water torture cell, the doctor urged him to seek immediate medical attention and go to the hospital. But Houdini went through with the trick and finished the whole show. He made himself a splint for the fractured ankle and a leg brace and continued on the tour.

On another occasion, a blood vessel in his kidney burst while he was being sealed tightly in a canvas bag by a “gang of longshoremen.” He started urinating blood and the doctor told him to take it easy for several months and to lay off the strenuous escapes. Houdini informed the doctor that such a respite was impossible. “It is my duty to inform you that by continuing your present regimen you would be committing suicide. You must reconcile yourself to the fact that your strenuous days are over…If you continue at present, you will be dead within the year,” the doctor gravely intoned. “You don’t know me,” Houdini replied with a shrug. He took two weeks off and then went back at it with his usual aplomb. For the next 15 years, the magician sent the doctor photos and news clippings of his dangerous exploits along with a note: “Still alive and going strong.”

Of course this stoicism in the face of pain could be take to an unhealthy extreme and would be his undoing. After weathering several punches to the abdomen by a man who wanted to test the legendary steeliness of the magician’s stomach, Houdini was left in severe pain. Although he was running a temperature of 104, he felt obligated to his audience to continue his performances. When he finally consented to be taken to the hospital days later, his appendix had already burst and despite surgery, Houdini failed his final escape…from death.

Harry Houdini
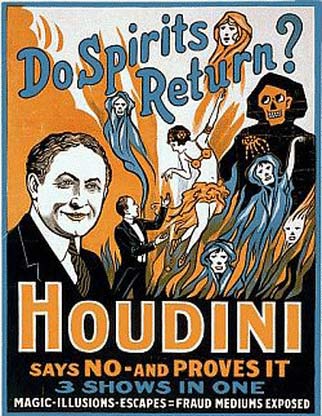
Spiritualism was all the rage after WWI, as many families longed to make contact with their loved ones who had been killed. Houdini always insisted that he kept an open mind and desperately wished that mediums really could make contact with dead spirits, but he could not find any mediums who were not fraudulent.

An avowed enemy of humbuggery, Houdini devoted the latter part of his life to exposing false mediums and the tricks they used.

He promised to try to make contact once he himself had crossed over, but so far, he has not pierced the veil with a message.

Keep Pushing Your Limits

Houdini became a national star at age 26 and several years later had conquered Europe as well. He escaped from jails cells around the US, federal prisons, Scotland Yard and the dreaded Siberian wagon transport, essentially a safe on wheels.

Harry Houdini

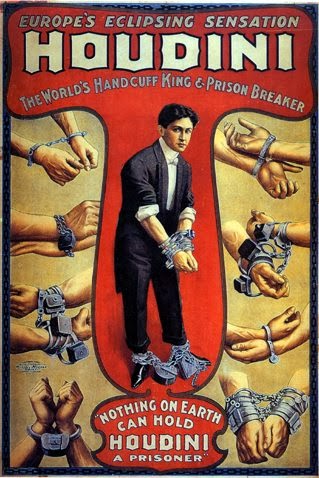
Having freed himself from every mechanism thrown his way, he was known around the world as the undisputed “Handcuff King.”

But Houdini was never content to rest on his laurels. He couldn’t; imitators were constantly stealing his act, duplicating his feats and falsely accusing him of being a fraud. So he would ever push his limits, forever looking to evince a stunt so incredible it couldn’t be duplicated.

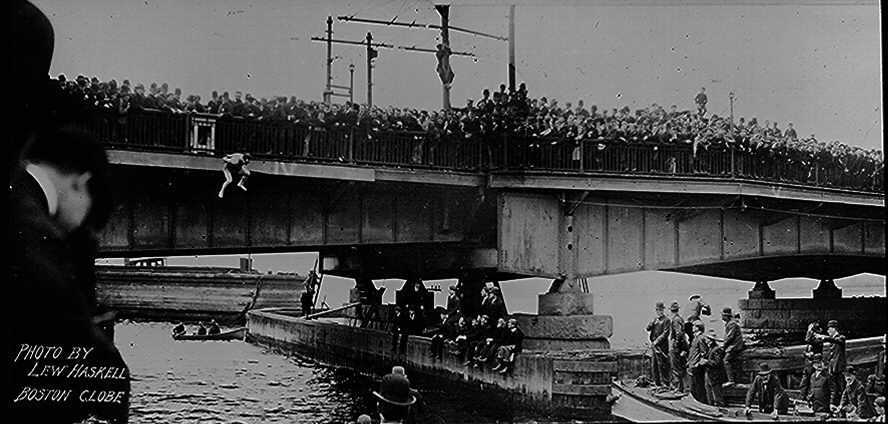
When audiences became inured to his simple handcuff escapes he upped their difficulty—jumping from bridges into rivers while shackled, chained and weighed down and emerging from coffins, chests and packing boxes which had been nailed shut and even built right on the stage. He would complete such escapes in minutes, leaving the chains and handcuffs still locked and the containers seemingly untouched.

He found his way out of a variety of interesting objects as well—a glass box, a canvas and leather mail sack, a giant football sown shut, a roll-top desk, an iron boiler and even the belly of a “sea monster,” a strange creature that had washed up on shore and couldn’t be identified.

Harry Houdini

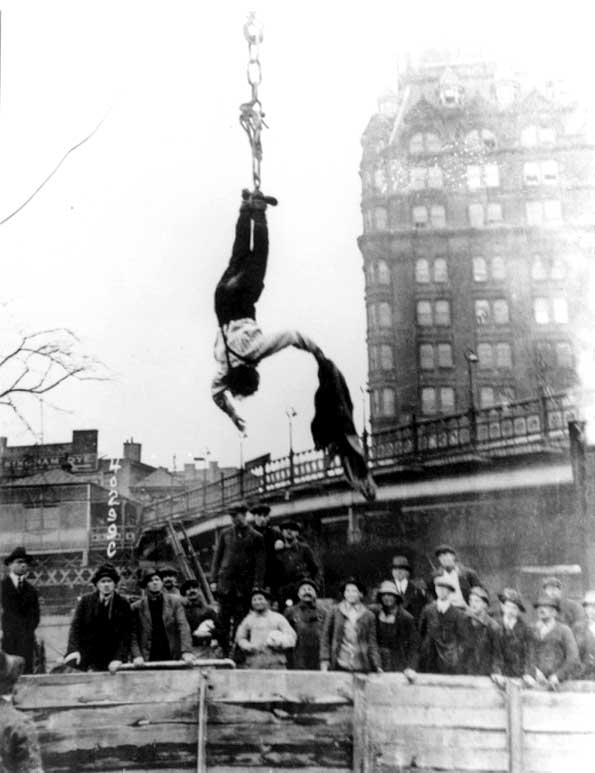
Houdini would escape from a straight jacket while hanging as much as 400 feet off the ground.

To remove the jacket, he had to dislocate one of his shoulders.

When rivals copied some of these tricks, he introduced elements of greater danger. For example he combined his box escapes and his river jumps. He climbed into a heavy pine box so small he had to bring his knees into his chest to fit. He was then handcuffed and shackled and the box was nailed shut, wrapped in ropes and chains, weighted with 200 lbs of metal and tossed into New York City’s East Harbor. Houdini escaped in less than a minute-with the box intact and the ropes and chains still in place.

He then brought the specter of a drowning death to the indoor stage, first with the milk can escape and then with the water torture cell.

Harry Houdini

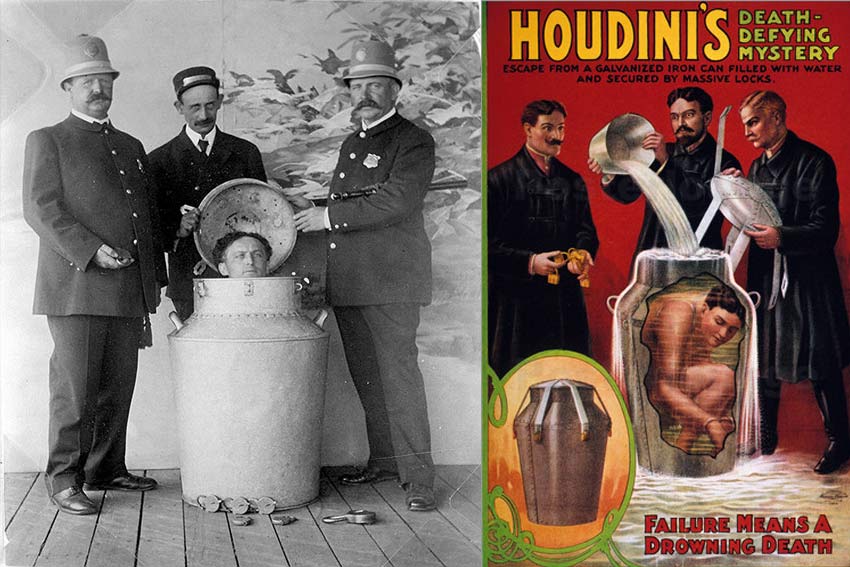
To build suspense for his milk can trick, Houdini would have the audience hold their breath for as long as they could. After a minute or so, all would have given up. He would then climb into the can, which was filled with buckets of water, the lid was locked on top with 6 padlocks, a cabinet was drawn around the can and a giant timer began ticking down the seconds. Houdini’s assistant would pace nervously with an axe, waiting to smash open the can if Houdini did not emerge. Around the 3 minute mark, with the audience nearly overcome with anxiety, Houdini would step dripping wet from the cabinet to thundering applause.

Harry Houdini

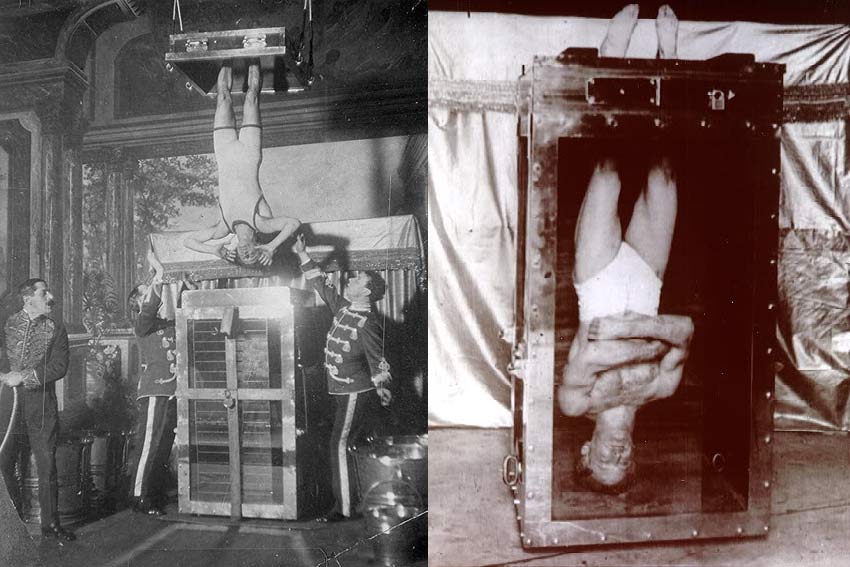
In the water torture cell trick, Houdini’s feet were locked into the stock and he was lowered upside down into a water filled tank, which was then padlocked shut. He emerged in 2 minutes, the tank still filled with water and the top still locked in place.

“The water torture cell was constructed by myself…It took two full years. Another year was required to give me sufficient courage to attempt same. And can you blame me? Imagine yourself jammed head foremost in a cell filled with water, with your hands and feet unable to move and your shoulders tightly lodged in this imprisonment…I believe it is the climax of all my studies and labors. Never will I be able to construct anything that will be more dangerous or difficult for me to do. Having flown a biplane and taught myself to become an expert aviator, I am in a position to state that flying is child’s play in comparison.”

Harry Houdini
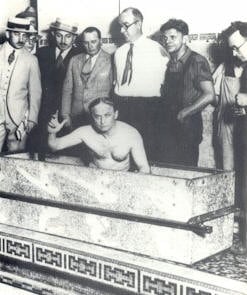
Houdini didn’t slow down as he got older. At age 52, he had himself sealed in an airtight coffin which was then submerged underwater.

He rested there for an hour and a half in 100 degree temperature. All to debunk a rival who performed a “buried alive” trick under the claim that a man could only survive in such a state for 3 minutes and that it was necessary to enter into a mysterious cataleptic state in order to last longer.

It was just a matter of endurance and training, Houdini showed. Houdini also had himself buried under 6 feet of dirt and clawed his way out.

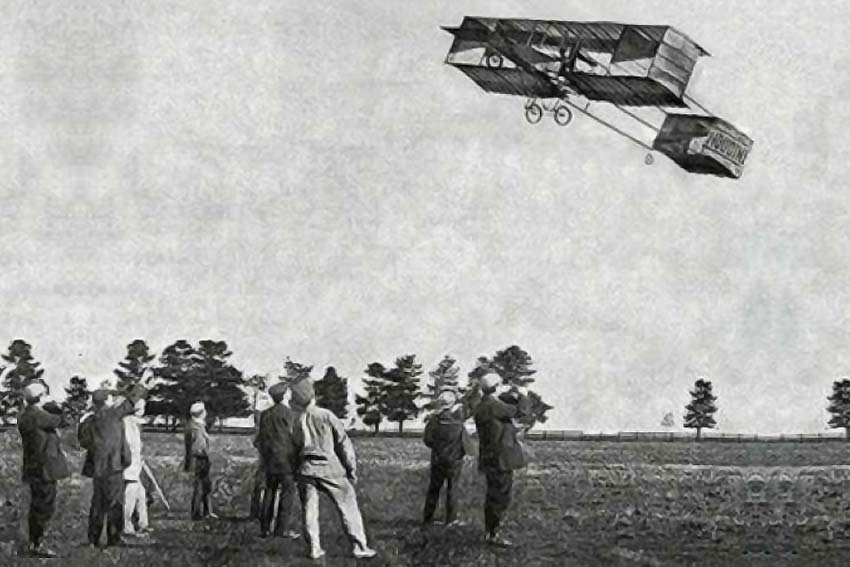
This was no trick: Houdini had a keen interest in flying and became one of the world’s first pilots, even setting a flight record in Australia.

Harry Houdini

Practice, courage, discipline, strength, the hunger for greatness– these were the keys to Houdini’s success. It came down to will, as it does for all of us. How badly do you to become the man you want to be? Are you willing to pay the price?

“I want to be first. I vehemently want to be first. First in my profession…For that I give all the thought, all the power, that is in me. To stand at the head of my rank: it is all I ask…so I have struggled and fought. I have done and abstained; I have tortured my body and risked my life, only for that–to have one plank on the stage where they must fall back and cry ‘Master!’….I am strong, as you see; strong in flesh, but my will has been stronger than my flesh. I have struggled with iron and steel, with locks and chains; I have burned, drowned and frozen till my body has become almost insensible to pain; I have done things which rightly I could not do, because I said to myself, ‘You must;’ and now I am old at 36. A man is only a man and the flesh revenges itself. Yet the will is its master when the will is strong enough. Do you think that these religious martyrs-the willing martyrs-those in India, say-who torture themselves by driving hooks through their flesh and swinging suspended-do you think they suffer pain? I say ‘No; they do not.’ I have proved it in myself. To think vehemently of a thing, of the feat, that conquers the pain-some kinds of pain. If the thought is intense enough, the pain goes-for a time. Sometimes the task before me is very hard. Not every night, but sometimes. I must fling myself down and writhe; I must strive with every piece of force I possess; I bruise and batter myself against the floor, the walls; I strain and sob and exhaust myself and begin again and exhaust myself again; but do I feel pain? Never. How can I feel pain? There is no place for it. All my mind is filled with a single thought-to get free! Get free! And the intoxication of that freedom, that success is sublime.” -Harry Houdini

Sources and Further Reading

The Secret Life of Houdini by William Kalush and Larry Sloman

Houdini: Master of Illusion by Clinton Cox

In addition to being a magician, escape artist, pilot, actor and spiritualism debunker, Houdini also penned many books and magazine and journal articles (and this was really the role he was most proud of). He wrote about magic of course, but also on revealing the tricks of criminals and debunking false mediums and superstition generally. His books are available free online from the Library of Congress and Google books.

Editor-in-Chief’s Note: This post was written by Brett and Kate McKay of The Art of Manliness. The Art of Manliness is a fantastic Website dedicated to uncovering the lost art of being a man. It features articles on helping men be better husbands, better fathers and better men. Check them out and be sure to subscribe!

Posted in Mindset | Tagged , , , , , , , , , , , , , , , | 1 Comment

Enter to Win 300 Rounds of Terminal Shock 9mm from DRT Ammo! *UPDATE!*

DRT Ammo 9mm

Update: The contest is over. Congrats to David L. on winning 300 rounds of DRT Ammo and thanks to everyone who entered!

Bryan recently attended a hog hunt organized by Dynamic Research Technologies to get a hands-on look at what makes their ammo so effective. While not out hunting, DRT shot a few different rounds into ballistic gel to illustrate what the permanent wound cavity would look like. It was very impressive to see such a wide distribution inside of the ballistic gelatin. DRT Ammunition has kindly offered to ship out 300 rounds of their lead free, penetrating frangible 9mm ammo to one lucky ITS reader.

Here’s what DRT has to say about their Terminal Shock Ammunition:

Reliability. In both function and performance, 9mm 85 grain DRT ammo will function in all 9mm weapons reliably and is the staple of the DRT line of projectiles and ammunition. Very light felt recoil and standard pressures allow the shooter to have faster follow up shots as well as better accuracy. You simply don’t need heavier bullets to inflict catastrophic damage to the target when 100% of the energy is absorbed by that target. In tests, the DRT 85 grain 9mm bullet penetrates semi-hard barriers like sheetrock, plywood, car doors, bone and most glass, then still performing well passing through clothing and into the gelatin test block. Utilizing a Hollow Point Flat Based (HPFB) design, the bullet is engineered to delay its expansion 1-2 inches before the jacket begins to peel back exposing the core. Penetration is 11-12” in ballistic gelatin with a wound cavity is typically 3” in diameter with complete fragmentation of the core.

What’s Included In The Prize Pack?

  • 15 boxes of 20 count 9mm 85 grain Terminal Shock ammo (300 rounds total)

According to DRT Ammunition, they can only ship within the United States, excluding Alaska, Beverly Hills (CA), Marin County (CA), Sacramento (CA), San Francisco (CA), Oakland (CA), Los Angeles (CA), Chicago (IL), Massachusetts, New York City (NY) and Washington (DC). Winner must be at least 21 years old.

a Rafflecopter giveaway

Click here if contest widget doesn’t load.

As you can see, you have multiple ways to enter this contest and we’ve also enabled the “Refer a Friend” feature for a chance to gain up to 10 more entries. It’s probably a good idea to tell the friend you’re referring that you’ll split the winnings but that’s up to you.

Here’s how it works: After one of your entry options has been completed, a box will appear that will provide a unique URL that you can share with your friends. For each friend that enters the giveaway, you will receive +1 entry into the giveaway. This is good for up to 10 people.

Good luck!

Fine Print:

  • One winner will be selected at random and will receive one prize pack with the contents listed above.
  • Winner must be at least 21 years old.
  • According to DRT Ammunition, they can only ship within the United States, excluding Alaska, Beverly Hills (CA), Marin County (CA), Sacramento (CA), San Francisco (CA), Oakland (CA), Los Angeles (CA), Chicago (IL), Massachusetts, New York City (NY) and Washington (DC).
  • Winner will be notified by email. Once contacted, they have 24 hours to claim their prize. If we do not receive a response from them within 24 hours, we will select a new winner.
  • Contest ends at 11:59 PM CST on 2/26/14

DRT Ammo 9mm

Posted in ITS Information | Tagged , , , , , , | 14 Comments