ITS Tactical will be gone this upcoming week for vacation and training, but we’ve still got a full week of great articles, photos, videos and awesomeness lined up for you! Support will be minimal this week and we’ll get back to everyone upon returning Monday the 20th.
Our online store will remain open for orders, but shipping will be delayed until the 20th as well. If you’ve placed an order up until the time this article posts (Saturday 10 a.m. Central Time) your order will ship today at the latest. New memberships will still be automatically processed, but Forum access for new Crew Leaders will also be delayed.
Lately I’ve been going on Ruck Runs to build myself up for the GORUCK Challenges I’ll be doing in Oklahoma and Dallas this year, followed by the GORUCK Ascent in September with Mike.
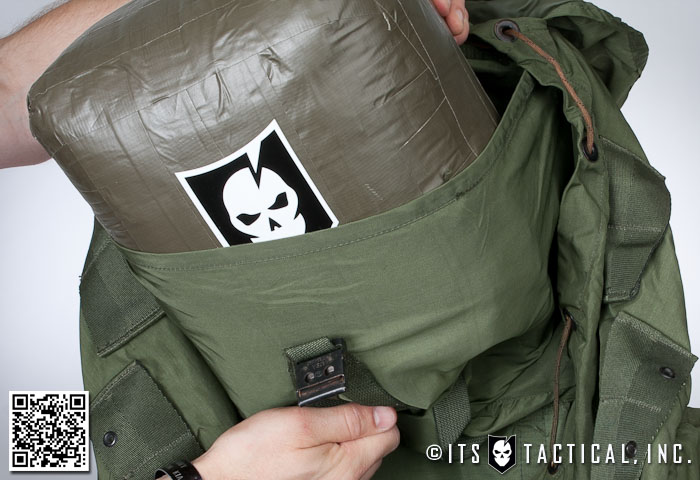
While I haven’t done many Ruck Runs since leaving the Navy, I still use the construction techniques I was taught at BUD/s to make different weighted “pills” to run with in my pack/ruck.
Pills you say? Yep, that was how we used to refer to the taped up sandbags we’d run with during Second Phase in BUD/s. Primarily because the taped sandbags resemble pills and there’s the whole “take your pills” chant that you’d tell yourself when it was time to go for the Ruck Runs.
Ruck Running
At BUD/s your class inevitably winds up getting a nice “fresh” instructor to lead the Ruck Runs for all the fatigued students and they always suck. I did find they became more tolerable the more we did and the fact they were on sand definitely helps your knees. Soft Sand Running is worse than hard packed, but they’re both better than tearing up your knees on concrete.
I mention this as a warning to those that are out there training with a weighted pack. The added weight will put more stress on your knees, legs, ligaments, tendons, etc.; you should try to stick to grass/dirt whenever possible. When I run distance with weight, it’s been through residential areas and I try to stick to grassy medians or dirt if it’s around.
How to Make a Pill
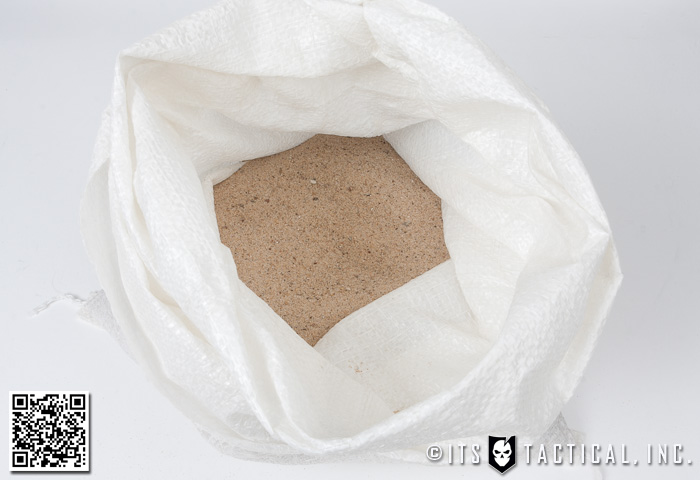
It’s a fairly simple process, but I’ve made a video of the process below nonetheless. All you need is a bag of Play Sand, commonly available in 50 lb. bags at your local hardware store, a sandbag, 100 mph tape or Duct Tape and a scale. Sandbags can also be found at your local hardware store too, but can be tricky to find.
The construction is just having a buddy hold a sandbag while you dump in the amount of sand necessary (more on that below) and fold over the sandbag. Next, tape it all up because sand does leak from sandbags and over time half of it will wind up in the bottom of your ruck or pack. Once taped your essentially done, unless you want to accessorize your pill with an ITS sticker!
Why Run with Weight?
There’s a couple of schools of thought on this and the one that I subscribe to is what I’ve talked about before in the article titled “Can you Physically Save Yourself?” I want to know that there’s nothing my body isn’t capable of and if that’s running with weight on my back, then so be it. I want to be prepared and continue to challenge myself.
Can you damage your knees by running with weight? You bet, regular running technically “damages” your knees too. You can save yourself from more weight-bearing injuries if you follow a few simple tips. First, get a ruck or pack with an upper compartment like the radio pocket in US Issue Alice Packs. The radio pocket is what we used to put our pills into at BUD/s, as it’s perfect to help keep the weight high up on your shoulders. Keeping the weight high is the second tip, it will allow for the most even distribution across your body when running.
You also want to watch the weight you run with and just like running you don’t want to increase more than 10% in distance per week. This also applies to the weight; don’t increase the weight you’re running with more than 10% a week. In Mike’s write-up on his GORUCK Challenge, he mentioned that his pack weighed about 16 lbs. which is why I made a 15 lb. pill to train with. In Second Phase our BUD/s Ruck Runs would always be with a 35 lb. pill stuffed in the radio pockets our Alice Packs. A buddy of mine in the Teams let me know that 1st Phase is now integrating Ruck Runs with 35 lb. pills too.
Here’s some additional tips for proper form from Navy SEAL and Endurance Athlete David Goggins:
How about Ruck Marches and not Runs?
If you’re not comfortable running with weight, there’s also tremendous cardiovascular benefit with Ruck Marches, or simply a fast paced walk with a weighted ruck/pack. Essentially this is like backpacking too.
Begin with 20% of your bodyweight. Stay with that weight for 2-3 weeks. Accomplish 2-3 ruck marches a week on days you are not running. The set distance is 5 miles. Every three weeks increase your weight but maintain your distance of five miles. Just like running you have to build one quality at a time. You can’t run fast AND far at the same time. You get your distance down first, then you work on speed. In rucking, you get your weight bearing capacity down first for a set distance, then increase the distance, then the speed if necessary. If you push yourself properly (fast enough so talking is possible but a bit labored) you should have the speed you need at the end.
Progression is as follows:
Week 1-3: 20% bodyweight x5 miles
Week 4-6: 25% x5 miles
Week 7-9: 30% x5 miles
Week 10-12: 40% x5 miles (do not exceed 40% of BW, for me at 175lbs this is 70lbs)
Week 13-14: 40% x6 miles
Week 15-16: 40% x7 miles
Week 17-18: 40% x8 miles
Week 19-20: 40% x10 miles
Week 21-22: 40% x12 miles
Week 23-24: 40% x15 miles
Tips:
Use a large ALICE pack, smartwool expedition socks, and Danner Acadia boots or the old basic training boots and take care of your feet!
Notice that this is 6 months of training but it should be a solid injury free six months with plenty of time for your nervous system, bones, ligaments, tendons, and muscles to adapt properly.
Do Kettlebell work on days you do not ruck and calisthenics on the days you do ruck.
Swim 1-2 times a week and pay close attention to your sleep and recovery.
Notes
Hopefully this article has given you a little exposure to running and marching with weight and the benefits behind it. You’ll also be amazed at the difference after running with weight and running afterwards without any weight. This can also help your regular running, much the same way weighted pullups can help train your regular pullups.
Please do your own research before running with weight and do what feels right for you. There’s definitely a certain amount of suck you have to endure running with weight, but be smart about it and don’t try to push through your body giving you warning signs. Oh, and of course the old disclaimer applies… consult your doctor before beginning. I really hate that disclaimer!
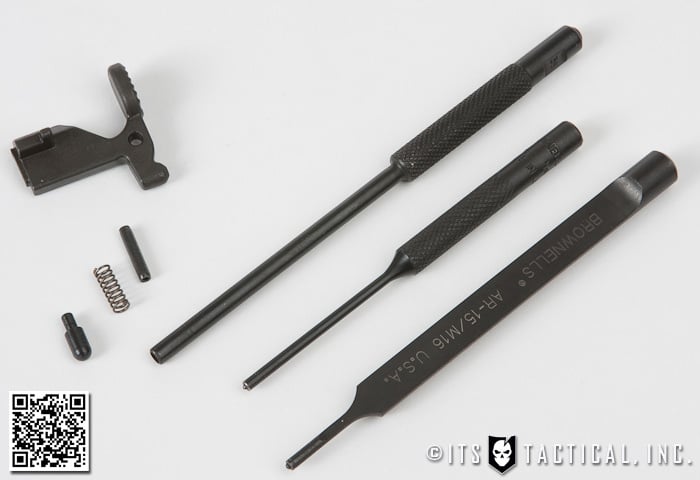
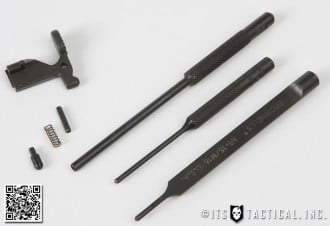
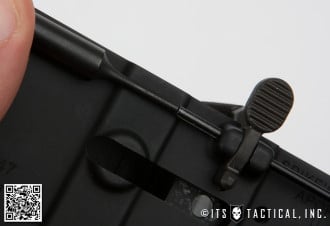
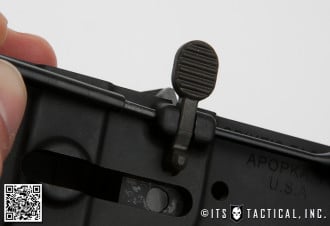
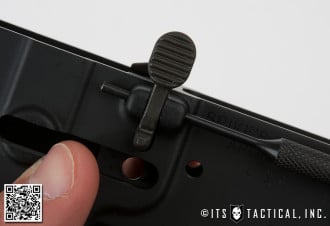
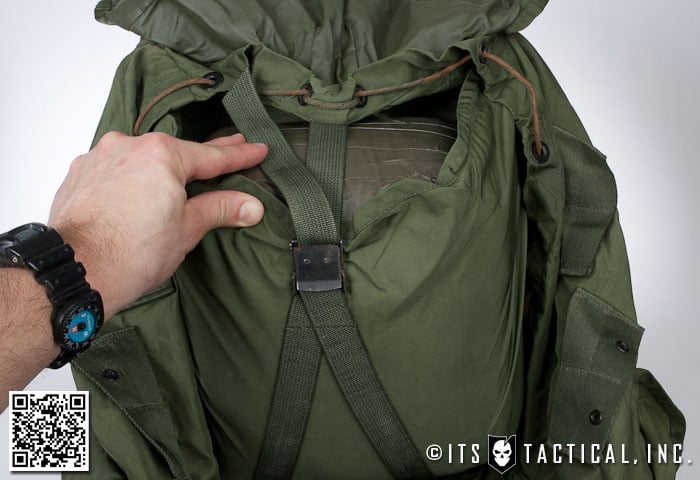
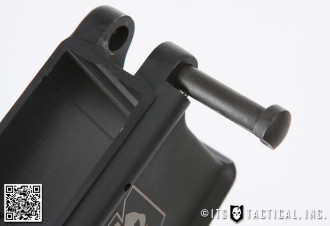
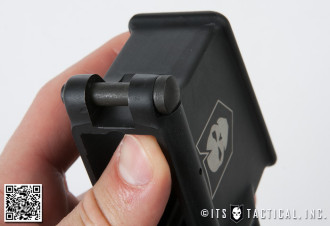
Today in part four of our DIY AR-15 Build you’ll learn how to install the Pivot Pin on your Lower Receiver and hopefully take our recommendations on board for a happier stress-free build!
This can either be one of the most complicated steps in assembling a lower receiver, or a relatively easy one. It just depends on your tool selection.
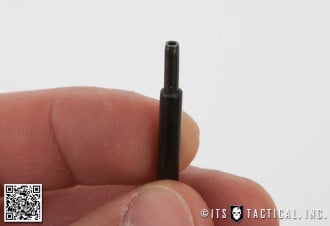
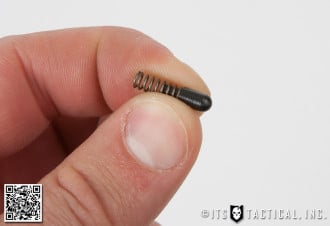
When inserting the detent that holds in the Pivot Pin, it’s quite common for it to turn into a Pegasus Missile and shoot across the room along with the spring that’s under tension. In this article we’ll describe a good method to utilize and mention a tool that will help avoid detent missiles!
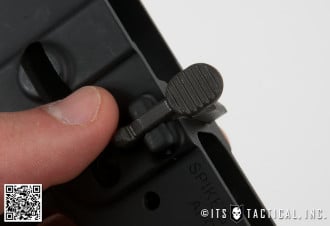
Pivot Pin Installation
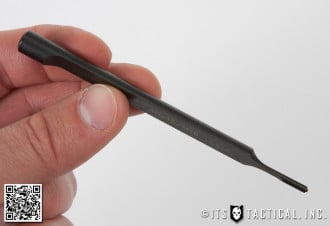
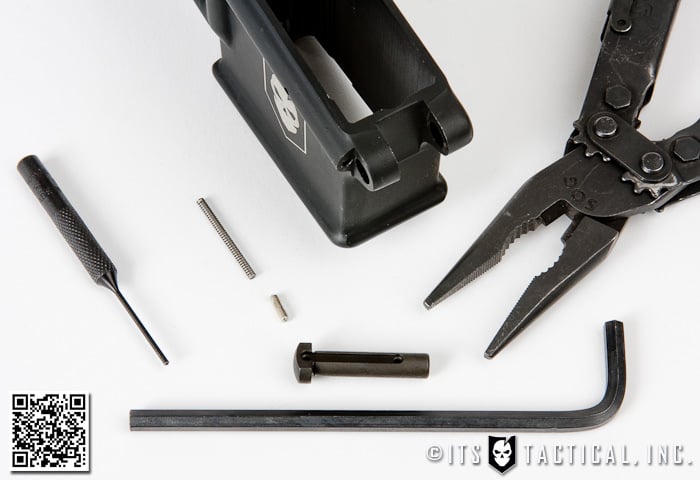
One of the reasons we like the Stag Arms Lower Parts Kit is that it comes with one extra detent in case yours takes off into the atmosphere during this assembly. As mentioned this step can be fairly simple depending on tool selection. You can get away with what we use in the video below, which is needle nose pliers, a hex wrench and a small punch.
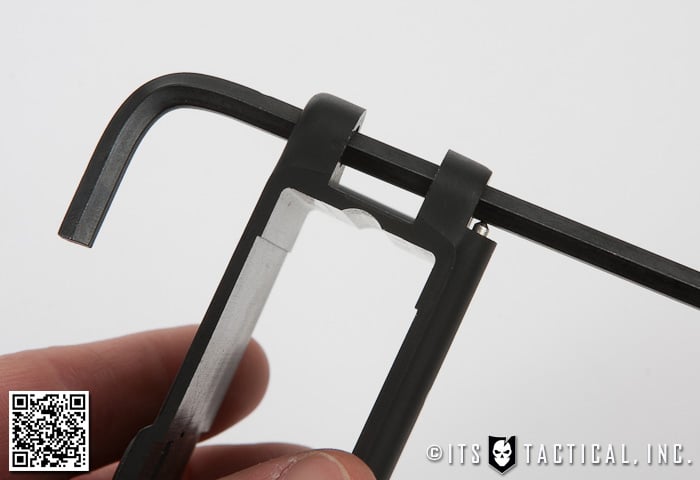
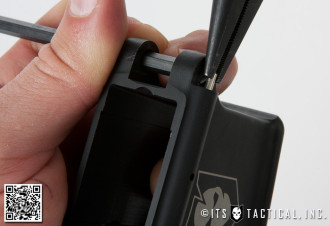
If you want to avoid frustration, we highly recommend the Brownells Pivot Pin Installation Tool, which is a cylinder that fits into the Pivot Pin ears and has a small cutout for the detent. You simply insert the spring, slide in the tool, put the detent into hole and push a small punch in and turn. This traps the pin without the Pegasus Missile effect. This will of course make more sense when we describe the installation in detail below.
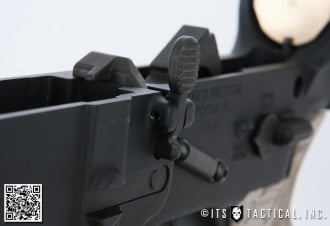
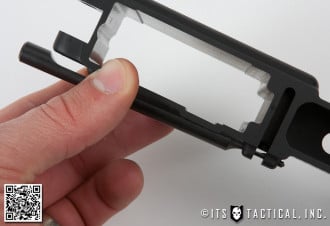
Put the lower on the vise block and tilt it towards you to so you can work easier.
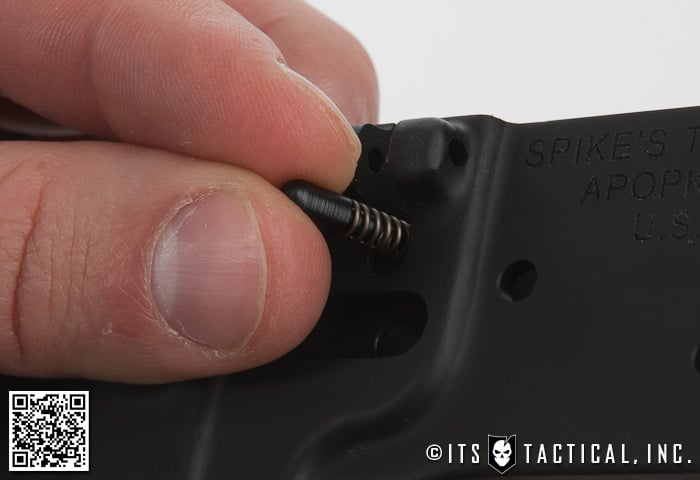
WARNING: The Pivot Pin Spring and Detent can launch out during this section and if you lose them you’d better have good eyes or you’ll be ordering replacements!
Insert the 3/16 Hex Wrench from the port side flush with the outer starboard side pivot pin ear.
Insert the Detent Spring into the Detent Spring channel in the lower.
Using the needle nose pliers, grasp the detent and push it onto the spring. Once it inserts into the channel, take a small punch and hold it there.
Carefully slide the punch away as you maneuver the Hex Key over the spring and detent, capturing them.
With the flat cut section of the Pivot Pin facing aft, slide it over as you back the hex key out.
You’ll now be able to test the Pivot Pin’s functionality by ensuring it’s capturing the detent as it moves back and forth.
ITS Tactical Logo Lower Receiver
Don’t forget about our exclusive offer to our Plank Owners and Crew Leaders to get a ITS Tactical Logo Lower Receiver from Spike’s Tactical for $99! Click here for more info! Offer ends June 10th!
Join us back here soon for our 5th installment in the DIY AR-15 Build where we’ll be assembling the Trigger Group!
For all those that have been anxiously requesting another batch of our Prevail Morale Patches be made available, we’ve listened! They’re now in production and will be shipping out to you less than two weeks!
To purchase a patch to help support America’s Mighty Warriors click here and commemorate the operation on 5/1/11 that took SEAL Team VI deep into Pakistan, eradicating Osama Bin Laden!
My good friend Jack is holding a contest over at The Survival Podcast and has partnered with Ready Made Resources to give away an AR7 Survival Rifle!
I personally have never had any trigger time on these rifles, but the modularity and compactness truly intrigues me. Head on over to TSP to get in on the giveaway!
June 10th is the cutoff date for Plank Owners and Crew Leaders to sign up to purchase a members-only laser engraved ITS Tactical Stripped Lower Receiver!
We’ve already had plenty of people roger up for one of these and they’re definitely getting made, so if you were considering one, now is the time to sign up!
Here’s a few of the common questions we’ve been getting and the answers. Continue reading →
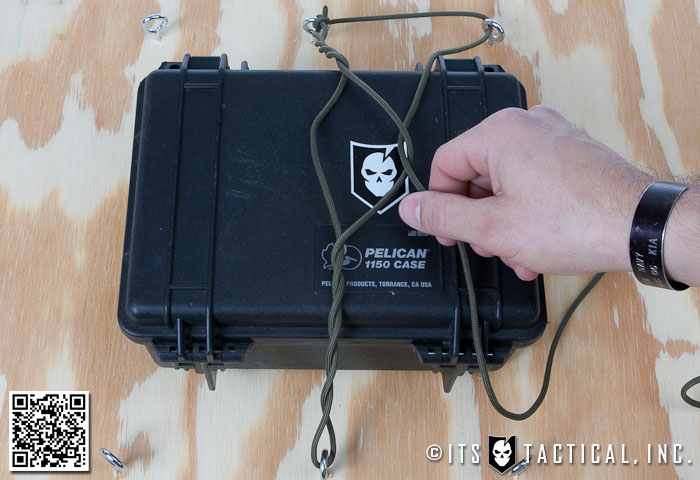
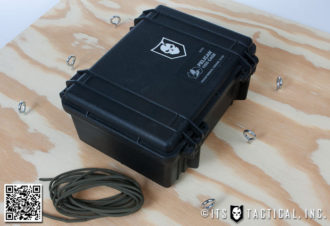
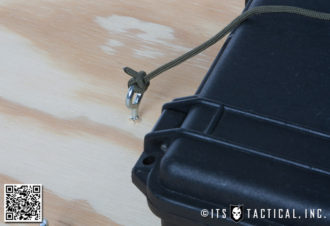
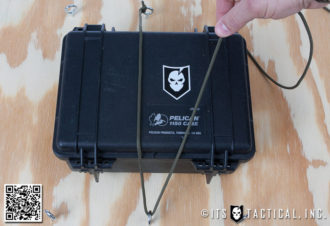
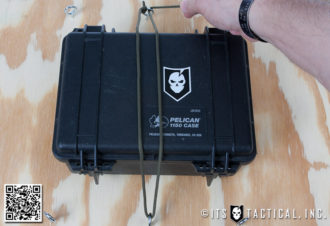
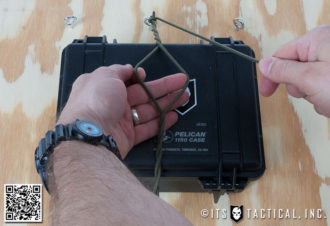
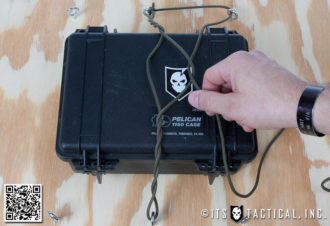
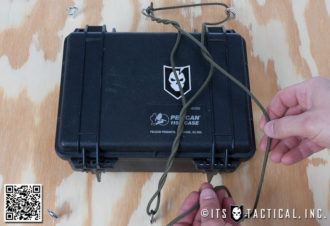
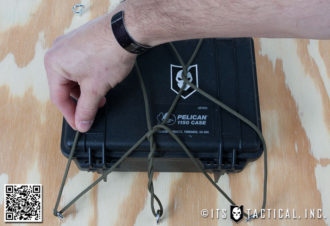
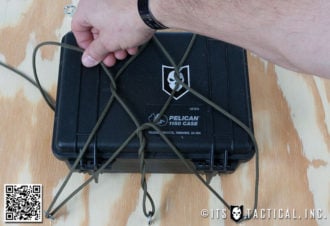
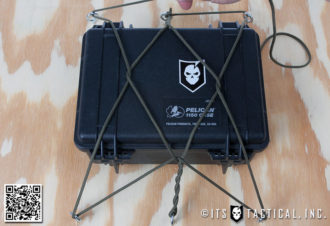
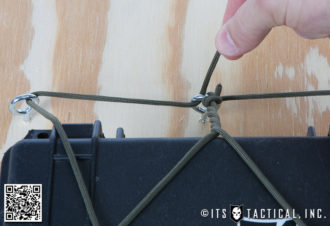
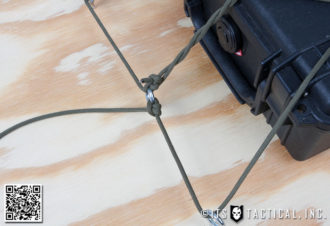
In our latest installment of the Knot of the Week, we’ll teach you how to tie the Diamond Hitch and explain what benefits it offers over traditional methods of securing a load.
What’s truly versatile about the Diamond Hitch is that once tied, it creates a diamond pattern in the center which not only is where its namesake comes from, but is what gives it the ability to compensate for the load shifting.
Whether being used to secure a load to a roof rack, truck bed or even a pack animal, the Diamond Hitch is definitely one to put into your knot tying toolbox.
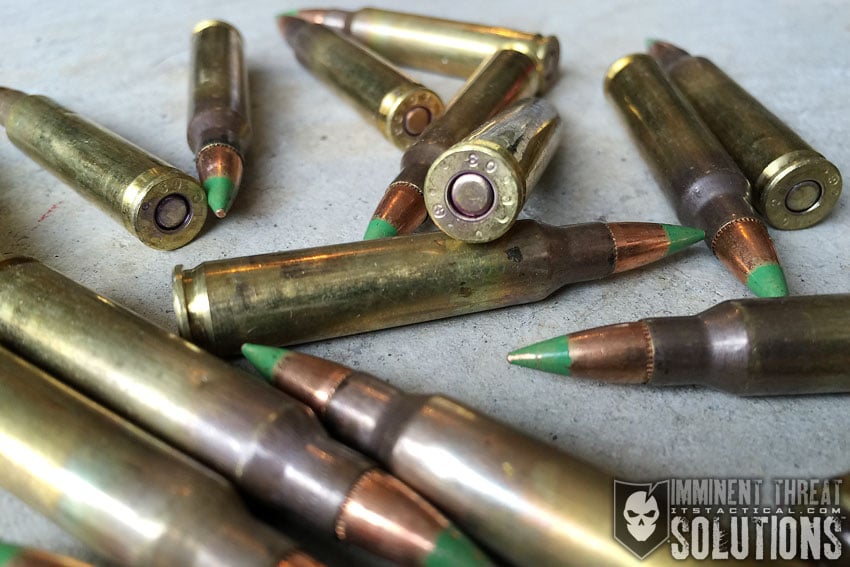
Over the weekend I attended the final hours of my NRA RSO (Range Safety Officer), Rifle and Shotgun Instructors training. While I won’t get into the NRA’s embargo on the word “weapon,” or that a few instructors freaked out when I carried a firearm with the muzzle pointed at the ground, I did learn something from our readers on Facebook I’d like to share with everyone about M855 ammunition.
Throughout my time in the Military, I’d always referred to M855/SS109 5.56 Ammunition (Green Tip) as armor piercing rounds or AP. For the life of me I can’t recall where I first heard that mentioned, but it was fairly common for it to be referred to as that.
One of the final taskers for the NRA courses was to construct a training aid and you’ll see a photo below of what I put together.
Armor Piercing?
As you’ll see, I have the green tip marked “AP Tip,” which is how I explained my training aid to the class as well. (If you’re wondering, it was made from a cardboard tube, floral foam, paint and a little creative thinking).
After a few people pointed out that M855 isn’t AP in the Facebook comments of the photo I posted, I started doing some digging. It turns out that sure enough, M855 was removed from the ATF’s list of AP rounds. I haven’t been able to track down when this change took place, but I thought it was important to share to all those that have considered M855 to be AP rounds like I did.
While having a Steel Penetrator Tip, this doesn’t constitute M855/SS109 as “Armor Piercing.” The round was designed for increased penetration at longer ranges to combat SAW (Squad Automatic Weapon) issues though.
Things may or may not be clearer once you read how the Federal Government defines AP ammunition in 18 USC sec. 921(a)(17).
Definition
(17)(A) The term “ammunition” means ammunition or cartridge cases, primers, bullets, or propellent powder designed for use in any firearm.
(B) The term “armor piercing ammunition” means –
(i) a projectile or projectile core which may be used in a handgun and which is constructed entirely (excluding the presence of traces of other substances) from one or a combination of tungsten alloys, steel, iron, brass, bronze, beryllium copper, or depleted uranium; or
(ii) a full jacketed projectile larger than .22 caliber designed and intended for use in a handgun and whose jacket has a weight of more than 25 percent of the total weight of the projectile.
(C) The term “armor piercing ammunition” does not include shotgun shot required by Federal or State environmental or game regulations for hunting purposes, a frangible projectile designed for target shooting, a projectile which the Attorney General finds is primarily intended to be used for sporting purposes, or any other projectile or projectile core which the Attorney General finds is intended to be used for industrial purposes, including a charge used in an oil and gas well perforating device.
What does all that mean?
A few things to take note of is that the classification as “armor piercing” is for bullets only, not the complete cartridge. Despite the mention of handgun caliber above, you can take that to mean that it’s a round that has been made as a handgun caliber at some point.
The bullet (projectile) must also have a core made entirely out of the metals listed above, or be a full jacketed bullet with a jacket weighing more than 25% of its overall weight. This means that the SS109/M855 bullets wouldn’t be covered, as their cores are partly steel, and partly lead. Lead isn’t listed in the metals above. Furthermore, as you’ll see in the list below, the ATF has specifically stated that the SS109/M855 bullets are exempted from AP status.
ATF AP Classified Rounds
All KTW, ARCANE, and THV ammo
Czech made 9mm Para. with steel core
German made 9mm Para. with steel core
MSC .25 ACP with brass bullet
BLACK STEEL armor and metal piercing ammunition
7.62mm NATO AP and SLAP
PMC ULTRAMAG with brass bullet (not copper)
OMNISHOCK .38 Special with steel core
7.62×39 ammo with steel core bullets
ATF Exempted Rounds
5.56 SS109 and M855 NATO rounds, with steel penetrator tip.
.30-06 M2 AP ammo
Hopefully that clears up some confusion for you like it did for me. You can rest easy that when a range calls for no AP rounds that you’ll be safe using M855 if desired. If you’re in the market for ammo, be sure to check out our sponsor Lucky Gunner for great online ammo prices!
Earlier this year we noticed a more pronounced female audience for all things tactical. As we’ve looked deeper into what’s out there for ITS gals, we’ve been pleasantly surprised. Not only are more women becoming hunting and outdoor sporting enthusiasts, but more women are interested in protecting themselves with a firearm.
As I’ve been looking for content to contribute to ITS I’ve found that one of the recurring questions in my mind is “what can I do to become better prepared for handling myself in a defensive situation?” More specifically, “could I help protect my family if we were the victims of a home invasion, or could I assist with stopping a criminal if I witnessed a crime being committed?” My answer so far is simply “I don’t know…” Continue reading →
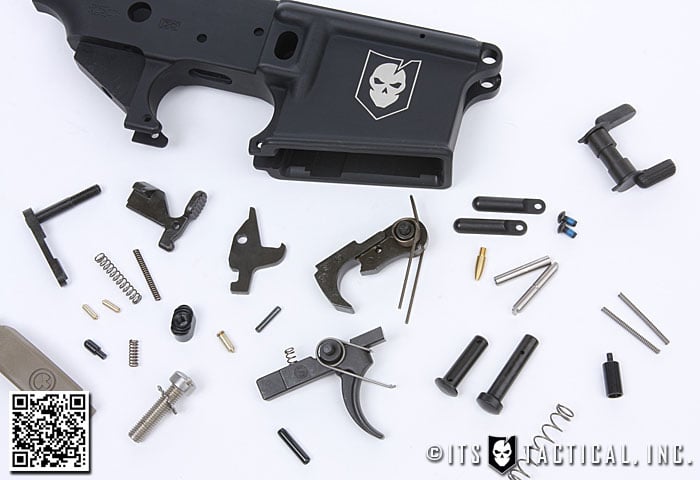
Today in part three of our DIY AR-15 Build you’ll learn how to install the Bolt Catch on your Lower Receiver.
This step is particularly important to get right, as damaging the roll pin or lower could cause you to have to purchase a new lower parts kit or even a lower in extreme situations. We don’t mention this to scare anyone, just to reinstate the need to use the right tools for the job.
The function of the bolt catch is to stop the bolt’s travel when pushed upward by the follower of an empty magazine. This enables the bolt to be locked to the rear after expending a magazine so that a new one can be inserted and the bolt catch slammed home to re-engage your target.
Lessons Learned
Something you really want to consider at this point and honestly before this point, is to buy quality when it comes to a Lower Parts Kit. We’ve been recommending the Stag Arms Lower Parts Kit for a good reason. They’ve been used in multiple builds here at ITS with no hiccups from parts quality or failure.
Editor-in-Chief’s Note: To add in a personal experience note here, I personally had an issue where my bolt was refusing to lock to the rear on an empty magazine. After careful and lengthy analysis of the problem, we started comparing the bolt catch to other rifles we had on hand and realized the upper lip of this particular sub-par bolt catch was shaped differently than the others. Replacing it fixed the issue of the bolt locking to the rear, as the added height of the new catch was all that was needed to get the AR back up and running correctly.
If you’re concerned about the finish on your lower, you might want to put some masking tape around the area of the Bolt Catch so that you don’t scratch the surface when driving in the Bolt Catch Roll Pin.
Place the Lower Receiver onto the vise block that’s been secured to your vise. (not like Bryan forgets to do in the video!)
Assemble Bolt Catch Spring and Plunger and place into the left side of the receiver just above where you installed the Magazine Catch.
Place the Bolt Catch between the roll pin ears and insert the #3 Roll Pin Punch from right to left through the hole in the bolt catch to hold it in place.
The direction the Roll Pin Punch is inserted is important, as you’ll be tapping in the roll pin from the opposite direction.
Drive in the Bolt Catch Roll Pin using the #3 Roll Pin Holder just slightly and not all the way through the left roll pin ear.
Finish driving the Roll Pin with the Brownell’s Bolt Catch Roll Pin Punch until flush on both sides of the bolt catch roll pin ears. (This punch is nice because it contours to the lower and avoids additional marring and potential bending of the Bolt Catch Roll Pin)
Test the Bolt Catch by pulling it slightly in the opposite direction and ensure that the spring is functioning correctly.
ITS Tactical Logo Lower Receiver
Don’t forget about our exclusive offer to our Plank Owners and Crew Leaders to get a ITS Tactical Logo Lower Receiver from Spike’s Tactical for $99! Click here for more info!
Join us back here for our 4th part in the DIY AR-15 Build where we’ll be assembling the Pivot Pin and getting into the common “flying detent” that you’ll run into.


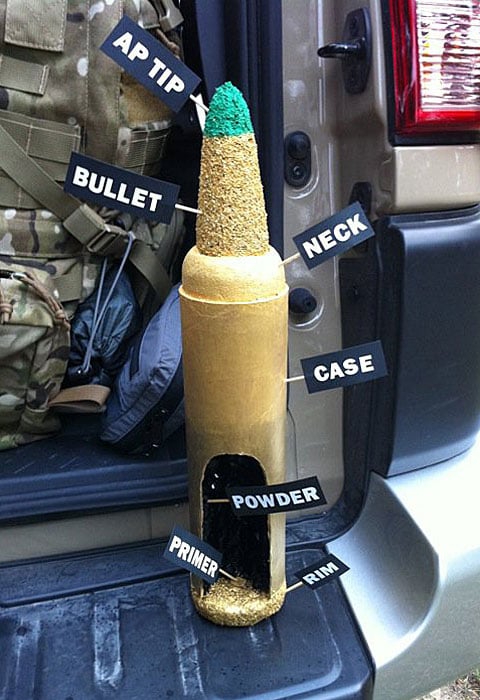 As you’ll see, I have the green tip marked “AP Tip,” which is how I explained my training aid to the class as well. (If you’re wondering, it was made from a cardboard tube, floral foam, paint and a little creative thinking).