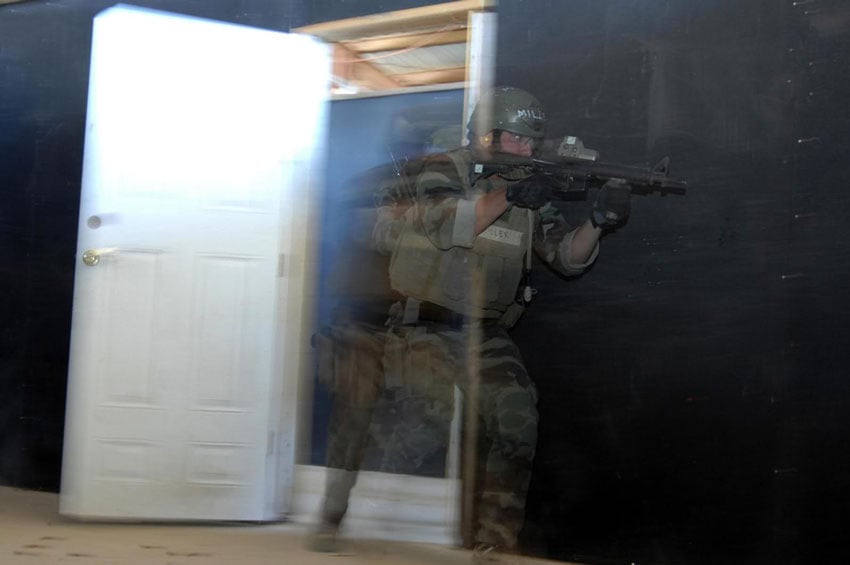
ITS Tactical Koozies to Keep your Favorite Beverages Cool this Summer!

Need a Koozie that will strike fear into the hearts of your enemies? Look no further than the ITS Tactical Koozie; sure to keep your favorite beverages cool this summer and help you PREVAIL!

They’re brand new to the ITS Tactical Store starting today and feature our screenprinted circular logo on one side and our flag logo design on the opposite. Available in collapsible-style tactical black for your next outing!

Order your ITS Tactical Koozie Here!

[flickrset id=”72157626912355401″ thumbnail=”thumbnail” photos=”” overlay=”true” size=”medium”]

Posted in ITS Information | Tagged , | 5 Comments

Boot Sock Showdown: SmartWool, Darn Tough Vermont and 5.11

Over the last eight months I’ve been in and out of three different pairs of socks; SmartWool Heavy Crew Trecking, Darn Tough Vermont Boot Socks and 5.11 Level 1 Socks.

I’ve got both positives and negatives for each pair of socks represented here, but first let’s talk socks in general and why you should care about quality.

Protecting your feet is nothing to take lightly and the right pair of socks makes all the difference. You depend on your feet to not only support your body and whatever weight is attached to it, but to also get you to where you need to be. Continue reading

Posted in Footwear | Tagged , , , , , , , , , , , | 38 Comments

Threat Identification in Low Light Shootings

Two Louisiana police officers were called murderers after they killed a young, unarmed man one night by repeatedly shooting him in the back.   The officers claimed the man was armed, but no gun was ever found.

In the aftermath, the police chief was fired, the officers were dragged through the legal system and the community lost faith in the police force.

What went wrong? Continue reading

Posted in Mindset | Tagged , , , , , , | 29 Comments

ALITE Monarch Backpacking Chair: Burrito Sized for Your Next Outdoor Adventure

ALITE Monarch Backpacking Chair

A Burrito Sized Backpacking Chair that weighs just over a pound? Yep, you read that right. It’s not exactly a Taco Bell Burrito I’m talking about, but more a San Diego Burrito. If you’ve ever had one than you’ll know exactly what I’m talking about. I think they weight about the same too!

In the neverending quest to find a small, lightweight backpacking chair I’ve purchased quite a few different options over the years.

I’ll talk about why the ALITE Designs Monarch Chair trumps all those that I’ve come across and why it should be on your next packing list!

ALITE Monarch Backpacking Chair

ALITE Monarch Backpacking Chair

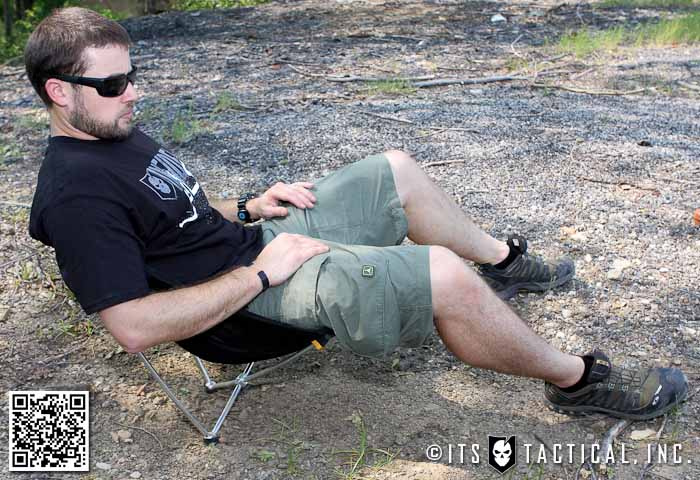
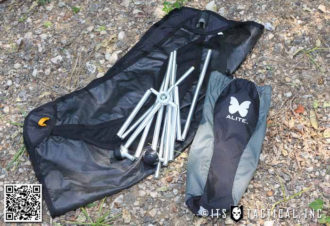
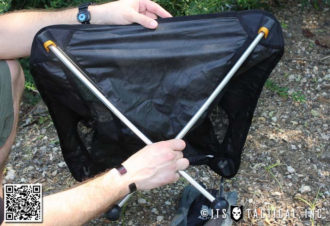
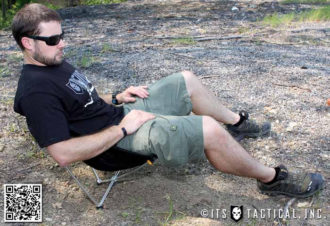
Weighing hardly more than a packaged MRE, the 1.4 lb. ALITE Monarch Chair provides a comfortable way to rest after a long hike on the trail.

While not specifically marketed as a backpacking chair, it’s hard to deny that anything as small and lightweight couldn’t be what you’d be looking for in a backpacking chair. Doing away with the slip cover for the chair will even bring the weight down to 1.3 lbs.

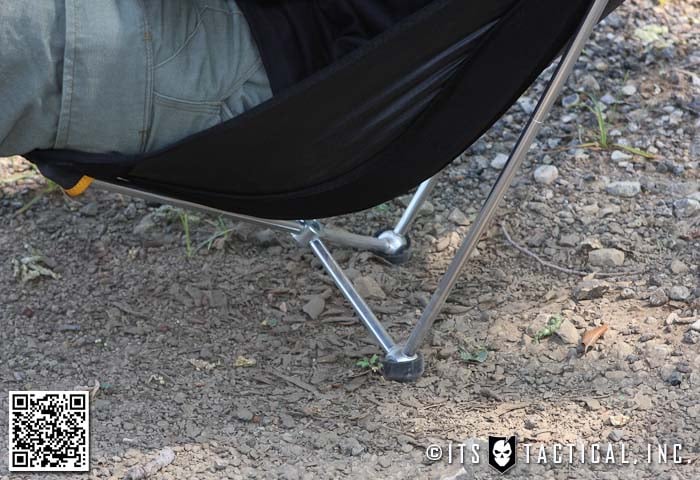
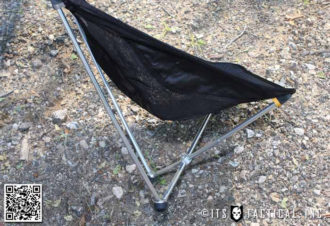
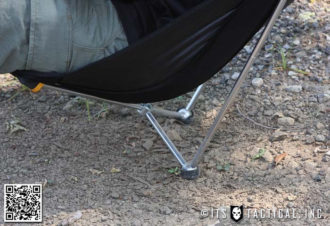
I first saw the ALITE Chair at REI and immediately wanted to try it out. After sitting in the demo unit they had there I was sold. I’ve been now using the chair off and on for the better part of 6 months with nothing but great things to say about its construction and durability. I had my doubts about the dependability of the heavy duty rubber feet that the chair pivots on, but I’m happy to report they’ve held up nicely.

ALITE Monarch Backpacking Chair

I was worried that on uneven surfaces or rocks that they’d fall off or become damaged, but neither has occurred. ALITE Designs is not a company I would have considered had I seen their other products before I came across this chair, but there’s no denying this is a fantastic backpacking chair that’s well made.

With other products like the “Sexy Hotness Sleeping Bag” made for “making love in the woods” they’re not exactly marketing this product to the readers of this Website, but the Monarch Chair is definitely something to keep on your radar.

Other Backpacking Chairs

ALITE Monarch Backpacking Chair

I’ve tried other “folding chairs” and found they either weighed too much for backpacking or had no back support whatsoever. There’s also the designs that act as a slip cover for your ground pad, but those aren’t very comfortable and I’ve actually broken one of those before while leaning back. They force you to sit fairly flat on the ground and you’re also on the ground, compared to off of it with the Monarch Chair.

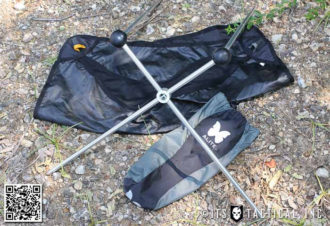
With the Monarch, the rubber feet act as two of the four points needed to balance the chair with your feet providing the other two. I’ve found this to be annoying at times when I want to be off my feet, but you can simply throw a bulky item or backpack under your butt to take some of the weight off your feet and stabilize the chair. It’s not a perfect system, but it does work if that’s an issue for you.

I know this isn’t the be all end all of backpacking chairs, but it’s definitely the best I’ve come across yet.

Construction and Details

ALITE Monarch Backpacking Chair

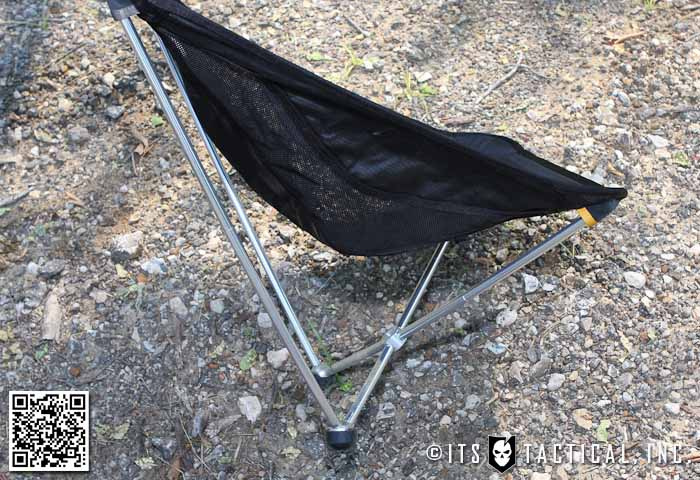
  • Super light, high-strength 7075 Aluminum tent pole structure with user-replaceable shock cord.
  • 210D nylon ripstop fabric with mesh side panels
  • Assembled Dimensions: 23″H x 21.5″W x 17″D
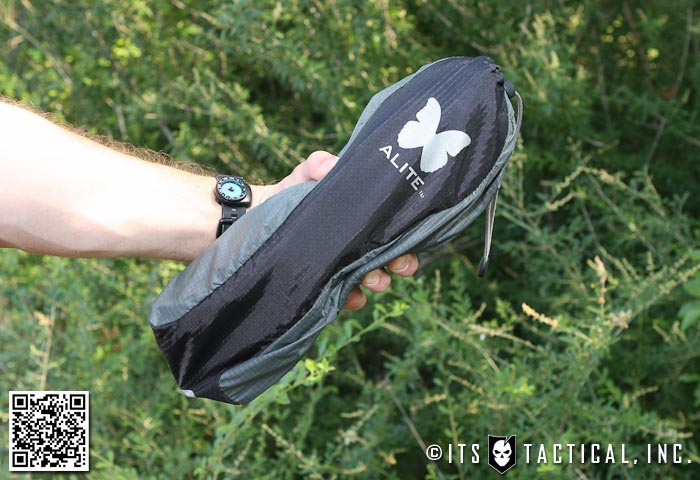
  • Packed Dimensions: 4.5″ x 13″
  • Weight w/ Stuff Sack: 1.4 lbs.
  • Weight w/o Stuff Sack: 1.3 lbs.
  • Stuff Sack features non-stretch drawstring and daisy chain attachment loops
  • Non-Skid Rubber Feet
  • Holds up to 250 lbs.
  • Made in the Philippines

Assembly

ALITE Monarch Backpacking Chair

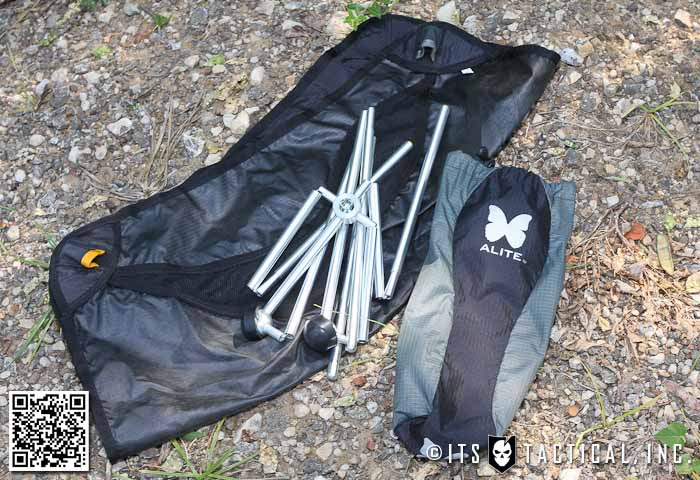
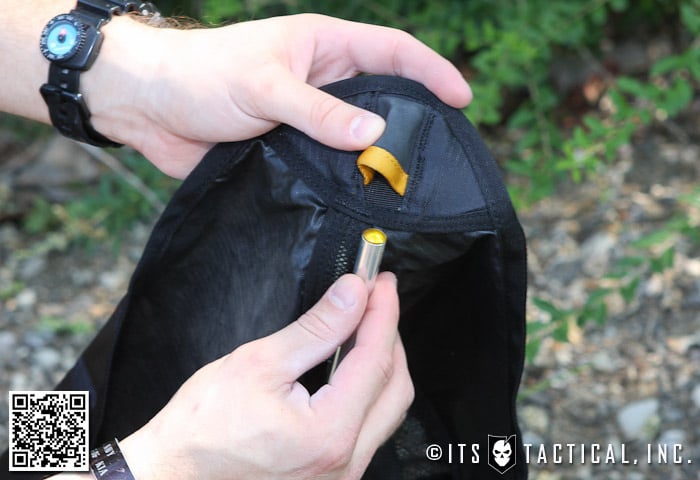
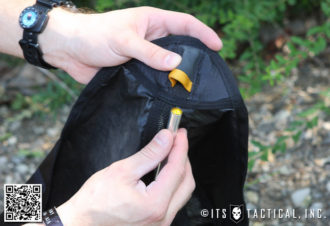
The ALITE Monarch Chair is a breeze to assemble, disassemble and repack. To assemble the chair, just pull the rolled chair cover out of the stuff sack and remove the folded pole. A quick shake will even assemble most of the pole and the other sections snap together quite easily. Simply insert the gold tipped ends into the corresponding gold colored points on the chair cover and the others into the grey colored points.

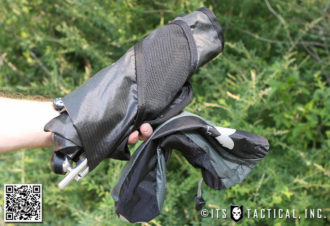
To disassemble, pull the tips out of the attachment points and quickly break down the pole. The chair cover gets folded in half and wrapped around the pole and placed in the stuff sack.

Video and Photos

Here’s a quick video review that shows the chair in use and the assembly and disassembly.

What backpacking/camping chairs have you used? How do you feel they would compare to the ALITE Monarch Chair?

Posted in Load Bearing | Tagged , , , , , | 13 Comments

DIY AR-15 Build: Trigger Group Installation

5 of 8 in the series DIY AR-15 Build

Today in part five of our DIY AR-15 Build you’ll learn how to install the Trigger Group in your Lower Receiver.

The trigger group is definitely something not to skimp on in terms of quality. We’ve never experienced any issues with the recommended Stag Arms Lower Parts Kit and feel confident recommending it’s components.

A failure point on the AR platform that can render your firearm unusable, is having a Hammer or Trigger Pin walk out on you. Literally.

We’ll show you how to prevent this problem as well as provide you step-by-step instructions for installing the Trigger Group.

Trigger Group Installation

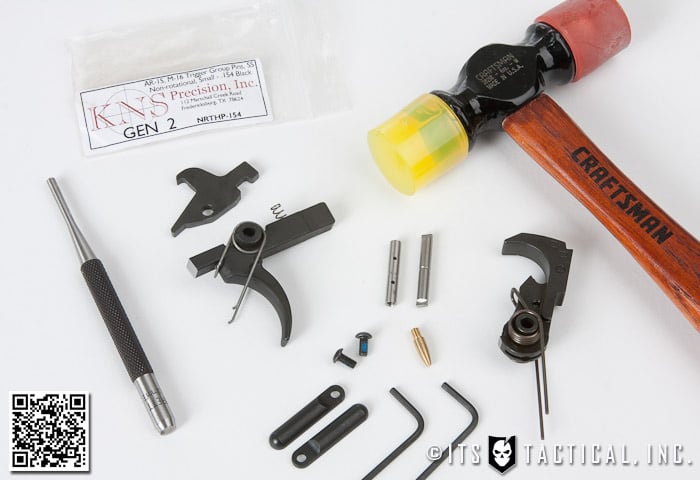
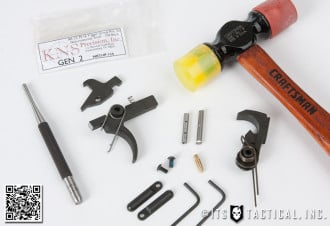
As mentioned, always use quality parts when building your Trigger Group, like the components found in the Stag Arms Lower Parts Kit. We’d also strongly recommend using a KNS Non-Rotational Roll Pin Set. The last thing you want is to lose a Hammer or Trigger Pin at an inopportune time. Namely anytime…

Replacing a Hammer/Trigger pin is certainly not a standard field repair, even though we recommend carrying extra Hammer/Trigger springs in your spare parts kit. The time it will take you to replace a pin under stress is really a no-go. You can offset this likelihood of Trigger Group problems by installing a KNS Pin Set.

DIY AR-15 Build: Trigger Group Installation

There’s a few different kinds of KNS Pin Sets, so get the one that you feel will work best for you and will fit your AR. There’s two different styles and two different sizes, we’ve linked to the standard set above.

Provided the covers stay on from the KNS Pin Set, that mostly leaves your springs to contend with if you have Trigger Group trouble in the field. Not that you want to be plagued by that issue either, but the point of using good parts is to offset the infamous Mr. Murphy. The KNS Hex bolts of set also come pre-dipped in blue Loctite to help ensure they don’t back out. Witness marks help too.

Parts Needed:

DIY AR-15 Build: Trigger Group Installation

Tools Needed:

Assembly Instructions

DIY AR-15 Build: Trigger Group Installation

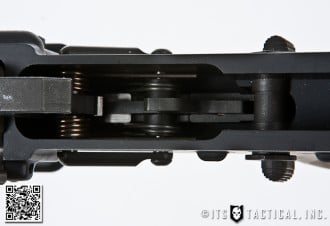
  • Place the lower onto the Lower Receiver Vise Block and angle it so you can see down into the lower.
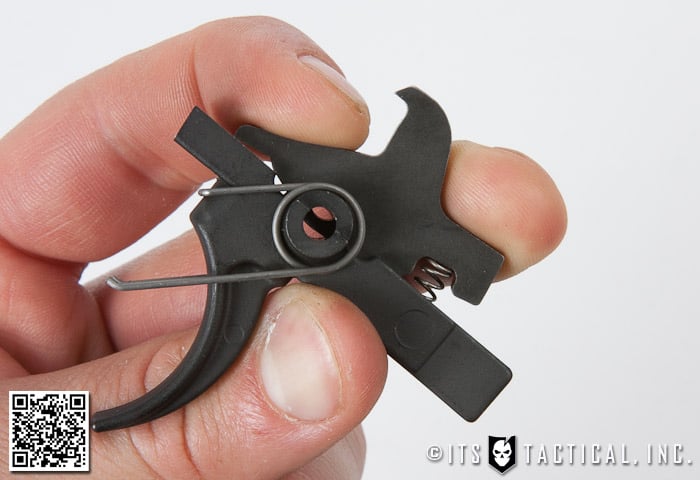
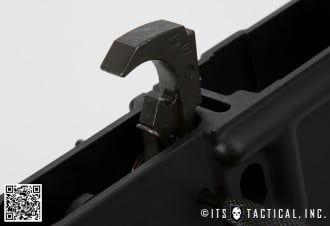
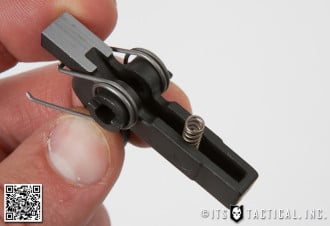
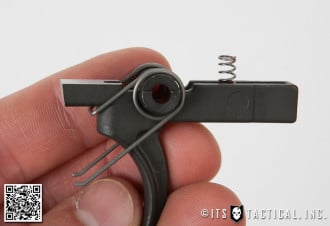
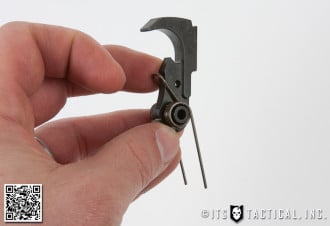
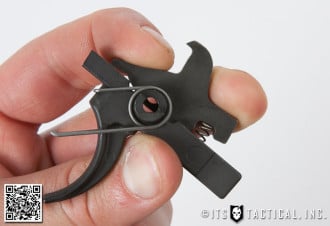
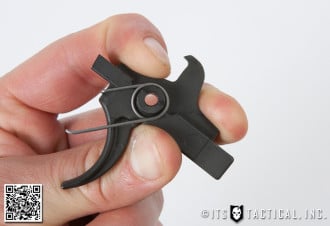
  • If you’re using the Stag Arms Lower Parts Kit we’ve recommended, the Trigger, Disconnector Spring and Hammer Spring already come installed. If yours aren’t pre-attached, please refer to our photos notating the position of these springs. It’s important to note on the Disconnector Spring, that it gets inserted with the flared side down.
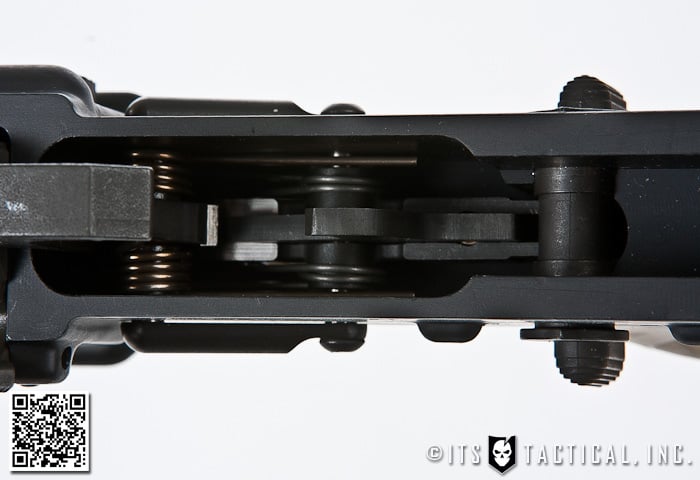
  • Drop the Trigger, with proper springs attached, down into the trigger cutout of the Lower Receiver. Ensure the spring legs rest on top of the Lower Receiver interior and don’t get caught in the cutout for the trigger.
  • Place the Disconnector in it’s proper orientation on top of the trigger and ensure the Disconnector cutout is placed over the Disconnector Spring.
  • Insert the 1/8″ punch through the Trigger Pin hole in the Lower Receiver, passing through the Disconnector as well. This will lock the Trigger and Disconnector in place.
  • Using the KNS Non-Rotating Hammer/Trigger Pin Set, select the internally threaded Trigger Pin and attach the pointed tool to push out the 1/8″ punch and push in the new KNS Trigger Pin.
  • With the Trigger installed, Place the Hammer Spring legs across the top of the Trigger Pin and bend the Hammer into place, securing it with an 1/8″ punch or #4 Roll Pin Punch.
  • As with the Trigger Pin, push the punch out while simultaneously pushing the Hammer Pin in.
  • Install the Pin Connector Covers over the flared ends of the Hammer Pin and align the threaded holes over the Trigger Pin.
  • Finger tighten the Blue Locktite dipped screws and insert both included hex wrenches, turning each in opposite directions to tighten.
  • A suggestion at this point is to place a witness mark on each screw to give yourself a visual indicator if these screws move.

Join us back here soon for our 6th installment in the DIY AR-15 Build where we’ll be assembling the Safety Selector and Pistol Grip!

Posted in Firearms | Tagged , , , , , , , , , , , , , | 5 Comments

Create a Dragline or Secure a Climber with the Artilleryman’s Loop

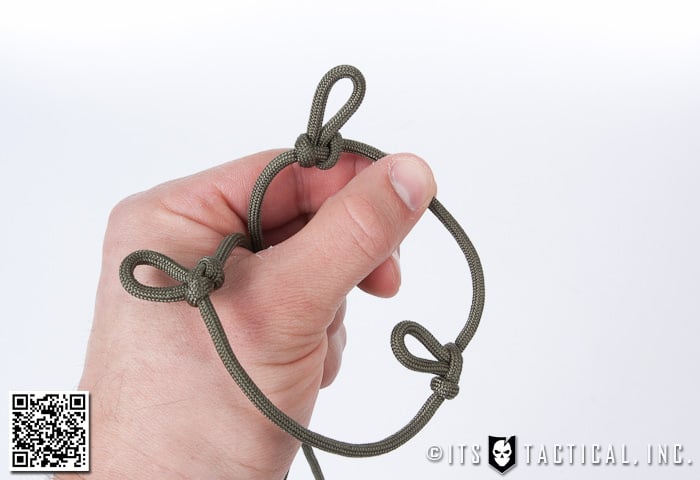
Artilleryman's Loop

Our newest Knot of the Week features an intermediary step in what we’ll be showing you next week, which is a method requested in the comments of our last KOTW to use four points to secure a load

While the intent is to show this knot used in that, The Artilleryman’s Loop is a quick method for tying a loop on a bight. Tying this loop on a bight requires your line to be free of tension, as tension would make it difficult to pull the slack needed for tying this.

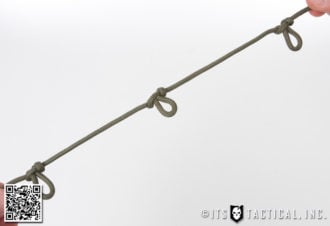
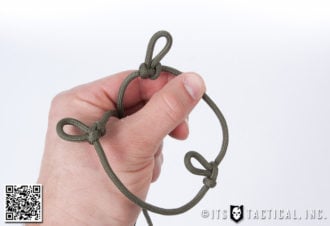
The Artilleryman’s Loop can be used for creating a tie-in point on a line or dragline, securing a third climber on a line or simply making a quick drop loop for attachments or adding tension to a lashing.

Artilleryman’s Loop » Loops

(Strength: 3/Secure: 5/Stability: 4/Difficulty: 2)

Please refer to our Knot of the Week introduction post for a description of what these ratings mean.

Uses:

  • Quick tie-in point on a line or dragline
  • Secure a third climber in a string
  • Trunk line or tether line attachment point
  • Adding tension to a lashing

Tying Instructions:

Artilleryman's Loop

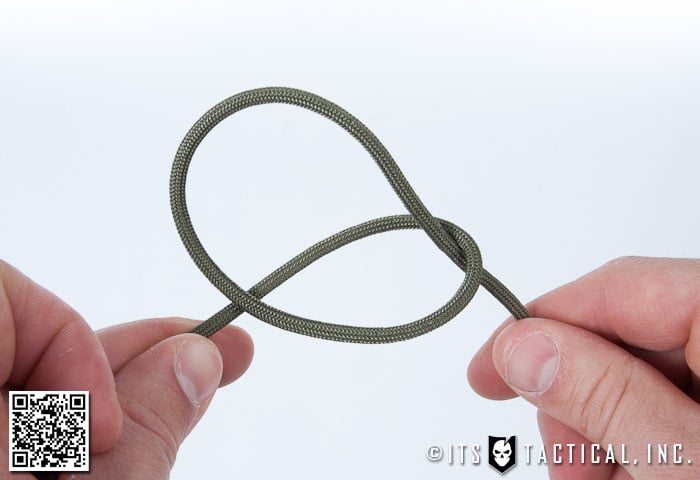
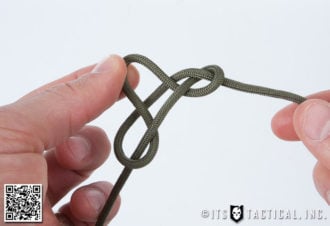
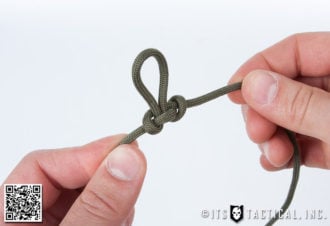
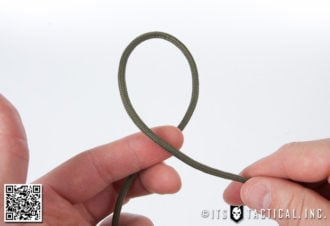
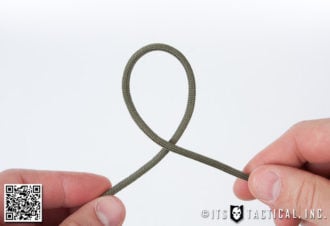
  1. Create an overhand loop in a bight in your line.
  2. Flip the overhand loop on top on top of the standing part of the line.
  3. Take the lower section of the overhand loop around the back and through the original overhand loop.
  4. Pull on the created loop and the standing parts to tighten.

Video and Photos

Posted in Loops | Tagged , , , , , , | 9 Comments

What To Do with Old Ballistic Vest Panels? Here’s a Few Options

So what do you with your old ballistic vest panels? If you have been in law enforcement or other occupation where you get a new vest roughly every 5 years, you probably have a couple of sets sitting around.

A few years ago I figured there had to be a way to use the panels I’d accumulated, as mine were sitting in the closet collecting dust.

Around that time I came across a video and photos of a Schertz Texas Police cruiser that had taken a bunch of rounds to the front from a AK-47. The article showed forensics photos of the trajectory the rounds took and had the officer been in the front seat he would have been killed.

While attempting to defeat rifle rounds would only be accomplished by an armored vehicle, it doesn’t take much to send pistol rounds through the windshield, windows and doors. I came up with a simple solution that got my vest panels out of the closet and into my cruiser. We’ll also talk about other ways you could use this concept in the civilian world. The photos presented here are older, but the concept remains the same and I still carry this system with me today.

About “old” Vests

Let’s talk about “used” vest panels before we go any further. What were talking about here are your vest panels that you have cared for, cleaned properly, and maintained like you’re life depended on it (because well, your life did depend on it). I’m not advocating running out to the nearest surplus store and buying panels out of a pile of Vietnam web gear. If that is the route you want to go because you don’t have your own panels then you do so at your own risk.

Body Armor

Properly cared for ballistic panels will last for years if maintained correctly. I’ll give two examples: A few years ago one of our firearms instructors took his old issued vest (from the mid 80’s) to the range and it stopped everything it was rated against. Our training section also had an old vest they used during knife defense classes that they tried to sick a ice pick through. The old vest stopped it every time.

The Concept

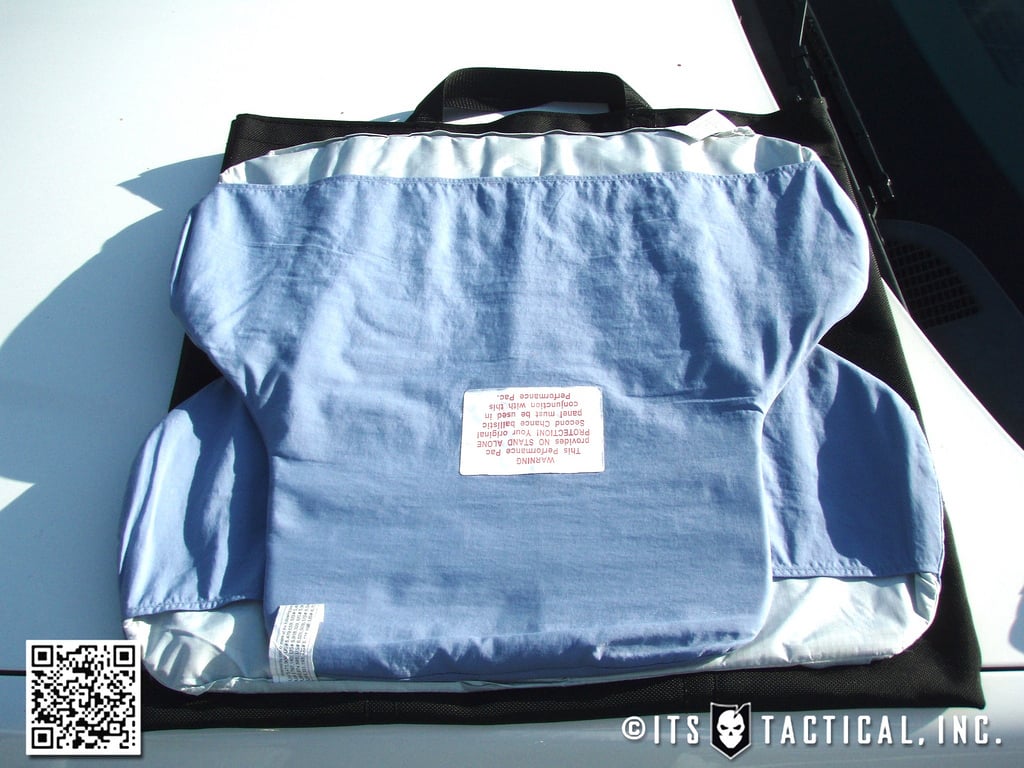
Body Armor UsesAll we’re doing is making a bag to hold the ballistic panels. That’s it. It doesn’t have to be fancy or made out of 10,000 Denier Cordura with quadruple stitching.

It should at the very least have handles to make it easy to carry and stitched well enough that it wont fall apart if you need to use it. As you can see in the photos of the bag I have, there isn’t much to it.

This bag was made by a local Sailmaker. I took my ballistic panels in and gave them a basic idea of what I wanted done.

I lucked out as they did a fantastic job with a heavy Cordura type material and heavy stitching. I had two sets of handles made; one set for the top and one set to hold like a shield. The top is secured with heavy Velcro to keep it closed. As you can see in the photos I have both my panels in the bag. Two panels might be an overkill but in this case more might be better because having to deploy it means the crap has hit the fan.

Uses

Body Armor UsesThis idea is pretty simple and can be used in multiple ways. From throwing it up on the dashboard, holding it against a door, or tossing it to someone pinned down. I keep mine on the passenger seat in my cruiser or take it with me when doing surveillance.

You could keep it at the office or classroom (if you’re a teacher). During the Virginia Tech shooting, students and teachers attempted to hold the doors shut with their bodies.

Cho shot through the doors because he knew victims were behind them. If I were to design one for a school setting I would have two separate panels that folded out to give you extra height protection; in effect, a soft shield.

Body Armor UsesThere is no reason you couldn’t apply those same ideas at home. Also look at the news footage of the recent tornadoes. You could use this as added protection against flying debris for you or your family while your in your safe room. Think outside the box.

Make one with adjustable handles and you could hang it behind the seat of your cruiser for extra protection. Yes, officers miss guns on prisoners and yes prisoners can slip their cuffs to the front.

You could also keep it in your TFDV (tactical family deployment vehicle) to help protect your family if the need ever arises. Everyone else has a swagger wagon right? Looking at the recent article on SSG Peoples who confronted the bank robber in Sarasota Florida, he surely could have used something like this.

Bad things tend to happen quickly and without warning. You may not have time to deploy this concept in certain circumstances, but having something like this at your disposal could come in handy. It surely beats having your ballistic panels siting in your closet or garage doing nothing for you.

Please leave us your thoughts and feedback in the comments below. Stay safe out there!

[flickrset id=”72157626875777190″ thumbnail=”thumbnail” photos=”” overlay=”true” size=”medium”]

Posted in Body Armor, Driving | Tagged , , , , , , | 30 Comments

The Similarities and Differences of Civilian Competition and Combat Shooting

Training

Editor-in-Chief’s Note: Please join us in welcoming former Marine, Navy SEAL and DEVGRU Operator Craig Sawyer as a contributor on ITS Tactical.

The main parallels I see between combat shooting and competition shooting are that in each case, you need to be able to put your shots on a given target in a timely manner. Both disciplines can involve shooting, moving, reloading and problem solving.

Other than those similarities, the two scenarios are worlds apart. One of the main points to consider in combat shooting is that your life is in immediate jeopardy. Someone is trying to kill you. This is simply never the case in civilian competition shooting. In my mind, that’s far and away the largest factor to consider.

Shooting Stress

In a life and death fight, the stresses on the shooter can be extreme, depending on his background, level of training, mental prep and actual combat experience. One thing I’ve noticed about my own reactions to sudden, violent confrontation over the years is the lack of significant increase in heart rate. Looking back on my own experiences growing up as a fighter, I clearly remember getting a massive adrenaline rush and an elevated heart rate to the point that my fighting actually became less effective with the physiological symptoms that come with an extreme elevation in heart rate.

Over the years, with more and more exposure to violence, I found myself much more calm under these conditions and making much sharper decisions; fighting more effectively. The same dynamic applies to fighting with weapons as well. There’s no difference in physiological effect. A shooter who gets too amped is still likely to experience auditory exclusion, loss of dexterity, tunnel vision, repetitive tendencies and lack of mental clarity. All these things are detrimental in a modern firefight.

Because there is no sudden, inter-human violent confrontation, civilian competition shooting simply is unlikely to present such stress on the shooter. If the shooter experiences this level of stress shooting in a civilian sporting competition, I’d have serious concerns about his ability to perform to any degree, whatsoever, in a real life and death confrontation. Conversely, just because someone has performed well in combat, that doesn’t mean they will necessarily do well against experienced competition shooters in their environment. Someone who trains extensively for perfect conditions will absolutely become very good in those conditions. We all adapt to the stimulus we’re challenged with most often.

Combat Shooting

In combat, at least the Spec-Ops combat most of us are familiar with these days, the considerations of the shooter are many. The first glaring difference, after the fact that his life is in danger, is that it’s not all about him. He has specific responsibilities which are part of a coordinated effort. Let’s face it, in a Spec-Ops unit, we’re not worried about getting shot so much as we’re worried about failing to cover our sector or clear our zone, which would get one of our teammates, our brothers; shot. In a tactical unit, we are together when we can’t be alone. The effectiveness of our unit is far greater than the mere sum of its parts. In single-man civilian shooting competitions, there is no such consideration.

Another aspect of combat shooting is cover. The combat shooter must consider that he is a target and must make effective use of cover and concealment whenever possible. In such an environment, the shooter has to take into account how he is perceived by his opponent(s) as he moves through the fight. If a civilian shooter is not behind a flimsy plywood barricade, there is no harm. If a combat shooter fails to make effective use of actual cover from the specific weapon his opponent is firing at him, he can be injured, killed, or get others in his unit killed. This is a severe penalty that cannot be replicated in the sport of civilian competition.

I could go on and on with the differences, but those are the first that occur to me. I could easily add the fact that many combat engagements throughout history have been at close-in distance to face-to-face proximity, resulting in hand-to-hand fighting to some degree. It isn’t for the feint of heart. The use of grenades, booby traps, IED’s, the many aspects of mastering various forms of comms, night vision gear, lasers, illuminators, the various methods of fire support, insertion, extraction platforms, working with the dogs, intel assets, emergency medical/trauma procedures, the heavy gear necessary to pull all this off, the physical training necessary to be an effective member of such a fighting force and many more considerations all play a part in the overall scheme of a modern day combat scenario. So in many cases, the shooting might very well be the LEAST of the considerations a combat “shooter” must weigh out at any one moment in time.

Tools of the Trade

The last point I’ll make is on the tools of the trade. Civilian shooters love their tricked out 1911 race guns, which work so smoothly on the range when perfectly clean and lubed, with just the right ammo. I’ve owned and shot some nice ones. Impressive, to say the least. So smooth, they shoot “like buttuh!”

In combat, however, such a “princess” gun is a liability that cannot be tolerated. In my experiences with the Spec-Ops world and as an advanced tactical instructor, I’ve seen more malfunctions from other units’ fancy 1911’s than any other weapon, period. I’ve seen them fail in JSOC demonstrations to Congress. I’ve seen them fail on the ranges, with sights falling off, failures to feed, eject, etc.

Heck, I’ve even come back off SEAL missions with rounds spun backwards in my SIG magazine. Why? A little sand and salt bound up the magazine follower, preventing upward pressure on the rounds. Once the first couple rounds are fired, there’s no more pressure and the rounds can tumble front to back. NOT what you want when you reach for your backup in combat.

With a weapon that’s finely-tuned with very tight tolerances and geared for downloaded ammo, there just seems to be a far greater incidence of malfunction, especially with the introduction of any foreign material like a bit of sand, carbon, lack of lube, etc. This is unacceptable in a weapon that must be counted on for survival. In combat, the weapon MUST fire, period.

Accounting for Murphy

Murphy’s Law demands that when you need your sidearm, you’ll happen to be in a fight for your life that’s so pressing, your primary has already gone down or gone dry and there is no time to correct it. Now you’re down to your pistol.

Are you hit? Where? Your primary hand? Are you bloody now? How banged up are you? Helo crash? How many are coming for you? How close are they? How many of your teammates are hit? What is your position relative to your teammates? Do you need to continue to move to continue covering them as you press forward your assault? Do you need to sprint to get into position? Are you winded? Night vision focused, or splattered with anything? Are you covered in bile, spinal fluid, feces, dirt from blasts, hydraulic fluid, dust in your eyes, night blind by a blast you didn’t expect? Wearing a gas mask, sucking wind like a lung shot buffalo? Heart rate screaming? NOW shoot your civilian race gun with your bloody weak hand!

Make sure to get a perfect grip, because that grip safety won’t negotiate. Get it perfect, or it doesn’t shoot. Great thought, huh? Oh, and don’t forget to flip that lever with your numb and bloody weak hand before you shoot, or you’re DEAD! Oh, and keep that lever from flipping up while you’re fighting for your life, because if it does, you die! Don’t forget to change those single-stack mags twice as often with that one hand, because those thin single stacks don’t last but a couple seconds in a violent confrontation.

Wrap-up

I know, you’re cursing me for pointing out that the “Princess” guns are not as cool as we all thought, especially after forking out a few grand for a big name brand. Well, some of those are the ones I’m talking about. Whatever a combat shooter chooses, it should be, above all, simple and RELIABLE under adverse conditions. Why? Simple. Inter-human conflict is an inherently imperfect scenario. A flawed arrangement. Struggle is awkward, ugly, far from glamorous and rarely goes according to anyone’s perfect plan. A complicated and finicky sidearm is the last thing an operator needs to have to worry about when it’s all down to that. This is of course just my take.

I have quite a bit more to add about the positive aspects of competitive shooting, which are many. I can already say those points will include that it’s FUN and that it definitely improves your shooting. No doubt about it. I’ll post more on all that soon.

Rage on! ~SAW

Editor-in-Chief’s Note: Please join us in welcoming former Marine, Navy SEAL and DEVGRU Operator Craig Sawyer as a contributor on ITS Tactical. You can read Craig’s full and extensive biography on his Website tacticalinsider.com and catch him as an “expert” on this season’s Top Shot on the History Channel.

Posted in Firearms | Tagged , , , , , , , , | 35 Comments

DIY G-Shock Watch Negative Display Conversion

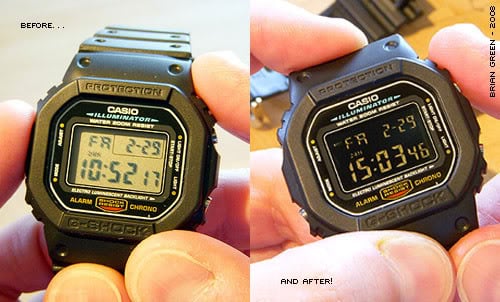
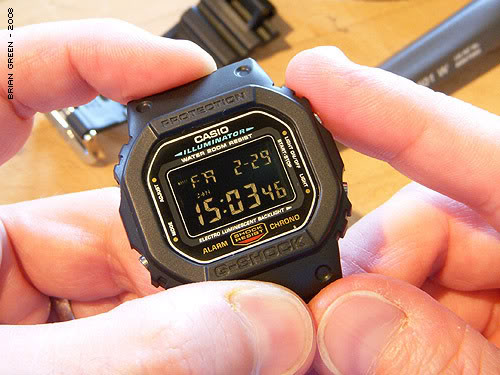
G-Shock DW-5600 DIY Negative Display

This project was quite adventurous for me and quite a bit more complicated than some of the other projects I’ve done with my G-Shock watches.

It involves doing some pretty nasty things to the screen of a “naked” G-Shock, so if you’re faint-hearted this is probably not the ideal DIY project for you.

If you’re still reading this and desperately wanting to try reversing the display of one of your digital watches for yourself — read on!

Creating a Negative Display

I’m going to be taking my plain Casio G-Shock DW-5600 and converting the regular display into a negative one with the use of some self-adhesive polarizing film. It took me a while to find a good source for the right type of polarizing film. I bought mine from Polarization.com in Texas.

The quality was very good, service excellent, and the shipping was pretty fast (3 days). I ordered the thinnest self-adhesive film they had in a relatively small size, part name was: “Linear Polarizer w/adhesive PFA”.

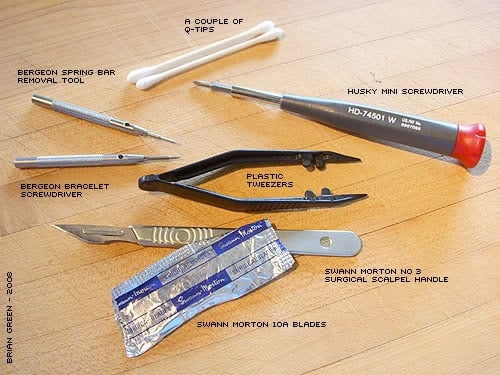
Ok, on to the project. First let me show you some of the tools you might like to have ready for this.

G-Shock DW-5600 DIY Negative Display

With all the necessary tools at hand it’s time to start thinking about how to tackle this. I will be using the DW-5600 that I recently stealthed the bezel on (separate post coming). By reversing the display it should be a pretty fine looking little watch. The next few steps will be obvious to most of you, but I figured I’d snap some pictures anyway.

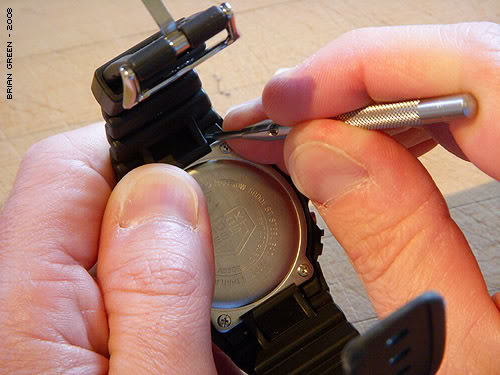
G-Shock DW-5600 DIY Negative Display

Take off the straps so that you can remove the back cover and so that they won’t get in the way while you are working on the body of the watch. I like to use my nifty little Bergeon Spring Bar Tool that is designed specifically for this.

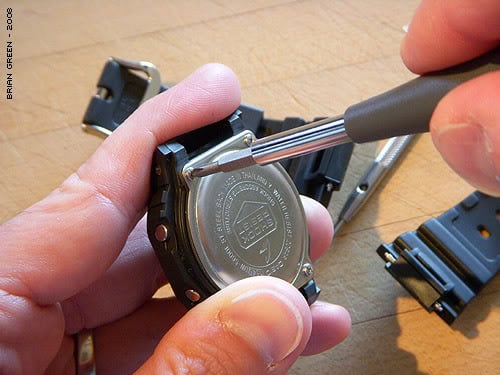
G-Shock DW-5600 DIY Negative Display

Next, carefully remove the four small screws that hold on the case back. Always make sure to put these somewhere safe and keep them together. This is where the Husky Mini Screwdriver comes in very handy.

G-Shock DW-5600 DIY Negative Display

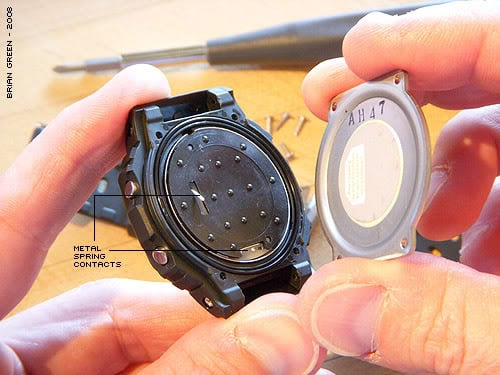
Remove the metal case back carefully, trying not to disturb the rubber gasket that creates the watertight seal around the module.

G-Shock DW-5600 DIY Negative Display

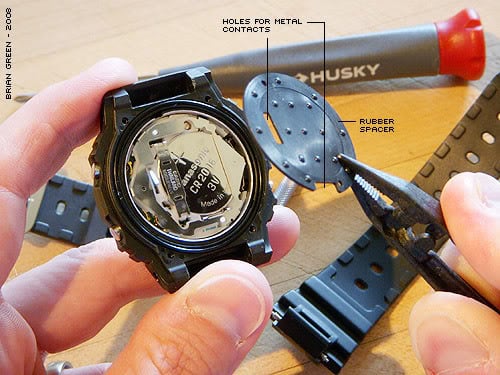
You should see the rubber spacer that covers and adds protection to the inner module. Remove the rubber spacer using the tweezers for extra grip. It can sometimes feel like it is deliberately stuck to the module but it isn’t, it just gets pressed tightly and sticks a bit — it should come off very easily.

G-Shock DW-5600 DIY Negative Display

You should now be able to lift out the entire module by one of its edges using your tweezers. Mine actually fell right out when I flipped it over. Be patient, there’s really nothing holding it in other than the pressure of the buttons against the spring contacts.

G-Shock DW-5600 DIY Negative Display

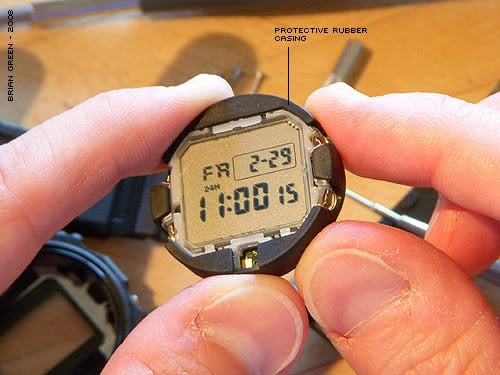
I took off on a bit of a tangent here and decided to remove the black outer rubber protector and the metal inner ring casing. I also removed the glass screen from the module and spent the next three hours shouting and cursing at how hard it was to put the darn glass screen back in. I was also extremely annoyed at my stupidity as I discovered that it was not necessary to remove the glass at all (I learn as I go along..).

I have deliberately omitted the next six or so images that I took of me removing the glass and putting it back in because it is not necessary and very nearly screwed up my display and module!

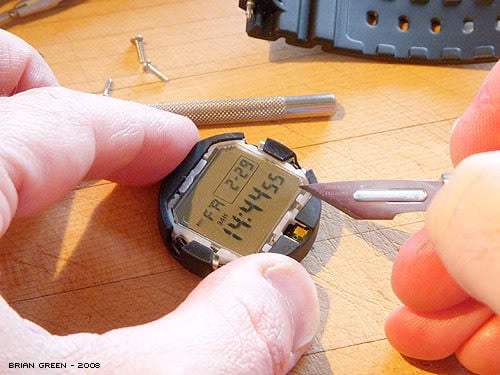
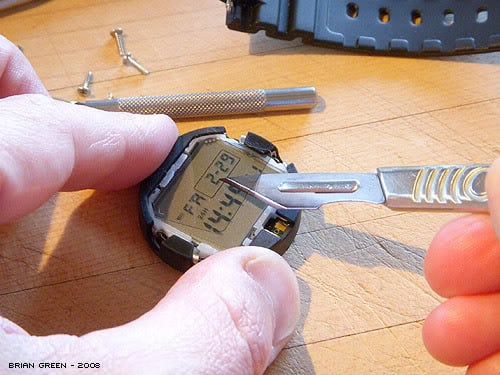
The next thing to do is to remove the polarizing film that is glued to the surface of the glass. The film is slightly smaller than the glass and can be seen easily if you look close up. I am using my scalpel to gently lift up the polarizing film a bit at a time. The trick is to slide the blade between the polarizing film and the glass.

G-Shock DW-5600 DIY Negative Display

Take your time and work from one edge of the polarizing film across to the other, slowly pushing the blade of your knife under more and more while still moving it from side to side. Eventually you will have the blade under far enough to lift off the polarizing film.

G-Shock DW-5600 DIY Negative Display

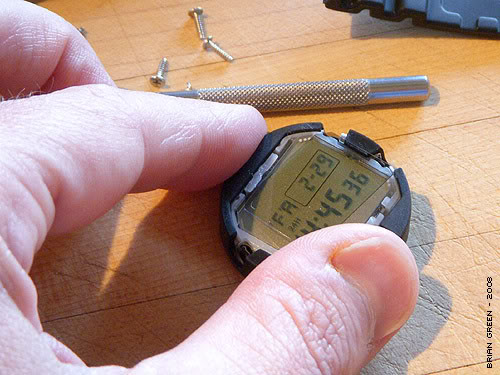
The film is stuck to the glass by a thin layer of tacky glue. It’s pretty nasty stuff so be patient and it will come up eventually. Lift off the polarizing film using your plastic tweezers. You can see that the film looks almost transparent while over the display and the digits are only visible on the parts of the display that are covered by the film — it’s quite amazing.

G-Shock DW-5600 DIY Negative Display

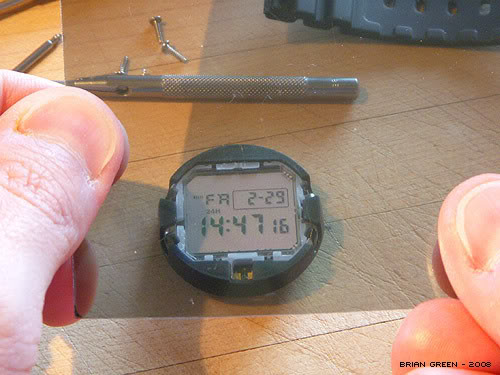
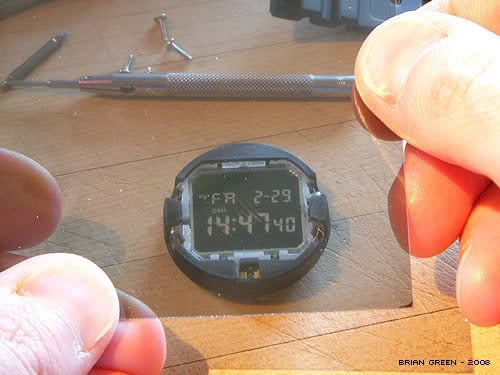
Here’s where it gets very cool. Simply turn the polarizing film around 90 degrees and as if by magic the digital display becomes reversed! The polarizing film does not need to be in contact with the glass to work.
G-Shock DW-5600 DIY Negative Display

At this point I used my Q-Tips and some Goof Off to clean the tacky glue residue from the glass and the old piece of polarizing film. Make sure you get the glass as ‘squeaky’ clean as you can. It took me several Q-Tips and about 15 minutes to get it perfectly clean. I promise you that the time spent getting the glue off as much as possible will be worth it. If there is any glue residue left on the glass it will show up when you stick on the new piece of polarizing film and you don’t want that.

Now let’s take a look at the digital module display using the new sheet of polarizing film. Here is the display with the film held in the regular position. The display is shown as normal and we can see the module is still ticking away quite happily.

G-Shock DW-5600 DIY Negative Display

Rotate the polarizing film 90 degrees just like you did with the piece that was removed from the glass and the display is reversed. Excellent, this ensures that the film is going to work — until this point it was a bit of a gamble on whether or not this particular type of polarizing film would work — looks good.

G-Shock DW-5600 DIY Negative Display

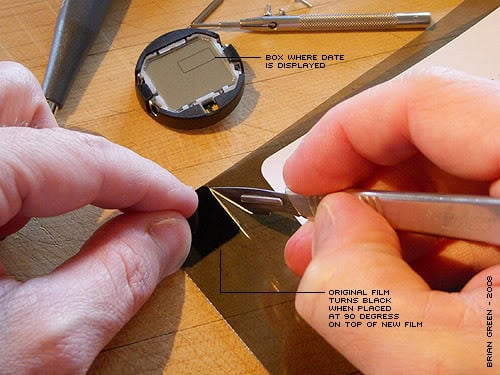
Next you’ll need to cut out a piece of the new polarizing film to the exact shape of the original piece. Make sure that you are cutting out the film with it turned in the right direction. Make doubly sure you have the film oriented so that it will make the display look reversed before you place the old piece on top as a cutting guide.

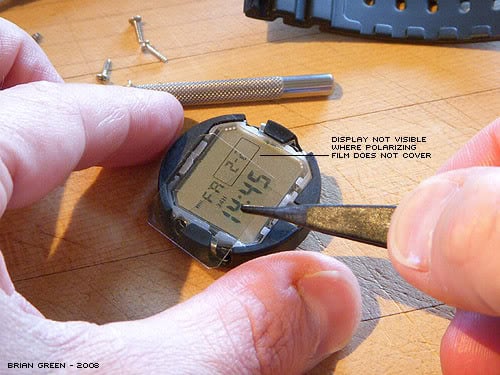
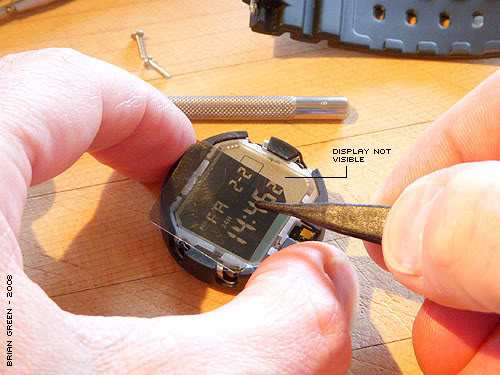
Hint: you can tell when the two pieces are the right way because the original piece that you are using as a cutting template should look completely black. Notice in the picture below how the display is invisible without the polarizing film. Also notice the small box on the display in the upper right corner; this will be disappearing when we reverse the display using this ‘hack’. The factory reversed modules manage to reverse the box too — interesting distinction.

Hold the original piece of film tightly up to the corner of the new sheet and gently cut around it using your sharp knife. Make several slices using medium pressure rather than trying to cut all the way through on the first pass. By making several slices you will avoid slipping and hopefully avoid the loss of any finger tips! Just take your time.

G-Shock DW-5600 DIY Negative Display

Once you have cut out the new piece of polarizing film, hold it over the display to make sure that it fits and that it will create the desired negative effect. The film used here (details at top) was self-adhesive on one side and had a protective cover on the other. Remove the cover from the self adhesive side and without touching it carefully place the new piece of polarizing film onto the glass screen.

Use your tweezers for better precision. Gently rub the polarizing film with a soft cloth or clean Q-Tip to make sure it is adequately stuck down. Then use your tweezers again to lift of the protective cover from the front of the film. You should be left with a smudge and fingerprint free surface.

G-Shock DW-5600 DIY Negative Display

The final step is to reassemble the whole thing. Carefully put the whole module back into the watch casing making sure it it seated down. I find that I nearly always have to use my tiny screwdriver to hold in the metal connectors where the buttons are in order to get a module back in.

Replace the rubber spacer making sure that the protruding metal contacts show through. Then replace the metal case back and four screws. I’m not showing pictures of these steps because most of you know how to do this and if you don’t simply read through the steps above that describe how to take the module out.

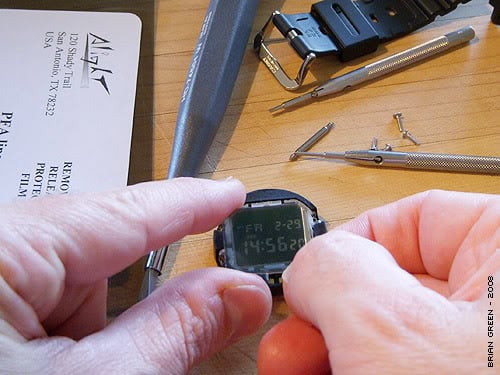
When the case back is firmly screwed down, flip the whole thing over and admire your handy work, a beautiful, negative display module. Notice how the small box in the upper right corner of the display is no longer visible. This is one difference between the DIY reverse display and the factory fitted version, but I kind of like the minimal look anyway so no great loss for me.

G-Shock DW-5600 DIY Negative Display

Well that’s it. The hardest part of this whole project was biting the bullet on the polarizing film and waiting the couple of days it took for it to arrive. The rest was relatively easy.

I hope you found this useful and I also hope this encourages a few of you to pop open that old G-Shock and hack a negative display. It took me a little over four hours to do this, but nearly three of those were spent trying to replace the glass display that I shouldn’t have removed in the first place. There were also some other distractions along the way.

G-Shock DW-5600 DIY Negative Display

I’ve done my best to provide as much detail as possible, but if you have any additional questions feel free to post a comment here and I’ll do my best to answer it. Happy hacking!

About the author: Brian is an avid lightweight backpacker and author of the popular Brian’s Backpacking Blog. In his spare time he designs watches and is the original designer of the Prometheus Ocean Diver line of dive watches. In addition to a rather large analogue watch collection, Brian is a self confessed G-Shock addict.

Posted in DIY | Tagged , , , , | 57 Comments

Dogs of War: Using Dogs as Unmanned Ground Vehicles (UGVs)

3 of 6 in the series Dogs of War

Previously we discussed by a Special Forces Team like the US Navy SEALs might want to include a dog on a high risk and dynamic operation like raiding UBL’s compound.

We then discussed how a Tactical Team might integrate a dog’s ability to fight into their operating TTPs. Now I would like to discuss how the dog might help a Tactical Team to make the best use of technology on the battlefield.

You’re probably reading the title of this article and asking yourself what an Unmanned Ground Vehicle is, let me explain.

UGVs are similar to UAVs (Unmanned Aerial Vehicles) in that they are remotely controlled robots used for performing high-risk operations or to function in locations that humans can’t go.   For instance there are UGVs used for disarming bombs. There were and possibly still are UGVs being used to work on the nuclear reactors that are melting down in Japan.

The Army has mounted various weapons platforms on UGVs, although the effectiveness of these platforms is still being evaluated. Military and Law Enforcement have used UGVs to insert various intelligence-gathering devices into areas prior to inserting tactical operators as well.

So how do we utilize the capabilities of the dogs to transform them into UGVs?

Agility and Size Requirements

This was mentioned very briefly in my original article, but allow me to expand on this specific point a bit. For a tactical dog, you do not want a huge German Shepherd or Malinois, you want one that is bred from smaller lines for several reasons. First, despite the dog’s abilities, there may be times when the handler has to pick up and carry the dog. This is much easier with a 45-55lbs dog than with a 75-100lbs dog.   Secondly, when parachuting or fast roping, added weight means faster decent.

You may be able to compensate for this on a rope, but under a canopy during a HAHO jump, you need all of your Team members to descend at about the same rate. If you have too much gear and descend faster than the rest of your team, you will either arrive at the Landing Zone (LZ) much sooner than your team, or you will never make it there in the first place. Both situations are bad, tactically speaking. Finally, one of the primary reasons dogs were beneficial to a Tactical Team is that they can fit into and function in spaces that their human counterparts would struggle in.

In addition to choosing dogs that are of modest size, Tactical Teams must select dogs that are agile. Dogs must be able to crawl, climb, jump and operate on narrow walkways at elevation.   Many times, it is precisely this ability that allows the dog to maneuver into the positions we need them in to deliver the equipment that we want delivered.

Techno Dogs

So what kind of equipment and technology can dogs transport for us?   Well, this is really only limited by your imagination and someone’s ability to make it. Let’s consider things that are available currently.

Infrared and Night Vision Cameras. Dogs are currently being used to transport night vision and IR cameras into buildings and locations ahead of the assault team to gather intelligence.   They have even retrofitted the IR cameras that can look through walls to determine if there are hostiles or hostages, how many, and their disposition.

Listening Devices.   Another piece of technology that can be mounted on our four legged companions are listening devices. Highly sensitive microphones and radio transceivers can be built into harnesses and carried into the objective for hearing what the enemy is discussing prior to a raid.

Route Clearance.   This can be done with our without ultra high tech equipment, but typically requires at least a radio receiver for the dog. For dogs trained to indicate on explosive scent and detect human presence, a dog can be sent ahead of the team along routes to ensure that they are clear of explosives and/or ambushes.

Explosive and Other Device Emplacement. During WWII the Nazis trained their German Shepherd dogs to carry and emplace explosives in front of moving Allied tanks. The dogs would drop the explosives upon command and return to their handler. The Germans would then command detonate these explosives when the Allies drove over them. Because of the dog’s limited profile and the narrow view from inside the buttoned up tanks, the Allies were not even aware that this was happening for quite some time after it was being employed.

In the same way, dogs can be used to emplace explosives at key locations prior to a raids, or even carry in listening and observation devices that are meant to be left behind so that the dog can return to the team for the raid itself.

Can’t Machines Do These Things?

The answer to this question is, yes they can. The problem with machines is that they are slower and louder than dogs. The operator may have slightly more precise control of the direction, as a dog is dependent on voice commands over a radio, but often speed gives a significant tactical advantages and this is where the dog excels.

In addition to this, you can’t call a machine back and use it for scent, hearing, and of course, biting. As mentioned in an earlier article, no machine can match the dog’s nose, and machines are not yet being used to detect specific sounds that give an enemies position away.

Conclusion

The amazing thing about using the dog in this manner is that you have all of these capabilities in one compact package and then the dog can still accompany the Team on the raid with all of the previous advantages we discussed.

Join us next time as we discuss in more detail, the combat capabilities of a dog with his most highly attuned sense, his nose.

Until next time, this is Joel with Dunetos K-9, helping sharpen our world…one dog at a time.

Joel is the founder and head trainer of Dunetos K-9, a training facility and equipment manufacturer specializing in Tactical and standard K-9 equipment.   He has been training and handling dogs for over 10 years and works closely with Baden K-9, a highly respected training facility in Ontario, Canada.   Joel has served in the United States Army for 11 years as a Military Police Officer deploying to the Pentagon days after the 9/11 attack, Afghanistan (2003), Iraq (2007) and is currently serving in Bogota, Colombia (2011) in the War on Drugs.   Joel has specialized in integrating dogs into every aspect of life, from personal obedience and protection to specialized military application.

Posted in K9 | Tagged , , , , , , , | 9 Comments