Happy Halloween to all our readers! Wow, you guys have some serious pumpkin carving skills!
We’ve been deliberating all day on our three winners and wish we had enough prizes for everyone!
You can find all 24 entries we received below so you can check out all the skill we had to sort through. Without further ado, here are our three big winners!
First Place
First place goes to Bryan S. for his extremely talented Reaper Pumpkin with ITS Logo Headstone that you’ll see above as our main image for this announcement, too cool Bryan! It also certainly didn’t hurt your chances that you spell your name the right way!
Second Place
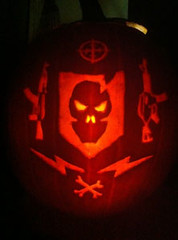
Second place goes to Chris L. and his extremely creative and detailed marksman pumpkin carving with the ITS Logo, AK, AR, cross hairs, lightning bolts and cross bones!
Awesome job Chris, we know this must have taken some time to carve all the small detail on the weapons and design the layout. Thanks for your entry!
Third Place
Third place was a tough choice, but Jay S. and his operator silhouette with ITS Logo pulled out on top.
Jay, we felt that this represented a core part of ITS Tactical; both the veterans and current operators that teamed up to start ITS. Thanks for your entry!
Honorable Mention
An honorable mention goes out to Clint W. for his hilarious Pumpkin Casualty in desperate need of a Pumpkin ETA Kit!
We’re all wondering what the three leading pumpkin causes of death in the field are? Great job Clint!
Details
To take a look at what all our winners get for their efforts, check out our original announcement and get your ideas started for your Tactical Pumpkin next year! We’re definitely doing this again!!
For all our winners, an email should have gone out to you already and we’ll need your choice of Magnum Boots and sizes, so if you didn’t get the email make sure you contact us with all your information! Special thanks go out to Original SOE Gear, Mil-Spec Monkey, Pimps n’ Mercs and Magnum Boots for their support!
Thank you to everyone for your participation and support, we have such awesome and talented readers!! We hope everybody has a safe and Happy Halloween!!
Magnum boots has just let us know that for each of the already awesome prize packages, they’ll be throwing your choice of either a pair of Spider 8.1 Urban or Elite Force 8.0 WPi boots! How awesome is that? Thanks Magnum!!
For all the details on the contest, make sure you check out the original announcment post and get those entries in by Midnight on October 30th! We’re choosing the winners on Halloween!
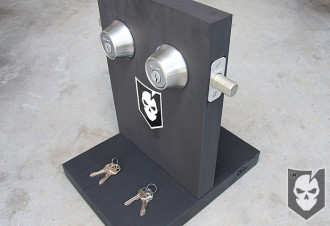
Whether you consider yourself a novice or pro when it comes to lock picking, there’s no denying that everyone needs to keep up their skill-set without damaging their house locks.
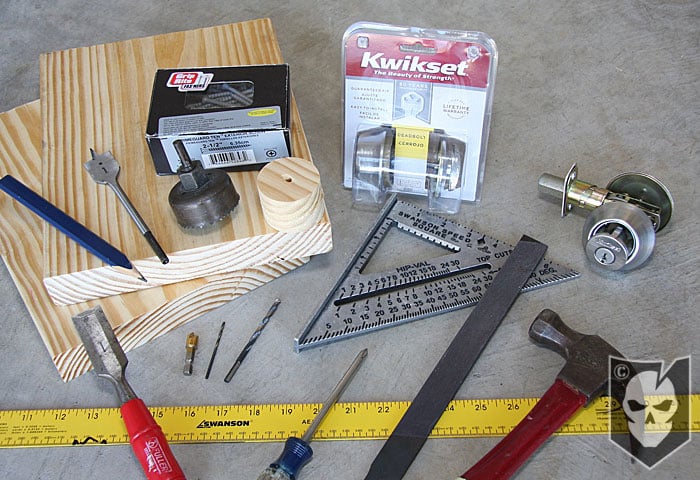
Today we’re going to show you how to build an inexpensive lock pick practice set for less than $40 that will rival the stands, kits and sets that cost three times that.
With just a quick trip to Home Depot, you’ll be on your way to creating your own set to work with and ensure that the next time you’re locked out of your house, you’ll be able to get back in!
Comprehensive
The way we’ve designed this practice set, is to enable you to practice providing tension from both directions, i.e. clockwise and counter clockwise. As you might know from practicing yourself, it’s nearly impossible to tell which direction the plug in a cylinder is going to turn simply by looking at the lock.
Other visual queues must be used in order to read the direction the plug is going to turn and from which direction you’ll provide tension with your tension wrench. While we could take up an entire article just on technique, we’ll save that for an upcoming article.
Suffice to say that this set will allow you to practice for what you may potentially encounter when LEGALLY picking locks and makes an excellent practice station for you pick set. What it won’t help you practice for are the dummies that install their locks upside down, which will eventually cause pin spring problems. Make sure you don’t make that mistake when building this setup.
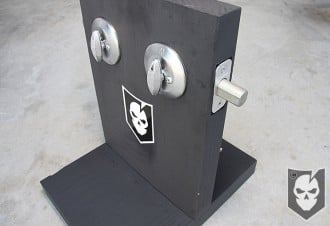
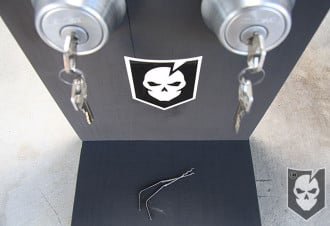
Versatile
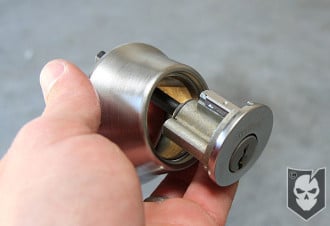
Not only will this practice set allow you to turn plugs in either direction, but the cylinders you’ll have with your purchased deadbolt sets will allow you to re-key or remove pins.
Removing pins is a great building-block method for learning how to pick locks. While again the scope of this article is the creation of this set, not necessarily teaching how to remove the pins. However, this is something that will be addressed in an upcoming article.
The cylinders you’ll see in the image to the right are removable from the deadbolt housing and with a simply sliding/prying motion, you can remove the cover and access the pins.
Beware of cheaper deadbolt sets you’ll see in your hardware store adventures, some lack the ability to access the pins and remove or re-key the lock.
Materials
The only real expenses for the set, provided you own tools, are the two deadbolt sets and wood. However, there are some specialized drill bits you’ll need that you may have hiding out in your tool box.
Don’t be afraid to open the deadbolt package up in the store to make sure it’s the kind we’re describing.
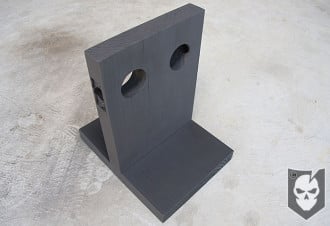
Essentially what you’ll be creating is two door jambs, but first you have to build the stand. We were able to find a 48″ x 9″ wide x 1 1/2″ deep piece of wood to make two stands for about $2. What’s great about buying this at Home Depot was that they’ll cut it for you. So for $2 we had four 12″ pieces of wood to work with, even though the project only requires two.
Make the Stand
Assembly is very straightforward after your wood is cut. Simply draw an outline of the upright 12″ piece of wood on the base piece and mark the location for your pilot holes in the bottom side of the upright piece and the top side of the base piece. Our three holes were marked at 2″, 4 1/2″ and 7″.
Now drill pilot holes (to keep the wood from splitting when you screw the two pieces together) with your small diameter drill bit all the way through the base piece, as well as up through the bottom side of the upright piece of wood. Flip your base piece over and using the pilot holes you drilled all the way through, countersink these to allow for clearance of the screw heads so they’ll fit flush.
Keeping the base board flipped over, line up the upright piece underneath it and screw your three screws in. You might want someone to hold and provide pressure to the base piece to ensure it stays still and that you don’t wind up with a gap where the two pieces meet.
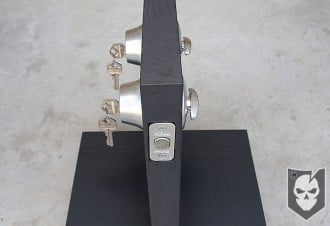
Drilling Deadbolt Holes
As you’ll read in the instructions for the deadbolts you’ll buy, the 2 1/8″ circle that needs to be cut is either 2 3/8″ or 2 1/2″ in from the outside edge depending on what. Our measurement was at 2 3/8″. Remember that you’ll be repeating the instructions for both sides. Our instructions even had a template you could use to mark the location of your holes.
On our 12″ piece of wood, we measured 3″ down from the top of the upright piece and drew a nice straight line all the way around the upright. This will help you out when you drill the 1″ holes required for the actual deadbolt backset.
We’re not going to get into how to drill these holes, as it’s pretty simple. You need to (2) 2 1/8″ holes and (2) 1″ holes drilled deep enough in the sides to meet the larger 2 1/8″ hole on each side.
After your holes are drilled, insert the deadbolt backset and trace around the face plate of the latch. This is now the area you’re going to chisel out. This takes some patience and work, as you need to continuously check the fit to ensure the chiseled out area is deep enough. Be careful not to chisel out too much. You’re not going for style points here, just make sure it fits flush.
You can also mark where the screw holes are in the faceplate and drill pilot holes for those, although it’s not really necessary.
Hardware Assembly
At this point you can spray paint your stand if you’d like to, we just used flat black spray paint. This is just cosmetic though, but you’re welcome to throw some support our way and slap some ITS Stickers on there too!
Following the assembly directions on your deadbolts is the best course of action here. All you’re essentially doing though is inserting the backset, screwing down the faceplate, placing the deadbolt cylinder set in the hole (make sure your cylinder is facing the right direction!), placing the turn piece on the back and screwing it all together with the long screws that are included.
What you have now is an awesome place to practice your lock picking that allows you quick access to change out pins or even replace the deadbolts completely if you wear them out. Keeping graphite in the locks is a good way to ensure proper operation.
An option modification to this stand is to purchase a piece of non-slip drawer liner material and spray glue it to the bottom like we mention at the end of the video below. This will ensure your stand doesn’t slide around while you’re practicing.
Notes
We hope you enjoyed this tutorial on creating your own Lock Pick Station, please follow the lock sport code of ethics below and have fun! Stay tuned for our next article where we’ll show you in detail how to remove pins and some good techniques for picking.
Lock sport is an honest, ethical, and legitimate hobby. Unfortunately, the whole world hasn’t figured that out yet (though we’re working on it!). Because the lay person has a tendency to perceive what we do as somehow nefarious, it is extra important that we commit to following a strict code of ethics. For this reason, the above credo is non-negotiable in the lock sport community. Lockpicking should never, ever be used for illegal or even questionable purposes. Please do not misuse this information. We assume no responsibility for your actions, and in no way condone immoral activity. Help keep locksport fun for all by following strictly the one rule.
“You may only pick locks you own or those you have been given explicit permission to pick.”
As you’ve no doubt heard us reference on ITS Tactical, we follow the TCCC (Tactical Combat Casualty Care) Guidelines very closely and have designed our ETA Kit around them.
Tactical Combat Casualty Care (Pronounced “T-Triple C”) is a set of guidelines developed by USSOCOM (United States Special Operations Command) to properly train non-medics to deal with the preventable causes of death in the field.
The latest updates for 2010 are out and we wanted to share them with you; The only change since the November 2009 updates is new material on hypothermia prevention.
Prior to these updates, the 2009 TCCC stated that WoundStat had been removed as a secondary hemostatic agent, which left QuikClot Combat Gauze and the primary and only hemostatic agent recommended.
We’ve posted the updated 2011 guidelines in their entirety here, but also have them available in .pdf format for download. Continue reading →
To give you some extra boo for your buck, we’re heavily discounting our yearly Crew Leader Memberships from now until Halloween!
Our yearly Crew Leader Membership is $50now on sale for just $35 until Midnight on October 31st November 1st.*Discount reflected upon checkout* You’ll also receive a FREE Crew Leader Rocker Patch just for signing up!
These patches are the exact size to add as a rocker above one of our velcro-backed ITS Logo patches like you see in the photo. We have these in stock and yours will be shipped out within a week after the sale is over.
Keep reading to learn all about what benefits you’ll enjoy as a Crew Leader and how you’ll be supporting everything we do here at ITS Tactical! Continue reading →
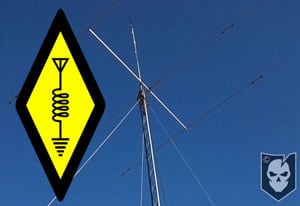
Amateur radio consists of a series of radio frequency bands designated internationally for public, non-commercial use. Various types of information can be transmitted over the bands, such as voice, video, and digital data.
A doorway to the world, amateur radio can be used to communicate with people both local and distant. Even off-planet communications are possible, as the astronauts in the International Space Station (ISS) maintain an amateur radio station!
Since the invention of radio, amateur operators — often referred to as hams — have been on the airwaves, constantly pushing the technology. Hams are responsible for not only many advances in radios themselves, but also in satellite communications (hams regularly launch their own satellites, called Orbiting Satellites Carrying Amateur Radio or OSCARs) and digital computers.
Why should I become a Ham?
Today, amateur radio is used for recreational communication as well as a public service to provide communications for communities, whether during an emergency or during a local event, such as a parade.
Here are some other exciting things you can do with a Ham License:
Doorway to the world! Talk to people in foreign countries . . . DX’ing is a favorite activity of many hams.
Talk to people both local & distant while driving to work or someone on those sleepless late nights!
Public assistance by providing communications during emergencies, natural disasters, parades, bike races, marathons and other public events
Help other people become hams . . . also called “Elmering”
Hook your computer to your radio and communicate “computer-to-computer”
Collect QSL cards. Collect cards from other hams, from all over the world
Participate in radio contests or ARRL Field Day events
Provide radio communication services to your local Civil Defense organization: ARES (Amateur Radio Emergency Service), RACES (Radio Amateur Civil Emergency Service), FEMA (Federal Emergency Management Agency)
Aid members of the U.S. military by joining the Army, Air Force or Navy/Marine MARS (Military Affiliate Radio System)
Participate in “Fox Hunts” or transmitter hunt games
Receive weather satellites pictures
Operate low power from remote locations: SOTA — Summits On The Air
Use the moon to bounce signals to talk with people on Earth
Experiment with Amateur TV (ATV), Slow-Scan TV (SSTV), or send still-frame pictures by facsimile
Connect your ham radio to the public telephone system & call friends toll free . . . “auto-patching”
Communicate through orbiting satellites
Licensing
A license is required to transmit on the amateur bands. In the United States, licensing is handled by the Federal Communications Commission (FCC). There are three different license classes, each of which award the operator with a variety of privileges across the radio frequency spectrum.
On February 23, 2007, the FCC eliminated Morse code testing. The Morse code requirement was a major stumbling block for many interested in amateur radio. While no longer required for licensing, Morse code (or continuous wave) remains an interesting and effective mode of communication by many amateur radio operators.
New amateur radio operators typically enter the hobby by obtaining a Technician Class license, advancing later to the General Class or Extra Class. Volunteer Examiners prepare and administer written examinations from published question pools publicly available. Helpful study guides, training courses and online resources are widely available.
Technician Class
The privileges of a Technician Class operator license include operating an amateur station that may transmit on channels in any of 17 frequency bands above 50 MHz with up to 1,500 watts of power. Technician Class licensees also have privileges in four amateur service bands in the high-frequency range. To pass the Technician Class examination, at least 26 questions from a 35 question written examination must be answered correctly.
General Class
The General Class operator license authorizes privileges in all 27 amateur service bands. In addition to the above written examination, the requirement for a General Class operator license includes answering correctly at least 26 questions on a 35 question written examination.
Extra Class
Operating privileges of an Extra Class operator license include additional spectrum in the high-frequency bands. In addition to the two above written examinations, the requirement for an Amateur Extra Class operator license includes correctly answering at least 37 questions on a 50 question written examination.
A First Station
A great place to start as a new amateur radio operator is with a dual band hand-held radio capable of operating on both the 70 centimeter and 2 meter bands. This will get you active on the local repeaters and nets, as well as the amateur satellites and the ISS.
Additionally, 2 meters and 70 centimeters are the bands used by local emergency radio services such as the Amateur Radio Emergency Service, Radio Amateur Civil Emergency Service and Community Emergency Response Teams. These radios are small, compact and very portable. They can be used with the standard rubber duck antenna, a magnet mount antenna on a vehicle, or a portable antenna with a coaxial cable feed line.
A hand-held 5-watt radio can be found used at very reasonable prices on eBay or the online QRZ Swap Meet.
Ultimately you will be tempted to get a base station, upgrade your license and start making long distance contacts. A great resource for setting up your first station can be found at Ham Universe.
The Amateur’s Code
(Adopted by the American Radio Relay League from the original written by Paul M. Segal, W9EEA, in 1928.)
The radio amateur is:
Considerate, never knowingly operating in such a way as to lessen the pleasure of others.
Loyal, offering loyalty, encouragement and support to other amateurs, local clubs and the American Radio Relay League, through which Amateur Radio in the United States is represented nationally and internationally.
Progressive, with knowledge abreast of science, a well built and efficient station, and operation beyond reproach.
Friendly, with slow and patient operation when requested, friendly advice and counsel to the beginner, kindly assistance, co-operation and consideration for the interests of others. These are the hallmarks of the amateur spirit.
Balanced, Radio is an avocation, never interfering with duties owed to family, job, school or community.
Patriotic, with station and skill always ready for service to country and community.
Resources
First off, we’d like to sincerely thank USNERDOC for the contributing content in this article. If you haven’t ever checked out Doc’s YouTube Channel, head over right now! He has some great videos on Ham and even on communicating with the International Space Station!
With this article information, Doc also send over this PDF document for download. It will provide you with the information from this article as well as a great list of links and resources you can use to expand your Ham knowledge.
Today we’re going to get into the third installment of our five part Every Day Carry series that suggests a structured approach to creating EDC kits for the home, our vehicle, our place of employment and to be carried on our person.
In the previous installment, a security threat assessment was conducted for three limited areas of interest: crime; vehicle breakdown; and severe weather. Using my lifestyle as an example, these three “vertical slices” were examined in detail to show how the process I’m suggesting can help create kits that are useful to respond to what we reasonably believe to be serious threats to our well being — matters that threaten our security, safety and health. (For an overview of the suggested analytical process, see the first installment in this series.)
In this article, I’ll take each threat element and create what I consider to be reasonable responses. The purpose of knowing the likely responses is to help us determine what tools, resources and supplies will be needed to effectively respond to the threats. This will form the basis for selecting candidate tools, resources and supplies for inclusion in our every day carry kits. Continue reading →
I’m stoked today to announce that Operation Outpost is LIVE! If you haven’t heard of the awesome resource that is Op Outpost, allow me to fill you in.
I first heard about the project when Brent Piatti, President of Op Outpost, and I were talking on Twitter late last year. The project was just getting off the ground and the Website was under construction.
All I knew about Op Outpost is that it was going to be a resource for our troops downrange to be able to buy, sell, trade, and receive donated items that would in turn help to increase their quality of life overseas.
Little did I know how much I would become involved in the project… Continue reading →
I’ll admit I’m a bit of an organizational freak, but my wife and those that know me would probably say that’s an understatement. With that being the case, I knew I had to get one of 215 Gear’s Custom Tactical Bags to organize my entry tools.
The Custom Tactical Bag is the Gucci of entry tool bags. Nowhere have I seen a more comprehensive and modular way to carry method of entry equipment on the market today. Up until now, it’s been limited to throwing everything in a big bag, or trying to come up with your own velcro panels to mount all those little items.
While purpose built for carrying entry tools, the Custom Tactical Bag is functional enough to be used for just about anything, including medical supplies or EOD tools. Continue reading →
We try not to get into politics here and save those kind of discussions for our Facebook page, but I’d like to steer off course for a moment and urge everyone to exercise their Constitutional right to vote on or before November 2nd.
I’m an NRA Member and while I feel everyone who cares about their Second Amendment rights should be too, this isn’t a plea to get anyone to join. This is to support candidates in the November election who have received the NRA’s endorsement. This is based solely on a candidate’s support of our Right to Keep and Bear Arms. Continue reading →


 Second place goes to Chris L. and his extremely creative and detailed marksman pumpkin carving with the ITS Logo, AK, AR, cross hairs, lightning bolts and cross bones!
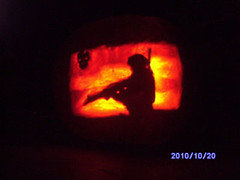 Third place was a tough choice, but Jay S. and his operator silhouette with ITS Logo pulled out on top.
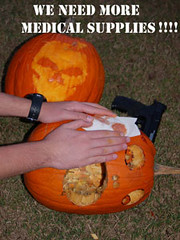 An honorable mention goes out to Clint W. for his hilarious Pumpkin Casualty in desperate need of a Pumpkin ETA Kit!


 Amateur radio consists of a series of radio frequency bands designated internationally for public, non-commercial use. Various types of information can be transmitted over the bands, such as voice, video, and digital data.