The Best Way Out is Always Through: Lessons Learned On the Road

DSC00837

Operating on a recommendation from another couple that had recently passed through Jackson, WY we bouncily climbed dirt roads in the Bridger-Teton National Forest. We’d lost track of time in town, grabbing dinner and playing cards, which left us to search ill-labeled roads in the dark for the proper route to Shadow Mountain. A rain storm the previous morning had left mud of banana-peel slickness and puddles of indeterminate depths dotting the “roads” like a mine field.

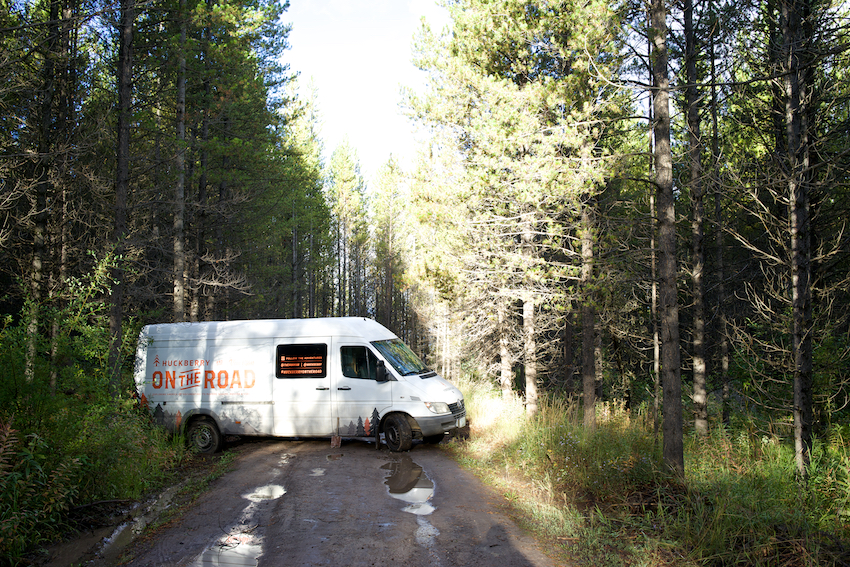
At 21ft long and sporting rear wheel drive, the Sprinter isn’t what you’d call an off-road vehicle. But a Platinum level AAA membership and a stubbornness not to miss out on stunning morning views of the Tetons, lent us the confidence to ignore the easy campsites and proceed upwards.

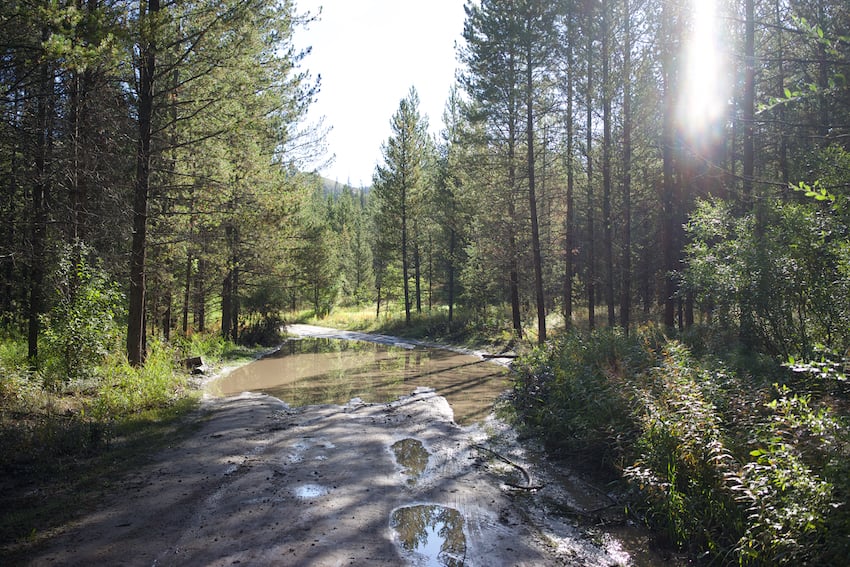
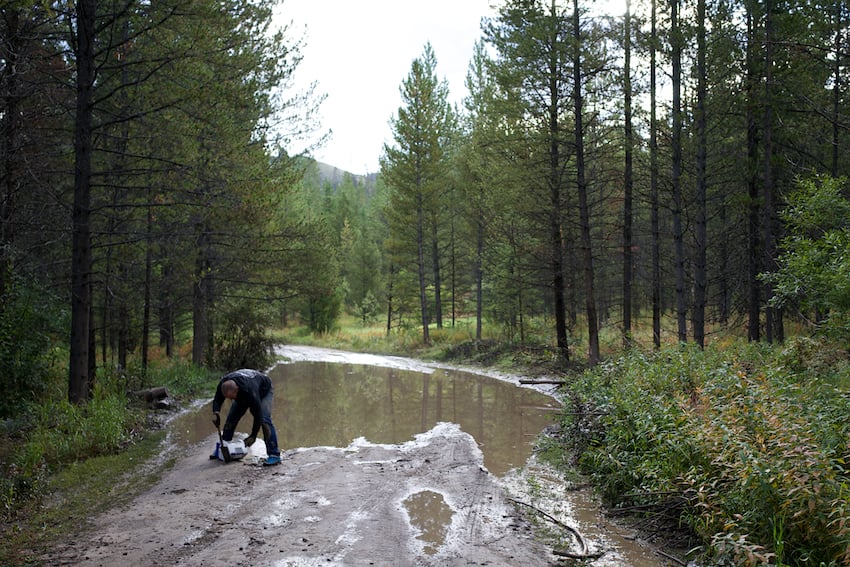
Avoiding puddles where possible and being mindful not to crack our rear differential, we finally found the access road to Shadow Mountain and were crawling our way up. Camp spots were few and dismissed for their lack of a view: we’d come this far, we were going to the top. Rounding a bend, our ascent came to an abrupt halt. The headlights played over a puddle that bordered on pond status. It flooded the entire road for 70ft. Short of wading out there was no way to know how deep it went, or whether its bottom was grippy rock or wheel-sucking mud. Backing down the trail would be dicey at best. The road was narrow, but wide enough to turn provided you nailed it perfectly.

Stuck in the Mud

I began gingerly backing up for the multi-point turn. After inching back to the edge of the grated road, I stopped and went to shift into Drive. As I slipped the transmission into gear, the rear end of the van shifted and sank.

“What was that?” My girlfriend asked.
“We just went off the road.”

DSC00865

Stuck in the Mud

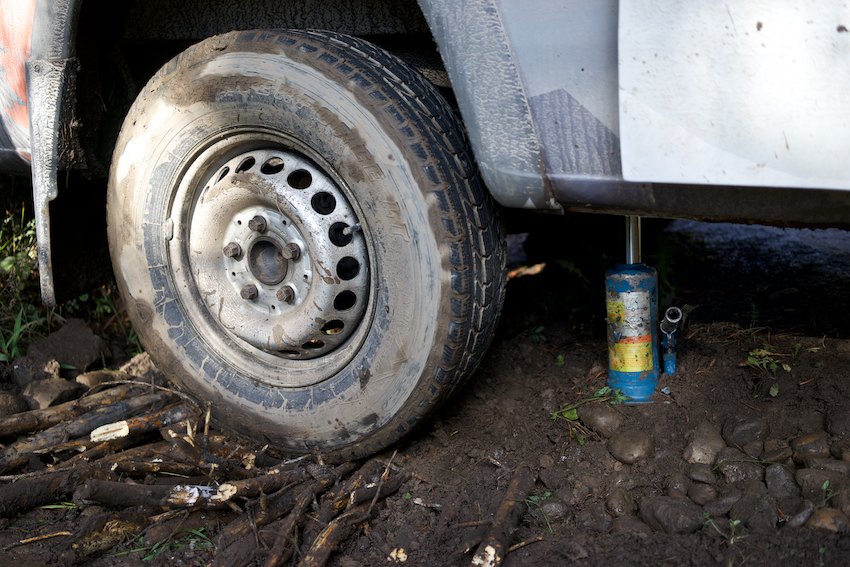
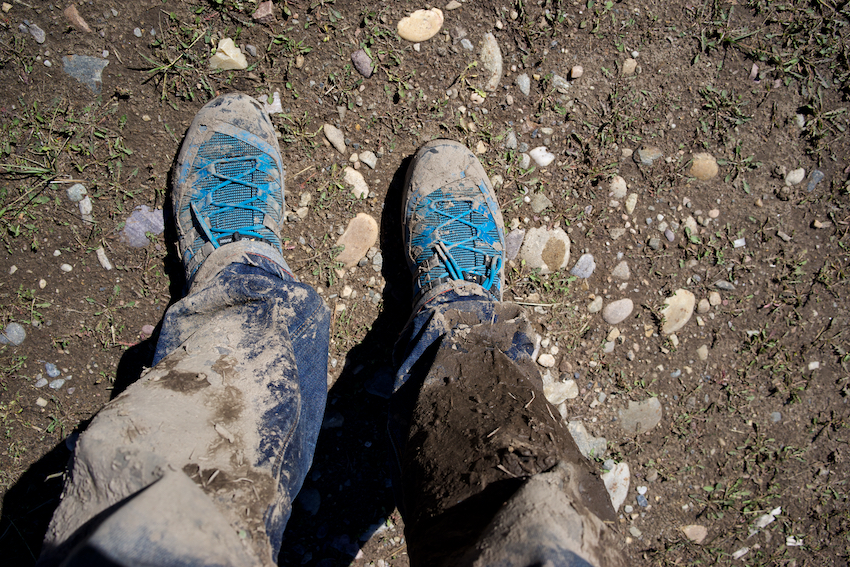
My breath hung in the air as I went to check the left rear tire. While I’d correctly judged the edge of the road, I’d misjudged how solid that edge was after the rain. The heavy rear end of the Sprinter had caused the wheel to slide down off the edge and into mud the consistency of pig slop. This was not optimal.

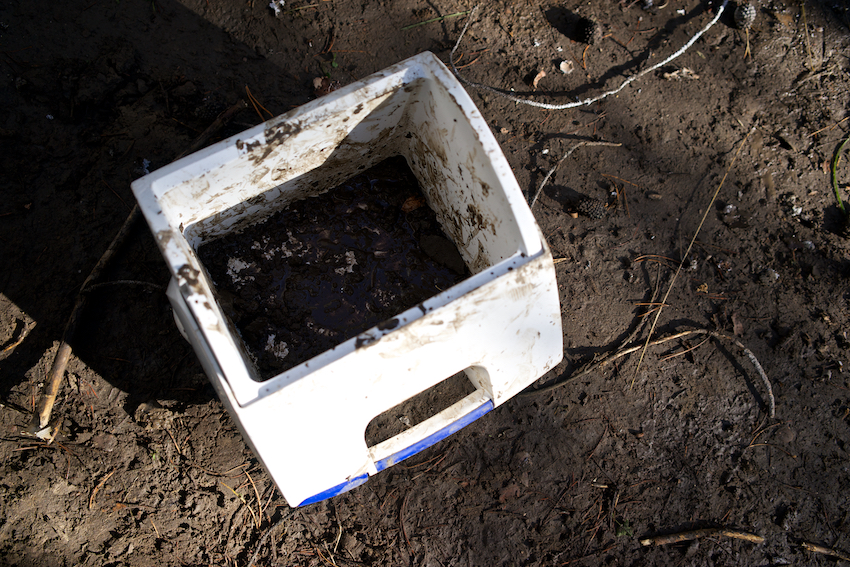
Livid and intent on extracting us, I went to the van and grabbed the shovel, a cooler (to carry rocks) and the bear spray. We were very much in grizzly country. I gathered three loads of rocks with the cooler, stuffing them strategically under the wheel in hopes of gaining traction. Using my hard earned snow escape tricks (courtesy of my New England background), I rocked the van between Reverse and Drive in futile hopes of escape.

Stuck in the Mud

Stuck in the Mud

More rocks were gathered and curses uttered. This time, my girlfriend (@she_explores) drove and I pushed. The Sprinter crawled tantalizingly forward, only to slip and roll back. Frustration and embarrassment made me indifferent to time and temperature, intent to work on extracting the van all night if need be. Luckily my girlfriend’s leveler head recommended (strongly) that we crash out on the inviting queen-size Casper bed in the back of the van. We would try again with daylight on our side.

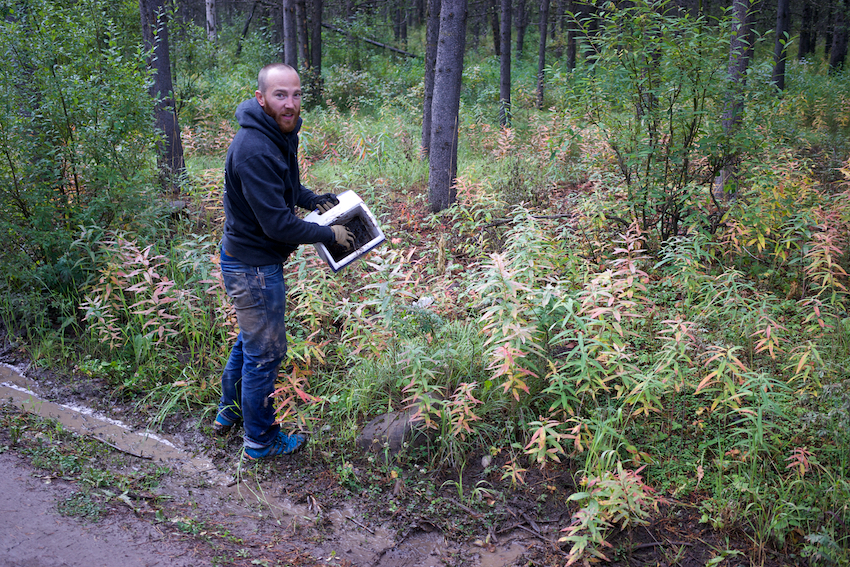
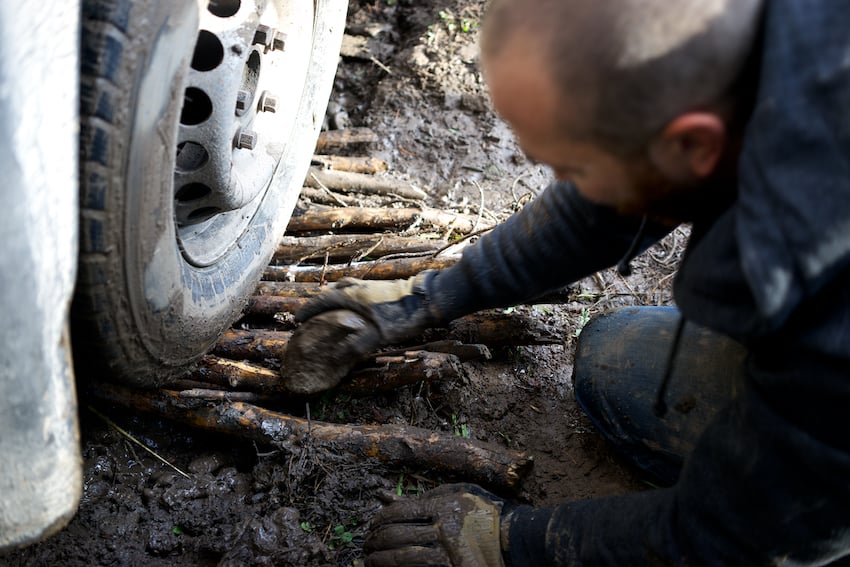
As morning broke, I woke and pulled out the car jack. My hope was to laboriously jack the wheel up, build up sticks under the tire, lower it and repeat the process until I reached a level where we could drive out. Slowly, I got the wheel closer to level with the road, I just needed a second person to help push and we’d be free.

A Yamaha Rhino rounded the bend with two bow-hunters, dressed head to toe in camo.

“Sorry about this, we got stuck last night.” I said
“We’ll go around, don’t worry.” They didn’t seem too concerned.

Without another word or offer of help, the bow hunters pulled around the van, sped through the puddle and zipped out of sight. So much for the vaunted middle-of-the-country hospitality.

Stuck in the Mud

Stuck in the Mud

A half an hour later, a big pickup pulled up and two middle-aged guys hopped out.

“You know you could’ve gone right through that puddle, right?”

Clearly I had not, which I relayed. Mud was caked on most of my clothing from my adventures under the van.

“Don’t mind getting dirty there do you Bear Grylls? Alright let’s get this thing out here. We’ll push, you drive.”

Thankful for the help I smiled at the ribbing and climbed in to drive. Two big pushes and we were straightened back out on the road, pointing yet again at the puddle pond.

“Do you really think this van can make it through that? It’s only rear wheel drive.” I asked.
“Son, you might have to turn in those ‘Live Free or Die’ plates if you’re gonna be a pu$$y about it.”

Stuck in the Mud

A smile twitched on his face as he adjusted his ball cap. I climbed back in the van.

“Are we going through it?” my girlfriend inquired dubiously.

I put the van in drive and punched the accelerator. We crashed into the puddle, water shooting up 5 ft in the air off each side. In seconds we were safely on the other side and climbing to the top of Shadow Mountain. Frost’s advice held true “The best way out is always through.”

Stuck in the Mud

Photos © Jon Gaffney and Gale Straub

Editor-in-Chief’s Note: Jon currently lives a semi-nomadic life with his girlfriend traveling North America in a camper van of their own design. If he’s not hiking, climbing, waterskiing, or attempting to surf you’ll probably find him playing with a camera. You can follow along with his antics on Instagram.

Posted in Off Road | Tagged , , , , , , , , , , , , , , , , , | 11 Comments

Go Old School with the new ITS Vintage Skills T-Shirts Available in the ITS Store

ITS Vintage Skills T-Shirt Main

Today we’re stoked to be adding our new ITS Vintage Skills T-Shirts to the ITS Store!

There’s no school like the old school and our ITS Vintage Skills T-Shirt shows that skill-sets, like those we advocate here at ITS, never go out of style. These super-soft fitted crew t-shirts feature our ITS Vintage Skills graphic, as well as a custom printed tagless label for ultimate comfort.

Read on for more information and details on how to order these new, exclusive ITS products!

ITS Vintage Skills T-Shirt (Vintage Navy)

ITS-vintage-skill-t-shirt-vintage-navy-02

ITS-vintage-skill-t-shirt-vintage-navy-01

An ultrasoft ink is utlized for printing to increase your comfort level without a heavy ink build-up to crack or create a hot spot in the heat.

Details

  • Heathered Tri-Blend (50% Polyester, 25% Cotton, 25% Rayon)
  • Custom ITS Printed Tagless Label
  • Available in Adult Sizes Small thru XXL

Click here to pick up the new ITS Vintage Skills T-Shirt (Vintage Navy).

ITS Vintage Skills T-Shirt (Military Green)

ITS Vintage Skills T-Shirt (Military Green)

ITS-vintage-skill-t-shirt-military-green-03

These Shirts are Proudly Designed and Printed in the USA

Click here to pick up the new ITS Vintage Skills T-Shirt (Military Green).


Posted in ITS Information | Tagged , , , , , , , , , | Leave a comment

Ridiculous Dialogue Podcast: Episode 20

Ridiculous-Dialogue-Episode-20-Main

Episode 20

In Episode 20 of Ridiculous Dialogue, Lang talks about googling himself and we discuss favorite movie soundtracks, Trekkies vs. Star Wars fans and what job we’d do if we could do anything.

We also started a Hipster count for Rob’s statements, talked about the recent Net Neutrality buzz, and the finer points of shopping at Ikea, including the infamous Ikea Swedish Market.

Enjoy the episode and if you’re interested in becoming a sponsor on Ridiculous Dialogue, head over to ridiculousdialogue.com to learn more! Don’t forget to pick up an official Ridiculous Dialogue Podcast T-Shirt while you’re there!

Ridiculous Dialogue Podcast Episode 20 Cast of Characters

Ridiculous Dialogue was created to share the banter that takes place at Imminent Threat Solutions on a daily basis. It’s us; candid, unedited and talking about everything from what movies we’re watching to the general geekiness that keeps us laughing here at ITS HQ.

While we generally keep the vibe in our articles PG rated, be warned, it may not be safe to blast over your speakers at work. We hope you enjoy the insight into ITS and who we are behind the scenes as a company; pull up a chair and tune in to Radio ITS.

Posted in Podcast | Tagged , , , , , , , , , , | Leave a comment

Quick and Inexpensive DIY: Easily Colorize your AR-15 Fire Control Roll Marks

DIY AR-15 Roll Mark Painting

I’m just about done building my first rifle and while there’s still a few finishing touches to add, I thought about marking the fire control engravings so they stood out slightly from the rest of the lower receiver.

Since I wasn’t sure this modification is one I’d want to live with forever, I searched for a non-permanent solution. In my initial research, I found that most people paint the roll marks on their rifles one of three ways; crayons, nail polish or model paint.

Because it was the simplest, most inexpensive and easily removable option, I went the crayon route. While this DIY would be easier for those working with a stripped lower receiver, it can also be done with a fully completed rifle like mine in this example. Depending on what you have at home, you may not even have to buy anything extra and could have this simple project completed in no time.

DIY AR-15 Roll Mark Painting

Items Needed

  • Crayons
  • WD-40
  • Paper Towels

Optional

  • Knife (to sharpen the crayons)
  • Toothbrush and/or Toothpicks (to clean engravings or fix mistakes)
  • Rubber Gloves (skin protection from WD-40)
  • Compressed Air Duster (blowing away excess crayon)

Once you’ve assembled all of your equipment, make extra certain that the weapon is safe and clear.

Don’t cut corners when it comes to safety.

DIY AR-15 Roll Mark Painting

Step 1

It should go without saying but be sure to clean the surface you’re about to work on. As mentioned previously, this rifle was just newly built and hasn’t even been test fired but I still made sure that the markings were clean and free of any debris. This is where a canister of compressed air could come in handy blow the dust away.

Step 2

DIY AR-15 Roll Mark Painting

Rub the preferred color of crayon into your markings. Don’t worry about coloring outside the lines as you want to really work the crayon wax into the engravings. Some rifles will have deeper markings than others, so be sure completely fill them in. If your crayon becomes dull, simply sharpen it with a knife.

Step 3

DIY AR-15 Roll Mark Painting

You’re now going to remove the excess crayon that’s not in the engraved marking. Spray a little WD-40 on a paper towel and gently rub away the excess wax surrounding the marking. You’ll notice that you can actually rub over the marking itself and what’s left inside will remain if you rub lightly.

Step 4

Repeat the above simple steps on all of the markings you’re looking to color. In my case, I used the same crayons on each side of the lower receiver and left the other roll marks of the rifle untouched.

DIY AR-15 Roll Mark Painting

Durability?

Over the next few months, I’ll be keeping an eye on how these markings handle the wear and tear of regular use at the range and cleaning. Also, if I decide that I still like this modification, I may go with something more permanent, but at least I have the option to remove it.

Have you ever colorized the markings on your rifle or handgun? Share your tips and photos of your work in the comments!

Posted in DIY | Tagged , , , , , , , , , , , , , , , , | 9 Comments

Understanding the Black Magic behind Sleeping Bag Temperature Ratings

Sleeping Bags

Editor-in-Chief’s Note: Buck is back with a few thoughts on the mystery behind sleeping bag temperature ratings. If you’ve ever wondered what those ratings mean, Buck will help to shed some light on the subject. Before you buy your next sleeping bag, be sure to watch this short and informative video.

Buck Holly served 9 years in the Marine Corps Intel Community and is currently the Science & Technology / Force Modernization liaison between DoD Program Staff, Operational Units, Force Modernization Officers, S&T Staff and Defense Industry BD & Engineering.

Posted in Camping | Tagged , , , , , , , , , , | 11 Comments

The Perils of Concealed Carry: Remember There’s no Prize for the Fastest Reholster

Concealed Carry Holster Options

We’ve all more than likely seen some tragic accidents that have involved concealed carry and while I’m not sure they could’ve been avoided, my hope is that the information provided in this article can help more folks from making the same mistakes.

When Baggy is Bad

One of the problems we see in our Concealed Carry Tactics classes occurs when students are attempting to reholster. The concealment garments loosens and gets funneled into the holster’s mouth just prior to the pistol reholstering. The concealment garment gets shoved further into the holster applying pressure to all parts of the gun, to include the trigger. One of the most important features you look for in a holster is protecting the trigger and that the trigger guard has sufficient protection. In other words, while the pistol is holstered, no object can gain access to the trigger. While you might’ve chosen an excellent holster that meets this objective, shoving a piece of your concealment garment into the holster as you reholster will override your efforts.

No One is Exempt

You don’t have to be practicing from concealed to experience this issue. In fact, we brief in the beginning of all our classes that the aspect of reholstering must be conducted in a safe and secure manner. That means to first ensure there are no foreign objects near the mouth of the holster. The most common culprit is the bottom hem of your shirt, but other items to keep an eye out for are drawstring hems and zipper pulls. In fact, I have a good friend who experienced a negligent discharge as a result of a zipper pull. Crazy stuff can happen so take precaution. Next, observe the reholstering process. Look down to ensure there are no foreign objects near the mouth of the holster. As you gently reholster, be on the lookout for any resistance and if you feel any resistance, STOP! Observe whatever is causing the resistance, address the issue then continue with the reholster.

There’s No Prize for Fastest Reholster

If you find yourself in a real world situation, consider the fact you’ll be hyped up on adrenaline. These procedures will help ensure when you reholster, you do so safely. Before you reholster, ensure the scene is safe and/or the target is secure. Once you have completed all scans, consider performing some ammunition management before slowly and very slowly reholstering. Yes, I do suggest you observe the process, but keep things in perspective. The reason you’re reholstering is because you’re either being relieved, there’s no longer a lethal threat, or you’re off the proverbial “X.” If you have any reason to believe there’s still a threat to your safety, then you wouldn’t be reholstering. So in this case, taking your eyes off your battle space is the tactical imperative.

Protect the Trigger

For those who carry “off-body” I first strongly encourage you to reconsider. I realize it’s much more difficult for women to carry concealed and still be fashionable. During our Concealed Carry Combatives classes we see so many off-body ideas go the way of the dinosaur. This doesn’t just include firearms, but edged weapons. The most common is a neck knife. While standing upright it tends to lay flat thanks to gravity, but add some aggressive movement or grappling to the mix and it’s very difficult to predict where the handle will be. If you carry off body, I strongly encourage the trigger guard still be protected. That means light sheaths or in some cases a plastic trigger guard. I love the Vanguard 2 from Raven Concealment and use them all the time. In the case of “off body” I would affix the holster to an anchor point so that when I obtain a firing grip and retrieve the pistol from the concealment, it separates from the holster.

It’s easy to second guess what happened in recent tragic events, but I’m more inclined to remind folks of proper concealment protocol. There’s more to it than just covering the firearm with your shirt.

Editor-in-Chief’s Note: Jeff Gonzales was a decorated and respected US Navy SEAL, serving as an operator and trainer who participated in numerous combat operations throughout the world. He now uses his modern warfare expertise as President of Trident Concepts, LLC., a battle proven company specializing in weapons, tactics and techniques to meet the evolving threat. Bringing the same high-intensity mindset, operational success and lessons learned from NSW to their training programs, TRICON has been recognized as an industry leader by various federal, state and local units. Organizations interested in training with TRICON can call 928-925-7038 or visit tridentconcepts.com for more information.

Posted in Firearms | Tagged , , , , , , , , , | 9 Comments

Are these 7.62 x 39 Rounds Without a Headstamp from Project Eldest Son?

Project Eldest Son 01

We recently came across a few 7.62 x 39mm AK-47 rounds that don’t have a headstamp and are marked with a blue ring around the primer. While we’re by no means historical ammunition experts, the lack of the headstamp and blue ring has started the conversation around the shop here about Project Eldest Son.

Project Eldest Son

MACVSOGDuring the Vietnam War, MACV-SOG (Military Assistance Command, Vietnam – Studies and Observations Group) a multi-service US Special Operations unit, conducted unconventional warfare operations from the time period of 1964 to 1972.

One of these unconventional operations, dubbed Project Eldest Son (later named Italian Green and Pole Bean) was developed out of frustration in not being able to destroy or airlift out enemy ammunition when found along the Ho Chi Minh Trail. Due to the small teams SOG operated in, they couldn’t carry the ammo away and they found that using demolitions would just scatter the rounds.

A SOG Commander and veteran of the OSS (Office of Strategic Services,) Colonel John K. Singlaub, had the revelation of boobytrapping the ammo by replacing the powder with a substitute that would increase the typical chamber pressure of a Type 56 AK from 45,000 PSI to 250,000 PSI! This would cause the receiver to explode, injuring or killing the shooter.

On inspection, the damage would look to have been caused by “bad metallurgy” or defective ammo. The difficult part of Eldest Son was the actual planting of the ammo. Care was taken to never plant more than one round per magazine (or ammo can) so that when the cause of the damage was investigated, another round wouldn’t be found and compromise the operation. The goal was to keep the sabotage secret.

A real concern was other US troops using captured AKs who weren’t aware of the boobytrapping. Warnings were issued through newspapers, radio and TV warning of poor quality control from Communist Bloc factories that could cause malfunctions leading to AKs blowing up.

Project Eldest Son 02

When details of Eldest Son were leaked to US news publications in 1969, the project was renamed to Italian Green and then Pole Bean. With the rushed nature of the program after the leak, SOG pushed to get the remaining sabotaged rounds in place and coincidentally allowed the Communists to ascertain the real cause of the firearm failures. The program did wind up doing its job of raising doubts about the safety of the Communist ammo supplies in combat areas.

Program Reignited?

While it’s not clear where the rounds we have came from, the boobytrapping of ammunition has recently come back up in the news within an article the New York Times wrote about the Syrian Government attempting to undermine Syrian Rebel’s confidence in their ammo.

Apparently with the rapidly expanding insurgency, the government of Syria has been doctoring ammunition and mixing them with regular ammunition just like Project Eldest Son did during the Vietnam war.

The article also mentions a similar program the United States currently runs in Afghanistan, trying to undermine the Taliban. This Syrian ammo mentioned may have also entered through Iraq, where the article claims that the CIA and Pentagon were secretly passing doctored ammo to insurgent groups during the most recent war.

Project Eldest Son and other sabotage like it, are an interesting part of history that’s rarely heard about. What’s your thought on the ammo we’ve shown and its origin?

References:

Posted in Ammunition | Tagged , , , , , , , , , , , | 23 Comments

New ITS + Emerson Folding Knife and Morale Patches Added to the ITS Store

New ITS Store Products

Today we’re extremely excited to announce a few new products to the ITS Store. Something we’ve had in the works is the new ITS + Emerson A-100 Folding Knife. We chose this model of Emerson due to its proven durability and no-nonsense dependability.

We’re also launching two new morale patches to add to your collection! Our ITS Texas State Flag Morale Patch is perfect for showing off your Texas pride and the ITS Bleeding Heart Morale Patch is just in time for Valentine’s Day. Read on for more photos and information on how to order these new ITS products!

ITS + Emerson A-100 Folding Knife

ITS + Emerson A-100 Folding Knife

ITS + Emerson A-100 Folding Knife

We’re proud to have worked with Emerson Knives on this project and are excited for its launch! The design of the A-100 is one of Ernest Emerson’s firsts. He often refers to it as the “Father” or even the “Grandfather” of all tactical knife designs that exist today. If you had to describe the A-100 Knife in three words, they would be Symmetry, Grace and Power.

Each plain edge ITS + Emerson A-100 Folding Knife is engraved with the ITS logo as well as a unique serial number. Knives will be shipped starting with the lowest number available on a first-come, first-served basis. Each knife also ships with a mini Emerson Knives catalog and sticker included in the box.

Click here to order the new ITS + Emerson A-100 Folding Knife!

ITS Texas State Flag Morale Patch

ITS Texas State Morale Patch

With ITS being based in Texas, this patch was created to show our Texas pride wherever we may be. While we could’ve made this patch “Texas sized,” we wanted to make sure it would fit just about anywhere, including the front of our ITS Crew Cover hat.

This 2″ tall x 2″ wide (at its furthest edges) embroidered morale patch features a velcro backing that can be removed with a seam ripper if you prefer to sew it on.

Click here to pick up the new ITS Texas State Flag Morale Patch!

ITS Bleeding Heart Morale Patch

ITS Bleeding Heart Morale Patch

Perfect for Valentine’s Day, our ITS Bleeding Heart Morale Patch features vibrant gold and rich red thread which overall leads to an excellent design for wearing or adding to your collection.

This 3.5” tall x 4” wide (at its widest) embroidered morale patch features a velcro backing that can be removed with a seam ripper if you prefer to sew it on.

Click here to order the new ITS Bleeding Heart Morale Patch!

Posted in ITS Information | Tagged , , , , , , , , , , , , , , , , | 13 Comments

Sir Robert Baden-Powell and His Adventures as a Spy

My Adventures as a Spy Book

For those of you who didn’t grow up participating in the Boy Scouts of America like I did, Sir Robert Baden-Powell might not be a name you recognize.

Baden-Powell was not only instrumental in scouting becoming of the world’s most successful youth organization, but also authored the first Boy Scout Handbook and wrote of his exploits as a Spy during World War I in the book My Adventures as a Spy. Baden-Powell was an accomplished author, with over 30 books to his credit, but the most intriguing thing about the author was learning about the little known side of him as a Spy. Not only did he serve in the British Military, but saw action behind enemy lines as a reconnaissance officer or scout.

Baden-Powell

These covert missions as a scout required him to adopt disguises while undercover, hide messages, create diversions, escape capture and slip deep into the world of espionage.

A good spy no matter which country he serves is of necessity a brave and valuable fellow

While the book My Adventures as a Spy is a fantastic read, rich with Baden-Powell’s stories of spycraft, I’d like to highlight one such particular example of a lost skill that’s slowly slipping away, semaphore messages.

Secret Messages and Semaphores

Baden-Powell illustrates how spies he ran used semaphore signaling to code messages that would be hidden inside concealment devices and delivered to him. He also notes that this method of encoding secret messages was made popular during the South African War of 1899, also known as the Second Anglo-Boer War.

Before we get into the encoding Baden-Powell used, allow me to highlight just what semaphore signaling is. Right around the time I had started serving in the Navy back in 2003, the rating of Signalman was being dissolved. Their duties, which revolved heavily around semaphores, were passed to the Quartermaster rate. Along with flag semaphores, Signalmen were responsible for transmitting, receiving, encoding, decoding and distributing messages obtained via the visual transmission systems visual morse code and flaghoist signaling.

Here’s the current flag system for semaphores, as you’ll see, by holding two square flags on short poles in different positions, letters and numbers of any combination are achievable. Their are eight possible directions for each arm and except for in the rest position, the flags do not overlap.

SEMAPHORE FLAG GRAPHIC

Flags are also colored differently based on whether the signals are sent by sea or by land. At sea, the flags are colored red and yellow (the Oscar flag). On land, they are white and blue (the Papa flag).

Secret Message Encoding

Baden-Powell took advantage of this method of sending secret messages through semaphores to encode secret messages. By using drawings of flag positions, connected by dots, he was able to teach his spies to put together a hieroglyphic drawing that those able to read the semaphore signaling code could decode. This was of course a bit dangerous on it’s own, as you had to hope the opposition didn’t know what they were looking at and couldn’t decipher the semaphore shapes.

My Adventures as a Spy Book

Along with other methods of signaling and leaving warnings as an Intelligence Officer, Baden-Powell would often travel as an eccentric English butterfly-hunter, scouting out enemy fortifications and passing the intel back to superiors.

To hide the sketched fortifications, he’d often work his butterfly-hunter cover for action into the messages he’d pass up the chain. In the example below, Baden-Powell hid his sketching inside a drawing of a butterfly, this would translate perfectly into his cover if he was searched and the drawing was found.

My Adventures as a Spy Book

Notes

My Adventures as a Spy is a short, but very interesting look into the life of Sir Robert Baden-Powell and his exploits as a spy during World War 1, I’d highly recommend giving it a read and learning more about the fundamentals of intelligence he discusses.

The book has given me a new appreciation for some old school spying methods employed by the English and how those have translated over to current techniques used today. If you’re a fan of espionage history like I am, you won’t be disappointed with this book.

Posted in Tradecraft | Tagged , , , , , , , , , , , | 16 Comments

Squawk Box Broadcast 015: On Mental Tranquility, Thinking Like a Fighter Pilot and Overlanding in a Sports Car

Squawk Box Broadcast 015

The Squawk Box Broadcast aims to highlight a few of the stories that have caught our attention recently. It’s also a way to broaden your horizons and explore new ideas.

The Mind: Worrying and Compulsive Thinking >> Alan Watts

Philosopher Alan Watts discusses how our minds handle worry and thoughts and how it can be a vicious circle of self thought. Can you put your mind at ease? Too many of us work tirelessly to keep our minds busy and are unable to be quiet or be left alone with our own thoughts. This speech edited together with music and video provides some true food for thought.

The Tao of Boyd: How to Master the OODA Loop >> Art of Manliness

Master the OODA Loop

While John Boyd initially served as a fighter pilot in the Korean War, he eventually became one of, if not the greatest military strategist in history. His “Aerial Attack Study” written in 1961 was essentially the “bible of air combat” for nearly every air force in the world. Brett and Kate McKay discuss one of Boyds greatest accomplishments, the OODA Loop, in detail and it’s worth a study.

The Army’s Ersatz Gliders of WWII >> Tested

US Army WWII Gliders

The typical process of getting troops on the ground was by way of individual parachutes. The downside of using paratroops however was that they tended to get spread out over a large area. A benefit of using gliders was that they could silently enter an occupied area and deliver a concentration of troops at a particular point. While landing without wrecking the glider was difficult enough, a larger issue was finding a way to train the pilots needed.

Inuvik or Bust: To the End of the Earth in a BMW M Coupe >> Expedition Portal

Expedition Portal BMW M Coupe Overlanding

Do you really need a top of the line 4×4 overlanding rig to experience the rugged wilderness of Canada? Sure it could make your life easier in many ways but sometimes the best adventures come from taking the unexpected route. Two friends did exactly that by piloting their BMW coupe on an epic road trip that covered over 4,800 miles through some seriously beautiful landscapes.

In Praise of the ‘Gentleman’s Knife’ >> KnivesShipFree.com

The Gentleman's Knife

Just about everyone these days seem to be fascinated more and more with having the latest and greatest but forgetting the reason behind it all. The tool should never trump the skill and in this case, there’s something to be said for simply having one knife to cover the basic duties of the day.

Like these posts? Stay up to date by following the Squawk Box daily.

Posted in ITS Information | Tagged , , , , , , , , , , , , , , , , , | 1 Comment