We’re thrilled to be bringing you some great new items to the ITS Store today! We’ve got new compact ETA Kits, awesome new 300 T-Shirts and a limited-edition membership exclusive item you’re going to want to get in on ASAP!
Just to give you a heads up, while the store was down we were working hard to get in some new items and make our ETA Kits better than ever! Let’s get right into what’s new!
ETA Kit Upgrades
We fixed two items on our ETA Kits that have always left us wanting more. First off, the width of the ETA Kits was always something that we wanted to reduce and now we have, by half! They’re a little bigger in circumference, but will now fit in more pouches and into a cargo pocket even better! We’re still using our vacuum seal bags that feature a resealable opening, but they now have a vertical orientation rather than a horizontal one.
While we had to remove one of the two packages of Z-Fold Standard Gauze to make everything fit into the new bags, we’re making up for it by bringing you the best and newest decompression needle on the market! The Combat Medical Systems Mojo Dart! This new 14g 3.25″ decompression needle represents a huge upgrade to the kit and no longer will you have to remove rubber endcaps to get to the needle in a tube.
The Mojo Dart comes in a durable, easily opened case with flanges that provide strength for handling and removing. What’s unique about the case is that the needle is sterilized with argon gas through the port in the top lid after the case is sealed, not before. Another unique benefit to those in the field is that when you open the case the needle will not fall out. This is due to a lip that holds the needle securely until it’s removed, never again will you accidentally drop the needle when opening the package and rendering it non-sterile!
Our new Frank Miller inspired ITS Tactical 300 T-Shirt is finally here! Members may remember this logo that Matt drew up for a recent iPhone wallpaper.
The black Hanes Heavyweight 50/50 T-Shirts feature a large red splatter design on the front with a white ITS logo. The back of each shirt has a small vertical flag, distressed in red and white with an ITS Logo. Our website runs along the bottom of the flag and the word prevail on top.
In a membership exclusive, ITS Tactical has partnered with Spy Coins to bring you a limited-edition Challenge Coin that you can use to transport your sensitive information!
This double-sided 2″ diameter solid-brass challenge coin is matte-nickel plated for a silver finish that will allow you to carry tactical awesomeness on you at all times!
We’re offering these first to our Plank Owners and Crew Leaders to get some feedback. When producing these through Spy Coins there was some slight chipping on the rear edge that’s hardly noticeable and has been touched up with a sharpie where necessary. We feel the chipping just adds to the “used” look of the coin and doesn’t give away the discreet nature of the device.
Each coin is produced from two ITS challenge coins, creating the hollow interior to place a Micro SD Card into (not included) and comes with two aluminum opening rings so you can keep one and give one to the recipient of the sensitive information or have one at home and one at work.
March 25th is officially Medal of Honor Day and we’d like to take today as a day of remembrance here on ITS Tactical as well.
Join us in honoring all those who have sacrificed their very lives as a duty to our great country. This is of course not to exclude the living Medal of Honor winners and their selfless actions that saved their brothers.
The realization that the media cares more about what’s going on with movie stars, than with the very heroes that have given them the opportunity to do so is truly a sobering fact.
We’ve embedded a tribute video below called Souls of Valor that showcases Chief Master Sergeant Richard Etchberger, Staff Sergeant Robert Miller, and Staff Sergeant Salvatore Giunta who all earned America’s highest award for valor.
In our last article on keeping your AR running we went over nomenclature, a simple field strip and the cycle of operations. Prior to that was a history lesson on the AR platform in the first part of this series. We’d encourage everyone to read the first two articles before diving into this one, as these are building blocks.
Today we’ll be conducting an LTI or Limited Technical Inspection and show you how to assess each component for damage and replacement. Knowing how to properly inspect your AR is paramount in ensuring the platform functions correctly each time you pull the trigger.
Some will argue that the AR platform is nowhere near as maintenance free and reliable as the AK Platform; there’s no doubt that the AK platform is an extremely reliable platform, but we’re here to tell you that by following along with the information we’re presenting in this series, you can achieve maximum performance out of one of the most popular weapons platforms out there today.
There are thousands of AR owners out there and the platform isn’t going away any time soon, so let’s get right into it!
Limited Technical Inspection
The goal of the LTI is fairly self-explanatory; it’s essentially “limited” because most everyone out there isn’t a trained armorer that can take an AR through a full inspection, but the LTI does a pretty good job. In our opinion it will expose most, if not all of the issues your AR may be having and can even prevent those that haven’t happened yet.
There’s a lot to check on your weapon, even before field stripping it. In an attempt to help better illustrate the LTI we’ve not only listed the steps below, but created a YouTube video embedded below the step-by-step instructions.
ENSURE A SAFE AND CLEAR WEAPON!!
Check Flash Suppressor for alignment/tightness and that the peel washer is in good shape (no hairline cracks).
Check that the gas tube roll pin is still in place and flush. The gas tube should not be in contact with your rail or handguards.
Check that front sight taper pins are flush.
Check tightness on any screws that your rail system and accessories might have. Use witness marks!
Take a look at your front and rear sights, whether fixed or BUIS (Back Up Iron Sights) and ensure all detents are working properly. Also check for BUIS tightness.
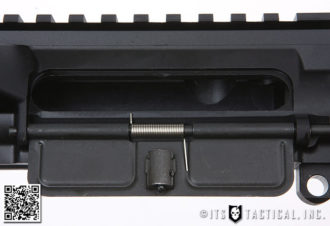
Check that the “C” clip is installed on the ejection port cover pin and that the pin isn’t going anywhere.
Check that the ejection port cover securely closes and keep it closed.
Pull the charging handle to the rear, ensuring that the ejection port cover pops open smartly. Instead of letting the charging handle go, allow it to go forward slowly and “feel” the close of the bolt carrier to receiver extension.
At this time also check the ejection cover port spring legs and ensure they haven’t become damaged.
As you’re working the charging handle further, note that it not only works, but that the action spring is providing enough tension to close the bolt into the barrel extension. We’ll be inspecting the charging handle in detail later after the field strip.
Check that the forward assist is working and that the roll pin is in place and flush.
Check for proper movement, unnecessary play and locking function of sliding buttstock.
Check that the castle nut is properly staked, optimally in three places.
If your stock has a top vent hole, ensure it’s clear of any obstructions to allow for proper air pressure and water release.
Check that buttplate screws are tight.
Manipulate safety selector and leave on safe, ensure correct operation and that the detent is catching it.
Check that hammer and trigger pins are flush with the outer surface of the lower receiver.
Check trigger guard roll pin is in place and flush.
Work the magazine release to check tension, insert magazine and push/pull ensuring the magazine catch locks in. Depress the magazine release and ensure the magazine drops free.
With magazine reinserted, pull back on charging handle ensuring that the bolt locks to the rear and push charging handle in. Depress the bolt catch and send it home. Additionally you can check this function without a magazine.
Last step before the field strip is to check the pistol grip for tightness and any gaps. As you’re checking the tightness with a screwdriver, ensure the lock washer is there as well.
Field Strip Your Weapon at this Point
Check front pivot pin and rear take down pin for proper function of springs/detents
Move the safety selector to fire and with your finger in place, test the function of the hammer, trigger and disconnector (see video).
Check buffer retainer and buffer spring for proper function and tension.
An optional step before you strip the bolt carrier group is to test the gas rings by pulling the bolt forward and standing the BCG up on the bolt. It should not fall under the weight of the bolt carrier group. (see video)
Visually inspect buffer and action spring for damage. We’ll get into more detail with action springs later.
Visually inspect charging handle for damage, hairline fractures and that the latch roll pin is installed and spring is working when the latch is manipulated.
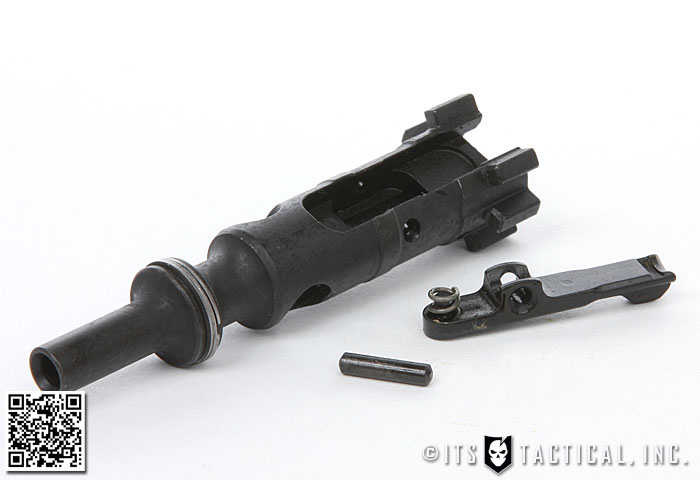
Visually inspect bolt carrier for any damage and proper staking in carrier key bolts (see video)).
Visually inspect firing pin for damage or bending.
Visually inspect bolt (especially lugs), extractor, extractor pin and cam pin for any hairline fractures or damage.
*More on gas ring position and alignment below*
Ensure ejector roll pin is in place as well as checking the ejector for proper function and tension.
Check firing pin retaining pin for damage and proper tension.
Grab extractor and drag your finger across the extractor spring feeling for a “bite” (you want this). More on proper extractor springs and inserts in the next article.
Reassembly and Functions Check
This completes the LTI for the most part and all that’s left is a functions check to ensure you’ve properly put the weapon back together properly and everything is working well.
Functions Check
After assembling the AR, re-ensure that the weapon is clear and safe. With the safety engaged, depress the trigger and the hammer should not fall. Rotate the selector to fire and depress the trigger and listen to the hammer fall. Keep the trigger depressed and rack the charging handle; slowly release the trigger and you’ll feel and hear the disconnector click.
Common occurrences when putting the weapon back together again are either improperly installing the firing pin retaining pin or completely forgetting the action spring and buffer. First off, the weapon won’t work without the firing pin retaining pin properly installed and you’ll notice that you forgot the the action spring and buffer as soon as you get into the functions check.
The firing pin issue is the reason you should always test-fire your weapon before depending on it in a real-world situation. To solve the issue that’s occurred from pulling back on the charging handle when there’s no action spring and buffer, simply hit the weapon on the flash suppressor and the bolt carrier should move forward again allowing you to put that action spring and buffer back in, dummy.
What Now?
First thing’s first. We’ll quickly cover the single most important step in keeping your AR running; Lubrication! We won’t spend too much time on it other than to say ditch the CLP and use SLiP 2000 EWL (Extreme Weapon’s Lubricant). You won’t go wrong, trust us!
The next thing is to take a look at the results of your LTI and with the steps outlined in our next article, come up with what needs to be replaced and what spare parts to carry on you to ensure reliability.
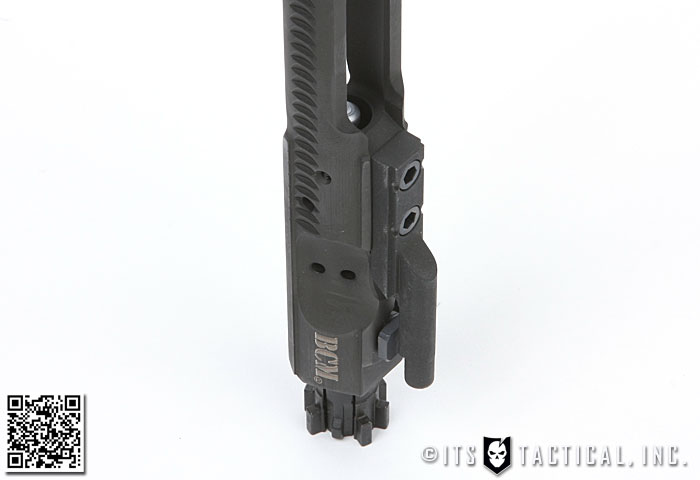
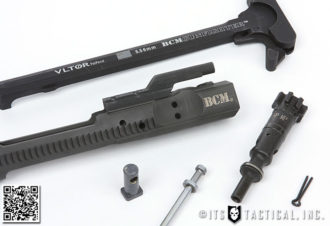
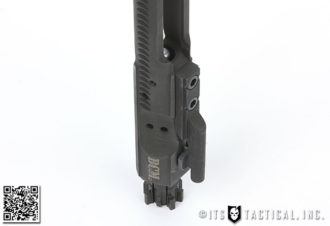
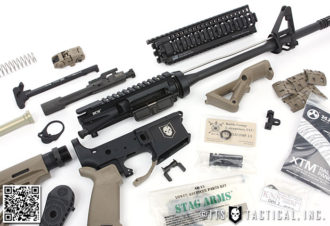
For now we’ll leave you with a teaser image of what’s to come on ITS. Running along with our how to keep your AR running series we’ll be introducing a step-by-step series on building a direct-impingement AR from the ground up. We’re super excited to be announcing this series and have already begun outline our ITS Tactical Build!
While casting calls have been going on since late last year, we’ve just received an email from Discovery’s LA-based casting director for The Assailant to ask if we’d help spread the word that they’re still looking for contestants.
If you haven’t yet heard of The Assailant’s premise, it’s going to pit four physically fit contestants an episode in elite military mission re-enactments to see who will come out victorious. They’re looking for Navy SEALs, Marines, SWAT, FBI, Firefighters, Police Officers, Rescue Workers, stuntmen/women and anyone who thinks that they have what it takes to survive the adventure.
Interested applicants (over the age of 18) that have always dreamed of being Jason Bourne can apply here.
While this is obviously a TV show and not how things would go down in real life, it’s great to see them looking for physically fit individuals. I’ve often had a problem with all those out there giving advice and showing what they know, when it’s obvious they couldn’t physically save themselves if their life depended on it.
Here’s to all the athlete’s out there defending our freedom!
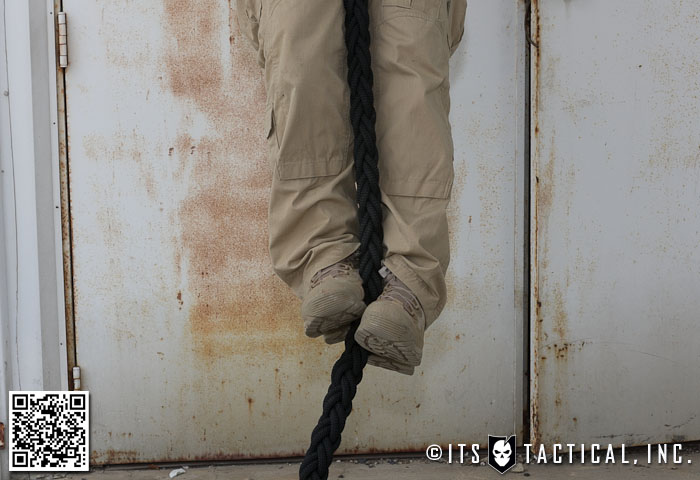
So why should you climb rope? First of all, if you’re not including rope climbing in your routine, you’re missing out on one of the best forearm and grip workouts around.
Climbing rope is also at the core of the Functional Strength discussions we’ve had here on ITS. Just as we advocate being able to physically save yourself; rope climbing has a large carry-over to training the same muscles you’d need to pull or lift yourself to safety.
Sourcing a Rope to Climb
If you’ve never attempted to climb rope before, don’t worry; I’ll address that below. The first step in progressing into climbing rope is an obvious one. Get yourself a rope! There are a couple of options I’ll recommend here.
Manilla Rope
The first option is to purchase a good natural fiber Manilla rope that’s at least 1 1/2″ to 2″ in diameter and 20 ft. long. I found a fairly good deal on Amazon for a 30 ft. 2″ diameter Manilla rope for $150. The only issue I see with buying something like this is the attachment method and I’d recommend cutting one end off and creating an eye splice.
By creating an eye splice (just like we did in our Fast Rope article) in one end it will allow you to climb a tree in a park or your backyard and girth hitch it over a branch to start climbing. The downside to using a Manilla rope is that it will fray over time as you can see in the photo to the right!
Fast Rope
The second option, which I highly recommend, is to make your own Fast Rope. By following our article series and making your own Fast Rope, you’ll not only gain the practice of tying a multitude of knots, saving money and building something awesome, but have a climbing rope that will last much longer than a natural fiber rope.
There are sometimes auctions on eBay too for used Military Fast Ropes, but they’re usually very worn and you won’t know the history behind the rope or how stable it is.
Climbing Techniques
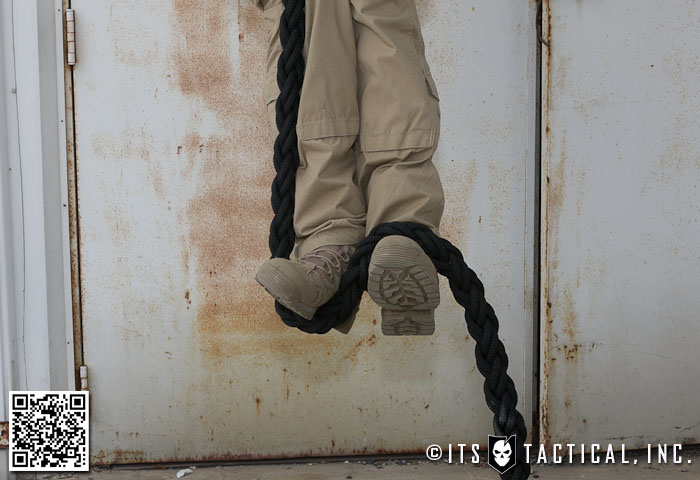
There are three different techniques I’m going to address today, below you can watch a video of each of these being used and see why I prefer to climb with the brake and squat technique I was taught in BUD/s. You should also climb in pants and boots to save your shoes and legs from rope abuse.
While any of these techniques I’ll explain below will allow you to climb a rope, there’s only one I’m going to recommend based on speed, fast reacquisition of the rope and energy savings.
Gym Class Technique
The first technique I’ll address is the typical way I see people climb rope that have never been properly taught how climb. I call it the gym class technique, because if you’re like me and went to elementary school before schools were afraid of being sued, you probably used this technique to get up the rope.
Gym class technique is where you pinch the rope between your feet and reach up with your hands to pull up on the rope and repeat. While you can manage to get up a rope using this technique, you’re working twice as hard. With any technique, the goal should be to use your legs to get up the rope and not depending on upper body strength.
That’s not to say upper body strength isn’t important or needed to climb, it’s just to say that your legs should contribute and not just hold the rope.
Brake and Squat (Marine Style)
Marine style brake and squat is what the Marines teach in boot camp; while effective, it’s not a very quick technique and can cause you extra work by having to reacquire the rope if you lose the wrap. With any brake and squat technique the goal is to work your way up the rope by using your feet to put the brakes on the rope in a squatted position and simply stand up, reach as far up as you can and repeat.
The technique for the Marine style brake and squat is as follows. First you jump up with your arms extended, letting the rope either fall between your thighs or to the outside (I’ve seen both). From there you single wrap the rope around one of your legs and across the top of your boot. The boot of the unwrapped leg clamps down on the other boot, trapping the rope. You can now support your weight without using the power of your arms and hands.
I don’t personally care for this method, because as mentioned above, you have to re-wrap the rope around your leg if it’s not feeding through your legs as you climb up. This can lead to extra work and getting beat when racing a buddy.
Brake and Squat (BUD/s Style)
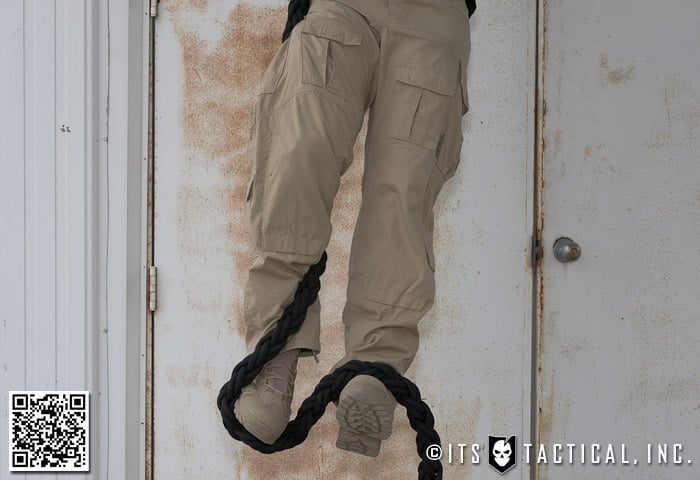
During BUD/s I was taught to use a very simple brake and squat technique that’s extremely fast, easy to reacquire the rope and will beat any other technique for speed. We’d have team rope climb races all the time and it would always be the guys using the Marine style brake and squat technique (despite being taught otherwise) that would slow a team down and cause them to hit the surf. It pays to be a winner!
All there is to the BUD/s style technique is to jump up to grab the rope high letting the rope to fall on the outside of a leg. With the leg that the rope falls to, simply step on it by using the opposite foot to help. The combination of the rope falling across the top of the opposite foot and stepping on the rope with the other foot will lock the rope in place.
The idea here is to always reach up as high as you can before you “squat” your feet back up the rope and reacquire, standing up to gain more height. The quickest guy I ever saw climb rope at BUD/s seriously looked like his feet would reach all the way to his chest before he’d stand up. It was truly amazing to watch.
You can stand in this position all day and take some of the work off your arms. Coming down from the rope is super simple as well, just relax the tension with your feet as you descend and the rope will flow through your feet easily.
Beginner’s Tips
If any of these techniques are more than you can physically master, start slow. You can work on the upper body strength needed to climb rope by using your rope to do pull-ups or even throwing a towel over a pull-up bar and doing towel pull-ups, as this will work the same muscles. For technique work, simply get on the rope and practice locking it in with your feet.
Advanced Techniques
A few other techniques you can use to climb are climbing without your legs, climbing without your legs from an L-Sit position at the bottom of the rope and even climbing two ropes side by side without your feet. I find that I have the hardest time with the L-Sit technique, as I figure my core is weak in that area or my technique just sucks!
Climbing without your legs is an intense forearm, bicep and back workout. It requires excellent grip strength and not being afraid of heights! I’ve successfully climbed two ropes without using my feet, one in each hand. Let me tell you though, it’s not an easy thing to do! I had a few close calls trying to climb like this and nearly fell twenty or so feet attempting it. Be careful if you decide to attempt the advanced techniques!
Workouts
While pretty self explanatory, in terms of workouts, the best thing to do is to incorporate a number of rope climbs into your workout routine. When I have access to a rope, I’ll usually throw in pushups, situps, dips, air squats and a rope climb or two into 3-5 sets. You can even use the pyramid workout I outlined in the Pull-up functional strength article and sub in rope climbs for pull-ups.
You can also figure on subbing in 15 pullups for every rope climb, it’s definitely not the same movement as a rope climb, but is the closest movement and repetition count to climbing a 20 to 30 foot rope.
Video
Disclaimer
Climbing ropes is inherently dangerous should your grip give out while you’re on the rope. Use caution and know your limitations before you get too high and can’t hold on any longer!
I hope you enjoyed this look at rope climbing techniques, be sure to leave any questions or comments below and let everyone know what kind of rope climbing you’ve worked into your workouts!
Editor-in-chief’s note: We’d like to thank the anonymous individual who came forward with this important information and allowed us to get it out to everyone here at ITS Tactical.
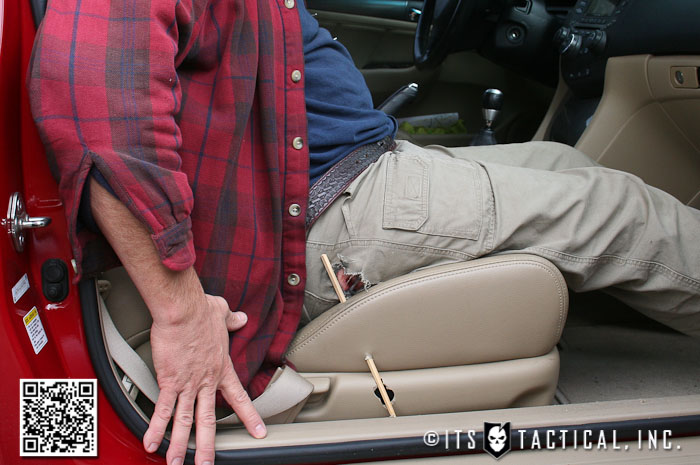
“What the hell was that?!?” she said. It took me a half a second to realize that my gun had just gone off…on my hip…in its holster. My wife and I had just finished breakfast at our favorite cafe and got into the car.
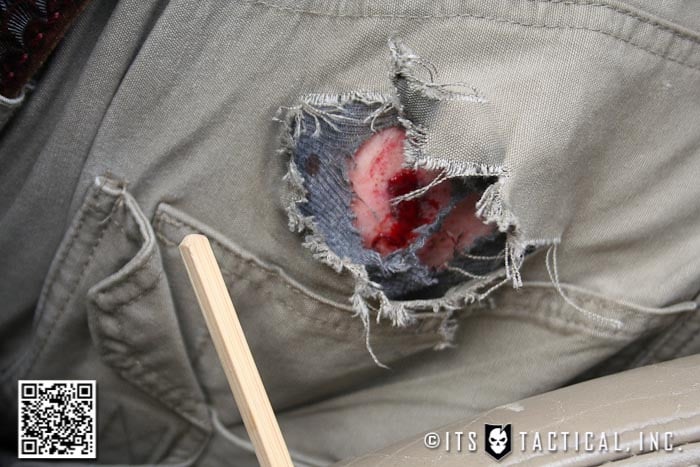
Me being the passenger, I rotated my torso to the left to fasten my seatbelt like I always do. When I straightened again, my Glock 19 discharged, blowing a 9mm hole through my pants, underwear, the leather seat and bottom of the car’s door frame.
The bullet nicked my hip, but the wound is nothing a bandage couldn’t cover. So what went wrong? Guns never go “Bang” all by themselves.
After ensuring I wasn’t hemorrhaging profusely and didn’t have to make a dash for the hospital, I stayed seated in the car as my wife came around to my door and opened it. I undid my belt and slid the Galco JAK202 Slide Belt Holster, with the gun still in it, off my belt. Why it went off was immediately apparent.
Accidental Discharge
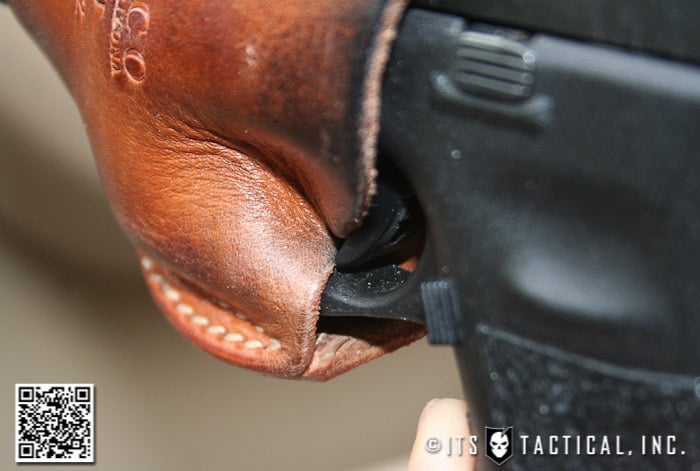
The trusty, comfortable, leather holster I had been using for a year and two weeks had done what a baseball glove does after lots of use; It got soft. This particular holster carries the pistol outside the waistband, but inside the belt. The belt slides through slots in the outer side of the holster.
The problem stemmed from the leather on the inner side of the holster getting soft. A crease formed, which eventually was large enough to extend beyond the trigger. Manipulate the gun in just the wrong manner and this crease is no different than a finger on the trigger. Boom!
I can’t say I didn’t know the crease had been formed in the holster. I trained myself to be sure that when holstering, to make sure the gun was fully in the holster, with the trigger protected. On this day, did I forget to do that when I holstered up? Did the leather finally get so soft that a combination of body movements and interference by the cushy leather seat move the Glock enough to create a situation where the trigger was engaged by the holster?
I don’t think we’ll ever know for sure, but I’ll humbly admit to the former as the likely culprit. However, if it was the latter, then those of you who use this type of holster need to be aware of its limitations and the possibility of experiencing what I did.
It might have been a very different story had the incident happened while we were dining. That bullet ricocheting off the concrete floor could have done untold damage and just as easily killed somebody. Fortunately nobody got hurt and damage to the car was minimal. It will be an interesting conversation with the insurance company to see if they’ll cover the repairs.
Lessons Learned
Holstering your gun can be just as important as drawing it. Make sure you pay attention when doing so. If your leather is getting soft and worn, be sure that it won’t interfere with your trigger or just replace it.
The back of the slide and/or grip was being pushed downward into the leather holster…or the holster was being pushed upward with some force. My guess is the firearm was being pushed and the fold in the holster acted as a finger and depressed the Glock trigger safety.
This truly brings home the importance of taking care of your equipment and ensuring it’s in proper working order. Hopefully you can learn from my situation and prevent an accident like this from happening to you.
Editor-in-chief’s note: We’d like to thank the anonymous individual who came forward with this important information and allowed us to get it out to everyone here at ITS Tactical.
Please share this with everyone you know that carries in a leather holster!
Together with Magnum USA, we’re saying thank you to all the original Plank Owners and all our Crew Leaders! We sincerely appreciate all your support and especially all the support we’ve received from Magnum!
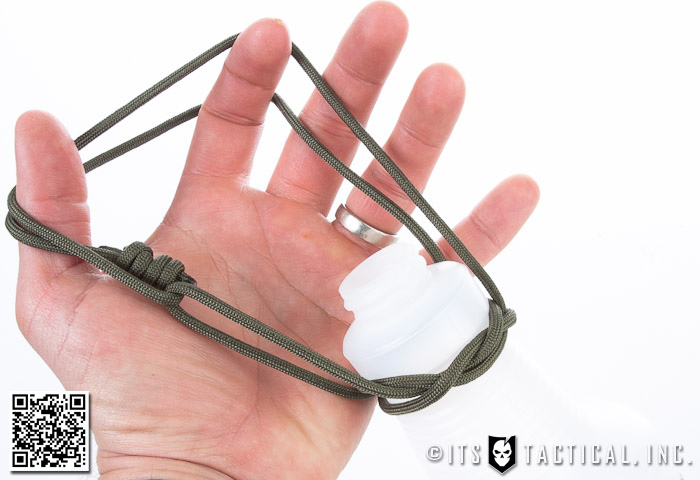
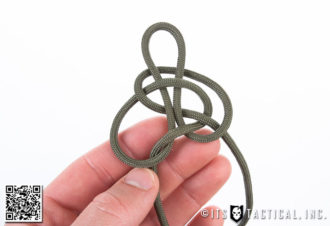
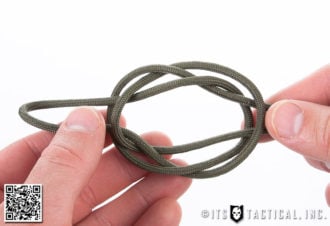
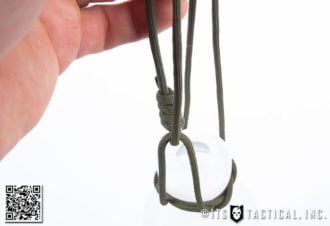
A bottle sling? What, you’ve never heard of a bottle sling before? We’ll admit we’ve seen them before but never give them much thought to include in the Knot of the Week until we tied one and realized how versatile of a knot it is!
From what we can tell, the bottle sling was first used by ancient greeks to not only carry jugs and bottles, but to also use as a surgical sling and as a traction device for dislocated joints.
Bottle Sling » Hitches
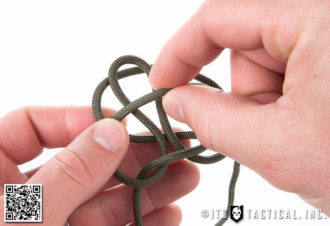
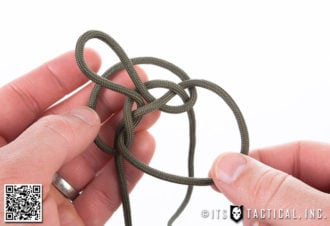
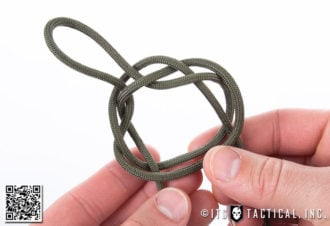
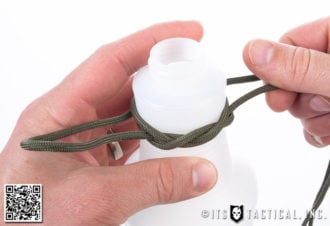
As mentioned, the bottle sling affords you the ability to carry any type of jug, bottle or jar by creating a hitch around the object and a carry handle. The carry handle can be made into a single loop as shown in the steps below, or for heavier items can be made into two carry handles to split the load between two people.
In the situation of carrying heavier loads, obviously the paracord we show being used would be replaced with a stronger rope such as natural fiber rope. What makes this knot truly versatile though is its ability to be used in medical applications for traction or slings. Definitely a knot to remember!
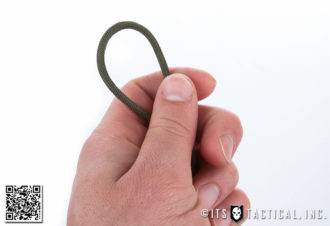
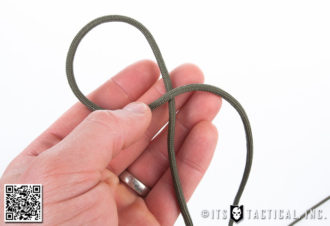
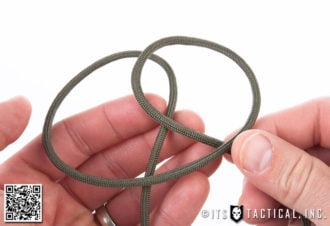
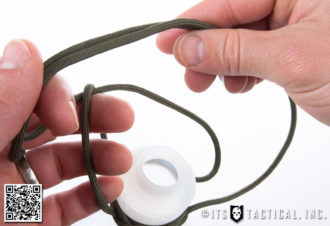
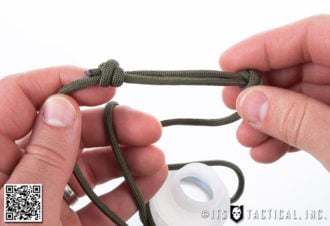
As written instructions for this knot get very detailed and can be hard to follow, we’ll defer to the photos and video below for instructions. Let us know if you have any questions regarding the steps.
Today I’m going to share some techniques with you that I came up with for creating dead drop devices during a previous SCG International Tactical HUMINT Operations course.
One of our taskers at the end of one class day was to create two dead drops by the next morning. This assignment was give to us at around 6 p.m., so with limited time, I did what anyone wanting to create dead drop devices would do. I hit the local Wal-Mart.
Dead Drop Devices
There are some great commercially available dead drop devices available out there, a few of which we’ve reviewed from Spy Coins. While the commercially available devices work great, there’s just something neat and rewarding about creating your own.
For a brief history on dead drop devices and their use, I’ll direct you to a previous post of ours where we went over some specifics and usage. Suffice to say the purpose of one of these devices is to covertly or overtly leave a message for another person without actually meeting in person.
During the SCG HUMINT class, we had to utilize dead drops to leave and retrieve messages to further our intelligence gathering against the opposition. Just using your local Wal-Mart for the necessary supplies, I’ll take you through a few of the dead drops I created and how they’re best utilized. Be sure to check out the video at the end of this article too!
Creating your Dead Drop
Imagine with me for a few seconds and picture some places that you think could work for both covert and overt dead drop locations. Keep in mind that these locations must be somewhere that doesn’t cause suspicion when being left or retrieved. Perhaps a public bathroom? Walking the dog and tying your shoe?
While you can get creative and make your dead drops ahead of time, it’s much better if you know where and how you’re going to leave your message and mold your device with those things in mind.
Materials Needed
One item I’ve found tremendously beneficial when creating dead drops is a contact lens case. These are about a dollar and you get a right and left container that can be broken in half, creating two dead drops. Another thing I’ll mention is magnets, which can be both a blessing and a curse. A dead drop that I didn’t show is one of those magnetic key hider boxes.
These are great until you go to hide your drop and realize the location you just knew would be metal that a magnet would stick to (ferrous), turns out to be aluminum and it falls off. Luckily, I had a contingency plan and a second dead drop ready to go when this happened! The last thing I’ll mention is Velcro strips or adhesive strips, both work great on the back of a dead drop to quickly leave them underneath something like a sink in that public bathroom we talked about.
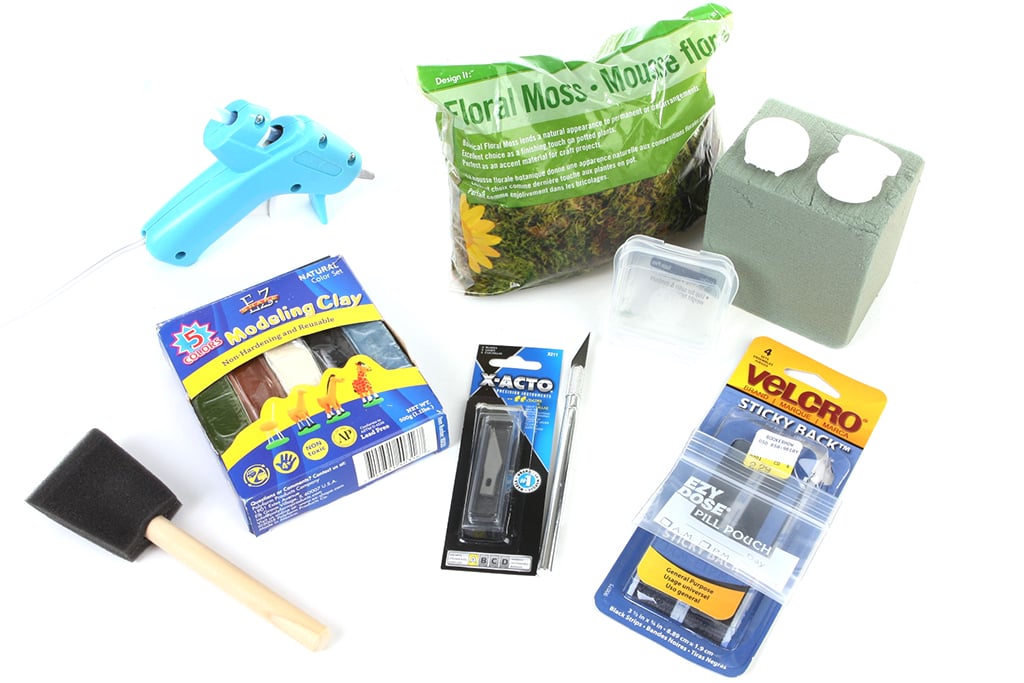
Here’s a break down of everything I used for the dead drops pictured in this article:
Brut Deodorant Stick
Contact Lens Case
Green Floral Foam
Sewing Pin Cases
EZ Dose Pill Pouches (zip locks)
Floral Moss
Craft Paint (2 shades of grey)
Sponge Brush
Modeling Clay
X-Acto Knife and Blades
Velcro Strips
Pocket Knife
Scissors
Hot Glue Gun
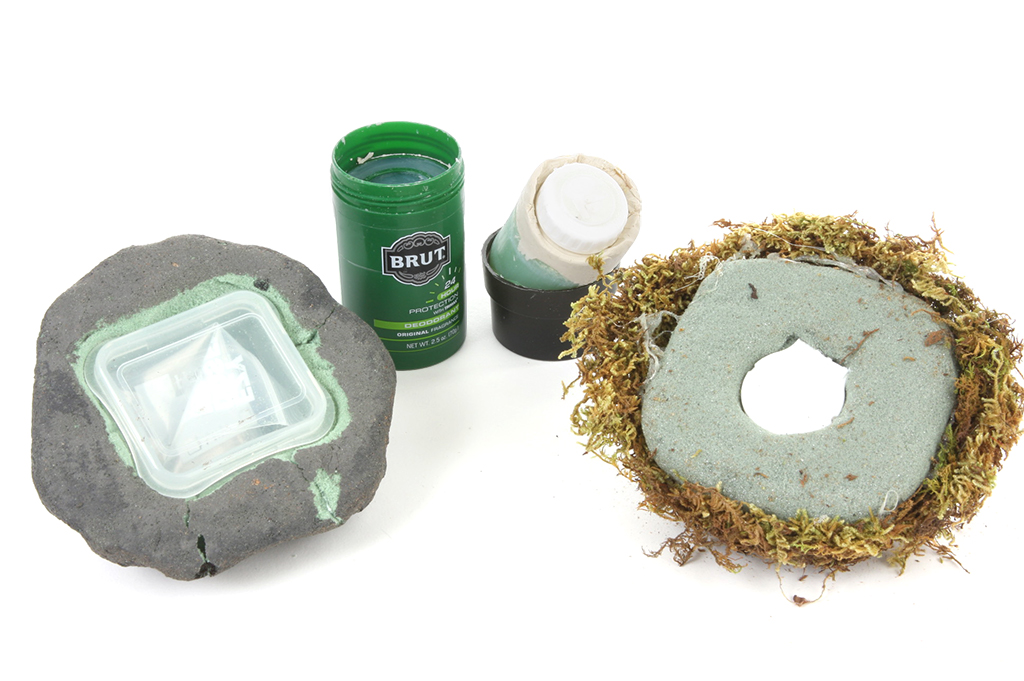
The old Dead Drop in the Deodorant Trick
The first drop I made was something I just wanted to attempt and thought would not only make a good dead drop, but also a great hiding place. As I was searching for useful items at Wal-Mart I stumbled upon the Deodorant and had a lightbulb go off in my head when I saw the Brut canister.
To create this drop, I simply pushed the deodorant all the way up until it broke free of the push-pop like canister. I then cut off about 1/4 of the deodorant stick using a knife. Wanting to store a contact lens case half inside, I knew that simply dropping it in and putting the deodorant stick back down would leave it totally obvious and unusable if anyone ever looked inside.
If that was my goal, I’d just completely remove the deodorant and have a large storage area and replace the cap. The problem with this is that when creating an overt dead drop, like in this case, you want to ensure it remains as true to it’s original purpose if it’s ever discovered. If anyone stumbled upon the Brut in question, they’d never suspect that it wasn’t regular deodorant (well maybe after reading this they would).
Fake Rocks and Grass Mounds
These next two drops are a bit harder to construct but are still relatively easy. The core of these rely on that green floral foam, while the floral foam I show in the images is square, these two drops used half-circle shaped floral foam that was found right next to the square stuff in the floral area.
What’s great about floral foam is its ability to be shaped into whatever you need. With the grass mound drop I didn’t do too much shaping, just hot glued on some floral moss and sticks I could find outside. If I had more time I would have gathered foliage that would match the area I planned to leave the drop.
Floral moss works well and will blend in with most grassy areas provided it’s not dead grass. On the bottom of the grass mound drop, hollowed out and shoved a contact lens case in that fit snugly but could still be removed. Again, a benefit of the foam is how easy it is to shape.
The fake rock was something that definitely took me a long time to sculpt. I started using my fingers to create the angular areas of the rock until I was satisfied that it looked like a rock. I then used two different shades of grey craft paint to dab on the color using a sponge brush. A single color just wouldn’t have looked good and I feel the lighter shade of grey really adds to the realism.
For the last step and while the paint was still wet, I grabbed some sandy dirt from outside and sprinkled it over the fake rock. After drying the sand stuck much better than I’d hoped and again added to the realism.
Notes
Hopefully this article’s made your imagination run wild, thinking of all the things you can create your own dead drops for. They don’t even have to be purpose built for dead drops, your projects can even be hiding places for your valuables that hide in plain sight. The problem with all those overt containers you see, like the hollowed out books or cans is that it’s the first place someone with any knowledge on the subject is going to look.
Let me know what you think of the drops I created and your ideas for what you’re going to put together!
In honor of St. Patrick’s Day and our awesome new shamrock patches, we’re going to have a one-day exclusive giveaway just for you!
Our awesome graphics guy Matt made up a special edition T-shirt just for the ITS Crew and made up an extra just to giveaway. We’ve included one of the new sold out shamrock patches to complete your St. Patty’s Day ITS Tactical swag.
We’re going to draw a winner today, so don’t wait to read more and find out how to get your entry in! UPDATE: Crew Leader Sheep.Dog is our winner!


 While we had to remove one of the two packages of Z-Fold Standard Gauze to make everything fit into the new bags, we’re making up for it by bringing you the best and newest decompression needle on the market! The Combat Medical Systems Mojo Dart! This new 14g 3.25″ decompression needle represents a huge upgrade to the kit and no longer will you have to remove rubber endcaps to get to the needle in a tube.
 Our new Frank Miller inspired ITS Tactical 300 T-Shirt is finally here! Members may remember this logo that Matt drew up for a recent iPhone wallpaper.
 In a membership exclusive, ITS Tactical has partnered with Spy Coins to bring you a limited-edition Challenge Coin that you can use to transport your sensitive information!