Ridiculous Dialogue Illustrated No. 6

Ridiculous Dialogue Illustrated No. 6

This month’s Ridiculous Dialogue Illustrated was inspired by Matt’s backfiring game of Hipster Slug Bug in Episode 24. Matt quickly found that downtown Fort Worth was lousy with Hipsters and his arms had the bruises to prove it.

Ridiculous Dialogue Illustrated is a selection of some of the best moments from our Podcast, Ridiculous Dialogue. It’s a way to bring some of the inside jokes and adventures to life that we all share here at ITS. This is a monthly comic strip that we’re sure our devoted podcast listeners will relate to and love.

For more insight into this month’s strip, you can listen to Episode 24 below.

Subscribe on iTunes Download Episode Subscribe via RSS Image Map


Posted in Podcast | Tagged , , , , , , , | 2 Comments

We’re Hiring at ITS! Be Part of Our Team

hiring

We’re growing here at ITS and we need someone to grow with us! We’re looking for an enthusiastic person to join our existing small business team in the role of Warehouse Support for our retail services. We need someone on a full-time (40 hours per week), long-term basis who is willing to learn about the inner workings of our company and will enjoy contributing to the team.

Think you have what it takes? Here’s what we’re looking for…

Warehouse Support

Job Responsibilities for the Warehouse Support position:

  • Preparing merchandise/store inventory for sale by packaging and tagging items
  • Receiving and auditing/QC review all incoming shipments
  • Completing packing slips, reading bills of lading, understanding other shipping documentation
  • Oversee storage of product in need of preparation for sales
  • Order fulfillment
  • Daily prioritization of inventory/stock needs/merchandise preparation
  • Inventory counts for merchandise
  • Warehouse supplies inventory and order request processing
  • Daily/Weekly cleaning tasks

Required Skills for the Warehouse Support position:

  • Excellent communication and organizational skills
  • Comfortable with various PC-based software/computer programs
  • Must be able to prioritize daily tasks and balance with retail needs
  • Must be able to understand and complete shipping documentation, packing slips, etc.
  • Must be physically able to lift and move boxes up to 50 pounds in weight
  • Must be able to stand for long periods of time
  • Must have 1-3 years of experience in a warehouse environment
  • Must be able to work independently as well as positively contribute to a team

Additional Requirements for this position:

  • Must have successfully completed high school or a higher level of education
  • Must have the legal right to work permanently in the United States
  • Must have reliable transportation
  • Must have a strong work ethic including timely daily attendance
  • Must submit resume to [email protected] to be considered for the position
  • Must undergo a background check, pre-employment drug screen and be insurable if job offer is made

Work Schedule: Monday – Friday, 9:00 a.m. – 6:00 p.m. (with 1 hour lunch break)

Job Location: Arlington, TX

Compensation: $12.00 per hour with eligibility for increase in pay, Life and Dental Insurance after successful completion of 60-day Initial Training Period.

Please email your resume to [email protected] for consideration.

Posted in ITS Information | Tagged , , , | 5 Comments

Red Team Mindset: The Original 12 Rules to Ensure Success

The Original 12 Red Team Rules

Editor-in-Chief’s Note: Our friend and ITS Contributor, Uri Fridman, has provided a wealth of information here on ITS surrounding Red Team Operations. Today, we’re highlighting his Original 12 Rules for Red Teams to ensure success. 

While “Red Team” often refers to a group of experts testing or infiltrating a physical or virtual perimeter of an opposing force, anyone can benefit from employing a Red Team mindset in non-technical aspects. Think of everyday activities such as work or school. The goal here is to enhance decision making.

Red Teaming can solve problems through an indirect and creative approach, using reasoning that isn’t immediately obvious. It also involves ideas that may not be obtainable solely through traditional step-by-step logic.

1. Always Have an Escape Plan

You know your plans will fail, there’s no doubt about it. Always have a way out. This also applies to projects, operations and everything else you do. Always know where the exits are, always know what to do in an emergency and be prepared for them. This is such an important thing that it’s the 1st rule on the list.

  • Always have a plan.
  • Always have a back-up plan, because the first one probably won’t work.
  • Always have an escape plan, because all the rest of your plans will fail.

This also goes along with the planning acronym PACE: Primary, Alternate, Contingency and Emergency.

Elevator Escape 09

2. Be Aware of Your Surroundings

So now you have an escape plan. What comes next is knowing where you are, what’s happening around you, what things that are out of place, or who might be watching you. Being aware of your surroundings will give you that extra fraction of a second to react and save your life, or that of your buddy.

On the Red Team side, being aware of what’s around you, both physically and digitally, might give you that extra edge. It will help you find that way in, find the faulty policy, or the question no one asked. So right after having an escape plan, is the need to be aware of your surroundings.

3. Assumption is the Mother of All F**kups

Assuming that something will happen in a certain way is asking for trouble. Never assume, always verify, ask, research, investigate, collect intel and inform yourself and your team.

This rule is one of those truths that has to be realized time and time again. We forget about it when we’re very involved with something and think we know all the answers. Don’t do it.

4. Always Have a Backup Plan

This rule is right up there with rule number 1. You know your plan will go to hell once you’re in the field, so always have a plan B and if possible, a plan C.

When we’re planning a project, we always designate a team member as the Plan B guy. He or she is in charge of saying that Plan A is bad and won’t work, so a Plan B will be drafted. Similar to the 10th Man Strategy, the plan B person will always work on contingencies. When in doubt always remember PACE (see rule 1.)

Editor-in-Chief’s Note: The “10th Man” is a strategy that seems clouded in its exact origin, but the premise is that if you have 10 people in a decision making process and all nine agree on a specific direction to take, it’s the 10th man’s responsibility to offer a dissenting opinion, or disagreement with the majority. You could even use the term “Devil’s Advocate” here. The 10th Man philosophy is simply to offer an alternate viewpoint for the sake of fostering a different way of thinking.

5. Never Get Caught

Within the worlds of covert ops and fieldcraft this is a golden rule; you never get caught. Bad things happen if you do.

In the Red Team world, if you get caught you’ve failed. If they discover your backdoor or catch you trying to walk through the main entrance of your target, you’re done. Great care should be taken not to get caught.

6. Keep Your Mouth Shut

OPSEC isn’t just important for national security. If you talk to much about your tactics, the way you do things, your tools and your people, you damage your team. The blue team, or opposing force, will prepare for this and you’ll be done.

7. KISS: Keep it Simple, Stupid

I said it many times before; the simpler the gear, the better it is. Your life depends on this. This also translates to planning and tactics. A simple plan with a flexible blueprint will survive real world contact far better than a complex, rule-bound plan.

Simple things are easy to change when needed and will adapt better to the ever-changing conditions in the field. So when you’ve got a plan, start simplifying it until nothing more can be taken away. This also applies to gear.

“If there’s a question about if it’s necessary, remove it. Less is more and more is lazy.” ~ Jason McCarthy, GORUCK founder

8. Simple and Light Equals Freedom, Agility and Mobility

As with Rule 7, I believe in being nimble. Being small and light allows you to move faster, more fluently and more efficient.

Take packing gear for example, the heavier you are the slower you’ll be. Do you really need all that gear? Can you go lighter? Can you use some of the gear for multiple things or can you completely do without it? In most cases, you can.

The same thing applies to your team. You don’t need a big team to be successful, you just need the right team. The right people can perform at a higher level and be tasked with different things. Having a small team means you can adapt faster and that forward momentum can be stopped much easier. Meaning that if a Plan B that deviates 180 degrees from Plan A needs to be executed, it won’t crash the team.

I recommend you read Getting Real from the people behind 37Signals.

9. Plan, Execute and Vanish

The Original 12 Red Team Rules

Leave no trace. Plan your way in, execute it to the best of your abilities and vanish. If they don’t know you were there, they can’t protect against you.

If you’re testing the target’s blue team, QRF, or security team, this is key. You want to keep them guessing.

10. You Don’t Have to Like It, You Just Have to Do It

Sometimes you have to do things that make no sense. Suck it up. Do it and be done with it. The faster you do it, the faster it’ll be over.

11. Always Invest in Good Quality Stuff

Having the right gear and the best gear, means you can trust it. This also means less headaches, less maintenance and less mental energy in having to research new gear.

Good quality stuff will perform when you need it.

12. Trust Your Gut

Ah yes, the gut feeling. Sometimes you have a nagging feeling that something isn’t right. That you should be doing the exact opposite of what you and your team are doing. Listen to this. Your gut will let you know when Plan B is needed.

It also might save your life someday.

You can view the comprehensive list of Red Team Rules here on the Red Teams Blog.

Editor-in-Chief’s Note: U. Fridman is a senior information security consultant that specializes in detection of information security threats and response to security incidents. His background includes extensive experience in red team activities and management, information warfare, counter cyber-terrorism, industrial espionage, forensics analysis and other security services.

Posted in Mindset | Tagged , , , , , , , , , | 7 Comments

A Full-Featured First Aid Kit for Life’s Emergencies: The ITS First Aid Kit Plus

ITS Boo Boo Kit Plus and ITS Zip Bag

Today we’re introducing our upgraded and newly designed ITS First Aid Products. The ITS First Aid Kit™ Plus is a upgraded version of our popular ITS First Aid Kit and contains a few larger items for a more well rounded and complete First Aid Kit solution. Designed to contain the ITS First Aid Kit™ Plus, or anything you can think of, the ITS Zip Bag represents our take on the classic zippered pouch. Let’s get into the details of our new products.

ITS First Aid Kit™ Plus

ITS Boo Boo Kit Plus and ITS Zip Bag

While the original ITS First Aid Kit™ is still fully featured and can handle most of your daily First Aid issues, the additional contents in our ITS First Aid Kit™ Plus provide you with components to handle situations that might require CPR, wound irrigation, or severe bleeding.

All contents come contained in a heavy-duty poly bag that allows easy and repetitive access to the components. The original ITS First Aid Kit™ and its components are still in their pocket-sized configuration too, which makes it easy to remove just this portion of the kit and toss it into a pocket. Insert cards included in these kits contain a list of contents and space to fill in your emergency contact info, allergies and blood type if you’d like.

Click here to order the new ITS First Aid Kit™ Plus!

ITS Zip Bag

ITS Boo Boo Kit Plus and ITS Zip Bag

Featuring sewn webbing handles on each side, ITS Zip Bags not only facilitate easy retrieval from a bag, but also enable a fixed grip-point to aid in opening and closing the zipper. Additionally, we’ve sewn a 5“ wide x 1.5“ tall strip of color-matched loop Velcro to the front of each bag to enable custom nametapes to be affixed for identification of contents.

Available in Medical Red or Black, each ITS Zip Bag measures 8.5” wide x 6” tall and includes an ITS Med PVC Patch and two red Velcro One-Wrap strips for wrapping onto the handles to identify Zip Bag contents as containing medical items. These can also be removed to keep the bag sterile and in use for storing accessories or organizing your cables inside a backpack.

Click here to order the new ITS Zip Bag!

Posted in ITS Information | Tagged , , , , , , | 2 Comments

Ridiculous Dialogue Podcast: Episode 30

ridiculous-dialogue-episode-30-main

Episode 30

On Episode 30, we celebrate the podcast’s 1st Anniversary… four episodes too late. We also brought up our favorite Internet photos and want you to Poundtag us your favorites! (Nothing too greasy please.)

This episode also featured another round of word association with Kelly, Vince, Bryan and Lang. We also included some listener Poundtag action like favorite superheroes and a NSFW Amazon Review of Haribo Gummi Bears, from which this episode got its title.

Be sure to Poundtag us your questions on Twitter so we can include them in the next episode!

Episode-30-Cast-of-Characters

Ridiculous Dialogue was created to share the banter that takes place at Imminent Threat Solutions on a daily basis. It’s us; candid, unedited and talking about everything from what movies we’re watching to the general geekiness that keeps us laughing here at ITS HQ.

While we generally keep the vibe in our articles PG rated, be warned, it may not be safe to blast over your speakers at work. We hope you enjoy the insight into ITS and who we are behind the scenes as a company; pull up a chair and tune in to Radio ITS.

Posted in Podcast | Tagged , , , , | 3 Comments

Elevator Action: How to Escape Being Trapped in an Elevator

Elevator Escape 03

How many of you remember the old Nintendo game Elevator Action? In the game you play a spy, bounding to and from elevators to reach the bottom floor of a building. As you descend, you’re dodging bullets and taking out bad guys along the way to your escape in a super fast 8-bit sports car. That’s how your normal workday commute goes anyway, right?

While you might not be dodging bullets, I’m sure you’ve always wondered about what you’d do if you found yourself in a stuck elevator. Would you reenact Die Hard and climb out the top hatch and scale the cables? Probably not, considering those emergency hatches are typically locked from the outside.

I’ll get into the details of what you should do if you find yourself trapped in an elevator, but this article might also serve as a reminder to always take the stairs. Not just for the reason that electronics will inevitably fail at the least convenient times, but also due to the implication that you’re predictable in an elevator.

Elevator Escape 10

As my friend Uri from the Red Teams Blog says, “never take the elevator.” Uri’s not a particularly paranoid person, but he always has a way of looking at things from a situational awareness aspect and is an advocate of never putting yourself in a position that can be compromised. He mentions that you can easily be tracked in an elevator, as you’re basically trapped in a box that always drops you onto a semi-fixed location that’s easy to monitor and observe. Worse, a trap can easily be set on any of the stops an elevator makes. Taking the stairs can help you familiarize yourself with exits and work on your escape plan. You do always have an escape plan, right?

Let’s get back to what to do in an emergency if you should ever find yourself trapped in an elevator, because you’re bound to ride another one, even after reading this article.

Get Control

Elevator Action

Let’s first talk about your options inside the cab of an elevator. OSHA (Occupational Safety & Health Administration) requires that all elevators are thoroughly inspected every year and that additional monthly inspections for satisfactory operation are also conducted. Records of the annual inspections are also to be posted within the vicinity of the elevator, along with the elevator’s maximum load limits. Load limits are to be posted in a conspicuous location both inside and outside of the elevator.

I mention these details so that you’ll know what kind of regulations cover elevators on a federal level and know what to look for when it comes to load limits, etc. Checking your state regulations can be helpful too, if you want to wade through the elevator code. It’s also common to see the wording in the photo below, that mentions compliance certificates (inspections) being on file somewhere other than the elevator itself.

Elevator Escape 07

Depending on the building you find yourself inside of and the type of elevator, most have a common car operating panel in which to make your desired floor stop selection from. In addition to the array of floor buttons, you’ll also find an alarm bell button and either a dedicated phone to call for help, or a help button.

The alarm bell is there to sound an audible alarm in case of an emergency to summon help. This beats tapping out morse code on the elevator door, but the alarm might not be heard if you’re away from a floor where someone can hear it. The help button should establish a two-way communication with someone that can also dispatch assistance for you if you’re trapped with no way out.

Elevator Escape 08

Most elevators also have a top-opening emergency exit, but from what I’ve been able to find out in talking with elevator repair companies and a friend that’s a local downtown firefighter, they’re locked from the outside by law. It’s not necessarily for you to access during a self-rescue attempt, but more for emergency responders to use to rescue you.

Preventative Measures

There’s a few things to mention before you might even get on an elevator, that can help prevent you from finding yourself in a scenario that requires rescuing.

  1. What’s the condition of the elevator? Does it look dilapidated or like it’s having issues? Maybe you’d be best taking the stairs to begin with.
  2. Observe the load limits of the elevator and judge whether you stepping onto the elevator is the best decision, based on the number of people already on it.
  3. Keep your cell phone charged in case it’s needed for emergency communication.
  4. Consider carrying a flashlight if it’s not already part of your EDC (every day carry.)
  5. This may sound like a no-brainer, but I’ll say it anyway. If there’s a fire, take the stairs, don’t even think about evacuating a burning building in an elevator.

Elevator Escape 02

Emergency Procedures

So what should you do if your elevator gets stuck and you feel you need to utilize the emergency options, like the help button and alarm bell?

  1. Remain Calm, it can have a positive effect on those around you who may not be.
  2. If the power is out, use a flashlight or the light from your cell phone to find and press the door open button or another floor selection.
  3. If the door open button doesn’t help, activate the help button on the elevator control panel.
  4. Make note of the time that the elevator stopped working and how many people are inside with you. Report this information during your call.
  5. If the help button isn’t functioning, try using your cell phone to call 911. Most elevators are faraday cages and reception might not be possible.
  6. If you still can’t get through to anyone, use the alarm bell to try and summon assistance.
  7. Banging on the door or yelling could work as well, but don’t over exert yourself if there’s no response after awhile.
  8. Patience and time might be your only recourse while waiting for emergency responders. Did you bring snacks?
  9. If all else fails and it’s a life or death emergency, you can make the decision on whether it’s worth trying to pry the door open to see if you can climb out through the door on the floor above or below you. I’d highly advise against this option, as the elevator could spring to life and you could potentially be crushed. Your situation will of course dictate your risk level, but there’s no need to jump to this option too soon, or to even hastily set up a pee corner (see below.)

As mentioned previously, the emergency exit hatch at the top of the elevator is more than likely locked from the outside, as required by law. You may not even be able to reach this unless there’s another person in the elevator to help you, or a railing to stand on.

Elevator Action

I’ll reiterate that patience is key in a situation like this. The concept of keeping calm existed long before the British propaganda posters of WWII and is still a solid model to follow in many emergency situations.

Simply taking the time to assess your environment and determine the best course of action can work wonders, both inside an elevator and out.

What are your tips for handling an elevator emergency?

Posted in Escape & Evasion | Tagged , , , , , | 33 Comments

CoTCCC Tactical Combat Casualty Care Guidelines: April 2015 Update

CoTCCC April Update

Here on ITS Tactical, we follow the CoTCCC (Committee on Tactical Combat Casualty Care) Guidelines very closely and have even designed our ETA Trauma Kits around them.

Tactical Combat Casualty Care (Pronounced “T-Triple C”) is a set of guidelines developed by USSOCOM (United States Special Operations Command) to properly train non-medics to deal with the preventable causes of death in the field.

These latest updates were released at the end of April and we wanted to share them with you here in their entirety as we do with each update the CoTCCC provides. We also have them available in .pdf format here to download.

Tactical Combat Casualty Care Guidelines – 24 April 2015

* All changes to the guidelines made since those published in the 2014 Eighth Edition of the PHTLS Manual are shown in bold text. The most recent changes are shown in red text.

Basic Management Plan For Care Under Fire

  1. Return fire and take cover.
  2. Direct or expect casualty to remain engaged as a combatant if  appropriate.
  3. Direct casualty to move to cover and apply self-aid if able.
  4. Try to keep the casualty from sustaining additional wounds.
  5. Casualties should be extricated from burning vehicles or buildings and moved to places of relative safety. Do what is necessary to stop the burning process.
  6. Airway management is generally best deferred until the Tactical Field Care phase.
  7. Stop life-threatening external hemorrhage if tactically feasible:
    – Direct casualty to control hemorrhage by self-aid if able.
    – Use a CoTCCC-recommended limb tourniquet for hemorrhage that is anatomically amenable to tourniquet use.
    – Apply the limb tourniquet over the uniform clearly proximal to the bleeding site(s). If the site of the life-threatening bleeding is not readily apparent, place the tourniquet “high and tight” (as proximal as possible) on the injured limb and move the casualty to cover.

Basic Management Plan for Tactical Field Care

  1. Casualties with an altered mental status should be disarmed immediately.
  2. Airway Management
    a. Unconscious casualty without airway obstruction:
    – Chin lift or jaw thrust maneuver
    – Nasopharyngeal airway
    – Place casualty in the recovery position
    b. Casualty with airway obstruction or impending airway obstruction:
    – Chin lift or jaw thrust maneuver
    – Nasopharyngeal airway
    – Allow casualty to assume any position that best protects the airway, to include sitting up.
    – Place unconscious casualty in the recovery position.
    – If previous measures unsuccessful:
    – Surgical cricothyroidotomy (with lidocaine if conscious)
    c. If the previous measures are unsuccessful, perform a surgical cricothyroidotomy using one of the following:
    – CricKey technique (Preferred option)
    – Bougie-aided open surgical technique using a flanged and cuffed airway cannula of less than 10 mm outer diameter, 6-7 mm internal diameter, and 5-8 cm of intra-tracheal length
    – Standard open surgical technique using a flanged and cuffed airway cannula of less than 10mm outer diameter, 6-7 mm internal diameter, and 5-8 cm of intra-tracheal length (Least desirable option)
    – Use lidocaine if the casualty is conscious.
  3. Breathing
    a. In a casualty with progressive respiratory distress and known or suspected torso trauma, consider a tension pneumothorax and decompress the chest on the side of the injury with a 14-gauge, 3.25 inch needle/catheter unit inserted in the second intercostal space at the midclavicular line. Ensure that the needle entry into the chest is not medial to the nipple line and is not directed towards the heart. An acceptable alternate site is the 4th or 5th intercostal space at the anterior axillary line (AAL).
    b. All open and/or sucking chest wounds should be treated by immediately applying a vented chest seal to cover the defect. If a vented chest seal is not available, use a non-vented chest seal. Monitor the casualty for the potential development of a subsequent tension pneumothorax. If the casualty develops increasing hypoxia, respiratory distress, or hypotension and a tension pneumothorax is suspected, treat by burping or removing the dressing or by needle decompression.
    c. Casualties with moderate/severe TBI should be given supplemental oxygen when available to maintain an oxygen saturation > 90%.
  4. Bleeding
    a. Assess for unrecognized hemorrhage and control all sources of bleeding. If not already done, use a CoTCCC-recommended limb tourniquet to control life-threatening external hemorrhage that is anatomically amenable to tourniquet use or for any traumatic amputation. Apply directly to the skin 2-3 inches above wound. If bleeding is not controlled with the first tourniquet, apply a second tourniquet side-by-side with the first.
    b. For compressible hemorrhage not amenable to limb tourniquet use or as an adjunct to tourniquet removal (if evacuation time is anticipated to be longer than two hours), use Combat Gauze as the CoTCCC hemostatic dressing of choice. Celox Gauze and ChitoGauze may also be used if Combat Gauze is not available. Hemostatic dressings should be applied with at least 3 minutes of direct pressure. If the bleeding site is amenable to use of a junctional tourniquet, immediately apply a CoTCCC-recommended junctional tourniquet. Do not delay in the application of the junctional tourniquet once it is ready for use. Apply hemostatic dressings with direct pressure if a junctional tourniquet is not available or while the junctional tourniquet is being readied for use.
    c. Reassess prior tourniquet application. Expose wound and determine if tourniquet is needed. If it is, replace any limb tourniquet over the uniform with one applied directly to skin 2-3 inches above wound. Ensure that bleeding is stopped. When possible, a distal pulse should be checked. If bleeding persists or a distal pulse is still present, consider additional tightening of the tourniquet or the use of a second tourniquet side-by-side with the first to eliminate both bleeding and the distal pulse.
    d. Limb tourniquets and junctional tourniquets should be converted to hemostatic or pressure dressings as soon as possible if three criteria are met: the casualty is not in shock; it is possible to monitor the wound closely for bleeding; and the tourniquet is not being used to control bleeding from an amputated extremity. Every effort should be made to convert tourniquets in less than 2 hours if bleeding can be controlled with other means. Do not remove a tourniquet that has been in place more than 6 hours unless close monitoring and lab capability are available.
    e. Expose and clearly mark all tourniquet sites with the time of tourniquet application. Use an indelible marker.
  5. Intravenous (IV) access
    – Start an 18-gauge IV or saline lock if indicated.
    – If resuscitation is required and IV access is not obtainable, use the intraosseous (IO) route.
  6. Tranexamic Acid (TXA)
    If a casualty is anticipated to need significant blood transfusion (for example: presents with hemorrhagic shock, one or more major amputations, penetrating torso trauma, or evidence of severe bleeding)
    – Administer 1 gram of tranexamic acid in 100 cc Normal Saline or Lactated Ringers as soon as possible but NOT later than 3 hours after injury.
    – Begin second infusion of 1 gm TXA after Hextend or other fluid treatment.
  7. Fluid resuscitation
    a. The resuscitation fluids of choice for casualties in hemorrhagic shock, listed from most to least preferred, are: whole blood*; plasma, RBCs and platelets in 1:1:1 ratio*; plasma and RBCs in 1:1 ratio; plasma or RBCs alone; Hextend; and crystalloid (Lactated Ringers or Plasma-Lyte A).
    b. Assess for hemorrhagic shock (altered mental status in the absence of brain injury and/or weak or absent radial pulse).
    1. If not in shock:
    – No IV fluids are immediately necessary.
    – Fluids by mouth are permissible if the casualty is conscious and can swallow.
    2. If in shock and blood products are available under an approved command or theater blood product administration protocol:
          – Resuscitate with whole blood*, or, if not available
          – Plasma, RBCs and platelets in a 1:1:1 ratio*, or, if not available
          – Plasma and RBCs in 1:1 ratio, or, if not available;
          – Reconstituted dried plasma, liquid plasma or thawed plasma alone or RBCs alone;
          – Reassess the casualty after each unit. Continue resuscitation until a palpable radial pulse, improved mental status or systolic BP of 80-90 mmHg is present.
    3. If in shock and blood products are not available under an approved command or theater blood product administration protocol due to tactical or logistical constraints:
          – Resuscitate with Hextend, or if not available;
          – Lactated Ringers or Plasma-Lyte A;
          – Reassess the casualty after each 500 mL IV bolus;
    – Continue resuscitation until a palpable radial pulse, improved mental status, or systolic BP of 80-90 mmHg is present.

          – Discontinue fluid administration when one or more of the above end points has been achieved.
    4. If a casualty with an altered mental status due to suspected TBI has a weak or absent peripheral pulse, resuscitate as necessary to restore and maintain a normal radial pulse. If BP monitoring is available, maintain a target systolic BP of at least 90 mmHg.
    5. Reassess the casualty frequently to check for recurrence of shock. If shock recurs, recheck all external hemorrhage control measures to ensure that they are still effective and repeat the fluid resuscitation as outlined above.
    * Neither whole blood nor apheresis platelets as these products are currently collected in theater are FDA-compliant. Consequently, whole blood and 1:1:1 resuscitation using apheresis platelets should be used only if all of the FDA-compliant blood products needed to support 1:1:1 resuscitation are not available, or if 1:1:1 resuscitation is not producing the desired clinical effect.”
  8. Prevention of hypothermia
    a. Minimize casualty’s exposure to the elements. Keep protective gear on or with the casualty if feasible.
    b. Replace wet clothing with dry if possible. Get the casualty onto an insulated surface as soon as possible.
    c. Apply the Ready-Heat Blanket from the Hypothermia Prevention and Management Kit (HPMK) to the casualty’s torso (not directly on the skin) and cover the casualty with the Heat-Reflective Shell (HRS).
    d. If an HRS is not available, the previously recommended combination of the Blizzard Survival Blanket and the Ready Heat blanket may also be used.
    e. If the items mentioned above are not available, use dry blankets, poncho liners, sleeping bags, or anything that will retain heat and keep the casualty dry.
    f. Warm fluids are preferred if IV fluids are required.
  9. Penetrating Eye Trauma
    If a penetrating eye injury is noted or suspected:
    a) Perform a rapid field test of visual acuity.
    b) Cover the eye with a rigid eye shield (NOT a pressure patch.)
    c) Ensure that the 400 mg moxifloxacin tablet in the combat pill pack is taken if possible and that IV/IM antibiotics are given as outlined below if oral moxifloxacin cannot be taken.
  10. Monitoring
    Pulse oximetry should be available as an adjunct to clinical monitoring. All individuals with moderate/severe TBI should be monitored with pulse oximetry. Readings may be misleading in the settings of shock or marked hypothermia.
  11. Inspect and dress known wounds.
  12. Check for additional wounds.
  13. Analgesia on the battlefield should generally be achieved using one of three options:
    Option 1
    Mild to Moderate Pain
    Casualty is still able to fight
    – TCCC Combat pill pack:
    – Tylenol – 650-mg bilayer caplet, 2 PO every 8 hours
    – Meloxicam – 15 mg PO once a day
    Option 2
    Moderate to Severe Pain
    Casualty IS NOT in shock or respiratory distress AND
    Casualty IS NOT at significant risk of developing either condition
    – Oral transmucosal fentanyl citrate (OTFC) 800 ug
    – Place lozenge between the cheek and the gum
    – Do not chew the lozenge
    Option 3
    Moderate to Severe Pain
    Casualty IS in hemorrhagic shock or respiratory distress OR
    Casualty IS at significant risk of developing either condition
    – Ketamine 50 mg IM or IN Or
    – Ketamine 20 mg slow IV or IO
    * Repeat doses q30min prn for IM or IN
    * Repeat doses q20min prn for IV or IO
    * End points: Control of pain or development of nystagmus (rhythmic back-and-forth movement of the eyes)
    * Analgesia notes
    a. Casualties may need to be disarmed after being given OTFC or ketamine.
    b. Document a mental status exam using the AVPU method prior to administering opioids or ketamine.
    c. For all casualties given opiods or ketamine – monitor airway, breathing, and circulation closely
    d. Directions for administering OTFC:
    – Recommend taping lozenge-on-a-stick to casualty’s finger as an added safety measure OR utilizing a safety pin and rubber band to attach the lozenge (under tension) to the patient’s uniform or plate carrier.
    – Reassess in 15 minutes
    – Add second lozenge, in other cheek, as necessary to control severe pain
    – Monitor for respiratory depression
    e. IV Morphine is an alternative to OTFC if IV access has been obtained
    – 5 mg IV/IO
    – Reassess in 10 minutes.
    – Repeat dose every 10 minutes as necessary to control severe pain.
    – Monitor for respiratory depression
    f. Naloxone (0.4 mg IV or IM) should be available when using opioid analgesics.
    g. Both ketamine and OTFC have the potential to worsen severe TBI. The combat medic, corpsman, or PJ must consider this fact in his or her analgesic decision, but if the casualty is able to complain of pain, then the TBI is likely not severe enough to preclude the use of ketamine or OTFC.
    h. Eye injury does not preclude the use of ketamine. The risk of additional damage to the eye from using ketamine is low and maximizing the casualty’s chance for survival takes precedence if the casualty is in shock or respiratory distress or at significant risk for either.
    i. Ketamine may be a useful adjunct to reduce the amount of opioids required to provide effective pain relief. It is safe to give ketamine to a casualty who has previously received morphine or OTFC. IV Ketamine should be given over 1 minute.
    j. If respirations are noted to be reduced after using opioids or ketamine, provide ventilatory support with a bag-valve-mask or mouth-to-mask ventilations.
    k. Ondansetron, 4 mg ODT/IV/IO/IM, every 8 hours as needed for nausea or vomiting. Each 8-hour dose can be repeated once at 15 minutes if nausea and vomiting are not improved. Do not give more than 8 mg in any 8-hour interval. Oral ondansetron is NOT an acceptable alternative to the ODT formulation.
    l. Reassess – reassess – reassess!
  14. Splint fractures and recheck pulse.
  15. Antibiotics: recommended for all open combat wounds
    a. If able to take PO:
    – Moxifloxacin, 400 mg PO one a day
    b. If unable to take PO (shock, unconsciousness):
    – Cefotetan, 2 g IV (slow push over 3-5 minutes) or IM every 12 hours
    or
    – Ertapenem, 1 g IV/IM once a day
  16. Burns
    a. Facial burns, especially those that occur in closed spaces, may be associated with inhalation injury. Aggressively monitor airway status and oxygen saturation in such patients and consider early surgical airway for respiratory distress or oxygen desaturation.
    b. Estimate total body surface area (TBSA) burned to the nearest 10% using the Rule of Nines.
    c. Cover the burn area with dry, sterile dressings. For extensive burns (>20%), consider placing the casualty in the Blizzard Survival Blanket in the Hypothermia Prevention Kit in order to both cover the burned areas and prevent hypothermia.
    d. Fluid resuscitation (USAISR Rule of Ten)
    – If burns are greater than 20% of Total Body Surface Area, fluid resuscitation should be initiated as soon as IV/IO access is established. Resuscitation should be initiated with Lactated Ringer’s, normal saline, or Hextend. If Hextend is used, no more than 1000 ml should be given, followed by Lactated Ringer’s or normal saline as needed.
    – Initial IV/IO fluid rate is calculated as %TBSA x 10cc/hr for adults weighing 40- 80 kg.
    – For every 10 kg ABOVE 80 kg, increase initial rate by 100 ml/hr.
    – If hemorrhagic shock is also present, resuscitation for hemorrhagic shock takes precedence over resuscitation for burn shock. Administer IV/IO fluids per the TCCC Guidelines in Section 6.
    e. Analgesia in accordance with the TCCC Guidelines in Section 12 may be administered to treat burn pain.
    f. Prehospital antibiotic therapy is not indicated solely for burns, but antibiotics should be given per the TCCC guidelines in Section 14 if indicated to prevent infection in penetrating wounds.
    g. All TCCC interventions can be performed on or through burned skin in a burn casualty.
  17. Communicate with the casualty if possible.
    – Encourage; reassure
    – Explain care
  18. Cardiopulmonary resuscitation (CPR)
    Resuscitation on the battlefield for victims of blast or penetrating trauma who have no pulse, no ventilations, and no other signs of life will not be successful and should not be attempted. However, casualties with torso trauma or polytrauma who have no pulse or respirations during TFC should have bilateral needle decompression performed to ensure they do not have a tension pneumothorax prior to discontinuation of care. The procedure is the same as described in section 3a above.
  19. Documentation of Care
    Document clinical assessments, treatments rendered, and changes in the casualty’s status on a TCCC Casualty Card (DD Form 1380). Forward this information with the casualty to the next level of care.

Basic Management Plan for Tactical Evacuation Care

* The term “Tactical Evacuation” includes both Casualty Evacuation (CASEVAC) and Medical Evacuation (MEDEVAC) as defined in Joint Publication 4-02.

  1. Airway Management
    a. Unconscious casualty without airway obstruction:
    – Chin lift or jaw thrust maneuver
    – Nasopharyngeal airway
    – Place casualty in the recovery position
    b. Casualty with airway obstruction or impending airway obstruction:
    – Chin lift or jaw thrust maneuver
    – Nasopharyngeal airway
    – Allow casualty to assume any position that best protects the airway, to include sitting up.
    – Place unconscious casualty in the recovery position.
    — If the previous measures are unsuccessful, assess the tactical and clinical situations, the equipment at hand, and the skills and experience of the person providing care, and then select one of the following airway interventions:
    – Supraglottic airway, or
    – Endotracheal intubation or
    Perform a surgical cricothyroidotomy using one of the following:
    – CricKey technique (Preferred option)
    – Bougie-aided open surgical technique using a flanged and cuffed airway cannula of less than 10mm outer diameter, 6-7mm internal diameter, and 5-8 cm of intra-tracheal length
    – Standard open surgical technique using a flanged and cuffed airway cannula of less than 10mm outer diameter, 6-7mm internal diameter and 5-8cm of intra-tracheal length (Least desirable option)
    – Use lidocaine if the casualty is conscious.
    c. Spinal immobilization is not necessary for casualties with penetrating trauma.
  2. Breathing
    a. In a casualty with progressive respiratory distress and known or suspected torso trauma, consider a tension pneumothorax and decompress the chest on the side of the injury with a 14-gauge, 3.25 inch needle/catheter unit inserted in the second intercostal space at the midclavicular line. Ensure that the needle entry into the chest is not medial to the nipple line and is not directed towards the heart. An acceptable alternate site is the 4th or 5th intercostal space at the anterior axillary line (AAL).
    b. Consider chest tube insertion if no improvement and/or long transport is anticipated.
    c. Most combat casualties do not require supplemental oxygen, but administration of oxygen may be of benefit for the following types of casualties:
    – Low oxygen saturation by pulse oximetry
    – Injuries associated with impaired oxygenation
    – Unconscious casualty
    – Casualty with TBI (maintain oxygen saturation > 90%)
    – Casualty in shock
    – Casualty at altitude
    d. All open and/or sucking chest wounds should be treated by immediately applying a vented chest seal to cover the defect. If a vented chest seal is not available, use a non-vented chest seal. Monitor the casualty for the potential development of a subsequent tension pneumothorax. If the casualty develops increasing hypoxia, respiratory distress, or hypotension and a tension pneumothorax is suspected, treat by burping or removing the dressing or by needle decompression.
  3. Bleeding
    a. Assess for unrecognized hemorrhage and control all sources of bleeding. If not already done, use a CoTCCC-recommended limb tourniquet to control life-threatening external hemorrhage that is anatomically amenable to tourniquet use or for any traumatic amputation. Apply directly to the skin 2-3 inches above wound. If bleeding is not controlled with the first tourniquet, apply a second tourniquet side-by-side with the first.
    b. For compressible hemorrhage not amenable to limb tourniquet use or as an adjunct to tourniquet removal, use Combat Gauze as the CoTCCC hemostatic dressing of choice. Celox Gauze and ChitoGauze may also be used if Combat Gauze is not available. Hemostatic dressings should be applied with at least 3 minutes of direct pressure. If the bleeding site is amenable to use of a junctional tourniquet, immediately apply a CoTCCC-recommended junctional tourniquet. Do not delay in the application of the junctional tourniquet once it is ready for use. Apply hemostatic dressings with direct pressure if a junctional tourniquet is not available or while the junctional tourniquet is being readied for use.
    c. Reassess prior tourniquet application. Expose the wound and determine if a tourniquet is needed. If it is, replace any limb tourniquet placed over the uniform with one applied directly to the skin 2-3 inches above wound. Ensure that bleeding is stopped. When possible, a distal pulse should be checked. If bleeding persists or a distal pulse is still present, consider additional tightening of the tourniquet or the use of a second tourniquet side-by-side with the first to eliminate both bleeding and the distal pulse.
    d. Limb tourniquets and junctional tourniquets should be converted to hemostatic or pressure dressings as soon as possible if three criteria are met: the casualty is not in shock; it is possible to monitor the wound closely for bleeding; and the tourniquet is not being used to control bleeding from an amputated extremity. Every effort should be made to convert tourniquets in less than 2 hours if bleeding can be controlled with other means. Do not remove a tourniquet that has been in place more than 6 hours unless close monitoring and lab capability are available.
    e. Expose and clearly mark all tourniquet sites with the time of tourniquet application. Use an indelible marker.
  4. Intravenous (IV) access
    a. Reassess need for IV access.
    – If indicated, start an 18-gauge IV or saline lock
    – If resuscitation is required and IV access is not obtainable, use intraosseous (IO) route.
  5. Tranexamic Acid (TXA)
    If a casualty is anticipated to need significant blood transfusion (for example: presents with hemorrhagic shock, one or more major amputations, penetrating torso trauma, or evidence of severe bleeding)
    – Administer 1 gram of tranexamic acid in 100 cc Normal Saline or Lactated Ringers as soon as possible but NOT later than 3 hours after injury.
    – Begin second infusion of 1 gm TXA after Hextend or other fluid treatment.
  6. Traumatic Brain Injury
    a. Casualties with moderate/severe TBI should be monitored for:
    1. Decreases in level of consciousness
    2. Pupillary dilation
    3. SBP should be >90 mmHg
    4. O2 sat > 90
    5. Hypothermia
    6. PCO2 (If capnography is available, maintain between 35-40 mmHg)
    7. Penetrating head trauma (if present, administer antibiotics)
    8. Assume a spinal (neck) injury until cleared.
    b. Unilateral pupillary dilation accompanied by a decreased level of consciousness may signify impending cerebral herniation; if these signs occur, take the following actions to decrease intracranial pressure:
    1) Administer 250 cc of 3 or 5% hypertonic saline bolus.
    2) Elevate the casualty’s head 30 degrees.
    3) Hyperventilate the casualty.
    a) Respiratory rate 20
    b) Capnography should be used to maintain the end-tidal CO2 between 30-35
    c) The highest oxygen concentration (FIO2) possible should be used for hyperventilation.
    *Notes:
    – Do not hyperventilate unless signs of impending herniation are present.
    – Casualties may be hyperventilated with oxygen using the bag-valve-mask technique.
  7. Fluid resuscitation
    a. The resuscitation fluids of choice for casualties in hemorrhagic shock, listed from most to least preferred, are: whole blood*; plasma, RBCs and platelets in 1:1:1 ratio*; plasma and RBCs in 1:1 ratio; plasma or RBCs alone; Hextend; and crystalloid (Lactated Ringers or Plasma-Lyte A).
    b. Assess for hemorrhagic shock (altered mental status in the absence of brain injury and/or weak or absent radial pulse).
    1. If not in shock:
    – No IV fluids are immediately necessary.
    – Fluids by mouth are permissible if the casualty is conscious and can swallow.
    2. If in shock and blood products are available under an approved command or theater blood product administration protocol:
            – Resuscitate with whole blood*, or, if not available
            – Plasma, RBCs and platelets in a 1:1:1 ratio*, or, if not available
            – Plasma and RBCs in 1:1 ratio, or, if not available;
            – Reconstituted dried plasma, liquid plasma or thawed plasma alone or RBCs alone;
            – Reassess the casualty after each unit. Continue resuscitation until a palpable radial pulse, improved mental status or systolic BP of 80-90 mmHg is present.
    3. If in shock and blood products are not available under an approved command or theater blood product administration protocol due to tactical or logistical constraints:
            – Resuscitate with Hextend, or if not available;
            – Lactated Ringers or Plasma-Lyte A;
            – Reassess the casualty after each 500 mL IV bolus;
            – Continue resuscitation until a palpable radial pulse, improved mental status, or systolic BP of 80-90 mmHg is present.
            – Discontinue fluid administration when one or more of the above end points has been achieved.
    4. If a casualty with an altered mental status due to suspected TBI has a weak or absent peripheral pulse, resuscitate as necessary to restore and maintain a normal radial pulse. If BP monitoring is available, maintain a target systolic BP of at least 90 mmHg.
    5. Reassess the casualty frequently to check for recurrence of shock. If shock recurs, recheck all external hemorrhage control measures to ensure that they are still effective and repeat the fluid resuscitation as outlined above.
    * Neither whole blood nor apheresis platelets as these products are currently collected in theater are FDA-compliant. Consequently, whole blood and 1:1:1 resuscitation using apheresis platelets should be used only if all of the FDA-compliant blood products needed to support 1:1:1 resuscitation are not available, or if 1:1:1 resuscitation is not producing the desired clinical effect.”
  8. Prevention of hypothermia
    a. Minimize casualty’s exposure to the elements. Keep protective gear on or with the casualty if feasible.
    b. Replace wet clothing with dry if possible. Get the casualty onto an insulated surface as soon as possible.
    c. Apply the Ready-Heat Blanket from the Hypothermia Prevention and Management Kit (HPMK) to the casualty’s torso (not directly on the skin) and cover the casualty with the Heat-Reflective Shell (HRS).
    d. If an HRS is not available, the previously recommended combination of the Blizzard Survival Blanket and the Ready Heat blanket may also be used.
    e. If the items mentioned above are not available, use poncho liners, sleeping bags, or anything that will retain heat and keep the casualty dry.
    f. Use a portable fluid warmer capable of warming all IV fluids including blood products.
    g. Protect the casualty from wind if doors must be kept open.
  9. Penetrating Eye Trauma
    If a penetrating eye injury is noted or suspected:
    a) Perform a rapid field test of visual acuity.
    b) Cover the eye with a rigid eye shield (NOT a pressure patch).
    c) Ensure that the 400 mg moxifloxacin tablet in the combat pill pack is taken if possible and that IV/IM antibiotics are given as outlined below if oral moxifloxacin cannot be taken.
  10. Monitoring
    Institute pulse oximetry and other electronic monitoring of vital signs, if indicated. All individuals with moderate/severe TBI should be monitored with pulse oximetry.
  11. Inspect and dress known wounds if not already done.
  12. Check for additional wounds.
  13. Analgesia on the battlefield should generally be achieved using one of three options:
    Option 1
    Mild to Moderate Pain
    Casualty is still able to fight
    – TCCC Combat pill pack:
    – Tylenol – 650-mg bilayer caplet, 2 PO every 8 hours
    – Meloxicam – 15 mg PO once a day
    Option 2
    Moderate to Severe Pain
    Casualty IS NOT in shock or respiratory distress AND
    Casualty IS NOT at significant risk of developing either condition
    – Oral transmucosal fentanyl citrate (OTFC) 800 ug
    – Place lozenge between the cheek and the gum
    – Do not chew the lozenge
    Option 3
    Moderate to Severe Pain
    Casualty IS in hemorrhagic shock or respiratory distress OR
    Casualty IS at significant risk of developing either condition
    – Ketamine 50 mg IM or IN
    Or
    – Ketamine 20 mg slow IV or IO
    * Repeat doses q30min prn for IM or IN
    * Repeat doses q20min prn for IV or IO
    * End points: Control of pain or development of nystagmus (rhythmic back-and-forth movement of the eyes)
    * Analgesia notes
    a. Casualties may need to be disarmed after being given OTFC or ketamine.
    b. Document a mental status exam using the AVPU method prior to administering opioids or ketamine.
    c. For all casualties given opiods or ketamine – monitor airway, breathing, and circulation closely
    d. Directions for administering OTFC:
    – Recommend taping lozenge-on-a-stick to casualty’s finger as an added safety measure OR utilizing a safety pin and rubber band to attach the lozenge (under tension) to the patients uniform or plate carrier.
    – Reassess in 15 minutes
    – Add second lozenge, in other cheek, as necessary to control severe pain
    – Monitor for respiratory depression
    e. IV Morphine is an alternative to OTFC if IV access has been obtained
    – 5 mg IV/IO
    – Reassess in 10 minutes.
    – Repeat dose every 10 minutes as necessary to control severe pain.
    – Monitor for respiratory depression
    f. Naloxone (0.4 mg IV or IM) should be available when using opioid analgesics.
    g. Both ketamine and OTFC have the potential to worsen severe TBI. The combat medic, corpsman, or PJ must consider this fact in his or her analgesic decision, but if the casualty is able to complain of pain, then the TBI is likely not severe enough to preclude the use of ketamine or OTFC.
    h. Eye injury does not preclude the use of ketamine. The risk of additional damage to the eye from using ketamine is low and maximizing the casualty’s chance for survival takes precedence if the casualty is in shock or respiratory distress or at significant risk for either.
    i. Ketamine may be a useful adjunct to reduce the amount of opioids required to provide effective pain relief. It is safe to give ketamine to a casualty who has previously received morphine or OTFC. IV Ketamine should be given over 1 minute.
    j. If respirations are noted to be reduced after using opioids or ketamine, provide ventilatory support with a bag-valve-mask or mouth-to-mask ventilations.
    k. Ondansetron, 4 mg ODT/IV/IO/IM, every 8 hours as needed for nausea or vomiting. Each 8-hour dose can be repeated once at 15 minutes if nausea and vomiting are not improved. Do not give more than 8 mg in any 8-hour interval. Oral ondansetron is NOT an acceptable alternative to the ODT formulation.
    l. Reassess – reassess – reassess!
  14. Reassess fractures and recheck pulses.
  15. Antibiotics: recommended for all open combat wounds
    a. If able to take PO:
    – Moxifloxacin, 400 mg PO once a day
    b. If unable to take PO (shock, unconsciousness):
    – Cefotetan, 2 g IV (slow push over 3-5 minutes) or IM every 12 hours,
    or
    – Ertapenem, 1 g IV/IM once a day
  16. Burns
    a. Facial burns, especially those that occur in closed spaces, may be associated with inhalation injury. Aggressively monitor airway status and oxygen saturation in such patients and consider early surgical airway for respiratory distress or oxygen desaturation.
    b. Estimate total body surface area (TBSA) burned to the nearest 10% using the Rule of Nines.
    c. Cover the burn area with dry, sterile dressings. For extensive burns (>20%), consider placing the casualty in the Heat-Reflective Shell or Blizzard Survival Blanket from the Hypothermia Prevention Kit in order to both cover the burned areas and prevent hypothermia.
    d. Fluid resuscitation (USAISR Rule of Ten)
    – If burns are greater than 20% of Total Body Surface Area, fluid resuscitation should be initiated as soon as IV/IO access is established. Resuscitation should be initiated with Lactated Ringer’s, normal saline, or Hextend. If Hextend is used, no more than 1000 ml should be given, followed by Lactated Ringer’s or normal saline as needed.
    – Initial IV/IO fluid rate is calculated as %TBSA x 10cc/hr for adults weighing 40-80 kg.
    – For every 10 kg ABOVE 80 kg, increase initial rate by 100 ml/hr.
    – If hemorrhagic shock is also present, resuscitation for hemorrhagic shock takes precedence over resuscitation for burn shock. Administer IV/IO fluids per the TCCC Guidelines in Section 5.
    e. Analgesia in accordance with TCCC Guidelines in Section 11 may be administered to treat burn pain.
    f. Prehospital antibiotic therapy is not indicated solely for burns, but antibiotics should be given per TCCC guidelines in Section 13 if indicated to prevent infection in penetrating wounds.
    g. All TCCC interventions can be performed on or through burned skin in a burn casualty.
    h. Burn patients are particularly susceptible to hypothermia. Extra emphasis should be placed on barrier heat loss prevention methods and IV fluid warming in this phase.
  17. The Pneumatic Antishock Garment (PASG) may be useful for stabilizing pelvic fractures and controlling pelvic and abdominal bleeding. Application and extended use must be carefully monitored. The PASG is contraindicated for casualties with thoracic or brain injuries.
  18. CPR in TACEVAC Care
    a. Casualties with torso trauma or polytrauma who have no pulse or respirations during TACEVAC should have bilateral needle decompression performed to ensure they do not have a tension pneumothorax. The procedure is the same as described in section 2 above.
    b. CPR may be attempted during this phase of care if the casualty does not have obviously fatal wounds and will be arriving at a facility with a surgical capability within a short period of time. CPR should not be done at the expense of compromising the mission or denying lifesaving care to other casualties.
  19. Documentation of Care
    Document clinical assessments, treatments rendered, and changes in the casualty’s status on a TCCC Casualty Card (DD Form 1380). Forward this information with the casualty to the next level of care.

Click here to download the 2015 TCCC Guidelines in .pdf format

Posted in TCCC | Tagged , , , , , , , | Leave a comment

Don’t Get Ripped Off: Learn to Identify Rip Currents and Be Safe in the Ocean

Summer is here and for many coastal dwellers, that means it’s time to head to the beach and hit the surf. No beach trip would be complete without wading into the salty ocean water, but you also need to keep in mind the dangers associated with swimming in the open ocean. In fact, many people aren’t aware of the number one danger for ocean swimmers. Continue reading

Posted in Swimming | Tagged , , , , , | 6 Comments

Send It: How to Make a 1,000 Yard Precision Rifle Shot

Precision Rifle Shot 10

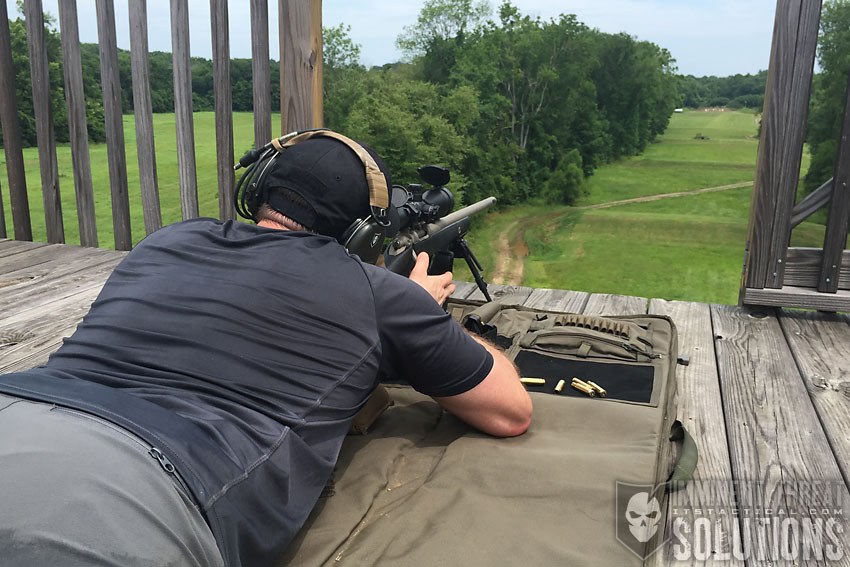
Would you think that by shooting a bullet 30 feet into the air, you could have it land on a target 1,000 yards away? If you said yes, you’re absolutely right. Today I’ll be sharing my recent experience of doing just that and what it takes to make a hit on a target from this distance.

Precision shooting is all about having the skills and knowledge to make your long distance shots go where you want them to. Learning how to make the shot takes patience, time and of course, a firearm capable of making it all happen. Let’s get into the specifics.

The Way of the Gun

I’ve been very interested in precision shooting for some time now and recently had the opportunity to learn from one of our ITS contributors, Jason Crist. While Jason will be the first to tell you that he’s not an instructor, he was willing to show me what he’s learned in the years he’s spent shooting at distance and give me a proper introduction. I’d like to pay it forward and sum up what I’ve picked up in hopes that the information will give you what you need to get started.

Even if you’re more experienced than I am, I hope that this article will be a good refresher, or provide the platform for you to share your knowledge about certain areas in the comments below.

Virginia International Raceway

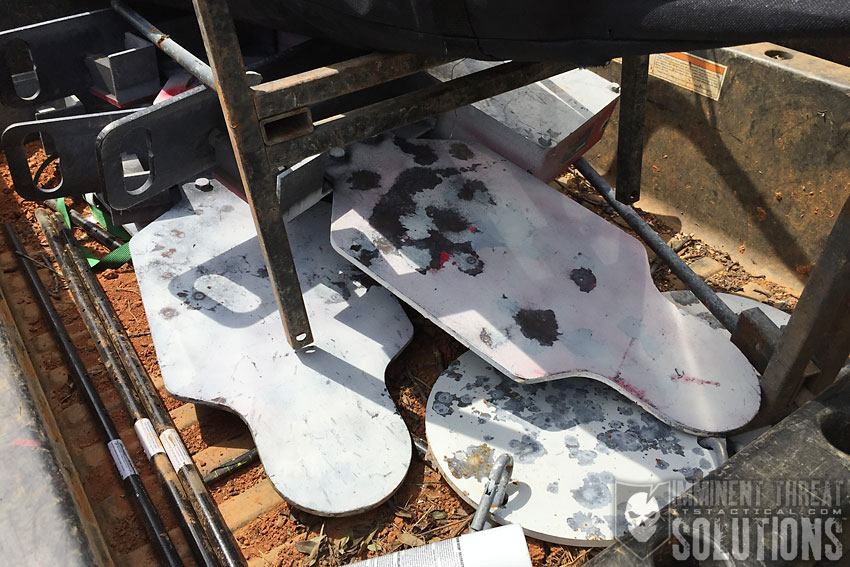
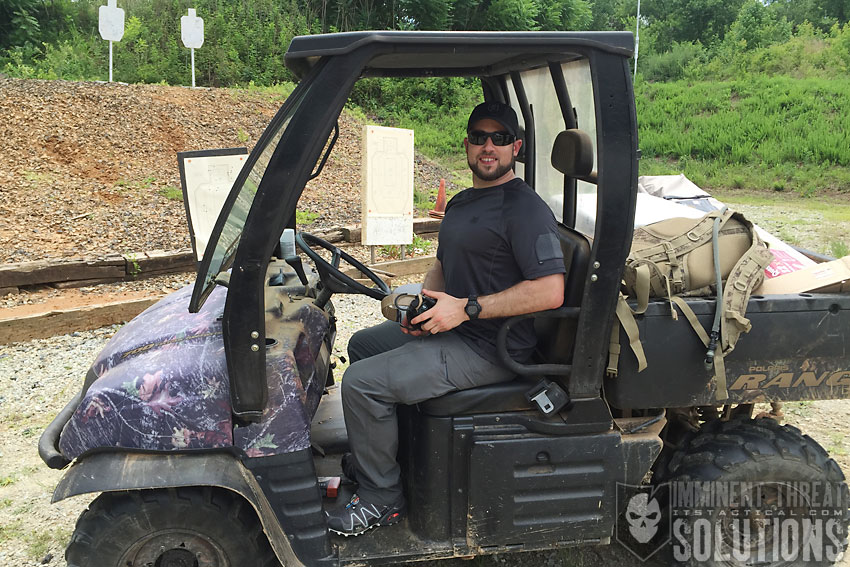
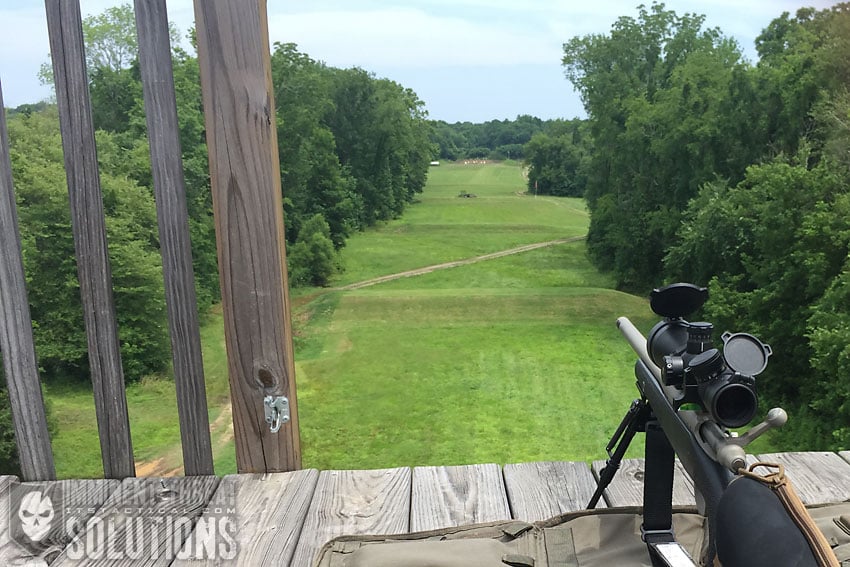
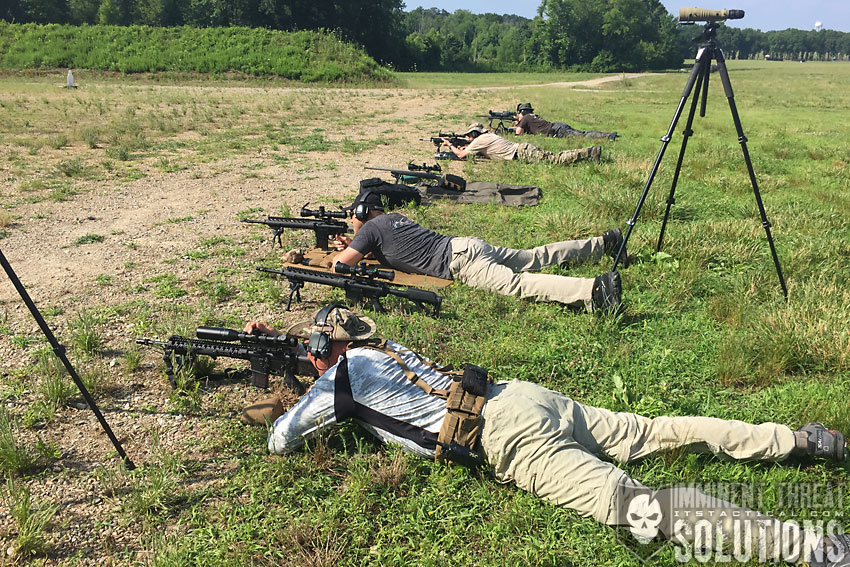
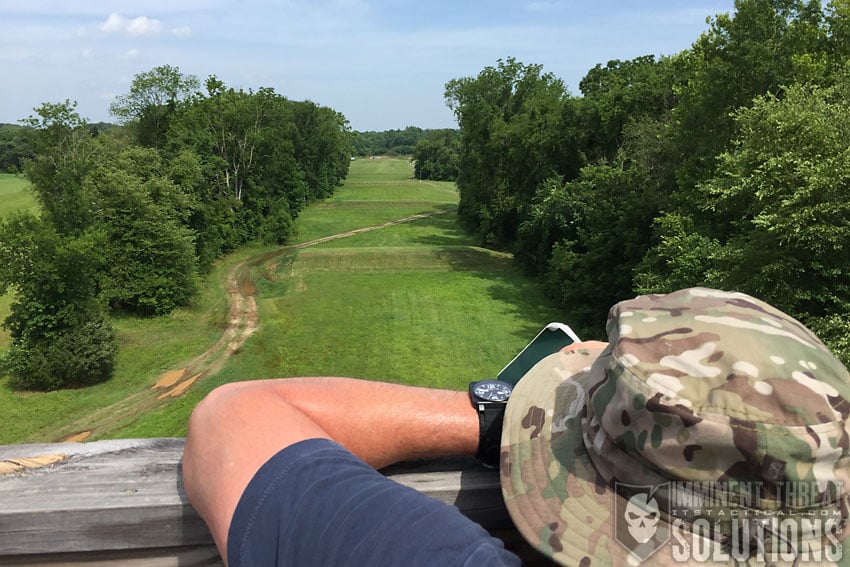
We were fortunate to have a phenomenal facility to use at the Virginia International Raceway. VIR has a little know gem, which is a shooting facility and training complex that includes 7 shooting ranges with distances from 50 yards, out to 1,000 yards. There’s also a shoot house, urban sim village and more.

Precision Rifle Shot 01

Precision Rifle Shot 05

The rifle I was shooting that belonged to Jason was a solid platform. While I’ll go into the features of the rifle I used, there were also others there with us that didn’t have as much invested into their firearm and were still able to achieve a 1,000 yard shot. It’s not all about the gun, but it certainly helps to have quality components. As you’ll see further along in this article, the fundamentals are still primary and ever so important with precision shooting.

Remington 40x in .308 Built by Accurate Ordnance

Accurate Ordnance Remington 40X

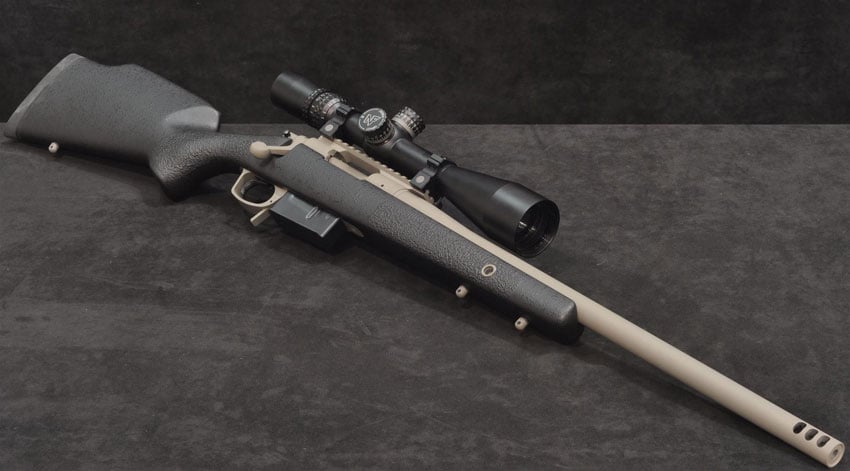
Jason recently received his gun back from Accurate Ordnance, who did an amazing job on his build. I can’t say enough about the Jewell trigger, the break on it was amazing! This rifle is truly a work of art.

  • Manufacturer: Remington
  • Model: 40x
  • Blue Print: Fully Trued
  • Lug: Trued Factory: .187”
  • Trigger: Jewell
  • Scope Base: Badger 20 MOA
  • Barrel: Bartlein 20” 1:11 Twist, .308 Winchester, Varmint Countor
  • Muzzle Device: Badger Thruster
  • Stock: Precision Stock Works Rifleman
  • Bottom Metal: Badger M5
  • Coating: Cerakote Icon Grey
  • Optic: Leupold Mark 4 LR (Model #67965)

I don’t want to spend too much time talking about the gun, but we’ll touch on it again when we talk about the scope in the MOA vs. MIL discussion below.

Precision Rifle Shot 04

Fundamentals are Key

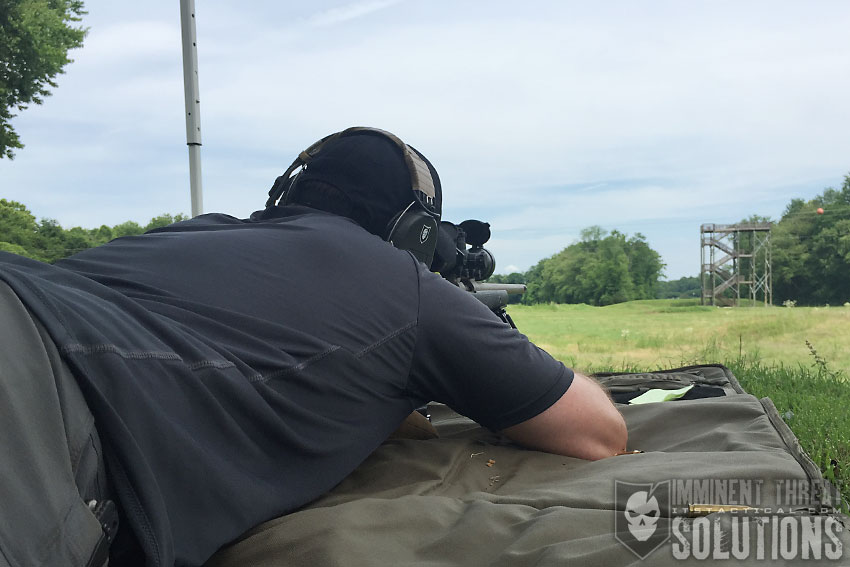
With each of the areas I’m highlighting, none will benefit you if you don’t have the right fundamentals, which I’ll be discussing first. The best thing I did, at Jason’s recommendation, was to watch two videos that Rifles Only put out. The first, Precision Rifle Volume 1: Fundamentals, features Rifles Only Chief Instructor, Jacob Bynum, running through the fundamentals used to accurately drive a precision rifle.

I picked up all kinds of information on everything from how you lie down into the gun, to grip/hand position, trigger pull, supporting hand position, breathing, etc. It’s an amazing video and as great as the information was that I gleaned from Jason, I think making the 1,000 yard shot happen was largely influenced by the info I picked up from this fundamental video. If you do nothing else, purchase this video and practice everything in it at home with your own rifle. Just like dry fire with a pistol, there’s so much you can do at home without ever needing to fire a round.

The second video from Rifles Only, Precision Rifle Volume 2: Field Positions for Precision Rifle was eye opening as well and included amazing information on the positional shooting that’s required for a wide variety of field conditions. You’re not always going to be able to go prone to take a shot and learning about positions is equally important as learning the fundamentals. They go hand in hand.

I can’t stress the fundamentals more. Even if you already feel comfortable with fundamentals, what’s required with precision shooting felt to me like a whole different set to learn, even though they’re using the same core fundamentals of marksmanship (sight alignment, sight picture, trigger control, follow through.)
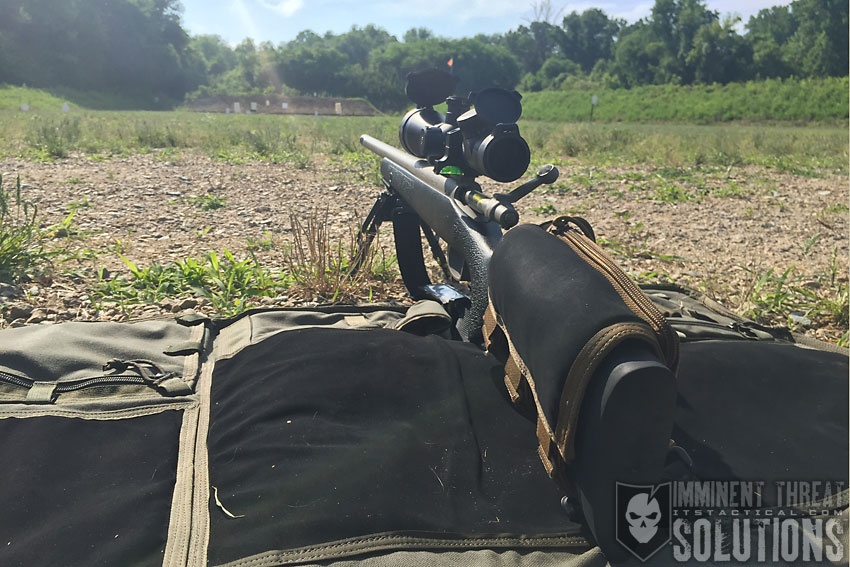
Scope Mounting

Precision Rifle Shot 06

A critical area when it comes to precision shooting is mounting your scope. The first thing to do is to start with a good cheek weld on your rifle and determine where your scope will sit to provide proper eye relief. Ensuring a stable, level rifle and in turn a level scope base is necessary to properly mount your scope. I watched as Jason went through this process with not only his rifle, but with another guy’s rifle that was shooting with us as well. It’s a time consuming process, but very important in the overall scheme of things. If your scope isn’t locked down or comes loose while you’re getting DOPE (see below,) it could require you to go back and zero your rifle again.

The tools we used for this included a Wheeler Scope Leveling Tool and Wheeler Gunsmithing Torque Wrench, both of which were integral to ensuring both that the gun and scope were level, as well as that proper torque was applied to the scope rings after mounting. Additionally, going over your rifle with proper torque on every bolt is critical to ensuring success.

Zeroing

Precision Rifle Shot 03

Just like with an AR or another rifle, zeroing is important. It’s what gives you the platform that all your other data is based on. Without a proper zero and confirmation that what you’re seeing in your scope is what’s happening on your target down range, your shot will fall apart when backing up in distance. We zeroed at 100 yards before backing up to 200, 300, etc. to confirm and get DOPE.

D.O.P.E.

Precision Rifle Shot 02

Shooting and logging shots from multiple distances and conditions to confirm that the bullet is behaving like you want it to, is what’s referred to as DOPE, or data on previous engagements. The idea is to log what your rifle is doing in every condition you can. The data aggregation in a DOPE book is never finished and includes everything from the type of bullet used, to environmental conditions. There’s plenty of apps out there that were designed to input these variables and calculate the adjustment needed to your scope based on your distance and holds for wind. It’s always a good idea to “trust but verify” with these apps.

I was using the Knight’s Armament Bullet Flight App and found it to be a bit off from what I was experiencing in the conditions I was in. This isn’t to say the app didn’t function correctly, this is just to say I noticed some differences based on my conditions. The DOPE I obtained while working back to 1,000 yards included a scope adjustment calculation for each distance we shot from. This was 100, 200, 300, 400, 500, 600, 800 and 1,000 yards. Proper range estimation is also an essential part of gathering DOPE and without it, your DOPE is worthless.

Meaning that if you have DOPE obtained in a certain distance and that distance wound up to not be accurate you could be looking a huge miss. To put this into perspective, 1 MIL is 3.6” at 100 yards and 36” at 1,000 yards. You’d be looking at a huge miss if you’re off by a MIL. To put that into MOA numbers, 1 MOA is 1.047 at 100 yards and 10.47” at 1,000 yards.

Before we go any further, I’d like to try to explain MOAs and MILs.

MOA and MIL

US Optics Academy

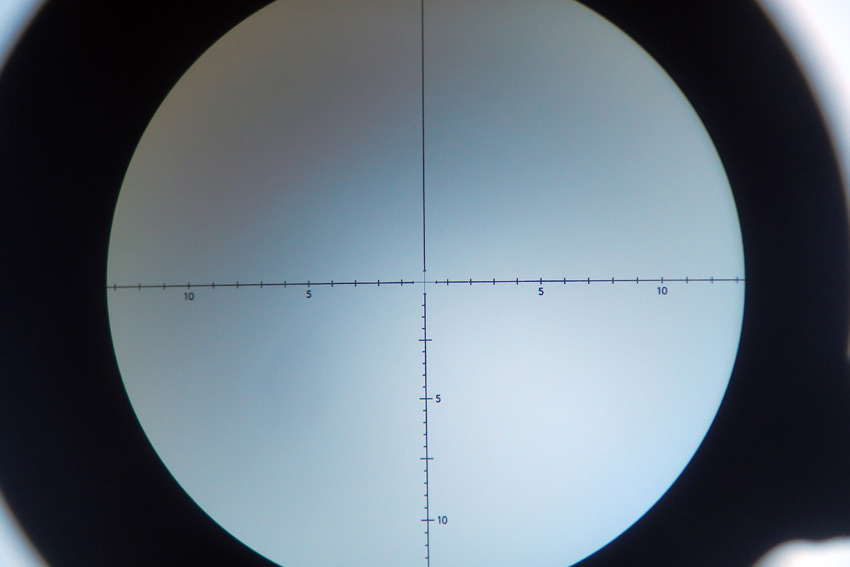
The best explanation of MOA and MIL that I’ve come across was mentioned in a recent article on the US Optics Shooting Academy from contributor Matt Sharp and is provided here to try and clarify the comparison.

MOA, or “Minute Of Angle,” is an angular unit of measure describing a standard portion of a degree. There are 60 Minutes of Angle per degree and 360 degrees in a circle. This makes for 21,600 minutes of angle per circle. With a circle of 100 yards, one true Minute of Angle (tMOA) equals 1.047 inches. For simplicity, this is usually rounded down to 1” at 100 yards, 2” at 200 yards, 4” at 400 yards and so forth.

There are several types of scopes capable of a variety of adjustments of Minute of Angle, from 1 MOA adjustments down to 1/8 MOA adjustments. The most common type of MOA adjustment for most tactical/precision shooting is ¼ MOA, meaning each click of adjustment is equal to .25” at 100 yards. There are also a few other measurement types, IPHY (Inches Per Hundred Yards) and SMOA (Shooter Minutes of Angle).

Then there are MILs, or Milliradians, which are a unit of measurement dividing radians in a circle. A radian is equal to 57.3 degrees, with 6.283 radians in a circle. There are 1000 milliradians in 1 radian and therefore 6,283 milliradians (or Mils) in a circle. Thus, 1 Mil at 100 yards is equal to 3.6” inches (or 10 centimeters). Milliradian scopes are adjustable by either 1/10th Mil or 2/10th Mil increments (1 or 2 cm adjustments, respectively). Furthermore, 3.438 MOA is equal to 1 Mil at any distance or rounded down for simplification, .3 Mils = 1 MOA at any distance. To convert Mils to MOA, you can use this formula:

Mils x 3.438 = MOA

To convert MOA to Mils, this is the formula:

MOA / 3.438 = Mils

Why would you ever want to do this? Well, if you’re shooting with a spotter and one of you has a Milliradian scope while the other has a MOA scope, converting between the two can be crucial to making proper adjustments. It also comes in handy when using off the shelf ammunition that may have data on your ammo’s drop (at given yardage), in a unit of measurement your scope isn’t setup for.

Spotting

Precision Rifle Spotting

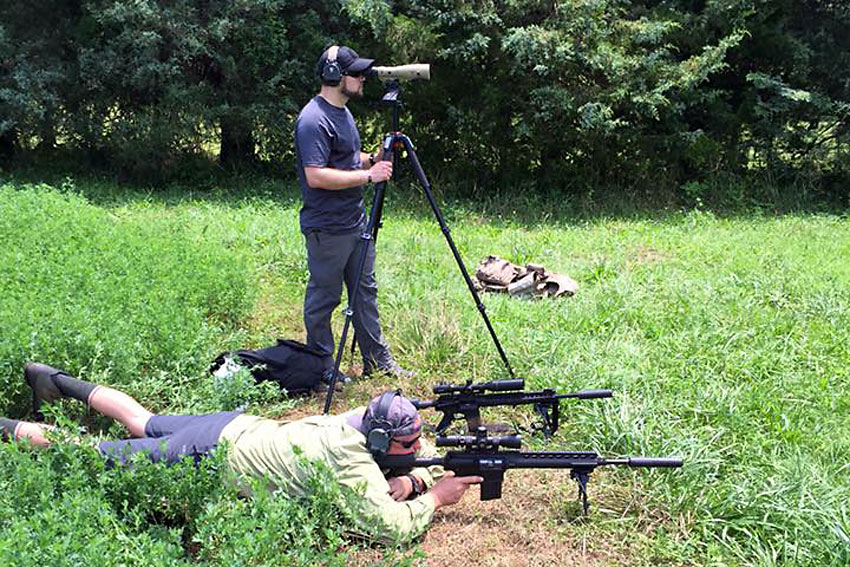
As you move back in distance, a spotter with a good spotting scope is crucial. While I was controlling recoil well, given the conditions, it was often hard to see whether I’d hit the steel we were shooting at. Not only is a spotter needed for this use, but for corrections on the fly for any fliers (misses) and another set of eyes for wind conditions. Often the mirage you see in the scope can be an indicator for wind, but reading the wind is a skill in itself and one I need more practice with. This can be where the MOA/MIL difference can get complicated. If your spotter is using a spotting scope in MIL and your scope is set up in MOA, you’d have to manually make the calculations or do your best to estimate the difference, which is never a good scenario.

We had this scenario and worked through it as best we could. We were using a Bushnell Tactical Elite LMSS Spotting Scope that read in MIL and the Leupold Mark 4 LR I was looking through was in MOA.

Ammunition

Precision Rifle Shot 09

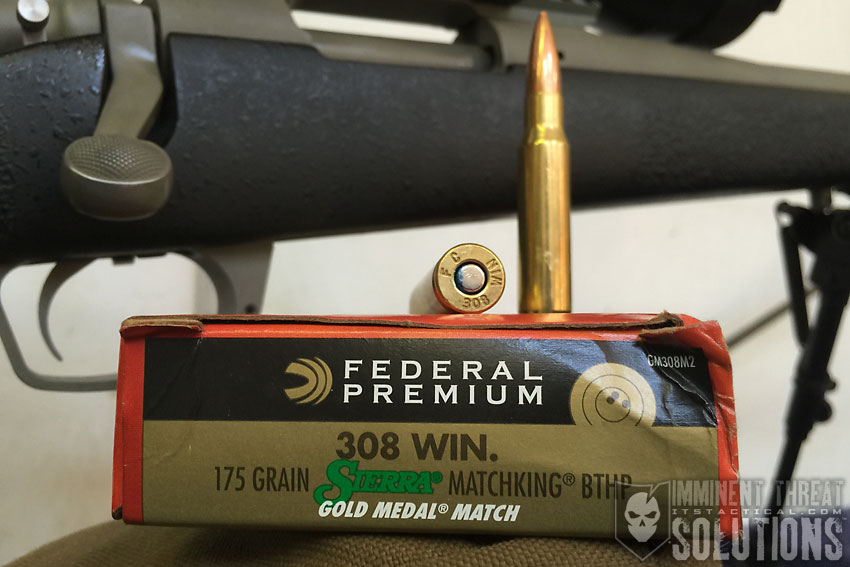
I touched on ammo a bit earlier, but ammunition matters. As you move back in distance your small mistakes get magnified considerably and using good ammo is just one way of mitigating mistakes. I was shooting Federal Gold Medal Match – .308 WIN. (7.62 x 51MM) 175 grain Sierra MatchKing, which is considered by many to be the gold standard for precision rifle ammunition.

The “best” ammo is relative and consistency is a large part in any decision, so whatever you use, make sure it’s consistent in your gun. Purchasing ammo that uses higher grade components and precise manufacturing costs more, but that’s to be expected with ammo manufactured at that level of precision. Just remember to match your ammo selection to your own situation.

The Shot

Precision Rifle Shot 08

There’s so much more that goes into making a shot at 1,000 yards, but I feel that what I’ve covered are the essentials that I took on board that helped me achieve it. That and solid advice from Jason, who’s competed in events like the Mammoth Sniper Challenge. It’s an amazing feeling to achieve a shot at this distance with a .308 round and eye opening that the 35 MOA adjustment in my scope to make it happen, calculated to just under 30 feet of elevation. That’s some bullet drop!

I consider myself to be fairly anal retentive (some would argue the “fairly” part) and there’s a certain amount of that required to make a 1,000 yard shot. Precision rifle is just that, precision. So many calculations and movements go into putting a bullet where you want to at distance. I’ve really gotten into the geeky side of Precision Rifle and can’t wait to start building my own gun and take a course with quality instruction, like one of the offerings from Rifles Only.

Working to master these different disciplines is a lifelong goal and the more you practice, the better you become. Just think, Carlos Hathcock, the famous Vietnam-era USMC Sniper with 93 confirmed kills, didn’t have a laser range finder, Kestrel Weather Meter, or many of the fancy electronic gadgets that precision rifle shooters depend on these days. Gadgets are great, but the basics never run out of batteries.

ITS Article Resources

Additionally, check out this well done and comprehensive article from Precision Rifle Blog.

Posted in Firearms | Tagged , , , , , , , , , , , , , , , , , , , , , , | 20 Comments

Where Are The Law Enforcement Medical Intervention Statistics?

LEO TECC Intervention

Where are all the “Law Enforcement medical saves”? That’s the question I had when I started looking into US Law Enforcement statistics on the use of Tactical Combat Casualty Care (TCCC) and Tactical Emergency Casualty Care (TECC). It seemed the more I looked, the less I found and I wanted to know if we in Law Enforcement were really making a difference by using basic TCCC/TECC medical interventions.

Before we go any further, I want to make it clear that I have no formal background in medical research or data collection. I’m simply an EMT-trained Law Enforcement officer who saw a need to collect this type of information and I started hammering away on my computer with a club. What I’ve compiled, as I’ll explain below, is a non-scientific set of information and I’m sure I’ve broken every “rule” of legitimate medical research. The information captured is what I feel is relevant to a cop on the street, not the doctor in the ER, professor in the classroom, or any other scholastic type.

Additionally, I wanted to be able to show my chain of command some kind of data to support developing TECC training and equipping officers at my agency. I want others in my shoes to be able to use the data I’ve collected to start up their own programs, or at least convince their partners to take medical training seriously. It would be hard for your Chief or Sheriff to look the other way when you have over 300 events to show them in the infographic towards the end of this article. 

Most importantly, I want this data to be open source for anyone that needs it. This is about potentially saving a life. If this data helps convince just one of my brothers or sisters to carry a tourniquet on their belt, then all this time and effort will be worth it.

Here are a few links for those who may be new to TCCC and TECC. These should get you up to speed and give you a good understanding of the principles behind the guidelines.

Data Collection

TCCC has gained huge ground over the past 13+ years of war and a key part of its success is the information collected on casualties. Because there’s data to look at and analyze, the Military can implement medical protocols and training to keep up with current trends. While there’s data that slips through the cracks, the 75th Ranger Regiment has something like a 98% TCCC Casualty Card reporting rate, which is pretty impressive.

The reason the Military is able to quickly make changes to TCCC is because it’s a Department of Defense program. The DOD gets data from the TCCC Casualty Card (and other sources) and it doesn’t matter if the casualty was a Marine, Airman, or Soldier. If there’s data to support needed changes in protocols and training, the DOD, with the help of the Committee on Tactical Combat Casualty Care (CoTCCC), can make it happen relatively quickly.

On the flip side, the civilian EMS sector lags behind with updating national level training. (I found this out first hand when I completed my EMT training at the beginning of this year.) The non-use of backboards is a recent example and another is equipping EMS units across the country with commercial tourniquets. You would think tourniquets would be a no brainer, right? We have Military data to back up the effectiveness of commercial tourniquets, but there’s no national level mandate to use them.

The U.S. Emergency Medical Services delegates its protocols and training down to the local level. This means the Medical Director in your town may run things differently than the town next door. In turn, the run report (information reports completed by EMS personnel) each EMS or Fire agency captures, may stay at the County or State level. This means trying to get everyone on the same page at a national level is impossible.

Most of you won’t be surprised when I tell you there’s no national level TECC medical program. As I mentioned above, the EMS system is not designed like the DOD and can’t make changes across the board at the national or even local levels. At this stage it’s impossible to get TECC protocols and training out to everyone like the CoTCCC has done, let alone get that training out toLaw Enforcement officers that most likely have no formal medical background.

In the interim, the National Association of Emergency Medical Technicians (NAEMT) is offering a TCCC course and other TCCC style training. If you take an approved TCCC course through the NAEMT, you’ll receive a TCCC provider card. This is great for a SWAT Medic and could possibly benefit you in court. However, local protocols are going to dictate whether you can perform that cricothyrotomy or needle decompression. On the Law Enforcement side, it looks good in your training records but that’s about it. 

In my opinion, the NAEMT has really dropped the ball on courses designed for Law Enforcement officers. The LEFR-TCC Course is nothing more than a cut down version of the main TCCC slide presentation and I don’t believe this is the way to come up with a “new” class. I’m curious to see what the new TECC course will be all about, but I’m not getting my hopes up. In my opinion this is just another way for the NAEMT to make money, but that is another discussion.

In reference to data, the issue with the NAEMT TCCC courses is that they’re using the Military medical training and the Military data that supports it. While I think the Military data is invaluable overall, it may be hard for an officer to convince their chain of command that their agency needs TECC training when all they have to support it is “Military” data. There are many similarities in Military and LEO wounding patterns, but there are also many differences. The Military has a group of mostly fit, young and healthy members, while Law Enforcement and the civilian population they’d be helping has everything in between.

The Committee for Tactical Emergency Casualty Care (C-TECC) has open source guidelines which are more appropriate for Law Enforcement. This group works closely with the CoTCCC and are looking at many of the issues I’ve addressed. I urge everyone to become familiar with the C-TECC and support what this 501c3 Non-Profit Organization is doing.

FBI UCR Data

The FBI collects Uniform Crime Reporting (UCR) data, which is a set of crime statistics for the country. They rely on local agencies to report the UCR codes to them in good faith. Our agency captures the UCR data via our report writing system, which is then provided to the FBI. Most people are familiar with the “Law Enforcement Officers Killed and Assaulted” (LEOKA) report, which is released on a yearly basis, but the FBI also collects other data like hate crimes, cargo theft and human trafficking.

The data collected by the FBI is a good resource if you want to see how officers are killed and assaulted, as it it goes into great detail. Let’s look at what is collected under the 2013 Detailed Assault Data:

  • Overview (the basics)
  • Victim (LEO in this case) profile
  • Circumstances
  • Assignments
  • Weapons
  • Uniforms, body armor, and holsters
  • Months, days, and times of incidents
  • Profile of alleged known assailants

There’s a great deal of information being captured and The Officers Feloniously Killed data is about the same.

While this is great, it made me wonder how many of those officers killed could have been saved by TECC medical interventions? How many of those assaulted were “saved” and given medical aid on scene before EMS arrived?

As you see, there’s no treatment or medical intervention data being captured by the FBI. I think another important question is how many LEOs’ are not getting medical attention on scene? The “no aid” is just as important as the saves. How many officers have bled out on scene because no one had the training and equipment to make a difference?

Here is one example of a young officer that could have been saved. Officer Guidice bled to death, despite the efforts of his partner to stop the bleeding with his bare hands.  In this day and age there’s absolutely no excuse for something like this to happen, but some of us are still using garden hoses as tourniquets!

The Search

I decided to start looking for data on the Law Enforcement medical interventions that are happening. From the start, I knew this was going to be a daunting task. HIPAA and “liability” are huge hurdles to any data collection in Law Enforcement and EMS. I think liability is the elephant in the room for the Chief’s and Sheriff’s as well. How can you send your officers into harms way on a daily basis and not equip them with proven life saving equipment like a tourniquet? I don’t know the answer to that question, but I wanted to find the data to support it. Factual data is difficult to argue with.

I started my search with the Valor Project, as I knew they were collecting “near miss data” and I even reported one of my own incidents from years ago.  While the website it still up and running, the data has not been kept up to date. This site was a great concept and I’m not sure why it’s no longer active.

Next, I looked at the National Near Miss Program that’s popular with Fire Fighters and I was pleased to find a LEO reporting side. This is a great resource for training, but it isn’t medical related and didn’t have data to collect from.

I think the National Near Miss program is great and they do a lot to protect the identity of those providing the information, but as a cop, I know other cops are paranoid about providing anything via computer. At a BBQ, you may get the whole story, but not so much over the internet as liability creeps in.

After that, I went through the Officer Down Memorial Page (ODMP) which unfortunately doesn’t specifically list medical interventions in the incident details. You may see it mentioned in the narrative, but for collecting the TECC data needed, it’s not relevant. I decided to resort to my detective skills and rudimentary typing ability to manually search for news stories or other media. I also tried to get first hand accounts from people I knew though networking. Social media, love it or hate it, has been a big help. I’ve also sent “cold call” emails from my government email address requesting follow-ups from stories I’ve found. In some cases, I never received a reply and I think “liability” was the reason.

The Data

LEO TECC Intervention Stats 150624

I’ll admit right up front I’m not a  bean counter and the first document I started was pretty sad. It had the basics, but was also pretty rough around the edges and took some serious cutting and pasting. I ended up having to dive head first into Apple Numbers and figure out how to work with spreadsheets. 

I considered the data I needed to start up a TECC program at my agency and also thought about the training and lack of time allocated to teaching anything medical related. Should we teach only tourniquets? Should we spend most of our time on arms or legs? How often are we using chest seals? Do we need to train more on drags and carries? Does the lack of uses mean we shouldn’t spend time training in that area?

Those questions developed into the infographic data you see above. I used the data I collected and charted the things I thought would benefit everyone the most. I want to let the numbers speak for themselves and allow all of you to decide what’s important to you and/or your agency.

The data collected is directly related to the TCCC and TECC guidelines. For this reason, medical interventions like CPR or AED uses are not captured. These are Law Enforcement officers with or without formal medical training. One interesting tidbit is the amount of officers who were/are in the Military and used that training or equipment to save a life. The events also show whether the patient was a Law Enforcement officer or civilian. Additionally I included events where “no aid” was provided, as we need to learn from those events as well. As I mentioned earlier, I wonder how many FBI/LEO KIA incidents we could have prevented? Officer Vincent Guidice is just one of many.

Notes

Make no mistake, this data is by no means complete and it would be next to impossible to track down every TECC event out there. I do think there’s plenty to be digested from the events I’ve been able to find though. The Military has its data and it’s time we in Law Enforcement build our own. I encourage anyone with an Law Enforcement specific event to share it so we can add your info to future updates. Until something formal comes along, we’ve set up the following email address you can use to report incidents you might come across. leotecc[at]itstactical.com We’re all in this together and it will benefit everyone.

If you’re curious about the source articles I’ve used to pool this data together, feel free to download this PDF that has links to the news articles.

I want to thank Bryan and the ITS Crew for helping to spread this information out to all of you. This started out in a small Facebook group of friends and my hope is that the data continues to spread to help others. So pass on the infographic, share it, use it for all it’s worth and remember, the life you save might just be your own!

Posted in TECC | Tagged , , , , , , , | 5 Comments