For Your Eyes Only: Real Life Spy Gadgets

Spy Tools

We’ve all seen it before. A man dressed sharply in a suit sprints down a hallway while an ear-piercing siren sounds. Clutching a folder marked TOP SECRET, he rounds a corner only to find a locked door; the thunder of footsteps grows louder as the henchmen close in. Our intrepid hero raises his wrist, checks his shiny Swiss watch and rotates the crown to produce a fiery laser. Before placing the laser beam on the door, he issues a well placed pun, “I guess I’ll need to cut to the chase.” Once the lock melts, he bounds through the door and into a small foreign sports car. Mission Complete.

From James Bond to Jason Bourne, movie spies have always relied on their trusty gadgets. With each new blockbuster release, gadgets get more wild and imaginative. Surely none of these fancy gadgets have a place in real espionage though, right? Are agents running around with explosive pens and phones inside their shoes? Today on ITS we’ll be walking through some real life spy gadgets; some of which seem to have come straight from the silver screen.

Dead Drops

Spy Tools

Dead Drops are a tool used to transfer information when it’s not possible for two parties to meet to exchange it. They’re designed for one party to hide the information inside of and the other party to discover it. A “Signpost” is then used, letting the other party know that the Dead Drop has been loaded.

Broken into two categories, Dead Drops are either Overt or Covert. Overt Dead Drops are usually designed to look like everyday objects so they can be concealed in plain sight, while Covert Dead Drops are designed to be hidden from sight.

Spy Tools

A good example of an Overt Dead Drop is a Hollow Spy Bolt. Using a hollowed out bolt, a message or other information can be placed inside and hidden in plain sight within a tool shop, garage or anywhere a loose bolt would be common. Another great example of an Overt Dead Drop is a Hollow Spy Coin (Half Dollar). Although with spy coins, you need to ensure that you don’t accidentally spend it!

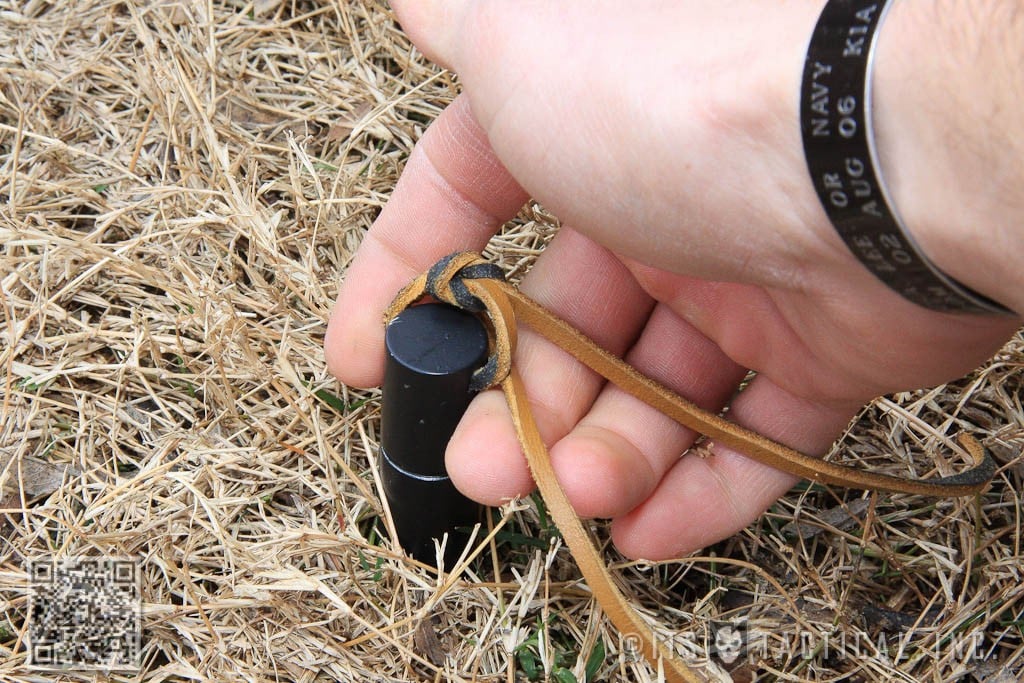
Covert Dead Drops are necessary when it may not be practical to hide something inside a common object. One common covert method is using a Dead Drop Spike. These hollow tubes have a sharp pointed end allowing them to be pushed into the ground. Cloth or leather ends may be left out so it can be easily retrieved by someone that knows the location.

Bugs

Spy Tools

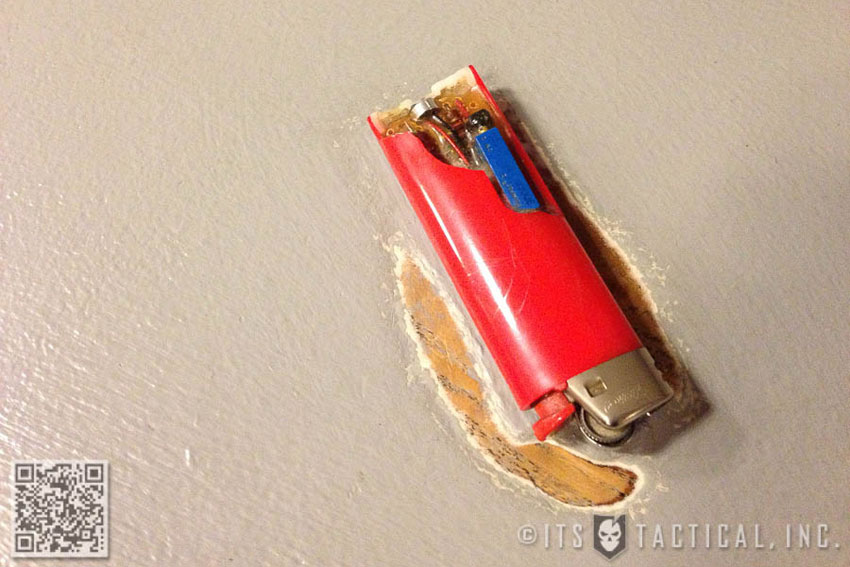
Listening devices have been in use for years and they’ve become even more advanced as technology progresses. Having the ability to eavesdrop on conversations can be a spy’s greatest tool. However, researchers quickly found that bugs could be discovered by using tools that search for broadcasting signals.

Things were a bit different though in the case of “The Thing” listening device. On a trip to the United States in 1945, the Young Pioneer organization of the Soviet Union presented a carved wooden seal of the United States to U.S. Ambassador W. Averell Harriman. Harriman hung this seal in his Moscow office and no signals were detected when it was swept for bugs.

Spy Tools

In 1952, a British radio operator accidentally discovered that on a certain radio frequency he could hear a conversation between two Americans. The State Department pinpointed that the conversation was coming from the office of Ambassador George Kennan. After an exhaustive search, a listening device was discovered to be embedded in the carved wooden seal that had been presented to his predecessor.

After locating the bug, it was discovered that it had no power supply or active electronic components. It would only become active when a specific radio frequency was broadcast to it, which caused the transmitter to vibrate and activated the microphone. It was purely an accident that the British radio operator was scanning the waves as the Soviets were actively broadcasting to the device.

Listening technology has developed even further throughout the years and it’s more difficult to detect these days with so many electronic signals being broadcast around us. With form factors getting smaller every day, sometimes the utmost secrecy calls for a tried and true method of secret communication.

Cryptography

Spy Tools

Communication often can’t be covert and needs to be sent in a method that can be intercepted by a third party. In Cryptography, these third parties are known as “adversaries.” When it’s known that a message will be intercepted, it’s best to use a code or cipher to hide the information. There are hundreds of codes and ciphers, but the general idea is that a message is coded using a key phrase and then transmitted to be decoded on the other side.

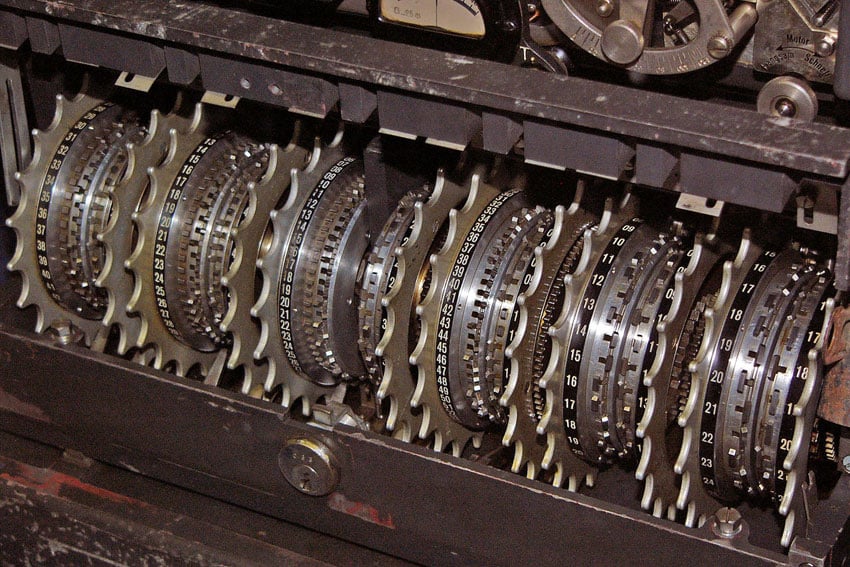
A famous example of this is the Nazi’s use of the Enigma Machine during World War II. At the time, it was regarded as one of the most difficult cryptography devices to decode. Using a series of rotors and a plugboard, a message could be created on the Enigma that would be transmitted as a code. Without the exact combination of rotor and plugboard position, it was impossible to decode the message even with an Enigma Machine. It allowed the Nazi’s to send their communications over the air without fear that they would be discovered.

Spy Tools

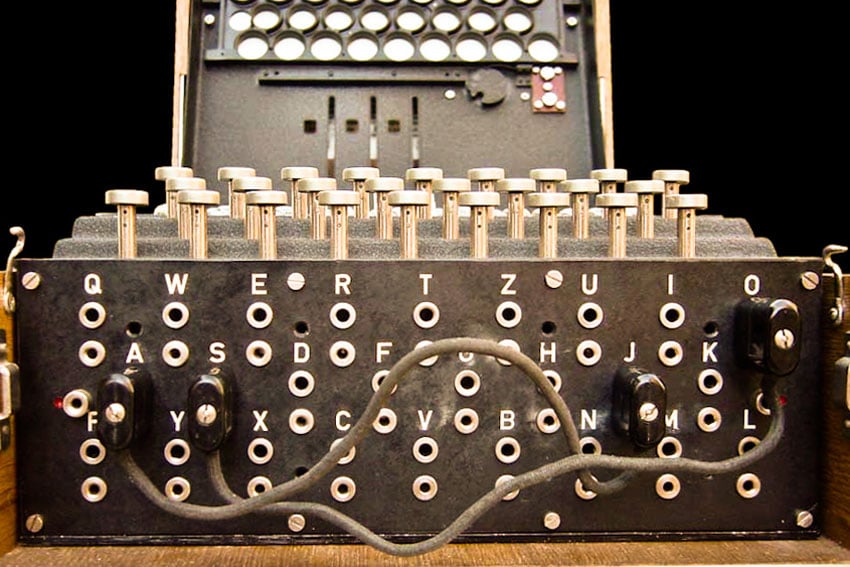
Eventually, the Enigma Machine was cracked due to the Nazi’s leaving their message formats the same for multiple messages. This meant that code breakers knew certain words and phrases would be used in the messages and this gave them pieces of the code. From there, they were able to decrypt the remainder of the message.

Now with computers, ciphers and codes can be even more complex and the encryption and decoding can be performed digitally. While this may seem more secure, keep in mind that computers can also be used to break encryption and simple encryption can be broken by a computer in a matter of minutes. Sometimes it’s best to keep secrets under good old lock and key, or is it?

Lock Picks/Key Impressioning

Spy Tools

Lock picking is a skill-set we’ve talked in depth about on ITS and it’s a valuable skill for espionage as well. The ability to open locked doors and cabinets ensures that a spy can obtain the information they need without leaving a trace to the untrained eye. There are many sizes and shapes of picks, but what would be chosen depends on the spy’s situation.

Methods of storing lock picks can vary from hollowed out books to things like Go-Tubes, allowing the picks to be discreetly hidden until they’re needed for use. Smaller pick sets could even be concealed in wallets, socks or the brim of a hat. In addition to picks, spies might also carry an Escape and Evasion Kit containing things like handcuff shims, razor blades and other items to assist them if they’re compromised and restrained.

Spy Tools

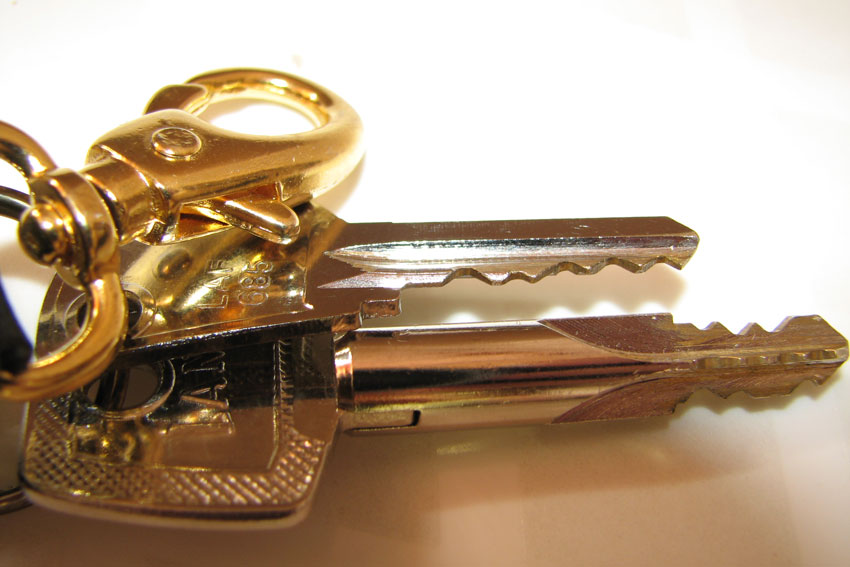
If lock picking isn’t an option due to time or other complications, spies might also use an impression of the key to make a copy. Many times, a wax press is used to make an impression of an obtained key to later mold a copy from. With today’s digital technology though, an impression can be made from a photocopy or even a picture. Something of scale like a ruler or other measuring device used in the photocopy, can make it fairly easy to create a copy for a pin and tumbler lock.

Weapons

Spy Tools

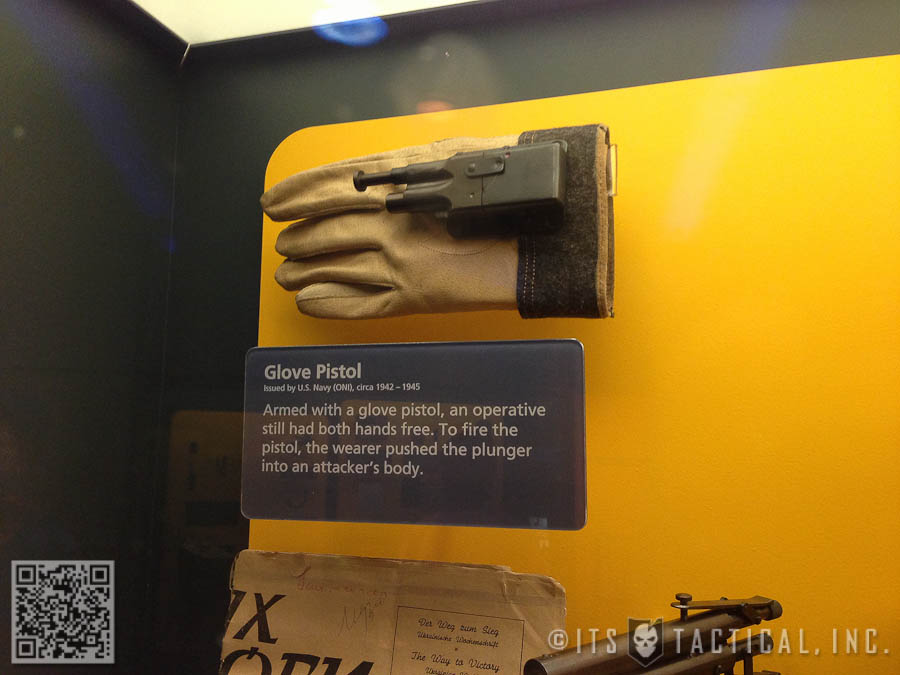
Occasionally, working as a spy means that you’ll need to access a weapon for some “wet” work. While there’s nothing more dapper than a Walther PPK, a full size pistol isn’t always practical or accessible. For times like these, it helps to have discreet weapons that can be accessed in an emergency like the Glove Pistol pictured above. Other options included gun disguised as pens, walking canes and even belt buckles.

Spy Tools

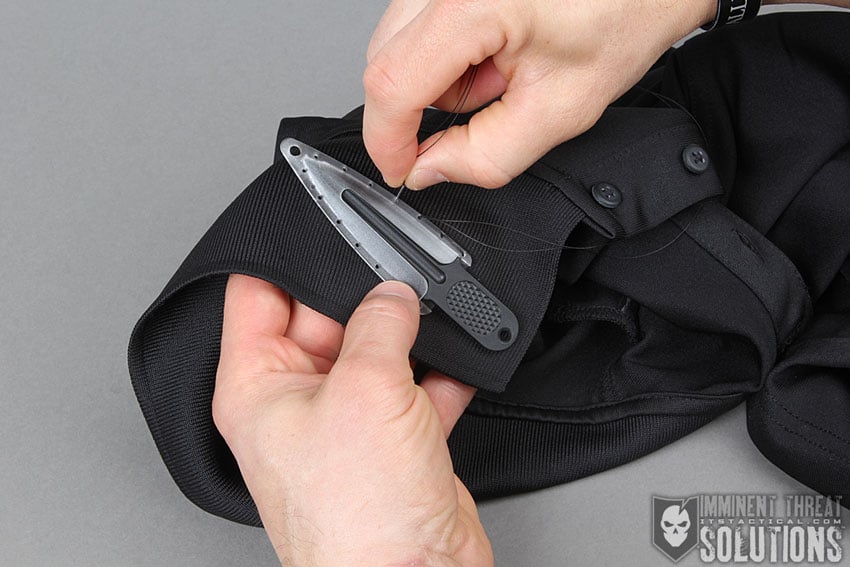
Lapel Daggers or Thumb Daggers are another discreet weapon used by the Office of Strategic Services to break contact during a search or to have an emergency weapon at hand. Due to their small size, these daggers could be sewn into the lapels of shirts and were sometimes made from materials other than steel to avoid detection in metal detectors.

These are just a few of the tools used by spies around the world. While they may not be as fancy as a shoe phone or a grappling hook belt, they allow information to be obtained, concealed, transferred and revealed. While much of espionage involves having the right mindset and training, it never hurts to have the right tool for the job.

What’s your favorite spy gadget?

ITS Article Resources

Posted in Tradecraft | Tagged , , , , , , , , , | 2 Comments

New ITS Polymer Handcuff Key and ITS Revolutionary Patriot Morale Patch Added to the ITS Store

ITS Polymer Handcuff Key

Today we’re excited to be introducing our new ITS Polymer Handcuff Keys to the ITS Store! With their lightweight and small form factor, these keys can be kept just about anywhere.

We’re also excited to be introducing our new ITS Revolutionary Patriot Morale Patch today! Keep reading for more photos and information on how to order these products.

ITS Polymer Handcuff Key (2-Pack)

ITS Polymer Handcuff Keys

ITS Polymer Handcuff Keys are completely non-magnetic and precision molded from durable polymer nylon. Each key is universal and designed to open single and double locked “swinging bow ratchet – type” adjustable handcuffs.

The small footprint of these keys means that they can be easily concealed on your person in multiple locations to utilize in the event of a home invasion or illegal restraint scenario.

Law Enforcement Grade Handcuffs are easily obtainable by anyone with a credit card and Internet connection and have been used in home invasions to subdue victims. These keys are just one way to ensure that you’ll always have an escape method from illegal restraint.

Click here to order the new ITS Polymer Handcuff Key!

ITS Revolutionary Patriot Morale Patch

ITS Revolutionary Patriot Morale Patch

In 1776, our Founding Fathers launched their war for independence. Marked as traitors of the crown, these men set forth to free themselves from an iron-fisted dictator. They envisioned a country where the voice of the people would serve as the governing body, where all men could influence the decisions made and where freedom truly meant freedom.

As the years have gone by, it’s easy to forget the sacrifices those men made; easy to cast aside much of their ideals as old fashioned and outdated. Our ITS Revolutionary Patriot Morale Patch serves as a reminder of a time when freedom wasn’t guaranteed and had to be taken. A time when the voice of one man was drowned out by the voice of the people; when we became citizens and not subjects.

The ITS Revolutionary Patriot Morale Patch was produced to commemorate Fourth of July and the 240th anniversary of United States Independence.

Click here to order the ITS Revolutionary Patriot Morale Patch!

Posted in ITS Information | Tagged , , , , , , | 5 Comments

Ridiculous Dialogue Podcast: Episode 29

Ridiculous Dialogue Episode 29

Episode 29

In Episode 29 of Ridiculous Dialogue, we played the word association game and Kelly’s candid answers took us all by surprise. We also discussed our favorite candies, Matt’s Speaker Installation Debacle and Bryan’s Bonsai.

A few questions from Twitter were answered and we got an update on an interesting neighbor that Bryan had growing up. Grab a “cold beer” and tune in!

Poundtag us your questions on Twitter with #RidiculousDialogue so we can discuss them on the show. Thanks for listening!

Ridiculous Dialogue Episode 26

Ridiculous Dialogue was created to share the banter that takes place at Imminent Threat Solutions on a daily basis. It’s us; candid, unedited and talking about everything from what movies we’re watching to the general geekiness that keeps us laughing here at ITS HQ.

While we generally keep the vibe in our articles PG rated, be warned, it may not be safe to blast over your speakers at work. We hope you enjoy the insight into ITS and who we are behind the scenes as a company; pull up a chair and tune in to Radio ITS.

Posted in Podcast | Tagged , , , | 1 Comment

How Criminals are Exploiting your Vehicle’s Keyless Entry System and What You Can Do

Keyless Vehicle Entry

Recent news articles have mentioned criminals “mysteriously” stealing items from inside locked vehicles while parked in front of a victim’s home. The suspects in these thefts are occasionally recorded by surveillance cameras and seen holding an “unknown device.”

Today I’ll be explaining how the same technology that makes it more convenient for you to get into your car and drive away, is being exploited by criminals to victimize drivers utilizing a Passive Keyless Entry and Start (PKES) system.

My goal is to clarify this complex technology in a way that everyone can understand, but for those who want more technical details, click here to view a report from an academic study on the relay attacks occurring with PKES.

Keyless Vehicle Entry

Quick Review of Vehicle Keys

Let me first elaborate on the circular “cat and mouse” game that criminals play.  When a security measure is exploited, it then forces the manufacturer to upgrade, only to find that upgrade exploited again. Because of this same game being played in the auto industry, vehicle keys have become more complicated and expensive.

Keys are meant to be a means of authentication; if you have a key that unlocks the door, you’re “authorized” to enter. If you have a key that turns the ignition switch, you’re “authorized” to drive the car. For decades, vehicle keys were just simple pieces of metal. It was easy to defeat the door lock by picking the lock, punching the lock, or breaking a window and then bypassing the need for an ignition key by pulling the ignition wires and “hot-wiring” the vehicle. A knowledgeable criminal could quickly drive your car away without needing a key.

To combat this issue, vehicle manufacturers added Radio-Frequency Identification (RFID) chips to the keys and a sensor in the vehicle that checks for the presence of a pre-programmed key, before allowing the engine to start. This added technology increased the cost of replacement car keys and required the vehicle to be programmed to recognize the new key as an authorized key.

Manufacturers also introduced the “FOB” with buttons that allowed you to lock and unlock the vehicle without inserting a key into the door lock. This increase in convenience was made possible by adding a radio transmitter to the FOB. The transmitter could reach out to 100 feet and ping the radio receiver in the vehicle, which recognized the signal and performed the requested function.

Keyless Vehicle Entry

However, criminals were also keeping up with technology and mimicking the radio signals. While you might not have noticed much difference in the technology, the communication between the key FOB and the vehicle was getting more complex. In the most recent quest for maximum convenience, some vehicle manufacturers have included “Passive Keyless and Start” (PKES) systems.

With PKES systems you can leave your key in your pocket or purse and simply walk up to the car. As you reach out to open the door, it unlocks without the need to push any buttons or use a key. When you get in the car you simply push a button on the dash and the vehicle engine starts. All of this is accomplished by two-way radio communication between the vehicle and the key.

Vehicles with a PKES system transmit radio signals that are received by any PKES key within range. Like magic and without any human interaction action, the key will respond. The vehicle transmits a short-range (usually about three feet) signal asking if there are any keys nearby. All PKES keys that are in range will respond.

If the vehicle recognizes that a key is authorized, the doors will unlock. There’s a second signal that’s broadcasted inside the vehicle, when responded to by an authorized key, the ignition button on the dash is activated allowing the engine to start. This technology is a great convenience, but as with any security item, it can be exploited.

Keyless Entry

Criminals Are Adapting Too

Removing the need for any physical action with the key has created an opportunity to exploit the wireless communication between the key and the vehicle. I mentioned earlier that the vehicle emits a short-range signal and the key responds with a longer range transmission.

Criminals have found that they’re able to amplify this short-range transmission so that your key thinks it’s getting the transmission request by your vehicle, asking if any keys are nearby. When your key receives this signal, which it would normally only get if it was close to your vehicle, it responds accordingly. The return signal your key broadcasts, causes the vehicle to behave as if the key is within the expected short-range distance and unlocks the doors.

After the criminal has entered the vehicle the “inside” signal can then be amplified and your key will reply, allowing the vehicle engine to be started. Some PKES implementations periodically check for the continued presence of an authorized key while the engine is running, but some don’t, which allows the car to be driven as long as the engine hasn’t stopped.

Even when you follow the standard vehicle security advice of locking your doors, not leaving valuables within sight, or leaving your keys within view, you’re still vulnerable to criminals searching or stealing your vehicle.

The devices needed to amplify the vehicle signals are relatively simple to acquire and there are reports of devices being sold on prominent auction websites for as little as $17. Using these devices, criminals could exploit this vulnerability whenever the key is relatively close to your vehicle. This means parking lots, coffee shops, convenience stores and more importantly, at home, where you probably leave your keys by the door closest to the car.

Keyless Vehicle Entry

Protecting Against This Exploit

A long term solution will have to come from the vehicle manufacturers, but until they feel the need to improve the security of their PKES style keyless-entry systems, these relatively simple ways to exploit the wireless communication between the vehicle and key will still exist.

When manufacturers decide to improve the PKES systems, they’ll include it in new vehicle models and aren’t likely to retrofit older versions. Before you post an advertisement to sell your vehicle, let me share some ideas that will hopefully bring you some peace of mind.

Vehicle manufacturers have included ways to disable some or all of the PKES features and you can disable the long-range functionality of your FOB by removing the battery. This will mean that you lose the conveniences you’ve become accustomed to using though. A better option is to block the wireless communication between the vehicle and keys when you don’t intend to open the doors or operate the vehicle.

Keyless Vehicle Entry

I tested a few products that advertise blocking wireless radio signals. These bags and pouches were marketed using terms like Faraday, Anti-Tracking, Anti-Radiation and GPS signal blocking and were marketed towards cell phone users.

My test keys consisted of older remote entry FOBS as well as PKES keys from multiple manufacturers. I tested bags small enough to fit in your pants pocket, some that were larger and more suited for a purse or Everyday Carry (EDC) bag and some that were even big enough to hold multiple sets of keys (like you might leave by the door at home.) I found that the items marketed as blocking RFID, cell phone and GPS signals also blocked the frequencies that my set of test keys used to communicate with the cars, as long as the bags and pouches were completely closed.

Keyless Vehicle Entry

I also tested two different credit card sleeves that claimed to block RFID signals emanating from the “Chip & Pin” credit cards that have been used in other parts of the world for several years and will soon be more widely used in the US.

One option was thin pieces of plastic pressed together and open on one end. That pouch was too small to contain a FOB and without being able to completely close it, the wireless signal was able to escape containment allowing the key to be detected by the vehicle during some of my tests.

I also purchased the ITS RFID Wallet Sleeve and found it was big enough to fit the PKES FOB while being completely closed. It blocked the radio signals and rendered the key useless. I liked the ITS sleeve as an option for my pocket because it didn’t take up much more room than the actual FOB and it’s softer and more flexible than the other options I purchased.

As a possible low-cost option I tested anti-static bags that are normally used to protect electronic equipment from damaging electrical discharges. As expected, the anti-static bags didn’t block wireless signals for any of my test keys.

Conclusion

If you own a vehicle with a Passive Keyless Entry and Start system and want to avoid the type of exploit I described, I recommend that you find a way to interrupt the radio communication between the vehicle and the key when you aren’t using the vehicle.

I prefer blocking the communication as opposed to disabling the convenience features that are a part of the PKES systems. Whatever you wind up doing, find a solution that fits your lifestyle and usage habits and test it to ensure it prevents the key from communicating with your car.

You can easily test your solution by placing the key in the container you think should block the signals and try unlocking your car while standing next to it. If your car doesn’t respond, your solution is working and you can sleep better at night knowing criminals can’t exploit your vehicle’s Passive Keyless Entry and Start System.

Editor-in-Chief’s Note: Kris Q. is one of our Life Members at ITS and his background includes information security, military and civilian law enforcement, which he applies to clients of his security patrol & consulting firm near Portland.

Posted in Security | Tagged , , , , , , , , , , , , , , , | 36 Comments

CoTCCC Tactical Combat Casualty Care Guidelines: February 2015 Update

imgo

Here on ITS Tactical, we follow the CoTCCC (Committee on Tactical Combat Casualty Care) Guidelines very closely and have even designed our ETA Trauma Kits around them.

Tactical Combat Casualty Care (Pronounced “T-Triple C”) is a set of guidelines developed by USSOCOM (United States Special Operations Command) to properly train non-medics to deal with the preventable causes of death in the field.

These latest updates were released a few months back and we wanted to share them with you here in their entirety as we do with each update the CoTCCC provides. We also have them available in .pdf format here to download.

Tactical Combat Casualty Care Guidelines – 9 February 2015

* All changes to the guidelines made since those published in the 2014 Eighth Edition of the PHTLS Manual are shown in bold text. The most recent changes are shown in red text.

Basic Management Plan For Care Under Fire

  1. Return fire and take cover.
  2. Direct or expect casualty to remain engaged as a combatant if  appropriate.
  3. Direct casualty to move to cover and apply self-aid if able.
  4. Try to keep the casualty from sustaining additional wounds.
  5. Casualties should be extricated from burning vehicles or buildings and moved to places of relative safety. Do what is necessary to stop the burning process.
  6. Airway management is generally best deferred until the Tactical Field Care phase.
  7. Stop life-threatening external hemorrhage if tactically feasible:
    – Direct casualty to control hemorrhage by self-aid if able.
    – Use a CoTCCC-recommended limb tourniquet for hemorrhage that is anatomically amenable to tourniquet use.
    – Apply the limb tourniquet over the uniform clearly proximal to the bleeding site(s). If the site of the life-threatening bleeding is not readily apparent, place the tourniquet “high and tight” (as proximal as possible) on the injured limb and move the casualty to cover.

Basic Management Plan for Tactical Field Care

  1. Casualties with an altered mental status should be disarmed immediately.
  2. Airway Management
    a. Unconscious casualty without airway obstruction:
    – Chin lift or jaw thrust maneuver
    – Nasopharyngeal airway
    – Place casualty in the recovery position
    b. Casualty with airway obstruction or impending airway obstruction:
    – Chin lift or jaw thrust maneuver
    – Nasopharyngeal airway
    – Allow casualty to assume any position that best protects the airway, to include sitting up.
    – Place unconscious casualty in the recovery position.
    – If previous measures unsuccessful:
    – Surgical cricothyroidotomy (with lidocaine if conscious)
  3. Breathing
    a. In a casualty with progressive respiratory distress and known or suspected torso trauma, consider a tension pneumothorax and decompress the chest on the side of the injury with a 14-gauge, 3.25 inch needle/catheter unit inserted in the second intercostal space at the midclavicular line. Ensure that the needle entry into the chest is not medial to the nipple line and is not directed towards the heart. An acceptable alternate site is the 4th or 5th intercostal space at the anterior axillary line (AAL).
    b. All open and/or sucking chest wounds should be treated by immediately applying a vented chest seal to cover the defect. If a vented chest seal is not available, use a non-vented chest seal. Monitor the casualty for the potential development of a subsequent tension pneumothorax. If the casualty develops increasing hypoxia, respiratory distress, or hypotension and a tension pneumothorax is suspected, treat by burping or removing the dressing or by needle decompression.
    c. Casualties with moderate/severe TBI should be given supplemental oxygen when available to maintain an oxygen saturation > 90%.
  4. Bleeding
    a. Assess for unrecognized hemorrhage and control all sources of bleeding. If not already done, use a CoTCCC-recommended limb tourniquet to control life-threatening external hemorrhage that is anatomically amenable to tourniquet use or for any traumatic amputation. Apply directly to the skin 2-3 inches above wound. If bleeding is not controlled with the first tourniquet, apply a second tourniquet side-by-side with the first.
    b. For compressible hemorrhage not amenable to limb tourniquet use or as an adjunct to tourniquet removal (if evacuation time is anticipated to be longer than two hours), use Combat Gauze as the CoTCCC hemostatic dressing of choice. Celox Gauze and ChitoGauze may also be used if Combat Gauze is not available. Hemostatic dressings should be applied with at least 3 minutes of direct pressure. If the bleeding site is amenable to use of a junctional tourniquet, immediately apply a CoTCCC-recommended junctional tourniquet. Do not delay in the application of the junctional tourniquet once it is ready for use. Apply hemostatic dressings with direct pressure if a junctional tourniquet is not available or while the junctional tourniquet is being readied for use.
    c. Reassess prior tourniquet application. Expose wound and determine if tourniquet is needed. If it is, replace any limb tourniquet over the uniform with one applied directly to skin 2-3 inches above wound. Ensure that bleeding is stopped. When possible, a distal pulse should be checked. If bleeding persists or a distal pulse is still present, consider additional tightening of the tourniquet or the use of a second tourniquet side-by-side with the first to eliminate both bleeding and the distal pulse.
    d. Limb tourniquets and junctional tourniquets should be converted to hemostatic or pressure dressings as soon as possible if three criteria are met: the casualty is not in shock; it is possible to monitor the wound closely for bleeding; and the tourniquet is not being used to control bleeding from an amputated extremity. Every effort should be made to convert tourniquets in less than 2 hours if bleeding can be controlled with other means. Do not remove a tourniquet that has been in place more than 6 hours unless close monitoring and lab capability are available.
    e. Expose and clearly mark all tourniquet sites with the time of tourniquet application. Use an indelible marker.
  5. Intravenous (IV) access
    – Start an 18-gauge IV or saline lock if indicated.
    – If resuscitation is required and IV access is not obtainable, use the intraosseous (IO) route.
  6. Tranexamic Acid (TXA)
    If a casualty is anticipated to need significant blood transfusion (for example: presents with hemorrhagic shock, one or more major amputations, penetrating torso trauma, or evidence of severe bleeding)
    – Administer 1 gram of tranexamic acid in 100 cc Normal Saline or Lactated Ringers as soon as possible but NOT later than 3 hours after injury.
    – Begin second infusion of 1 gm TXA after Hextend or other fluid treatment.
  7. Fluid resuscitation
    a. The resuscitation fluids of choice for casualties in hemorrhagic shock, listed from most to least preferred, are: whole blood*; plasma, RBCs and platelets in 1:1:1 ratio*; plasma and RBCs in 1:1 ratio; plasma or RBCs alone; Hextend; and crystalloid (Lactated Ringers or Plasma-Lyte A).
    b. Assess for hemorrhagic shock (altered mental status in the absence of brain injury and/or weak or absent radial pulse).
    1. If not in shock:
    – No IV fluids are immediately necessary.
    – Fluids by mouth are permissible if the casualty is conscious and can swallow.
    2. If in shock and blood products are available under an approved command or theater blood product administration protocol:
          – Resuscitate with whole blood*, or, if not available
          – Plasma, RBCs and platelets in a 1:1:1 ratio*, or, if not available
          – Plasma and RBCs in 1:1 ratio, or, if not available;
          – Reconstituted dried plasma, liquid plasma or thawed plasma alone or RBCs alone;
          – Reassess the casualty after each unit. Continue resuscitation until a palpable radial pulse, improved mental status or systolic BP of 80-90 mmHg is present.
    3. If in shock and blood products are not available under an approved command or theater blood product administration protocol due to tactical or logistical constraints:
          – Resuscitate with Hextend, or if not available;
          – Lactated Ringers or Plasma-Lyte A;
          – Reassess the casualty after each 500 mL IV bolus;
    – Continue resuscitation until a palpable radial pulse, improved mental status, or systolic BP of 80-90 mmHg is present.

          – Discontinue fluid administration when one or more of the above end points has been achieved.
    4. If a casualty with an altered mental status due to suspected TBI has a weak or absent peripheral pulse, resuscitate as necessary to restore and maintain a normal radial pulse. If BP monitoring is available, maintain a target systolic BP of at least 90 mmHg.
    5. Reassess the casualty frequently to check for recurrence of shock. If shock recurs, recheck all external hemorrhage control measures to ensure that they are still effective and repeat the fluid resuscitation as outlined above.

    * Neither whole blood nor apheresis platelets as these products are currently collected in theater are FDA-compliant. Consequently, whole blood and 1:1:1 resuscitation using apheresis platelets should be used only if all of the FDA-compliant blood products needed to support 1:1:1 resuscitation are not available, or if 1:1:1 resuscitation is not producing the desired clinical effect.”
  8. Prevention of hypothermia
    a. Minimize casualty’s exposure to the elements. Keep protective gear on or with the casualty if feasible.
    b. Replace wet clothing with dry if possible. Get the casualty onto an insulated surface as soon as possible.
    c. Apply the Ready-Heat Blanket from the Hypothermia Prevention and Management Kit (HPMK) to the casualty’s torso (not directly on the skin) and cover the casualty with the Heat-Reflective Shell (HRS).
    d. If an HRS is not available, the previously recommended combination of the Blizzard Survival Blanket and the Ready Heat blanket may also be used.
    e. If the items mentioned above are not available, use dry blankets, poncho liners, sleeping bags, or anything that will retain heat and keep the casualty dry.
    f. Warm fluids are preferred if IV fluids are required.
  9. Penetrating Eye Trauma
    If a penetrating eye injury is noted or suspected:
    a) Perform a rapid field test of visual acuity.
    b) Cover the eye with a rigid eye shield (NOT a pressure patch.)
    c) Ensure that the 400 mg moxifloxacin tablet in the combat pill pack is taken if possible and that IV/IM antibiotics are given as outlined below if oral moxifloxacin cannot be taken.
  10. Monitoring
    Pulse oximetry should be available as an adjunct to clinical monitoring. All individuals with moderate/severe TBI should be monitored with pulse oximetry. Readings may be misleading in the settings of shock or marked hypothermia.
  11. Inspect and dress known wounds.
  12. Check for additional wounds.
  13. Analgesia on the battlefield should generally be achieved using one of three options:
    Option 1
    Mild to Moderate Pain
    Casualty is still able to fight
    – TCCC Combat pill pack:
    – Tylenol – 650-mg bilayer caplet, 2 PO every 8 hours
    – Meloxicam – 15 mg PO once a day
    Option 2
    Moderate to Severe Pain
    Casualty IS NOT in shock or respiratory distress AND
    Casualty IS NOT at significant risk of developing either condition
    – Oral transmucosal fentanyl citrate (OTFC) 800 ug
    – Place lozenge between the cheek and the gum
    – Do not chew the lozenge
    Option 3
    Moderate to Severe Pain
    Casualty IS in hemorrhagic shock or respiratory distress OR
    Casualty IS at significant risk of developing either condition
    – Ketamine 50 mg IM or IN Or
    – Ketamine 20 mg slow IV or IO
    * Repeat doses q30min prn for IM or IN
    * Repeat doses q20min prn for IV or IO
    * End points: Control of pain or development of nystagmus (rhythmic back-and-forth movement of the eyes)
    * Analgesia notes
    a. Casualties may need to be disarmed after being given OTFC or ketamine.
    b. Document a mental status exam using the AVPU method prior to administering opioids or ketamine.
    c. For all casualties given opiods or ketamine – monitor airway, breathing, and circulation closely
    d. Directions for administering OTFC:
    – Recommend taping lozenge-on-a-stick to casualty’s finger as an added safety measure OR utilizing a safety pin and rubber band to attach the lozenge (under tension) to the patient’s uniform or plate carrier.
    – Reassess in 15 minutes
    – Add second lozenge, in other cheek, as necessary to control severe pain
    – Monitor for respiratory depression
    e. IV Morphine is an alternative to OTFC if IV access has been obtained
    – 5 mg IV/IO
    – Reassess in 10 minutes.
    – Repeat dose every 10 minutes as necessary to control severe pain.
    – Monitor for respiratory depression
    f. Naloxone (0.4 mg IV or IM) should be available when using opioid analgesics.
    g. Both ketamine and OTFC have the potential to worsen severe TBI. The combat medic, corpsman, or PJ must consider this fact in his or her analgesic decision, but if the casualty is able to complain of pain, then the TBI is likely not severe enough to preclude the use of ketamine or OTFC.
    h. Eye injury does not preclude the use of ketamine. The risk of additional damage to the eye from using ketamine is low and maximizing the casualty’s chance for survival takes precedence if the casualty is in shock or respiratory distress or at significant risk for either.
    i. Ketamine may be a useful adjunct to reduce the amount of opioids required to provide effective pain relief. It is safe to give ketamine to a casualty who has previously received morphine or OTFC. IV Ketamine should be given over 1 minute.
    j. If respirations are noted to be reduced after using opioids or ketamine, provide ventilatory support with a bag-valve-mask or mouth-to-mask ventilations.
    k. Ondansetron, 4 mg ODT/IV/IO/IM, every 8 hours as needed for nausea or vomiting. Each 8-hour dose can be repeated once at 15 minutes if nausea and vomiting are not improved. Do not give more than 8 mg in any 8-hour interval. Oral ondansetron is NOT an acceptable alternative to the ODT formulation.
    l. Reassess – reassess – reassess!
  14. Splint fractures and recheck pulse.
  15. Antibiotics: recommended for all open combat wounds
    a. If able to take PO:
    – Moxifloxacin, 400 mg PO one a day
    b. If unable to take PO (shock, unconsciousness):
    – Cefotetan, 2 g IV (slow push over 3-5 minutes) or IM every 12 hours
    or
    – Ertapenem, 1 g IV/IM once a day
  16. Burns
    a. Facial burns, especially those that occur in closed spaces, may be associated with inhalation injury. Aggressively monitor airway status and oxygen saturation in such patients and consider early surgical airway for respiratory distress or oxygen desaturation.
    b. Estimate total body surface area (TBSA) burned to the nearest 10% using the Rule of Nines.
    c. Cover the burn area with dry, sterile dressings. For extensive burns (>20%), consider placing the casualty in the Blizzard Survival Blanket in the Hypothermia Prevention Kit in order to both cover the burned areas and prevent hypothermia.
    d. Fluid resuscitation (USAISR Rule of Ten)
    – If burns are greater than 20% of Total Body Surface Area, fluid resuscitation should be initiated as soon as IV/IO access is established. Resuscitation should be initiated with Lactated Ringer’s, normal saline, or Hextend. If Hextend is used, no more than 1000 ml should be given, followed by Lactated Ringer’s or normal saline as needed.
    – Initial IV/IO fluid rate is calculated as %TBSA x 10cc/hr for adults weighing 40- 80 kg.
    – For every 10 kg ABOVE 80 kg, increase initial rate by 100 ml/hr.
    – If hemorrhagic shock is also present, resuscitation for hemorrhagic shock takes precedence over resuscitation for burn shock. Administer IV/IO fluids per the TCCC Guidelines in Section 6.
    e. Analgesia in accordance with the TCCC Guidelines in Section 12 may be administered to treat burn pain.
    f. Prehospital antibiotic therapy is not indicated solely for burns, but antibiotics should be given per the TCCC guidelines in Section 14 if indicated to prevent infection in penetrating wounds.
    g. All TCCC interventions can be performed on or through burned skin in a burn casualty.
  17. Communicate with the casualty if possible.
    – Encourage; reassure
    – Explain care
  18. Cardiopulmonary resuscitation (CPR)
    Resuscitation on the battlefield for victims of blast or penetrating trauma who have no pulse, no ventilations, and no other signs of life will not be successful and should not be attempted. However, casualties with torso trauma or polytrauma who have no pulse or respirations during TFC should have bilateral needle decompression performed to ensure they do not have a tension pneumothorax prior to discontinuation of care. The procedure is the same as described in section 3a above.
  19. Documentation of Care
    Document clinical assessments, treatments rendered, and changes in the casualty’s status on a TCCC Casualty Card (DD Form 1380). Forward this information with the casualty to the next level of care.

Basic Management Plan for Tactical Evacuation Care

* The term “Tactical Evacuation” includes both Casualty Evacuation (CASEVAC) and Medical Evacuation (MEDEVAC) as defined in Joint Publication 4-02.

  1. Airway Management
    a. Unconscious casualty without airway obstruction:
    – Chin lift or jaw thrust maneuver
    – Nasopharyngeal airway
    – Place casualty in the recovery position
    b. Casualty with airway obstruction or impending airway obstruction:
    – Chin lift or jaw thrust maneuver
    – Nasopharyngeal airway
    – Allow casualty to assume any position that best protects the airway, to include sitting up.
    – Place unconscious casualty in the recovery position.
    – If above measures unsuccessful:
    — Supraglottic airway or
    — Endotracheal intubation or
    — Surgical cricothyroidotomy (with lidocaine if conscious).
    c. Spinal immobilization is not necessary for casualties with penetrating trauma.
  2. Breathing
    a. In a casualty with progressive respiratory distress and known or suspected torso trauma, consider a tension pneumothorax and decompress the chest on the side of the injury with a 14-gauge, 3.25 inch needle/catheter unit inserted in the second intercostal space at the midclavicular line. Ensure that the needle entry into the chest is not medial to the nipple line and is not directed towards the heart. An acceptable alternate site is the 4th or 5th intercostal space at the anterior axillary line (AAL).
    b. Consider chest tube insertion if no improvement and/or long transport is anticipated.
    c. Most combat casualties do not require supplemental oxygen, but administration of oxygen may be of benefit for the following types of casualties:
    – Low oxygen saturation by pulse oximetry
    – Injuries associated with impaired oxygenation
    – Unconscious casualty
    – Casualty with TBI (maintain oxygen saturation > 90%)
    – Casualty in shock
    – Casualty at altitude
    d. All open and/or sucking chest wounds should be treated by immediately applying a vented chest seal to cover the defect. If a vented chest seal is not available, use a non-vented chest seal. Monitor the casualty for the potential development of a subsequent tension pneumothorax. If the casualty develops increasing hypoxia, respiratory distress, or hypotension and a tension pneumothorax is suspected, treat by burping or removing the dressing or by needle decompression.
  3. Bleeding
    a. Assess for unrecognized hemorrhage and control all sources of bleeding. If not already done, use a CoTCCC-recommended limb tourniquet to control life-threatening external hemorrhage that is anatomically amenable to tourniquet use or for any traumatic amputation. Apply directly to the skin 2-3 inches above wound. If bleeding is not controlled with the first tourniquet, apply a second tourniquet side-by-side with the first.
    b. For compressible hemorrhage not amenable to limb tourniquet use or as an adjunct to tourniquet removal, use Combat Gauze as the CoTCCC hemostatic dressing of choice. Celox Gauze and ChitoGauze may also be used if Combat Gauze is not available. Hemostatic dressings should be applied with at least 3 minutes of direct pressure. If the bleeding site is amenable to use of a junctional tourniquet, immediately apply a CoTCCC-recommended junctional tourniquet. Do not delay in the application of the junctional tourniquet once it is ready for use. Apply hemostatic dressings with direct pressure if a junctional tourniquet is not available or while the junctional tourniquet is being readied for use.
    c. Reassess prior tourniquet application. Expose the wound and determine if a tourniquet is needed. If it is, replace any limb tourniquet placed over the uniform with one applied directly to the skin 2-3 inches above wound. Ensure that bleeding is stopped. When possible, a distal pulse should be checked. If bleeding persists or a distal pulse is still present, consider additional tightening of the tourniquet or the use of a second tourniquet side-by-side with the first to eliminate both bleeding and the distal pulse.
    d. Limb tourniquets and junctional tourniquets should be converted to hemostatic or pressure dressings as soon as possible if three criteria are met: the casualty is not in shock; it is possible to monitor the wound closely for bleeding; and the tourniquet is not being used to control bleeding from an amputated extremity. Every effort should be made to convert tourniquets in less than 2 hours if bleeding can be controlled with other means. Do not remove a tourniquet that has been in place more than 6 hours unless close monitoring and lab capability are available.
    e. Expose and clearly mark all tourniquet sites with the time of tourniquet application. Use an indelible marker.
  4. Intravenous (IV) access
    a. Reassess need for IV access.
    – If indicated, start an 18-gauge IV or saline lock
    – If resuscitation is required and IV access is not obtainable, use intraosseous (IO) route.
  5. Tranexamic Acid (TXA)
    If a casualty is anticipated to need significant blood transfusion (for example: presents with hemorrhagic shock, one or more major amputations, penetrating torso trauma, or evidence of severe bleeding)
    – Administer 1 gram of tranexamic acid in 100 cc Normal Saline or Lactated Ringers as soon as possible but NOT later than 3 hours after injury.
    – Begin second infusion of 1 gm TXA after Hextend or other fluid treatment.
  6. Traumatic Brain Injury
    a. Casualties with moderate/severe TBI should be monitored for:
    1. Decreases in level of consciousness
    2. Pupillary dilation
    3. SBP should be >90 mmHg
    4. O2 sat > 90
    5. Hypothermia
    6. PCO2 (If capnography is available, maintain between 35-40 mmHg)
    7. Penetrating head trauma (if present, administer antibiotics)
    8. Assume a spinal (neck) injury until cleared.
    b. Unilateral pupillary dilation accompanied by a decreased level of consciousness may signify impending cerebral herniation; if these signs occur, take the following actions to decrease intracranial pressure:
    1) Administer 250 cc of 3 or 5% hypertonic saline bolus.
    2) Elevate the casualty’s head 30 degrees.
    3) Hyperventilate the casualty.
    a) Respiratory rate 20
    b) Capnography should be used to maintain the end-tidal CO2 between 30-35
    c) The highest oxygen concentration (FIO2) possible should be used for hyperventilation.
    *Notes:
    – Do not hyperventilate unless signs of impending herniation are present.
    – Casualties may be hyperventilated with oxygen using the bag-valve-mask technique.
  7. Fluid resuscitation
    a. The resuscitation fluids of choice for casualties in hemorrhagic shock, listed from most to least preferred, are: whole blood*; plasma, RBCs and platelets in 1:1:1 ratio*; plasma and RBCs in 1:1 ratio; plasma or RBCs alone; Hextend; and crystalloid (Lactated Ringers or Plasma-Lyte A).
    b. Assess for hemorrhagic shock (altered mental status in the absence of brain injury and/or weak or absent radial pulse).
    1. If not in shock:
    – No IV fluids are immediately necessary.
    – Fluids by mouth are permissible if the casualty is conscious and can swallow.
    2. If in shock and blood products are available under an approved command or theater blood product administration protocol:
            – Resuscitate with whole blood*, or, if not available
            – Plasma, RBCs and platelets in a 1:1:1 ratio*, or, if not available
            – Plasma and RBCs in 1:1 ratio, or, if not available;
            – Reconstituted dried plasma, liquid plasma or thawed plasma alone or RBCs alone;
            – Reassess the casualty after each unit. Continue resuscitation until a palpable radial pulse, improved mental status or systolic BP of 80-90 mmHg is present.
    3. If in shock and blood products are not available under an approved command or theater blood product administration protocol due to tactical or logistical constraints:
            – Resuscitate with Hextend, or if not available;
            – Lactated Ringers or Plasma-Lyte A;
            – Reassess the casualty after each 500 mL IV bolus;
            – Continue resuscitation until a palpable radial pulse, improved mental status, or systolic BP of 80-90 mmHg is present.
            – Discontinue fluid administration when one or more of the above end points has been achieved.
    4. If a casualty with an altered mental status due to suspected TBI has a weak or absent peripheral pulse, resuscitate as necessary to restore and maintain a normal radial pulse. If BP monitoring is available, maintain a target systolic BP of at least 90 mmHg.
    5. Reassess the casualty frequently to check for recurrence of shock. If shock recurs, recheck all external hemorrhage control measures to ensure that they are still effective and repeat the fluid resuscitation as outlined above.
    * Neither whole blood nor apheresis platelets as these products are currently collected in theater are FDA-compliant. Consequently, whole blood and 1:1:1 resuscitation using apheresis platelets should be used only if all of the FDA-compliant blood products needed to support 1:1:1 resuscitation are not available, or if 1:1:1 resuscitation is not producing the desired clinical effect.”
  8. Prevention of hypothermia
    a. Minimize casualty’s exposure to the elements. Keep protective gear on or with the casualty if feasible.
    b. Replace wet clothing with dry if possible. Get the casualty onto an insulated surface as soon as possible.
    c. Apply the Ready-Heat Blanket from the Hypothermia Prevention and Management Kit (HPMK) to the casualty’s torso (not directly on the skin) and cover the casualty with the Heat-Reflective Shell (HRS).
    d. If an HRS is not available, the previously recommended combination of the Blizzard Survival Blanket and the Ready Heat blanket may also be used.
    e. If the items mentioned above are not available, use poncho liners, sleeping bags, or anything that will retain heat and keep the casualty dry.
    f. Use a portable fluid warmer capable of warming all IV fluids including blood products.
    g. Protect the casualty from wind if doors must be kept open.
  9. Penetrating Eye Trauma
    If a penetrating eye injury is noted or suspected:
    a) Perform a rapid field test of visual acuity.
    b) Cover the eye with a rigid eye shield (NOT a pressure patch).
    c) Ensure that the 400 mg moxifloxacin tablet in the combat pill pack is taken if possible and that IV/IM antibiotics are given as outlined below if oral moxifloxacin cannot be taken.
  10. Monitoring
    Institute pulse oximetry and other electronic monitoring of vital signs, if indicated. All individuals with moderate/severe TBI should be monitored with pulse oximetry.
  11. Inspect and dress known wounds if not already done.
  12. Check for additional wounds.
  13. Analgesia on the battlefield should generally be achieved using one of three options:
    Option 1
    Mild to Moderate Pain
    Casualty is still able to fight
    – TCCC Combat pill pack:
    – Tylenol – 650-mg bilayer caplet, 2 PO every 8 hours
    – Meloxicam – 15 mg PO once a day
    Option 2
    Moderate to Severe Pain
    Casualty IS NOT in shock or respiratory distress AND
    Casualty IS NOT at significant risk of developing either condition
    – Oral transmucosal fentanyl citrate (OTFC) 800 ug
    – Place lozenge between the cheek and the gum
    – Do not chew the lozenge
    Option 3
    Moderate to Severe Pain
    Casualty IS in hemorrhagic shock or respiratory distress OR
    Casualty IS at significant risk of developing either condition
    – Ketamine 50 mg IM or IN
    Or
    – Ketamine 20 mg slow IV or IO
    * Repeat doses q30min prn for IM or IN
    * Repeat doses q20min prn for IV or IO
    * End points: Control of pain or development of nystagmus (rhythmic back-and-forth movement of the eyes)
    * Analgesia notes
    a. Casualties may need to be disarmed after being given OTFC or ketamine.
    b. Document a mental status exam using the AVPU method prior to administering opioids or ketamine.
    c. For all casualties given opiods or ketamine – monitor airway, breathing, and circulation closely
    d. Directions for administering OTFC:
    – Recommend taping lozenge-on-a-stick to casualty’s finger as an added safety measure OR utilizing a safety pin and rubber band to attach the lozenge (under tension) to the patients uniform or plate carrier.
    – Reassess in 15 minutes
    – Add second lozenge, in other cheek, as necessary to control severe pain
    – Monitor for respiratory depression
    e. IV Morphine is an alternative to OTFC if IV access has been obtained
    – 5 mg IV/IO
    – Reassess in 10 minutes.
    – Repeat dose every 10 minutes as necessary to control severe pain.
    – Monitor for respiratory depression
    f. Naloxone (0.4 mg IV or IM) should be available when using opioid analgesics.
    g. Both ketamine and OTFC have the potential to worsen severe TBI. The combat medic, corpsman, or PJ must consider this fact in his or her analgesic decision, but if the casualty is able to complain of pain, then the TBI is likely not severe enough to preclude the use of ketamine or OTFC.
    h. Eye injury does not preclude the use of ketamine. The risk of additional damage to the eye from using ketamine is low and maximizing the casualty’s chance for survival takes precedence if the casualty is in shock or respiratory distress or at significant risk for either.
    i. Ketamine may be a useful adjunct to reduce the amount of opioids required to provide effective pain relief. It is safe to give ketamine to a casualty who has previously received morphine or OTFC. IV Ketamine should be given over 1 minute.
    j. If respirations are noted to be reduced after using opioids or ketamine, provide ventilatory support with a bag-valve-mask or mouth-to-mask ventilations.
    k. Ondansetron, 4 mg ODT/IV/IO/IM, every 8 hours as needed for nausea or vomiting. Each 8-hour dose can be repeated once at 15 minutes if nausea and vomiting are not improved. Do not give more than 8 mg in any 8-hour interval. Oral ondansetron is NOT an acceptable alternative to the ODT formulation.
    l. Reassess – reassess – reassess!
  14. Reassess fractures and recheck pulses.
  15. Antibiotics: recommended for all open combat wounds
    a. If able to take PO:
    – Moxifloxacin, 400 mg PO once a day
    b. If unable to take PO (shock, unconsciousness):
    – Cefotetan, 2 g IV (slow push over 3-5 minutes) or IM every 12 hours,
    or
    – Ertapenem, 1 g IV/IM once a day
  16. Burns
    a. Facial burns, especially those that occur in closed spaces, may be associated with inhalation injury. Aggressively monitor airway status and oxygen saturation in such patients and consider early surgical airway for respiratory distress or oxygen desaturation.
    b. Estimate total body surface area (TBSA) burned to the nearest 10% using the Rule of Nines.
    c. Cover the burn area with dry, sterile dressings. For extensive burns (>20%), consider placing the casualty in the Heat-Reflective Shell or Blizzard Survival Blanket from the Hypothermia Prevention Kit in order to both cover the burned areas and prevent hypothermia.
    d. Fluid resuscitation (USAISR Rule of Ten)
    – If burns are greater than 20% of Total Body Surface Area, fluid resuscitation should be initiated as soon as IV/IO access is established. Resuscitation should be initiated with Lactated Ringer’s, normal saline, or Hextend. If Hextend is used, no more than 1000 ml should be given, followed by Lactated Ringer’s or normal saline as needed.
    – Initial IV/IO fluid rate is calculated as %TBSA x 10cc/hr for adults weighing 40-80 kg.
    – For every 10 kg ABOVE 80 kg, increase initial rate by 100 ml/hr.
    – If hemorrhagic shock is also present, resuscitation for hemorrhagic shock takes precedence over resuscitation for burn shock. Administer IV/IO fluids per the TCCC Guidelines in Section 5.
    e. Analgesia in accordance with TCCC Guidelines in Section 11 may be administered to treat burn pain.
    f. Prehospital antibiotic therapy is not indicated solely for burns, but antibiotics should be given per TCCC guidelines in Section 13 if indicated to prevent infection in penetrating wounds.
    g. All TCCC interventions can be performed on or through burned skin in a burn casualty.
    h. Burn patients are particularly susceptible to hypothermia. Extra emphasis should be placed on barrier heat loss prevention methods and IV fluid warming in this phase.
  17. The Pneumatic Antishock Garment (PASG) may be useful for stabilizing pelvic fractures and controlling pelvic and abdominal bleeding. Application and extended use must be carefully monitored. The PASG is contraindicated for casualties with thoracic or brain injuries.
  18. CPR in TACEVAC Care
    a. Casualties with torso trauma or polytrauma who have no pulse or respirations during TACEVAC should have bilateral needle decompression performed to ensure they do not have a tension pneumothorax. The procedure is the same as described in section 2 above.
    b. CPR may be attempted during this phase of care if the casualty does not have obviously fatal wounds and will be arriving at a facility with a surgical capability within a short period of time. CPR should not be done at the expense of compromising the mission or denying lifesaving care to other casualties.
  19. Documentation of Care
    Document clinical assessments, treatments rendered, and changes in the casualty’s status on a TCCC Casualty Card (DD Form 1380). Forward this information with the casualty to the next level of care.

Click here to download the 2015 TCCC Guidelines in .pdf format

Posted in TCCC | Tagged , , , , , , , | 4 Comments

Storm Chasing: It’s All Fun and Games Until One Chases You Back

Storm Chasing 01

The mosquitos this year are absolutely atrocious, I look down briefly as I struggle to get my tripod and camera combination set up and my arms are covered with pterodactyl size mosquitos. I look around at the other vehicles parked on the shoulder of a farm to market road in between two vibrant green fields and notice everyone standing outside on the road slapping at themselves; at least I’m not the only one.

Giving my arms a quick swipe I focus my attention back on my camera and the looming wall cloud and green-tinted hail core rapidly closing in on my position. My shirt is soaked with sweat due to the high levels of humidity and I can feel the inflow winds shooting past me, feeding the monster with moisture rich air. I only have a couple of minutes to take photos of the rotating storm before I have to throw the camera back into the Jeep and drive to stay ahead of the turbulent mess coming my way. This is it, this is what it’s all about, this is why I drive thousands of miles into the middle of nowhere, surviving off red bull and gas station food; tornados.

Storm Chasing 02

Storm Chasing

Every year the transition from winter to spring is marked by a curious event in Texas and other locations throughout tornado alley. Sleepy little towns and long stretches of open highway become inundated with hoards of vehicles, mobile radar trucks and “tanks” fixed with bulletproof Lexan glass and covered in reinforced steel. Jammed into these vehicles are a wide array of spectators to include scientists, meteorologists, photographers and even tourists who pay thousands of dollars to ride along with seasoned storm chasers. This is tornado season in the United States and people from all over the world pour into tornado alley in search of the elusive weather phenomenon known as a tornado.

Storm Chasing 03

While tornados occur throughout the world there’s only one place that sees tornados with such density per square mile. Situated in the central plains of the United States, tornado alley is a unique location that’s the focal point of a series of colliding air masses creating an environment conducive to tornado genesis. There is no place on earth quite like it, hence the mass influx of chasers from all over the world during the spring.

Tornado Alley

The Thrill of the Chase

I spend as much time as I can chasing and documenting super cells and tornados; I originally got into storm chasing via photography, a trend that continues to this day. While my knowledge of basic meteorology has grown over the years, the brain behind the operation is my chase partner, Brett, who’s been chasing for over a decade and has a meteorology degree from OU. Brett’s brother and another good friend of mine are also frequently with us in “the field,” serving as drivers and videographers.

Storm Chasing 04

There are numerous resources to forecast severe weather and a storm chase usually begins with a phone call from Brett one to two days prior to a severe weather event. We keep an eye on the weather models while we figure out who can take off work and go chase. Closer to zero hour, a target area is decided on and we hit the road. Sometimes we chase just a couple hours away from Dallas/Fort Worth, where we live, other times we find ourselves in Oklahoma, Kansas or even driving out the night before to chase as far away as Nebraska.

Storm Chasing 05

Tools of the Trade

On chase day we link up and prepare the vehicle for the chase by situating our equipment, checking the fluids and applying Rain-X to all the windows. When we go as a group we take Brett’s 4×4 Xterra, which is rigged with video cameras that live stream via a mobile hot spot and extender. At one point Brett had an anemometer set up on the roof as well, but it was lost during a close call in 2013.

Storm Chasing 06

We use a real-time radar app called Radarscope to monitor storm evolution and movement, as well as rotation and precipitation. This app is a staple in the storm chasing community for smart phone or tablet users and delivers NEXRAD Level 3 radar data. The app also shows your position via GPS relative to the storm and allows you to see the position of other storm spotters/chasers. This is the most accurate and up to date weather info you can get in an app and can benefit anyone who wants to monitor weather.

Radarscope

Typically we drive to our target area and wait for storm initiation, or drive right to the storm if it’s already in progress. Once we get on a storm, we locate the base and follow it, staying out of the hail core and out of the direct path of the circulation. If or when it dies out, we decide whether to target a different super cell. Additionally, we photograph and record the storm to submit storm reports to the National Weather Service if we see wall clouds, funnels, or various other storm elements such as high wind and hail. While radar technology is steadily increasing, the radar simply can’t see what’s actually happening on the ground and the NWS uses these storm reports in conjunction with radar data to issues Severe Weather and Tornado Warnings.

Storm Chasing 07

Storm Chasing 08

Tornado chasing isn’t always fun and games; while I love watching the atmosphere come to life with towering storms, there’s always the very real fact that Tornados are a dangerous weather phenomenon. Every year numerous people are impacted by tornados; the current fatality numbers for 2015 stands at ten, while in 2011 there were 553 people killed in the US. Given our close proximity to a potential natural disaster, we prepare for the worst and carry equipment that could be potentially life saving should we happen upon a tornado hit area.

Storm Chasing 09

I usually carry an axe, bolt cutters and a medical trauma kit consisting of a couple tourniquets, clotting agent and various compression bandages. I also keep a bug-out bag in my personal vehicle with a tent, sleeping bag, water, freeze dried food, etc. in the event I have to stay in an area overnight. While the equipment generally sits unused in the back of the chase vehicle, I’m of the mindset that it’s better to be prepared and not need it, than to need it and not have it. We’ve come upon scenes right after the passage of a tornado where we checked recently thrown vehicles and destroyed homes, but have been fortunate in that we haven’t had to dig anyone out or render first aid.

Storm Chasing 10

Use These Tips to Prepare and Stay Safe

Storm Chasing 11

There are many things you could do to prepare for the worst, but two of the most important things are to be familiar with the warning systems in place and to have a plan. If you live in or near tornado alley, just a little bit of preparation can save you and your families’ lives. Your plan should be checked and talked about every year at the end of winter. Know the difference between a watch and a warning, familiarize yourself with weather radar, download one of the many weather-warning apps and have a physical weather radio around to back up your phone.

Storm Chasing 12

Pick a safe room in your home if you don’t have a basement or storm shelter and stock that room with water, flashlights, tools and anything else you think you may need in the event the worst happens and your home is struck by a tornado. Also consider that your house may collapse and you may be stuck in that room for a while.

As far as where to shelter in your home, a general rule is to put as many walls between yourself and the outside as possible; bathrooms, closets, pantries and the areas under staircases are frequently used and often the only thing left standing after a destructive tornado. Make sure this room is on the first floor if you live in a two-story home and if you live in an apartment complex, get to know your first floor neighbor and arrange to shelter there should a tornado become imminent.

Storm Chasing 14

If the sirens go off, shelter immediately. Bring pillows, mattresses or sports equipment to cover and protect yourself from flying debris. Most tornado deaths occur due to foreign object penetration and dismemberment; tornados can turn something as simple as a spoon into a deadly projectile. If you find yourself out and about in your vehicle, attempt to get indoors if you’re able to. If there aren’t any buildings around, get as low as you can by any means available, use a ditch, depression, sewer etc. It’s an extremely bad idea to shelter in your vehicle, as tornados throw vehicles around like toys and many tornado deaths are directly attributed to people being struck while in their vehicles.

Be safe and remember to always have a plan when it comes to severe weather.

Storm Chasing 13

Resources

Editor-in-Chief’s Note: Please welcome Daniel Rodriguez as a contributor on ITS. Daniel is a former US Marine Corps aerial gunner, photographer and a Mountain Sports of Arlington kayak fishing team member. You can often find him yak-packing (kayak camping trips), chasing storms or adventure and hunting. All of the photos in this article were taken by Daniel (except the one he’s in which was taken by his wife, Melissa) and I think you’ll agree he’s an amazing photographer! Check out his website here and also the kayak fishing blog he runs with his dad.

Posted in Storm Chasing | Tagged , , , , , , | 6 Comments

Get Outdoors Sales Event

Get Outdoors Sales Event

Summer is here! It’s the perfect time to get outdoors and get back in touch with nature. To kick start your adventures, we’re offering up to 25% off select outdoor items in the ITS Store thru Monday, June 15th!

In addition to the awesome savings, we’re also announcing a brand new ITS Rite in the Rain Memo Book that’s not available to purchase. The only way to get yours is with any order over $25 (while supplies last.) This 24-page Memo Book is a 3 1/4″ x 4 5/8″ water-resistant notebook featuring a Field-Flex cover.

Stock is limited on sale items, so be sure to get your order in quickly!

rite-in-the-rain-02

Click Here to Grab your Free Rite in the Rain Memo Book!

Posted in ITS Information | Tagged | 1 Comment

Ridiculous Dialogue Illustrated No. 5

Ridiculous_Dialogue_Illustrated_No

Episode 11 was the inspiration for this month’s Ridiculous Dialogue Illustrated, where Rob makes his own roads and discovers that it’s sometimes best to follow some roads.

Check out the Overland PVC Morale Patch and the You Never Go Full Retard Morale Patch in the ITS Store!

Ridiculous Dialogue Illustrated is a selection of some of the best moments from our Podcast, Ridiculous Dialogue. It’s a way to bring some of the inside jokes and adventures to life that we all share here at ITS. This is a monthly comic strip that we’re sure our devoted podcast listeners will relate to and love.

For more insight into this month’s strip, you can listen to Episode 11 below.


Subscribe on iTunes Download Episode Subscribe via RSS Image Map
Posted in Humor | Tagged , , , , , , , , , | 6 Comments

How to Hack a Garage Door in Under 10 Seconds and What You Can Do About It

garage-door-hack-main

We’ve talked in depth about garage doors and their vulnerabilities on ITS, but today we wanted to highlight a discovery made by Samy Kamkar using a children’s toy and some common materials. The device he’s created, dubbed the OpenSesame, can open a garage door using a brute force attack in less than 10 seconds.

How Garage Door Openers Work

Before we get into the details of the vulnerability, let’s explain a bit about how automatic garage door openers developed. The first electric garage door opener was introduced in 1926, but didn’t gain in popularity until after World War II. These openers usually involved a wired switch being run from the door motor to a keypad or button that could be pressed from inside the vehicle. As technology improved, the wireless remote was created and used radio signals to transmit a code from the remote control to the opener itself. Once the code was transmitted, the opener would receive it and run the motor to draw the door up or down.

garage-door-hack-02

In the 1960’s, as automatic openers were more widely adopted, it was discovered that the doors all used the same code. Since the doors used the same signal and code, any remote could open any door. Thieves quickly discovered that by purchasing a few remotes from different manufacturers, they could open nearly any door. This led the garage door industry to introduce new openers that featured changeable codes.

Don’t Be a Dip Switch

Manufacturers wanted to design an opener with a code that could be set by the owner in case they needed to replace or add new remotes. These new programmable openers featured a series of 8-12 dip switches that could be set in the up or down position to create a unique code. This meant that for an 8 switch remote there were 28 or 256 possible codes and on a 12 switch remote there were 212 or 4,096 possible codes. This greatly decreased the chances of the door’s code being matched by a thief armed with a standard remote, as they would need to sit outside and physically set each dip switch and test the new code.

This might sound like a large number of possible codes but in binary terms, it’s not much. In fact, using a two character alphanumeric password would be more secure than this and would provide more combinations.

Do the Math

The method that Samy Kamkar used to attack these type of garage doors was a brute force attack, in which he sent every possible code (4,096) to the door until it would open. The device he used to perform this brute force attack was a slightly modified IM-ME children’s toy. He found that if he transmitted each code five times with a wait period behind the code, he could transmit every possible code to the door in about 29 minutes. That’s a pretty scary fact as theoretically, a thief could sit in a car outside your home for that long without being noticed. Unfortunately, that’s not the worst of it as Samy discovered that he could dramatically shorten the length of time it took to open the door using math.

Samy found that by transmitting each code only once rather than five times, the time was reduced to 6 minutes. Many times, remotes transmit the code multiple times in case of interference, but there’s rarely ever any, so transmitting it once seems to work just fine. Not only that, he also discovered that removing the wait times between the codes took the time down to 3 minutes. So if there wasn’t a wait time between codes, how could the opener know when one code stopped and another began?

4-Bit_PISO_Shift_Register

The answer lies in the fact that the openers use what’s called a Bit Shift Register, where it’s only looking for a part of the code to match up with the actual code. This is a very insecure method to check the code and results in a dramatic decrease in the overall time it takes to send all the codes to the opener since the opener is checking all possible permutations of a code and doesn’t have a defined start and end point.

Knowing that the opener used a Bit Shift Register, Kamkar was able to apply The De Brujin Sequence to transmit all possible codes much quicker and managed to take the total time down to just 8.7 seconds.

Preventing the Attack

Luckily, most automatic openers today aren’t affected by this exploit since they use “Rolling” codes, where the code is changed every time the door is opened. However, there are some manufacturers that are still producing openers with dip switches. These manufacturers include Nortek / Linear / Multi-Code and NSCD/North Shore Commercial Door. Older models from vendors such as Chamberlain and Liftmaster can also be vulnerable so you should double check to ensure that your door does not feature this technology.

garage-door-hack-01

The best method to check your opener is to check the remote. If you open the remote and find dip switches, you should upgrade the opening system immediately. Look for a system that offers Rolling Codes, Hopping Codes, Intellicode or Security Plus. The remote above is a good example of a Rolling Code remote because it lacks dip switches. These technologies don’t rely on a fixed code and are harder to hack. Keep in mind though that nothing is foolproof, so you should design your security around that.

Additional ITS Article Resources

Top 10 Garage Door Security Tips to Prevent Break-Ins

Safety Announcement: Protecting Against Garage Door Break-Ins

How to Escape from Zip Ties

Use These Tips to Protect You and Your Family Against Home Invasions

Beat The Clock: Most Burglaries Take Place in Minutes

What To Do in the Crucial Three Hours after a Burglary

Posted in Physical Security | Tagged , , , , , , , , | 24 Comments

Former Navy SEAL Craig Sawyer on Changing His Outlook and Always Learning

Craig Sawyer

As I grow older, my outlook is changing.

I’m realizing that showing love and appreciation for the people I care about most, is more important than momentarily looking “cool” to a few acquaintances. I’m learning to express more gratitude and genuine appreciation to those who have gone out of their way to look out for me when it mattered. I’m recognizing that too many people foolishly mistake kindness for weakness. I’m learning that it’s a liberating breath of fresh air to cut the rope and separate from habitual liars, setting them free to lie to others and once free from the lies, wishing I had done it sooner!

I’m seeing it proven again and again that fear is the single most crippling obstacle preventing people from achieving their dreams. I’m gaining an appreciation for those who must try to raise children by themselves after recognizing there is simply no equal to the environment of a loving home with a mother and father to raise secure, well-grounded kids. I’m growing clearer on the nature of the abuse of power and how humans just can’t stop themselves when given too much of it. I’m seeing that character absolutely does matter, especially in positions of great responsibility. Character alone is the only guarantee of a public official acting in good faith when it’s been demonstrated how easy it is to get around laws.

I’m quicker to hang up on solicitors and slower to raise my voice at those I love. I’m recognizing that the power of the pen is mightier than the sword, because our warriors, no matter how heroic or effective, can’t physically kill enough of our enemies to satisfy the demand by unending screw-ups from crooked politicians back home. I’m growing less tolerant of the cowards who lack the courage to enter the game, criticizing from the safety of the sidelines, those who are actually doing the hard work on the field. I’m recognizing that I really have a particular appreciation for animals, especially those that so charmingly look after their own.

I’m learning that men with the loudest mouths and those who create the most ridiculously exaggerated physical appearance for themselves use that appearance like a costume to hide behind, because inside, they are still sad, scared, broken little children that usually come from abusive homes. I’m seeing clearly that the rude and selfish are that way because they’re utterly overwhelmed by the sheer magnitude of their own insecurity and therefore lack any further capacity for consideration of others.

I’m recognizing that the truly strong look after not only themselves, but for others around them as well. I’ve learned by observing my own father that strength is definitely on the inside in the will to do what matters most, without regard to what’s easier, or more immediately attractive. I’m learning that a positive outlook is infectious and that smiling at others, holding a door, helping change a flat tire, or reaching out to someone who is down, can spread outward like a ripple effect from a rock thrown in a pond. I’m seeing that a hero is one who deliberately sacrifices of themselves to rescue others from death, or to radically improve other’s lives and that nothing less qualifies for that title.

I’m seeing that people are too quick to voice their opinions these days before informing themselves on a particular subject. I’m seeing that as science makes major advances, we’re coming to the realization that we actually understand far less than we’d once thought. I’m learning that even though I’m as flawed as anyone else, I have values, standards and principles, which mean more to me than people who do not. I’ve learned that the best things in life aren’t things at all, but relationships.

In the end, I’ve grown to genuinely believe we’re not just random particles whizzing around on a rock in a blank universe by accident. There is a big picture, a reason, a purpose and a plan.

Editor-in-Chief’s Note: Craig “Sawman” Sawyer is a former Marine and Navy SEAL with an extensive background, including being one of the first Federal Air Marshals after 9/11. You can read Craig’s full biography on his website tacticalinsider.com and check out his Hard Target Training courses while you’re there.

Posted in Mindset | Tagged , , , , | 71 Comments