What do you think of when you hear the words belly and band? Perhaps images of exercise straps or maternity pants waft through your mind, but what I’m actually talking about is handgun concealment.
Most of the people I’m around who have a concealed carry permit use Kydex or leather holsters when carrying, so when I began looking for ways to carry that’s naturally what I migrated towards. The three rigid holsters that I invested in over time haven’t worked that well with my wardrobe, so I thought it would be cheaper to keep looking for the right holster solution instead of buying a bunch of new clothes. Plus, I didn’t want to greatly modify the style of clothing I like to wear.
For several months, I’ve been wearing a Comfort Fit Belly Band by The Well Armed Woman instead of a waist band holster and it’s actually become my go-to concealment option. There are some definite pros and cons when it comes to wearing a belly band, but I thought it might be helpful to share my experience for anyone who might be considering one.
An Epiphany
When I first began wearing a belly band I couldn’t stand the feeling of lugging something around right up against my body. I’ve tried to reduce the size of my purse and the volume of stuff I tote around with me everyday, so the idea of tacking on something else to my daily wardrobe was initially an irritating thought.
I had an interesting conversation with Rob at the office one day that changed my perspective, however. I told him how uncomfortable wearing my gun was and that I wasn’t really diggin’ it. Rob told me directly, “Carrying is supposed to be comforting not comfortable, as they say.”
That poignant statement got my attention. It made me take a deeper look at why I originally wanted to carry and I began working harder to make concealed carry work for me. I know myself well enough to know if an accessory is irritating then I’ll stop wearing it eventually. I wanted to figure out if the belly band concealed carry option could become a favorite, or if I’d be better off with a rigid holster and altering my wardrobe.
Research
When I first started looking online for where to buy holsters designed for women I stumbled across a Website called The Well Armed Woman. There were several holster options for me to consider and this Website had written descriptions as well as video demonstrations to help educate me before buying. Other Websites offered belly bands that were designed for men or more unisex purposes. Because I was looking for a small size I wanted a belly band made exclusively for women.
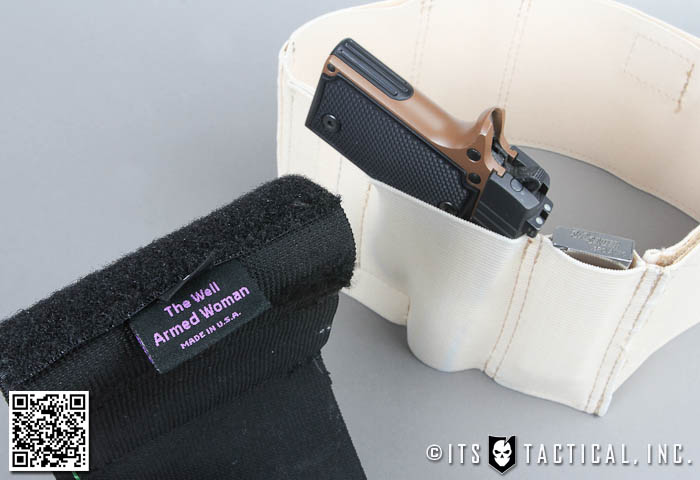
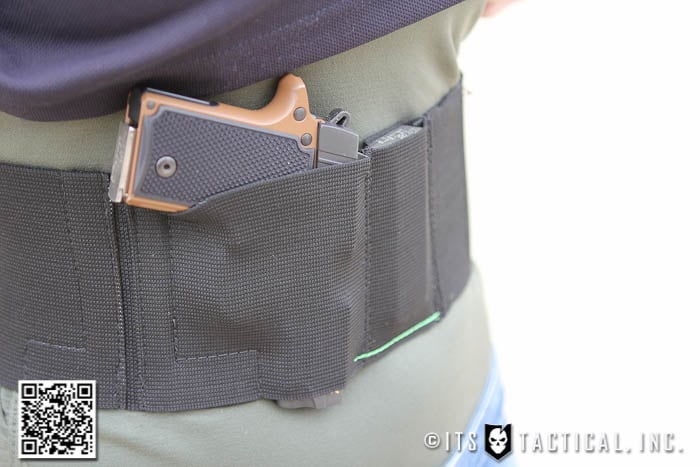
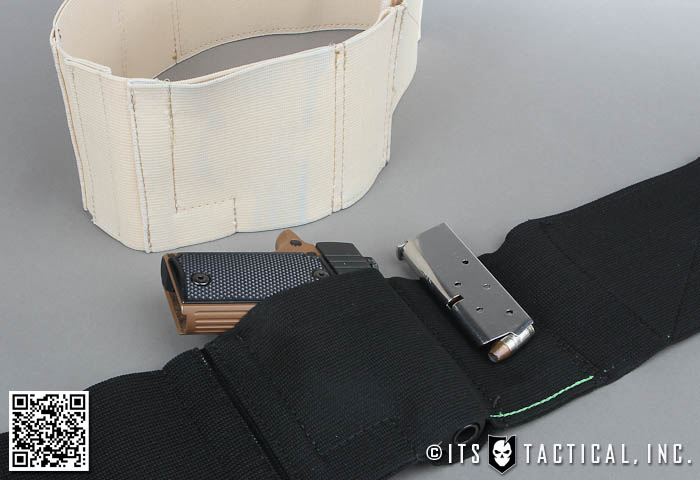
I decided to try the Comfort Fit Belly Band. There were two different width options, a 4″ and a 5″ band. I decided to go for the shorter one since my torso isn’t very long. There were pockets sewn into the belly band for my pistol, as well as extra magazines. From what I saw it looked like something that might work well for me. The price was $40.99 and came in Nude or Black with sizes ranging from Small to 2XL.
This form of concealment also didn’t have to be made to fit my gun, which I liked. I carry a Sig P238, but the belly band will accommodate a wide variety of hand guns.
Putting it to Work
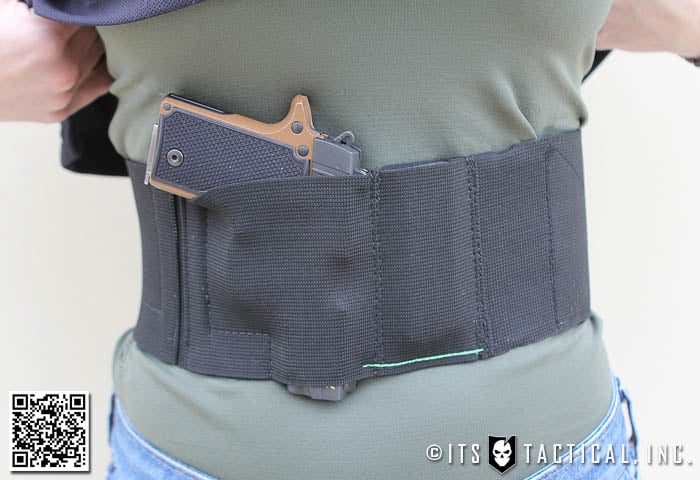
Wearing the belly band was definitely an adjustment. I found out very quickly that I needed to wear a tank top under the belly band in order for it to feel comfortable. It’s made of elastic that irritates my skin as I move around, but as long as I’ve got an undershirt on I’m good to go.
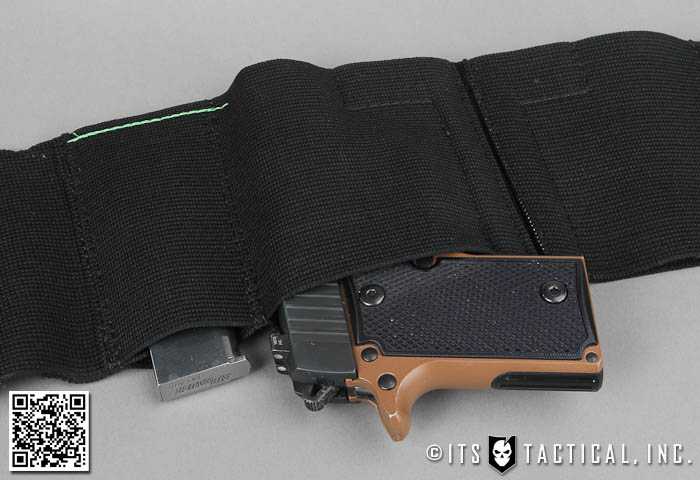
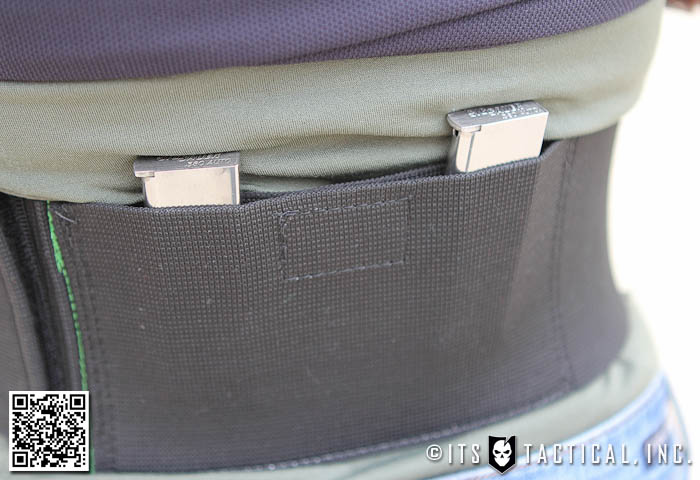
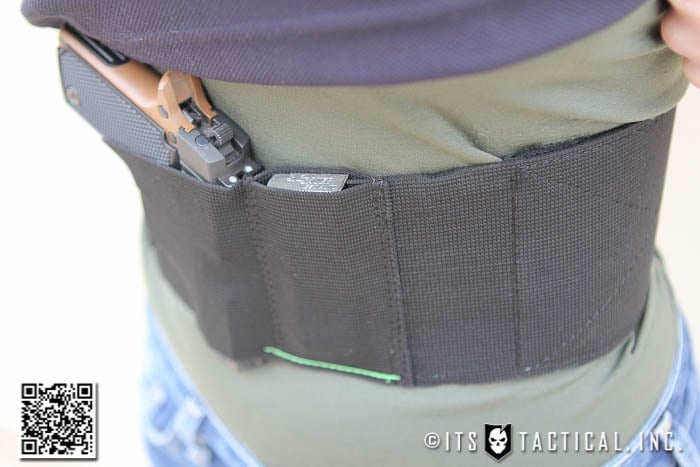
The magazine pockets featured on the belly band were sewn in a place that wasn’t easily accessible for me. I wear the band so that my pistol is either above my appendix area or directly centered in my torso (depending on my outfit) which puts the magazine pockets all the way around to the back of the band. If I needed to reload I wouldn’t be able to access my extra magazine easily without taking the extra time to turn the belly band 180 degrees.
After breaking in the belly band and realizing that I wanted to keep using it, I stitched one of the double layers of elastic closed that was located right beside my pistol allowing easier access to my extra magazine. If you look at the photo below, I used green thread so that you’d be able to see just where I put my stitch line. The pocket that’s supposedly designed for use as a magazine pocket will serve me better by carrying my i.d. or cash since they sit so far out of reach.
After wearing my first belly band (the nude colored band) for a few weeks, it began to stretch out. This isn’t a big deal except that I had ordered the smallest size available. I decided to fold over and stitch down one of the areas of the belly band that wasn’t used for holding anything important. This provided me with a better fit and eliminated another problem I’d been having.
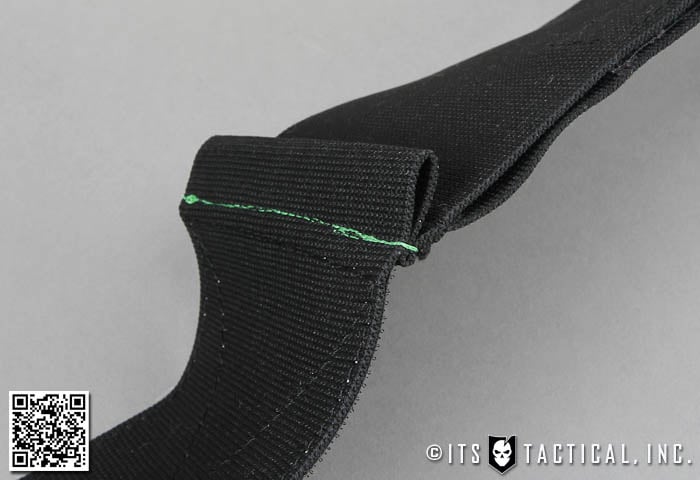
Pulling the belly band snug around my torso always left top part of the Velcro closure (the loop side) hanging past the available hook. This would brush my arm through my shirt when my arm would move close against my side. It also caused the hook and loop to occasionally snag my shirts or the tank top under the belly band, which would result in my shirt bulging. Once I cinched up the circumference by folding and stitching an unused section of the elastic, the Velcro closure was able to line up and close as it was designed to. This stitch line is also seen in green in the photo below.
Lessons Learned
Since the belly band isn’t a rigid holster and definitely stretches as it’s worn, I’ve realized that I need to keep an eye on the stitching and that it doesn’t get overly stretched out. When I was modifying my first belly band (the nude colored one) to tighten it up, I saw that some of the stitching in the pistol pocket had come loose. I restitched this so that my gun would fit securely between the elastic layers and not fall out if I bent over. This is definitely something to pay attention to if you choose to wear a belly band. There will come a time, however that the elastic will become too worn out to restitch and I’ll need to invest in a new one.
The belly band offers me quite a bit of flexibility (no pun intended) when it comes to how I wear it. I can pull it down around my waist or wear it right under my bra. I’ve found that I like wearing it higher up because it’s easier to conceal my gun right under my chest.
It’s also very easy to adjust if I change clothes or need to switch activities. I don’t have to worry about adjusting the cant of the holster or adding a belt to my outfit to make this form of concealment work. I can wear the belly band when I exercise, relax and also when I go to work. It’s really quite versatile for me.
The main downside I’ve found while wearing the belly band is the body heat it generates. It’s been great for me during the winter months, but now as we move into spring and summer in Texas I’m curious to see what happens. I’m going to try wearing tube tops under my belly band instead of full tank tops and see how that works. I may have to make some undershirts by hand so that there isn’t a lot of extra fabric to hold in body heat, but I’m willing to take that extra step since the belly band has been such a great concealed carry option for me.
Is the Belly Band for You?
Women who are looking for a concealment option that can be easily worn, easily adjusted, affordable and can be modified at home, may find the Comfort Fit Belly Band the right holster to buy. In my opinion, finding light weight, comfortable undershirts will help the belly band be more comfortable to wear. Also remember to inspect the stitch lines from time to time just to make sure the holster isn’t losing its grip.
Let us know what you think of the belly band if you’re already wearing it or if you decide to give it a try!
Please note the Comfort Fit Belly Bands I’ve worn were not provided for review by TheWellArmedWoman.com. I purchased both holsters and am reviewing them without input from the retailer.
To give a quick background, we were introduced to Ed a few months ago and were lucky enough to listen and pick his brain for about 12 hours over a period of 2 days and yet still have tons of notes. Ed is a wealth of knowledge and the information he provides only scratches the surface of what one can learn from him.
If you’re not familiar with Huckberry, they’re a Website that features weekly offerings of some of the best products available from around the Internet. They’re personally one of my frequently visited Websites and I’m always finding great offers on my favorite brands.
It’s this reason that I wanted to work with Huckberry to get an offer together for ITS Tactical. I really like what they’ve put together over there and this week, we’re one of the brands featured in their store. Head on over and check out our offering. While you’re there, let me know what you think of an article I contributed to their blog, The Lost Art of Self-Sufficiency.
I’d like to thank Huckberry for the opportunity to work with them on an offering and an article. I can’t say enough good things about what they’re doing!
While these bills are slated to go into effect on July 1, two ballot measures have been proposed in an attempt to undo these restrictions.
Magpul also reaffirms that the Boulder Airlift program will continue to operate as planned. If you aren’t familiar, they’re working to provide standard capacity magazines to responsible Colorado residents who wish to own them before HB1224 goes into effect.
If you’re a resident of Colorado and wish to jump in line to order your PMAGs, visit Magpul.com for more information.
For those outside of Colorado, don’t feel left out:
Customers in the rest of the country should rest assured that the airlift only takes a small portion of our production, and magazines and other products are continuing to ship to the rest of the nation. Our transition to a new home will occur in a phased and orderly a manner to allow us to continue to serve our customers during the move, as well as to allow an orderly transition for affected employees. We are actively working on those plans.
The final verdict is yet to be written but Magpul does consider themselves to be in “occupied territory.” There also is no official word on exactly when Magpul will leave Colorado or where they will go, but they did share their statement on Monday through a Facebook post:
…we will have no choice but to leave [Colorado] if the Governor signs this into law. We will start our transition out of the state almost immediately, and we will prioritize moving magazine manufacturing operations first. We expect the first PMAGs to be made outside CO within 30 days of the signing, with the rest to follow in phases.
As most of you know, ITS Tactical is proudly based in Texas and according to the Denver Post, Texas Governor Rick Perry sent a letter to Magpul saying that no other state “fits the definition of business-friendly like Texas.” We wish the best for Magpul in their transition out of Colorado and stand with them in their decision. We’ll also be here to welcome them to Texas with open arms if they choose to take Governor Perry up on his proposal.
Colorado is being used as a testing ground for national gun legislation and we continue to urge you to contact your local representatives and make yourself heard!
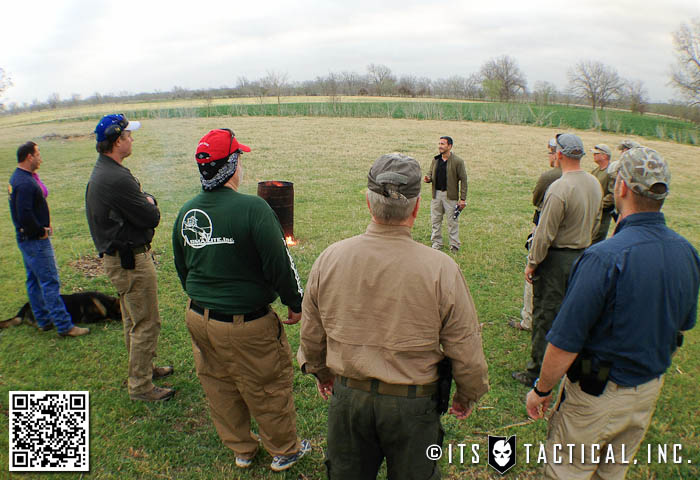
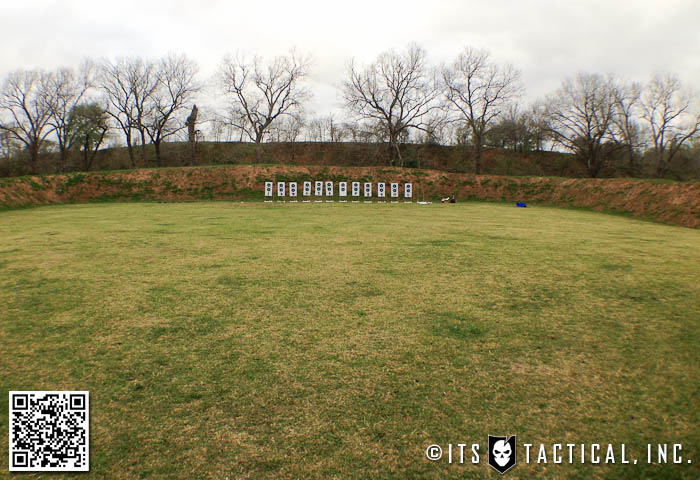
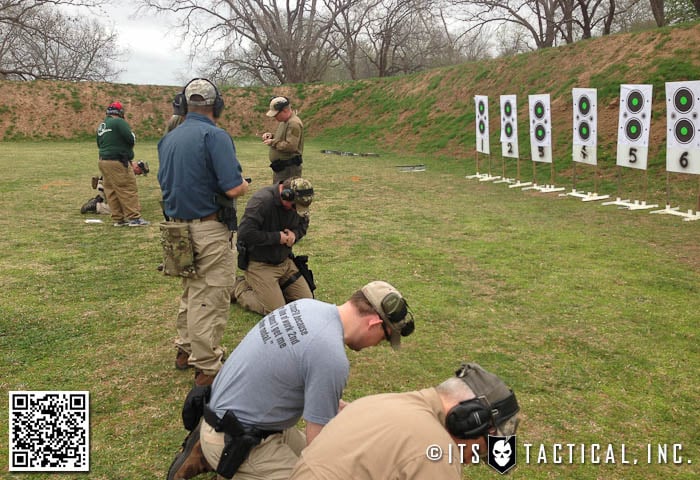
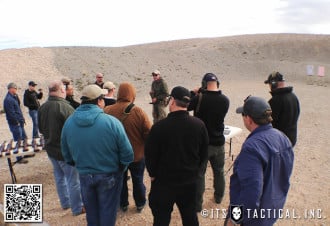
This past weekend, I had the privilege of attending the Trident Concepts Combative Pistol Level One course in Bastrop, TX.
I’ll start this off by saying this was by far the most helpful block of pistol instruction I’ve ever attended. I mean that not to discredit any instructors I’ve trained with previously, but to say that this course was my “Ah hah!” moment in my pursuit to better my pistol skill-set.
Trident Concepts
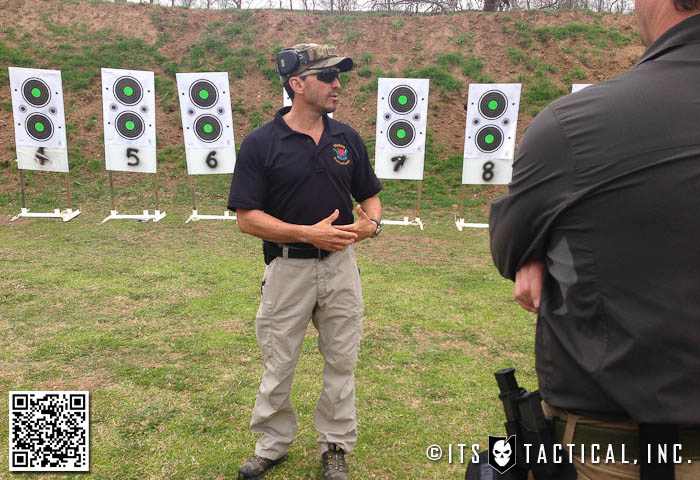
Jeff Gonzales, President of Trident Concepts and our instructor for the weekend, asked each student at the beginning of the first day, what they were here for. He wasn’t looking for some blanket statement like I just made above “to better my pistol skill-set.” He wanted specifics.
My answer to him was to be more consistent with my shots and to hone my implementation of the fundamentals. I’ve taken quite a few shooting courses in the time since ITS was founded and even a few before, but in that time, the majority of my training has been with rifle.
I’m by no means an expert with a rifle, (I hate that term by the way) but I consider myself to have quite a bit more skill with a rifle that I do with a pistol. It’s been my goal for this year to change that. I’d been wanting to take a course from Jeff Gonzales, President of Trident Concepts, for quite a while now. I was thrilled when I bumped into him at SHOT Show and we had a chance to discuss coming out to one of his courses.
I’ll say right now that my driving factor to want to attend Jeff’s courses is not the fact that he’s a former Navy SEAL, but because of the professionalism and dedication I’ve always respected in everything I’ve heard about him both personally and professionally.
This month marks the 10th year that Trident Concepts has been educating the industry and it was great that our Pistol One course took place during the mark of their first decade in business. I truly don’t know why it’s taken me this long to attend one of their courses.
The Warrior Mindset
The first day of our two-day course started out with a good hour or so of fantastic lecture. It began with the basis for who TRICON is and where their curriculum came from.
Lessons learned from the battlefield and personal experience of their instructor staff makes up the foundation for what defines. They’re fanatical about standards as a tool to gauge progress. Without standards there’s not way to recognize if a technique is working or not.
Does it work? Is it necessary? Will it work under stress? Those are the three questions you should ask yourself during the evaluation process of any new technique, according to Jeff. I wholeheartedly agree. The last question “will it work under stress,” is key because of the high stress conditions you may find yourself in one day when confronted with a threat. Jeff stated that 80% of his job is to eradicate training scars (bad habits) and that was certainly true with me, as you’ll read further in the article.
Another poignant principle that Jeff follows is that he doesn’t care where you come from, all he cares about is meeting the performance standards. The question he told us all to ask ourselves was “What will you do to increase your lethality on the battlefield?” This brings us to warrior mindset, which as Jeff described, isn’t necessarily confidence. Confidence can be a false bravado, but competence equals confidence.
Proper mental conditioning is extremely important because who sees who first in an engagement can be the determining factor for the outcome. Some of you that are paying attention should hopefully be thinking about situational awareness at this point.
We addressed situational awareness by discussing the Cooper Color Code, which I’ve mentioned previously on ITS in Closing Distance: Personal Space and Body Alarm Response. While I won’t repeat the color code here, it’s a good thing to research and note that you can’t go around on high alert all the time.
Shock threshold was another interesting concept I haven’t heard much in detail about. From what I understand, it’s the measure of time from the initial shock of an event to the point at which you react. If you don’t train that aspect into your training, you’ll never know how you’ll react.
Factors that can affect shock threshold are physical fitness, age, experience (more familiar, less shock threshold) and genetics. Remember, strong people are harder to kill.
We also went over other threat recognition tools like the OODA Loop (Observe, Orient, Decide and Act) and the PADE Cycle (Perceive, Analyze, Decide and Execute), which Jeff seemed to favor.
Perceive – Knowing what danger looks like.
Analyze – Remove self doubt “We live in a good neighborhood, it could never happen here.”
Decide – Your response selections should be kept to a minimum.
Execute – Do so with coolness and without hesitation.
In turn, it’s important to remember the maxim followed in close quarters battle; speed, surprise and violence of action.
The Combat Triad was the next topic of discussion for our class and revolved around four points on a pyramid, taking into consideration that a pyramid uses three points as its base. On those three sides are manipulations, marksmanship and tactics. Mindset is the top of the pyramid and reigns supreme.
Essentially these four topics are what TRICON considers the most important aspects to bring to the battlefield. Without a solid base of manipulations, marksmanship and tactics, your mindset can’t be solid. This also goes right along with what was mentioned earlier, competence equals confidence. Confidence without that competence (solid base) is false bravado.
From there we moved into personal protective directives and that these need to be developed on your own. This is simply asking yourself the question “Am I willing to protect life by taking life?” This answer in turn should be communicated to your intimate circle; family, friends, etc. They deserve to know who you are and what to expect should a situation occur.
There will be three fights that you’ll have to go through in a gunfight. The mental fight that you should have already gone through with yourself, knowing how you’ll handle a situation. Next is the real fight and finally the fight for your civil liberties.
Jeff also shared his formula to creating a solid technique as a foundation. This includes having a maximum certainty of success, maintaining simple and economical movements, honing your situational awareness and minimizing your response selections.
This all goes back to training and why we’d all come to the TRICON course. Jeff mentioned that the reason The Teams are so effective is due to the effort they put into rehearsals; movement becomes almost instinctual. Remember the old adage that you don’t rise to the occasion, you default to your level of training.
Course Objectives and Equipment Used
Teaching the competence that will instill confidence is what TRICON’s Combative Pistol is all about. During the two days of instruction, we were introduced to what they refer to as “the combative fundamentals forging process for the tactical employment of a pistol in high-risk situations.”
I was grateful to receive not only a solid refresher on fundamentals from the weekend’s instruction, but an eye opening introduction to new concepts (to me) and why they were advocated by TRICON. These were reinforced with repetitions and drills to aid in forging correct technique and marksmanship.
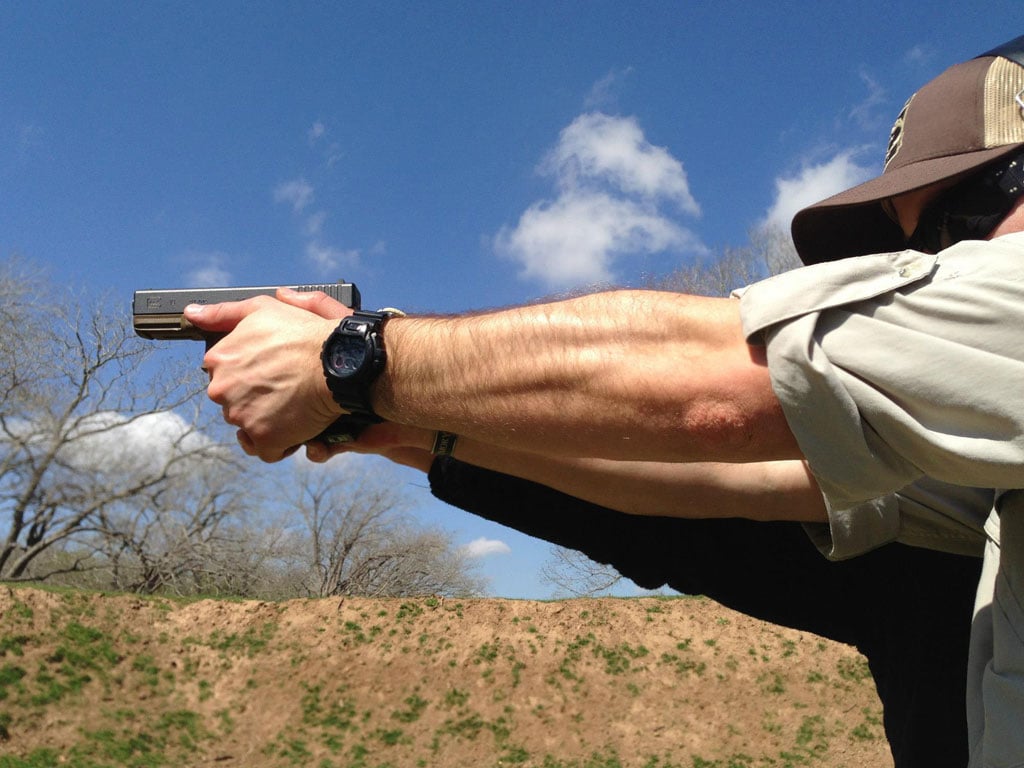
We shot close to 1,000 rounds during the weekend at ranges of 3, 5, 7, 10, 15 and 25 yards. This was also my first class fully using a Glock 19 instead of my Sig Sauer P225 or P226 that I’ve been used to. I was truly thankful to not have to deal with double action shots and have come to appreciate that about Glocks lately.
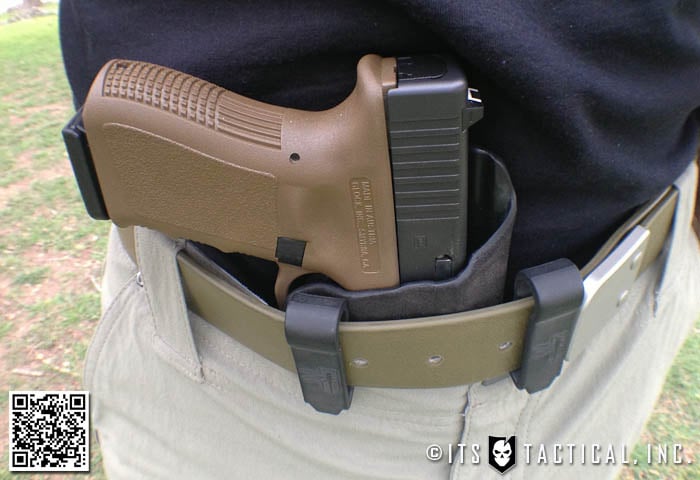
The Incog allowed me to reholster easily, although one initial thing I don’t like is that it’s not capable of being canted. I’ve tried adjusting the height on the clips a bit, but it prints more than the VanGuard for me because of its inability to cant. I do truly like the holster though and want to get more time with it before I put together a full write-up.
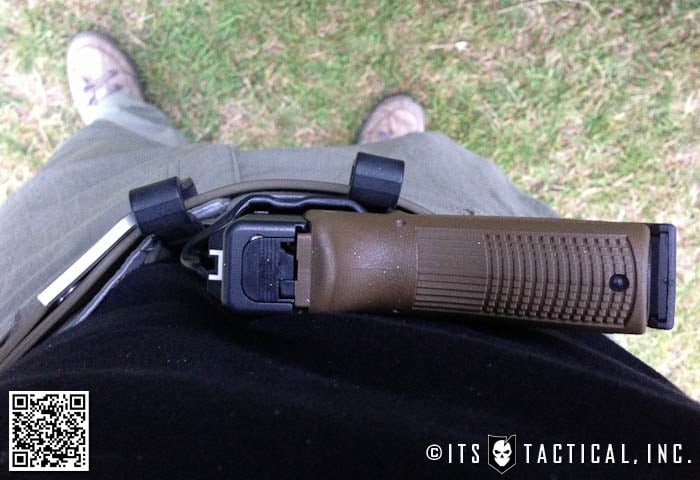
One thing I wanted to do with this course is to run it like I carry. What I mean by that is that I wanted to run apendix carry, just like I’ve been carrying lately and not have anything other than the essentials. I had an EDC Trauma Kit in my back pocket and used a combo of options for carrying extra mags, including cargo pockets. I’ve been questioning people’s motivation lately for wanting to run battle belts and other drop leg holsters when they train. I’m guilty of it it too in the past, but why not train like you fight? If you’re active duty Military or Law Enforcement, I fully understand running your kit like that. For me, I don’t put on a battle belt everyday, nor would I if anything went down. For me, it’s using a pistol to fight to a rifle and using that to fight to a better position. Sorry for the rant.
Drills and Lessons Learned
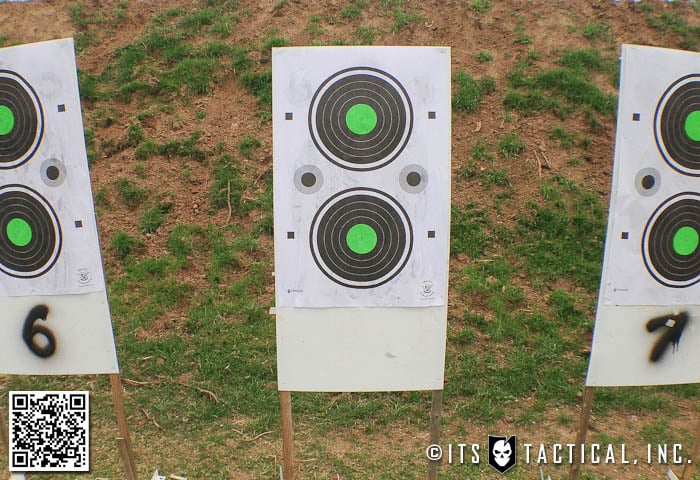
One of the initial drills we practiced is one where you have a buddy balance an empty casing on top of your front sight post while you have a clear and safe pistol fully extended. When your buddy removes their hand from the casing, you squeeze the trigger. Any deviation of your trigger press immediately causes the casing to fall and is a great visual tool to address not pressing the trigger straight back and improper follow through. As Jeff described, you’re pushing past the point of detonation.
We also practiced this same drill, but after we achieved pulling the trigger while the casing stayed put on the front sight, our buddy would remove the casing, rack the slide and replace the casing again. We’d then reset the trigger and squeeze again. This two-step drill had to be completed in both stages completely five times before we moved on.
What Jeff stressed is follow through after the shot, recovering the gun, putting your sights back on target and then and only then, resetting the trigger. That tip helped me out quite a bit too. Another great tip was to remember that the trigger is just a lever. Being a lever, pulling on the lower 1/3 of the trigger flat and straight back will give you better leverage and require less effort.
Some of the bigger lessons that I took home from Jeff’s instruction, were his description of shoulder placement. I’ve never noticed before how much my shoulders shrug when I extend to shoot a pistol. Jeff said to picture your shoulder blades trying to pinch a dry erase marker to create a solid shooting platform.
My huge ah hah! moment was when I overheard Jeff telling another student to try squinting his left eye to acquire the front sight faster. Something that this course and Jeff helped me identify on the first day was that I chase my focus on my front sight. My brain just seems to have issues quickly acquiring focus on the front sight without shifting focus to the rear sight and the target I’m shooting at.
By simply squinting my left eye (I’m right eye dominant) quickly, my brain immediately recognizes where I need to focus. It’s weird to write it out, but for me, it just works. I’ve never really tried that before and have always heard to keep both eyes open to avoid tunnel vision and maintaining situational awareness, I look at it like this. Those things are very important too, but I’m ultimately responsible for each bullet and where it goes. To me quickly closing and reopening my left eye and getting a crisp sight picture before firing, is worth the brief possible loss of the other things.
When I compare the way I was shooting on day one versus using the squinting method I was using on day two, there’s no comparison. It was a night and day difference for me.
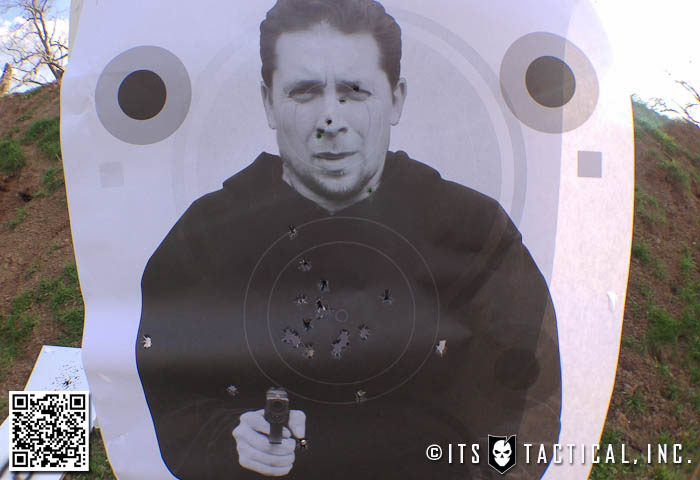
Many other drills we practiced throughout the weekend were variations of drawing from the holster and the low ready at multiple distances. We worked on malfunction clearances, reloads and even shot some steel on the last day. The culmination of the course was a few different graded evolutions that comprised the final score at the end of day two. We also had a cool competition towards the end where we raced another student for hits on an 8″ steel circle target at 15 yards.
Notes
While this AAR could go on for pages more, I’ll end it here and let you know that if you’ve ever considered a course from Trident Concepts, or even if you haven’t, I wholeheartedly recommend looking into attending a course.
As I mentioned in the beginning, out of all the pistol instruction I’ve been too, I hold this course at the top of my list. Through Jeff’s ability to diagnose issues and offer suggestions, I was able to fix some problems I’ve always had when it comes to fundamentals and put me on the track to success with my consistency. That is worth more to me than I can ever put into words.
Remember to ask yourself what your goal is and how you’ll achieve and measure success.
Today we’d like to welcome a few additions to our Tactical Discount Buyers Club. These participating companies have extended discounts and offers that are only available to members of ITS Tactical.
We value your membership support and have created this program, along with our other membership benefits, to allow us to give back to you. Here are the most recently added discounts that members can take advantage of starting today:
ITS Pennant Flags, are a smaller alternative to our larger Battle Flags and can be displayed just about anywhere; including the summit on your next adventure.
Measuring 12″ wide x 18″ tall, these digitally printed flags feature grommets for hanging or even attaching to a flag pole. We haven’t skimped on quality with these flags, they’re hand made in the US by American workers.
Today we’re also adding some new colors and sizes of our ITS Microfiber Pack Towels, they’re now available in Sand, Coyote and OD Green. Coyote and OD Green are a new larger 30″ x 50″ size and the Sand is 20″ x 40″
Discreet Messenger Bags
I’ve always been a fan of flops and walked way too many miles in them. However, Combat Flip Flops‘ tag line speaks the truth. They’re bad for running and worse for fighting.
Started by two Army Rangers and a Bass player from Montana, Combat Flip Flops was born on a trip to Afghanistan in 2010 where a Afgan-owned boot factory worker was seen wearing a makeshift pair of flip flops using the sole of a combat boot.
Combat Flip Flops’ goal is to manufacture in Afghanistan with the belief that a strong economy will sustain the gains made over the last decade. As international forces withdraw in 2014, the mature Afghan National Army and Police are taking the lead. Footwear manufacturers in Kabul depend heavily on military contracts, so any decrease in volume has a huge impact on operations. Unfortunately, the decline came faster than expected and the plant where Combat Flip Flops were about to begin production, could not sustain operations on supplemental flip flop volume alone.
In response, the Combat Flip Flop team went to work in December designing and building a micro-manufacturing facility in Issaquah, WA to fulfill the backlogged orders. While current production is in WA, the team intends to expand production to Afghanistan, Libya and Syria in the next few years, based on demand.
Tuck Tuck
While I wear flops on a regular basis, I’m always diligent about having a pair of shoes or boots in my vehicle for situations when flops just won’t cut it. That aside, the pair of Tuck Tuck Combat Flip Flops I’ve been kicking around for close to a year now are probably THE most comfortable pair of flops I’ve ever owned. I’m not just saying that for the sake of a good review either.
The cushion in these is worlds above any other pair I’ve owned, they’re squishier than Apu’s Quick-E-Mart! Thanks to a nice suede deck, they’re also soft. I’ve worn most all of the major brands of flops; Flojos, Reef, Rainbow, you name it. One of the biggest differences between those brands and Combat Flip Flops is wear. After a few months the foam wears out and my feet leave impressions in the decks. With this pair of Tuck Tuck’s I haven’t noticed that at all and they still feel as comfortable as the first day I started wearing them. The combat-boot grade rubber tread has hardly worn at all either.
I will say this, there’s no way anyone will miss seeing you while you’re wearing these. To quote the Tuck Tuck description on the Website, they’re “visible from space on a cloudy day.” The other features include a patent leather upper, EVA medium density midsole, quilted suede deck and chrome poppy hood ornament for extra bling.
The Combat Flip Flops lineup includes men’s and women’s flops with a few styles to choose from. Adorned with embellishments like chrome poppies and hand grenades, each model ties in to the Afghan culture and creates a connection with the wearer. Non-traditional assembly methods are also utilized, including old aircraft ovens and old school hand-labor.
Check out Combat Flip Flops online to pick up a pair today, just don’t blame me when people start staring at your feet!
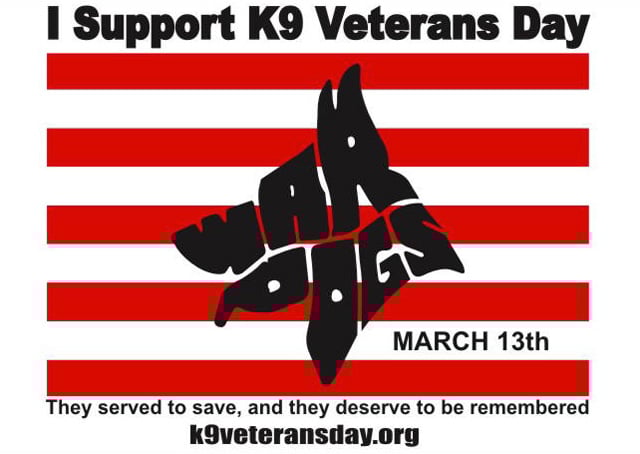
I’ll admit that before today, I hadn’t heard of K9 Veterans Day. In my research efforts to learn more about this, I discovered that Joe White, the founder of the movement to nationally adopt March 13th as K9 Veterans Day, is no longer with us.
Since 2009, Joe’s wife Sally has continued the effort to get nationwide recognition for this holiday and I’d like to help her spread the word here on ITS. It appears that in 2010 New Jersey officially recognized the date for K9 Veterans Day, but I couldn’t find that any other states had done the same.
I feel that the mission statement from k9veteransday.org best sums up why we need to have national recognition for K9 Veterans Day: Continue reading →
Rifle Dynamics is one of the most innovative rifle manufacturers in the in the industry; continuously pushing the boundaries of what’s capable with the AK platform and designing purpose built firearms that become highly valued for their craftsmanship, functionality and attention to detail on every level.
However, Rifle Dynamics is much more than the great firearms they produce. They’re a company that I highly respect for their passion, integrity and ingenuity in a platform of firearms that’s largely ignored when compared to the popularity of the AR-15.
There’s a certain level of mystery surrounding how to work on AKs, at least to me. Perhaps this is due to their extreme reliability in nearly every environmental condition and the low maintenance they require. I’ve owned an AK for over 10 years and put a few thousand rounds through it, but have never had to do much more than keep it well fed.
I feel this and the stigma of the AK being the “enemy’s weapon of choice,” has largely hindered its popularity. This mindset is changing and has been for the past few years. With our troops having faced this weapon in the battlefield and the recent resurgence of the platform, more people are starting to notice the once forgotten AK and appreciating it for its merits.
From my perspective, the resurgence is due to a few things. The first is with our military needing to understand the platform on the battlefield, including it’s capabilities, operation and pitfalls. Battlefield pick-ups are a reality and the need has never been greater for our military’s familiarization. The next reason for the growing popularity, in my opinion, is due to companies like Rifle Dynamics, who have be advocating the AK for it’s reliability and performance while uniting the industry with good information. Finally, I feel that ammunition costs and the availability of 7.62×39 and 5.45×39 (until recently) have helped the resurgence as well.
AK Builder Invite
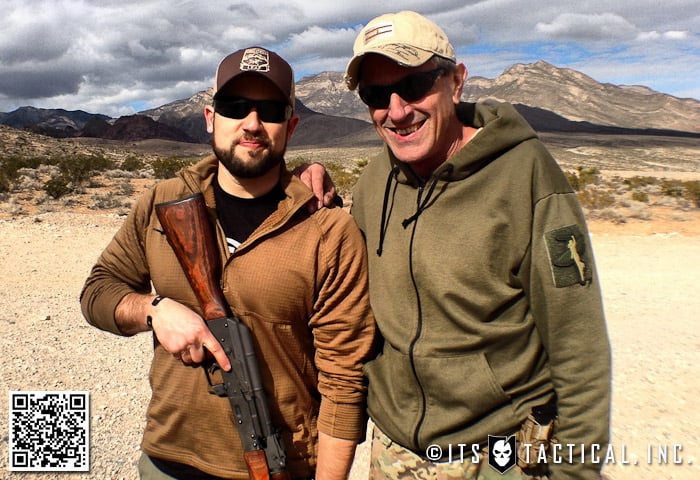
I’ve become very fond of the AR platform in recent years and spent countless hours learning and building my own. Recently, I’ve wanted to expand my firearm building skill-set and dig deeper into the AK platform. Visiting Rifle Dynamics last year was my tipping point. Getting the opportunity to meet Jim Fuller, Billy Cho and the entire RD staff was an eye opening experience.
Words can’t describe the pulse of their shop in Las Vegas, NV. The overall feel of metal clanging and the magic of seeing the level of detail that Rifle Dynamics pours into everything they do, is something I really geek out on. Their passion is projected with each turn of a wrench and is visible every time you look at a Rifle Dynamics AK.
When Jim and Billy asked if I’d like to attend their first public AK Builder Course at Rifle Dynamics HQ, I was all over it! (They’ve run one other open-enrollment course on the road but, this was the first at RD HQ.)
Before receiving the invite, I’d recently taken up the task of building my own Krink in a DIY series on ITS. I realized the best way to learn how to build an AK was to do it myself through trial and error and share my lessons learned.
Needless to say, I was stoked at the chance to learn directly from Rifle Dynamics and not only be able to share that information with you, but learn how to avoid pitfalls that would surely be inevitable when building my Krink.
True Craftsmanship
Having finished the AK Builder Course, my perspective on the AR platform has changed. While I’m in no way discrediting the skill required in building an AR-15, I now look at it as a cookie-cutter assembly, much like legos.
By that, I mean that each part has a specific place, a measure of torque, an easily obtainable tool to put it in place with. Not so with the AK. There’s certainly skill involved in putting together an AR, but not the same kind required when building an AK.
You can easily find information on the Internet on how to put together an AR, we’ve even walked through each and every step in our ITS DIY AR-15 Build Series. Not as much with the AK. Sure, there are plenty of forums and articles about the steps to assemble an AK, but it’s extremely easy to screw things up quickly.
An AR is assembled, an AK is crafted. I mean that with all sincerity too. An AK is an under appreciated work of art and until you’ve built one from the ground up, you’ll never fully understand the meaning of that statement. I’m not saying with some sort of self-righteousness, I’m saying that from someone that’s seen the light and truly learned from the master craftsmen at Rifle Dynamics. Jim touched on the fact that “not many manufacturers in the US truly know how to put these guns together right” and that “there’s just a different mindset here in the West.”
The amount of fitting, manipulation, precision, feel and sweat that goes into building an AK, will make you truly appreciate each one you touch. Some may be reading this and say, “see, this is exactly why I like ARs. They’re easy.” That’s fine too, there’s nothing wrong with that way of thinking.
But why not step outside of your comfort zone and tackle something you don’t understand? That’s what life is all about, right? I thought I knew the AK, but after the builder course, I’m now confident in that statement. I know the AK and can not only troubleshoot problems, but fix them too.
The wealth of knowledge obtained from the Rifle Dynamics AK Builder Course is immeasurable. My brain is swollen with the amount of information I learned and it’s going to take me awhile to even process everything. Thanks to my multiple pages of hurried note taking, videos and photos, I can only hope to retain it all. My hope with this article, photos and videos, is to pass along as much as I can to you.
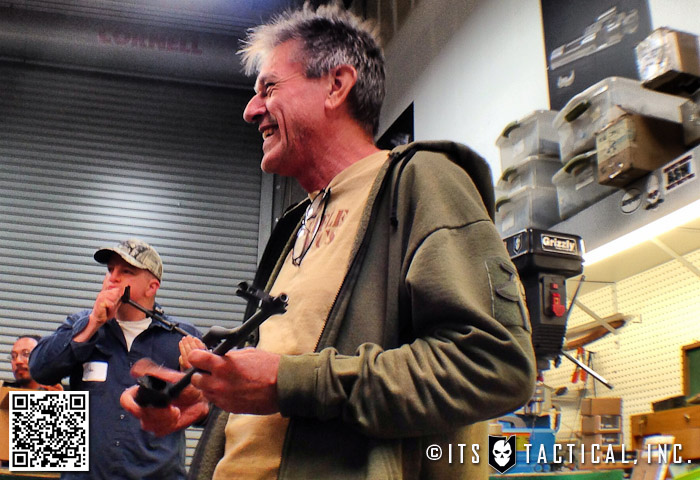
Something that really hit me during the course is just how passionate and dedicated Jim Fuller is to sharing his knowledge with as many people as possible. Jim is probably one of the most unselfish people I’ve ever met and even though I’ve met him on multiple occasions and consider him a great friend, after this weekend, I fully know Jim.
To give you an example, not only did Jim say that he hoped we’d all go back with the information we learned and teach others, he said he’d be thrilled if we all opened up companies building AKs. Why? Because after observing our skills, he was confident we’d be doing it the right way and that there are plenty of AKs out there that need those skills. Also because Jim is a living, breathing patriot that believes in our inherent right to bear arms and that those rights shall never be infringed.
Jim stated that he’s only got a short time on this earth and if he can make a difference in peoples lives by passing along what he’s learned through years of trial and error, then he’s done his job. That, folks, is what the world needs more of. Integrity, passion and giving back.
After you see what’s required to build an AK properly and just how much craftsmanship goes into each and every step, I hope that you can appreciate just what Jim and Rifle Dynamics have done by offering the AK Builder Class to the public.
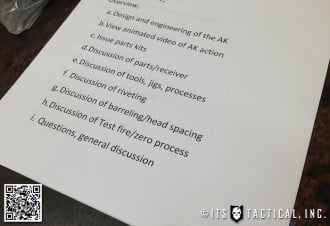
Course Curriculum
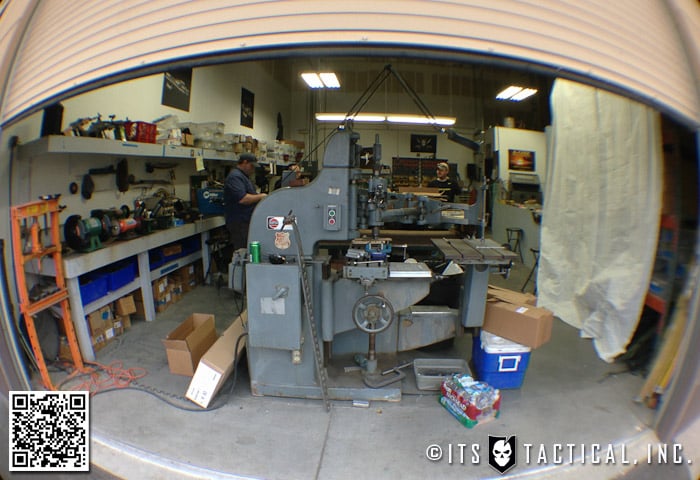
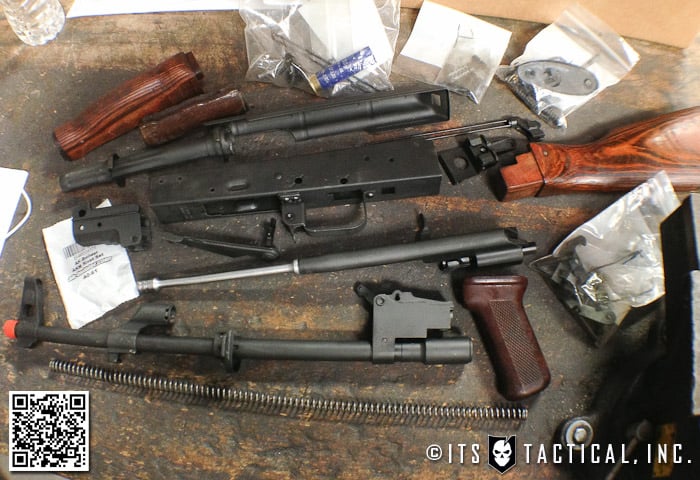
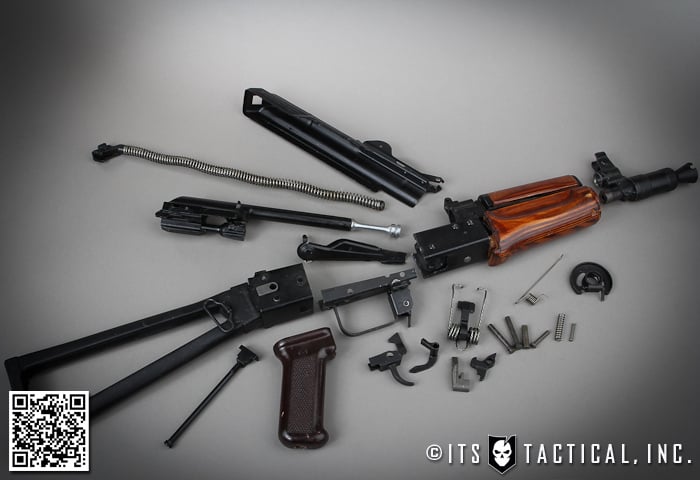
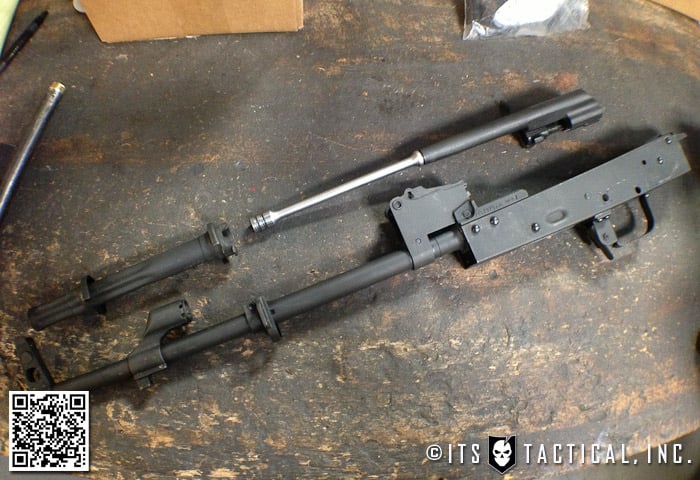
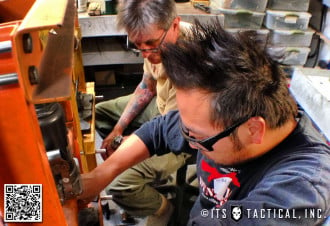
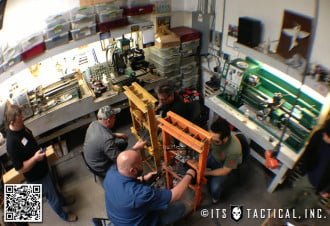
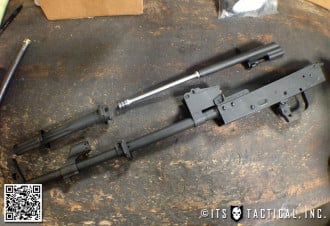
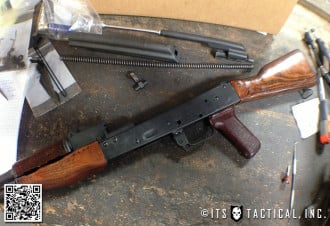
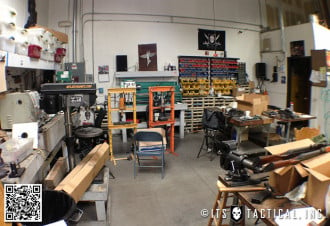
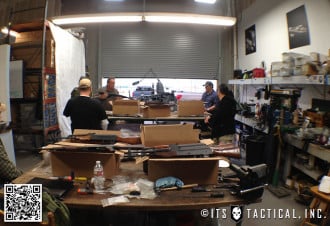
When I showed up at Rifle Dynamics HQ on the first of three days, we made the rounds with introductions and filled out some paperwork while staring at the luminous cardboard box placed before us.
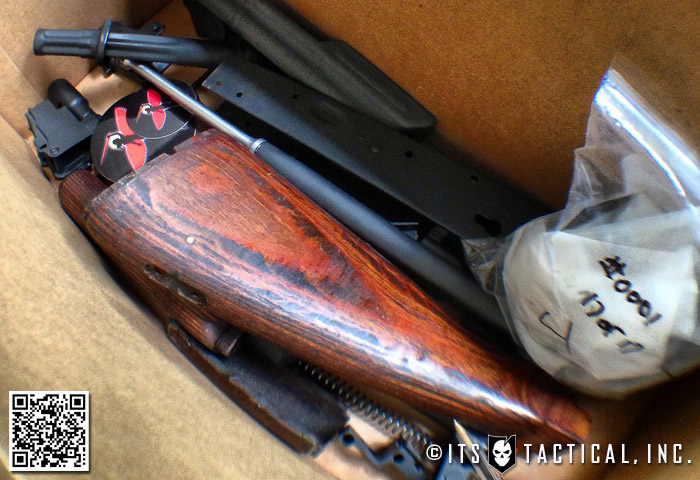
Luckily I wasn’t intimidated when I opened the box and saw a disassembled AK, having that Krink kit that I started really helped me to learn more about the AK and to be able to identify parts.
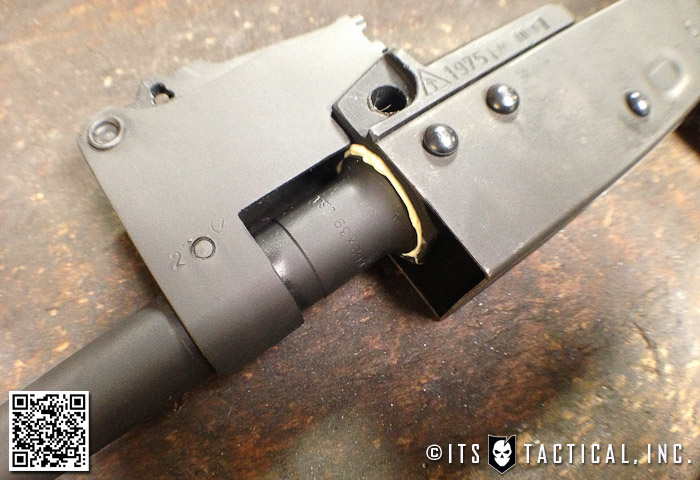
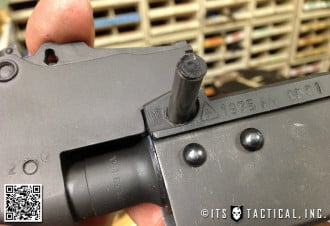
Jim described that these were Romanian Military AKM Kits and that they’re higher quality than the Romy “G” kits typically found. AKM, if you remember from our AK history article, means AK (Avtomat Kalashnikova) Modern, another way to say that they’re a modern AK-47 (7.62 x 39mm) variant. My kit was marked as being originally manufactured in 1975.
I’m a sucker for a traditional looking AK and I was excited to see the wood furniture in the box. Jim mentioned that the wood hand guard had been cut and sanded down by Rifle Dynamics to remove the fore grip.
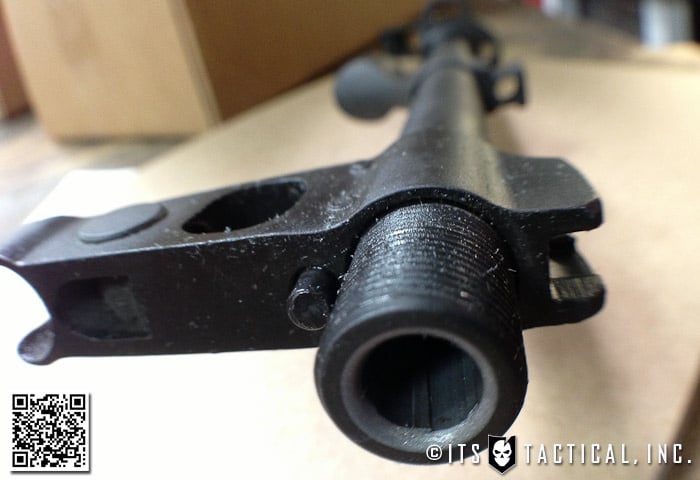
One thing I also noticed when checking out the box of parts in front of me, was that the barrel already had the rear sight tower and front sight block pinned on. The reason for this was that the course would have to have been extended another day to a day and a half if we all needed to fit these ourselves. Not to say that it takes that long, but in a class of 20 people there’s limited resources available.
The goal of the 2.5 Day AK Builder Course was to reproduce exactly what the Russian’s did with the AKM. A completely assembled 1mm stamped sheet metal receiver properly riveted with leaded rivets and guaranteed to run forever with the same 4 MOA capability as an out of the box AR. Yep, the AK is just as capable as an AR, despite the common myth that they aren’t.
Video Walk-Through
Below is the 3-part compilation of the Rifle Dynamics AK Builder Course I filmed during my time with Rifle Dynamics, there’s a lot that this article doesn’t cover contained in the videos and vice versa. For a comprehensive look at the entire experience, I’d recommend reading the article first and then coming back to watch the videos. It’s certainly your choice though, just merely a suggestion.
Parts Considerations
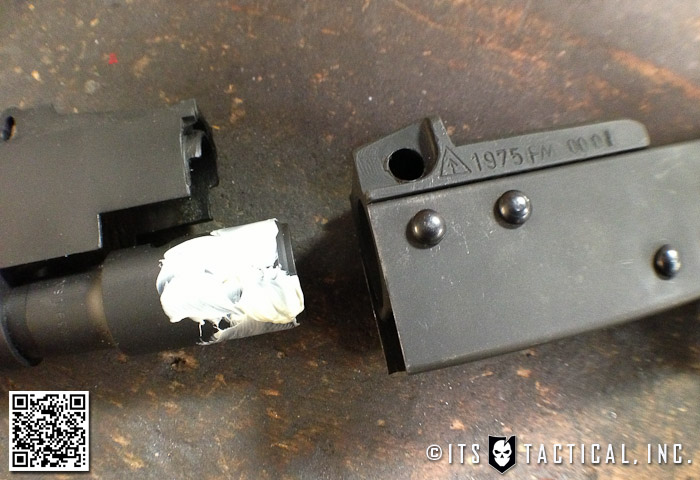
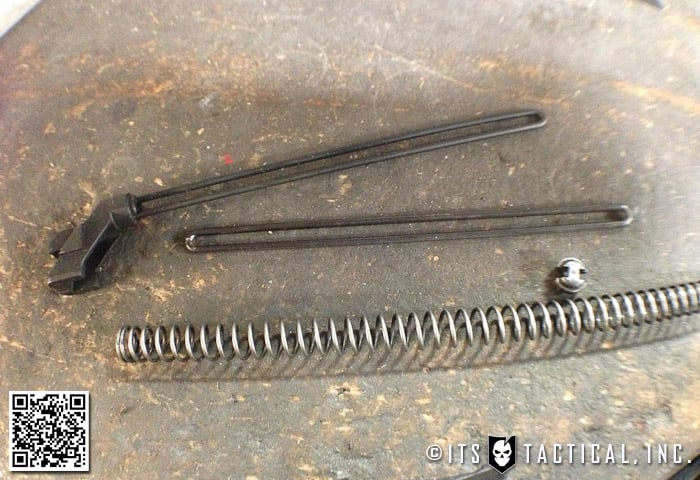
Most AK parts kits you come across are demilled, which means that the firearms are imported to the US and taken to a bonded BATFE chop-shop, where they have their evil parts removed per BATFE regs for import. After inspection, they’re released to US importers. Demilling is essentially cutting up the barrel and receiver, while leaving the integral parts intact. Here’s a photo of my Krink parts kit for an example of what a demilled kit looks like.
All you “should” need to do to assemble one of these kits, is to remove the cut up parts, add a barrel, a receiver and the necessary rivets. This of course all depends on the quality of the parts kit and that you don’t screw something up. These Romy kits have already had all the existing parts removed by Rifle Dynamics to ensure we were starting with a clean slate.
Something to remember is that AKs aren’t rigid and firm like US guns, they stretch, move and flex like jello. Everything is hand fit, there’s no CNC Machining or Mil-Spec on the AK. One of the results of this flexible design is the need for leaded rivets. Not just any rivets will suffice and the reason leaded rivets are used on the AK is that they stretch like a rubber band right along with the gun.
Regular pop rivets will shear right off and you may get off a round or two before the gun falls apart or you get physically damaged when the front trunion falls apart. Same goes with screws and don’t even think about welding an AK together. Build it properly from the beginning and it will run forever.
The US made barrels that we utilized on these builds were from Green Mountain Rifle Barrel Co. and the US made receivers were NDS-1’s from NODAK Spud. The “US made” part is important and will be a bit clearer why when we get into 922r compliance. Just remember, not all receivers are made equal. This is especially true with the recent surge of 80% blanks, flats and other non-complete receivers that don’t require an FFL transfer to acquire.
Heat treating on a receiver is crucial because of the twisting factor and the fact they’re made of 1mm stamped steel. If you don’t properly heat treat a receiver, or try to use one that’s not even heat treated, minor pressure can cause it to warp and over time the hammer/trigger pin holes will stretch. Some receiver manufacturers attempt to counter this by only heat treating these holes, which is just as bad as not heat treating.
It’s also possible to heat treat a receiver too hard, which can cause it to crack along the sides where they’re bent when formed. It makes it a nightmare to drill into them and they’ll eat up cobalt bits all day long. The correct heat treating on AK receivers is between 38-40 on the Rockwell C scale. The NODAK and 74uLLC are a few of the receivers Rifle Dynamics recommends.
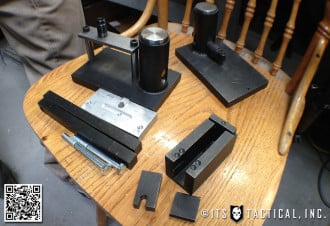
Tools/Parts
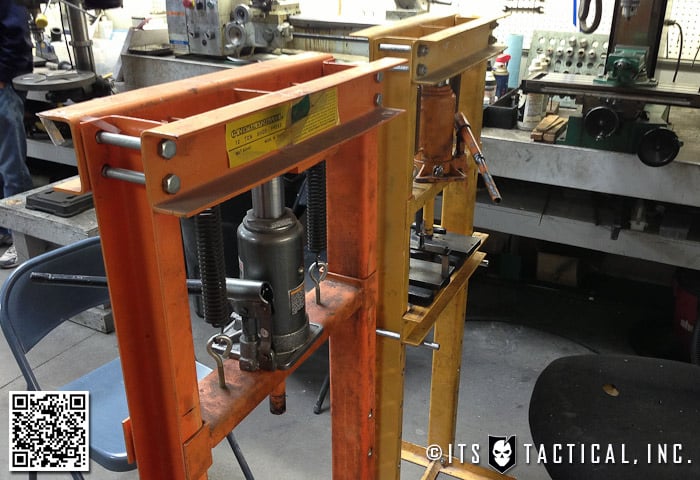
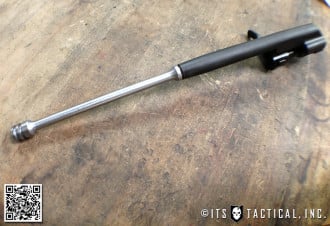
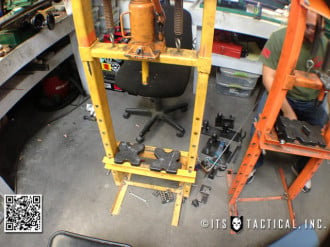
You’re going to see some custom tools that Rifle Dynamics made to assist them in multiple assemblies, but everything you need to assemble an AK can be sourced commercially. I’ll provide some links during and at the end of the article where you can pick up these tools if you desire. Everything can be purchased for about $600-$700 and while that cost doesn’t make sense if you’re building just one, pitching in with buddies can make that expense more tolerable.
With the exception of a few things, the main tools needed are an AK-Builder Rivet Tool, AK Trigger Guard Riveting Jig, Barrel Press Kit and a 12 Ton Press. The AK Jigs can all be purchased through AKBuilder.com and the 12 Ton Press can be purchased for about $125 from any Harbor Freight. You can also add in a Drill Press if you can afford it. Add in some go/no go headspace gauges (don’t skip these), drill bits and miscellaneous tools you’ll see throughout the article and videos and you’re good to go.
When I continue the DIY Krink Build Series, I’ll get a comprehensive list together of the tools required, just like we did on the DIY AR Build Series.
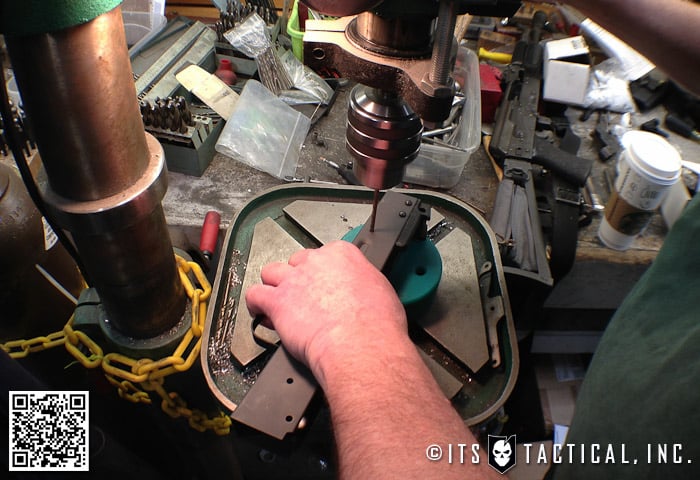
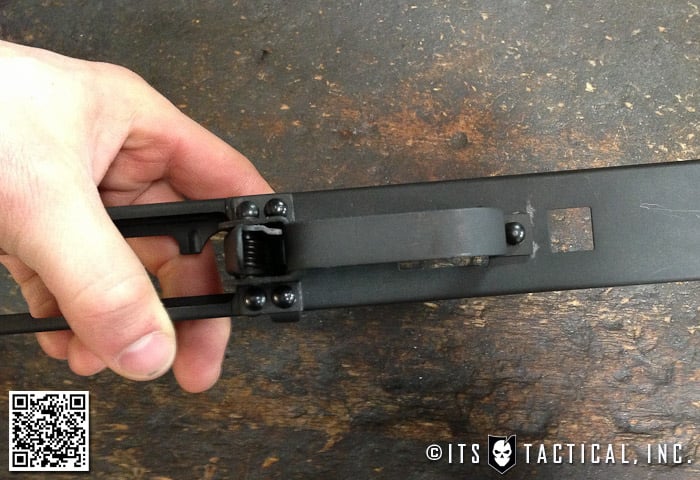
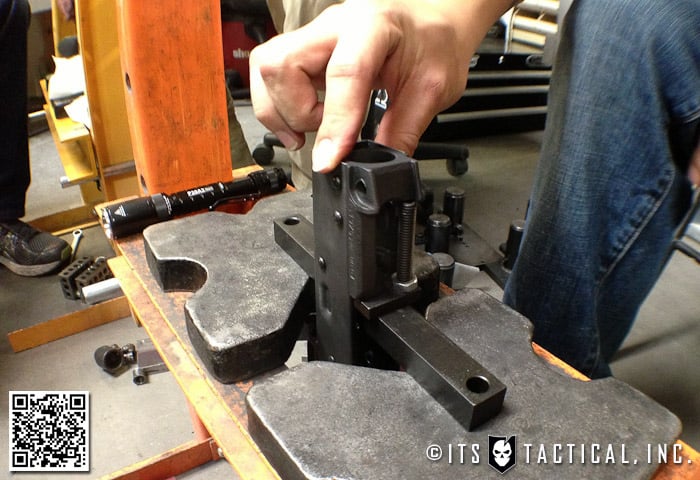
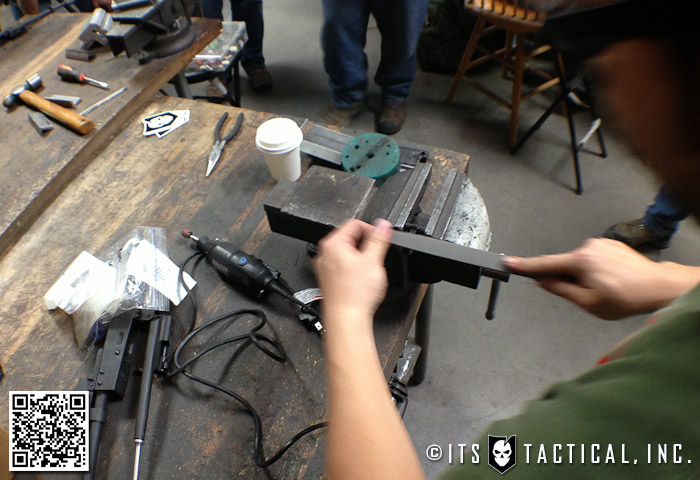
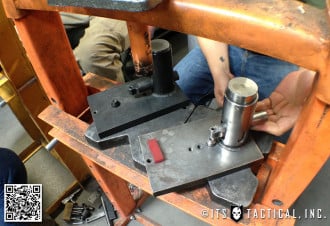
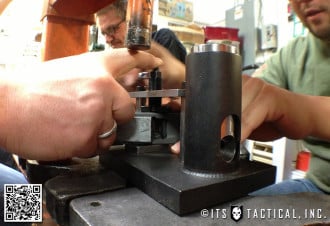
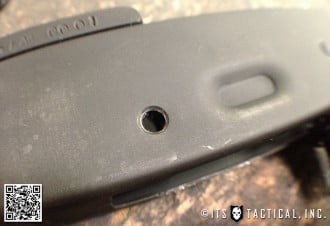
Trunion and Trigger Guard Assembly
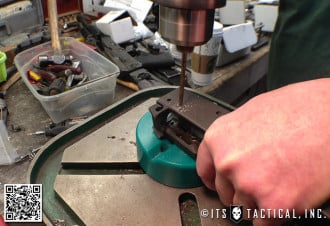
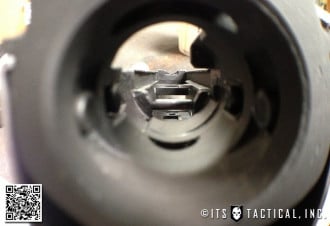
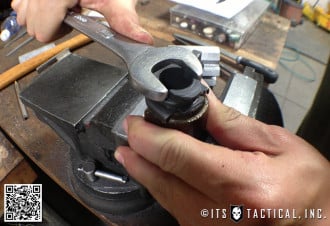
The first thing we did in the AKM assembly process was to rivet in the trigger guard using the AK Trigger Guard Riveting Jig. The front four rivets are pressed in at the same time and the rear single rivet is pressed by itself.
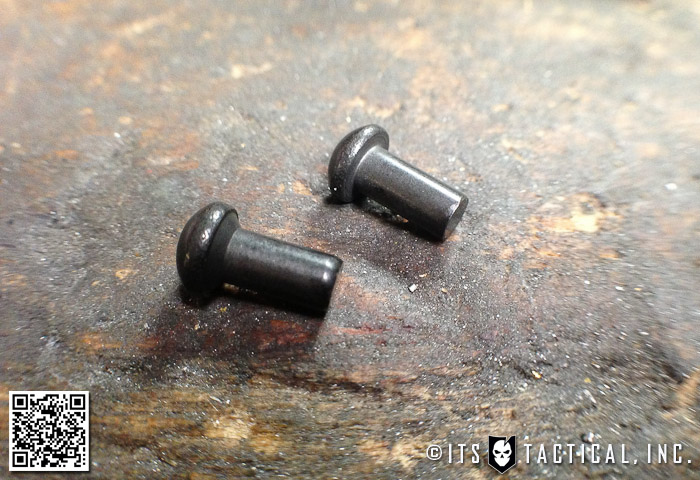
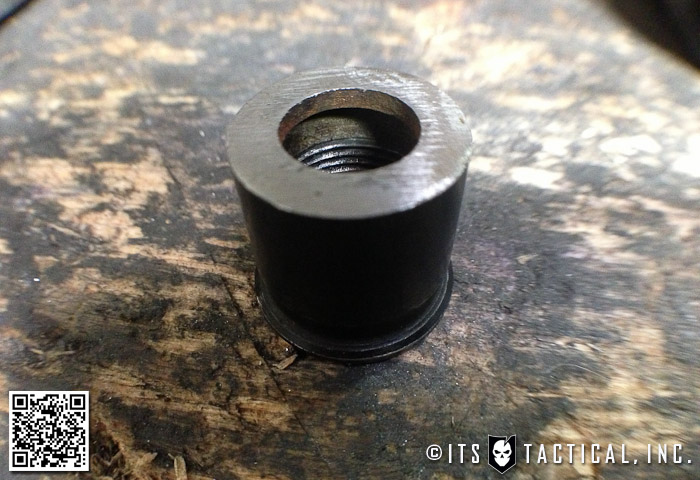
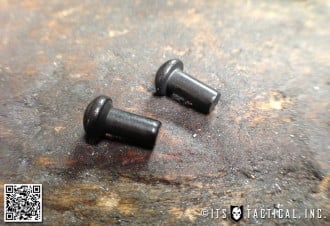
One thing I’d like to note here is the difference between the standard AK rivets and AK swell neck rivets. This identification is an important thing to learn if you’re building your own AK and you purchase a rivet kit.
Swell neck rivets are nearly identical to standard rivets but instead of sitting flush when pressed in, they have a curve or “swell” under the head of the rivet. This is to fit into a dimpled hole; dimpling adds shear strength to a rivet hole. For instance, instead of having four rivets on each side of the front trunion for strength, there are two regular rivets and one swell neck rivet.
Next up is riveting in the front trunion to the receiver using the AK-Builder Rivet Tool. A tip here is to start with the rearmost rivets, as this is the centerline of the front trunion and things are easier to adjust later if needed. With each rivet installed, it’s also important to check that the front of the receiver is still square and the front trunion isn’t protruding and throwing things off.
Another check at this point is to also ensure that the interior of these four rivets aren’t going to interfere with the barrel being pressed in. After the four regular rivets are pressed in, you may need to chase the swell neck rivet holes.
Chasing the holes, means to drill out the receiver sheet metal so it lines up with the hole in the trunion. Even if there’s a slight offset after this procedure, it will get covered when the rivet gets pressed in.
Since these remaining two rivets in the front trunion assembly are swell necks, these holes need to be dimpled first. This is done with an added attachment that’s included with the AK-Builder Rivet Tool.
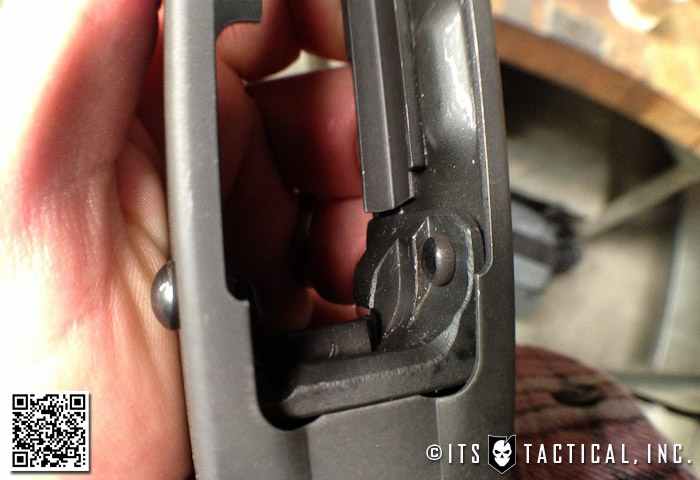
The last step is riveting the rear trunion in with the two long swell neck rivets. These four rear trunion receiver holes will also need to be dimpled first. Just be sure here that you don’t dimple the hole that the safety inserts into. These long swell neck rivets are also pressed with the AK-Builder Rivet Tool assembled in a different configuration.
What’s interesting about this step is that as you press the rivet, the end forms a rivet head with the forming die. Check after the first rivet is pressed that the holes for the remaining rivet don’t need to be chased.
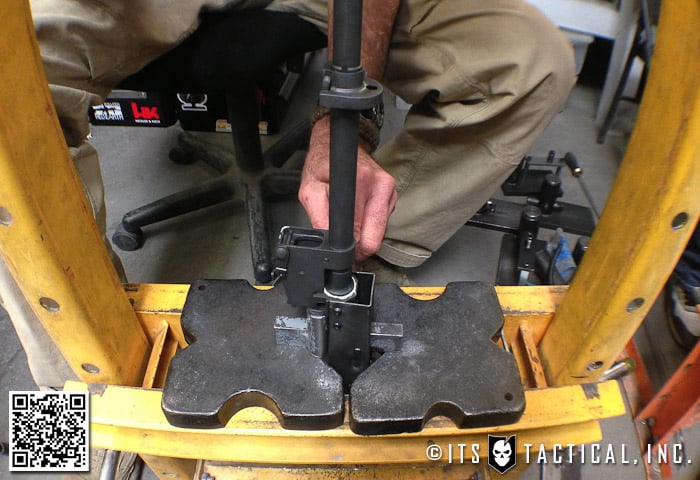
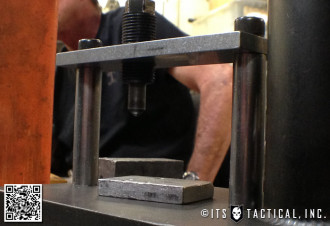
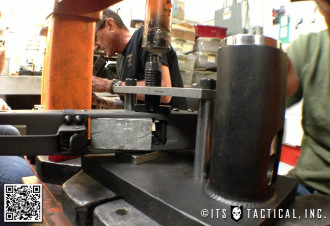
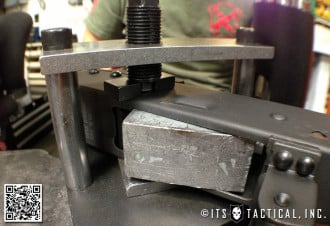
Barrel Assembly
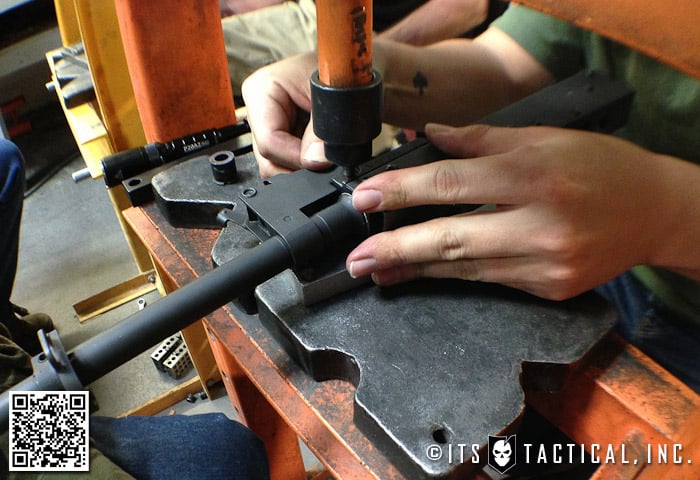
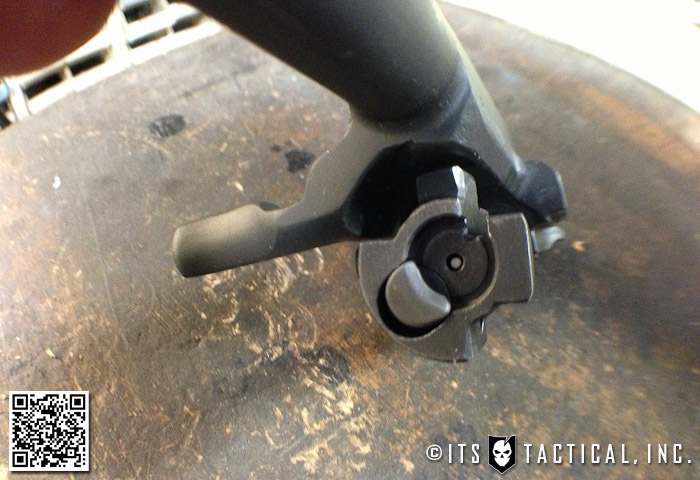
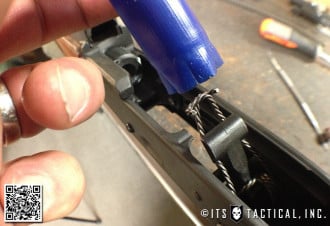
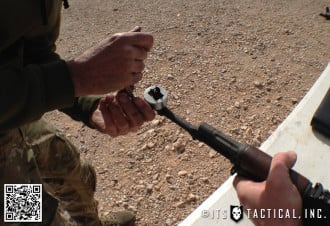
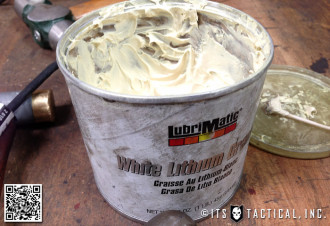
As mentioned previously, our barrels already had the front sight block and rear site tower assembled. Starting with this configuration, the first step is to apply a small amount of lithium grease around the barrel. There’s way too much in my photo below and I wiped about half of that off before pressing my barrel.
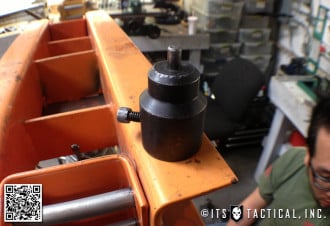
The good thing with having the rear sight tower in place already is that it guides right along with the front trunion and helps in the alignment. At this point, we added a modified slant comp that threaded on the barrel and acted as a thread protector. You press directly on the top of the barrel, so it’s important to protect those threads.
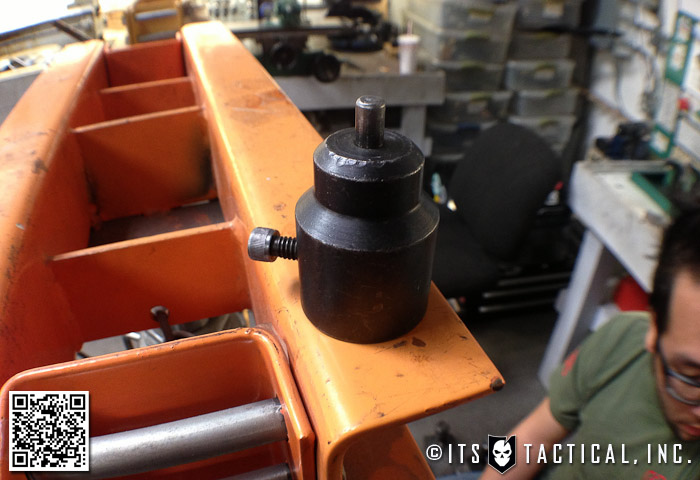
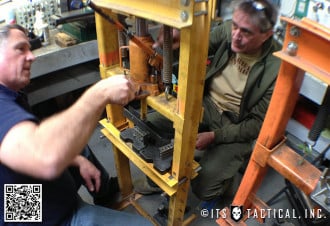
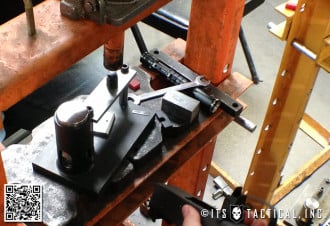
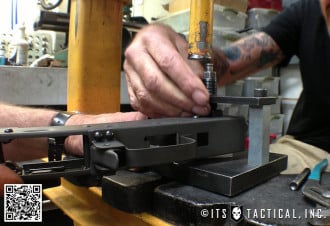
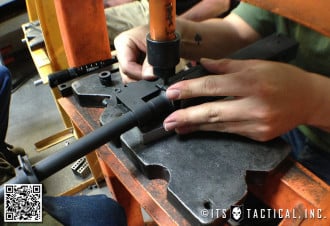
During the barrel pressing, we had one 12 Ton Press running a custom Rifle Dynamics barrel press tool and one running the AK-Builder Barrel Press Kit. The gist of this process is that the Barrel Press tool supports the front trunion while the barrel is being pressed.
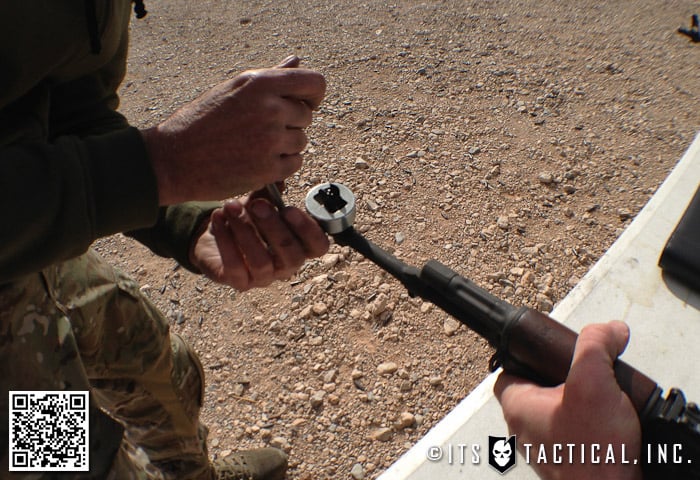
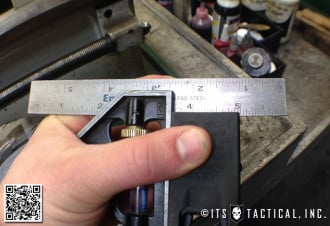
It’s important not to press the barrel in too far or too shallow. One reason being that the hole won’t line up in the front trunion for the barrel pin. This also affects headspacing; here’s how AK headspacing works:
If the bolt can’t close on a go gauge, then the barrel is pressed in too far, if it can close on a no-go gauge, it needs to be pressed in further. WASRs are notorious for being improperly headspaced, not being able to close on a go gauge.
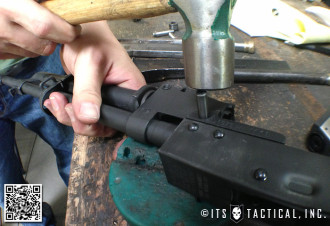
After checking and adjusting headspace, we used the barrel pin attachment from the AK-Builder Barrel Press Kit and pressed the barrel pin in.
Before we move on, it’s important to note that you can’t just buy any AK barrel and expect it to fit your front trunion. There are a few different sizes of front trunions, so be sure you get the right match if you’re replacing a barrel.
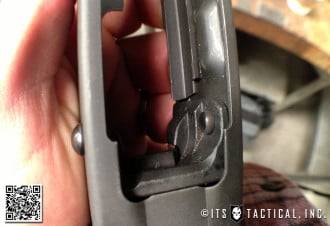
Hammer/Trigger/Safety and Bolt Assembly
I found the bolt assembly to be pretty interesting and as Billy also explains in the second video (above), there’s a lot of pin alignment that needs to take place. It’s definitely more complicated when compared to the assembly of an AR bolt.
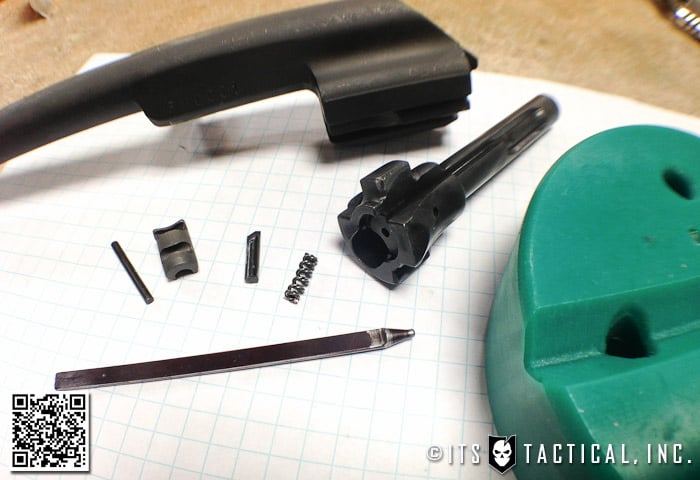
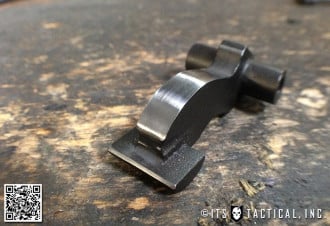
Installing the Hammer, Trigger and Safety weren’t in themselves that difficult, but one step in this process really got me and was the only point in the build I said a few choice words to my new AKM. To start this procedure, we began by filing down the hammer face to remove the sharp edges and bevel that came on the US Made TAPCO G2 trigger.
In the second video, Billy demonstrates how to to properly file, sand and polish the hammer. This ensures the bolt carrier doesn’t get stuck when charging. Be very careful here, because if you take too much off the hammer, you’ll get a dead trigger and the trigger won’t reset properly.
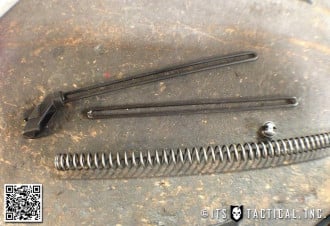
The next step is to set the spring onto the hammer and hope that the cobra doesn’t bite you! The legs of the AK spring are like a cobra ready to strike after you finish wrapping them on the hammer. A neat trick here is to take an empty shotgun shell and place it over the hammer and “set” legs, so it doesn’t get you if it strikes when you’re installing it.
Once you have your hammer spring set, install the trigger disconnector, disconnector spring and sleeve. You’re now ready to install the hammer and trigger. If you notice, the hammer/trigger pins have a groove around the entire pin, which was originally used to rest a wire on to hold them in.
Advancements have thankfully come around and we now have things like the Krebs Retaining Plate, which do a better job of retaining the hammer/trigger pins and are easier to install. There’s nothing wrong with using the wire, other than it being a pain in the ass to install. I had an issue with the Krebs plates I used and had to default to the wire, which is why my choice words came out during this step.
It’s easier if you install the hammer into the receiver before the trigger, as there’s more room to get it to fit correctly. Once it’s in place you may need to tap the pin with a hammer to get it to seat properly. Next put the trigger in place and insert the pin before adding the wire or retaining plate.
The last thing is releasing the mouse trap hammer spring on top of the trigger and ensuring the wires are resting on the trigger correctly. The Recoil Spring assembly is also an important step that Rifle Dynamics has a neat trick for. Billy demonstrates in the video below:
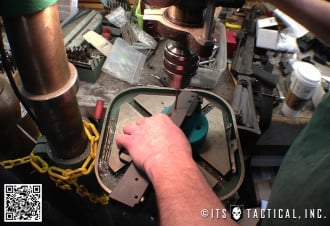
Furniture Assembly and Polishing
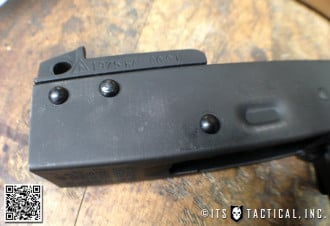
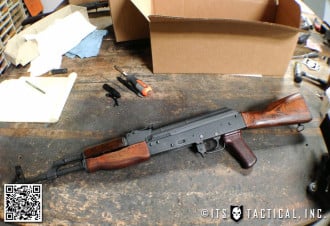
Assembling the furniture on the AK is almost the easiest thing to do. There’s two large screws that hold the stock on and another two that hold on the rear stock plate that features a trap door which houses the cleaning kit. I’ve always loved the feature on the stock that stores the cleaning kit until it’s needed. Yet another reason why I like AKs with their original wood furniture.
I did run into a few problems installing the top section of wood to the gas tube. You basically take a large wrench and spin the wooden cover 180 degrees into position. You can split the wood here if you’re not careful, so don’t force it.
The pistol grip is fairly self explanatory as well. There’s only one way the nut will fit inside the receiver and you’ll know immediately if you have it in the wrong way. Then it’s just a quick adjustment with a screwdriver to tighten it up.
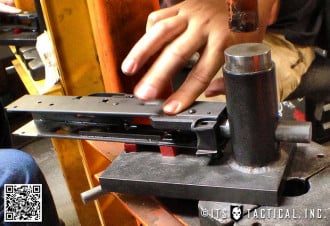
At this point, we assembled the bolt carrier group and recoil spring and got to see if the bolt carrier was sticking. On my AKM, it was sticking in the rearmost position when racking the charging handle. This was easily fixed by some slight polishing with a dremel diamond wheel on the receiver rails and the area on the bolt carrier group that they interface with.
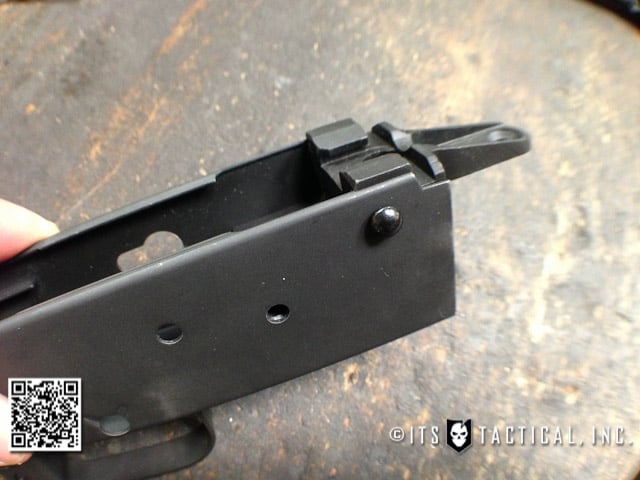
Front/Rear Sight Installation
The AK cleaning kit, which is probably one of the most versatile inventions, can be configured to handle almost any work you might have to do in the field to your AK. Jim demonstrates these configurations in the third video (above.)
One such configuration is using it as a front sight adjustment tool that can also install the front sight. The rear sight is a bit more difficult, as you have to depress the leaf spring with a flat head screwdriver while you slide the rear sight in.
We also utilized the Fuller rear sight modification, a custom filing done on the rear sight to draw the eye into the sight. Jim also explains this modification in detail in the videos.
Function Check, 922r Compliance and Test Fire
At this point, everything was coming along perfectly with my build and Day 2 was wrapping up. Jim pointed out that you could realistically assemble a complete AK in about 2 hours if you knew what you were doing. I don’t think that I’m there yet, but I’ll reiterate here how invaluable learning hands-on like this is.
This is also a good opportunity to mention 922r compliance. In the video on day three, Jim briefly goes over 922r, but I feel that this video below from my previous trip out to Rifle Dynamics spells it out a little clearer:
Day three commenced with a final function check to ensure our trigger groups were behaving before heading out to the range to test fire. The goal of the test fire was to burn through a mag first to look at the ejection pattern of the spent cartridges. Optimally these will launch at the 2 o’clock to 3 o’clock position and fly at least 10 feet away. If that occurs, it means your gas system is working properly. There could also be junk in the gas port that will more than likely blow out as you’re running that first mag.
The other things you’re looking for is how the gun feels, is the furniture working loose? Are the hammer and trigger pins staying in? Zeroing was also done at 25 yards and I was very impressed with how well my AK shot. There was hardly any adjustment at all needed.
Wrap-up and Future Course Offerings
During the time between the AK Builder Course and this article, Rifle Dynamics has already offered another class and I believe it filled up immediately. Here’s the announcement on Facebook for that course though if you’d like to inquire for available spots.
The best thing to do if you’re interested in getting in on a Rifle Dynamics AK Builder Course, is to watch the Rifle Dynamics Facebook Page. They’re using the page for announcements of these classes and you need to be quick if you want to get in on one.
I want to thank Jim and Karen Fuller, Billy Cho, Mark Flinn and the entire Rifle Dynamics staff for an amazing course, I feel honored to have attended the AK Builder Course and words can’t express what a tremendous opportunity it is to learn how to build an AK first hand from the RD staff.
If you have the resources to attend this course, it’s some of the best money you’ll ever spend, not to mention the fact you own the AK that you build during the course! This is craftsmanship at its finest and is a true trade that needs to be learned in the old way like this. There’s not enough of this kind of learning out there today if you ask me.
I’ll leave this with a great quote from Jim after the course was over that I think speaks volumes about what this course means and the caliber of company that Rifle Dynamics holds itself to.
“Another aspect of this class is “freedom and the American way.” We are a country that was founded on personal achievement and excellence driven by capitalistic offerings of services, goods and products. We have unfortunately moved away from that mindset today but we hope that these classes will inspire some of the students to go on to build their own AKs or even go into business building for others. We just want to make sure they’re doing it right for the sake of maintaining a standard of quality in American AK variants. Not to mention that the freedom you have to do something like this is important for our survival as a free nation.“
Links/Resources
Rifle Dynamics – Information on production AKs, custom work and training
AK-Builder.com – AK jigs, presses, rivets, parts, magazines