Win a “MURPH: The Protector” Prize Pack from ITS, Kill Cliff and Mactavish Pictures! *Update!*

See below for winner announcement.

MURPH: The Protector is a feature-length documentary based on LT Michael Murphy’s entire life of honor, courage and commitment, as told by his friends, family and teammates. This film premieres on  March 22nd, 2013, exclusively at select  Regal Entertainment Group Theatres.

We’ve teamed up with Kill Cliff  and Mactavish Pictures to bring you an awesome contest for a great cause. The world needs to see what a true hero looks like. Michael Murphy is an American hero who was posthumously awarded the Medal of Honor for his bravery in Afghanistan during Operation Red Wings in 2005. Never forget those that have given their life for others.

Two lucky people will win a prize pack for themselves and a friend to watch this documentary on opening day. In addition to the movie theatre gift certificate, Kill Cliff is throwing in a case of “The Tasty” and a couple Kill Cliff morale patches. There are multiple ways to enter so read on for the details!

Continue reading

Posted in ITS Information | Tagged , , , , , | 11 Comments

TSA to Allow Small Knives on Airplanes Starting April 25th 2013

This recent news of  the TSA allowing small knives onboard aircraft, has flooded the internet with misconceptions and question as to what constitutes a “small knife.” Today, with the help of a great email I received from KnifeRights.org, I’ll attempt to set the record straight.

John Pistole, a TSA administrator, recently announced the lift on their ban of small knives at an aviation conference in New York. He stated that these small knives would be limited to “retractable blades shorter than 6 centimeters (2.4 inches) and narrower than 1/2 inch at the widest point.” There would still, however, be a ban on “knives with locking blades or molded handles” and that “fixed blades are still prohibited.”

As you can see with the quotes above, this leaves a lot up to interpretation, so I was grateful when I received the recent email from Knife Rights that had images from the online TSA PDF, showing exactly what these new guidelines allow.

tn

tn-1

From the images, you can see that by “retractable,” Pistole means “folding.” If you’ve ever owned a Swiss Army Knife, you’ll know that the blades don’t lock in the open position, but are foldable. This can be dangerous when cutting, as the blade can fold back into your fingers if you’re not careful.

Obviously the TSA doesn’t believe these are just as capable of inflicting damage as a locking blade and are also still banning box cutters and razor blades. Pistole said  “there is just too much emotion involved with those.”

Knife Rights suggests that whatever knife you’re carrying through the airport, (after April 25th, 2013) be sure to measure the blade length from handle to tip, not just the sharp edge. They also mention that Leatherman “Squirt” or “Style” multi-tools are allowed.

The term “molded grip” has apparently been invented by the TSA and Knife Rights suggests that it means any handle that is ergonomic and excludes anything but slab-sided Swiss Army Knives or multi-tools.

Shortly after the announcement yesterday, one of my favorite knife companies, Emerson Knives, released an image on their Facebook page of the new “TSA Compliant”  knife, the Hummingbird. As you can see from the photo below, it’s questionable whether the TSA is going to allow this to get through. There’s no production timeline posted on the Hummingbird yet, but I’ll be waiting with baited breath for feedback on whether someone gets one through.

67022_2922581561345_31041349_n

Just remember that the final decision on these allowable knives rests with the TSA, however “rational” their decision appears to be in this situation. I am glad to see this get through though, hopefully our Knife Rights organizations like kniferights.org and the American Knife and Tool Institute can help at getting the TSA to further relax their guidelines. It’s important to support these organizations, so please head on over to their Websites for more information and do what you can.

I assume it’s going to take quite awhile after April 25th for everyone working for the TSA to be brought up to speed, so be prepared to lose a few Swiss Army Knives until they get the memo. Kelly used to travel with small scissors for her crochet projects and got through just fine at multiple TSA checkpoints, only to have them taken by a misinformed TSA agent in Albuquerque, NM. Please  remember the changes don’t go into effect until April 25, 2013, so don’t try to bring your small knife on board until then!

What does everyone think of the new guidelines? Does the Emerson Hummingbird stand a chance?

Posted in Knives | Tagged , , , , , , , , , , | 26 Comments

ITS Tactical is Hiring: Come Join The Crew

werehiringWe’ve just put the finishing touches on a new page on ITS Tactical that features  career opportunities we have available here at ITS HQ in Arlington, TX. This page will continue to update as new positions become available, but today, we’re looking for someone to fill a warehouse support position.

If you’re local to us here in Arlington and feel like you’d be a good fit for our company, head on over to the Careers page and check out the opportunities we have available. Please ensure you read the instructions carefully on the career page, we’ll only be handling inquiries through the email address listed on each available position.

Thanks for your continued support, our growth would have never been achievable without each one of our members, readers and customers!

Posted in ITS Information | Tagged , | 5 Comments

Trauma Kit Prize Pack Winner Announcement!

Trauma Kit Prize Pack Winner

You guys are awesome! This is by far the most successful giveaway we’ve ever had on ITS Tactical. With over 20,000 entries and amazing words of support, it’s clear that you guys love the new contest format.

We’d like to say thank you to all of those that went above and beyond. Instead of just using the generic tweet or Facebook share, you added some great comments and trust us, we noticed.

Continue reading

Posted in ITS Information | Tagged , , , | 10 Comments

Trauma Kit Prize Pack Reader Appreciation Contest

Not too long ago, we revamped the entire medical lineup here at ITS Tactical, providing you with more options so that you’ll never be without life saving equipment.

Today we’d like to announce our latest reader appreciation contest. It only runs through the weekend so you have to act fast.

ITS Medical Kit Giveaway

Continue reading

Posted in ITS Information | Tagged , , , | 67 Comments

Make Your Case: How To Run a Self-Surveillance

Survivalists, preppers and even security personnel can be prone to the same shortcomings they often preach to the unprepared, making a case for themselves.

Too often we become obsessed with being up-to-date with technology and skills-sets that we forget to look at ourselves. Sure, we know why we do the things we do, but what message are we projecting to others? Are we too transparent? Instead of being truly covert, the height of preparedness or surveillance, are we being terribly overt?

Pride can be a flame that draws unwanted attention. There’s nothing covert about the neighbors saying, “Looks like John’s bought enough food for two Armageddon’s,” or “Look’s like Mark’s on security detail again.”

It’s not just about staying under the radar; it’s about taking stock of what you’ve been doing and that’s why it’s important to take a week of self-reflection and case yourself.

Start Your Day with Breakfast

The moment you get up tells a lot about yourself. Do you eat breakfast at home; how do you park; what route do you take to work; do you buy coffee from the same shop every day on your way to work?

Case yourself like you would a suspect. What type of dress do you wear and what kind of image do you project? Your morning routine leads to a lot of deductions, usable by the enemy or opportunists. We all know we need to change up our morning routines just in case, but if you’ve fallen into a rut or simply become comfortable this can be the wake up call you need to bust up your pattern.

Gadgetry and Gizmos

If there’s one thing we’ve learned about the technology age, it’s that people sure do love having stuff.But there should be a time and place about bragging about what you’ve got.

To the unscrupulous neighbor or blog reader, it’s all part of a mental shopping list they’re creating to call on when the opportunity presents itself. Most of us are probably guilty of making mental notes of things we would pilfer if the need presented itself, so take stock of what you have and who knows about it.

Cash is King

Money advice and buying habits are best discussed by accountants and bankers. We will offer, however, when it comes to spending your money and leaving as few traces behind as possible, put your money on the barrel head.

If you haven’t already, take a closer look at your credit card or bank statement — and don’t just look at the bottom number to see if you have anything left in your account at the end of the month. Every one of those purchases or deposits creates an easily deciphered pattern if it finds it’s way into the wrong hands. Friday nights out on the town with the boys means nobody’s home until midnight. Frequent Monday-to-Friday visits to the fast food joint is a pretty good indication no one’s paying attention to your work computer at the office; return visits to the hardware store might mean you’re making enough racket at home to not hear who’s moving around in the backyard.

Using cash gives you the only piece of paperwork you need, proof of purchase. Using debit or credit creates paperwork announcing you have proof of purchase, so cut the redundancy and tighten up your paper trail.

Loose Lips Sink Ships

Somebody Blabbed
The greatest threat to your security is yourself. Whether its using social media or meeting someone for the

Marital status, kids, where we grew up or went to school used to be civil points of conversation but are now nuggets of information we don’t want to in the wrong hands. And God forbid if you tell the wrong person you go to the Dominican Republic every March on holidays. You might come home to an empty home — literally.

Safe topics for making conversation can be your job — if you’re allowed to talk about your work — or a “safe” hobby, like woodworking, sports or history.

And if all else fails, create a throwaway profile. Really dig into something that is not necessarily important at first blush— cooking, gardening, maintaining a salt water aquarium — and learn enough to pass yourself as a budding amateur. This becomes your first-contact profile until you can evaluate someone.

What you decide to give up after that is up to you.

For the dating man, there’s something to be said about being the guy who is passionate about his gold fish collection one day, to being a karate black belt who can shoot the petals off a flower at 75 yards and also knows how to administer wilderness first aid the next.

Bringing it All Together

James Bond was an international man of mystery, but he was also a respected socialite. No one truly knew Jason Bourne, including Jason Bourne and there was a clear boundary between work and home for Ethan Hunt.

Balancing what some would call a double life is a struggle and holding back while being affable doesn’t come naturally to a lot of us but throughout the day there’s many opportunities to practice and hone your skills.

Pick your moments. When the barista at the coffee shop asks how your weekend was, she doesn’t need to know you shot the best grouping in your life at the range. Maybe this is a good time to tell her about your new goldfish.

More than likely, though, it’s the perfect time to just say “good,” pay her in cash and leave it at that as you walk to work using a different route than the one you took Friday.

Editor-in-Chief’s Note: Please welcome Christopher Gooding  as a contributor on ITS Tactical.  Christopher is a Canadian survivalist who hates finding his picture in a Google Images search.

Posted in Mindset | Tagged , , , , , , , , , , , , , | 19 Comments

What’s in Your Bag? Show Off Your Gear for a Chance to Win!

Note: Contest is over and winning entries can be viewed on this post.

Whether you carry a messenger bag, backpack or something else, we want to see what’s in it! We’ve run a few “What’s in Your Pockets” contests, but we’ve decided to switch things up a little. Sharing what we carry every day can help provide everyone else with ideas on how to adjust or improve their setup.

While there’s no reason to carry 10 days worth of emergency rations, you certainly need to have what you consider “the basics” covered. Although, even if you have a solid set of items that would help get you out of an emergency situation, you may not have the ability to get to that bag if it’s in your car or away from you.

Continue reading

Posted in ITS Information | Tagged , , , , , | Leave a comment

Cooking Around the Campfire: 9 Easy and Delicious Foil Packet Recipes

In the quest to streamline your camping trips, foil packet meals can be one of your greatest allies. It’s cooking at its simple best; you take some ingredients, wrap them up in a foil parcel, and place the pouch in a campfire’s coals to cook. You can prepare these foil packets before you head out into Mother Nature, and they require no pots and pans, no plates, and no clean up. All you need is a fork and some fire. And, if you know what you’re doing, they can be incredibly tasty and satisfying. So today we’re going to cover the basics of foil packet cooking and provide you with some delicious recipes to try the next time you venture into the great outdoors.

Campfire

Continue reading

Posted in Camping | Tagged , , , , , , , , , , , , | 14 Comments

How to Build Your Own Dip Bars

DIY Dip Bars

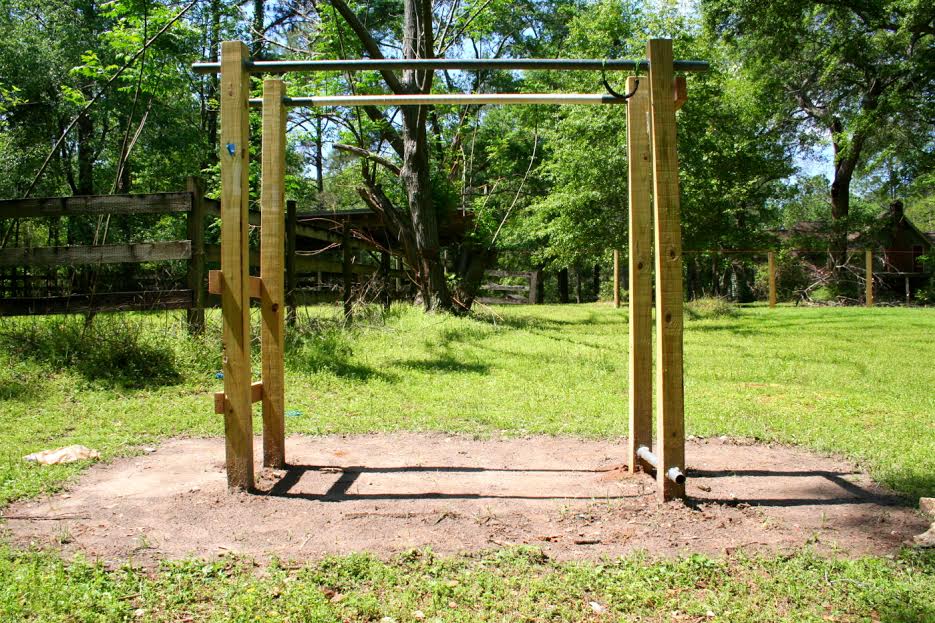
You don’t need a gym membership to get a good workout. If you have space on your property and can rent or borrow some tools, you can build your own backyard gym. While this dip bar may look like it’s something just for one type of workout, you can also use it for sit ups and pull ups.

This was also built with available tools and while it may not be the best or easiest way to build yours, it should help give you an idea of where and how to start.

Note: I included the plans for adding a Sit-Up bar, which is optional. However, if you think you may want one in the future I suggest you follow my instructions on drilling the holes for it now as it will prove difficult to do once the posts are set in the ground.

Tools and Supplies

  • 4 Pressure Treated Posts (8′ x 4” x 4”)
  • 1 Pressure Treated Board (8′ x 2” x 4”)
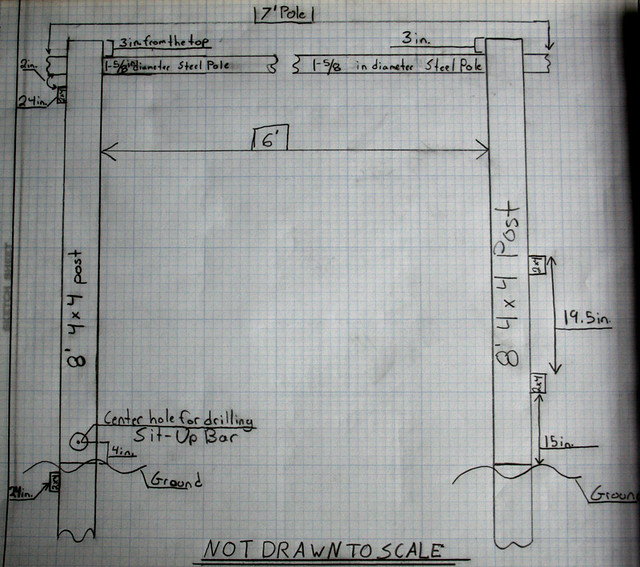
  • 2 Galvanized Metal Poles (1-5/8” diameter x 7′)
  • 1 Galvanized Metal Pole (1-5/8” diameter x 28”)
    • Optional. Could be used for a sit-up bar.
  • 1 Tube of Silicone based sealant
  • Handful of Galvanized Nails or Wood Screws
  • Power Drill
  • Hammer or drill bit for your Wood Screws
  • 2” Hole Saw Bit with Arbor Bit
  • 1/8” Drill Bit (at least 4 inches long)
  • Straight Edge Square
  • Caulking Gun
  • Hand Saw
  • Post Hole Shovel
  • Measuring Tape
  • 2 Saw Horses/Elevated Work Platform
  • Sharpie or other Marking Device
  • Clamps

Once you have your tools and materials assembled, it’s time to start the build.

Dip Bar Plans 2

Dip Bar Plans 1

STEP 1: Cross Boards

Measure your 2×4 into four equal pieces each 2 feet long and cut them with your hand saw. These will be your cross boards and you can set them aside for now.

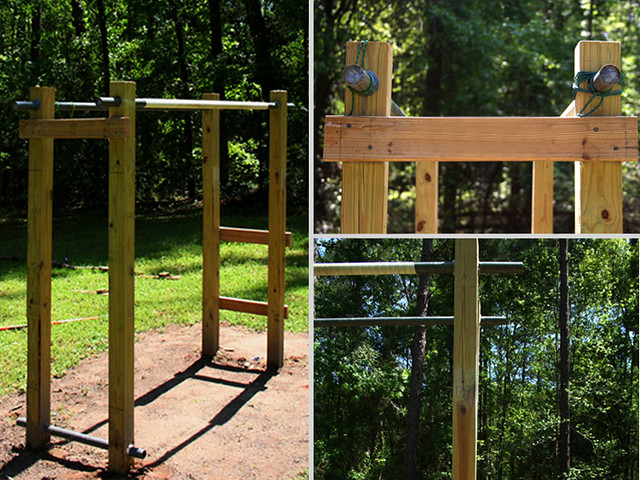
STEP 2: Post Construction

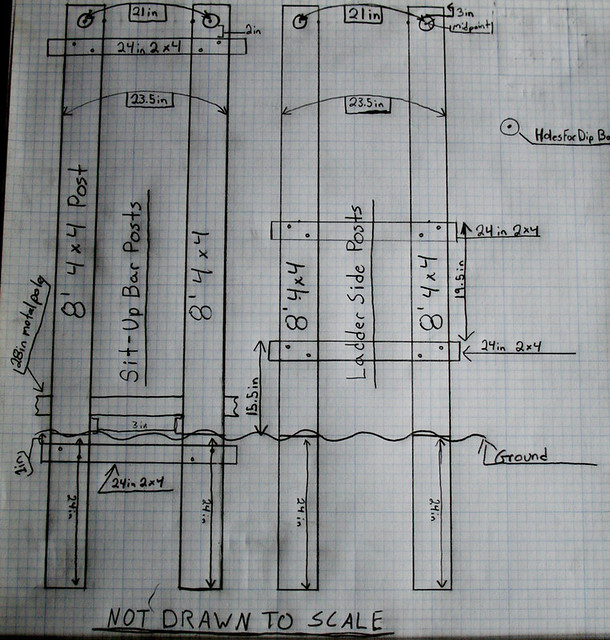
Lay out your four 4x4s on your saw horses and establish which side of each post is going to be the top and bottom. Then decide which of the two posts is going to have your Sit-Up bar running through it. When deciding the top and bottom of your posts, keep in mind that it is both difficult and unwise to drill a hole through a knot in the wood.

STEP 2.1 Mark each post with a line 2 feet from the bottom. This line will represent how deep each post will be buried. I recommend that you mark this as “BURY LINE” on all four sides of the post.

STEP 2.2 Mark each post at the point where your cross boards will go. This will be different for each pair of posts because one side’s cross boards are going to act as a ladder.

STEP 2.21 Ladder Posts’ Cross Boards: Mark your first lines 15.5 in. above the bury lines. The top of your cross board will lay on this line. Mark your second line 19.5 in. above the previous line. As with the previous board, the line you make is where the top of the 2×4 will sit. Make sure to use a square to draw your lines, as this will help you maintain level dip bars and ladder rungs.

STEP 2.22 Sit-Up Posts’ Cross Boards: Mark your first lines 1 in. below the bury line on both posts. Mark your second line 7 in. from the top of the two posts. Make sure to use a square to draw your lines.

STEP 2.3 Mark the posts where you’ll drill holes for your dip bars. To mark these holes, measure 4 in. down from the top of the post and make a line horizontally across each post with your square. On that line find the midpoint, approximately 1.75 in. from either side of the 4×4, mark this spot and make a vertical line with your square. The spot that these two lines intersect is where you will drill your guide hole. Repeat this process for all four posts.

STEP 2.4 Grab the two posts that you decided to put your Sit-Up bar in and in the opposite plane, (i.e. perpendicular to the dip bars) you’ll mark your holes. To mark these holes, measure 4 in. up from the bury lines and make a horizontal line with your square, and then find the mid point, approx. 1.75 in. from the edge. Make a vertical line on this mark and their intersect point will be the spot for the guide hole, much like the holes for your actual dip bars.

STEP 3: Drilling Holes

All six holes will have the same method for drilling. First take your 1/8 in. drill bit and drill straight through the posts where you made you intersecting marks in steps 2.3 and 2.4. This will serve as your guide for the 2 in. hole saw with 1/4 in. arbor bit.

I wasn’t able to find a hole saw that was deep enough to drill straight through the post in one shot so once you drill into the hole saws’ extent, flip the post over and repeat from the other side. This is why it is important to drill all the way through with your 1/8 in. bit first, to create a guide hole. Once you get your first hole routed through, repeat this process on your 5 other spots.

Editor-in-Chief’s Note: One thing that’s not mentioned when drilling holes, is that if you don’t want the bars to turn on you when doing pull-ups, I’d suggest drilling a hole running perpendicular to the bar in each 4×4 post while the bar is inserted. Then just insert a bolt and nut to keep each bar stationary. This step is of course completely optional, but I had good success with this method when constructing my backyard pull-up bars.

STEP 4: Assembly

Assembling the posts, lay out the two posts that are going to have the sit-up bar running through them. Make sure your holes are going to line up and then grab two of your 24” 2×4 cross boards. Measure and make a vertical line with your square a quarter inch in from both sides of the 2×4. (You can go ahead and do this for all four 2x4s now.)

Now, lay out the first 2×4 on either of your marks from STEP 2.22, make sure the top of your 2×4 is the side that is on the line, and make sure that the marks on your 2×4 line up with the sides of the 4×4 posts. Use nails or screws to attach this 2×4 to the post, 2 per post are sufficient. I used clamps at this point to insure that the 2×4 did not slip out of alignment as I was attaching it to the 4×4 post. Repeat this process for all cross boards on each line from STEPS 2.21 and 2.22 until all four 2x4s are attached and square.

STEP 5: Site Selection

DIY Dip Bars 1

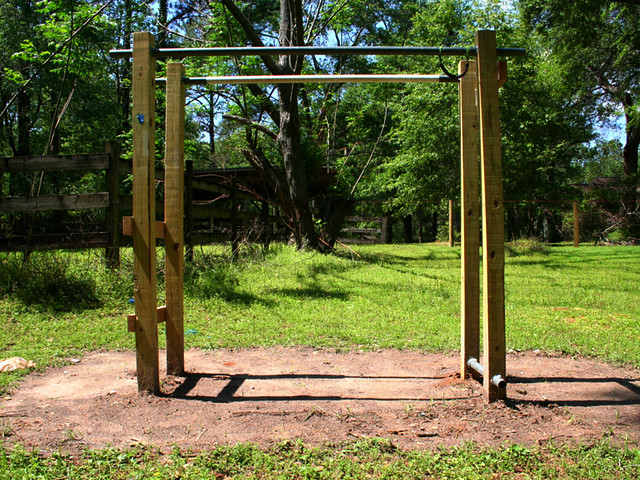
When selecting a spot for your dip bars, you will want to find a location that has as little contour change as possible and I suggest you find a spot that doesn’t have a threat of branches or anything falling on it. This spot will need to be at least 6′ long and 2′ wide and be able to have 2′ deep holes dug into it. Be mindful of underground wires and septic pipes.

Use your post hole shovel to dig four holes 2′ deep and only as wide as your post hole shovel. These holes should be 24 inches apart from their two outside edges and 6′ apart from their inside edges. Refer to drawings for clarification. On whichever side you decided to put your sit-up bar make sure to dig a small trench about 6 in. deep between the two holes for the 2×4 to rest in.

With your level, do your best to make these posts as straight up and down as you can. This process can sometimes take quite a while but it is a very important step so take your time. Make sure that they are level on both planes of your posts. You can use your metal poles to help you ensure that both sets of posts lie on the same line. If you are not an avid digger, you may find it easier to align your poles properly if you get one set of posts in the ground both level and filled back in with dirt to hold them in place.

Next, measure from that set to find the spots for your other two holes. I’ll leave it up to you to decide which you find easier. You may find that your posts don’t rest in the ground all at the same 2′ bury line, this is fine as long as the majority of them are at or below this line. Especially the two posts that have the 2×4 underground.

Now make sure you fill the holes back in with dirt and do your best to pack the dirt in as tight as you can. You could use concrete to set the posts but I found that dirt worked just fine for this purpose. You will have to wait approximately 1 full week for the dirt to fully harden before you can use them, but it is worth the wait.

STEP 6: Finishing Touches

Slap on a couple of ITS Tactical stencils and decorate as you see fit.

STEP 7: Test and Work Out

Remember, freedom isn’t free!

DIY Dip Bars

Editor-in-Chief’s Note:  Please welcome Justin Wooden as a contributor on ITS Tactical. Justin is an Aviation Ordnanceman  in the US Navy as well as an avid rock climber and all around adventure sports enthusiast.

Posted in Functional Strength | Tagged , , , , , , , , , | 17 Comments

New ITS Patches and T-Shirts for St. Paddy’s Day!

We couldn’t leave everyone hanging this St. Patrick’s Day without some new morale patches and shirts to wear during  another season of celebration, green beer and overindulgence. This year, we’ve revamped our best selling Shamrock Morale Patch to PVC with American manufacturing!

ITS St. Patrick's Day Shamrock Morale Patch

Grab a few here from the ITS Store before they’re gone for the season and share them with your friends. Or don’t and give them a hard time about not wearing green.

ITS Pint Glass PVC Morale Patch

We’ve been getting many requests to turn our ITS Pint Glass logo into a patch and your dreams have now come true! Our Pint Glass PVC is our ode to a favorite beer around ITS HQ, Guinness!

ITS Pint Glass PVC Morale Patch

Pick up your Made in America  Pint Glass PVC here from the ITS Store and raise your glass!

Prevale T-Shirt

Speaking of beer, as we now actually have a true Prevale that our friends at Thunder Chicken Brewery previewed for everyone at the Muster last year, we thought it was appropriate to start thinking about what we’d have on a bottle cap of our favorite brew!

Prevale T-Shirt

Prevale came about from our motto, Prevail and along with a few festive St. Paddy’s Day ITS Logos. These made in America  Prevale T-shirts  also feature the Irish word i réim, which translates to Prevail.

These Prevale T-s are a limited edition run, so grab yours here before they’re gone!

Posted in ITS Information | Tagged , , , , , , | 1 Comment