I first heard about Liberty Bottles by chance a few months back and had been searching for a good metal bottle to see how they compared to the Nalgenes I’ve been using for over 10 years now.
I’d been through the changeover when the BPA debacle happened and have been using the BPA Free Nalgenes for a few years now. However, Nalgenes have always left me desiring more. I’d always looked at the various metal bottles on the market, but never found one that I liked more than a Nalgene.
When I found out that Liberty Bottles were the only American made metal bottle on the market, I decided to order the 32 oz. and 24oz. sizes and give them a try. I’ve really been trying to buy American lately in not only my personal purchases, but also with what we carry in the store at ITS Tactical as well. Continue reading →
Recently ITS contributor Chris C. reviewed a few Sling options from OSOE (Original Special Operations Equipment) and today we’d like to give a few lucky readers the opportunity to win one of the six slings we’re giving away this weekend!
We have a Black and OD 2 to 1 Point Convertible Sling, Tan and OD Two Point Bungee Sling and a Black and Tan Single Point Bungee Sling to giveaway. Unfortunately, the winners won’t have the opportunity to choose what they receive, but will certainly be getting a quality-made sling sewn right here in the USA!
Like computers and other electronic technology, light-emitting diodes (LEDs) have advanced over the past few years. I won’t attempt to explain how or why LEDs have advanced, as I’m not a electronics guy and couldn’t explain wavelengths, semiconductors, quantum wells, resistor calculations, radiant flux or any other jargon.
What I do know is the LEDs that were on my Commodore 64 were dim and everything these days is super bright. For me personally it’s just like shooting; I don’t need to know how much my bullets weigh or how many feet per second they’re flying. I just need to know how to pull the trigger and get rounds on target.
There are some people, like precision shooters and snipers, who need to know that technical bullet information. If you really want to learn about LEDs I would recommend Don’s Homepage or The LED Museum for detailed explanations on LED lighting.
Brite-Strike Technologies
Brite-Strike Technologies use the latest technology and creative thinking to produce lights for law enforcement and the military. Along with cutting edge flashlights and products like Tactical Balls (yes, I’m serious), lighted traffic safety and bike gloves, Duty Light Cameras, Perimeter Infrared Intrusion Security Alert systems and the APALS (All Purpose Adhesive Light Strip), prove Brite-Strike puts a lot of thought into their lighting systems.
Their flashlights also use the latest LED and digital power management systems. It’s no surprise, as the company was founded by two police officers who were looking for better lighting during police work.
Specs
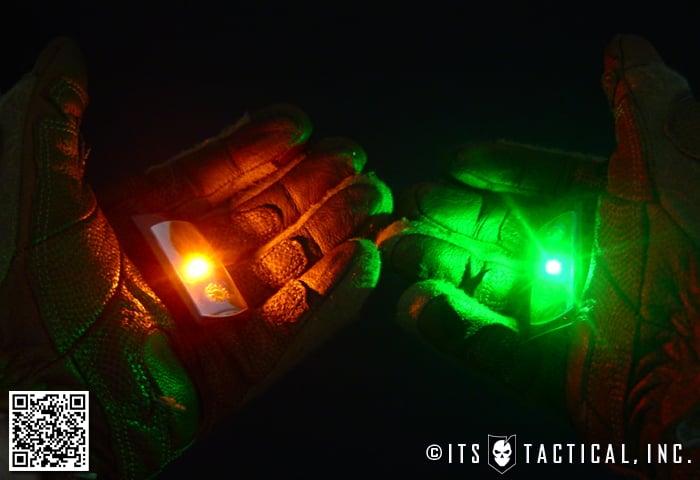
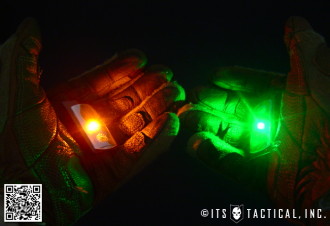
The APALS was designed primarily for the military as a low cost disposable combat marking system. They use the newest LED technology to produce a compact lightweight marker that has a advertised run time of 35 hours. As you will see in the video below, the green APALS I tested far exceeded that run time.
The light, battery and circuits are sealed in a water and dust proof package that uses a 3M adhesive strip on the back. This allows the light to be affixed to just about anything, even when wet or underwater. One of the APALS I tested in my pool went over 300 hours attached to a smooth plastic container. I also attached one to the inside of a glass jar filled with salt water (from the ocean). It stuck to the glass with no problem and lasted the duration of the test.
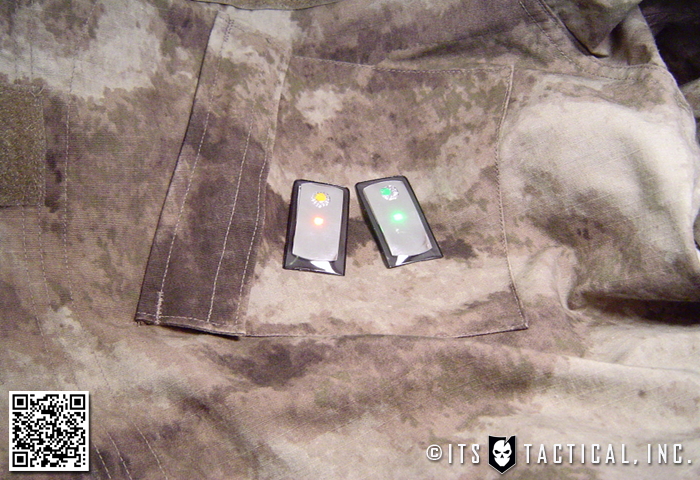
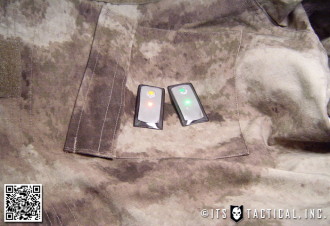
There are three separate flash patterns to choose from. They go from a fast flash, to slow flash, to constant on. The selection button has a raised edge for a tactile feel in the dark and the color of the LED is marked on the front, for easy identification.
APALS comes in five colors; green, amber, blue, red, white and are available in IR for law enforcement and military. The colored models have a silver reflective strip on the front which aides in light distribution and identification. On the IR model the strip is blacked out for night operations.
Here are the APALS specs from Brite-Strike:
– Can be seen from up to 1/4 mile
– Runtime up to 35 hours (in our test the green went for 323 hours on the slow flash setting)
– Modes: On / Fast Strobe / Slow Strobe / Off
– Heavy Duty Adhesive Back holds tight to any surface wet or dry
Possible Uses
As stated the main design behind the APALS is for identification in low light or no light. Having spent many long hours in the dark while in the Army and as a Deputy, I can say identifying your buddies at night can be tough.
The APALS can be setup in numerous ways because of the flexibility in mounting and color options. Teams/squads could be issued certain colors (or color combos) so leaders could quickly see who is who. This would have been great in training as you could direct your troops accordingly.
While the military has it pretty good with the use of NVGs, law enforcement (generally) doesn’t have this availability. The APALS could be used the same way for leaders to identify and control their members in training.
While the APALS are pretty bright and light discipline is a big concern I’ll show you one way you can control the light output in the video portion of this article below.
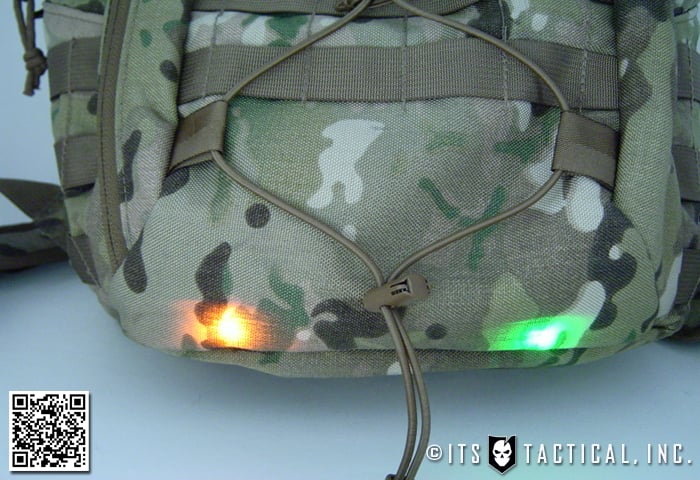
Low light identification applies to not only your friends but to your gear also. Anyone who has been in the field or deployment knows the fun of finding your gear in the back of a Deuce (OK I’m dating myself here) in the dark. How about that blacked out C-130 or Chinook? It gets pretty dark back there and you can’t rely on the crew chief to police up your gear.
As you’ll see in the video, the APALS has plenty of power to shine through most materials allowing you to throw one in your bag. If you’re not worried about light discipline you could mount it to the outside of your gear too.
If you need to mark items, doors, gates, vehicles, or anything else, these lights are built to perform. I was really impressed with the 3M tape being able to stick while fully submerged in saltwater. The APALS I have in my pool is still attached to a smooth plastic container and that was affixed on 5/24/2011.
If you hunt, fish, boat, kayak, paddle board or camp these make great lights as well. Since they’re small and lightweight you can store them just about anywhere as emergency backup lighting. Throw a few in your off-road vehicle, ATV, or side by side. The uses are almost endless and since they’re disposable, you wont get heartburn if you loose it over the side or in the woods.
My Uses So Far
It seems I’m always on the lookout for new “tactical” low-light flashlights and lighting ideas. With the LED technology getting better everyday there are a lot of new products on the market. The vast majority of them are in the form of a flashlight or penlight which is the standard when you think of lighting. The prices range from the mid-twenties to well over eighty dollars.
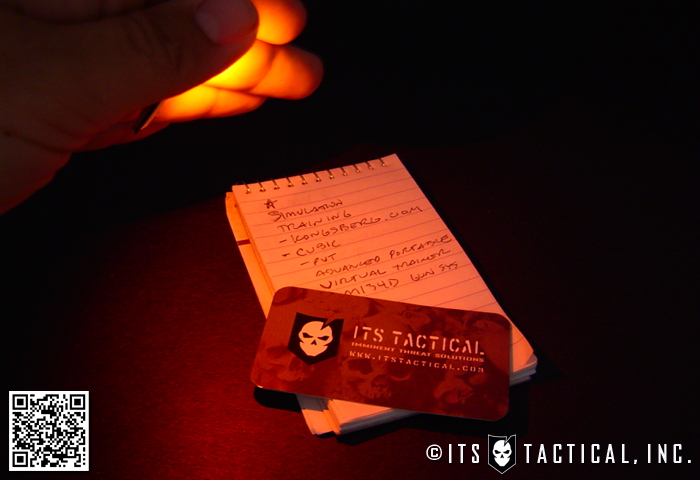
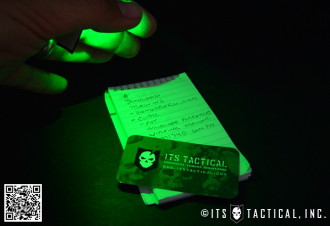
What makes the APALS so versatile is the fact that it’s not shaped like a flashlight. It’s flat and the LED is positioned on a flat surface. I’ve been using one in my shirt pocket and turning it on to view my notepad by holding it near the pocket. Being able to do this will of course be based on the material of your shirt. I’ve also got one on my plate carrier for close in lighting. I simply used the 3M backing to attach a piece of hook and loop to it. This would be similar to using a MOLLE-mounted Princeton Tec MPLS (which I really dig also).
I also keep one in my pocket and use it when doing vehicle surveillance in plain clothes. It’s much easier to keep my shorts pocket than a penlight and I can cup it in my hand using my fingers to regulate the amount of light I need.
While the light patten on the APALS isn’t a focused beam like a flashlight, it does provide plenty of up close lighting for low-light operations.
Video and Photos
As I’ve described, the APALS has more uses other than a combat identifier. They are light, small, waterproof, and affordable. What more could you ask for in a tactical light? Check out our YouTube video below to see the many uses of these versatile lights and make sure to keep checking the Brite-Strike website for new forward thinking products.
We’ve combined these two assemblies, as they’re fairly simple, yet still take some attention to detail to ensure you get them in installed correctly.
Particularly the Ejection Port Spring and what direction to install the Forward Assist Roll Pin. We won’t be building the Forward Assist from the ground up and recommend that you buy an already assembled Forward Assist. It’s not difficult to assemble one, but you’re better off purchasing one pre-assembled.
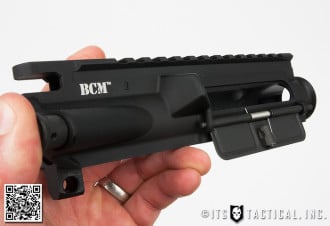
As mentioned in our intro article on the upper assembly, we’re starting with a stripped Upper Receiver to highlight each and every step.
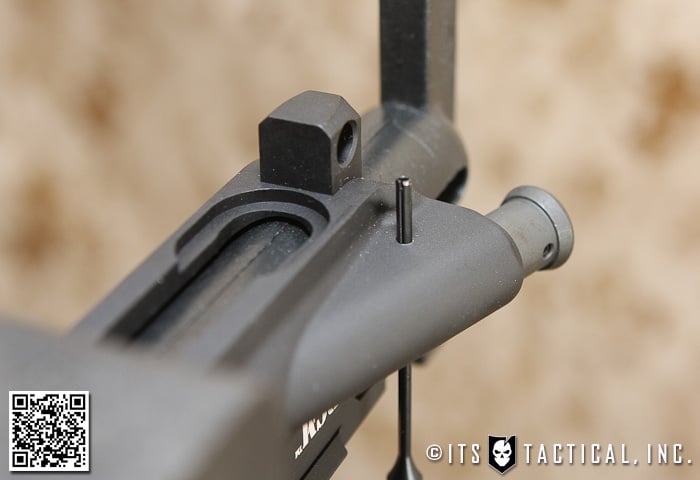
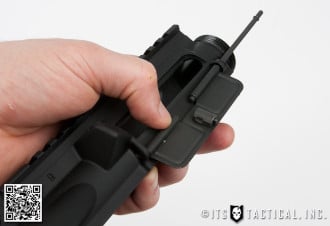
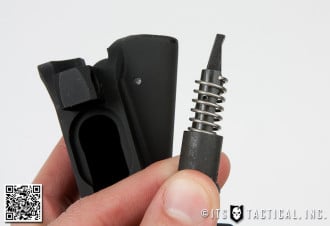
Ejection Port Cover
Getting the Ejection Port Cover installed can be tricky, so pay particular attention in the photos, instructions and video below to ensure the spring is in the correct position on assembly. The cover is one of the worst designed parts to assemble, the reason is that it has to be installed when the barrel/rail system is removed.
What’s bad about this design is that if you ever have a spring break or the door fail you’ll have to strip down your AR to fix it. There is a way to fix it in reverse and not totally undoable, but it’s definitely a pain. What makes it so is the small c-clip that’s installed on the pin. To operate on it with the barrel installed, you’d need to remove and replace the c-clip in a small working space.
You’ll have a better idea of this when you see the installation below.
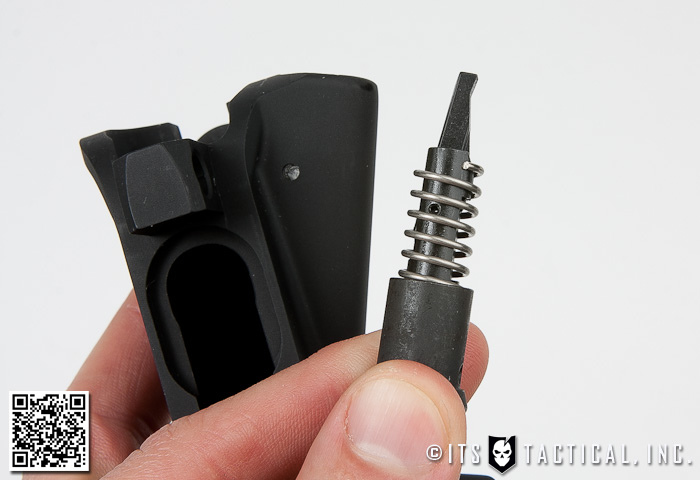
Forward Assist
The forward assist is fairly self-explanitory and was initially added into the AR-15 to combat the issues that were eventually fixed in the design, yet it remains integrated on may Upper Receivers.
It’s purpose is to help ride the bolt into full lockup on the chambered round if fouling or other trouble exists. It’s never a good idea to chamber a round that won’t chamber on its own by depressing the bolt release, but there are times when you might not want the noise of the bolt release chambering a round.
This “silent loading” is where you ride the charging handle closed and hit the forward assist to close the bolt the rest of the way. This isn’t something that’s typically an issue, because if you’re waiting to load until you’re close enough to danger for the sound to be heard; it’s too late. That is if you’re using your AR-15 for defensive purposes.
The forward assist can also be used in an immediate action drill to clear a stoppage (more on that in future articles). Pay particular attention below to the orientation of the Upper Receiver when driving in the Forward Assist Roll Pin.
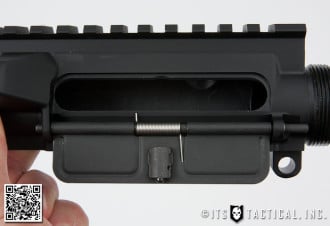
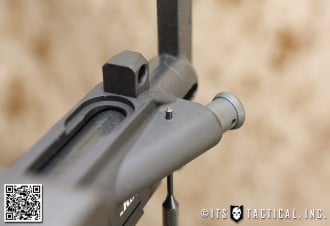
Place Upper Receiver on its side with the Ejection Port facing up.
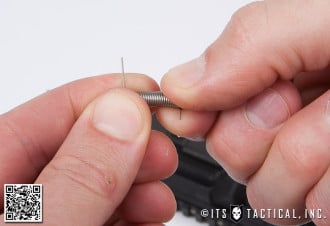
Using the needle nose pliers, place the snap ring onto cut in the hinge pin.
After attaching the snap ring, install the opposite end of the hinge pin into the Upper Receiver.
Place the Ejection Port Cover in place and slide the hinge pin through just until it appears in the gap where the Ejection Port Cover Spring will be installed.
Twist the spring 180 degrees so that the spring legs provide the proper tension on the upper receiver and the Ejection Port Cover.
Complete the installation by sliding the remaining hinge pin the rest of the way through.
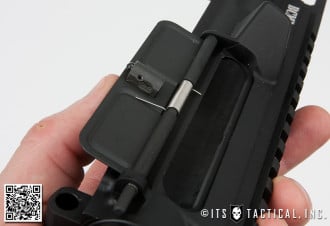
Test the function by closing the cover and the press it open from inside the upper receiver. It should flip open smartly under the tension provided by the spring.
Forward Assist
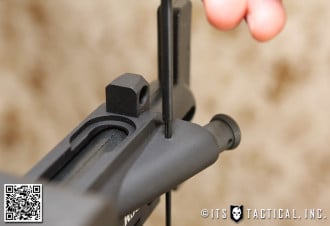
Place the Upper Receiver into the Upper Receiver Vise Block.
Install the insert and place into the vise upside down (looking down on the underside of the upper).
Insert the forward assist assembly into the forward assist guide hole in the upper receiver.
*You want the claw shape of the pawl to be facing towards the interior*
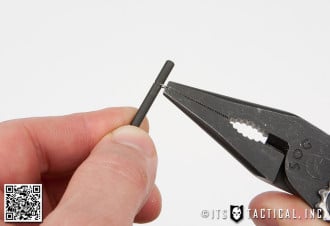
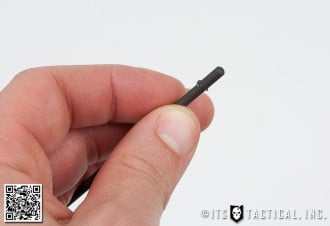
Push the Forward Assist in until you can insert the #3 Roll Pin Punch from the underside to hold it in place.
Start the roll pin with the #3 Roll Pin Punch, driving it from the top (actually the underside of the upper).
Your #3 Roll Pin Punch will fall out as the roll pin is driven in and is used to complete the driving of the roll pin (ensure it’s flush).
Test the Forward Assist by depressing it to ensure it spring back into position.
Join us back here soon for our 2nd installment in the DIY AR-15 Build (Upper Receiver) where we’ll be assembling the Barrel and Rail before moving on to the Front Sight Base!
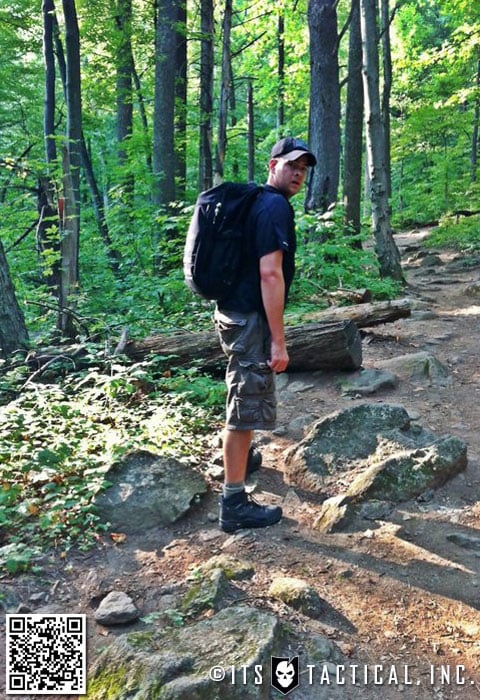
The air is thin at 14,000 feet. That’s a little over two and a half miles straight up. At that altitude, the oxygen available is only 61% of that which is available at sea level. Breathing and heart rates will be more strained, struggling to find oxygen. That’s why fitness is both paramount and completely irrelevant.
When it comes to altitude sickness (acute mountain sickness), it doesn’t always matter how physically fit you are. Being as in shape as possible is still important and if you don’t do what you can to prepare your muscles for the riggers of non-stop uphill hiking, you’re going to have quite an interesting time.
What Bryan and I have been focusing on are a mixture of physical fitness and gear choice. We plan on arriving to Colorado a few days early for the GORUCK Ascent to try and get a head start on the acclimatization process. In a best case scenario, we would need a good couple of weeks at altitude to truly acclimate but a few days certainly won’t hurt. Also, having quality lightweight gear will make the hiking less strenuous on our bodies.
Here are some workouts and basic notes on our preparation for the GORUCK Ascent.
Mike’s Workouts & Prep
Ruck Marches
Unweighted and Weighted Runs
Hill Repeats
Weighted Stair Repeats
Squats
Lunges
Push Ups
Burpees
Buddy Carries (usually with bricks in my ruck and my wife on my shoulders)
So far, I’ve done some long weighted ruck marches with bricks varying from 30 to 60 pounds in my GORUCK GR2. I’m focusing on ‘over carrying’ so that I’ll strengthen my back and legs and when my I’m carrying my ruck at altitude things will seem lighter and easier. To be honest, that’s my hope because I’ve never done anything like this before. I’m putting the physical aspect first so I’ll be able to enjoy the rest of the Ascent and keep a clear mind during the land navigation, medical and survival classes.
I’ve also been doing a lot of research on both technique and gear choice. Actually, I’d like to give a shout out to two ITS Tactical contributors that have helped me quite a bit; Peter Hogg our Managing Editor and Brian Green. Because I’m new to this, I had to decide on many different types of gear. Which boots to try on, sleeping bags to consider, and even tips on how to repackage toothpaste and deodorant. All the while looking to keep weight as low as possible.
Bryan’s Workouts & Prep
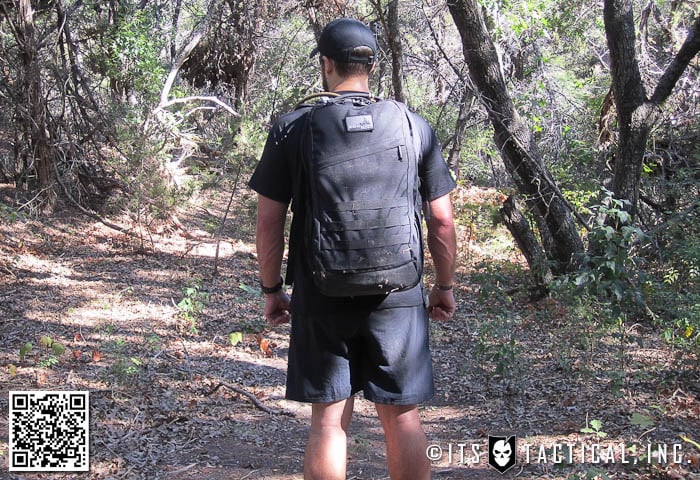
I thought I’d chime into Mike’s article and talk a bit about what I’ve been doing to prepare, as it’s a bit different from Mike’s preparation. As I mentioned in my write-up after my GORUCK Challenge a few weeks ago, I’m a swimmer and I’ve been continuing to integrate that into my training for the Ascent. I’ve also given my legs and back a rest and stopped running with a weighted pack and switched to hiking with a heavier load in my GORUCK GR2 pack.
There are some fairly challenging hills nearby that got the best of me when I headed out for the first time to hike with 65 lbs. worth of Sandbag pills in my pack. A gross miscalculation on my part about what the GR2 can manage. As you might notice it doesn’t have a waist strap and if you’ve spent time under a pack, you’ll know how quickly heavy weight can wear on you without the load being distributed to your hips. Not unmanageable, just working harder not smarter.
I’ve since toned down my weight to anywhere between 20 and 30 lbs. when I’m out hiking. I’ve been out quite a bit lately, as I’ve recently bought some new Lowa Renegades (thanks to Peter’s recommendation as well) that I’m trying to break in before the Ascent in a few weeks. Check them out here in the members only video I made on How to Tie your Boots the Mountaineering Way.
In addition to swimming, hiking and upper body PT, I’ve also focused on what I didn’t do enough of for the GORUCK Challenge; squats, lunges and lower body PT. I’ve also gotten back on my road bike for some endurance training and typically ride 19 to 20 miles in hour-long workouts.
Donation and Support
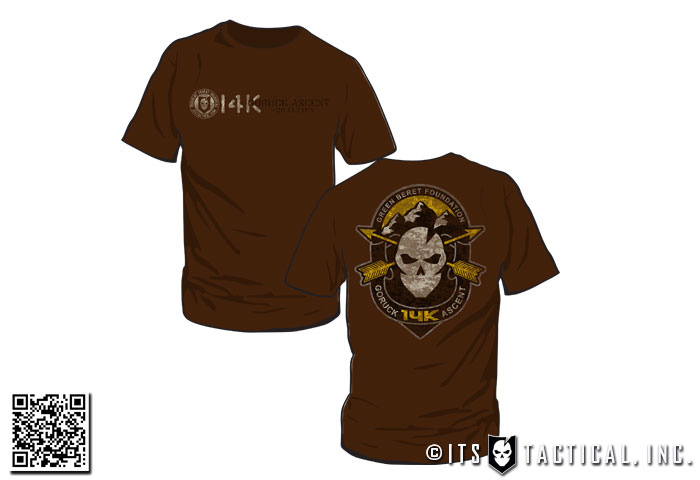
Even though we’ve reached our initial goal of $1,000 for the Green Beret Foundation, we’ve upped it $2,000 and are still looking for donations. Don’t forget that you get some pretty sweet perks in addition to your donation a worthy cause.
$30 or more — Limited Edition Patch commemorating the event (Never available on ITS)
$60 or more — Limited Edition T-Shirt & Patch (Never available on ITS)
$100 or more — Limited Edition T-Shirt, Patch, and ITS Flag (We have flags? They’re in the works, but you’ll get one of them first!)
$200 or more — All of the above and some serious ITS store swag (Details forthcoming, but it’s going to be good!)
We’ll be releasing the design for the flag soon, but see the main image of this article for the patch design and the shirt design above.
How you Can Help
Here are Bryan and I’s First Giving Donation Pages, this is where you can go to help us get to the Ascent! Any help you can provide would be extremely appreciated and will be going to a fantastic cause! Even if you can’t donate, we’d appreciate any way you could share this fundraising goal with those you know and even around the web.
This is the first article in a follow-up series to our previous series, Dogs of War. In Dogs of Defense, we’ll focus on dogs for personal protection.
Today we’ll begin by asking if there is a need for trained protection dogs. The next article will discuss whether there’s a danger associated with “weaponizing” a dog, followed by an article that considers breeds, trainers, and the responsibilities of the owner of a trained dog.
Later articles will discuss the safety of those around a trained protection dog and how to maintain that dog’s peak performance. We’ll also illustrate methods of integrating a protection dog into a home defense plan, as well as how U.S. laws relating to service dogs can be used to keep your family safe.
Should You Own a Personal Protection Dog?
Any security minded person, especially in today’s society of ever rising crime rates and increasing violent crimes, should seriously consider owning a protection dog.
Do you own a gun? You should seriously consider owning a protection dog.
Do you have a family to protect? You should seriously consider owning a protection dog.
While there are many other valid reasons to own a protection dog, let’s examine the above questions in more detail.
Crime Rates and Security
Increasingly, we find ourselves in an ever more violent and criminal society. Economic depressions tend to increase this trend as more people find themselves out of a job and desperate to find money and goods to take care of themselves. Of course, many others simply commit violent crimes for the pleasure they receive from seeing others suffer.
Home invasions are one of the most dangerous crimes, often resulting in violence against the victims. Violent crimes in general have steadily increased for more than 20 years. According to the Bureau of Justice statistics on violent crimes, you have a 126% chance of being a victim of violent crime at some point in your lifetime. So do your children.
Many people think that a security system will protect them from violent crimes within their homes. I can tell you, as a Military Police Officer and Sheriff’s Deputy, there is little chance that law enforcement will respond quickly enough to stop a crime from occurring.
Others claim that their martial arts training will protect them. Sadly, this is woefully inadequate in most real world encounters. Are you prepared for multiple attackers taking you by surprise at night when many still have difficulty clearing their mind enough to respond appropriately? This does not even consider the fact that most of these violent encounters involve weapons on the part of the attackers.
But the most popular response to protecting your home from violent crime is having a gun readily available and being trained to use it. I’m an advocate of the second amendment and strongly encourage anyone who can own a gun to do so and learn how to effectively use it. But is having a gun enough?
Firearms for Home Defense: Their Limitations
Home invasions are fast paced and chaotic. You won’t know if there’s one attacker or many. Depending on the layout of your home, you may leave your family vulnerable by unknowingly allowing an attacker to bypass you while you clear other areas of your home. There is a high probability that you may find the attacker between you and your family, even if they are on the other side of a wall, restricting your ability to shoot due to the threat of over-penetration.
If you have a family, your home defensive plan probably looks something like this: We are alerted to a threat, your wife gathers the children and calls the police while holding a firearm as a last defense, in case something should happen to you. You grab your handgun or shotgun, and begin clearing your home to ensure that there is no threat.
Now let me ask you a question: With you by yourself, are you really prepared to take on several attackers with weapons of their own? Please put away the bravado for a second and for the sake of your family, really think this one through. Are you willing to rest the safety of your wife and children on your ability to single handedly clear your home if there are actually attackers present?
Think about that long and hard, because if it ever happens to you — and the chances are increasingly greater that it will — you do not want to make the wrong decision here.
Here is another question to think about: if a special operations team were going to enter your home and clear it, would they send one guy, or a team with a K-9 force multiplier? Can an individual highly trained operator conduct this task at peak performance alone? Unless you are one of these few men, then soberly consider your own limitations and what failure means to your loved ones.
Family Protection: When You’re Gone
Let’s pretend that you are Rambo, capable of taking on vast hordes of Vietcong, zombies and home invaders with ease. You have millions of rounds of ammunition, several strategically placed mini-guns and you even decided to set up some claymores under your porch; just in case. No one is getting into your home and harming your family on your watch.
What about when you aren’t there? “I will always be there,” you reply with confidence. Really? You don’t go to work? You don’t travel for your job? You don’t take overnight hunting or fishing trips with the boys? Will you really always be there?
What about when your wife takes a trip to the mall alone in the evening. Some dear friends of ours just had a terrible experience where the wife was kidnapped in a car, driven around for several hours, and then dumped back off at the mall. Terrible situations like this happen. Are you sure they will never happen to you?
How can you, as a loving protector, ensure that your family will be safe in your absence? The real answer is that you can never fully ensure it, but you can certainly take steps that give you and yours a much increased level of protection.
The Constant Companionship of a Dog
If you have a trained protection dog in your home, you have a team of defenders instead of being alone. Your trained protection dog can indicate the presence of an intruder, often before they ever actually enter your home. Your trained protection dog can be left at a key location to prevent anyone from circumventing you and reaching your family. Your trained protection dog can distract the first attacker, allowing you to focus on the second.
When you are away, your protection dog can warn your wife and children of an intruder. The dog can be commanded to bark, warning off would be attackers. The dog is now the teammate of your family, able to assist them if the need should arise.
When you wife goes out to the mall at night, she can take along the dog. Often the presence of a dog is enough, but, even if that doesn’t deter them, the bite will certainly be worse than the bark.
Force Multipliers
Force multipliers refer to the idea of using something relatively small or simple to give you a significant advantage in a fight. That is what a dog brings to the table.
Should you own a trained protection dog? I strongly believe that you should. We’ll explore this question further, along with the process that you should use to evaluate your specific situation, in the upcoming articles in this new series.
Because so many questions arise immediately when this topic is brought up, I wanted to use this opportunity to provide an overview of what the articles in this series will contain. If you have any questions that do not seem likely to be covered in the series, feel free to ask in the comments below or contact me directly.
Joel is the founder and head trainer of Dunetos K-9, a training facility and equipment manufacturer specializing in Tactical and standard K-9 equipment. He’s been training and handling dogs for over 10 years and works closely with Baden K-9, a highly respected training facility in Ontario, Canada. Joel has served in the United States Army for 11 years as a Military Police Officer deploying to the Pentagon days after the 9/11 attack, Afghanistan (2003), Iraq (2007) and is currently serving in Bogota, Colombia (2011) in the War on Drugs. Joel has specialized in integrating dogs into every aspect of life, from personal obedience and protection to specialized military application.
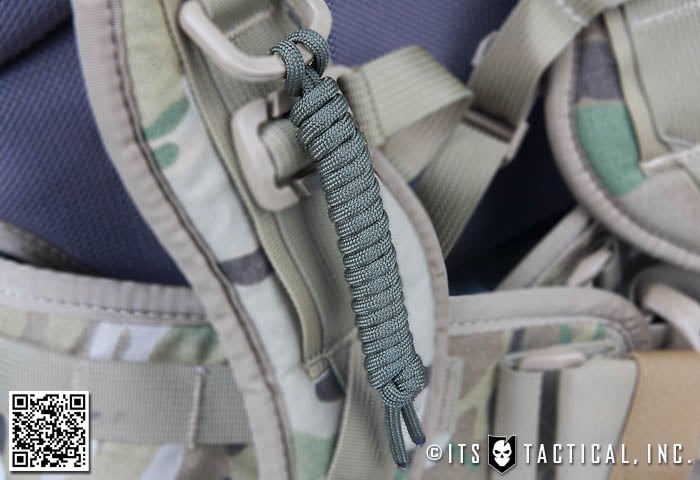
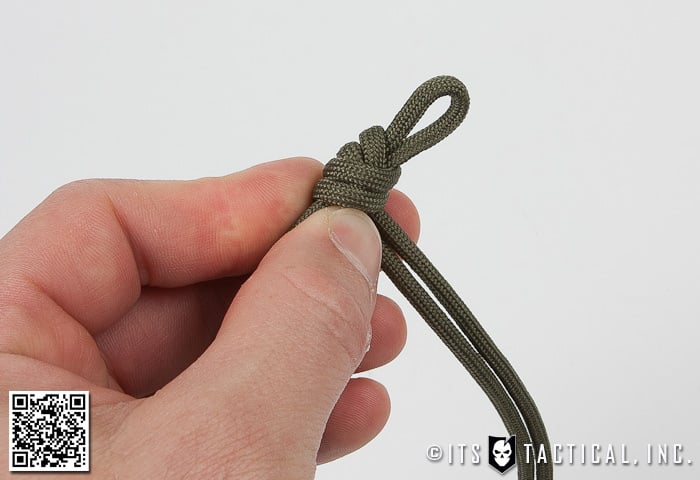
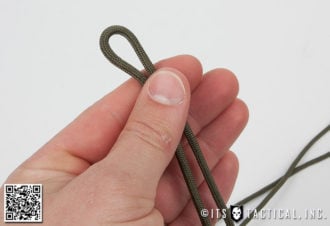
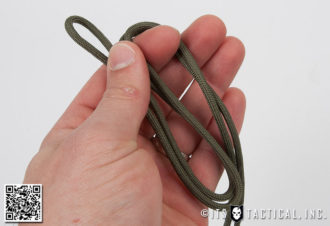
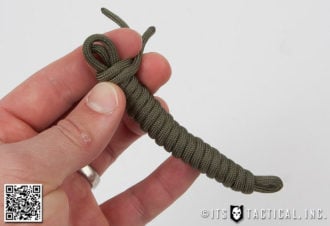
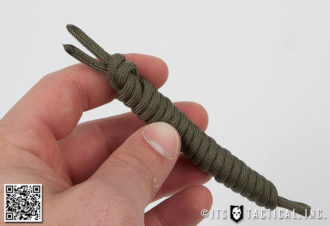
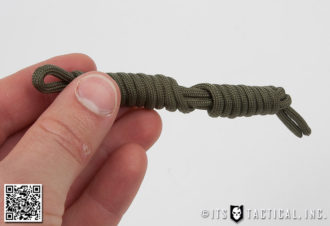
This knot of the week started off as a request from a reader who wanted to know how to create a lanyard he saw at the end of a knife sheath.
On analyzing the knot, typically tied to shorten up loose ends, we’ve come up with a few more uses for it and another way to tie it.
When tied in this manner it creates a way to keep a few feet of paracord ready to deploy quickly. While not a quick-release per se, there’s just one knot to untie at the end to unwrap it.
As mentioned you typically see this kind of wrapping hanging down from longer fixed-blade knife sheaths, as it allows you to store a length of cordage to untie and tie around your leg to further secure the sheath from flapping around.
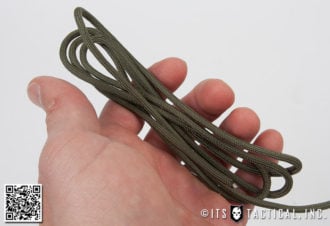
Another useful method for tying this knot is to follow the instructions below, but use more paracord and double up the wrapping to make a fatter lanyard.
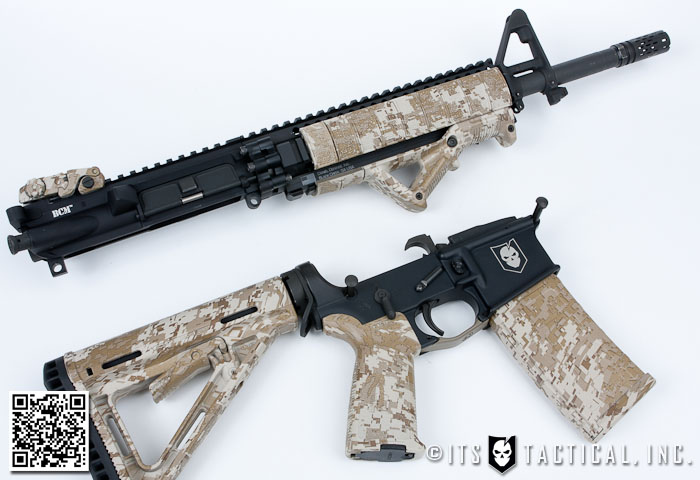
Welcome back to our DIY AR-15 Build and the start of our tutorials on assembling your Upper Receiver and finishing the build!
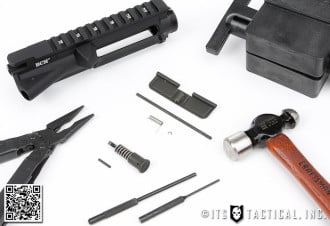
In this article we’re going to re-address all the parts and tools you’re going to need to assemble your Upper Receiver. While there are many complete uppers out there to purchase, we’ll be taking you through a complete upper assembly.
From the forward assist to the compensator and everything in between, when we’re done with this second series you’ll have all the resources available to you to take an AR-15 build from the ground up! Let’s get started!
Upper Receiver Introduction
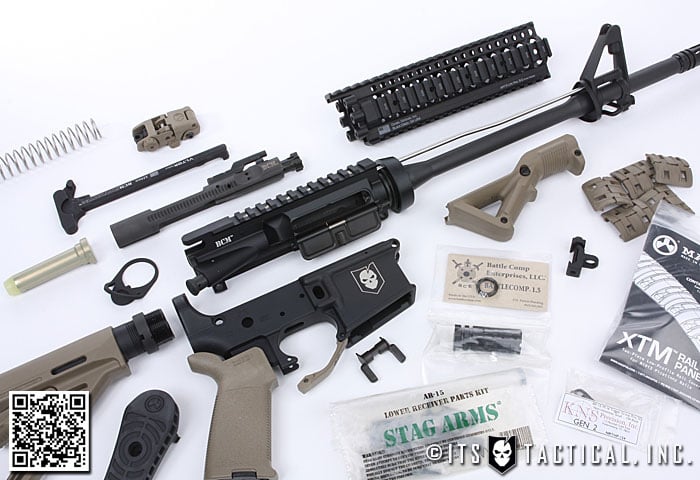
In this series of articles on the Upper Receiver assembly there’s a whole lot to discuss and many things to consider when you’re selecting the parts that will go into your upper. Today we’re simply going to discuss the proper tools and the parts that we’ve selected for our 14.5″ Direct Gas Impingement Hybrid AR-15 build.
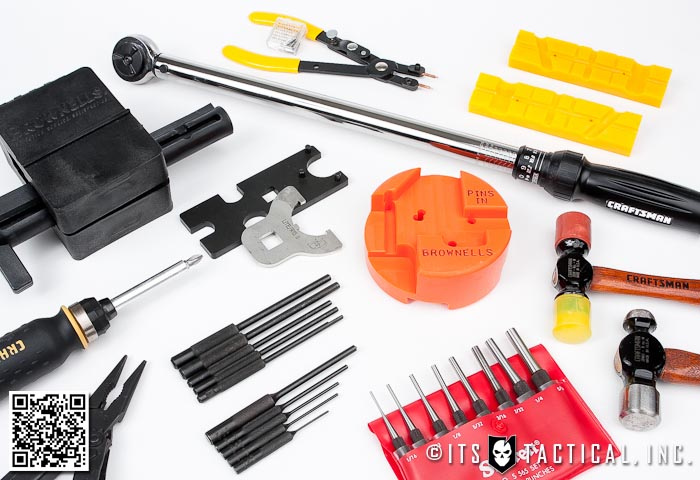
We’ll save the individual assembly articles for what to consider at each stage of the build and why. For an in-depth look into the tool selection we’ll highlight below, please refer to the initial introduction article to the DIY AR-15 Build.
While we’ve also referenced the parts we’re using in the original intro article, we’ve broken the list down a bit here to further highlight the individual pieces should you choose to undertake a ground up upper build like we’ll be going through in all these upcoming upper articles.
Parts
Something to note here before we get into the parts list is to ensure you’re aware that the stripped parts we’re linking to in regards to the barrel will require a gunsmith to drill the holes for the taper pins and the pins themselves are not included here on our parts list.
With our 14.5″ barrel you’ll also need to get a gunsmith to permanantely affix the BattleComp 1.5 that we’re using in this build to satisfy the requirements of the National Firearms Act. Permananetly affixing the 1.5″ BattleComp brings the barrel length to the required 16″ length without having to apply for a SBR and pay the $200 Tax Stamp.
Below you’ll find links to the “Group” part (in bold) as well as the individual parts contained in the group in a sub-category below it. Some sub-category listings are simply features of the group.
Stay tuned next week as we continue our DIY AR-15 Build with the first part of our Upper Receiver assembly installing the Ejection Port Cover and Forward Assist!
We’ve been updating our 8.6.11 Tribute Patch design to honor those that gave their lives in Afghanistan on August 6, 2011 and have made some changes based on feedback we’ve received from our readers.
ASOC (Army Special Operations Command) will be replaced with USAR and ARNG to properly honor the Chinook crew comprised of the Army Reserve 158th Aviation Regiment and the Army National Guard 135th Aviation Regiment. In addition, the 30 will be replaced with 31 to recognize the K-9 with Naval Special Warfare. We’re also adding a star for the K-9 as well. The updated art is shown on the right and we’ve also updated the descriptions on the checkout page and original article.
Last but not least, we’re working on allocating all the proceeds to multiple charities that will support the Army National Guard crew and the Air Force Special Operations, in addition to the Navy SEAL Foundation.