Picks can also be expensive and difficult to acquire for some. Previously we demonstrated how to make your own pick out of a paperclip. Today, I’ll discuss how to craft your own pick set.
Tools & Materials
The pick set itself will be made out of metal. For this tutorial, spring steel from an aircraft wiper blade was used. Hacksaw blades or spring steel from automotive windshield wiper blades may also be used. Keep in mind that a thin set can help when picking certain locks.
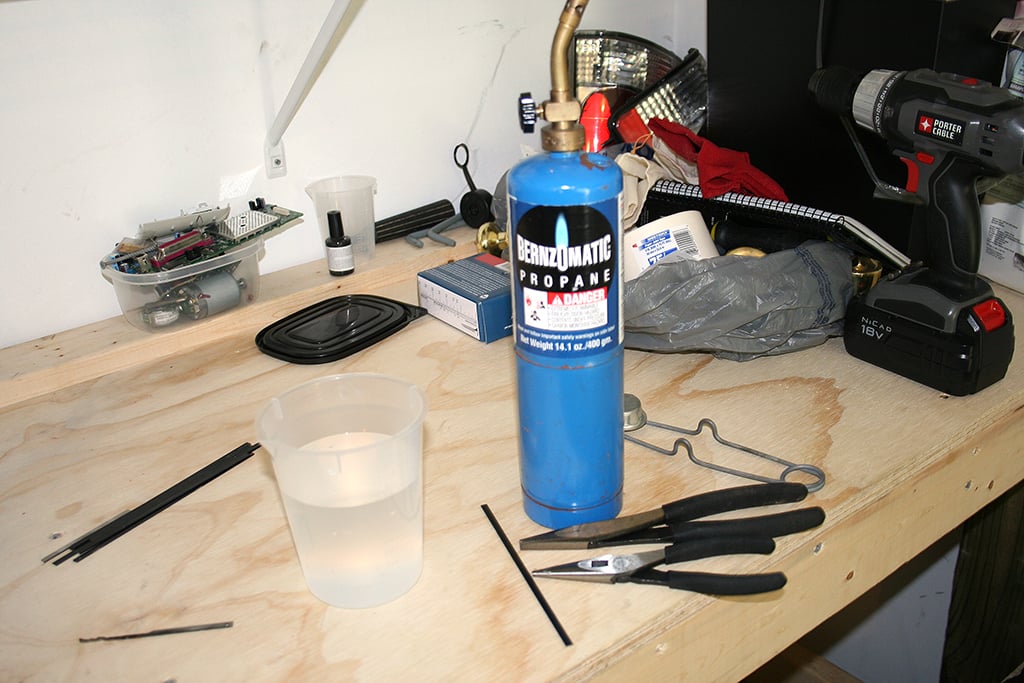
In addition to the required materials, a few commonly available tools are needed for the project.
Grinder or Dremel tool – You can make your picks by using files, but it will take more time
Sandpaper – You will want to use (at least) 220 grit all the way up to 600. This is to smooth and polish the metal after grinding, allowing it to slide over the pins with ease
Propane torch
Pliers
Cup of water
Safety Glasses
During this process, please remember to utilize protective equipment and be wary of where any sparks go. It’s hard to use a pick set when you’re blinded by a hot shard of metal!
The Pick
The first thing to do is take your material and cut it to a length that feels good in your hand. This may take a couple of tries. Different lengths work better on certain locks, so experiment.
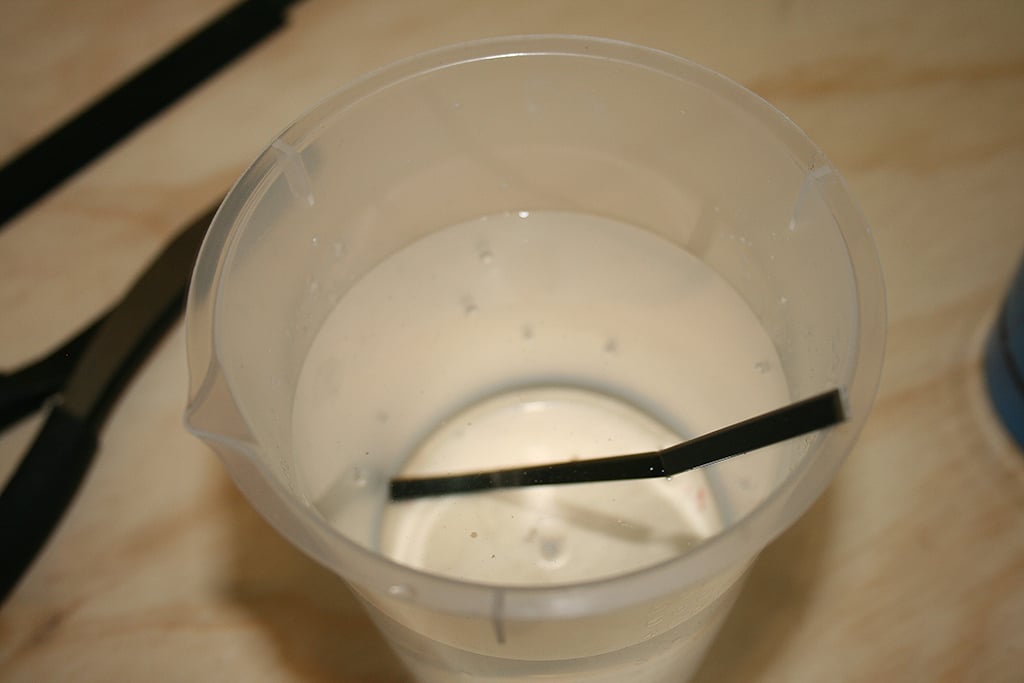
After you have your material cut to size, it’s time to set up your work area. Take a cup of water and set it in a way that you can dip your pick in as you grind away. You don’t want to heat the metal up too much. Doing so will cause the pick to be very brittle. If you do overheat the metal, you will have to heat treat the steel, which we will discuss later. Do try and avoid this issue though.
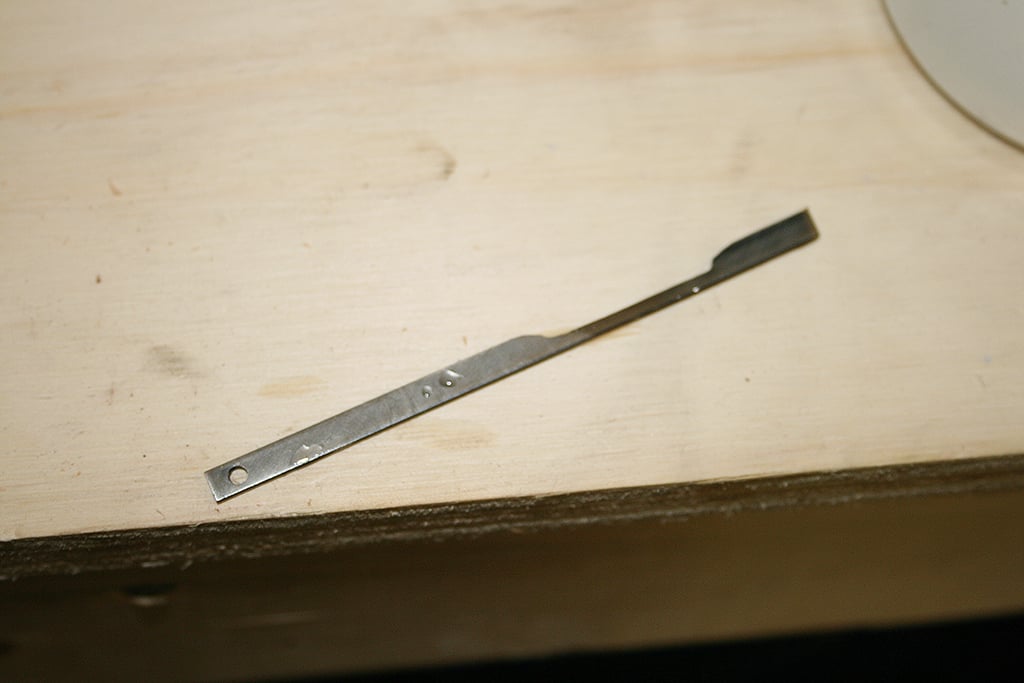
Start grinding away at the blade. Take your time and dip it in the water to keep it cool. What you want to end up with is called a pick blank, which can then be further ground into the desired pattern.
From here you need to figure out which pick you want to make. Patterns can be found everywhere on the internet, or you may use the pattern of another pick in your collection. Once you’ve found the desired pattern, use it to grind your blank into a pick. Remember to constantly dip the metal into the water to keep it cool. (Previously, I tried marking the blade with a pattern but found that as I ground away the markings disappeared.)
Once satisfied with the pick, use sandpaper to knock off the rough edges. Work your way to a fine grit to polish it up. This is an important step; the pick must be smooth enough to glide over the pins of the target lock.
The Tension Wrench
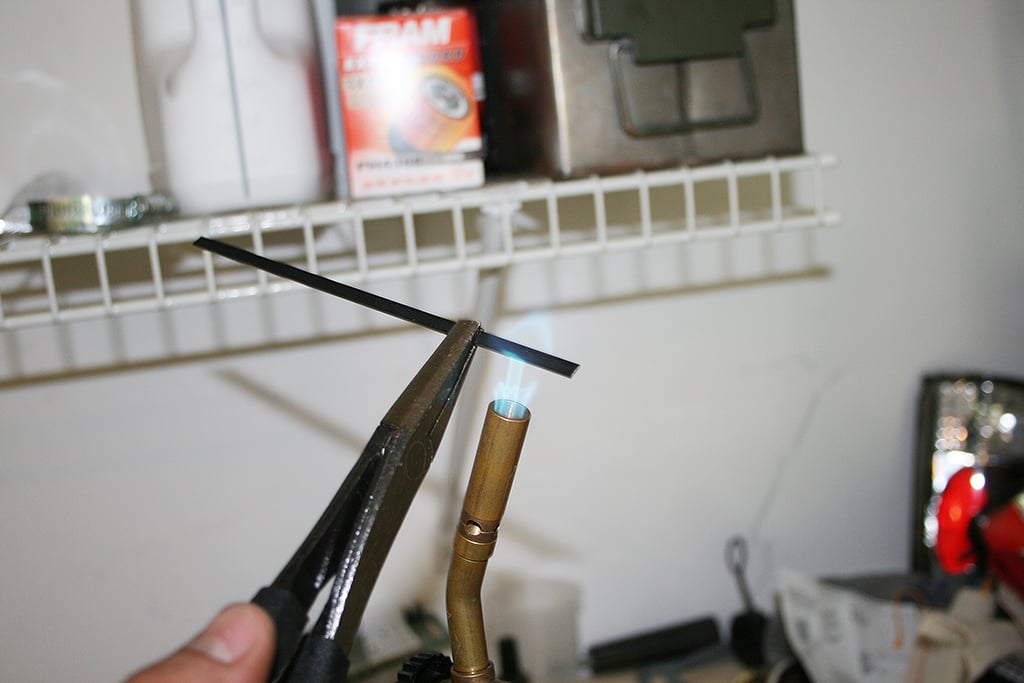
A pick is great, but useless without a tension wrench. This is where you need to get your propane torch out. I recommend making the wrench with some spring steel from a wiper blade. You can shape the steel either before the bending or after. It’s a matter of preference, I find it easier to shape the metal if I bend it first.
Bending
Light your propane torch and grip the spring steel with a pair of pliers. Heat the section you want to bend until it is cherry red. This section should be close to the end of the steel. While keeping it in the flame, take another pair of pliers and bend it 90 degrees. Then immediately dunk it into the cup of water. If you have not yet done so, you may shape the tension wrench now.
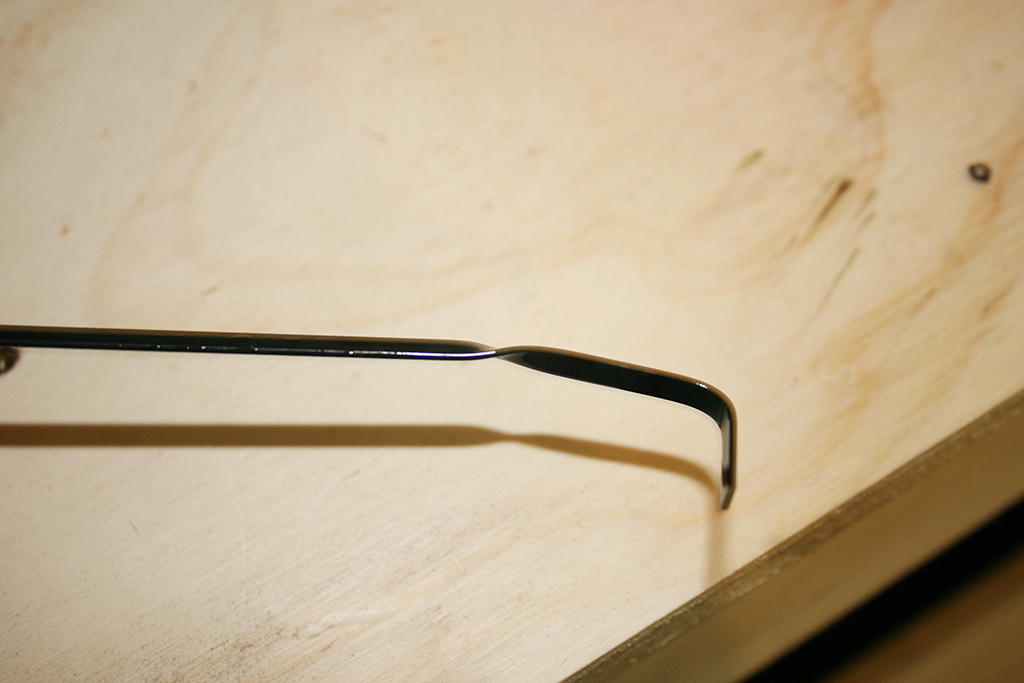
Shaping the Handle
The tension wrench can be made easier to handle by giving it a twist in the handle area. The process is similar to before: heat the metal up until it is cherry red and, with your two pliers, twist the metal while it is in the flame. Then immediately dunk it into the water. Your result should be something like the wrench in the accompanying photo. The bow isn’t much of a concern, as it will not interfere with the operation of the wrench.
Treating the Steel
If you were hard on the grinder and overheated the pick you will need to heat treat the steel. The process sounds difficult, but is actually quite easy. Just light your torch and with a pair of pliers heat the pick at the cool part of the flame (not the blue cone). Wait for the metal to turn colors, but not cherry red. Once it changes color, work your way down the pick, then set it to the side and let it cool naturally. Your pick has now been heat treated.
Conclusion
After you’ve made your set, you will probably want to put a little oil over the tools to keep them from rusting. When practicing, I will thin out the tension wrench as I try it out in a lock.
With patience you can build a decent set to start learning the skill with. Combine this with a DIY Lock Pick Practice set and you will be well on way your way to mastering the skill of picking locks. So get to the workshop and start picking!
Editor’s Note
We encourage everyone reading this article to get involved with lock picking as a skill set through various lock sport groups such as Toool and Lock Sport International. There’s a large community out there of people who understand the value of this skill-set and also like to have fun picking locks.
Remember, when practicing your set you should always follow the Lock Sport code of ethics.
You may only pick locks you own or those you have been given explicit permission to pick.
Lock sport is an honest, ethical and legitimate hobby. Unfortunately, the whole world hasn’t figured that out yet (though we’re working on it!). Because the lay person has a tendency to perceive what we do as somehow nefarious, it is extra important that we commit to following a strict code of ethics. For this reason, the above credo is non-negotiable in the lock sport community. Lockpicking should never, ever be used for illegal or even questionable purposes. Please do not misuse this information. We assume no responsibility for your actions and in no way condone immoral activity. Help keep locksport fun for all by following strictly the one rule.
Editor-in-Chief’s Note: Please join us in welcoming Chris Rea as a contributor to ITS Tactical. Chris is a former Coast Guard boarding team member and currently working with the Maryland State Police as an Aircraft Mechanic. He also shares our passion for learning all he can and giving back to our community!
In my previous articles about the capabilities of dogs and their application to tactical teams we explored the dog’s ability to fight with humans, their ability to carry specialized equipment into the field for us, and their ability to detect scent.
Today I would like to discuss some of the tactical applications of a dog’s increased hearing capabilities.
A dog’s sense of hearing can be especially useful to smaller teams like the MAC-V SOG teams in Vietnam, or sniper teams who are particularly vulnerable to being overrun by larger units. Detecting an enemy’s approach allows these soldiers to conceal themselves or move to avoid being detected.
How Well do Dogs Hear?
According to a study by Louisiana State University on the ability of various animals to detect sounds at specific loudness levels and frequencies, the human range of hearing is between 64Hz and 23,000Hz. This same test determined that dogs had a range between 67Hz and 45,000Hz. Other studies suggest an upper limit as high as 65,000Hz. This indicates that dogs and humans have equivalent hearing in the lower frequencies, but that dogs can detect sounds at much higher frequencies than humans. Some studies of dogs also indicate that they can detect sounds up to four times softer — or further away — than we can.
Dogs have ear mobility, which allows them to rapidly pinpoint the exact location of a sound. Eighteen or more muscles can tilt, rotate, raise, or lower a dog’s ear. In addition to detecting sounds up to four times further away, a dog can identify the location of a sound much faster than a human. A sound that you can hear at 20 meters can be detected by a dog at 80 meters.
Tactical Application of a Dog’s Hearing
A number of years ago I spent several months developing sniper team integration of dogs as well as counter sniper tactics. The idea was that you could train a dog to accompany a sniper team and eliminate the danger of the team being sneaked up on, as well as allow the team all of the previously discussed benefits.
When I started working with the dogs to detect and locate sniper teams, we attended several sniper competitions in various states. We tracked military, law enforcement and civilian sniper teams. I started the training with the theory that the primary detection method would be scent, achieved by running the dog along likely avenues of travel. The dog could then run that scent down, hopefully to an unsuspecting sniper team.
What I found was quite shocking to me at the time. My dogs would indicate on sniper teams sometimes as far away as two miles over open terrain. Integrating the indications my dog was giving me with binoculars allowed me to locate teams at great distances. What was the dog using to find these teams at such distances? Their ears. As we experimented with these techniques I discovered that the components typically used by humans make noise that we can’t detect, but that the dogs zero in on. This is especially prevalent in a rural environment when such sounds are out of the ordinary.
My dogs understood that we were out there looking for something, and when they realized it was these sniper teams, they would zero in and want to track them long before I would have ever been able to identify them with even the most advanced hearing hardware.
But not all tactical teams are tracking or even concerned about sniper teams. Dogs can also use their hearing to locate sentries in a compound, detect approaching enemies in a patrol base or defensive position, or even indicate on enemy positions for standard infantry units conducting patrols and movement to contact missions.
Integrating the Various Capabilities of Dogs into Tactical Solutions
There are many ways to turn the capabilities of dogs into force multipliers to solve tactical problems. Allow me to briefly describe a couple of them.
Going back to the counter sniper application, the dog would indicate on the location of the sniper team at great distances. If I wanted to capture or kill said team, I would need to get much closer. So, using binoculars, I would locate the team the dog was indicating on and make a mental note of the nearest terrain feature; trees on a grassy plain were my favorite.
You could also use range finders and GPS to plot the grid on a map. Either way, I knew the team’s location at that time. I would then move to that location using cover and concealment. Once at that location, I would begin tracking the team with my dog using his sense of smell. This allowed me to track down and “kill” every team on every exercise we participated in. On the longer exercises, we found every team multiple times. In fact, several of the teams wanted to start fights after being located for the third time in two days. The technique proved to be very successful.
Another situation where a dog could provide solutions using multiple senses would be one similar to the Osama Bin Laden compound raid. Let’s say that Bin Laden received advanced notice that a US Navy SEAL team was coming to pay him a visit. He flees to a nearby cave. Just before the raiding party arrives, the SEAL sniper teams move into position with their dogs and begin locating sentries to take out just prior to touch down of the main body. The team lands and conducts a sweep of the compound using the dogs to clear their route of hostiles and explosives.
They get to the room that intelligence indicated was where Bin Laden slept, and find nothing. Using the dog, they know that there was someone here recently, so they grab a scent article (item of clothing, cut a piece from his pillow case, etc) and start their track. Before day break, they locate the cave, deploy the dogs to confirm that there are hostiles, and either enter and clear the cave, killing their target, or call in air strikes and collect little pieces of Bin Laden to confirm he is actually little pieces of fish food.
As I mentioned, applying a dog’s capabilities is almost endless, but I hope you get the idea.
Conclusion
Consider that even if I had equipment that could replicate these hearing abilities, it could not then transition from hearing detection to scent detection. Nor could it detect explosives or track. This same equipment could not then transition into a combat effective machine, disarming and causing confusion among my enemies. There is simply nothing that man possesses that can replicate the capabilities of the dog.
Join us next time as we discuss in more detail the equipment used by these dogs to make them complimentary to the high tech warriors they accompany on the battlefield.
Joel is the founder and head trainer of Dunetos K-9, a training facility and equipment manufacturer specializing in Tactical and standard K-9 equipment. He has been training and handling dogs for over 10 years and works closely with Baden K-9, a highly respected training facility in Ontario, Canada. Joel has served in the United States Army for 11 years as a Military Police Officer deploying to the Pentagon days after the 9/11 attack, Afghanistan (2003), Iraq (2007) and is currently serving in Bogota, Colombia (2011) in the War on Drugs. Joel has specialized in integrating dogs into every aspect of life, from personal obedience and protection to specialized military application.
Revision has recently released their traditional Aviator style Alphawing sunglasses, meant to be casual and not shooting glasses. You really don’t want to shoot in Aviators, do you?
They feature a lightweight etched stainless steel frame with no-slip overmolded temples for comfort and retention, the nosepads and temple pads on the sunglass are also overmolded for comfort and to optimize fit. Continue reading →
If you remember my previous post about the GORUCK Challenge I completed, it’s an evolution that takes strangers and individuals and transforms them into a team.
The GORUCK Ascent will be no different. While there are no bricks involved, this will be a 100+ hour challenge in it’s own right. Multiple 14,000 foot summits, mission planning, land navigation, survival and medical courses; this won’t be easy.
GORUCK Ascent
The GORUCK Ascent is mission driven and based on the culminating exercise all Special Forces soldiers must pass to earn their Green Berets. Both active and former Green Berets will be on hand for instruction and guidance though most of what we do will have to do as a team.
Taking place September 1st thru 5th in Colorado, the Ascent is very much still shrouded in mystery. We only know where we’re supposed to fly in to, but not where we’ll be going yet. How can you not love that?
Not only will Bryan and I be climbing multiple 14’ers with a team of hard charging individuals, we’ll also be putting a ton of gear to the test. After all, you guys want to see how well the gear we’re choosing to take is going to hold up don’t you?
This is Where We Need Your help
Through enlisting to partake in the Ascent, both Bryan and I have committed to raise at least $1,000 each for the Green Beret Foundation. These are some of the world’s greatest soldiers and have given so much for this great country, now it’s our turn to give back.
To sweeten the pot, we have some special perks that will only be available for those who donate. Some of you have already donated so don’t worry, these perks are retroactive and once we finalize everything we’ll get your information.
$30 or more — Limited Edition Patch commemorating the event (Never again available on ITS Tactical!)
$60 or more — Limited Edition T-Shirt & Patch (You’re going to want this shirt!)
$100 or more — Limited Edition T-Shirt, Patch, and ITS Flag (We have flags? They’re in the works, but you’ll get one of the first!)
$200 or more — All of the above and some serious ITS store swag (Details forthcoming, but it’s going to be good!)
We’ll be releasing the designs for the patch, shirt and flag soon, so stay tuned!
How you Can Help
Here are Bryan and I’s First Giving Donation Pages, this is where you can go to help us get to the Ascent! Any help you can provide would be extremely appreciated and will be going to a fantastic cause! Even if you can’t donate, we’d appreciate any way you could share this fundraising goal with those you know and even around the web.
If you donate to both First Giving pages, be sure to leave the same name in the comments and we’ll total your giving to determine your perk.
Stay tuned for more articles leading up to the Ascent, including what we’ll be bringing with us. We’ll also run articles after, detailing how our gear held up climbing multiple Colorado 14’ers! Thanks for your continued support!
Today in part seven of our DIY AR-15 Build you’ll learn how to install a Magpul MOE Trigger Guard into your Lower Receiver.
While installing a trigger guard might not seem to be a very complicated step that warrants it’s own article, there are a few tricks that can help you from making a fatal mistake when assembling your lower.
The ears (pin extensions) that hold the trigger guard roll pin are more fragile than you might think and if care is not taken with this step to find an appropriate multi-level surface, you could potentially wind up breaking one of these off.
If that happens, you might not only be out a lower receiver, but also a $200 tax stamp if you’ve put in to SBR your lower before assembling it. We hope this article will shed a little light on the installation and prevent any catastrophes from happening while you’re assembling your trigger guard.
Continue reading for our step-by-step instructions for installing the Trigger Guard with detailed photos and video.
Trigger Guard Installation
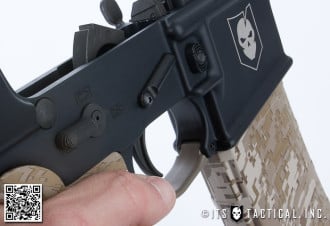
For this step, you won’t be using the trigger guard that’s included with the Stag Arms Lower Parts Kit we recommend, unless you’d like to. The benefit the Magpul MOE Polymer Trigger Guard has over stock trigger guards is the contour and removal of any hard edges that will eventually dig into your fingers after a long day of shooting.
The Magpul Trigger Guards also remove that annoying gap you might have seen at the rear of a standard trigger guard. Not having the gap makes for a more natural roll as you hold the pistol grip. The “V” shape of the MOE also helps finger placement when wearing gloves, as it allows for some extra room.
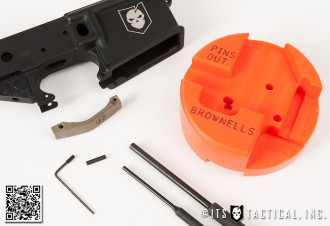
As noted above, a multi-level surface is what’s truly important about this step to ensure disaster doesn’t strike. There are a few options for this, in the video you’ll see that we were able to use the Magpul MOE Stock and the Lower Receiver Vise Block to create this. Alternatively you can also use the Brownell’s Front Sight Bench Block in addition to the Rifle Bench Block. If you already have these blocks, it’s definitely a good way to go, but you don’t need to go out an purchase them just for this step.
You can always create your own multi-level surface out of wood if you want to spend the time. It’s beneficial to create one out of wood if you plan on building many rifles, as it will save you time and headache in the future. The good thing about the Brownell’s blocks though is that they do double duty.
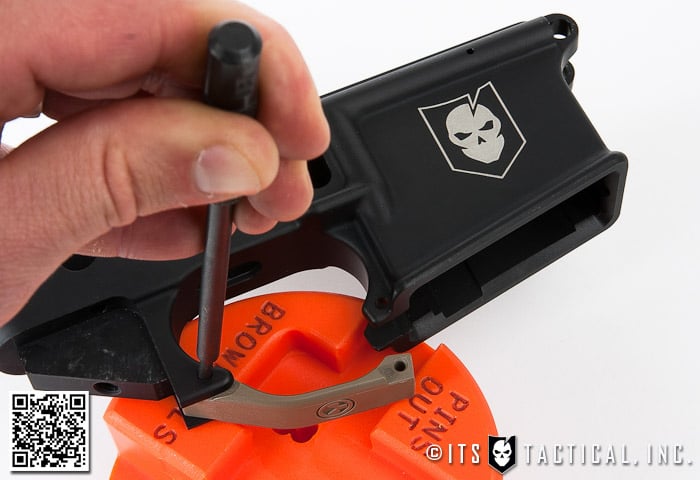
Rest your Lower Receiver on the Front Sight Bench Block according to the photo, using it in this fashion will give you the support you need so that you don’t accidentally break off one of the Roll Pin ears on your lower when tapping in the Roll Pin.
Place the Trigger Guard with the large hole aft; using the #4 Holder, start to tap in the included Roll Pin. Finish tapping the roll pin flush (on both sides) with the #4 Roll Pin Punch. This can also be done without the aforementioned punches, but they do make it easier and prevent misalignment of roll pins.
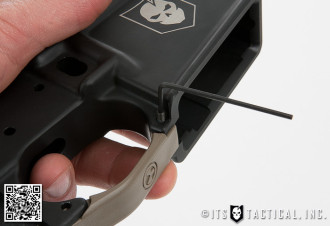
Finish installing the Trigger Guard by screwing down the front set screw until flush, using a 1/16″ Hex Key.
Join us back here soon for our 8th installment in the DIY AR-15 Build where we’ll be assembling the Buttstock before moving on to the Upper Receiver!
We first heard about Method Burn prior to the SHOT Show this year and were able to catch up with them there to get hands on with their quality craftsmanship.
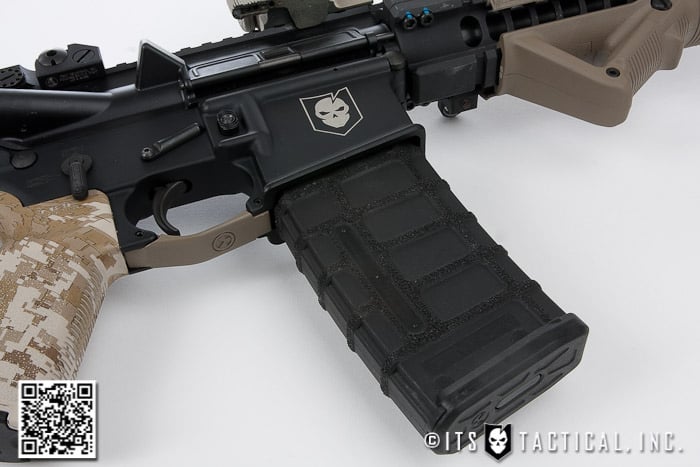
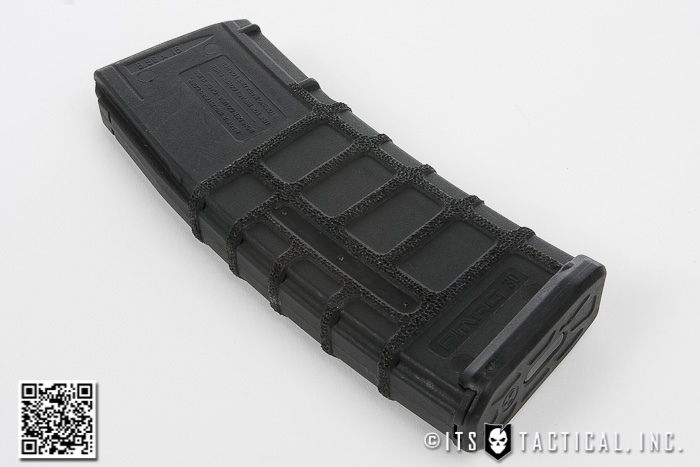
We’ve been kicking around a Method Burn stippled PMAG for the last few months and wanted to share our thoughts on the intense attention to detail that they deliver to the industry.
Stippling
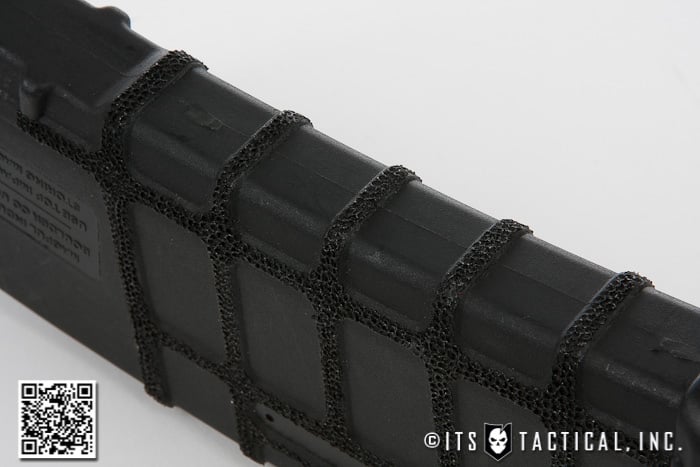
Method Burn prides themselves on “burning tiny dots into things you love.” Who doesn’t love a cool company slogan like that? If you’ve never heard of polymer stippling before, it’s a newer technique to the industry where a soldering gun or wood burner is used to “burn” a pattern into the places your hands go on your firearm and firearm accessories.
The theory is that this gives you a better purchase on these high traffic areas and increase your ability to grip. Many swear by stippling and it’s definitely catching on with all the new firearms utilizing polymer frames.
This technique has been around longer in the industry in the 1911 world. From what we can tell, Gunsmiths have been custom stippling the metal frames of 1911’s with punches for much longer than the polymer stippling craze has been around.
Method Burn PMAG
We’ve been rotating in the Magpul PMAG we received from Method Burn into our range time for the past few months and can definitely tell that it provides a benefit in grip retention. Not only does it help the grip in the Texas heat with sweaty hands, it shines when using gloves. As you can imagine, leather gloves really create a nice purchase on the stippling during mag changes.
We like the location of the stippling on this PMAG as well, as it’s just on the raised rib areas of the polymer pattern. It’s just enough stippling, but not too much to be overbearing. The stippling can be done in numerous patterns, but this one in particular looks to be one of the best.
The most impressive part about the stippling that Method Burn churns out is the attention to detail, each dot almost seems to have been precisely positioned next to the prior one and you almost forget that the work is all done by hand!
Specialization
Method Burn provides texture for a wide range of weapon accessories, rail panels, vertical grips, magazines, shotgun forends, firearms and even custom work. Check out their impressive gallery online!
As of this article, their Website states that they don’t have their FFL yet, so if you need firearm stippling you’ll need to be local to Dallas, TX. Method Burn also offers a 10% discount for Military.
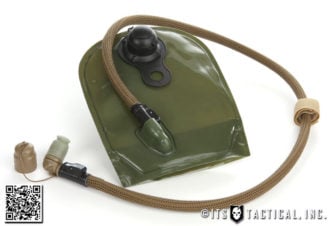
Today we’ll be taking a look at Source Hydration Systems, which I feel to be the leading hydration bladders on the market today. I’ll also show you some killer pouch offerings by London Bridge Trading to complement them.
Until I finally found a easy “source” through Tactical Distributors to purchase Source Military products about a year ago, I discounted them due to being hard to find. Once getting my hands on them, I quickly wished I’d done the extra leg work back then to get them!
Source Military Hydration Systems
Source Vagabond Systems is an Israeli-based company that provides many hydration products for the Military, Tactical and Outdoor communities. Their products used to be solely for the Israeli Army but have now found their way into military units worldwide.
My experience with hydration bladders dates back to some of the first CamelBak bladders in the mid 90s and I’ve always been unsatisfied with some part of all hydration bladders, despite trying quite a few products from Blackhawk Hydrastorm, Camelbak and Platypus. My biggest complaint has always been with the drinking tube and how with all the aforementioned bladders, it’s merely shoved on a flared end piece that’s molded into the bladder. This is a recipe for disaster.
The problem with this is that if that tube gets pulled or works loose, the water leaks out like a sieve. It’s happened to me numerous times, in particular with two CamelBak bladders I own. It was the last occurrence of this that caused me to purchase Source Hydration products. During a multi-day outing I had my tube work free of a CamelBak bladder leaking about 70 oz. of water into the bottom of my pack. I didn’t realize it until the guy behind me mentioned the water dripping out the bottom of my pack. I wound up having to dry out the bladder, duct tape the tube and continue to use it.
Something else on hydration bladders is that I’ve never found a bite valve I really cared for. I’ve liked some features on a few, like the shut-off valve that CamelBak bite valves integrate, but nothing has ever stood out to me as a perfect system. I’m also sure many of you have also experienced the notorious bad taste of hydration bladders as well, that’s always been something I just figured I had to deal with…
Features
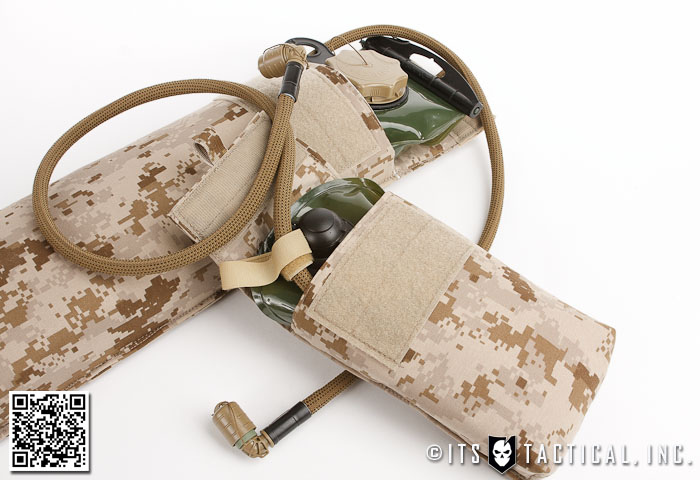
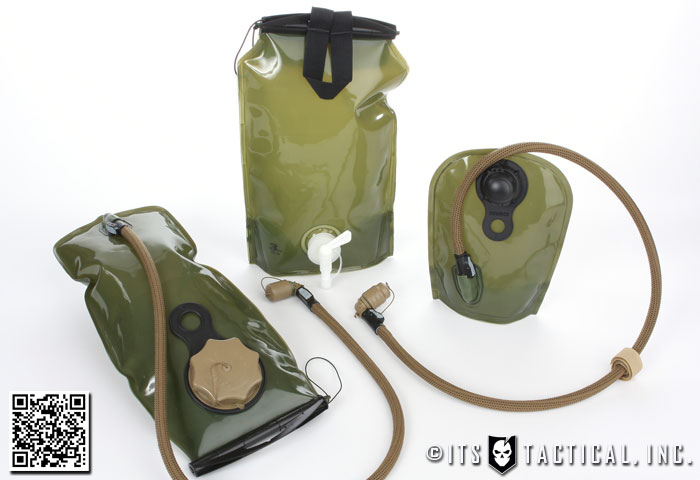
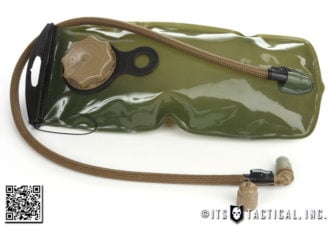
Source offers what I feel to be the best Hydration System Bladder on the market today, the numerous features they’ve packed in truly set them apart from any other offering. What I’ll be reviewing today is a Kangaroo 1L, WXP 3L w/ Helix Valve, UTA universal tap adapter and a K-9 Widepac Bladder that Combat Medical Systems is including in their K-9 Handler Mission Pack.
Before I talk about the specifics of each individual item, I’d like to go over some of the features I’ve mentioned that sets Source apart in the industry.
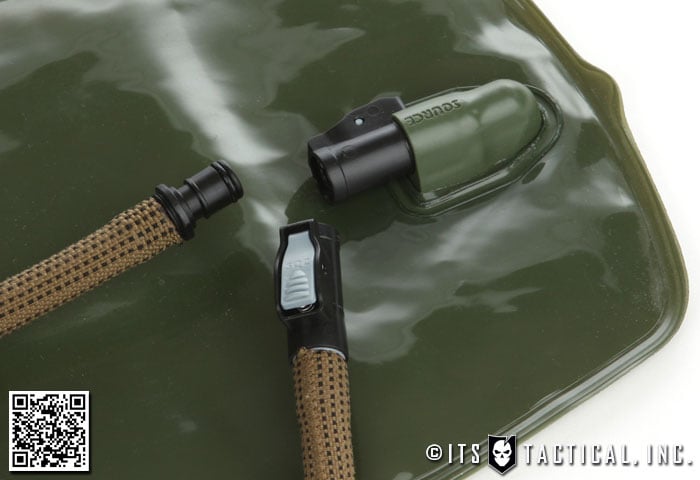
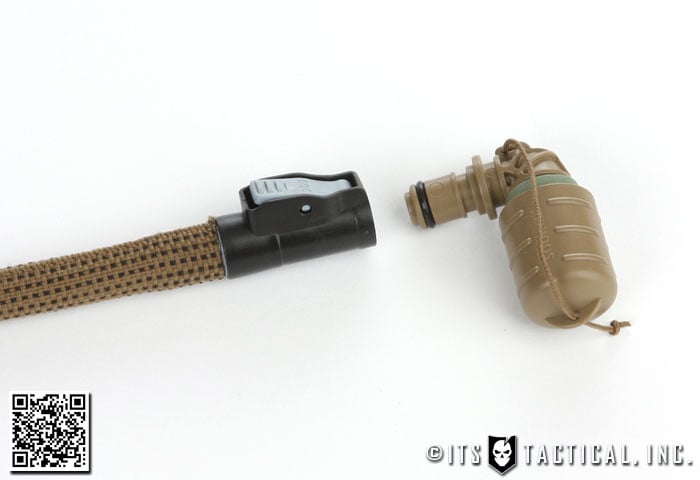
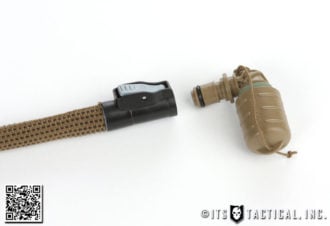
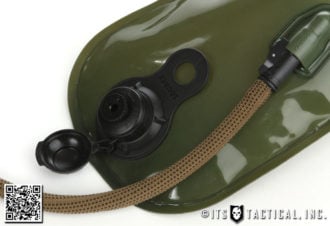
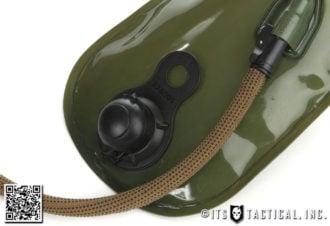
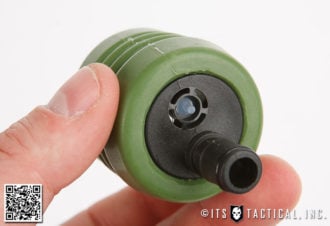
Quick Connect Hose Fitting
As mentioned above my largest hangup with bladders is the way the hose is connected. Source has developed their QMT system to not only alleviate the common leakage problem, but to also integrate a quick disconnect feature of the hose from the bladder by simply depressing a lever. What’s great about the QMT is that the hose can be disconnected while water is still in the bladder with no leaking!
The QMT has a built in shut-off mechanism that prevents water from leaking out when the tube is disconnected. This quick disconnect feature is located on both sides of their tubes as well, which allows their bite valves to quick disconnect as well with the same shut-off mechanism. This also allows the quick attachment of accessories like the UTA which I’ll go over below.
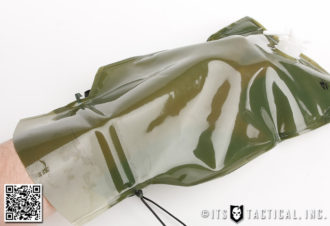
Widepac Wide Opening Access
Something I really like on both the WXP and K-9 Widepac Bladder is the ability to slide open a large closure and gain wide access to the interior of the bladder. This allows for easy filling, adding ice and cleaning. One of my hangups with bladders has always been needing a long brush to get down threaded cap opening to clean them.
The smaller Kangaroo doesn’t feature this Widepac opening, so that’s something to consider if this type of access is import to you.
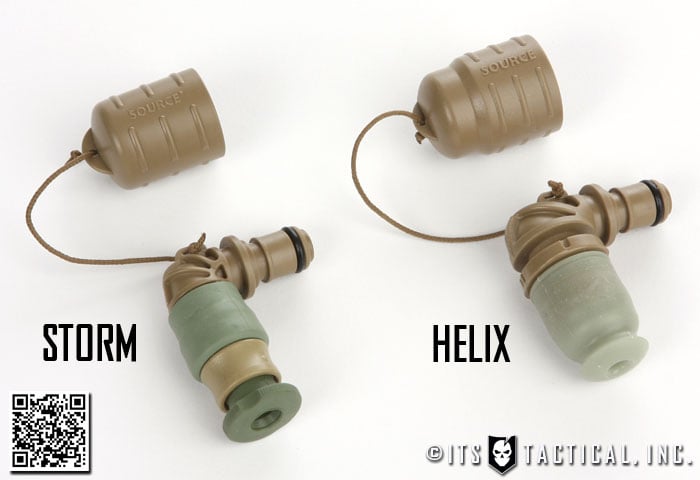
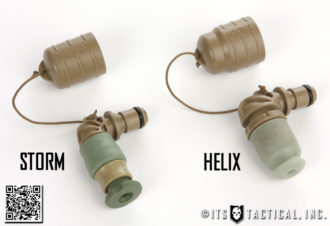
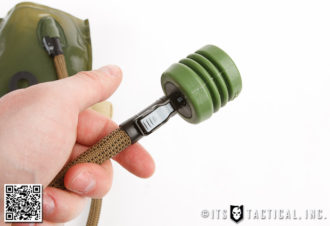
Angled Bite Valve
Something simple yet highly effective that Source did was angle the bite valve 90 degrees and enable it to rotate 360 degrees. This ensures the perfect orientation to your mouth is always available and also allows the overall length of the tube to be shorter.
Source makes the Helix Bite Valve and also the Storm Bite Valve. I’m a big fan of the Helix, which is the newer variation. The Storm leaves much to be desired, as I’ve found the simple pull-out design to let the water flow is prone to leaking. The Helix solves this issue nicely with a twist motion to lock off the valve and a simple soft bite that will not release water until you bite down, even under pressure.
Another great feature on the bite valves is the dummy corded protective cover that nicely snaps on to keep the valve protected and free of dirt and dust.
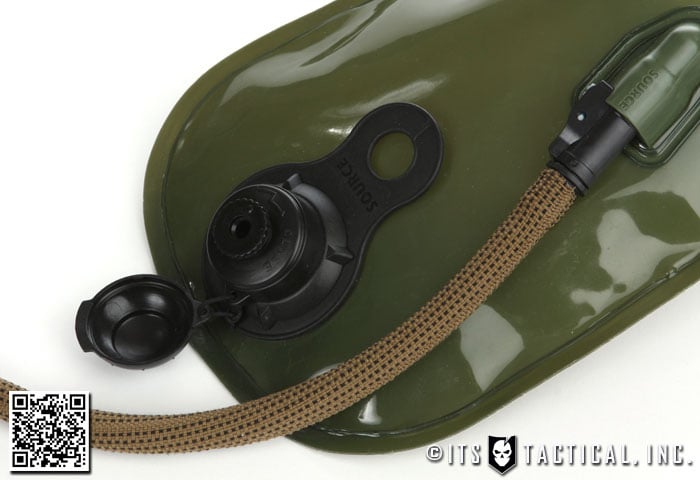
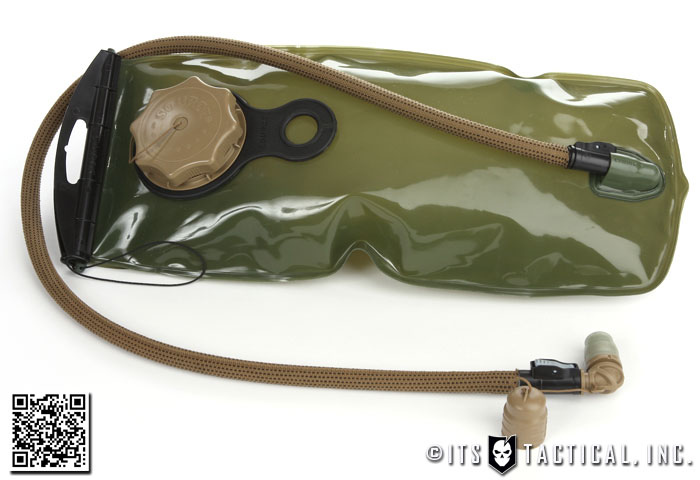
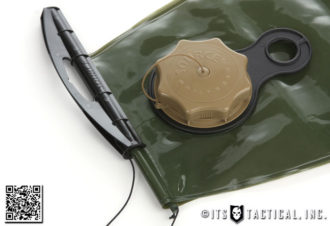
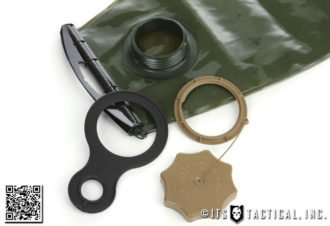
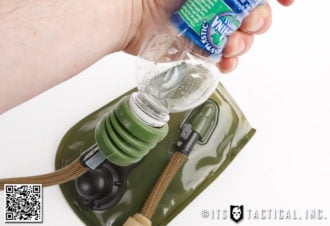
Filler Caps
Something cool that I’ve only recently discovered is that the filler cap on the WXP bladders is the same thread size as a Nalgene. What this means is that not only can you interchange the caps (if you had to), but you can utilize the Nalgene adapter that water filtration systems include to fill your Source reservoir.
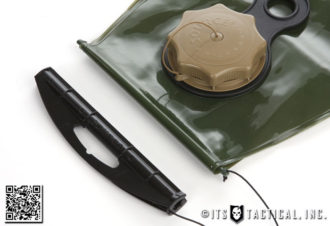
The filler cap is also very easy to use and features a dummy cord lanyard to prevent loss. The secondary ring to which the dummy cord is attached tightens the cap down to the integrated threads in the bladder and acts as retention for the black spyglass shaped filler handle.
While the Kangaroo also features the filler handle, its filler cap is quite different. As the Kangaroo does double duty as both a standalone canteen (by disconnecting the tube) or a small bladder, it has a sports bottle like pop-up lid that can also be twisted in the down position to secure it from popping up. It also has a pop-off cap that’s dummy corded.
This pop-up unit is then threaded on the integrated bladder threads to secure it. Beneath this is a secondary ring much like the WXP that acts as retention for the filler handle. My only suggestion would be to add extra dummy cord between the secondary ring and pop-up filler cap to prevent accidental loss.
Free System
A few of the last features to note is Source’s Taste-Free, Bacteria-Free and Care-Free system. These descriptors definitely ring true, as I’ve found Source to be the one bladder that I don’t have any taste issues with whatsoever. Their “Glass-Like” liner technology along with antimicrobial technology is what they credit for no plastic flavor and the blocking of bacterial growth for the life of the system.
Source states that these technologies also eliminate the need for cleaning for days, weeks and even months of use. I’ve found this to be entirely accurate and have actually never cleaned these in the off and on use over the past year. I constantly cleaned my other bladders, thinking that one day I’d clean the bad taste out of them. That unfortunately wasn’t the case.
I still remove leftover water from the bladders and try to put something in them so that they can dry out all the way. This is usually a piece of a plastic hanger I have that works good for this purpose.
Tube Cover
I really like the integrated tube cover on the WXP and Kangaroo, which insulates the tube and blocks UV light. This helps water stay cooler and prevents bacteria from growing in the tube due to UV light exposure. It’s very well made with a strong weave pattern that’s never frayed or slipped off the tube. The glue that’s used to secure it to the valve end and the QD end is holding well.
When I bought the Kangaroo and WXP I also purchased an extra tube, but it’s been sitting in the package for the last year. At the rate these tubes are holding up, I don’t think I’ll ever need it! Having different color options on the tube is also nice, I purchased mine in IRR Coyote, but they’re also available in IRR Foliage, Black and Olive. (Kangaroo only available in IRR Coyote and IRR Foliage).
The IRR (Infra-red Reflective) coating has a specific reflective wavelength to blend in with natural coloration in the infra-red spectrum, reducing visibility to night vision devices.
Systems Overview
While many of the features of the three systems listed below have already been noted, I’d still like mention some individual notes on each one and better describe them.
WXP 3L
This system has definitely become all that I’ll ever need in a 100 oz. hydration system. I still feel that 100 oz. is a perfect amount of water for most outdoor activities and trips to the range where I use a pack. It also tucks away quite nicely in my Triple Aught Design FastPack EDC.
To give it an honest critique, it is slightly larger than other 100 oz. bladders I’ve owned, but not by much. What seems to make it a bit more bulky is the Widepac access slider bar. While I wouldn’t change the functionality for anything, the rigid plastic bar means that it can’t contort in a way that other bladders can. This isn’t necessarily an issue at all, just something to note.
Kangaroo 1L
I was skeptical when I ordered the Kangaroo if it would find a place in my outdoor use, but it certainly has. It’s use as a standard canteen without the tube is where I really like it. It holds the same amount of water as a Nalgene, but folds flat when empty rather than taking up space like a Nalgene does.
It’s also great on the back of a chest rig for use with the tube, as larger bladders can be cumbersome to wear when weight is a constraint or prolonged riding in vehicles.
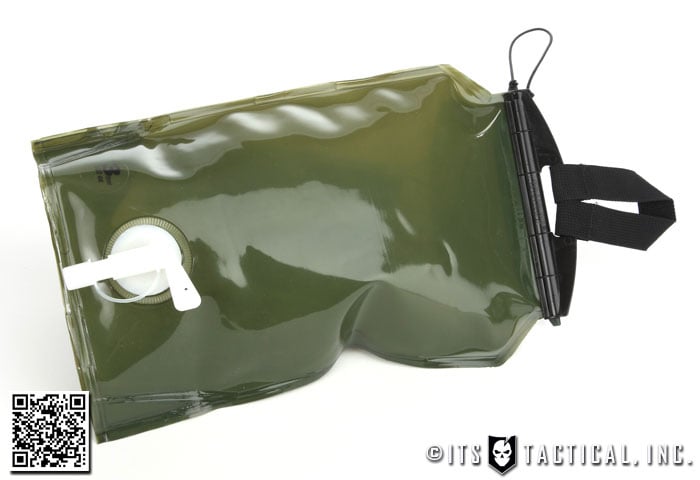
K-9 Widepac Bladder 3L
While the K-9 Widepack Bladder isn’t a regular product for Source, I still really wanted to highlight it in this article in the hopes that it will be someday.
I truly think it has a great purpose for outdoor enthusiasts as well as military and law enforcement use of dogs. I know when I’m out hiking with my dog, a common issue is bringing water along for him too.
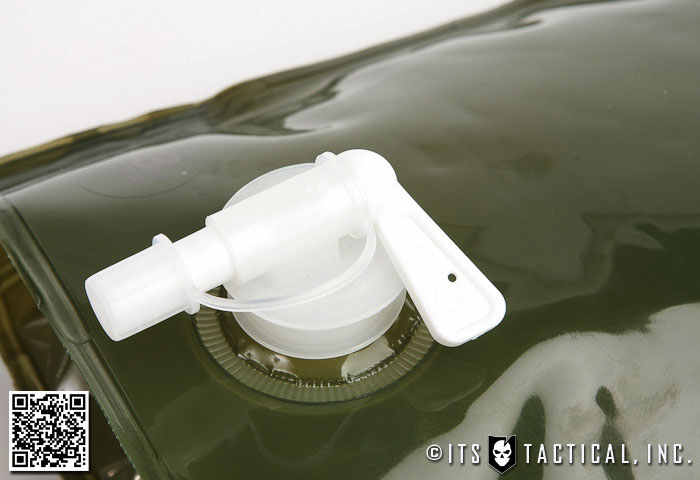
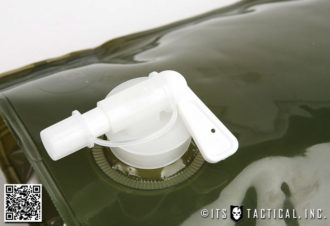
The K-9 Bladder features a spigot that makes pouring water into a pop-up bowl a breeze. I simply grab the bladder by the integrated handle, remove it from my pack and twist the spigot to fill up the bowl. Before I either had to carry a collapsible (and bulky) Nalgene bladder or squeeze out water from my own hydration system for him. Having a dedicated K-9 bladder is truly awesome.
I was able to check out a bladder from the Combat Medical Systems K-9 Handler Mission Pack and can’t say enough good things about it! The one small critique I have is that while I’ve never experienced any leakage while carrying this bladder, the on/off spigot could potentially get turned by Mr. Murphy.
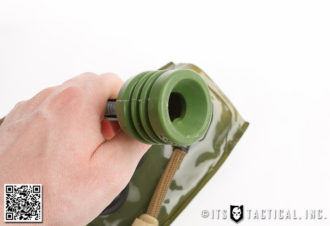
Universal Tap Adaptor
One last accessory to mention is the UTA. This accessory is mandatory if you ask me, as it takes an already stellar system and makes it that much more versatile. The UTA enables you to disconnect the angled bite valve from any of Source’s systems, dock in the UTA, and fill the bladder directly through the tube from a hose, sink, or even a water bottle!
What’s great about this is that you can now refill your hydration system without having to remove your pack for refills, truly helping you stay on the move! There’s also a MOLLE compatible pouch for the UTA that comes in Coyote, ACU and MultiCam.
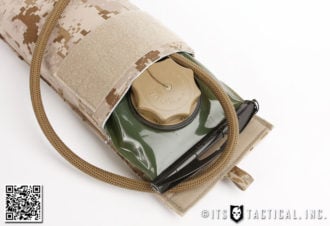
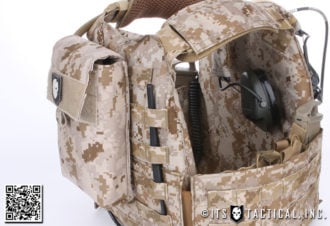
London Bridge Insulated Hydration Bladder Pouches
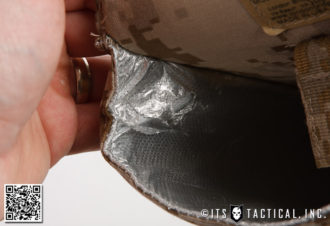
A killer combo for Source Hydration Systems, is the 6142 series pouch offerings from London Bridge Trading. Utilizing the same reflective insulation used in NASA space suits, these pouches help keep the cold in and the heat out.
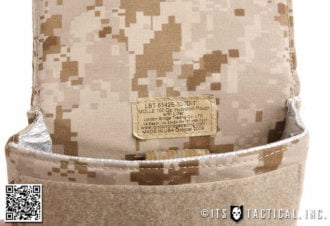
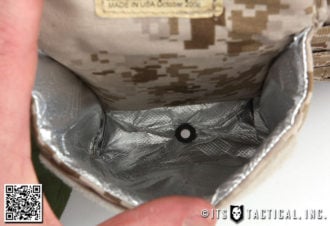
The interior of each pouch is lined with this thermal insulation and I’ve definitely noticed that my water stays cooler in these 500D Cordura pouches. London Bridge makes five different size pouches ranging from 27 to 100 ounces. The 6142A weighs 5.5 ounces and fits the Source Kangaroo 1L. The 6142E weighs 9.6 oz. and fits the WXP 3L.
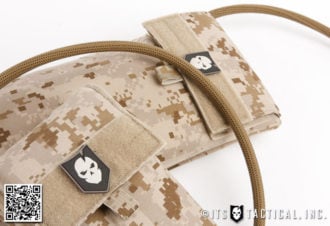
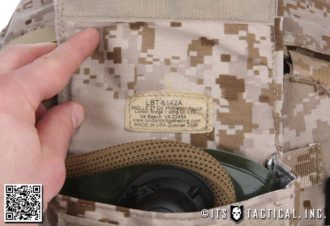
On the flap of these bladder pouches you’ll find a 2″ loop velcro panel for affixing identifiers and patches, along with a sewn pull tab.
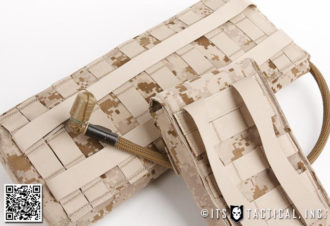
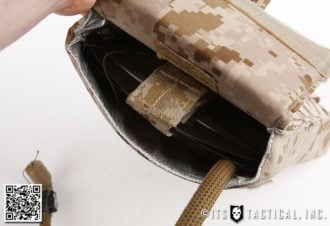
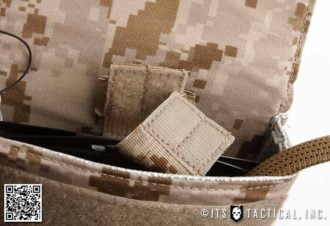
On the larger pouches, the interior features a 1.5″ velcro closure webbing loop for routing through the slider bar of the hydration bladders, ensuring it doesn’t fall to the bottom of the pouch.
I’ve found that the larger pouch is prone to the insulation getting rubbed by the WXP 3L when the Widepac access slider bar moves past it. You can see in the photos below that a few parts of the material hve been torn away by this through repeated use. It’s not compromising the overall effectiveness of the insulation, but it’s something to note.
Also something to note is that these pouches are three columns of PALS wide and built for centering on the back of MOLLE compatible carriers that have an odd number of PALS columns, as opposed to an even number found on many rigs.
Editor-in-Chief’s Note: Please join us in welcoming former Navy SEAL and current Director of Training at Center Mass Group, Chris Sajnog as a contributor on ITS Tactical.
Imagine if there was a law that all car seats had to be set to the same distance from the steering wheel. It didn’t matter how tall you were, your body shape or if your arms looked like you came from Planet of the Apes — You will keep that seat in the same position!
OK, wait…if it’s a manual transmission you can scoot a little forward, but for automatic slide that seat back to the approved seat-length.
Sounds strange? Of course it does; but why doesn’t it sound strange when a firearms instructor tells you the “law” about where you need to put your finger? Continue reading →
A Smith & Wesson .38 revolver and a pair of handcuffs were typically the only things carried on a police officer’s duty belt when the first Taser was being developed. Now a Taser is typically just one of seemingly dozens of gadgets hanging off a cop’s Sam Browne.
The Taser has earned a place on that belt due to its ability to quickly subdue combative criminals, while reducing the number of injuries and deaths to officers and suspects.
But, has the Taser been so successful that it has become a crutch for law enforcement officers? Are officers using the Taser when other force options are more appropriate? Continue reading →
They’re well constructed, comfortable, lightweight, breathable and have held up to everything from hiking, running, climbing rope and Fast Roping. Today I’ll give you my unbiased review of what I loved about them and also some things that I’d like to see different in how they’re made. Continue reading →


 In my previous articles about the capabilities of dogs and their application to tactical teams we explored the dog’s ability to fight with humans, their ability to carry specialized equipment into the field for us, and their ability to detect scent.
 If you remember my previous post about the