Every Day Carry Planning – Step Four: Assembling Your Kits

5 of 5 in the series EDC Planning

Here is the last of a five part series concerning every day carry kits and how we might use a structured decision-making process to put them together. The first part of this series introduced the idea of deliberate and structured planning for reasonably foreseeable contingencies.

The second installment focused on conducting a security threat assessment (in the form of a limited example), so we’d have a basis for making decisions about what to carry. The third offering expanded on the example by discussing planned responses in light of the threats previously identified.

The fourth article in the series took the limited example a step farther by suggesting tools, resources and supplies needed in order to implement the planned responses. As we’ve seen in some of the comments, EDC is something different for everyone since the threats we perceive, and how we choose to respond to them will be different based on our particular situation, knowledge, training and personal preference.

Now, it’s time to speak to assembling kits. Using the items from the limited example constructed in the previous articles, I’d like to show how our every day carry kits can be kept in different locations, and how they can take different forms. Sometimes it’s as simple as putting items in your pocket, and other times we’ll need a bag, box, shelf or container of some sort to help us keep our necessities close at hand when we need them. Continue reading

Posted in EDC | Tagged , , , , , | 9 Comments

Learn How to Increase Your Depth Time with Mixed Gas Diving

If you’ve ever been diving, chances are you’ve noticed something unique about those that have been diving for a while. You may have seen tanks lined up on dive boat and noticed those with more experience donning “NITROX” cylinders.

This isn’t just a fancy label, NITROX a mixed gas that helps divers maintain longer bottom times and reduce their risk of decompression sickness. This is generally the only other gas you’ll see when recreational diving, but there are many more out there.

In this article we’re going to go over some of the different gas mixtures, their benefits, draw backs and even ask, “What’s the point?” Continue reading

Posted in Diving | Tagged , , , | 7 Comments

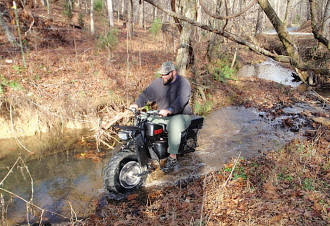
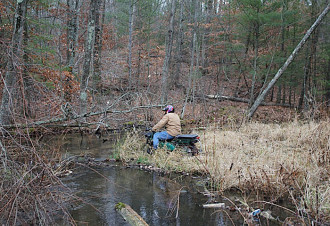
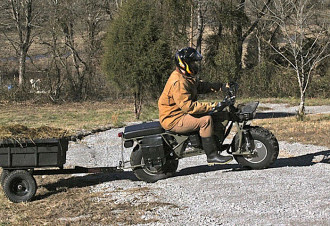
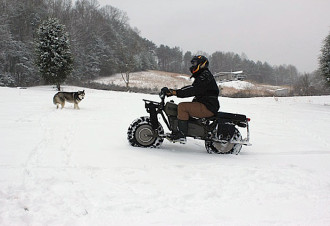
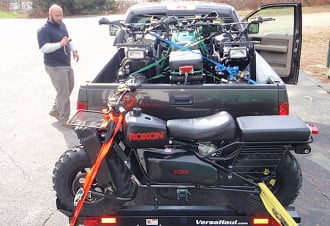
Rokon Mototractor, Perhaps the Best ATV You’ve Never Seen

When you mention Rokon, most people will give you a confused look. If you’re lucky they may say, “Yea, I’ve heard of them before.”

You would think the second oldest American manufacturer of motorcycles would be more of a well-known icon. How can one of the most capable ATVs on the planet be the big foot of the off-road industry, heard of but hardly ever seen?

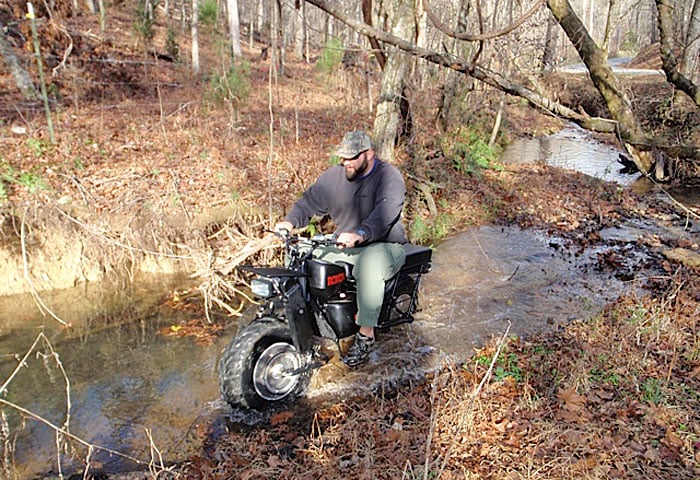
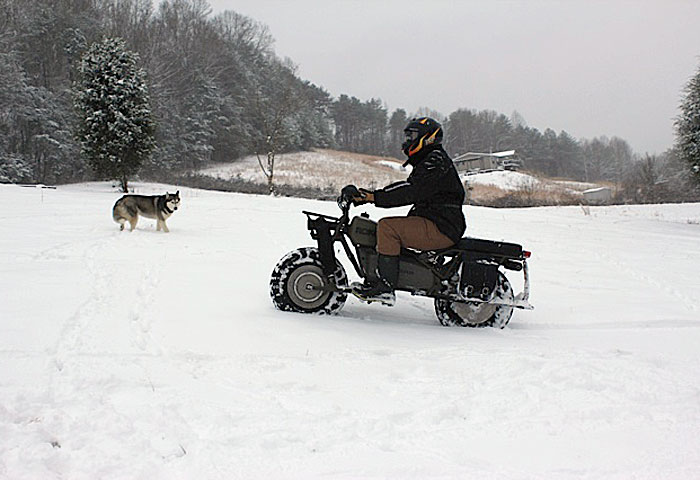
Rokon Mototractor

In the 1950s, a California inventor named Charles Fehn set out to build the ultimate off-road vehicle. It had to go anywhere and be a rugged workhorse. With this in mind a two-wheel drive vehicle with hollow wheels was designed and produced. Some call it a bike but the name Mototractor more closely defines its capability.

While there have been a handful of updates over the last 50 years to this trusted and reliable design, the heart is still the same. Since its creation it’s been adopted for military use and is in service with more then 25 state and federal wildlife agencies. They’ve also been recognized as the go to vehicle for the toughest situations.

Rokon

Operation

Lets talk a little bit about how it works. The Rokon is a two-wheel drive motorcycle powered by a 6.6hp Kohler four-cycle engine. The power gets distributed to the automatic torque converter (same as on most 4-wheelers and snowmobiles). It features an automatic three-speed transmission, allowing it to reach a top speed of 35 mph and crawl up and over the toughest obstacles. After the power goes through the transmission it gets transferred to the wheels; the rear wheel by a direct chain.

The front gets its powerthrough a drive shaft that runs through the frame, then goes to a miter box and to a chain driving the front wheel. It then powers either a 15” wheel with a 6.5” wide tractor tire, or the preferred 12” wheel with an 8” wide ATV tire. The rims are hollow so that you can carry water for added ballast in climbing steep hills or carry gas for extended trips.

While no one off-road vehicle will meet the needs of every individual, a Rokon meets more than most. With its 15” of ground clearance and full frame skid plates, it will climb over logs over 30” in diameter. All it takes is a clearance of 30” to clear the handlebars, allowing it to go into tighter places. It’s also designed to carry a passenger.

The Rokon will run for 9 hours (or 200 miles) on three gallons of gas. When it comes to hills it has the ability to climb 60 percent grades and remain upright when driving horizontal on hill sides. With a 4-wheeler you always run the risk of flipping it over when on a steephill. The Rokon will take you where you want to be and get you back again.

Rokon

Features

Below are a few other Rokon features:

  • Ability to pull 700 lbs. dead weight or 2500 lbs. rolling
  • Weighs in at 205 lbs. making it a breeze to move and load
  • Lightweight allows it to be carried using just your hitch receiver and a special rack
  • Can ford water or mud 2 ft. deep and can float across bodies of water when the rims are left empty
  • Allows you to go down the tightest trails making it ideal to retrieve downed game
  • Fits easily in a garage
  • Solid state ignition so it will start even if there’s been an EMP attack
  • American made and owned

Cons

So what are the down sides? The speed is the biggest thing. They’re not for flying down trails; on the contrary they are for making trails. Although with its automatic transmission anyone can get on one and go, they stay upright at 0.5 MPH. However, there is a learning curve that must be mastered; just know you WILL tip it over. The good thing is when you do it’s normally at 2MPH so it’s no big deal.

Over time you’ll learn how to climb over logs, hills and drive in wet conditions. As you learn how to drive a Rokon you’ll soon start to master the things that hung you up in the beginning.
Here’s my disclaimer, I own a Rokon dealership in Tennessee. With that being said, the dealership is just a hobby and not my day job; I do it because I have a passion for showing people the benefits of Rokon and have put this article together for the same reasons.

Whether you come to me or not for your Rokon needs, you can absolutely call me or email me with any questions; I’ll shoot you straight.

Posted in Uncategorized | Tagged , , , , , , , , , , , | 21 Comments

Pocket Survival Kit Reviews: Pocket Survival Pak by Adventure Medical Kits

5 of 6 in the series Pocket Survival Kits

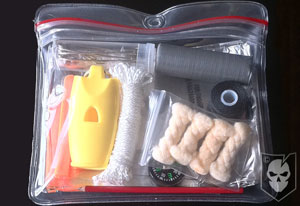
The fifth kit in our Pocket Sized Survival Kit series is the Pocket Survival Pak from Adventure Medical Kits.

Doug Ritter, founder of Equipped to Survive, worked with Adventure Medical Kits to develop this Survival Pak. As you’ll soon read, this kit is full of high quality items, but also has some great notes in the packaging that aims to better equip you for survival.

In the packaging itself, on the second page under “Improving The Odds In Your Favor” there is an important piece of survival information. Something so essential that I’m going to share it here. Are you ready? Don’t blink!

“Your fundamental survival tool is your brain.”

There it is. That’s the key to survival right there. Having the tools in this survival kit will only be of use if you are in the right frame of mind and if you have the know-how to survive.


Contents

PSPMain01

  • Rescue Howler Fox 40 Whistle
  • Rescue Flash Signal Mirror
  • 20mm Survival Compass
  • Spark-Lite Firestarter
  • Tinder-Quik [4]
  • Duct Tape [2″ x 26″]
  • Scalpel Blade [#22]
  • Stainless Steel Utility Wire [6 ft. of 0.020″]
  • Fresnel Lens Magnifier [2″ x 3″]
  • Heavy Duty Nylon Thread [50 ft.]
  • Braided Nylon Cord [10 ft., 150 lb. test]
  • Fish Hooks [4], Sinkers [2] and Snap Swivel
  • Heavy Duty Sewing Needle
  • Safety Pins #3-2″ [4]
  • Pencil and Waterproof Note Paper [2 pcs.]
  • Contents List [gives examples on how to use each item]
  • Waterproof Instructions [10 pages]

Testing Notes

  • Weight: 4.0 oz
  • The kit itself was strong, sturdy, resealable, waterproof, and even floatable. While it was very easy to open and close, I had no worries of it opening on it’s own and dumping the contents.
  • To say the whistle was extremely loud would be an understatement. It’s said to be able to reach 122 decibels and can be heard over a mile away! It exceeds the specifications set by The International Convention for the Safety of Life at Sea (SOLAS) and the U.S. Coast Guard.
  • This was my first time using a signal mirror and I was more than happy with the results. There are easy to follow instructions on the back and it took no time at all to figure it out. With a plane or helicopter flying overhead, this will be one of your best options for getting rescued.
  • When I first saw the compass, I thought it might be the cheapest quality item in this kit. But it actually surprised me. It is extremely small and accurate. The liquid felt to be very viscous with ultra smooth movement.
  • The Spark-Lite Firestarter worked extremely well and even continued to work after being submerged in water for a few minutes. It claims to have over 1,000 sparks so I’m sure you won’t have much trouble starting a fire if you have this on you.
  • The Tinder-Quiks lit quickly and stayed burning for almost 3 minutes. This is certainly something you will need if working with wet material.
  • Duct tape was super sticky and easy to tear. Pretty much just your basic duct tape. Since this kit didn’t come with any first aid supplies, I would probably save some of this to use as a bandage. It actually burned pretty well, too, and gave off some good black smoke. You could use it as a fire starter or signal device.
  • The scalpel was crazy sharp! It is indeed a surgical blade and while you should always carry a decent knife, in a pinch you can use this blade. It’s not very easy to work with but it’s better than nothing. I was able to fashion a ‘knife’ with just duct tape but it still wasn’t very easy to make something like a fuzz stick.
  • I made a snare (but didn’t test it out) with the wire which was pretty easy to manipulate. Very strong yet still able to be ‘broken’ by just folding back and forth as fast as you can; it melts at the joint and separates so that you can trim to size.
  • The Fresnel Lens Magnifier (I believe it’s pronounced ‘fruhnel’) worked very well. It took a while for me to start a fire because the sun kept going behind clouds but eventually I got a decent flame.
  • The nylon thread was strong and there was a ton of it. It works well as fishing line (though I didn’t catch anything), but could also be used for lashing or repairing gear and clothes.
  • The braided nylon thread was very strong and claims a 150 lb. test strength. I couldn’t get it to unravel on me and when you burn the ends it really seals up nicely.
  • The fishing gear was great. Just about everything you need to fish except for the bait. While there was no ‘official’ lure, you could use the keyring from the whistle or a piece of tin foil. I wonder why most of these kits don’t include actual fishing line. Does the nylon thread have the same strength?
  • I didn’t have to use the sewing needle, but it could be used for repairing gear or possibly even a makeshift suture (though I’m no doc!). It has an extra large eye that made it very easy to thread.
  • The aluminum foil was just as expected and luckily didn’t have any holes from being folded. I used it to boil water but you could easily cook with it too.
  • The safety pins are huge and can be used for any number of tasks, such as clipping the whistle onto your clothes or using them to keep your backpack closed if the zipper breaks. Like duct tape, they have a million uses!
  • The pencil was crazy small and took up no space. It was also very easy to sharpen. The paper it came with was waterproof yet still burned easily if you needed it to start a fire. Even when burned, the water proofness of the paper still held its integrity.
  • In addition to all of the standard survival contents, they threw in a waterproof instruction booklet that told you (and showed with pictures in some examples) how to handle medical issues, build a shelter, start a fire, find food and water, signal for help and more. This little booklet could be worth it’s weight in gold (although it’s pretty light, but you get what I mean) and is especially worth having on you whether you go with this kit or not.

Grading

Cost
5/5 – You can find this kit online or in stores between $25 and $35. I almost gave this kit a ‘4’ in this category but the contents are of such a high quality that I reconsidered. I’m sure you know the saying of quality versus quantity but this kit doesn’t skimp on any of the items, so you really have the best mixture of quality and quantity.
Waterproofness
5/5 – This case is waterproof and resealable. Also, the plastic feels super tough so drops or scrapes on and over rocks shouldn’t be a problem. This bag is IPX7 rated (submersible to 1 meter for 30 minutes).
Size/Weight Portability
5/5 – Even when repacked, this kit is tiny. Roll the top over, stuff it in your pocket, and you’re good to go. It’s hard to ask for something smaller.
Shelter
4/5 – This kit has just about everything you need to build a shelter even though there is nothing in the kit that can be used as a shelter itself. You have enough cord, thread, and wire to lash together some branches; add some natural foliage with a bed of leaves/boughs/etc. and you have yourself a shelter.
Water Purification
4/5 – No water purification tablets but I was able to bring water to a boil with the included tin foil. And unlike the last kit, there were no holes in this tin foil so the water didn’t leak. Also it’s a pretty big piece of tin foil, so you could possibly use it to carry some water.
Food
4/5 – No food or candy was included in the kit itself, but there are a plethora of options for catching, preparing, and cooking your catch. You can set snares or go fishing and then use the scalpel to prepare your dinner and the tin foil to cook it!
Fire Starting
5/5 – You have a few different options when it comes to starting a fire with this kit. There are Tinder-Quiks which are great for wet environments where you have no sun and little chance of starting a fire. Then you have the flint fire starter which you could use on either the Tinder-Quiks or just dry tinder. And lastly, if you have some sun, you can use the magnifying lens.
Signaling
5/5 – Finally, some real signaling devices! This kit has an amazing whistle and a legitimate signal mirror. Both are important to your rescue and cover two different angles of signaling.

Overall Remarks

This is by far the best pre-made kit I’ve yet seen. Everything included is high quality and the additional reading material supplied is top notch. My favorite line from this kit? “This Pocket Survival Pak cannot, however, contain all the equipment or supplies you might need or want in an emergency.

It then runs through a list of items that everyone should carry in addition to this kit. Having that disclaimer may sound like a no brainer but not many other kits would put that in print and I believe it shows integrity. I would trust this kit with my life and it did not disappoint.

Posted in Survival Kits | Tagged , , , , | 18 Comments

DIY Primer on How to Get Started Working with KYDEX

DIY KYDEX

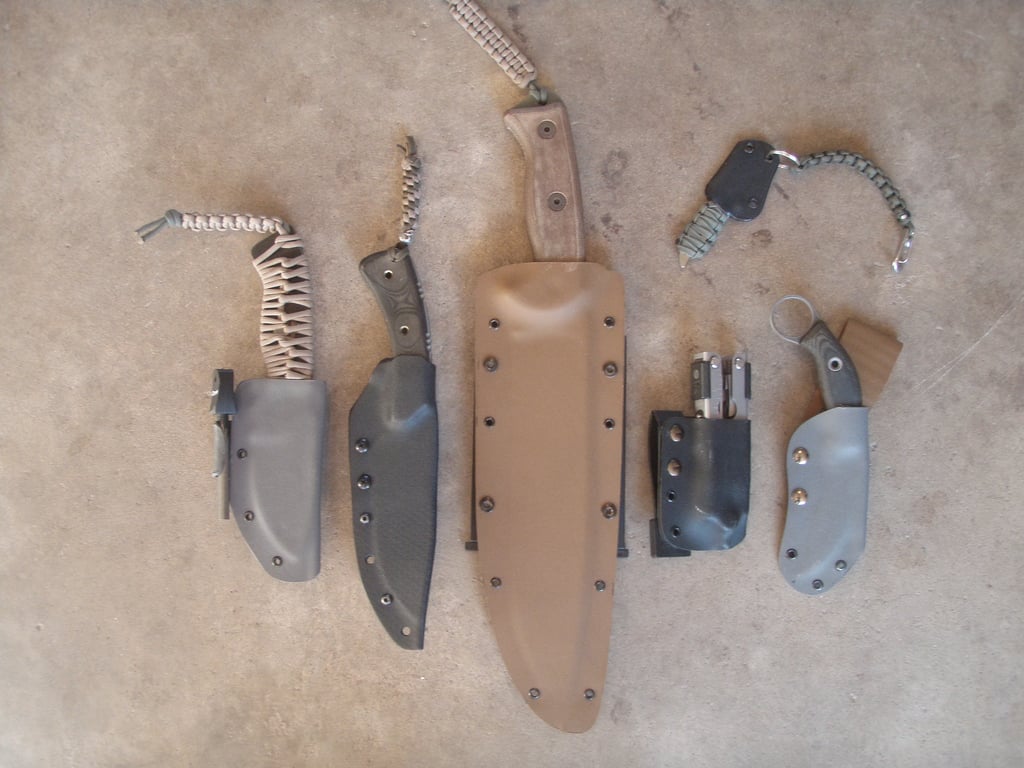
This is a short how to article for anyone interested in working with KYDEX. I’m sure most of the people here know of KYDEX and many of you probably own a KYDEX sheath or holster that was either sold with a blade or purchased for a hand gun.

My personal experience working with KYDEX is somewhat limited and there may be others here with more experience and knowledge on the subject, so feel free to add your thoughts.

DIY KYDEX

I had a few knives that I really liked but loathed the sheaths they were supplied with, so I decided to make my own from KYDEX. I went with it because it seemed to be a material I could work with easily. (no stitching required, I suck at that.) After some web searching I came across www.knifekits.com. They offer KYDEX in various colors and thicknesses. They also supply tools, instructional books and all the hardware needed to complete just about any KYDEX related DIY project.

For those interested in just making a sheath or two, there’s no need to purchase an expensive arbor press and other specialty tools, a lot of the work can be done with some tools that you probably already own.

Tools
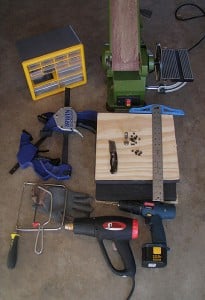
Here ‘s a list of tools that I used:

  • Hammer
  • Heat Gun
  • Drill
  • Hack Saw or Coping Saw, a band saw would be ideal
  • Belt Sander
  • Vice or other type of clamps that you can tighten down
  • Two pieces of plywood, 12″ x 12″ square should be sufficient for most knife sheath projects
  • Heat resistant gloves
  • Rivet Eyelet Flaring Die
  • Sheath making foam

The flaring dies and sheath making foam can be found at knifekits.com, but all other tools (and hardware below) can be found at a hardware store. Here are the materials you’ll need:

  • KYDEX sheeting, different sizes and thicknesses are available
  • Rivets – get the proper size for the KYDEX you intend to use
  • Chicago screws
  • Belt or web gear mounting hardware

How to Get Started
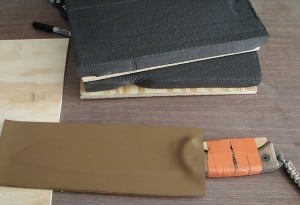
First you will need to make the molding blocks that you will use to form the KYDEX around your knife. Simply glue the two pieces of sheath making foam to the two pieces of plywood, allow to dry and there you have it.

Now you need to decide if you want to make your sheath from two pieces of KYDEX (a front and back) or from one piece wrapped around the blade. Using one piece wrapped around the blade is the easiest way to go and it creates a more narrow, lower profile sheath. However, it leaves less material available for mounting hardware.

If it’s a large knife I would recommend using two pieces of KYDEX riveted together on each side of the blade to allow for more stable mounting options, but for medium and small knives one piece of KYDEX wrapped around the blade is sufficient.

Wrap-Around Style
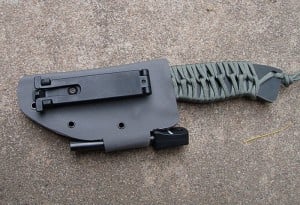
For the wrap around style of sheath first lay your knife flat on the KYDEX about one inch from the edge and roll the knife over once then add another inch, this will give you the proper width of KYDEX to fully wrap around the blade and should leave you with some extra “screw up” material. With a utility knife and straight edge (two tools that I forgot to mention above), score the KYDEX and snap it off.

Take your piece of KYDEX and lay it flat on a work bench. You should also have your Vice/C-Clamps and Foam Press within arms reach. Use your heat gun to heat the KYDEX until it becomes pliable. Hold the heat gun about four to six inches away from the KYDEX and fan it over the surface. If you pick up the KYDEX and it’s floppy, then it’s ready to mold.

When the KYDEX is sufficiently pliable, lay your knife on the surface with the spine of the blade in the center then fold the KYDEX over the blade.

Molding
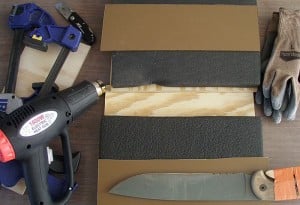
With the KYDEX still hot, sandwich the knife between the two foam molds and clamp the entire unit down tight. After about ten minutes you can remove the sheath from the mold. Check that the blade is secure but not overly difficult to remove from the sheath, remember that the sheath will tighten up when you add the rivets.

The next step is to drill the holes for the rivets and mounting hardware. Drill the holes far enough away from the edge of the blade so that when you add the rivets they will not pinch the cutting edge of your knife. You can now use a saw to remove the excess KYDEX and shape the sheath to your liking. I used a hack saw for this but a band saw would be ideal.

Now that the sheath is roughed out you can sand down the burs. For this I used a belt sander, it removes the burs and can be used for final shaping of the KYDEX. You may want to move to a higher grit paper to smooth off the edge, you can also buff the edge just by rubbing it on your jeans.

Rivets
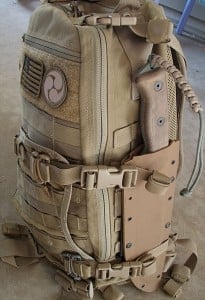
Adding the rivets and using the flaring die is pretty self explanatory just remember when setting the rivets one good tap with the hammer on the flaring die is better than a lot of little taps. There are several options for MOLLE or belt mounting hardware including making your own out of another piece of KYDEX, this is where the Chicago screws can come in handy.

For making a sheath by using two pieces of KYDEX the process is pretty much the same as above, you just need to be careful during the molding process because the two pieces will want to shift while you are clamping them together.

KYDEX is a forgiving material, should you have any screw ups during the molding process you can always reheat and try again. I hope this article is of some help to those who might be interested in making their own KYDEX sheaths.

Editor-in-Chief’s Note: Please join us in welcoming Justin Spindler as a contributing author on ITS Tactical! An avid outdoorsman, shooter, fly fisherman and fellow connoisseur of BOSS Coffee! Be sure to check out his great photos on Flickr!

[flickrset id=”72157625796975779″ thumbnail=”square” overlay=”true” size=”large”]

Click here to view the full KYDEX photo set on Flickr.

Posted in DIY | Tagged , , , , , , , , , , , , , , , | 28 Comments

The Threat from In-App Purchases and How They Can Cost You

Some of our readers are full time operators and contractors that fight for us and our way of life. Some of our readers are also parents and Imminent Threats come in all shapes in sizes; from physical to electronic.

What I want to touch on today and bring awareness to, are Imminent Threats to your family’s finances. Threats so underhanded they make my blood boil.

Let me explain… Continue reading

Posted in Privacy | Tagged , , | 12 Comments

Custom KYDEX for your Weapons with JMC Custom Holsters

Like most all of you out there, I have a box of holsters. It’s been growing larger year after year as I strive to not only find what works the best for me, but for what will accommodate me as I learn and grow as a shooter.

As my friend Doc from RSKTKR can attest, if your shooting isn’t constantly evolving, you’re stagnating. In my many talks with Doc about shooting, he mentioned a new KYDEX-smith out of Florida he’d been working with named Jason at JMC Custom Holsters. Before we get into the awesomeness that Jason is cranking out in Florida, let me elaborate on my KYDEX  experience.

KYDEX and I have a love/hate relationship for the most part. Just when I think I’m getting used to running a KYDEX  holster, I realize their shortcomings. For the most part for me this is due to the way they fit on my hip. I don’t know if it has anything to do with having “manly” hips, but I’ve found that all the KYDEX  I’ve used up until this point does a horrible job of contouring to my hip. This is no matter if it’s ITW (Inside The Waistband) or OTB (Outside The Waistband).

This usually leads to me being overly paranoid about my weapon printing and going back to my SmartCarry Holster for Concealed Carry. Continue reading

Posted in Accessories | Tagged , , , , , , , , , | 28 Comments

Z-Medica Introduces QuikClot Z-Fold Combat Gauze for the Rest of Us

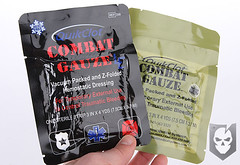
We were able to get a sample of the new QuikClot Z-Fold Combat Gauze LE at the SHOT Show this year and have been scrambling trying to find out the details for our readers.

It seems that this is the replacement for the standard “Rolled” Combat Gauze that Z-Medica is currently manufacturing and designed specifically for Law Enforcement and First Responders. The Z-Fold Combat Gauze has been available for Military and Law Enforcement only for some time; distributed solely through Combat Medical Systems.

We’ve offered the Military and Law Enforcement only Z-Fold Combat Gauze as an option on our ETA Kits and are truly excited that it’s finally looking like this Z-Fold Combat Gauze is going to be replacing the standard Combat Gauze.

Z-Fold Combat Gauze LE

QuikClot Z-Fold Combat Gauze FrontThere is one difference though with the Combat Gauze LE and that’s the removal of the X-Ray detectable strip that runs throughout the current Z-Fold Combat Gauze. We’re not sure if this is an FDA thing or not, but maybe the FDA sees the X-Ray strip as promoting an “invasive” procedure and the regulations are different.

Hopefully this news sticks and the Combat Gauze LE replaces the non-vacuum sealed and rolled Combat Gauze that’s currently on the market. We feel that z-folded gauze of any kind is superior to rolled gauze, hands down.

UPDATE: Z-Fold Combat Gauze has now replaced the standard rolled Combat Gauze in all our ETA Kits!

Posted in Medical | Tagged , , , , , , , | 16 Comments

Protect your iPhone with the Magpul Executive Field Case

One of the newest tactical accessories to hit the market is the highly anticipated Field Case from Magpul. Originally showcased at the 2010 SHOT Show, the Field Case was designed for the iPhone 3G and 3GS.

Upon it’s release a little over two weeks ago, an iPhone 4 version was also introduced called the Executive Field Case and is what we’ll be taking a look at today. The field case is in high demand and despite placing my own personal order for one the first day they were released, mine is still on backorder.

I was lucky enough to have been given one at this year’s SHOT Show by Magpul and you’ll find my written and video review below. Continue reading

Posted in EDC | Tagged , , , , , | 24 Comments